Crunches aren’t the best way to work your core. For one, they only target the abs not the entire core. And two, they don’t burn very many calories because they don’t work the large muscle groups of your body.
That is why we love these 10 Crunchless Core Exercises. These moves work everything from our shoulders to our knees in different planes of motion using a Suspension Trainer.
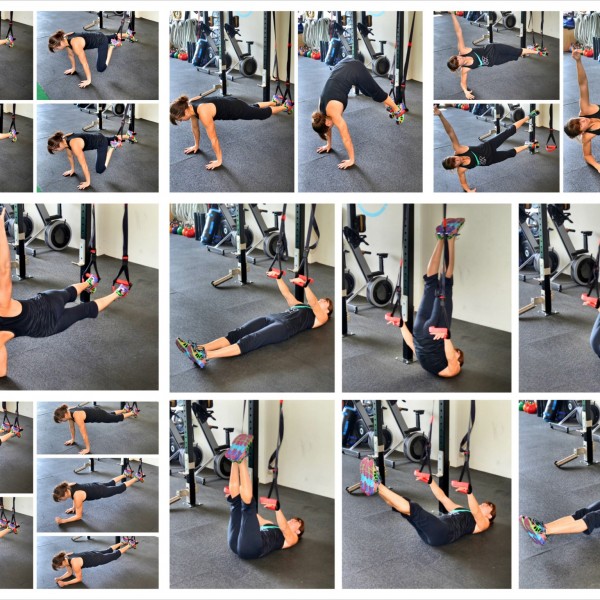
10 Suspension Trainer Core Exercises
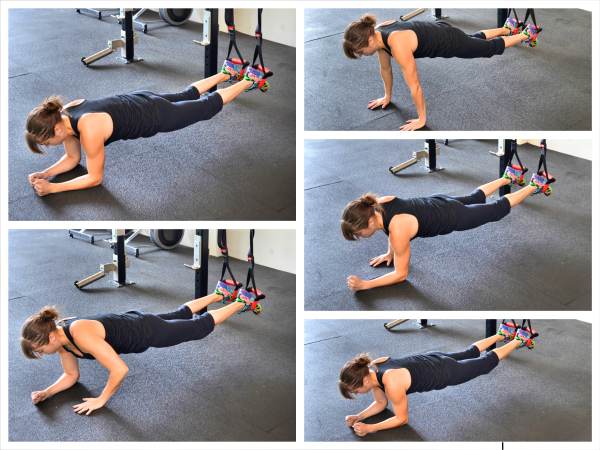
1. Knee Tucks (Oblique Knee Tucks):
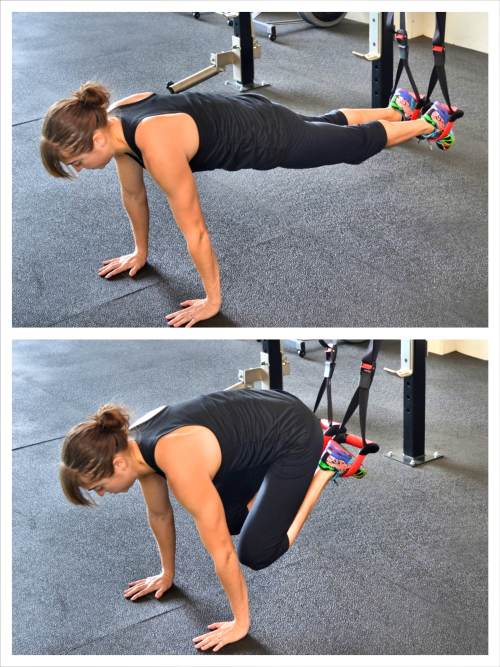
Knee Tucks and Oblique Knee Tucks are a great plank variation to really challenge the core and make your shoulders, abs and legs work even harder!
To do the Basic Knee Tucks, place your toes in the foot straps and set up in a plank from your hands with your hands under your shoulders. Engage your abs so that your hips don’t sag or your butt doesn’t go up in the air.
Then pull your knees in toward your chest. Tuck them in as far as you can and then straighten your legs back out.
Your back may round as you tuck, but try not to let your butt go way up in the air. And when you straighten back out, don’t let your hips sag. Keep your legs and abs engaged to keep a nice straight line from your head to your toes while you are in that plank position.
Repeat, tucking your knees back in toward your chest.
If you want to work your obliques more and challenge your core in a different plane of motion, try Oblique Knee Tucks. For the Oblique Knee Tucks, you will tuck your knees in toward each elbow instead of bringing them straight in.
2. Glute Bridge and Curl:
Your core consists of the muscles down your front and your backside yet often we get stuck focusing on our abs. The glute bridge and curl is a great exercise to focus on the posterior of our core, especially our glutes and hamstrings.
To do the Basic Glute Bridge and Curl as well as some fun variations, check out this article on the Glute Bridge and Curl.
3. Posterior Plank to L-Sit:
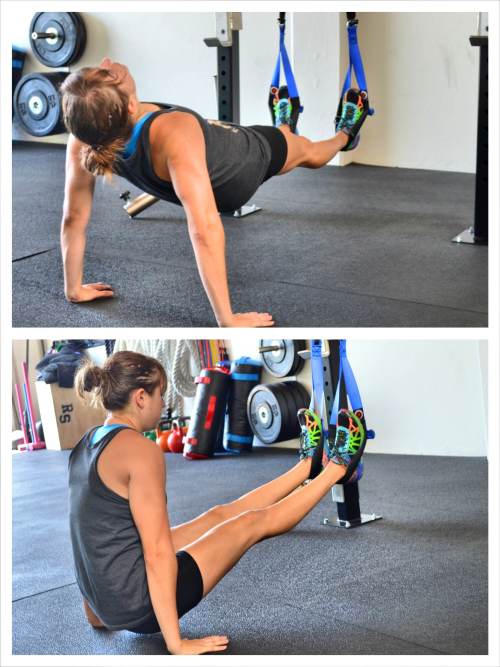
If you want to work your front and backside at the same time, you need to do the Posterior Plank to L-Sit.
This move works your abs, shoulders, quads, glutes, hamstrings, calves and back. It is a great move to also reverse the effects of sitting all day because it also stretches your chest.
However, it is a more advanced movement and beginners may need to break it down or do it without the suspension trainer.
To do the Posterior Plank to L-Sit, place your heels in the foot straps and sit on the ground with your legs out straight in front of you, and your hands on the ground behind your butt.
Then drive your hips up, pressing down through your hands and heels. Try to get your body in a nice straight line, leaning your head back as you lift and squeezing your glutes.
Then lower your hips about an inch from the ground and pull your butt back in between your hands so that your upper body and lower body create an “L” shape. Keep your legs straight the entire time and do not shrug your shoulders as you sit back.
Then press your hips back up into the posterior plank before repeating the L-Sit. Keep your arms straight throughout the entire movement. Make sure you don’t feel this move in your low back.
Beginners may want to break the move down and do only a Posterior Plank or the L-Sit in the suspension trainer. They may also regress the movement and do it on sliders instead.
4. Plank Climbers:
Plank Climbers are a great core exercise that also really work your shoulders and triceps. Beginners may want to start with climbers from the ground or even on their knees.
To do Plank Climbers in the suspension trainer, place your toes in the straps and set up in a high plank position on your hands. Your hands should be under your shoulders and your body should be in a nice straight line from your head to your toes.
The farther out you walk from the straps hanging straight down, the harder the move will be because the trainer will work to pull you back.
Then, keeping your body in a nice straight line, lower down onto one forearm and then the other. Once you are in a plank from your forearms, climb back up one hand at a time. As you climb back up, place your hand where your elbow was to come back to your hands.
Try to keep your core engaged and wiggle your hips as little as possible as you climb up and down. You can alternate which hand leads to climb or you can switch after a certain number of reps.
5. Side Planks:
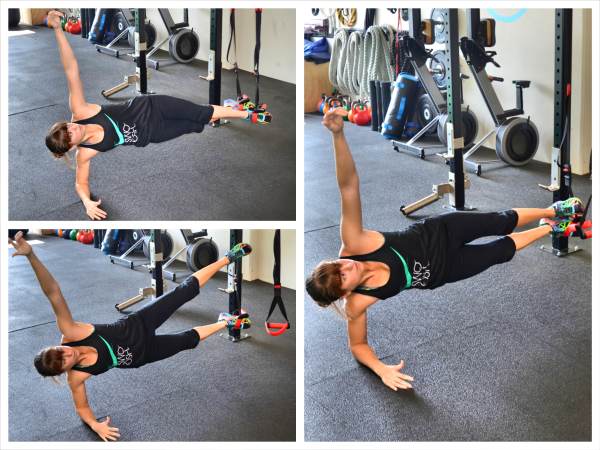
Adding in the suspension trainer to Side Planks advances the movement and really challenges our sides, including our shoulders, obliques and glute medius.
To do the Basic Suspension Trainer Side Plank, place your feet in the straps and lie on your side propped up on your forearm. Your top foot may be in front of your bottom foot.
Lift up onto your forearm and drive up through the sides of your feet. Lift your bottom hip so your body is in a nice straight line. Squeeze your butt as you hold the plank and keep your chest open.
You can reach your hand up toward the ceiling or place your hand on your hip just keep that top hand off the ground.
Hold in this plank position.
To advance this move, you can lift up onto your hand and hold a side plank from your hand.
Or you can take your top foot out of the strap and stack it on top of your bottom foot in the strap.
From this stacked-foot Side Plank, you can then add in a leg lift to challenge your glutes and obliques even more. Holding on your forearm (or even your hand for an extra challenge), lift your top leg straight up.
Hold and keep your bottom hip up and your glutes and core engaged. Or instead of holding the leg up, perform reps, lifting and lowering.
Make sure that as you progress the movement, you are keeping your bottom hip up as high off the ground as you would with a Basic Side Plank.
Also, make sure that with all the variations, you keep your elbow stacked under shoulder to protect your shoulder from extra strain and injury.
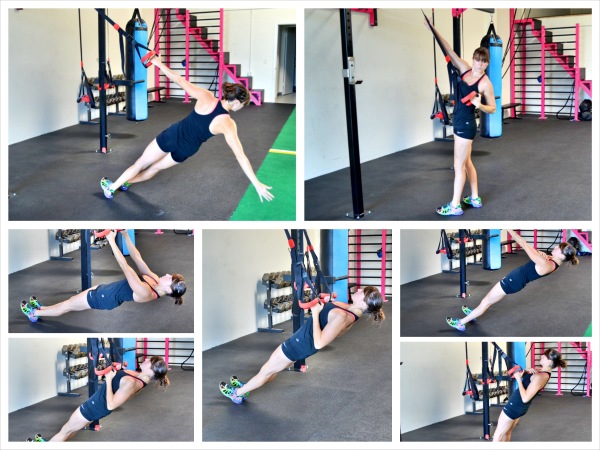
6. Plank with Reach Through:
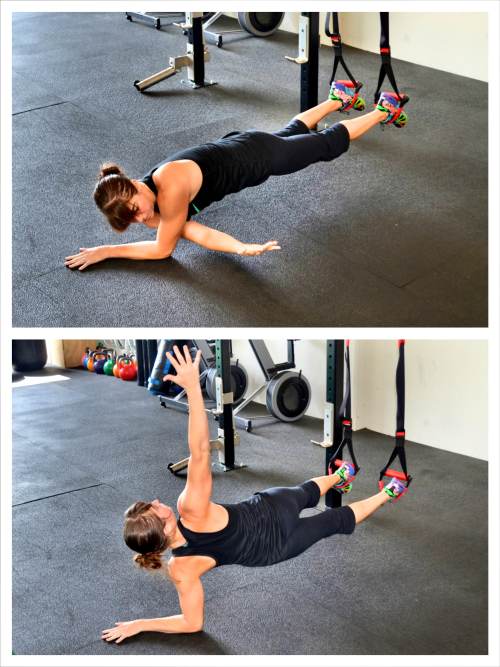
The Plank with Reach Through is a great rotational core exercise. It is a very challenging movement for the upper body because you are rotating while supporting yourself on one forearm. Make sure to move slowly with the movement.
To do the Plank with Reach Through, place your toes in the foot straps and set up in a plank on your forearms. Your body should be in a nice straight line from your toes to your head.
The further out you walk to set up in the plank and the more you pull the straps forward from where they hang straight down, the harder the move will be because the straps will work to pull you back.
Once in the plank, reach one hand under your body as if reaching toward the wall beyond your side. Do not let your hips sag or your butt go up in the air as you reach through under your armpit.
Then extend that arm up toward the ceiling, rotating your body open. You will rotate into a semi-side plank position as you reach the arm overhead.
Then rotate your hips closed and reach your hand back under.
Keep your glutes and abs engaged and do not let your butt go up in the air or your hips sag as you rotate to reach under and open up.
Complete all reps on one side before switching.
Beginners may want to do this without using the suspension trainer or even from their knees.
Advanced exercisers may want to try this move from their hand instead of their forearm.
7. Pike:
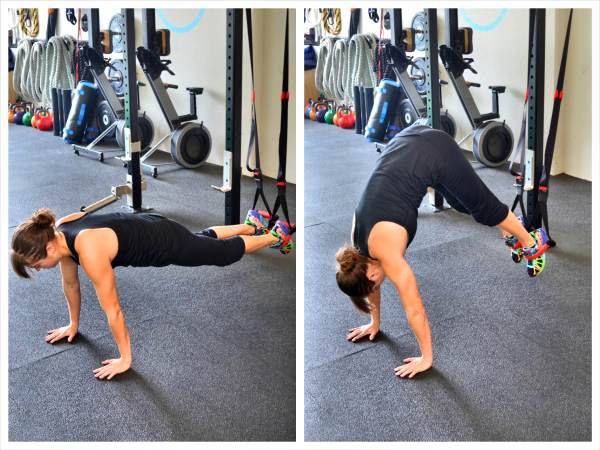
The Pike is a great way to advance the basic Knee Tuck and challenge your shoulders even more.
To do the Pike, place your toes in the straps and set up in a high plank position from your hands. The further out you walk in the plank and the more you pull the straps forward, the harder the move will be.
Then from this plank position, push your butt up in the air and pull your feet in toward your head. Keep your legs straight as you pike your hips up and pull your feet in toward your head. Your arms will stay straight as you pike as high as you can.
Then straighten back out into a plank and repeat. Do not let your hips sag down as you straighten back out.
8. Mountain Climbers:
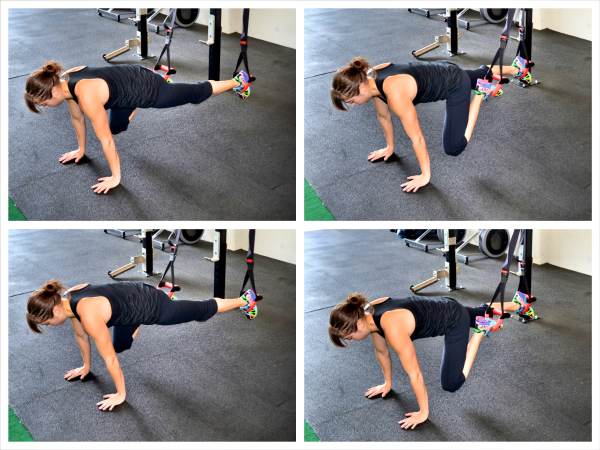
Mountain Climbers are a great core and cardio exercise. Beginners may want to start with a bodyweight variation or even use sliders before progressing to the Suspension Trainer Mountain Climbers.
To do Mountain Climbers with a suspension trainer, place your toes in the straps and set up in a high plank position with your hands under your shoulders.
Then “run” one knee in at a time bringing the knee in toward your chest and then extending the leg back out as you bring the other knee in toward your chest.
Do not let your back round way up in the air as you run your knees in. Keep your arms straight the entire time and your butt down.
You can also do cross-body mountain climbers where you run the knee in toward the opposite elbow or even a spider man mountain climber where you run the knee in toward the outside of the same elbow.
You can change up the tempo to make the move more cardio or more strength and stability oriented. Slowing the move down focuses more on core strength while speeding the move up makes it more cardio while still working your core.
9. Ab Roll Out:
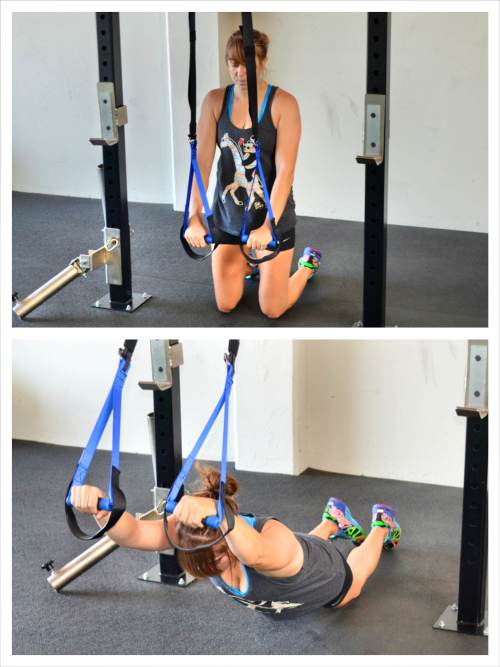
This is a great move to work your lats, abs and glutes. However, you do have to be careful not to let the move go into your low back.
To do the Ab Roll Out, kneel on the ground behind the trainer with a handle in each hand. Extend your arms out straight in front of you at shoulder height. Squeeze your glutes and engage your abs.
Keeping your arms straight, begin to lean forward, letting your arms move slowly up overhead.
Keep your body in a nice straight line as you lean forward. Squeeze your glutes and brace your abs so that you don’t feel the move in your low back.
Reach up and lean forward as far as you can so that your body is in a nice straight line from your knees to your hands. Feel your abs engage especially at the end as you are fully extended.
Then pull your arms back down to shoulder height, keeping them straight as you lower. You want to use your lats to pull your arms back down and bring your body back up to a kneeling position.
Do not let your butt sit back first as you come back up. You want your body to move as one unit and your lats to pull the suspension trainer straps back down in front of you.
Repeat, reaching out as far as you can each and every time.
Try to keep your shoulders from shrugging as you pull your arms back down. You want to really feel your abs and the sides of your back working.
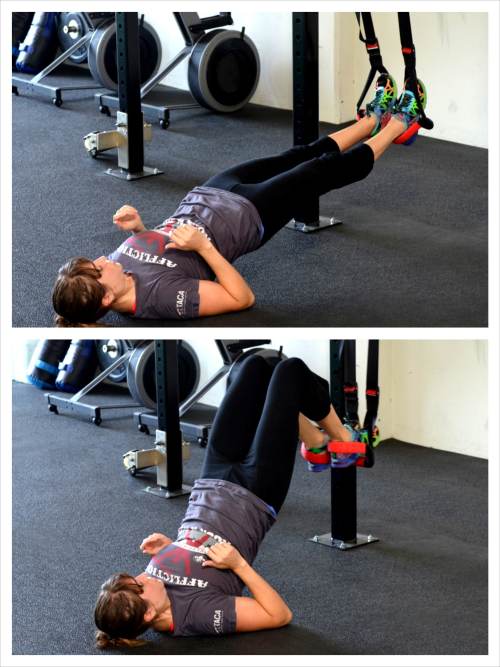
10. Leg Lowers Plus:

This move combines a leg lower with an isometric lat push down and even a quick shoulder stand type movement. Beginners may want to start with a simple Leg Lower or even a Bent-Knee Tuck instead.
To do the Leg Lower Plus, lie on your back on the ground and hold a suspension trainer handle in each hand. Extend your arms down in front of your body and press down on the handles so you feel your arms and lats engage.
Then lift your toes up toward the ceiling rolling all the way up on to your shoulders. Get your body as straight up toward the ceiling as you can while pushing down on the straps.
Then lower your butt back down to the ground and slowly lower your legs down in front of you. Keep your legs straight the entire time and make sure to press down on the handles.
Engage your abs so you don’t feel this move in your low back.
Lower your legs until your heels are an inch off the ground and then raise your toes back up toward the ceiling and your back up off the ground.
Keep your legs straight and tension on the suspension trainer straps the entire time. Also make sure to keep your legs close together if not completely together.
BONUS:
Rows:
Inverted Row variations are another great way to work your core. You can do Anti-Rotational Rows or even Rotational Rows to really challenge your core as you work your back.
For Basic Inverted Row Form and great variations of the move, check out this post on Inverted Row Variations!
NOTE: Need a suspension trainer? Get one here!


That is a challenge for me.
A good challenge or do you need modifications?
I loveeeee this….I read all your posts but this one is amazing!! (although I also love the post about imbalances and flexibility)
Would you recommend having a full workout using only these exercises or it would be to hard on the shoulders?
Honestly exercises like this can be used in so many ways. Depends on what your whole workout routine looks like and how much volume you’re doing and your goal for the workout. I’d personally probably use these more in full body workouts but that’s just what I’ve done in the past. There are so many options! 🙂