A strong core means less risk for injury and pain. And if you suffer from low back pain, you need to strengthen your core!
That is why the Pelvic Tilt exercise is a must-do move. It activates your intrinsic core stabilizers so that your core is working and your low back doesn’t have to.
Because we sit all day, which create imbalances and tight muscles, our abs aren’t activated and working. Because our abs aren’t working, our low back sometimes take over and does work it shouldn’t, which leads to pain and injury.
Therefore anyone with low back pain or even simply a desk job, needs to do the Pelvic Tilt Exercise.
Plus if you’ve ever done Leg Lowers, or any other ab exercise, and felt the move in your low back, it means your abs aren’t yet strong enough to stay engaged during that move. Therefore, you need to do the pelvic tilt first to engage and strengthen your abs!
While we firmly believe that EVERYONE should do the Pelvic Tilt, it is often only recommended for women post pregnancy to help them regain their ab strength. However, no one can ignore this very important core stabilizing exercise if they suffer from low back pain!
Here’s how to do the Pelvic Tilt exercise and prevent and alleviate your low back pain!
How to do The Pelvic Tilt:
The Basic Pelvic Tilt is an isometric hold to engage your intrinsic core stabilizers. Once you’ve learned to do this bracing movement during the Basic Pelvic Tilt, you will want to use it to prevent your low back from working during moves like the plank or push up.
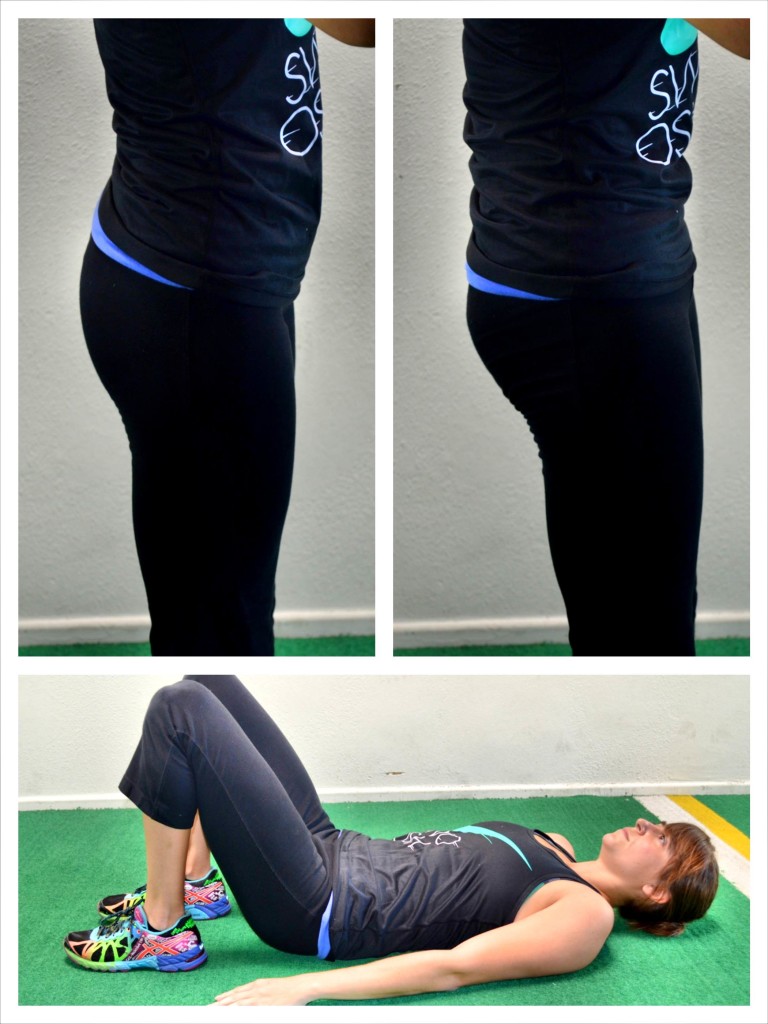
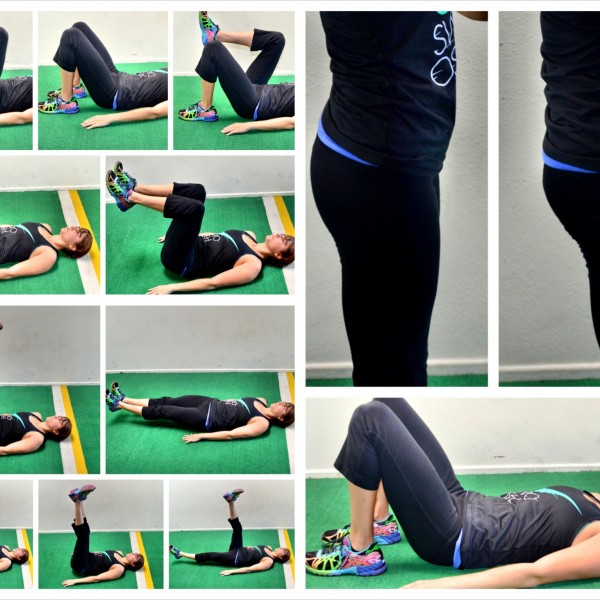
To do this basic variation of the Pelvic Tilt, lie on your back with your knees bent and your feet flat on the ground. Relax your arms down by your side.
Then feel the space between your low back and the ground. Press that space away by drawing your belly button toward your spine and “tilting” your pelvic.
You want to feel your low back press against the ground. Hold there with your abs braced and making sure to breathe as you hold.
Once you can hold the basic pelvic tilt, you will progress the move and add in movement. Adding in movement will force your core to work harder to stabilize.
The first progression is the Pelvic Tilt with March.
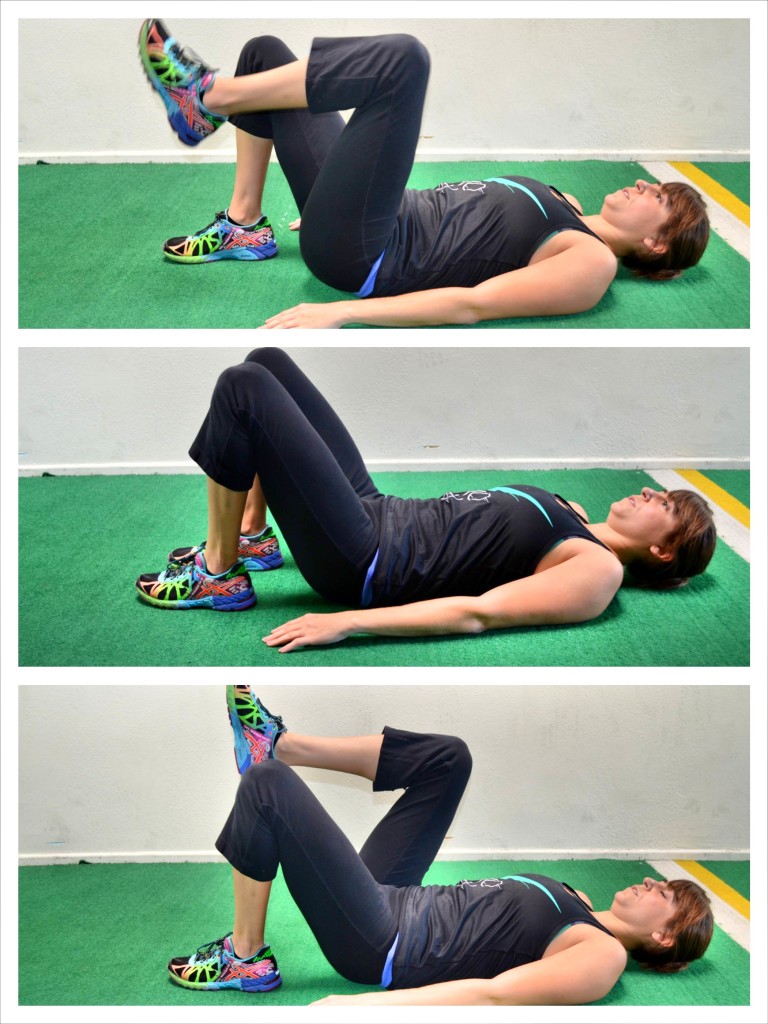
To add in the March, you will lie on your back and perform the Basic Pelvic Tilt exercise. However, once you’ve engaged your abs and tilted your pelvic you will lift one foot up off the ground, bringing your knee in toward your chest.
Make sure that as you lift the knee in toward your chest, your low back stays firmly on the ground. Touch that foot back down and raise the other knee in toward your chest.
Keep alternating legs, marching until all reps are complete. This should be a controlled march that you can speed up as you become confident in your ability to keep your low back against the ground and your abs braced.
Once you’ve mastered the march, you can move on to the Pelvic Tilt with Double Knee Tuck.
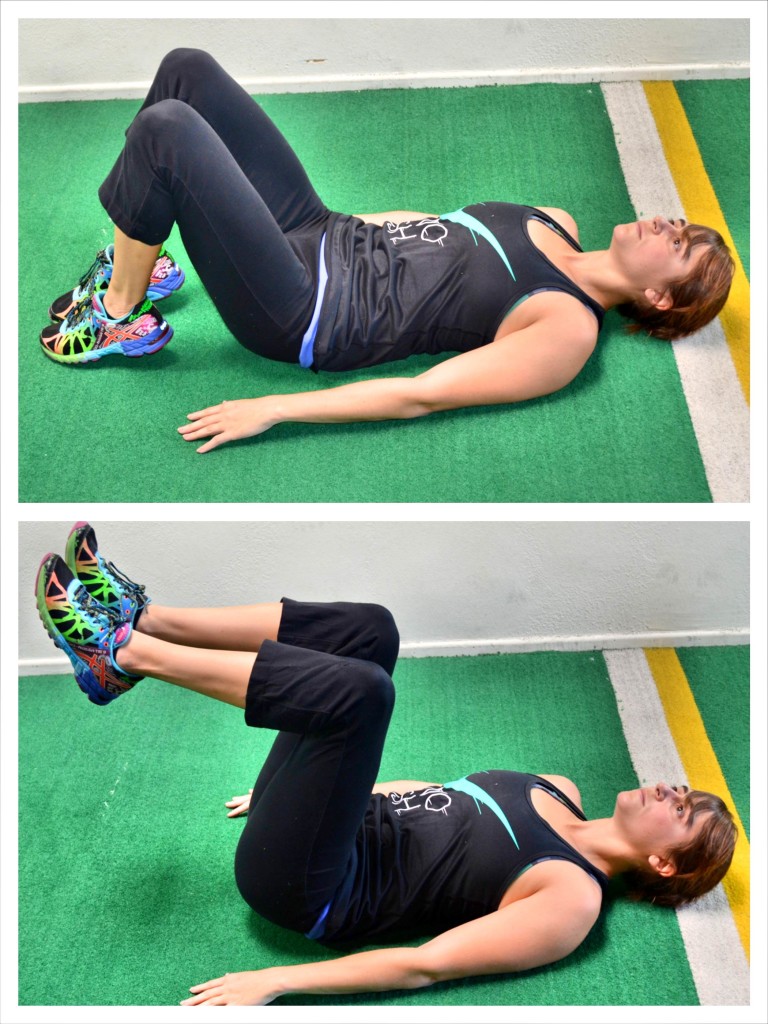
To do the double knee tuck, you will perform the basic tilt, but while keeping your low back against the ground, you will tuck both knees in toward your chest instead of simply holding.
Move slowly and make sure to keep your low back against the ground as you lift both knees in toward your chest.
If at any point your abs aren’t engaged and your low back isn’t firmly pressed into the ground, pause and reset or regress the movement back to the march until you are ready for the double knee tuck.
It is very important that you focus on quality movements and not just progressing as quickly as you can.
If you can keep your abs fully engaged with the Double Knee Tuck, progress onto the Pelvic Tilt with Single Leg Lowers.
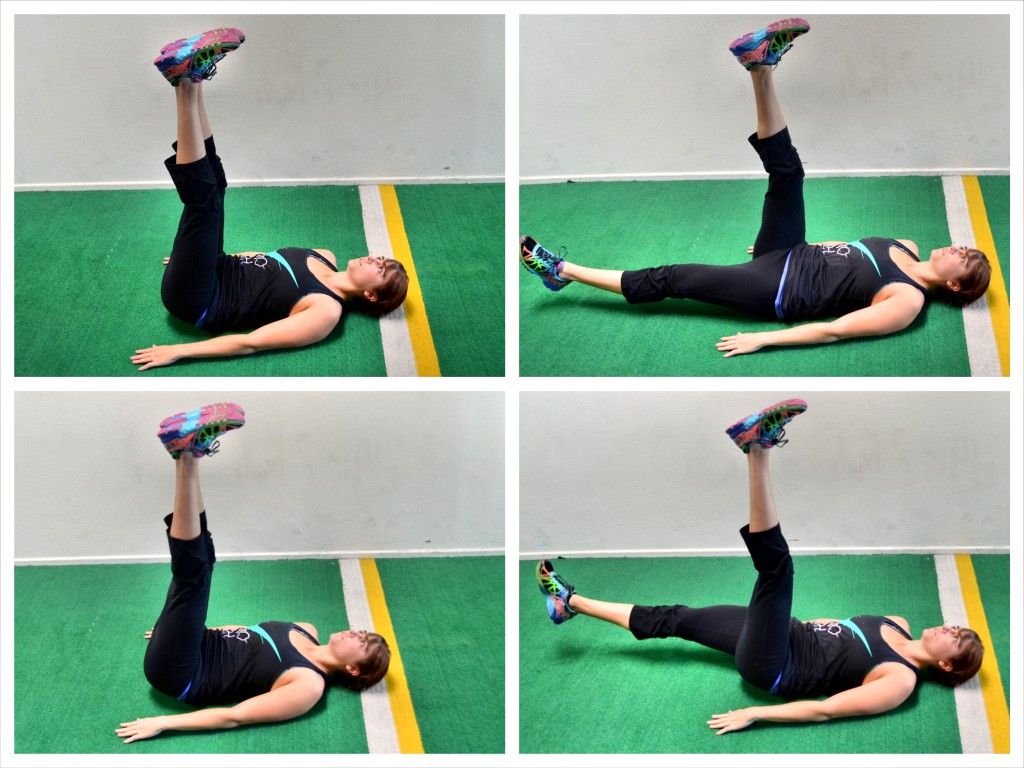
To do the single leg lowers, engage your abs with the basic pelvic tilt and raise both legs straight up toward the ceiling.
Keeping your abs engaged and your low back against the ground, lower one leg down toward the ground. The closer to the ground you lower the leg, the harder your abs will have to work to stay engaged.
The goal is to lower the leg so that your heel is just hovering off the ground. As you lower the leg, make sure to engage your glute as well.
Then, keeping the leg straight, raise it back up and lower the other leg. Alternate leg lowers, keeping the other leg straight up toward the ceiling.
Work to lower the leg as close to the ground as possible. Don’t feel that you have to lower the leg all the way down if you can’t keep your core engaged. You can increase your range of motion as you become better able to activate your core.
If at any point your low back isn’t pressed firmly into the ground, reset and even regress the movement. Either don’t lower the straight leg all the way down or go back to the Double Knee Tuck.
Once you can do the alternating Single Leg Lowers without your low back leaving the ground, progress to the Pelvic Tilt with Double Leg Lowers.
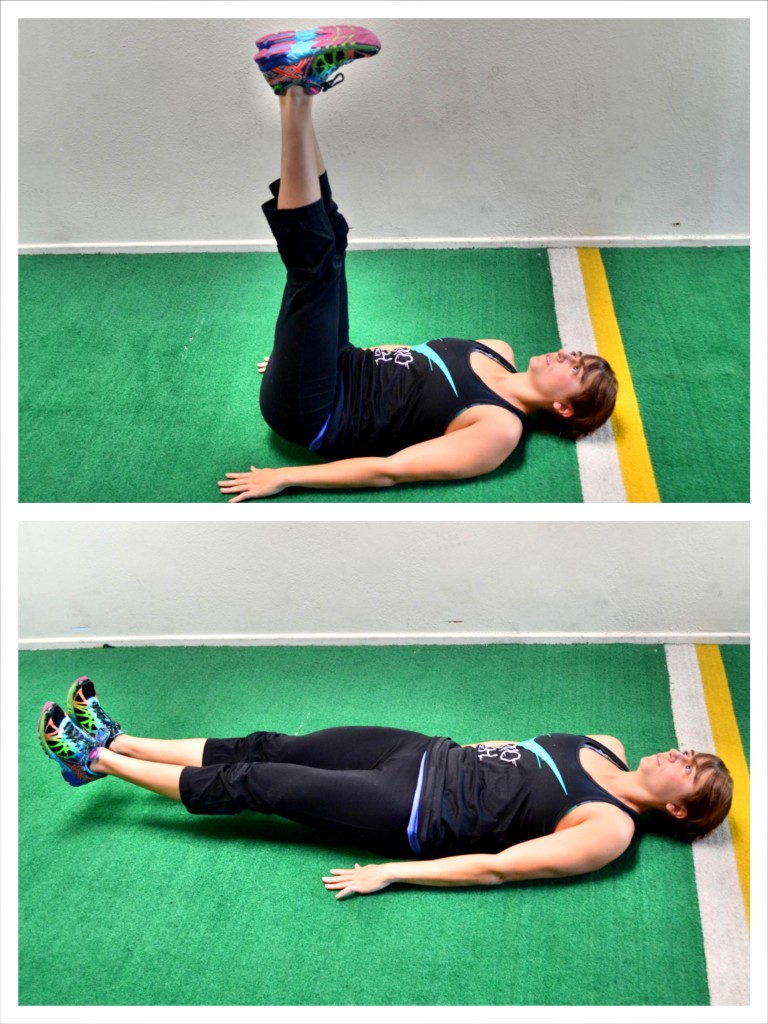
For the double leg lowers, set up in the pelvic tilt with your legs raised up toward the ceiling (same as for the Single Leg Lowers). Then with your low back firmly against the ground and your abs braced, lower both your legs down toward the ground.
If at any point while you lower your legs, your low back comes off the ground, stop and reset. Then either decrease your range of motion or regress to the single leg lowers.
However, if you can keep your abs engaged, lower your legs down so your heels are no more than an inch off the ground before raising them back up. You should also engage your glutes as you lower down.
And make sure that your legs stay as straight as you can throughout the motion.
With all of these progressions, you can place a towel under your low back to help make sure you are pressing it down firmly into the ground. To use the towel, place it right under your low back and then engage your abs with the Pelvic Tilt.
Grab the free end of the towel and give it a little tug. If the towel moves, you aren’t fully engaging your abs and pressing your back down. If the towel doesn’t move, your abs are fully engaged.
As you progress the Pelvic Tilt Exercise, you can use the towel as a check to make sure your abs stay engaged. If at any point you can pull the towel out, you know you aren’t yet ready for that progression.
If you have a partner, you can even have them hold a little tension on the towel as you perform the movement to help you check and see if you are maintaining core engagement throughout the motion.
As you move through this Pelvic Tilt progression, your abs will get stronger. The next key is to make sure that you perform this bracing movement when you do other exercises so that your low back doesn’t work when it shouldn’t be working!
To benefit from the Pelvic Tilt Exercise, you should include it in your warm up at least a few times a week to make sure your core is ready and activated for your workout after sitting at a desk all day.
You can also do the Pelvic Tilt while standing (as shown above). If your low back is acting up at work, stand up for a second and tilt your pelvic to engage your abs and relieve your low back. Do that a few times a day for 30 seconds and you can significantly reduces your low back ache!


This is such a great article. This is the only resource I could find that starts the progression from absolute basics. Thank you.
Glad it helps!
Question – when we get to double leg lowers, I’ve noticed it helps to raise head/shoulders off ground to keep low back pressed into the floor. Is this a good idea or bad idea? In other words, will my abs get more out of this in the long run if I do or don’t lift my head/shoulders?
This helps because you are flexing the spine. While it can make a move harder, that flexion also helps. I think it is key we learn to be able to control our core with and without lifting. So I would regress and do some where you can control the move without the added spinal flexion.
One question, should this just engage the abs or also the flutes?
The posterior pelvic tilt will engage your abs and glute max.