ROLL OUT
Wrists/Forearms
Chest
Shoulders/Traps/Upper Back
Lats
(Below in the Exercise Descriptions are some basic moves for the areas.)
STRETCH
10 reps Wrist Extension
10 reps Wrist Flexion
10 reps Kneeling Thoracic Extension and Lat Stretch
10 reps Quadruped Thoracic Rotation
10 reps per side Lying Chest Stretch and Scorpion
10 reps Camel
ACTIVATION
Complete 2-3 rounds of the circuit below if you are using this as a warm up. Otherwise you can do this as a part of your recovery day workout and complete 3-5 rounds of the circuit below.
CIRCUIT:
10-15 reps Mini Band Pull Downs
10-15 reps per side Back of Hand Band Rows
15-20 reps Scapular Push Ups
8-12 reps Mini Pull Ups
NOTES:
Go slow with all of the activation exercises and make sure you feel the correct places working. If you just rush through and don’t actually get the correct muscles activated, you won’t get as much out of this warm up or recovery workout.
If you do this workout on off days even in between back/pull up workouts, you will see lots of improvement in your pull ups and even in your posture!
The key is to get the big muscles actually activated and working!
For more on Activation Exercises, click here.
EXERCISE DESCRIPTIONS:
Wrists/Forearms – To roll out your forearm, place a small ball or roller up on your desk, table or even a box. Place your forearm over the ball with it right below your elbow. Press down on your forearm with your other hand to press it into the ball. Make small circles on the ball, holding on any tight spots. If you find a tight spot, you can also tense and relax your forearm by either making a fist or by pointing your fingers down toward the ground. By flexing and relaxing the muscles, you help the ball dig in and release the tight spot. Once you’ve worked on one spot, move the ball down your forearm. You can use it to roll out both sides of your forearm. Make sure to get the outside and inside of your forearm as there can be trigger points in both spots causing your wrist and elbow pain. Don’t waste time on any areas that aren’t tight or sore. Seek out and spend time on any areas of pain. Apply as much pressure as you can handle and use as small and hard a ball or roller as you can.

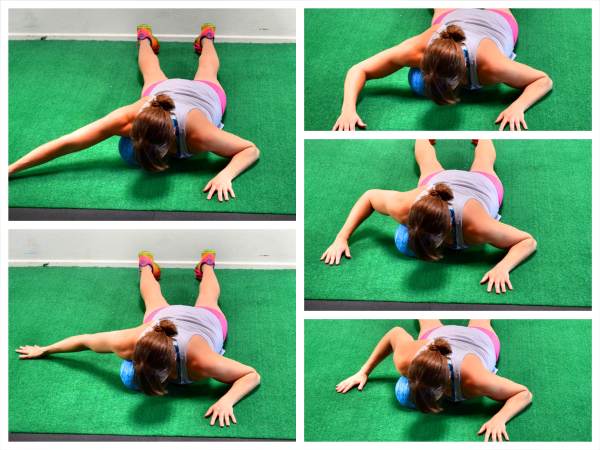
Chest – To roll out your chest, a blue foam posture ball is a great tool although you can use a small ball against a wall or up on some books. Place the ball on the ground and lie face down on top of it with the ball right in your chest beside your shoulder joint. Then with the ball right to the inside of your shoulder, move your hand overhead and then back down toward your legs. Move your arms slowly up and down to change exactly how the ball digs into your chest muscles. Hold and relax on any tight spots.
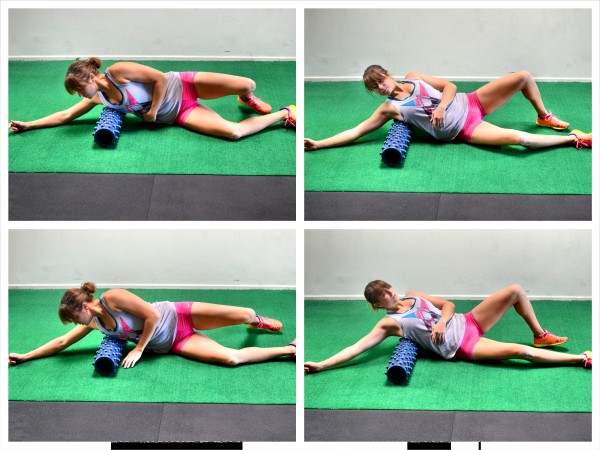
Lats – To roll out your lats, place a roller under one armpit when you are lying on your side on the ground with your arm stretched out overhead. Rock forward and backward on the roller and then move it lower down the side of your back. Hold on any tight spots as you go and make sure to rock forward and backward as you make your way down your side. Work all the way from your armpit to the end of your rib cage.
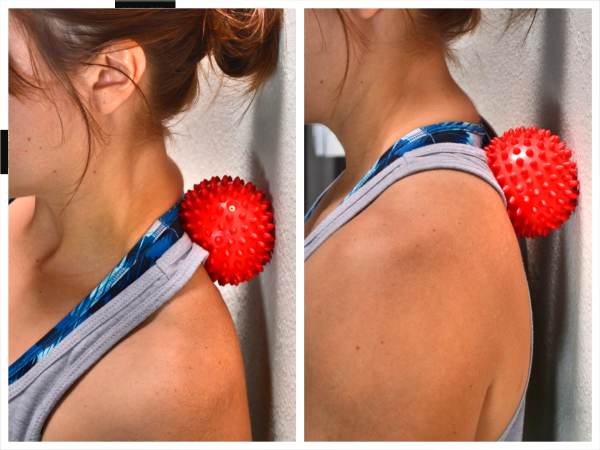
Shoulders/Traps/Upper Back – To roll out your upper back with a ball, stand with your back to a wall and place the ball to the side of the base of your neck. Press the ball into the wall and roll it down along your shoulder blade. Hold on any tight spots. You may even want to pull your arm across your chest as you dig out under the shoulder blade. You can also use the ball against the wall to dig out right at the top of your armpit. If you want to apply more pressure with the ball, you can use a harder ball or use the ball against the ground instead of the wall.
Wrist Extension – To do the Wrist Extension Stretch, kneel on the ground and place your hands down on the ground in front of you, palms down. Turn your fingertips out and back toward your knees. Then rock back, sitting on your heels, keeping the heels of your palms down on the ground as you sit back. Come back out of the stretch then sit back again, stretching down the inside of your forearms.
Wrist Flexion – To do the Kneeling Wrist Flexion Stretch, start kneeling on the ground. Place your hands down on the ground in front of you with the backs of your hands on the ground and your fingertips pointing in toward each other. Rock side to side slowly, holding slightly to each side so that you feel a stretch down the outside of your forearms.
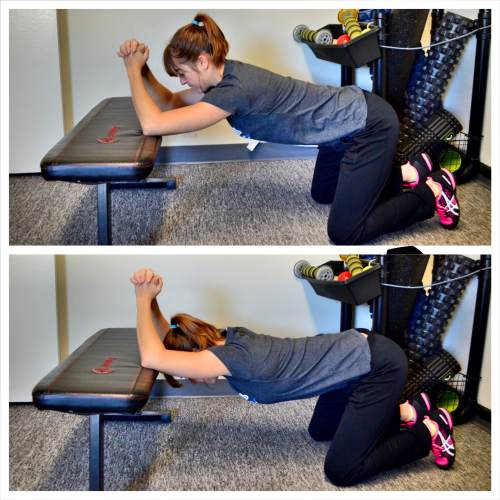
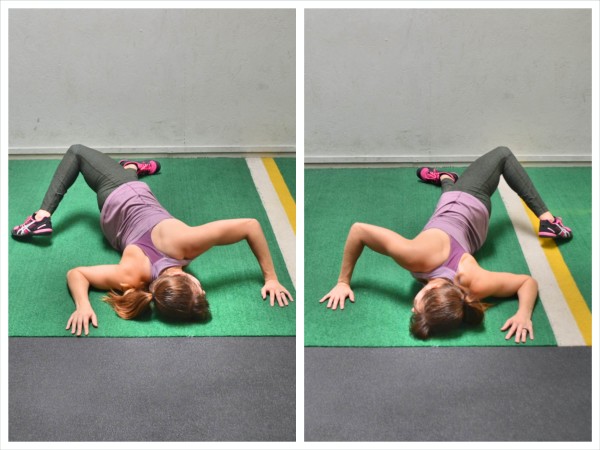
Kneeling Thoracic Extension and Lat Stretch – To do the Kneeling Thoracic Extension and Lat Stretch, place your elbows up on a bench about shoulder-width apart and kneel on the ground in front of the bench. Make sure you are back far enough that you have room to lean forward and over and drop your head between your elbows. Then with your elbows on the bench, relax your chest and head over, sitting your butt back just slightly. Press your chest toward the ground and feel a nice stretch down your triceps and lats as well as through your thoracic spine. Try to extend your back as much as possible as you press your chest toward the ground. You can either hold here and breathe to stretch deeper or you can come out of the stretch and then relax back into it and try to get further with each rep.
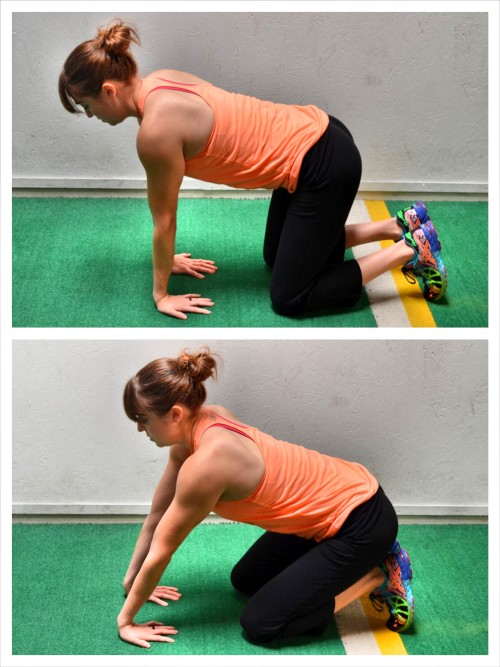
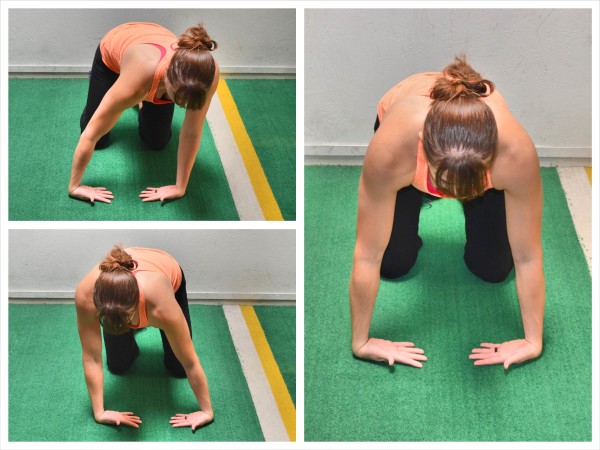
Quadruped Thoracic Rotation – To do the Quadruped Thoracic Rotation, start on your hands and knees with your knees under your hips and your hands under your shoulders. Then reach one hand down your neck and spine. With your hand behind your head, rotate your elbow down under your body toward your opposite knee, sitting your butt back slightly as you tuck. Then rotate the elbow up toward the ceiling as much as you can, opening your chest up toward the ceiling and pushing your hips slightly forward. Feel a nice stretch down your back and even into the outside of your hips. Repeat, rotating your elbow back under before twisting open. Complete all reps on one side before switching. Make sure to really rotate open as much as you can each time.
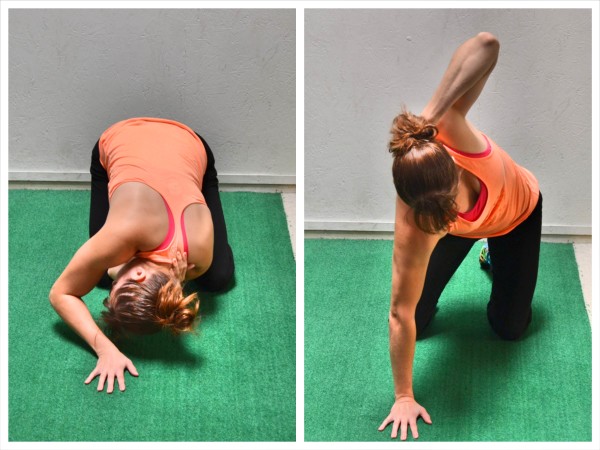
Lying Chest Stretch and Scorpion – To do the Lying Chest Stretch with Scorpion, lie on your belly with your arms out straight at shoulder height. Bend the elbow of one arm to 90 degrees so that your upper arm is still in line with your shoulder. Then lift the opposite leg up from the bent arm and bend your knee to kick your foot over and behind you as you press your chest open with your straight arm. Kick your leg back over your body, trying to touch your toe back behind you and feel a stretch through your chest and low back. You should feel a nice stretch down the front of the shoulder of the bent arm. Make sure as you reach the leg back over that you relax your head down onto the ground. Hold for a second or two then bend the other arm and kick the other leg back over. Alternate sides, holding for a second or two each way.
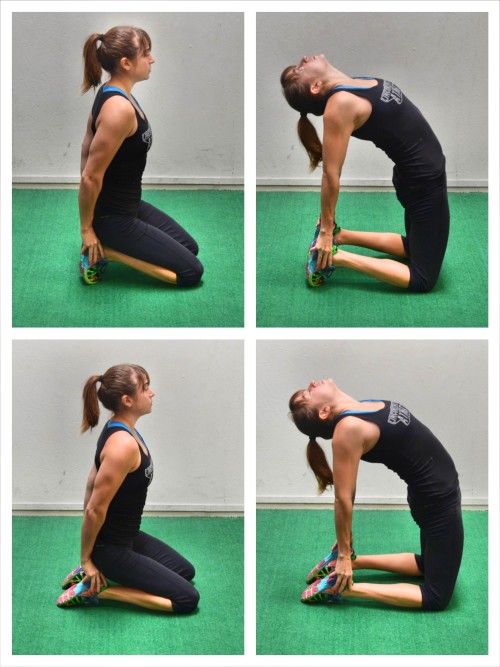
Camel – To do the Camel, kneel on the ground with your knees about hip-width apart and your feet flexed. If you point your toes instead, this will make the move harder and require more flexibility (bottom two photos). Also, flexing your feet will stretch the bottom of your feet more while pointing your toes will get your shins more. With either your feet flexed or pointed, sit back on your heels and place your hands on your heels. Then arch your hips up and away, as you press your chest out and lift your glutes up off your heels. Keep your hands on your heels as you arch away and squeeze your glutes to fully extend your hips. Do not hyperextend your low back. Engage your glutes to stretch out your hips. Relax your head back and arch as much as you can, getting a nice stretch down your chest, core, hips and quads. Do not let your shoulders shrug and really focus on opening your chest up. Hold for 1-2 seconds and relax back down. Repeat, arching back up. You can also make this a static stretch by simply holding the pose for 15-20 seconds. If you are less flexible and can’t place your hands on your heels, you can do this stretch with a couch, chair or table behind you. Kneel down with the coach or table behind you. Place your hands back behind you on the couch or table. If you are at your desk, you can use your desk or chair. Keeping your arms straight behind you, press your chest out and arch away from the piece behind. Relax your head back and really squeeze your glutes to arch away.
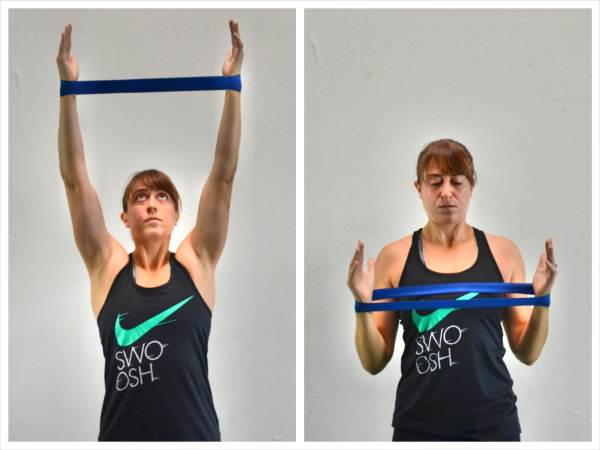
Mini Band Pull Downs – To do the Mini Band Pull Down, place a Mini Band around the back of your hands, wrists or even your forearms. To make the move easier, place the band closer to your elbows. Then with the band around your arms, extend your arms up toward the ceiling. Stand tall, pressing your chest out and bracing your abs. Press out on the band so that there is tension. Keeping tension on the band, pull the band down toward your chest. As you pull the band down, draw your shoulder blades down and together. Feel the sides of your back working to pull the band down to your chest. Make sure to keep your chest pressed out and open toward the ceiling. Hold for a second at your chest and then extend your arms back up toward the ceiling. Make sure to consciously engage your back and draw your shoulder blades down and back as you pull the band down. Keep tension on the band the entire time. Also make sure you do not arch your low back as you perform the move. Keep your abs braced so you don’t feel it in your low back. If you don’t have a Mini Band, you can use a towel instead. Hold the towel in both hands. Pull out on the towel to create tension and then do the Pull Down like you would with the band.
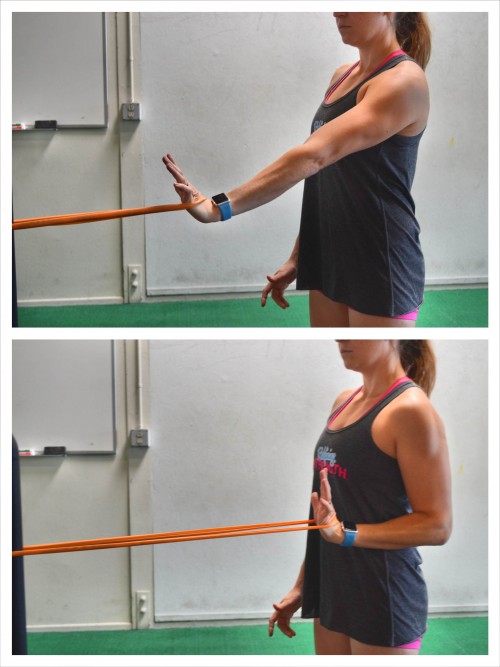
Back of Hand Band Rows – To do the Back of Hand Band Row, anchor a resistance band in front of you and either loop it or make sure it has a handle you can put your hand through. Place the band or handle around the back of your hand and point your fingers up toward the ceiling. Step away from the anchor point so that there is tension in the band with your arm extended in front of you. Stand up nice and tall and press your chest out as you face the mini band. Your feet should be about hip-width apart. Make sure you aren’t shrugging your shoulders as you hold your arm out in front of you with the band around your hand. Then drive the elbow down and back as you row the back of your hand and the band into right below your chest. Row low so that you don’t shrug your shoulder. Also, don’t rotate as you row. Feel your back pull the band back. Don’t just use your arms. Also, make sure that your upper traps don’t try to take over. Really press the chest out and drive the elbow down and back. Straighten the arm back out and repeat. Focus on feeling your back pull the band and not just your arm. By focusing on what muscles should be working, you will improve your mind-body connection. Also, make sure to keep your fingertips pointing up toward the ceiling to engage the extensors in your forearm.
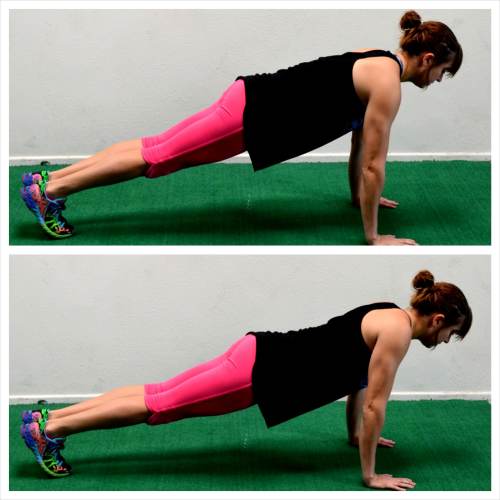
Scapular Push Ups – To do the Scapular Push Up, set up in a high plank position with your hands under your shoulders and your feet together. Your body should be in a nice straight line from head to your heels. Without bending your elbows or dropping your hips, pinch your shoulder blades together and press your chest out. Do not tuck your chin or jut your head forward. Also do not let your core wiggle or your elbows bend to try to increase your range of motion. You are not doing a push up. This is a very small range of motion where you are simply focused on pinching your shoulder blades together. Just pinch your shoulder blades together and then relax or even round your back up out of it (rounding your back at the top is another variation but can be very useful for correcting certain push up problems). Keep your core tight as you pinch your shoulder blades together. As you get stronger and build the mind-body connection you will find your range of motion increases. If you struggle to pinch your shoulder blades together without wiggling your core or bending your elbows, go down to your knees as if doing a push up from your knees. If you still struggle, bring your knees under your hips. Do not get caught up on doing this from your toes. Just focus on pinching the shoulder blades together.
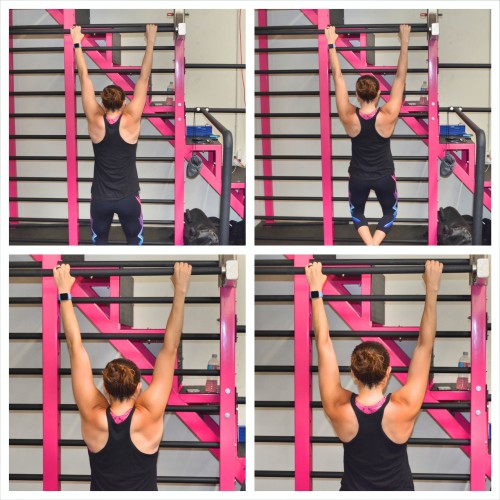
Mini Pull Ups – To do the Mini Pull Ups and work on engaging your lats to pull up, hang from the bar with your palms facing away from you (you can also do this with palms facing toward you for a Mini Chin Up). Your hands should be about shoulder-width apart although you can do it with them wider apart or closer together as well. I recommend using whatever grip you use when you do your Pull Ups. Hanging from the bar, press your chest out and pull your shoulder blades down and together. Feel your back engage as you draw your shoulder blades together. Don’t bend your elbows and turn this into a pull up. Just press your chest out and retract your shoulder blades bringing them down and together. Feel your back engage and pull you up toward the bar even though your arms aren’t moving. You should feel your shoulders go down as your chest lifts up. Then relax out and repeat. Remember, you are not bending your elbows to make this movement bigger.