Mobility is not the same as flexibility. Nor is it the same as stability. But for true mobility, you need both a certain amount of stability and flexibility of the muscles around the joint.
Heck, you even need a certain amount of distal stability and mobility in order to have proximal mobility.
HUH?
What that even means is not only do you need to work on your HIP JOINT and the muscles that move it if you want hip mobility but you have to make sure that the other joints that can really influence movement at the hip are also mobile and stable.
For instance, especially with hip mobility, core stability and ankle mobility issues can be incredibly important to address and may be the reason why your hip seems to lack mobility when there is actually no restrictions at the hip.
Our body often limits our mobility because it is PROTECTING itself from doing something that it feels could result in further injury.
Of course, all too often we still continue to push through…
BUT if we listen and take a full-body approach to our pain, realizing that where it hurts isn’t always the problem, we can help restore proper functioning!
These 15 moves are a great way to address not only common tight muscles, mobility issues and stability issues at your hip but also the common restrictions elsewhere in your kinetic chain that can result in what seems to be limited hip mobility.

How To Improve Your Hip Mobility: 15 Hip Mobility Exercises
Restoring proper mobility means using foam rolling, stretching and activation to relax tight muscles, restore them to their proper length-tension relationships and then get the underactive muscles engaged and working.
These 15 moves provide you with moves from each part of the 3-Part RStoration Method – Foam Rolling, Stretching and Activating. Because we have to remember that all three are key to preventing and alleviating injuries!
Foam Rolling:
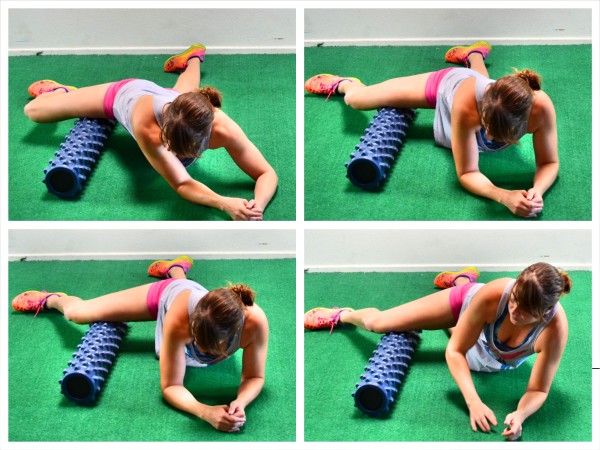
Hip Foam Rolling (Psoas and TFL):
All too many of us end up with tight hip flexors from sitting long hours hunched over a computer or commuting in a car. Tight hips can mean underactive glutes and can lead to not only a lack of hip mobility but also injury!
And if you’re a runner or cyclists, you may only be perpetuating the problem with the repetitive movement and further hip flexion. That is why it is important you roll out your hip flexors before you run.
Two important muscles to target and roll out, that are often tight, are the Psoas and TFL or Tensor Fasciae Latae.
Psoas:
A tight Psoas contributes to Anterior Pelvic Tilt and hip mobility restrictions as well as underactive glutes. This can lead to not only hip injuries, but also low back pain and injury. It can even create compensations that lead to problems further up and down your kinetic chain, like knee injuries!
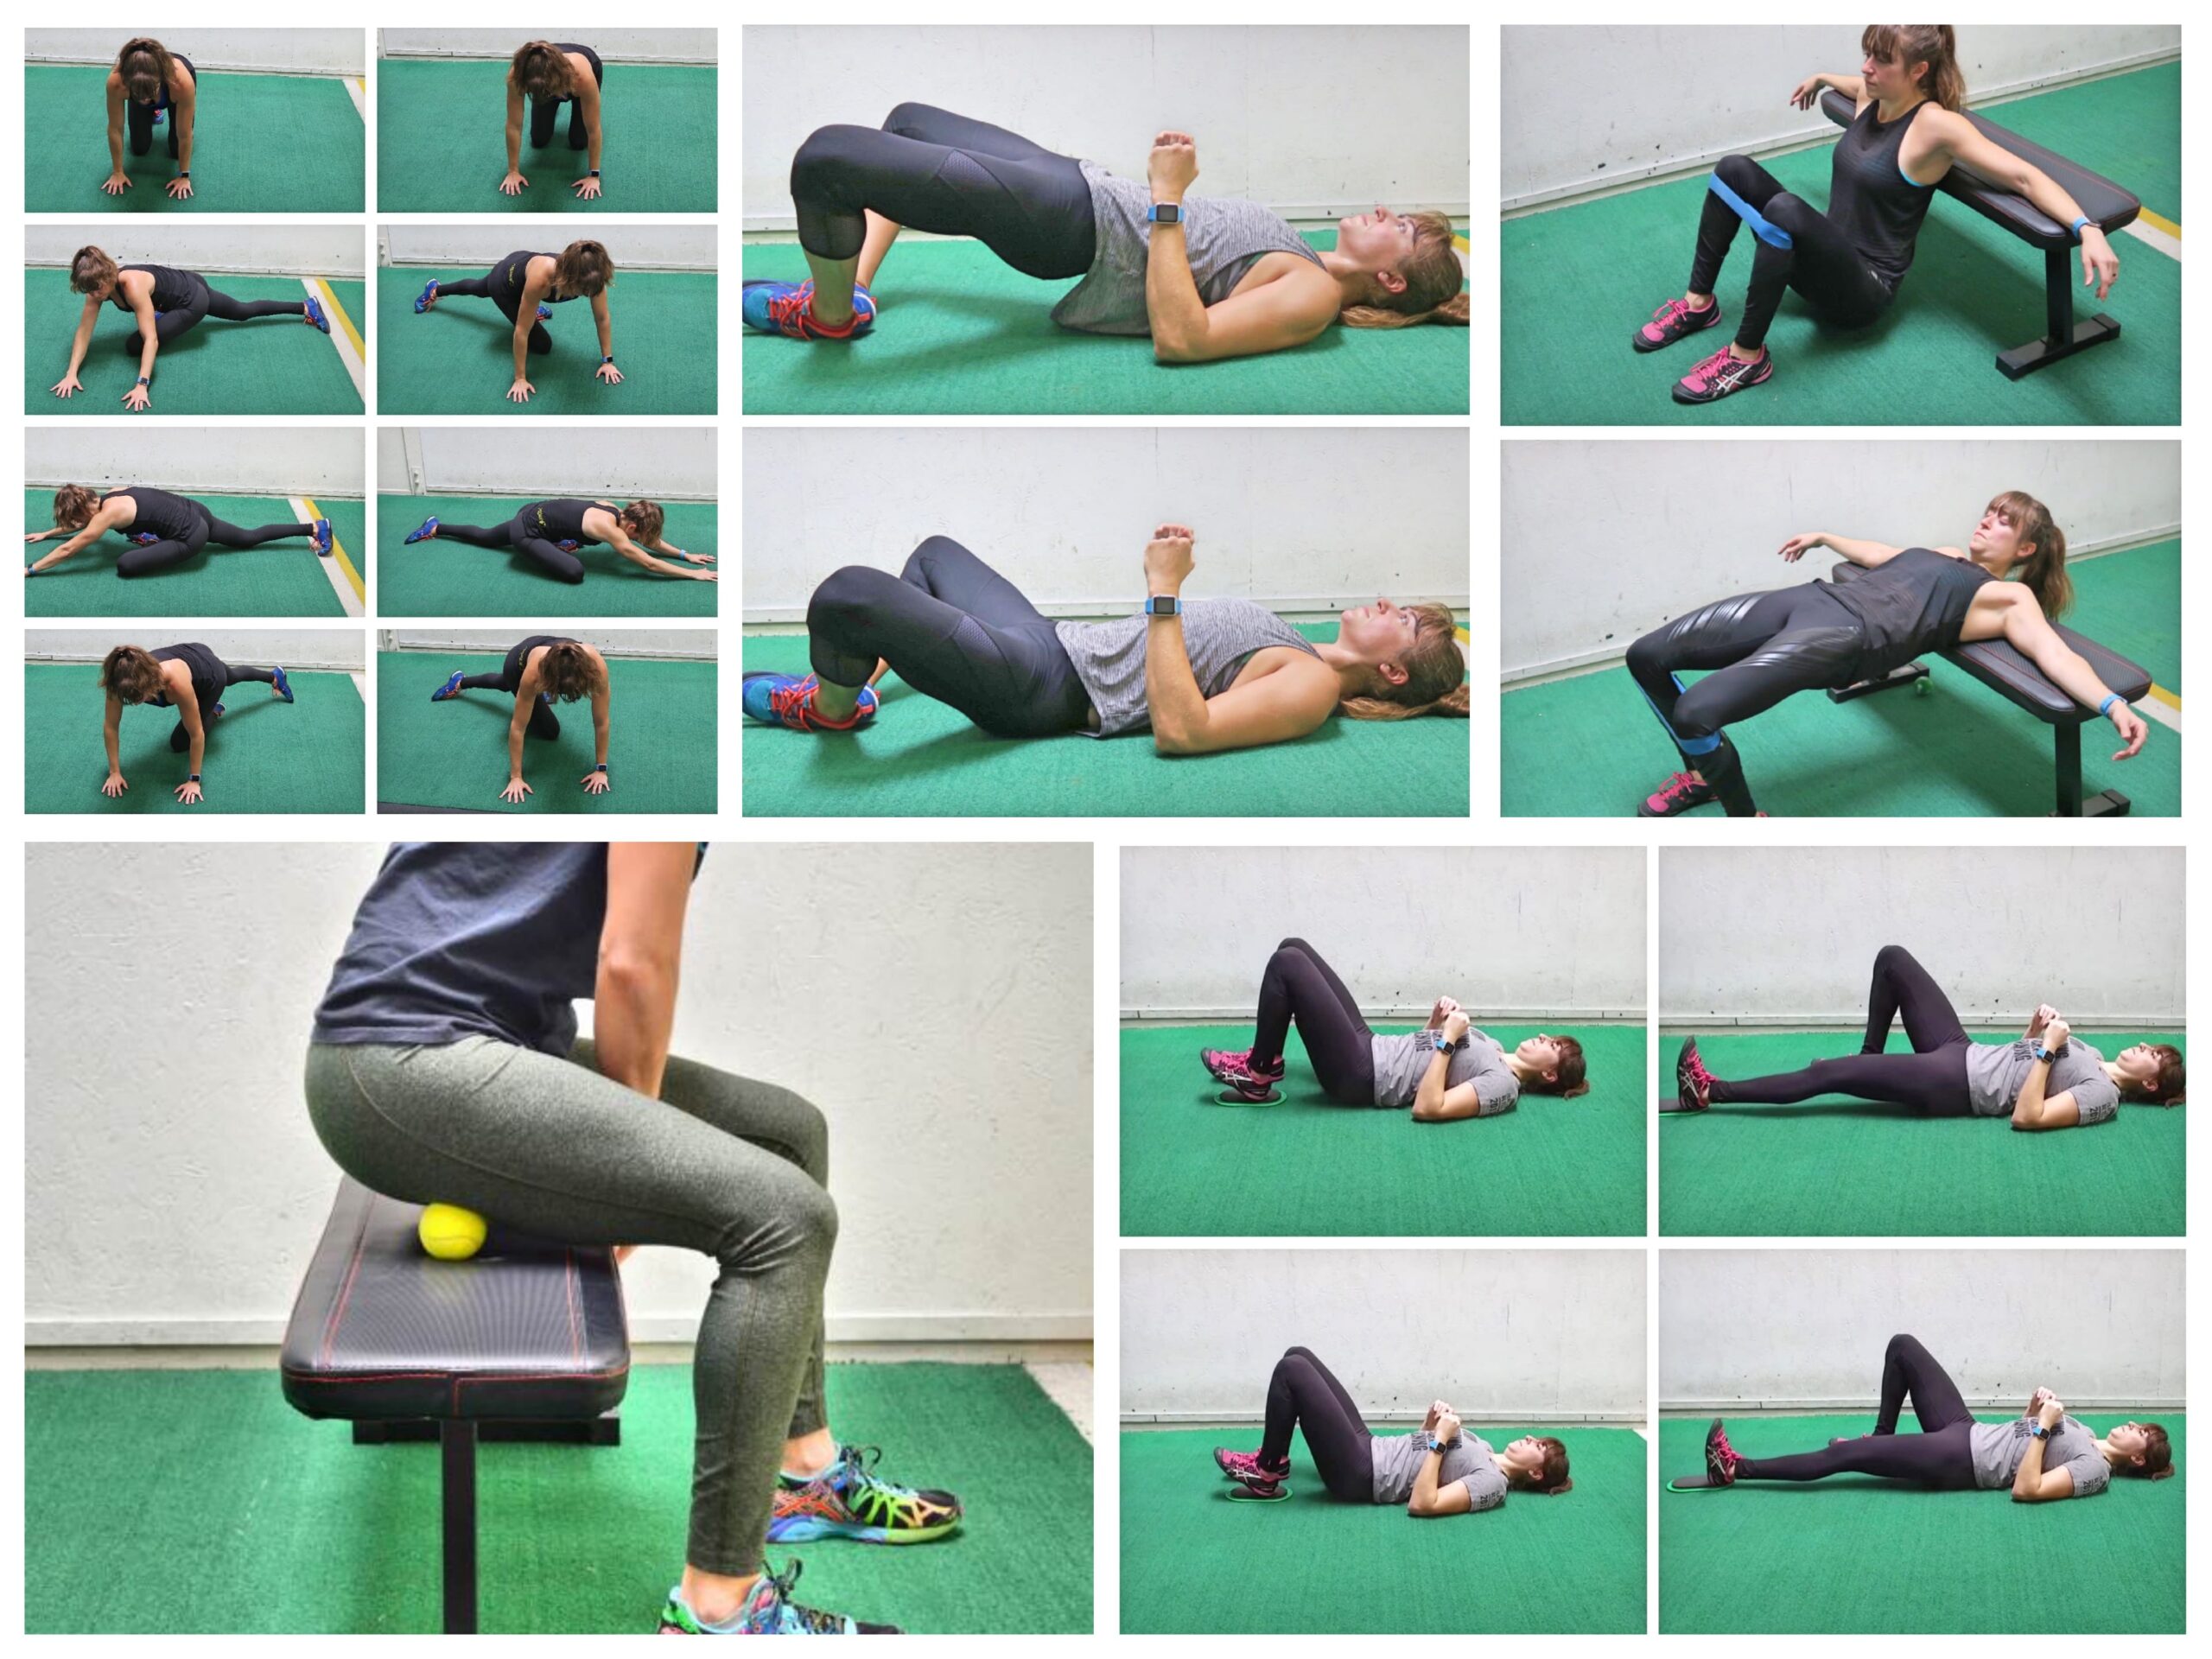
To roll out your Psoas, a big foam ball/posture ball works best. Place the ball in your abs above your hip to one side of your belly button.
Relax over the ball and lie face down on the ground. Breathe.
Then move the ball, working your way around the side of your lower abs between your belly button and hip. After you move the ball, relax completely back over it.
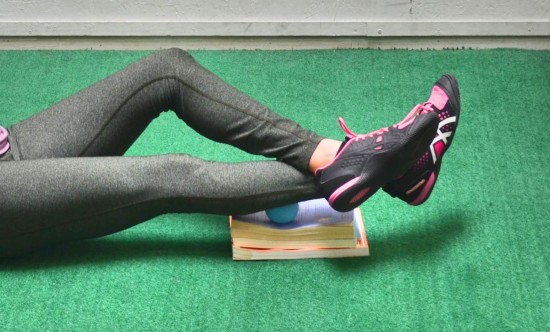
If you don’t have a larger ball, you can use a tennis ball; however, the tennis ball will dig in more. To use the tennis ball, you will also need some books or a yoga block. Place the ball up on the books or block and lie over it just like you would with the posture ball. Relax and breathe.
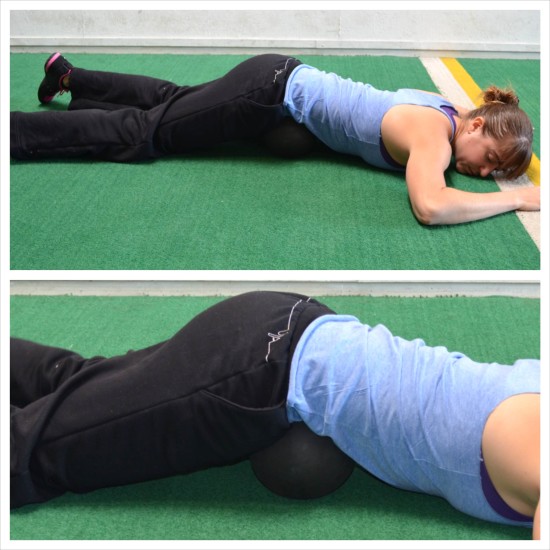
TFL:
Ever have IT Band issues? Tried suffering through rolling your IT Band and feel like the pain goes away a bit but never fully gets better? STOP rolling your IT Band and instead focus on rolling your TFL!
This hip muscle can contribute to IT Band issues as well as hip and knee pain! It is often also the reason our glute medius doesn’t fire correctly to stabilize our hips, which can lead to hip and low back pain!
To roll out your TFL, lie on the ground on your side and place a ball just to the side and slightly under your hip bone. Hold on this spot and even move an inch or two down your leg.
If you find a tight spot, hold on that spot and lift and lower your leg up and down as if doing an adductor leg raise. By lifting and lower the leg, you are flexing and relaxing the muscle, which will help loosen everything up as you hold.
As you seek out tight spots in your hip, bring the ball back around your side toward your butt. Hold on any tight spots. You can even work back into your glute medius if you find any trigger points.
Remember to relax and hold on any tight spots and breathe as you hold.
Hamstring Foam Rolling:
Ever feel like your hamstrings are tight no matter how much you stretch them? What if that is because they FEEL tight, but are actually OVERSTRETCHED!?
This is actually often the case, especially if you sit often and have tight hips. So instead of stretching, try rolling to help relax your hamstrings. (This is especially important if you’ve ever had any high hamstring injuries!)
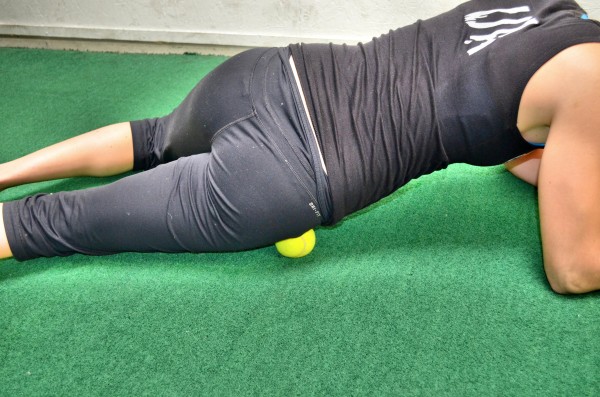
To roll out your hamstrings, a ball is actually best while sitting up on something like a chair, table or box. The pressure you can apply even when isolating one leg on a roller on the ground is limited so using a ball when seated up on something allows you to dig into your hamstring more.
Take the ball and place it at the top of your hamstring right under the bottom of your butt while you are seated up on a chair. Rock side to side on the ball and roll it from your inner thigh out toward the outside of your leg.
Hold on any tight spot and perform small rocks side to side to help you dig into the knot further. You can even flex and relax your hamstring by straightening your leg out and then relaxing your foot back down to the ground to help the muscle release the knot.
Work your way down your hamstring toward your knee. Work all along the hamstring, moving toward your inner thigh and out toward your IT Band. Make sure to hold on any tight spots. Do not spend time on areas of your hamstring that aren’t tight.
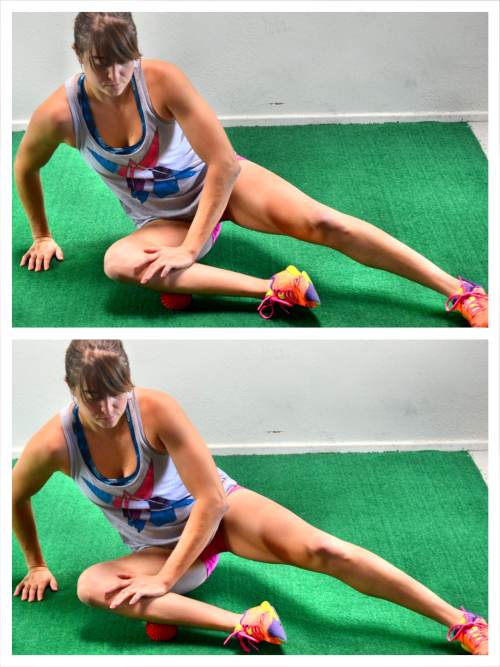
Adductor Foam Rolling:
Tight adductors contribute to limited hip mobility and stability because your glute medius doesn’t fire correctly. This can lead to hip and low back pain.
Tight adductors can also contribute to knee valgus, which can cause your patella to not track correctly, leading to knee pain and injury! That is why it is important to roll out and relax tight adductors.
To roll out your adductors, lie face down on the ground. Bend one knee out to the side at about 90 degrees and place the roller under the inside of your knee.
Resting on your forearms, rock your leg forward over the roller toward your quad and then back toward your hamstring. Hold on any tight spots.
Then move the roller up your inner thigh toward your crotch. Rock forward and backward again and remember to spend more time on any tight areas.
Lower Leg Foam Rolling:
Movement distortions at our feet and ankles can lead to problems up our entire body. They are our foundation and any imbalances there means compensations higher up. That is why it is important to roll out and relax tight muscles in our lower legs.
If you wear high heels, run long distances, cycle or simply find you walk on the inside or outsides of your shoes, you’ll want to try these foam rolling moves to loosen up your lower leg.
Calf Foam Rolling:
Tight calves can contribute to plantar fasciitis and even knee pain. Tightness here can also limit your ankle mobility, which will impact your hip mobility as well!
To roll out your calves, a tennis ball works great especially if you have a yoga block or books to place the ball up on.
Using the tennis ball, place it up on some books or a yoga block and then put one calf on top of the ball. Start with the ball at the bottom part of the meat of your calf.
Cross the other leg on top to help apply more pressure if needed.
Rock very slightly from right to left or side-to-side a couple of times and then move the ball to another spot on your calf, working over the entire meaty part of the muscle right up to below the back of your knee. Keep rocking side to side as you work your way around your calf.
Hold on any tight spots. If you find a super tight spot, make 10 circles with your foot and then tense and relax your calf (flexing and dropping your foot) 5 times before you move to the next spot. This will help the muscle relax itself and help the knot to release.
Peroneal:
If you tend to walk on the inside of your shoes or your have eversion of your feet, the outside of your lower leg may be tight. This movement distortion can lead to not only knee pain, but also hip pain. And can cause imbalances and compensations that lead to underactive glutes and tight hips.
To roll out your Peroneals, place a ball on the ground in front of you and then bend your knee and place the side of your lower leg on top of the ball, starting with the ball below and outside your knee. Press down on your lower leg with your hand to apply more pressure so that the ball digs in.
Then move your leg so that you make small circles on top of the ball. Work your way down the length of the side of your lower leg, pressing your lower leg firmly down into the ball. (You may even put a book under the ball to help you apply more pressure and get a better angle.)
Hold on any tight spots and, as you hold, flex and relax your foot to help dig into any knots or trigger points. To dig in more, you can also circle the ankle while holding on any tight spots instead of flexing and relaxing the foot.
Stretching:
After your roll out and relax overexcited or overactive muscles, you want to work on the flexibility of your muscles and improving range of motion with a combination of Dynamic and Static Stretches.
You want to make sure too that you address all of the muscles around your hip joint as well as the other muscles of your lumbo pelvic hip complex.
It is important that you use stretching to help you mobilize not only your hips but also other muscles and joints that may create imbalances or compensations that could lead to your hip movement becoming restricted aka addressing a lack of ankle or spinal mobility is also key!
World’s Greatest Stretch:
A great way to improve your hip mobility AND even your spinal mobility is the World’s Greatest Stretch. This move stretches out your hips, glutes and even hamstrings. It will also work on opening up your chest as you activate your core.
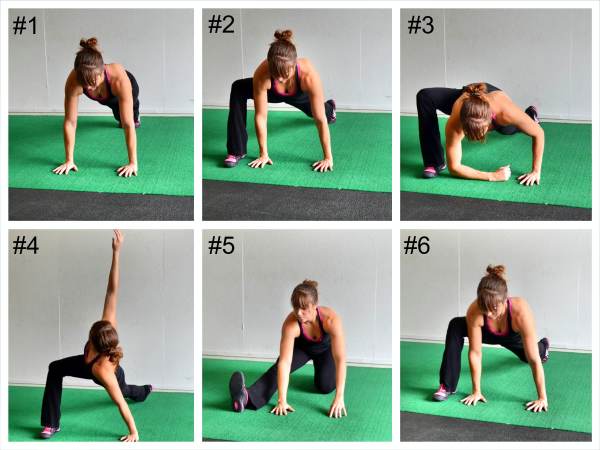
To do the World’s Greatest Stretch, start in a high plank position with your hands under your shoulders and feet together. Your body should start in a nice straight line from your head to your heels. Do not let your hips sag or your butt go up in the air.
Step your right foot outside your right hand so that you are in a nice low runner’s lunge. Make sure your foot is flat on the ground. (If you are less flexible, your foot may not be right outside your hand or you may need to drop your back knee down to the ground. But do not let your front heel come up. You still want your foot to be flat on the ground.)
In the low runner’s lunge, drop your right elbow down to the ground near the instep of your right foot. Do not worry if you can’t touch the ground. Just drop your elbow down as low as you can. Feel a nice stretch in your hip and glute.
Then bring your elbow up off the ground and rotate your right arm up toward the ceiling, opening your chest up toward the ceiling to face your right leg. Stretch your right arm up toward the ceiling and rotate your chest open to feel a nice stretch in your hips, glute, back and chest.
Bring the right hand back down to the ground and then drop your back knee (left knee) down to the ground. Sit back on your left heel and let your right leg straighten out in front of you. Feel a stretch down your right hamstring. Lean forward over that front leg to increase the stretch. You may even feel this stretch your low back a bit. Make sure though that you are pushing your butt back as you hinge and lean from the hips and don’t simply round over.
Then shift back forward into the low runner’s lunge, bending your right leg and lifting your left knee up off the ground. You can then repeat the stretch on the same side or step your right foot back into the plank position and step your left foot up outside your left hand to stretch the other side.
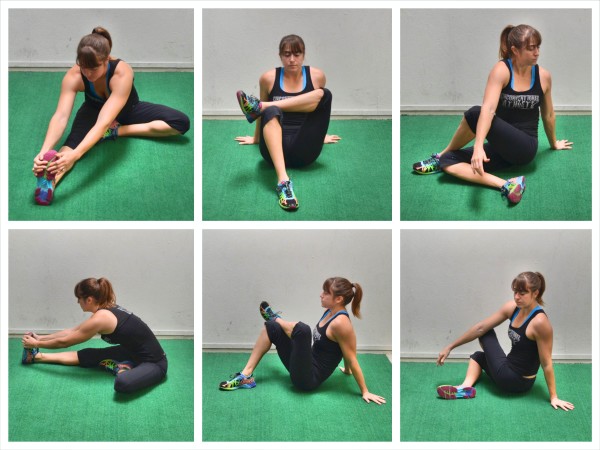
Seated Foot Stretch:
All too often we only pay attention to our feet when we have an injury, like plantar fasciitis. But tightness even in our BIG TOE, can lead to imbalances that cause injury. Our body seeks out the path of least resistance. Immobility in one area causes us to try to find mobility from other joints or flexibility out of other muscles or even strength from muscles not meant to handle the loads.
That is why it is important we address restrictions at our feet and ankles because this is often even why we feel like we lack hip mobility during moves like squats!
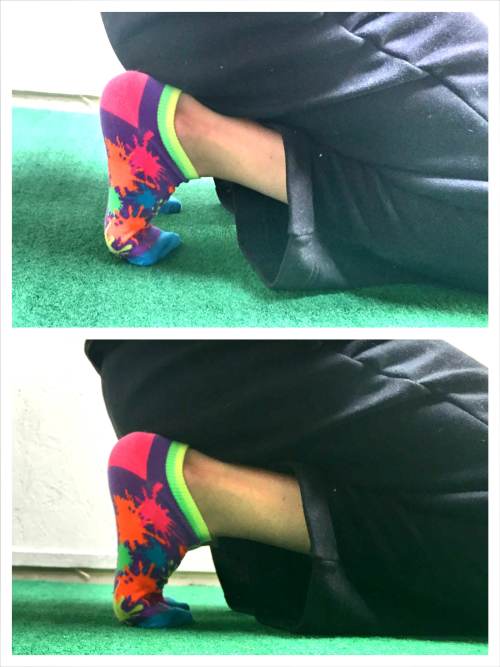
To do the Kneeling Foot Stretch, kneel on the ground and flex your feet, tucking your toes under. Then sit back on your heels and feel a stretch down your feet and toes. Rock a little side to side as you hold in the stretch.
You can then release and move into the Bear Squat Stretch (described below) or you can simply relax out of the stretch and repeat, sitting back on your heels and gently rocking side to side.
If your quad flexibility is really restricting you from sitting back on your heels and feeling this stretch, you can instead stand up and place the ball of your foot on the wall and lean forward against the wall to stretch your foot and even your calf.
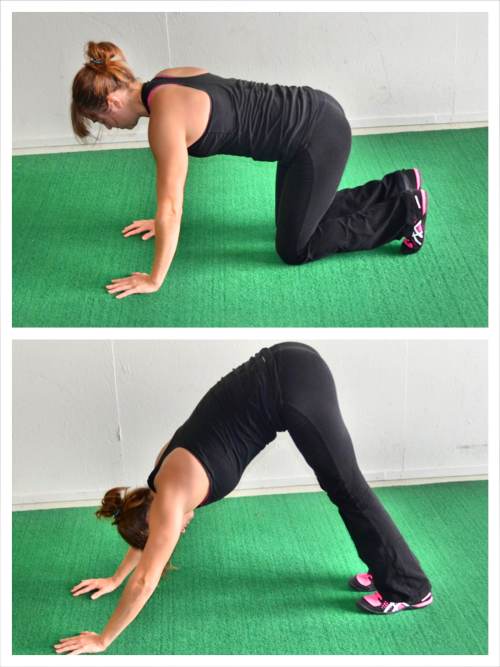
To do the Bear Squat Stretch, place your hands down on the ground and press your butt up into the air, driving your heels down to the ground. Relax your calves and try to get your heels down to the ground. Feel a nice stretch down your calves and even up into your hamstrings. Hold for 1-2 seconds and then drop back down to your knees and sit back on your heels again to stretch your feet.
Make sure that as you drive your butt up, you are pressing yourself back so that your driving your heels down. Don’t simply pike up and lower back down. Actually drive back and feel the stretch down your calves.
You can walk your hands in just a little bit closer to your knees to help you feel the stretch a little bit more, but do not walk them in too close.
Alternating Quadruped Pigeon Pose:
The pigeon pose is one of the BEST glute stretches and a must-do move to mobilize your hips and prevent low back and hip pain. Ever had sciatic pain or piriformis issues? This is a MUST-DO MOVE!
However, if you’re using it as a warm up, you don’t want to do the static pigeon pose stretch. That is where this version of the pigeon pose works well. The Alternating Quadruped Pigeon Pose makes the stretch dynamic to mobilize your hips AND this version can make it easier to get in and out of the stretch if you struggle to set up correctly.
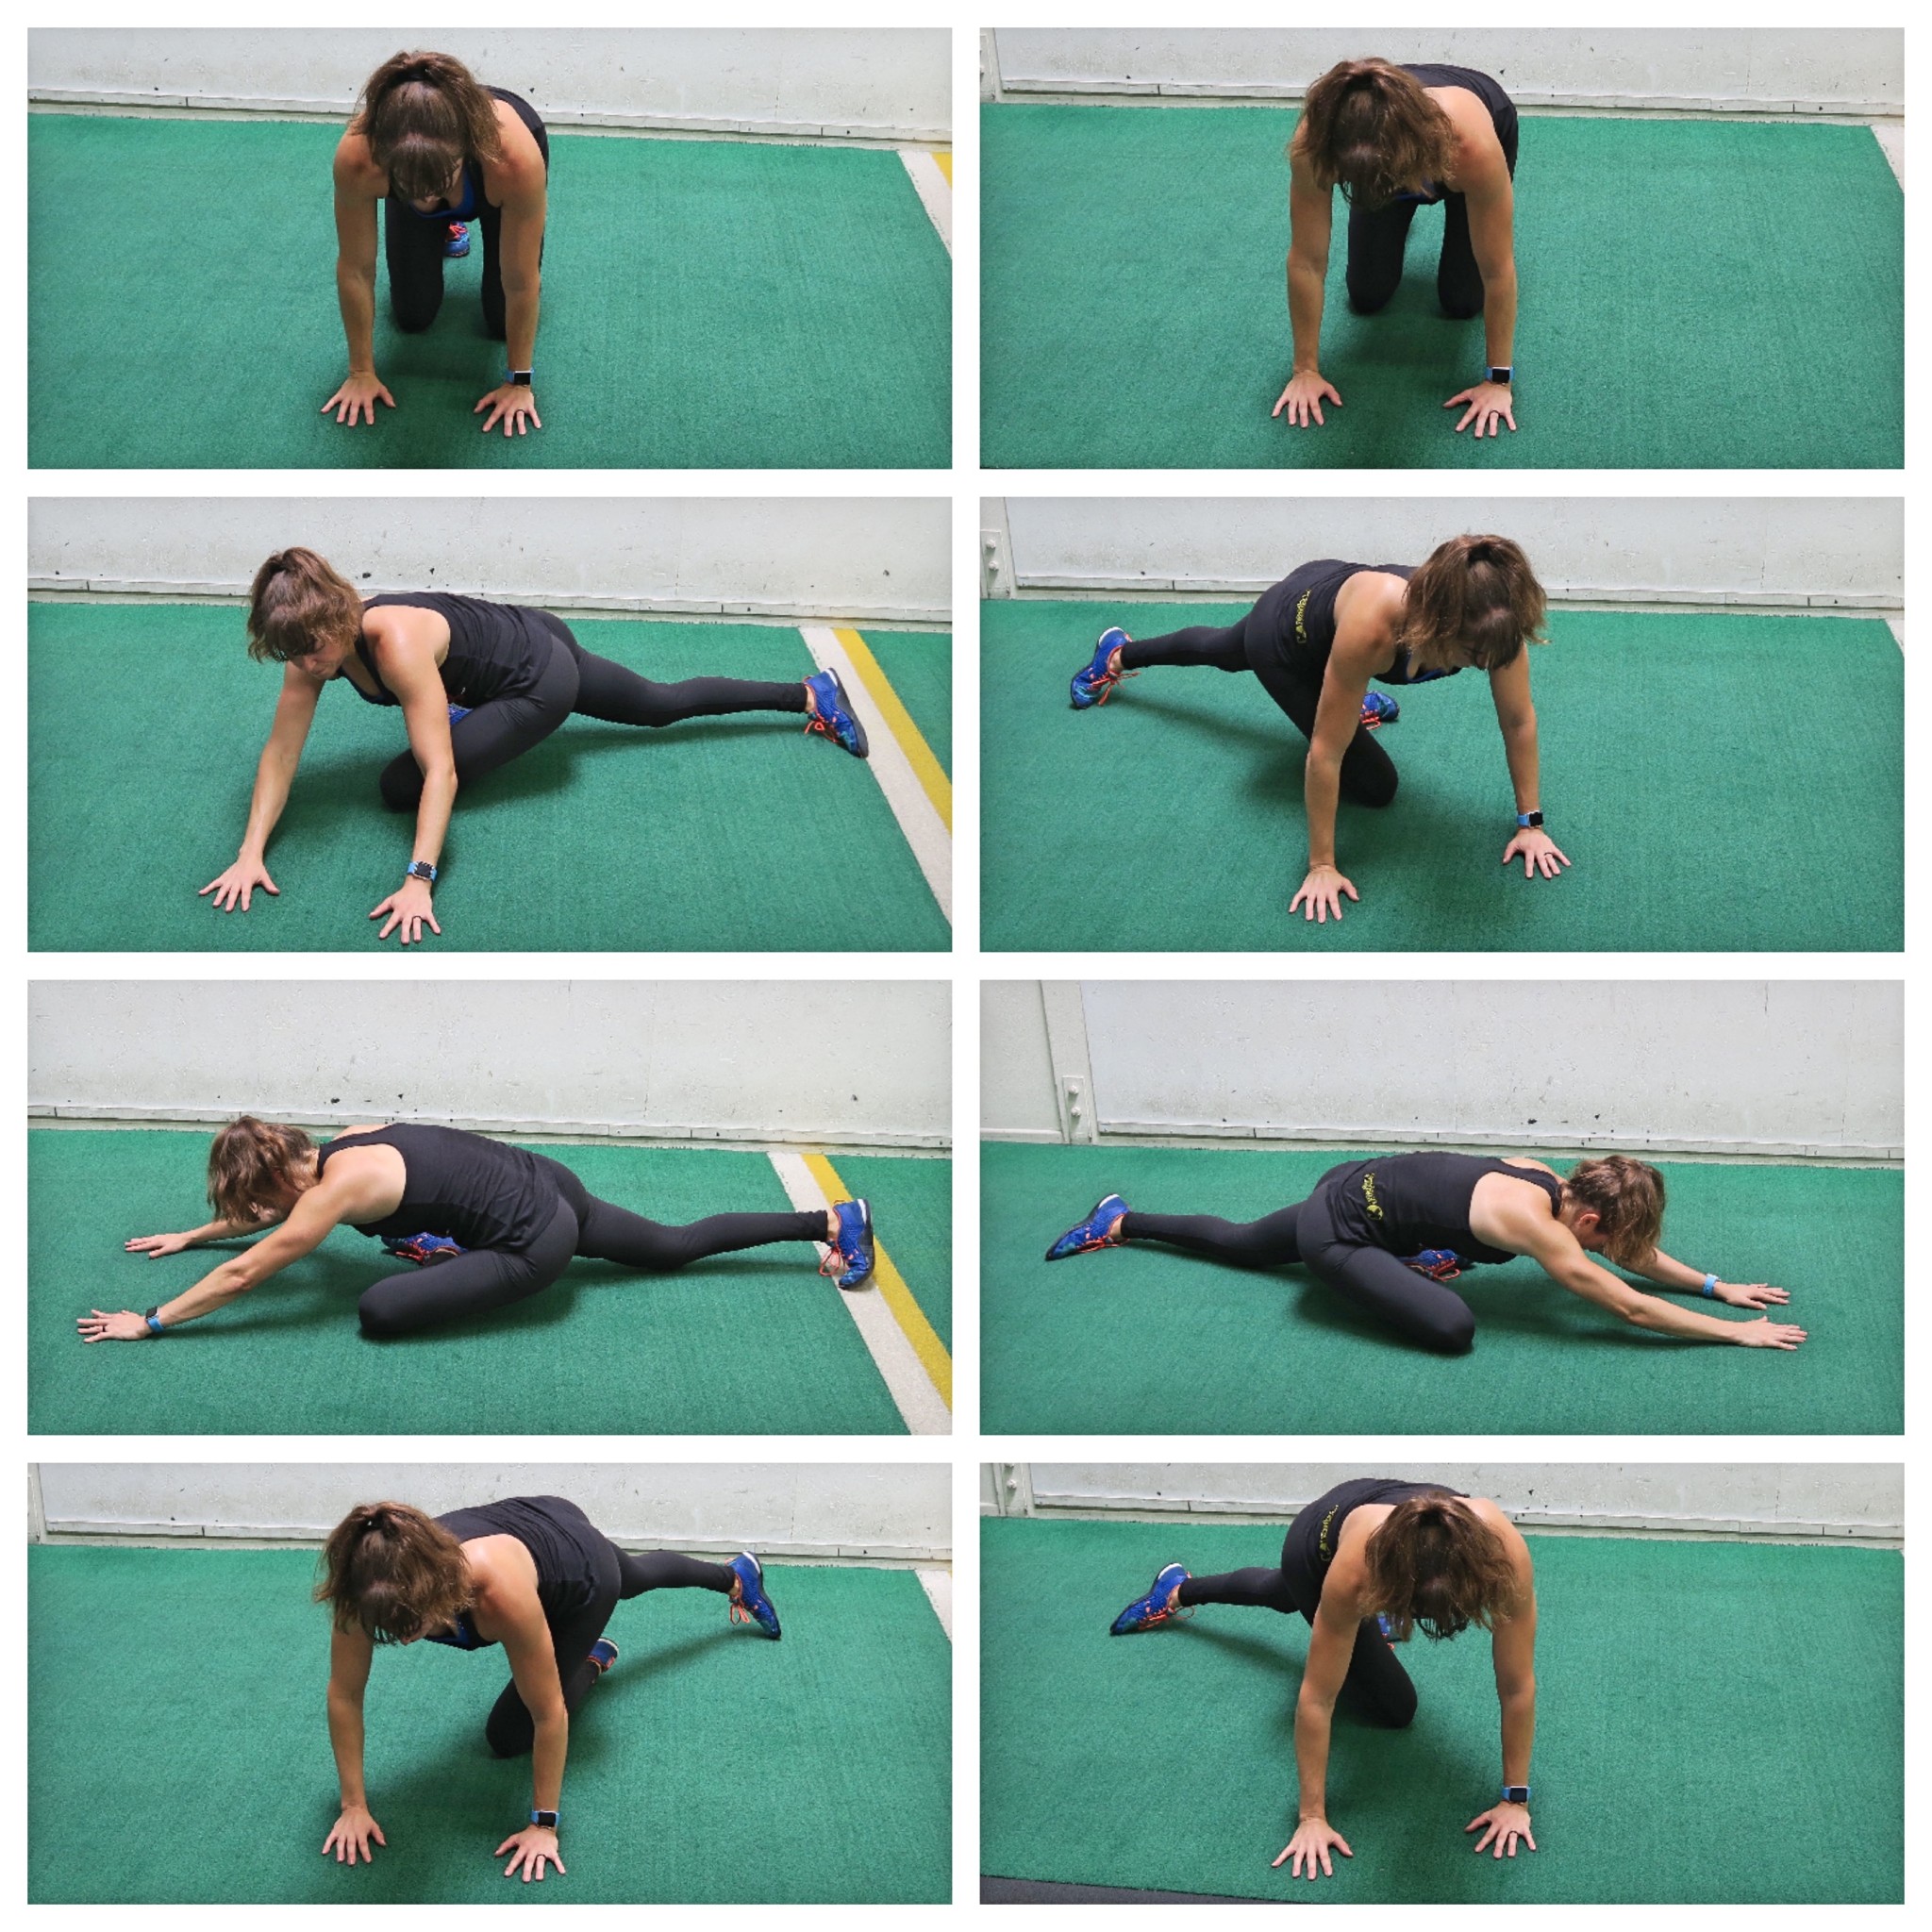
To do the Alternating Pigeon Poses, start on your hands and knees on the ground. Then straighten your left leg out and slide it behind and over your right. As you rotate to slide your left leg over and behind your right, begin to walk your hands over to the left and rotate your body.
You will basically keep your right leg still as you rotate your upper body to the left and slide your left leg over and behind your right to shift into a pigeon pose. Sit back into the right butt cheek as you walk your hands out and pause in pigeon.
Then bend your left knee and walk your hands back around front as you shift back into the quadruped position. Switch sides, walking your hands to the right as you slide your right leg over and behind your left leg. You will rotate your body to sit into pigeon pose on the left side.
Pause in pigeon and really push that left glute back as you square up your hips. Then come back into the quadruped position and repeat on that first side.
Seated Hamstring, Glute and Spinal Twist Complex:
This static stretch is the perfect way to work on your hip and spinal mobility and unwind after a long day. Low back sore, tired and achy? This should be your go-to stretch! Remember with hip mobility, you don’t only want to focus on the hip joint, but also your entire lumbo-pelvic-hip complex!
To do the Seated Hamstring, Glute and Spinal Twist Complex, sit on the ground with one leg out straight in front of you. Pull the foot of the other leg in to your inner thigh so that your knee is pointing out to about 3 or 9, depending on which leg is out straight. Relax that bent leg and let the outside of the leg relax to the ground as you fold over at the hips and reach toward the foot of the straight leg.
Keep that leg straight to stretch your calf and hamstring as you reach and grab your foot. If you can’t reach your foot while keeping your leg straight, grab a towel or jump rope and wrap it around your foot so that you can use that to pull yourself over and stretch your hamstring.
Hold here and breathe for 15-20 seconds and try to relax further into the stretch.
Then release and cross the ankle of the bent leg over your straight leg right above your knee. Place your hands on the ground behind your butt and bend the straight leg to bring your quad and the leg crossed over in toward your chest.
Sit up nice and tall and press your leg and chest closer together to feel a stretch in the outside of your glute. Breathe and hold, trying to get your legs and chest closer together. You can walk your hands forward toward your glutes to help push you up taller. You can also move your foot on the ground in closer to your glutes to bring your leg in closer. Flex the foot of the leg crossed over to protect your knee.
Hold for 15-20 seconds.
Then allow the foot of the leg crossed over to lower down to the side while keeping your bottom leg bent. Place the foot flat on the ground as you lay your bottom leg down on its side.
Then lift the hand on the side you lowered your foot down to and place that arm on the outside of your knee pointing up toward the ceiling. Press off that knee to rotate your chest toward the leg. Sit nice and tall and feel a stretch down your spine. Breathe and hold for 15-20 seconds.
If you are less flexible, you may need to straighten the bottom leg out instead of keeping it bent like it was from the glute stretch.
After holding in the Spinal Twist, release and straighten the other leg out and start on the other side with the Seated Hamstring Stretch.
Camel:
Stretching and activation all in one is what you get with the Camel Bridge. It is the perfect way to stretch out and unlock tight hip flexors while really focusing on your glutes to drive hip extension and even hyperextension.
The bonus of this move is it also opens up your chest and can even stretch your feet a little. Opening up your chest can help improve your spinal extension, which can, in turn, aid in improving your hip mobility.
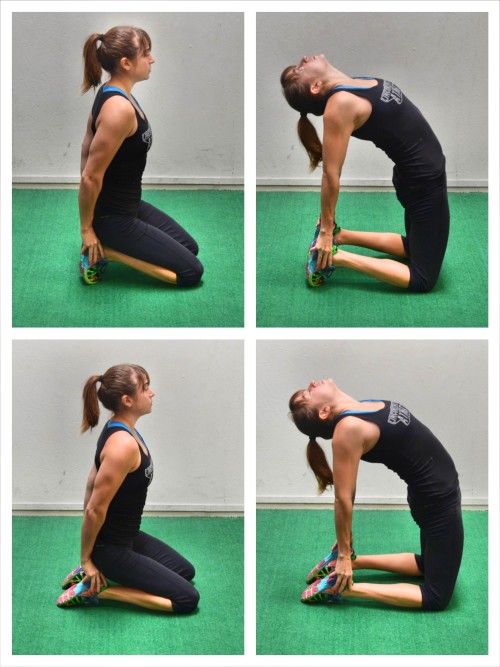
To do the Camel, kneel on the ground with your knees about hip-width apart and your feet flexed. If you point your toes instead, this will make the move harder and require more flexibility (bottom two photos). Also, flexing your feet will stretch the bottom of your feet more while pointing your toes will get your shins more. With either your feet flexed or pointed, sit back on your heels and place your hands on your heels.
Then arch your hips up and away, as you press your chest out and lift your glutes up off your heels. Keep your hands on your heels as you arch away and squeeze your glutes to fully extend your hips. Do not hyperextend your low back. Engage your glutes to stretch out your hips.
Relax your head back and arch as much as you can, getting a nice stretch down your chest, core, hips and quads. Do not let your shoulders shrug and really focus on opening your chest up. Hold for 1-2 seconds and relax back down.
Repeat, arching back up. Or you can also make this a static stretch by simply holding the pose for 15-20 seconds.
If you are less flexible and can’t place your hands on your heels, you can do this stretch with a couch, chair or table behind you.
Activation:
A HUGE part of mobility is stability of our joints. Our body will not allow us to perform a range of motion it doesn’t feel safe or STABLE enough to do. That means that if you want to improve your hip mobility, you also have to improve not only your hip stability, but also the stability of your entire core!
Frog Bridge:
If you want to improve your hip mobility, building stability is also key. That means making sure your glutes are activated and strong! Too often our modern lifestyle leads to underactive glutes. That is why more isolated activation moves to target our glutes before compound lifts are so essential to include!
This Frog Bridge may not be something you want to do in the middle of your gym, but it is one of the BEST glute bridge variations out there, especially if you struggle to feel your glutes activating and your lower back and hamstrings have a tendency to take over.
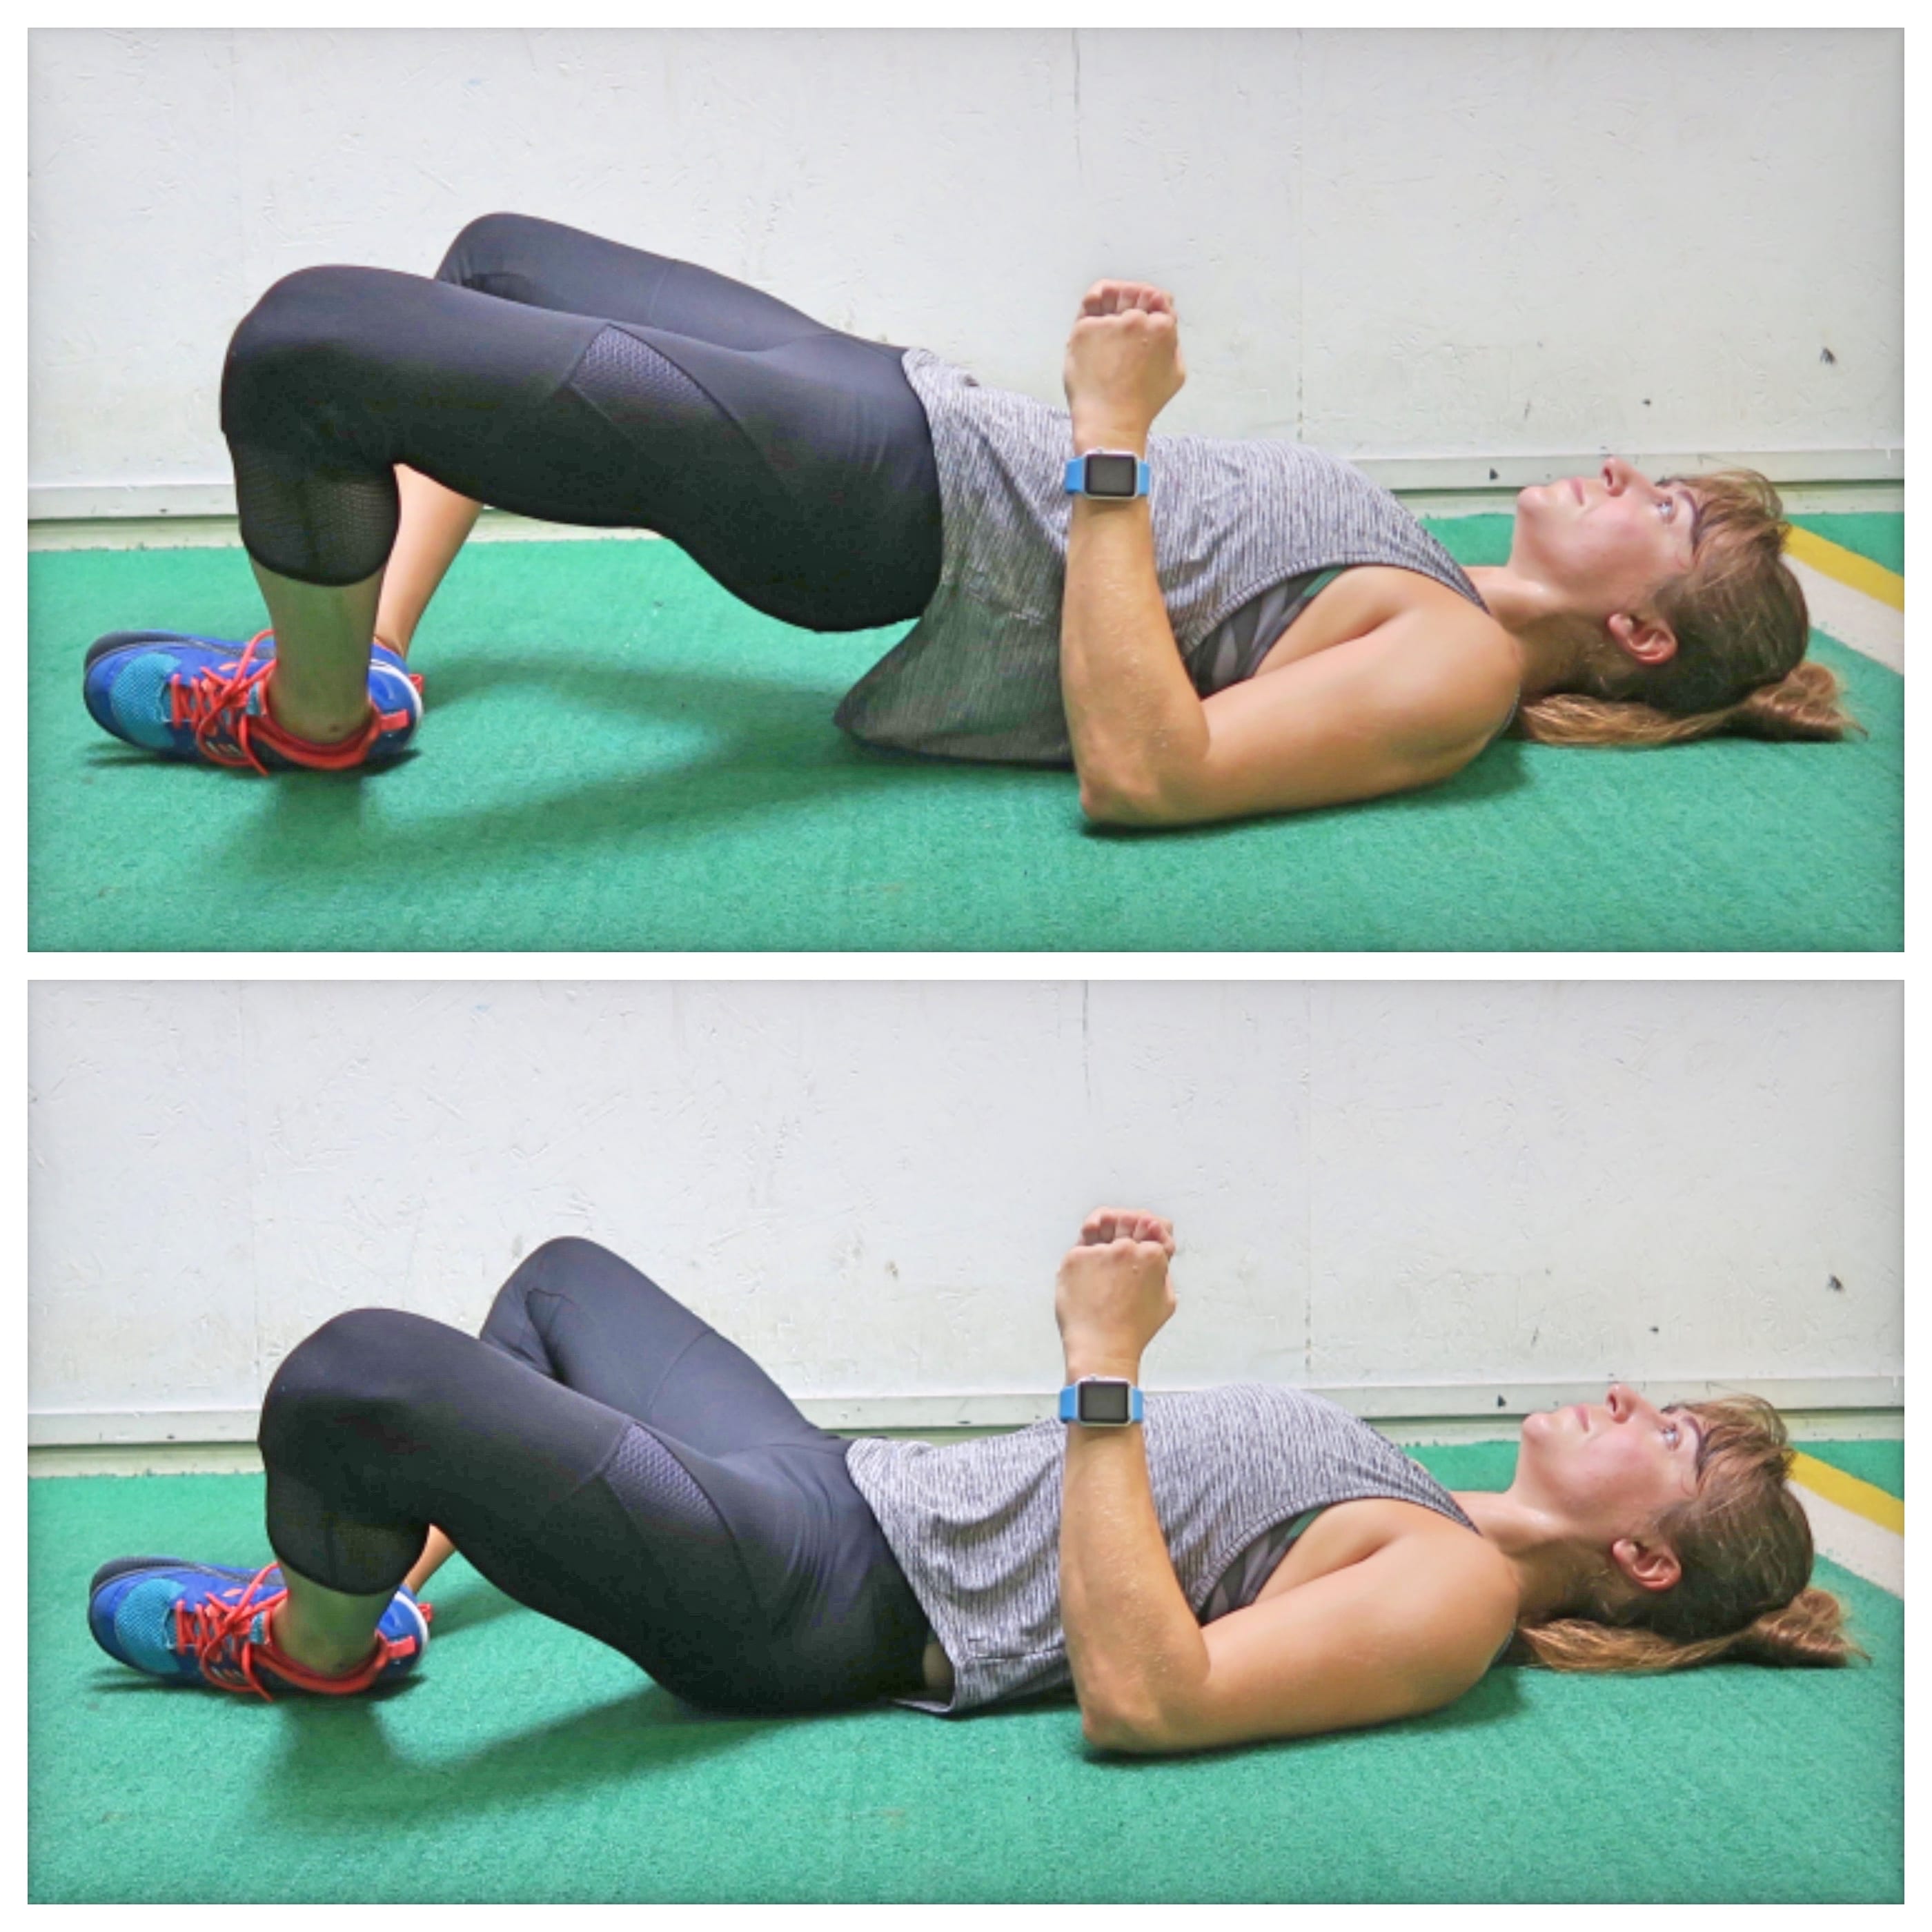
To do the Frog Bridge, lie back on the ground and place the bottom of your feet together, letting your knees fall open sort of as if doing the butterfly stretch. The closer you bring your feet in toward your crotch, the more mobility you need to do the move. Find a comfortable placement and allow your knees to relax open.
Lying on your back with your knees wide and the bottoms of your feet together, bend your elbows to 90 degrees so that only your upper arms are against the ground. You want to really drive your elbows down into the ground as you bridge up.
Driving through your upper arms and the outsides of your feet as you engage your core, bridge up while keeping your knees open. Squeeze your glutes as you lift and really contract them at the top.
Then lower back down and repeat.
Keep your core engaged and really drive down through your upper arms so that you don’t push yourself backward as you bridge back up. Do not let your knees come back together. Keep them relaxed and open.
Concentrate on your glutes working to lift. Make sure to pause and engage your glutes at the top.
If you feel your hips too much, don’t bring your heels in as close to your body.
Pelvic Tilt with Slides:
An often ignored piece of the puzzle to build hip mobility is CORE STABILITY! If our abs, and core intrinsic stabilizers, aren’t engaging correctly and strong, we can not only overwork our hip flexors, but also restrict our hip mobility. When our body doesn’t feel safe and stabile, it will restrict mobility.
That is why the Pelvic Tilt with Slides is such a great move to include. Not only will this move strengthen your posterior chain, specifically your hamstrings, but it will also do it while you work on engaging your intrinsic core stabilizers. This can help you prevent low back, hip and knee pain! It is also an essential move to include if you have Anterior Pelvic Tilt!
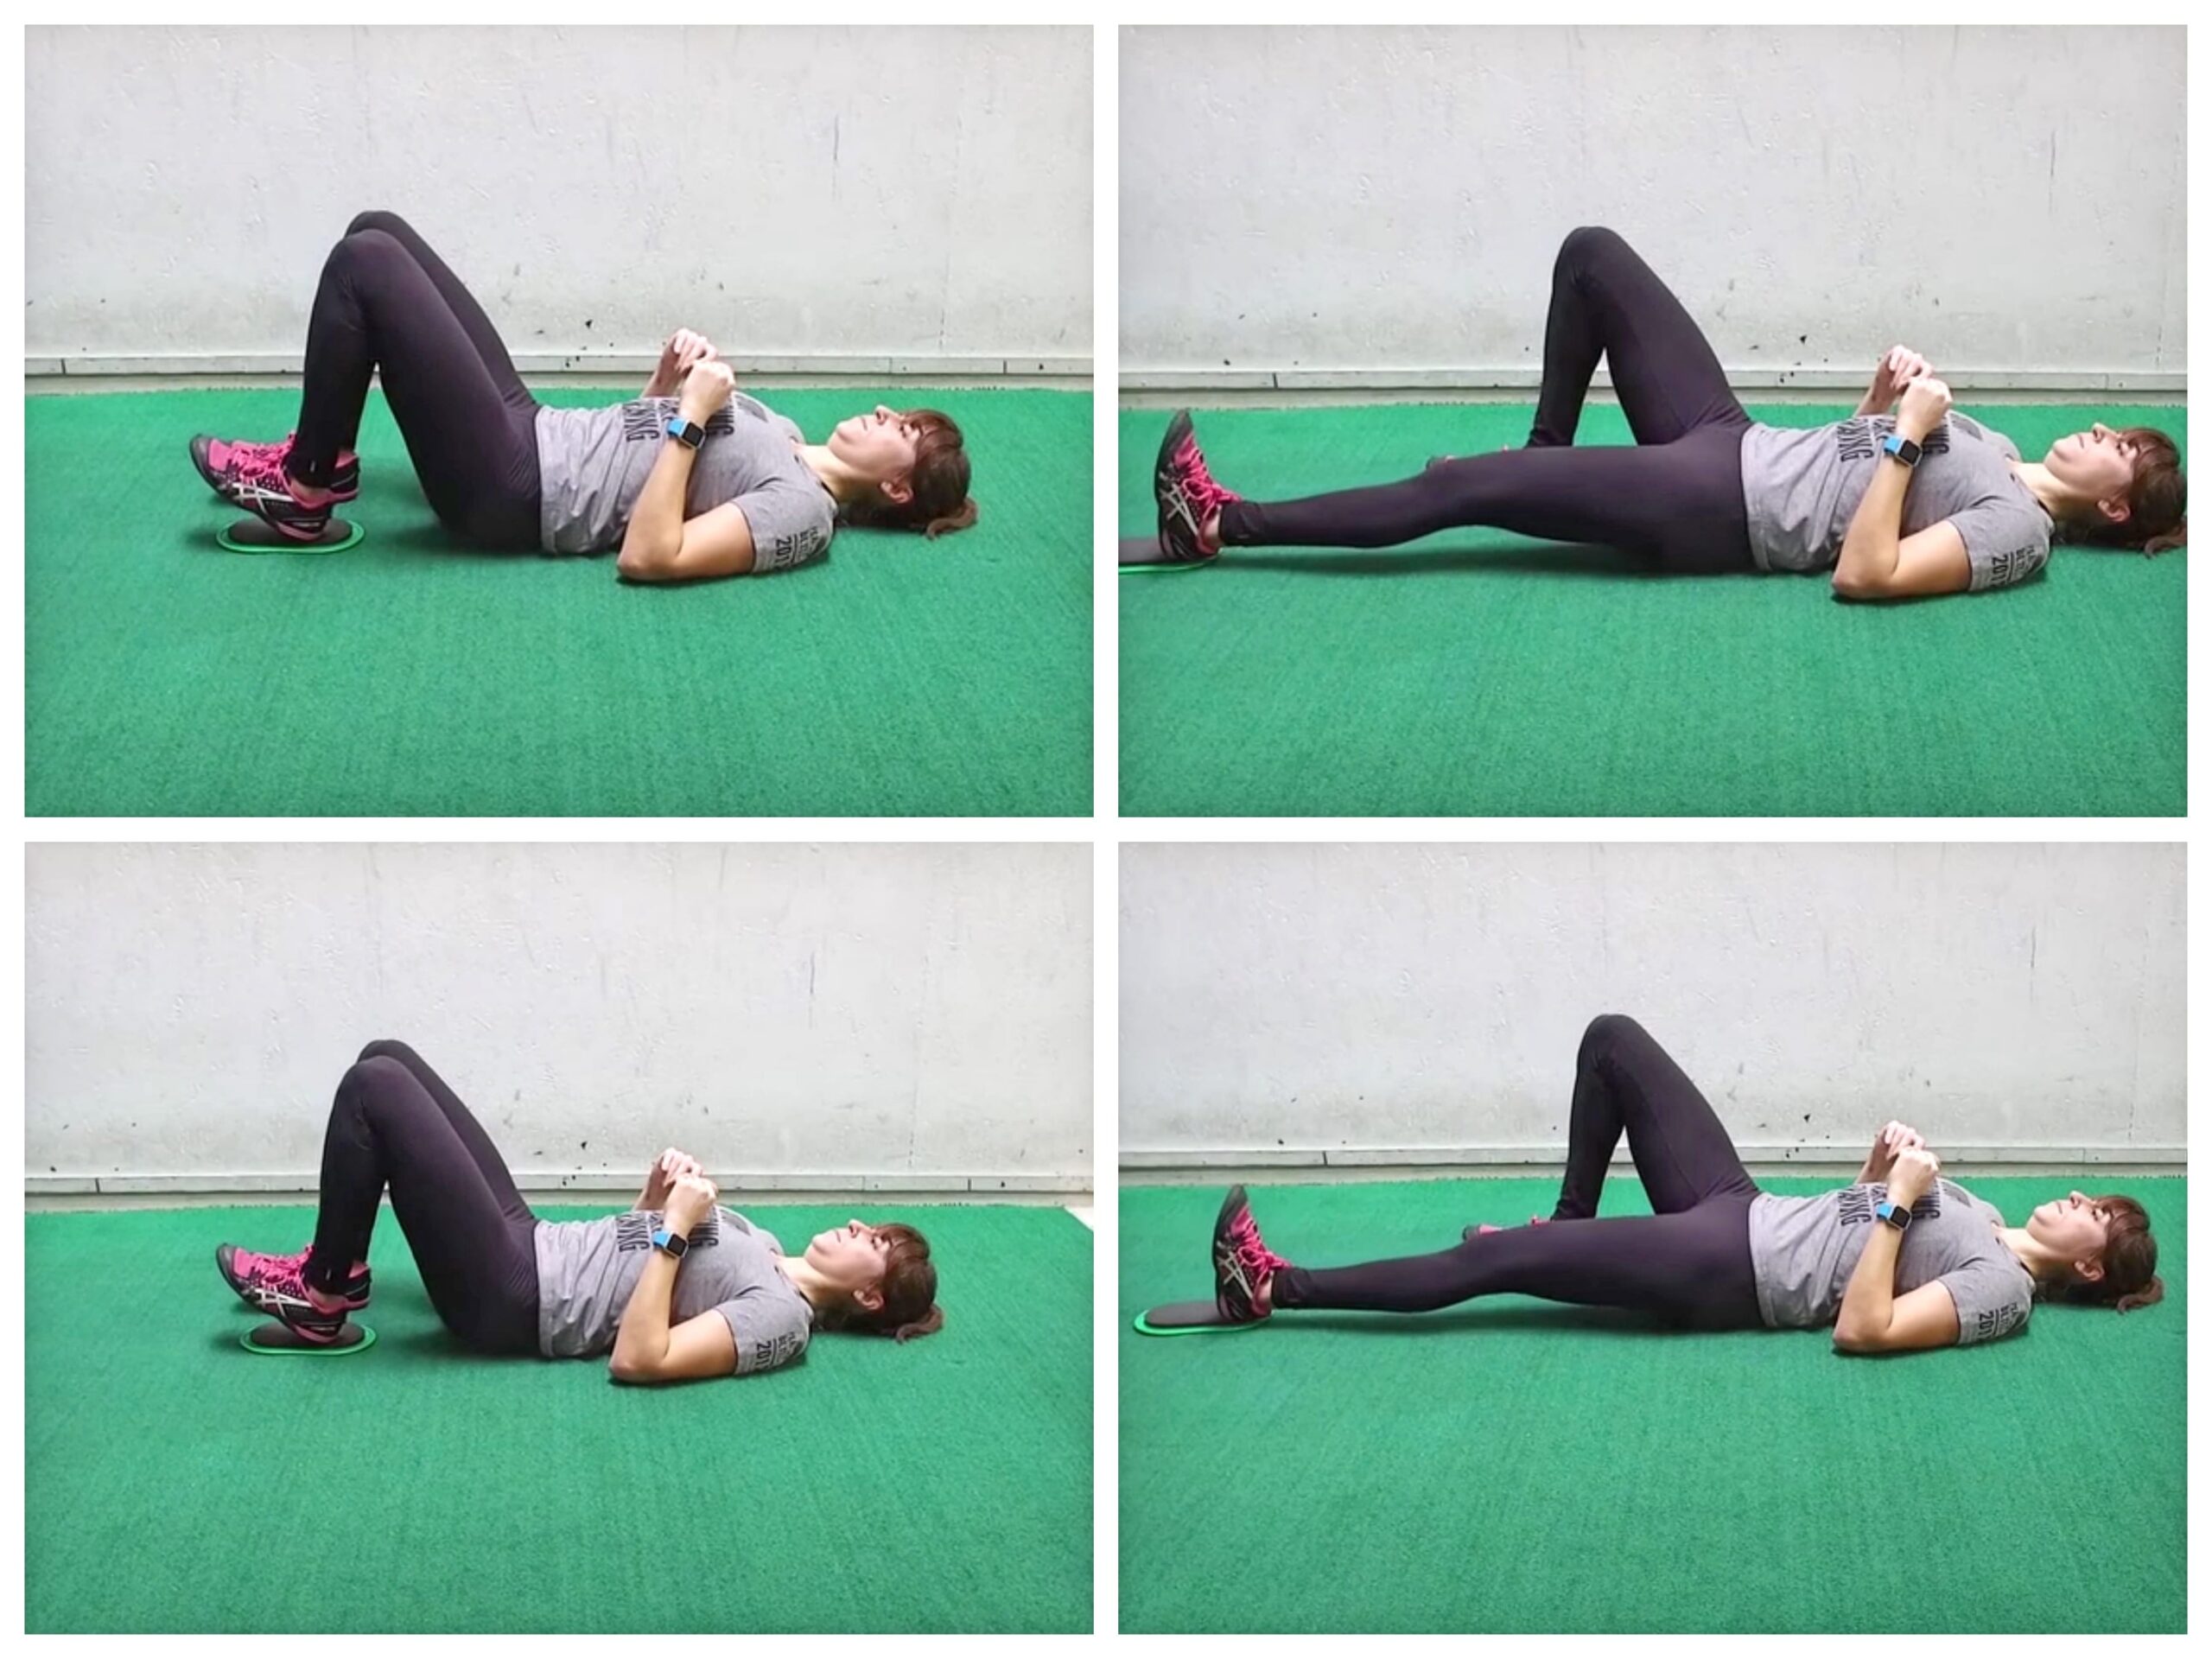
To do the Pelvic Tilt with Slides, lie on your back with a slider under each heel and your heels a few inches from your butt. Feel the space between your lower back and the ground.
Engage your abs to get rid of the space as you press your lower back into the ground. Keeping your abs engaged and lower back pressed down, slowly slide one heel out, straightening your leg out.
Then curl that heel back in, pulling the heel in with your hamstring almost as if you are trying to drive the slider into the ground as you curl it back in. Feel your hamstring work to pull it back in.
Make sure to keep your abs engaged and hips still as you extend out and curl back in. Move slowly so you can focus on the right muscles working. You can complete all reps on one side or alternate sides as you go. Do not let your lower back come off the ground. If you start to feel your abs disengaging or your lower back taking over, pause and reset don’t just push through!
Side Plank Clams:
When you work on building core stability, you have to work your core from every angle. That means making sure you include moves to work on your lateral stability as well.
Often these frontal plane moves are also the perfect way to strengthen your obliques and glute medius. Your glute medius especially is important to activate as it is key to hip stability and preventing not only hip pain, but also low back, knee and Achilles aches and pains!
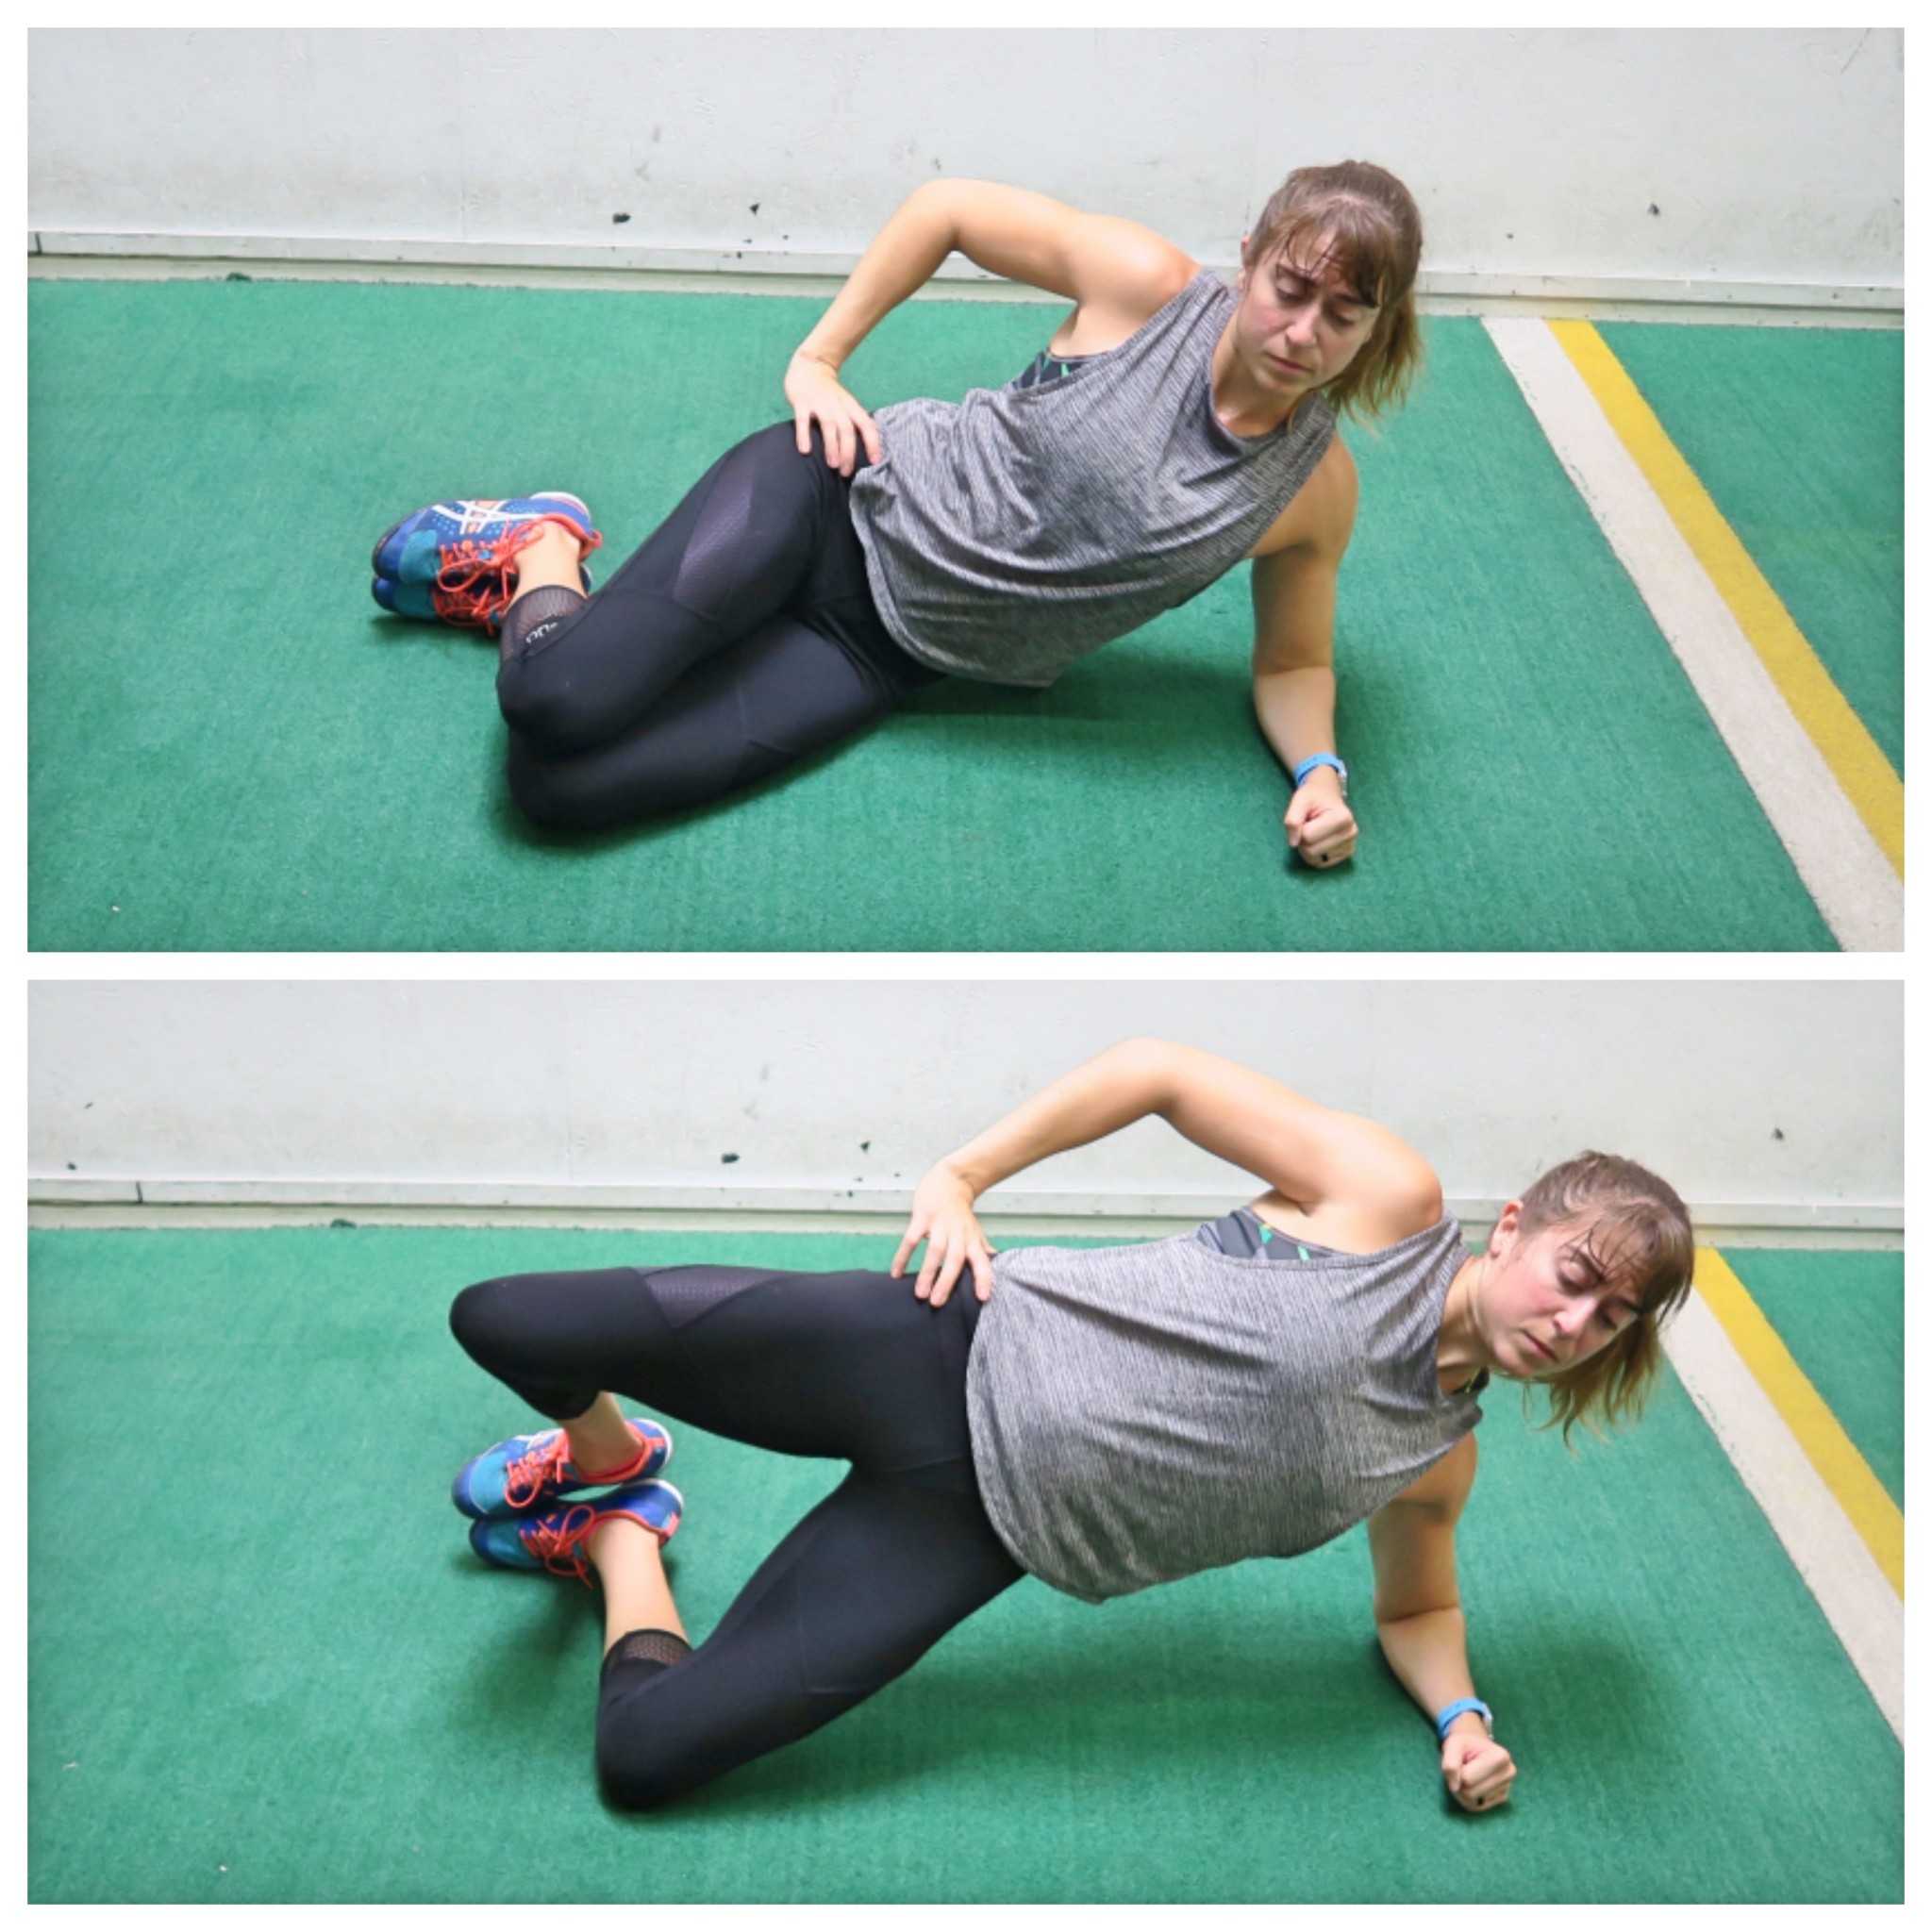
To do the Side Plank Clam, set up on your side propped up on your forearm with your elbow underneath your shoulder. Bend your knees so that your feet and lower legs are behind you. You can place your top hand on your hip or reach it up toward the ceiling, but don’t touch it down to the ground or use it to help you balance or press up.
Propped up on your elbow with your knees stacked, lift your bottom hip up off the ground, driving through your knee and forearm. As you bridge your hips up, lift your top leg up and toward the ceiling, keeping the knee bent. Open up your legs, lifting your top knee toward the ceiling using your glute. Make sure to squeeze your glutes forward as you lift.
As you lower the leg back down, lower your hip back down to the ground.
Repeat, bridging up as you raise your top knee up toward the ceiling. Complete all reps on one side before switching. Also keep your elbow under your shoulder and do not get too spread out. Really focus on bridging and lifting with your glute and obliques.
You can also challenge your glute medius more by adding a mini band right below or above your knees!
Band Hip Thrusters:
Improve your hip extension and activate your glutes with this move. By adding in and using the mini band with the Hip Thruster move, you also help activate your glute medius. And often when we get the glute medius firing correctly, our glute max will also fire better!
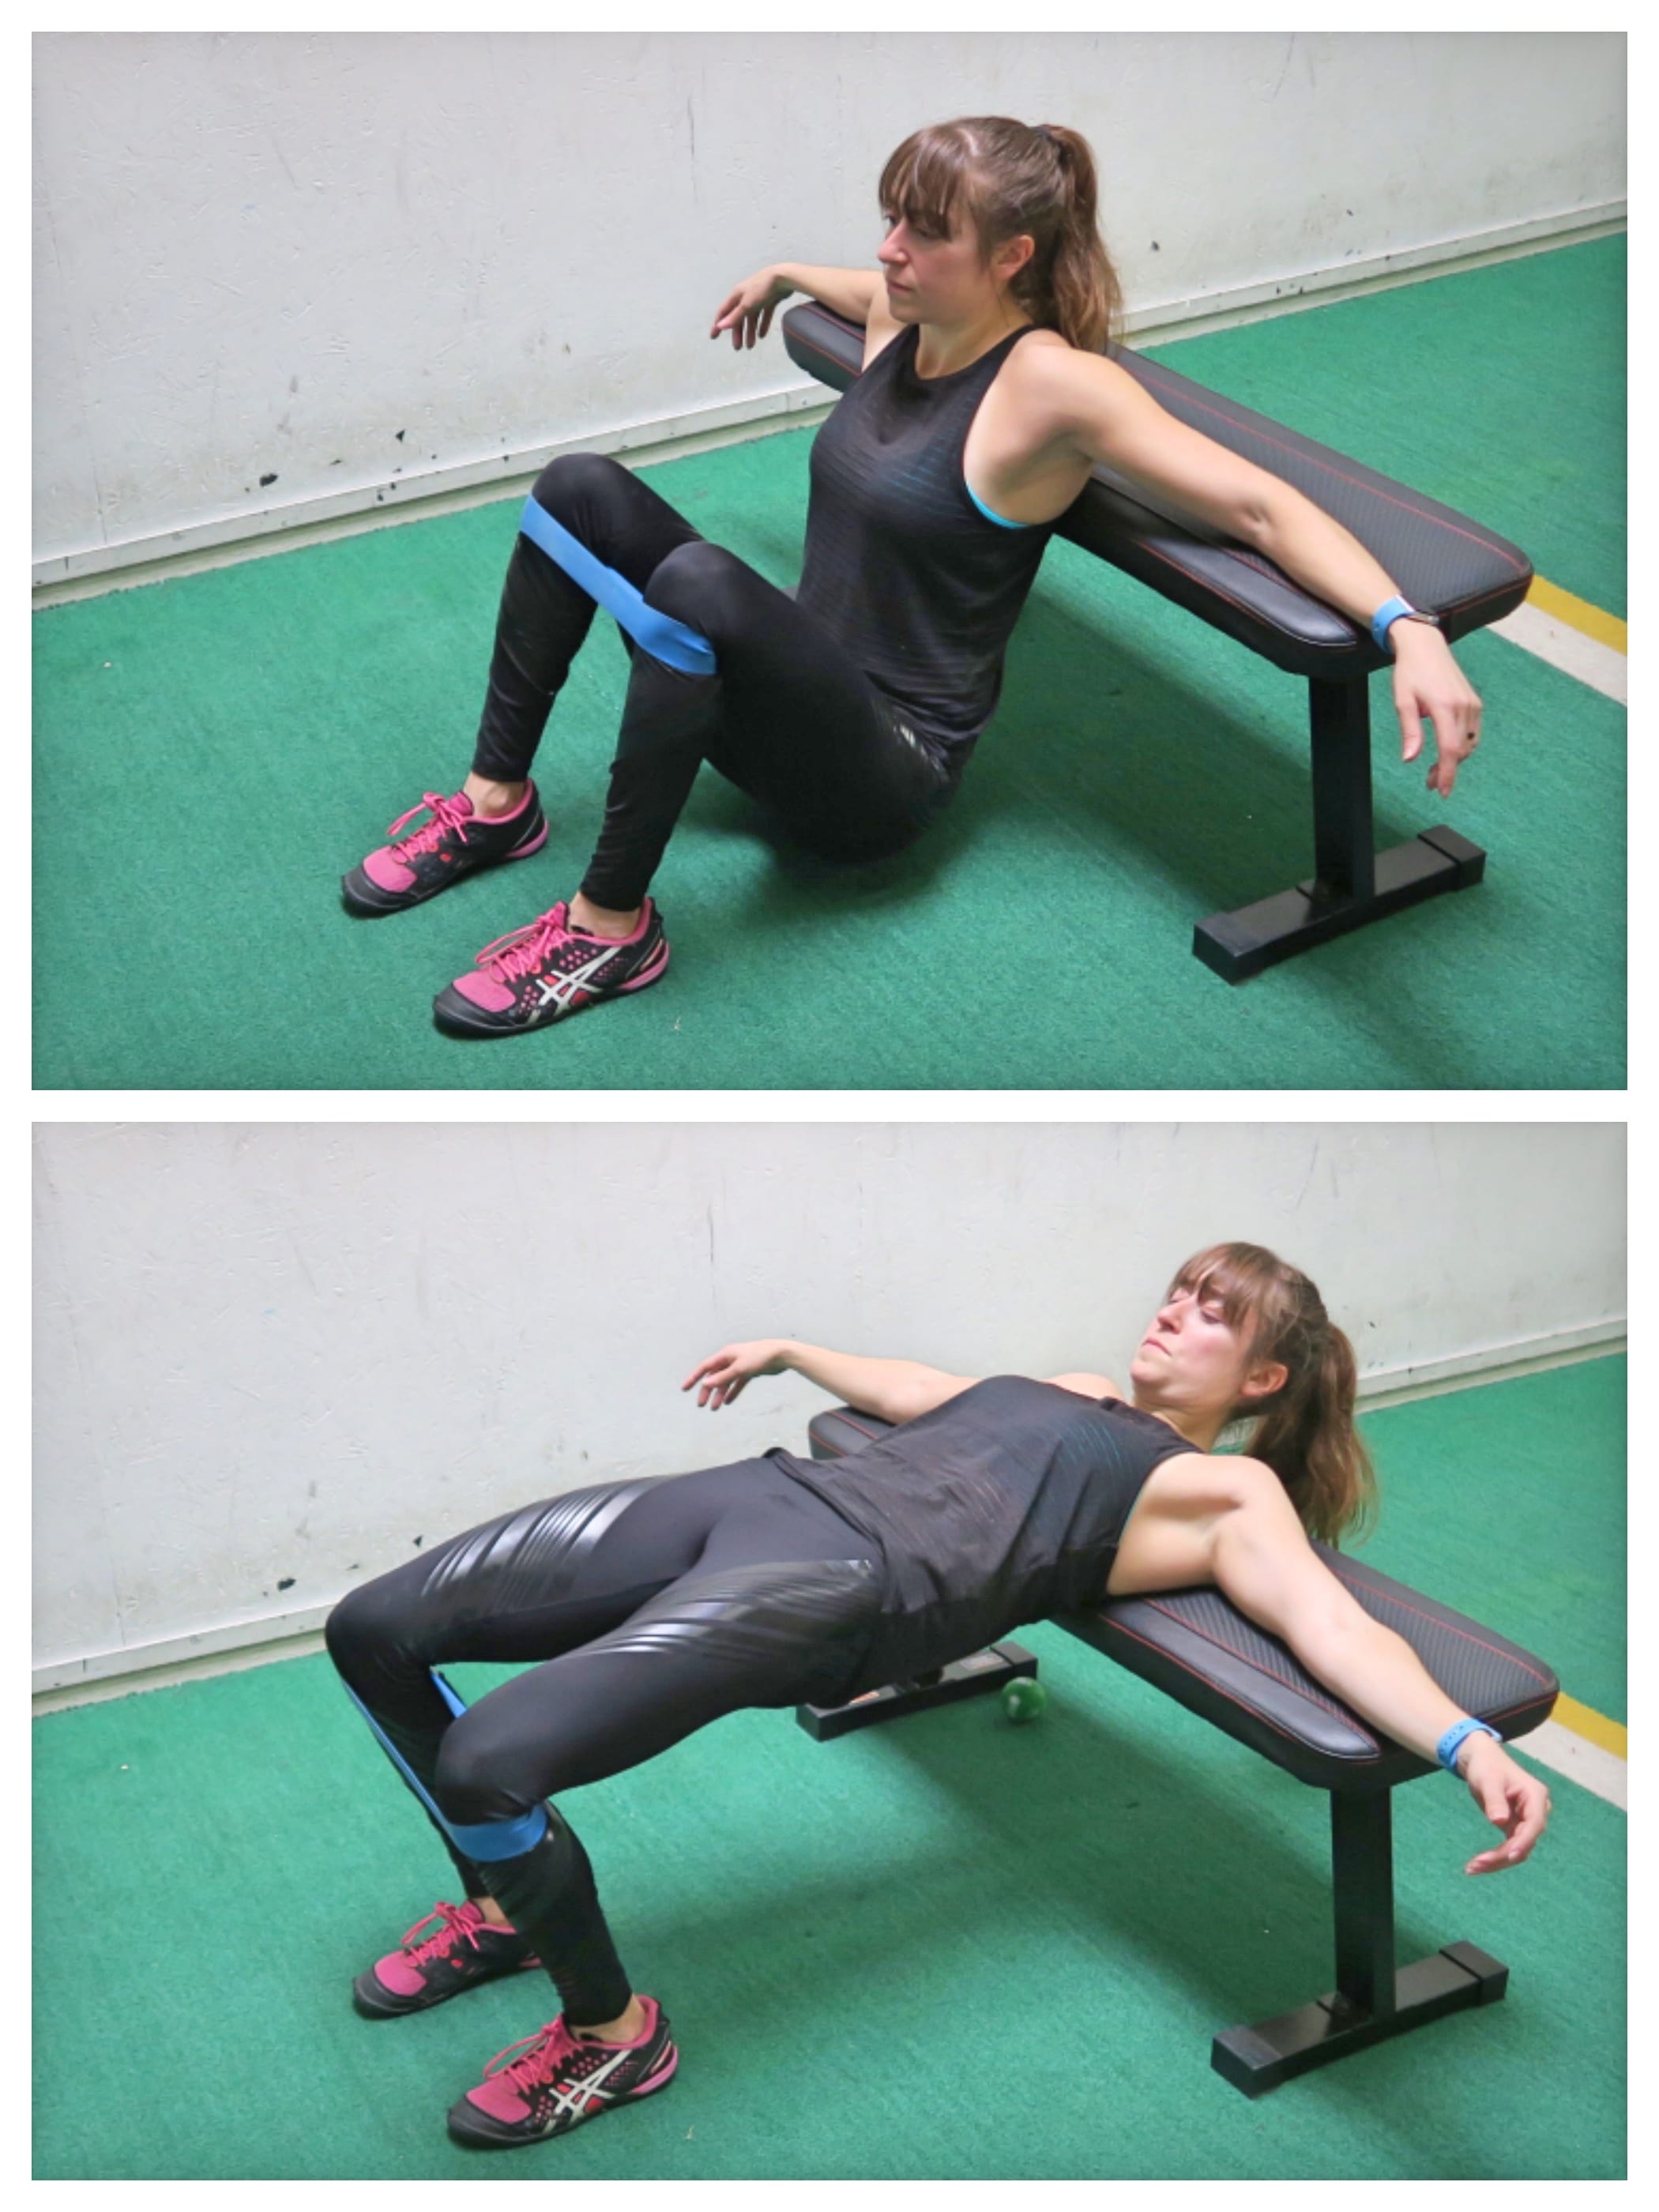
To do Mini Band Hip Thrusters, place the mini band right below your knees with your back on a bench and feet about hip-width to shoulder-width apart. Press out on the band and don’t let your knees cave in. You want your ankles, knees and hips in line throughout the entire move. Don’t even let your knees cave in when you come down.
Then, perform a posterior pelvic tilt (especially if you feel your low back often taking over during bridges) and bridge up, driving through your heels and upper back on the bench. Make sure to press out on the band as you bridge up. Squeeze your butt to drive up and keep your abs engaged with a pelvic tilt so you don’t hyperextend your back at the top. Pause and feel those glutes then lower back down and repeat.
You can even look down slightly toward your knees as you lift up. That slight spinal flexion can help activate your glutes even more!
Calf Raise Circles:
As I mentioned, your feet and ankles are your foundation. Imbalances, immobility or instability there can create compensations and issues up your body and lead to hip pain and injury! That is why it is important we also create strength and stability in our feet and ankles!
The Calf Raise Circles are the perfect way to strengthen your feet and lower legs and help correct any pronation or supination you may have!
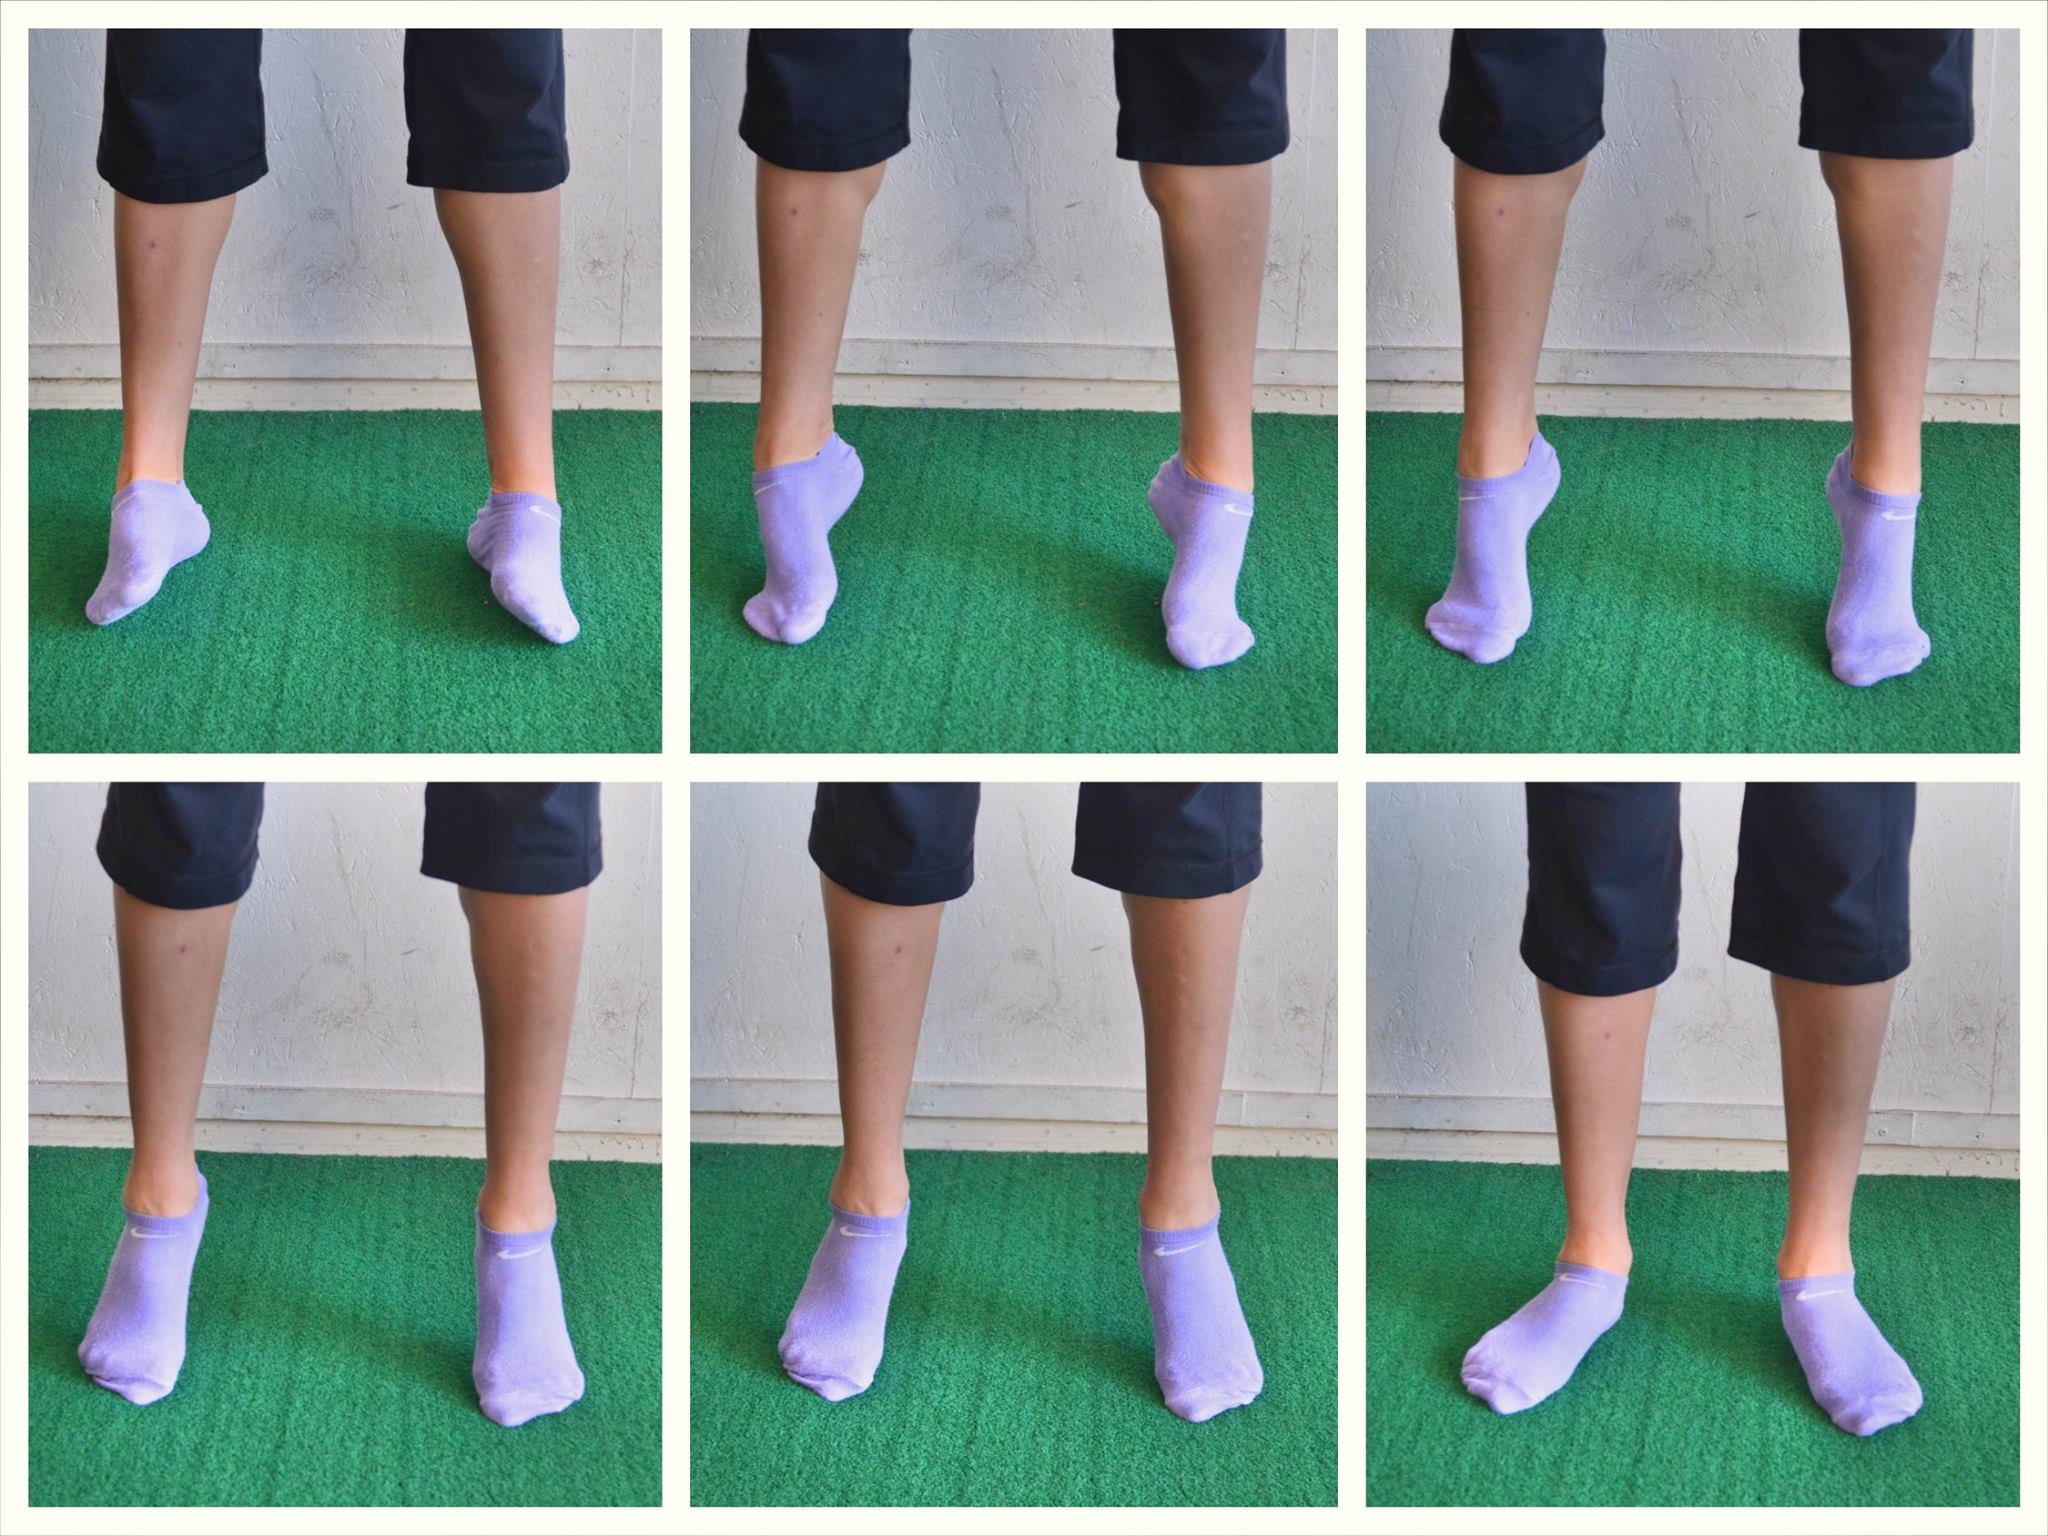
To do Circle Calf Raises, start standing with your feet about hip-width apart. You can face a wall or table if you need a little help balancing so that you can really focus on circling.
Then start to circle by rocking to the outside of your feet. Slowly come forward toward your pinky toe. Then come up onto your toes slowly circling from your pinky toe toward your big toe. Come up as high onto your toes/balls of your feet as you can. Then reach your big toe and circle in toward the inside of your feet as you come down.
Then come back up, this time starting with the big toe and circling out toward your pinky toe before coming down on the outsides of your feet. Repeat circling back up and in. Really feel yourself getting as big a circle as you can while feeling your calves work to help you come up onto your toes. In order to really circle, you may need to lightly keep your hand on the wall.
Plank:
This basic isometric core move is a MUST-DO if you want to prevent injury and maintain a stable strong core. You can literally strengthen everything between your shoulders and your knees with this one basic move.
The key though is focusing on engaging HARDER and creating shakeage over holding LONGER.
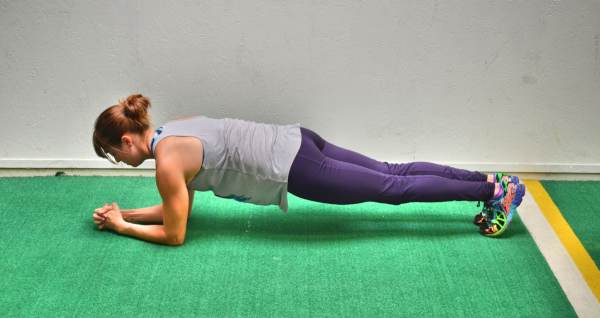
To do the Basic Forearm Front Plank, set up with your elbows underneath your shoulders and your feet and legs together. It is important that your elbows are underneath your shoulders so that you can properly engage your back and the muscles around your ribs to support your shoulders. By placing your feet and legs together, you can engage your inner thighs. Putting your feet wider apart provides you with more stability if you are just starting out.
With your body in a nice straight line, drive back through your heels with your elbows under your shoulders. Then begin to focus on engaging the muscles of your core to create tension and “shakeage.” Think flex your quads, engage your glutes and squeeze your legs together. Think about performing a slight posterior pelvic tilt as you brace your abs and draw them in toward your spine.
Make sure that you aren’t shrugging and that you are using your back and the muscles around your ribs to keep your back flat and shoulders down. With everything engaged and your body in a nice straight line, HOLD. Make sure you don’t feel your lower back taking over or your neck tensing. If you start to have your hips sag or butt go up in the air, regress the move or rest.
Need workouts and a program to get you on track and consistently working to improve your hip mobility? Then check out these two programs I offer below.
- The 21- Day RStoration Program – This works on full-body mobility with 10 minute workouts that include foam rolling, stretching and activation. LEARN MORE –>
- The 28-Day Booty Burner – Need I say more!? hehe It’s under 15 minute Glute Activation workouts that will leave your booty…well…on FIRE! LEARN MORE –>


Incredible content!!! Thank you!
Thank you very much for this information it’s is fantastic ! I have had trouble with my knee and hips , have gone to Doctors and Phisiotherapy but not much help . Have being foam rolling and stretching which has helped . But your information on foam rolling and stretching will be a big help . Than you .
Hi Cory, in the first excersize (Hip Foam Rolling (Psoas and TFL)), what diameter ball do you use? Could you even paste a link? Thanks for the back pain help!
I actually have both the 6 and 8 Posture Ball – https://goo.gl/9CgrSL but prefer the 6
Glad it helps!
Thanks!
These would be so helpful if I didn’t have a knee that I can’t bend OR straighten. That’s WHY my hip hurts. Any suggestions for those of us with knee arthritis? Thanks.
Yes foam rolling of your hips and calves and quads still and glute activation and quad strengthening are key!
How brilliant,thank you.
Thanks!
Hi Cori, on average how long do you spend foam rolling each muscle group? And when you talk about spending more time on the tight spots, how long do you spend? I love all your glute activation exercises, as a cyclist with tight hip flexors this is just what I need 🙂
A video of this would be amazing!
On my YouTube I have a ton of hip mobility videos you should check out 🙂
So usually about 30 seconds at a time, breathing and relaxing. I may come back to an area, but would rather do another session, aka make myself get up from sitting, at another point. Just enough to start relaxing the muscle before the rest of my warm up. If I find when I start to do other moves though that it hasn’t responded, I may then circle back and roll it again. And I usually now don’t roll muscles I know don’t need it unless just doing a relaxing recovery session.
These are some awesome hip mobility tips.
I find that for me personally the dynamic movements work better than static stretches.
I’m so happy my trainer included a lot of hip work into my functional training program.
Going from sitting in a chair all day to primal movements has taken my training to another level.
Static are definitely best used post workout as part of a prehab or a recovery session while dynamic are far better for your warm up. Glad you’re doing a lot of mobility work 🙂
I have ongoing pain outside my knee and cannot seem to get rid of it! I’m training for triathlon and race is in two months, any suggestions on how to tackle this issue so I could get back into running?
I’d recommend seeing someone if you don’t know what is going on for the fastest rehab, but if you aren’t, start foam rolling your peroneal and your TFL. I’ve included links to articles for both:
https://redefiningstrength.com/the-ankle-butt-connection/
https://redefiningstrength.com/dont-ignore-this-nasty-little-sucker-the-tfl-or-tensor-fasciae-latae/
Thanks Cori for the recommendation. I have seen sports therapist and deep tissue massage seems to work for a while but when I try to run it comes back again. I’m good on the bike and when I swim, it is just the running part that is painful. I did the above mobility session this morning and it felt great, how often do you recommend doing a full session of foam roll, stretch and activation? This is all new to me but I think it is a must so want to get it right.
Thank you for the content and advice 🙂
I would do the mobility session as part of every warm up and even for a bit DAILY since you’re close to race day!
This is a standout series of exercises. Thank you ,your dedication is appreciated and helping many.
Glad it helps!
Hi Cori, I wonder if you would have any suggestions about working toward a 90-90 stretch.
Are you doing TFL and piriformis foam rolling? The pinwheel progression? Those are great!