WARM UP
Stretch and Roll Out:
Calves
Hamstrings
Quads
Groin
Hips/Glutes
Chest/Shoulders/Traps
Back/Lats
ACTIVATION
After stretch and rolling, complete 2-3 rounds of the circuit below to get your core activated and working before you start lifting.
CIRCUIT:
10 reps per side Straight Leg Fire Hydrants
10 reps per side Donkey Kicks
10 reps per side Bird Dogs
WORKOUT
Complete 5-8 rounds of the circuit below. Do the 30 second hold then move right into reps. Once you complete the reps move right into the next hold. If the move is unilateral (like the Warrior III) do the hold on one side then the reps on one side before moving on to the hold on the other side and then the reps. Do both sides before moving on to the next move. Rest 1-2 minutes between rounds of the circuit, but do not rest between exercises or the hold and reps.
CIRCUIT:
30 seconds per side Warrior III Hold
10 reps per side BW Single Leg Deadlift
30 seconds Scapular Wall Hold
15 reps Scapular Push Ups
30 seconds Glute Bridge Hold
15 reps Glute Bridges
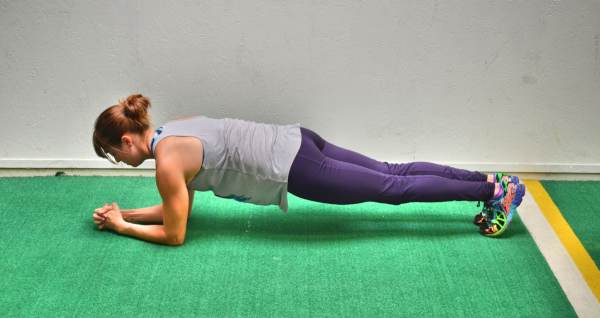
30 seconds Forearm Front Plank Hold
10 reps per side Plank with Reach Out and Back
COOL DOWN
Stretch and Roll Out:
Calves
Hamstrings
Quads
Groin Hips/Glutes
Chest/Shoulders/Traps
Back/Lats
NOTES:
You can also do the Glute Bridge as a Single Leg Glute Bridge. If you do the Single Leg, hold on one side then do the reps before holding on the other side. Focus on the correct muscles working as you hold and then do the reps.
EXERCISE DESCRIPTIONS:
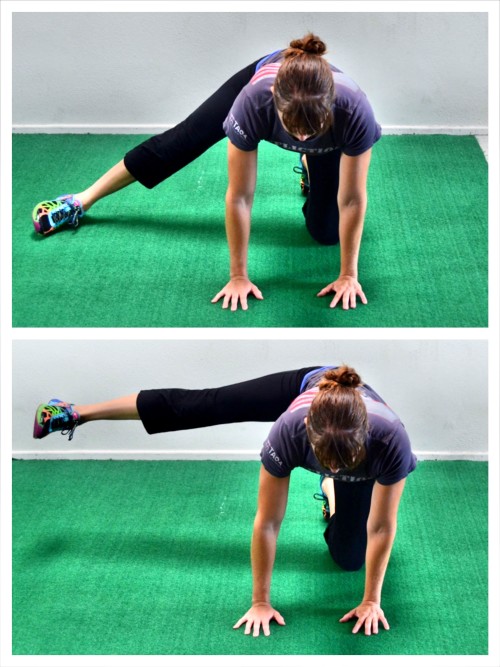
Straight Leg Fire Hydrants – To do the Straight-Leg Fire Hydrant, set up like you would for the Bent-Knee Fire Hydrant. Start quadruped on the ground with your hands under your shoulders and your knees under your hips. Flex your feet. Straighten your left leg out to the side in line with your hip. Then, keeping your arms straight, lift your straight left leg up toward the ceiling. Squeeze your glute as you lift. Also, make sure to keep your arms straight. Do not bend your arms and lean away just to get your leg higher up. Hold for a second or two at the top then lower back down. Tap your foot down and repeat. Keep your leg straight as you lift and do not let it start to float back behind you. You want to make sure you are lifting basically straight up to the side. Complete all reps on one side before switching.
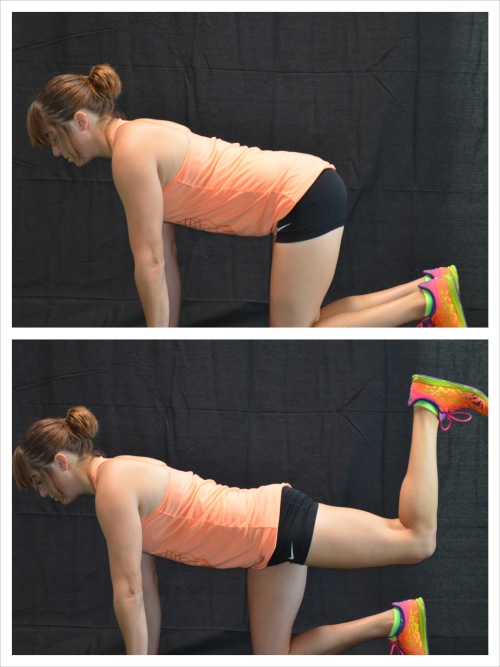
Donkey Kicks – To do the Donkey Kick, start on your hands and knees with your hands under your shoulders and your knees under your hips. Flex your feet. Keeping your arms straight and your core engaged, drive your right foot up and back toward the ceiling, keeping your right knee bent to 90 degrees and your foot flexed. Keep your core braced and squeeze your glutes as you kick your heel up and back. Do not let your right knee flare out as you lift or your low back arch. Try to get your quad to about parallel to the ground. Only kick up higher if you are extending from the hip. You do not want to hyperextend your low back just to kick up higher otherwise you will start working your back instead of your glutes. Hold for a second or two at the top and lower back down. To make the move more challenging, hold for a bit longer at the top. You can also add weight to this move to make it more challenging by putting on an ankle weight or even using a resistance band. Complete all reps on one side before switching. Make sure you don’t rock forward and bend your arms just to kick up higher as you perform the move.
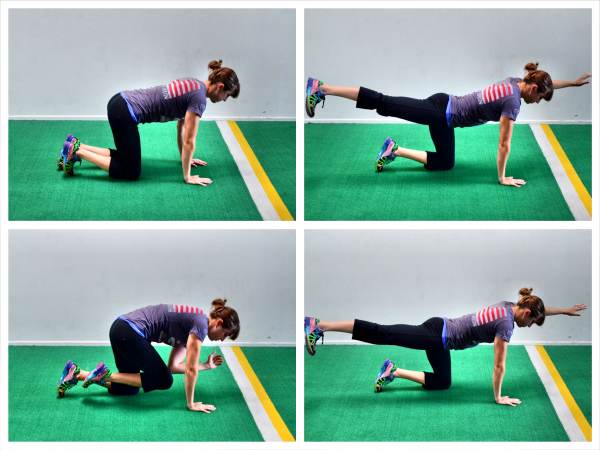
Bird Dogs – To do the Basic Bird Dog, start on your hands and knees on the ground with your hands under your shoulders and your knees under your hips. Flex your feet. From here you are going to kick your right leg back as if doing the Straight Leg Kickback as you raise your left arm out toward the wall in front of you. Kick your leg straight out behind you as if kicking it into the wall while you reach the other arm out straight toward the wall in front of your head. Don’t worry about lifting your leg or arm up high. Really try to drive your arm and leg toward opposite walls as you keep your core engaged and squeeze your glutes. You do not want to hyperextend or arch your low back just to reach your arm or leg up higher. Also make sure to keep your chest and hips square to the ground as you reach out. Hold for a second or two at the top then, as you lower your arm and leg back down, bend them and bring them together under your body. Try to touch your elbow to your knee before extending back out. Complete all reps on one side before switching to the other side. All reps should be done in a slow and controlled manner. You should even hold for a second or two at the top of the move. A longer hold at the top will make this move even more challenging.
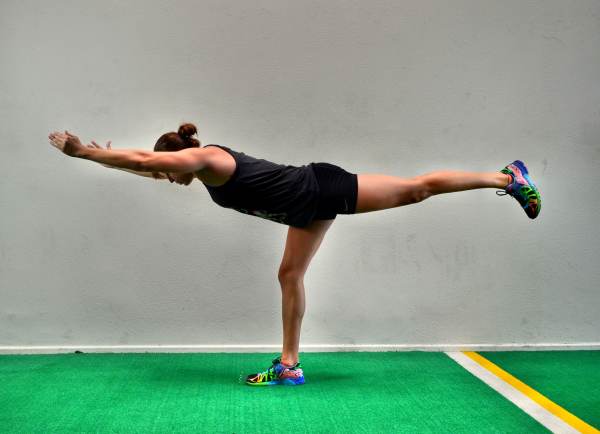
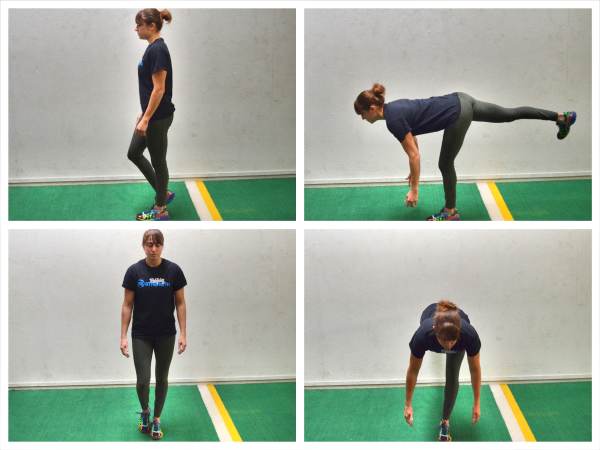
Warrior III Hold – To do the Warrior III pose, start standing tall with your feet together. Then shift your weight so you are balancing on one foot with the knee slightly bent. Hinge over at the hips, leaning your torso forward as you push your butt back and lift your back leg straight toward the wall behind you. Pretend you are driving the foot of the lifted leg straight back into the wall behind you as you reach your head toward the wall in front of you. You want a nice straight line from your head to your raised heel, making sure to keep your back flat and your core tight as you hold this hinged over position. You can then reach your hands overhead in front of you, out to your sides or back toward your heels. Hold in this position and feel your foot working to grip the ground. Try to straighten your standing leg as much as possible to work on improving your mobility while your glutes and core work to keep you balanced. Make sure you do not lock the standing leg out though as you hold. Also make sure your hips don’t rotate open. Squeeze the glute of the lifted leg to keep your hips level. Do not let your back round or your other foot touch down as you hold. Beginners may need to reach back toward their foot instead of out in front of them or they may even not be able to hinge over as far and raise their back leg as high. Using a wall can also help beginners. Stand with a wall behind you and when you hinge over have the lifted foot lightly touch the wall behind you to help you balance.
BW Single Leg Deadlift – Stand up nice and tall, balancing on your right leg with your knee slightly bent and your left toe lightly touching the ground. Your arms should be hanging down by your sides. Then lift your left leg back toward the wall behind you as you hinge over, keeping your back flat. As you hinge over, extend your arms down toward the ground. Make sure to sit your butt back as you hinge over and not simply lean forward. Your weight should shift slightly toward the heel of your standing leg although you do not want to complete rock backward or you will lose your balance. Do not reach your arms toward the ground and let your back round. It doesn’t matter if you touch the ground, just extend your arms down toward it as far as you can without rounding or “squatting.” Your standing knee should be soft but isn’t going to bend extra as you hinge over. Hinge over as far as you can with good form and then drive through that standing heel to come back up to standing. Feel your glutes work to bring you up nice and tall. Squeeze your glutes at the top and repeat, hinging back over on the same leg. Only tap your other foot down at the top if you need to. Also, do not use the other foot to help you come back up to standing. Slow down the tempo of the movement to make it harder. You can also add weight to the movement to make it harder.
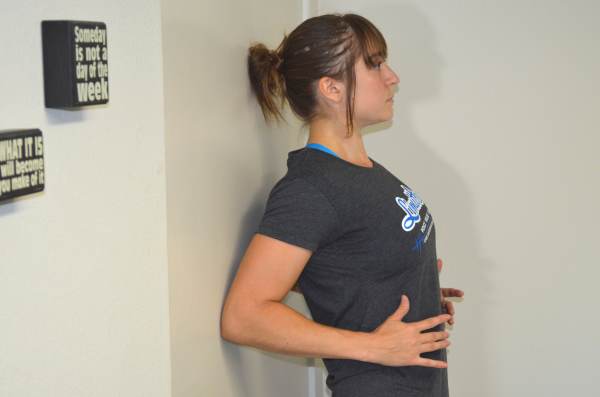
Scapular Wall Hold – For the Scapular Wall Hold, and variations, check out this Scapular Wall Hold post.
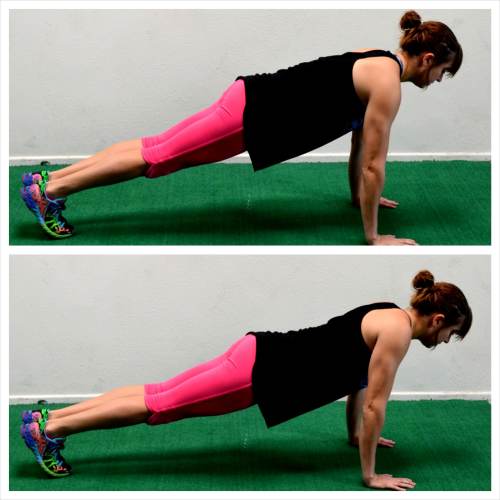
Scapular Push Ups – Set up in a high plank position with your hands under your shoulders and your feet together. Your body should be in a nice straight line from head to your heels. Then press your chest out and pinch your shoulder blades together. Your hips should not drop toward the ground and your elbows won’t bend. The Scapular Push Up is a very small range of motion. All you are doing is pinching your shoulder blades together and then relaxing. Make sure you keep your head in line with your spine and don’t tuck your chin as you complete your reps.
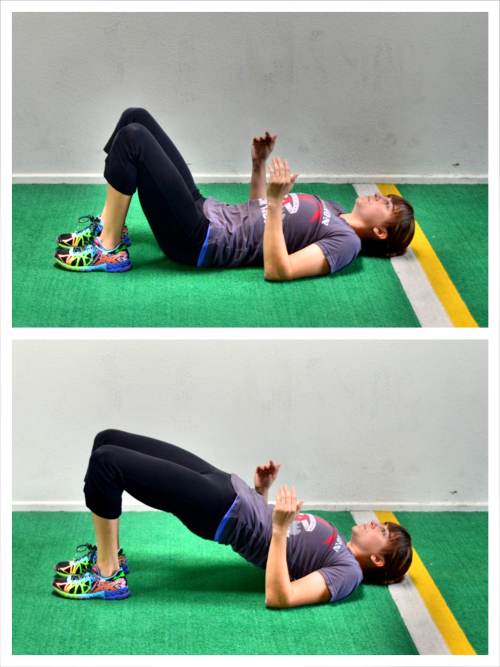
Glute Bridge Hold/Reps – To do the Basic Glute Bridge Hold, bend your knees and put your feet flat on the ground just close enough that you can graze your heels with your fingertips when you stretch your arms down by your side. Your feet should be about hip-width apart. You can change up how far your heels are from your butt. If they are further out, you may engage more hamstring. While keeping your heels in closer to your butt will isolate more glute. Then bend your elbows to 90 degrees so that only your upper arms are on the ground. Drive up through your heels and upper back and arm to lift your glutes up off the ground. Drive your hips up as high as possible, squeezing the glutes hard. Keep your belly button drawn in so you don’t hyperextend your back. Do not push backward off your heels. Make sure you are driving straight up almost as if driving your knees forward over your toes. Also, make sure that your knees aren’t caving in or falling open. Squeeze your glutes and hold at the top. Concentrate on feeling your glutes work. Don’t just go through the motions. Actually think about the muscles that should be working! To do the reps, simply lift and lower instead of holding at the top.
Forearm Front Plank Hold – To do the Basic Forearm Front Plank, lie on your stomach and bend your elbows so that you’re propped up on your forearms. Your legs should be straight out behind you with your feet together. Flex your feet and lift up onto your forearms and toes. Your elbows should be stacked under your shoulders and your feet should be together. On your forearms and toes, create a nice straight line with your body from your head to your heels. Make sure that in this position you are concentrating on tucking your pelvic to engage your abs as you squeeze your glutes and quads to keep your legs straight. Make sure that you are also squeezing your legs together as you hold and driving back through your heels. Do not push forward onto your toes. Also, do not let your chest sag toward the ground or your upper back round. You want a nice flat upper back. While holding, don’t just go through the motions. Assess whether the right muscles are engaged and even consciously activate them. If you begin to shake, you know you are engaging the muscles. Hold in this position for a set amount of time or until your form starts to break down. If you feel this in your low back, assess whether or not you are performing a proper Pelvic Tilt. For instructions on how to do the Pelvic Tilt, check out this post.
Plank with Reach Out and Back – To do the Plank with Reach Back and Out, set up in a Front Plank from your hands and toes with your hands under your shoulders and your feet about hip-width to shoulder-width apart. For this move, you will want your feet wider to create a more stable base. Beginners can do this move from their knees. Then from the Plank position, reach one hand back and across toward the opposite ankle, pushing your butt back and up toward the ceiling as you reach. Then reach back forward and out toward the wall in front of you, dropping your hips back into a nice plank position. Do not drop your hips too low and feel your low back engage. Keep your core tight to protect your low back as you come back into that nice plank position. Reach back and across with the same hand until all reps are complete on that side.
