Shoulders sore and achy?
Try These 4 Exercises For Shoulder Aches And Pains!
Improve your posture, alleviate shoulder aches and pains and help prevent continued overuse of the small muscles of your shoulder that could lead to injury!
We sit hunched over our computers, texting on our phones…heck even sitting in the car…
And this forward flexion can cause imbalances and compensations that lead to injury. This forward flexion causes some muscles to become tight and overactive and others to become underactive.
What this means is that often the small muscles of our shoulders that SHOULDN’T be carry the load, end up burdened with it.
And because they aren’t really strong enough, they become overloaded, which can cause injury.
These 4 moves will help you loosen commonly tight muscles and even work to get the correct muscles engaged and working so you can restore proper shoulder mobility!
4 Must-Do Exercises To Prevent And Alleviate Shoulder Aches And Pains:
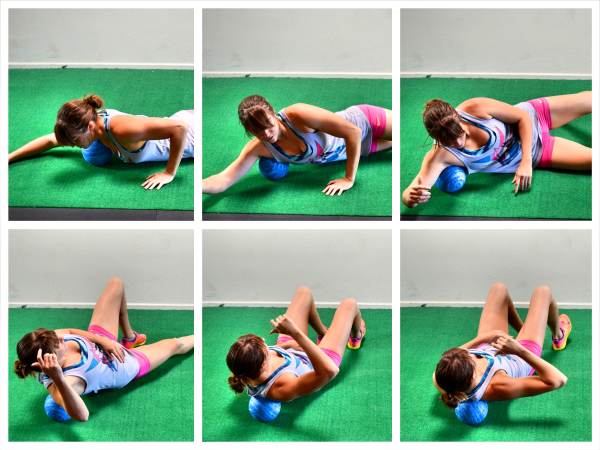
Exercise #1: Shoulder “U” Foam Rolling
Guess what? If you hunch over and even constantly feel like your upper back and neck are tight, chances are you need to roll out your chest and even your lats! And the Shoulder “U” is the perfect way to hit both!
The constant forward flexion and rounded forward shoulders can cause the muscles of our chest and even our lats to become tight. This can not only cause that feeling of constant tightness in our upper back, but can also cause the large muscles of our upper bodies to not properly support our shoulders OR allow for proper shoulder mobility.
 To do the Shoulder “U,” a bigger foam ball works best. Lie face down on the ground with the ball under your chest, under your collarbone and right beside your shoulder. Begin to roll out your chest. Hold on any tight spots in your chest as you move your arm from overhead down toward your feet.
Then roll the ball right along the muscles around your shoulder joint and then under your armpit. You can hold on any tight spots and relax and breathe. Continue moving the ball under your armpit to the side of your back, especially the muscles where your arm and back connect at the back and top of your armpit. Hold on any tight spots as you move the ball around your back.
You can roll it down the side of your back a bit and then up your back around your shoulder blade. Work up and down the shoulder blade then roll it back around front. And repeat a couple of times.
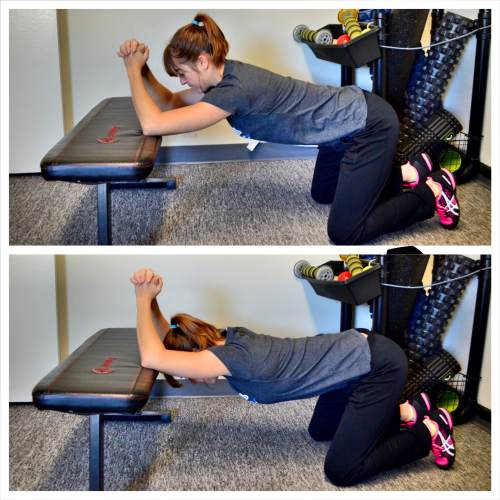
Exercise #2: Kneeling Thoracic Extension With Lat Stretch
Our bodies are amazing in that they will find a way to perform the movements we ask them to do. The sucky part is…They will compensate when needed to perform that movement EVEN though that compensation may end in injury later.
One way in which we compensate is by asking joints for more mobility than they have to give. For instance, if we don’t have proper spinal extension when we reach or press overhead, we will ask our shoulder to make up for that lack of extension, potentially overstraining the muscles there.
That is why the Kneeling Thoracic Extension and Lat Stretch is so key to include.
 To do the Kneeling Thoracic Extension and Lat Stretch, place your elbows up on a bench about shoulder-width apart and kneel on the ground in front of the bench. Make sure you are back far enough that you have room to lean forward and over and drop your head between your elbows.
Then with your elbows on the bench, relax your chest and head over, sitting your butt back just slightly.
Press your chest toward the ground and feel a nice stretch down your triceps and lats as well as through your thoracic spine. Try to extend your back as much as possible as you press your chest toward the ground.
You can either hold here and breathe to stretch deeper or you can come out of the stretch and then relax back into it and try to get further with each rep.
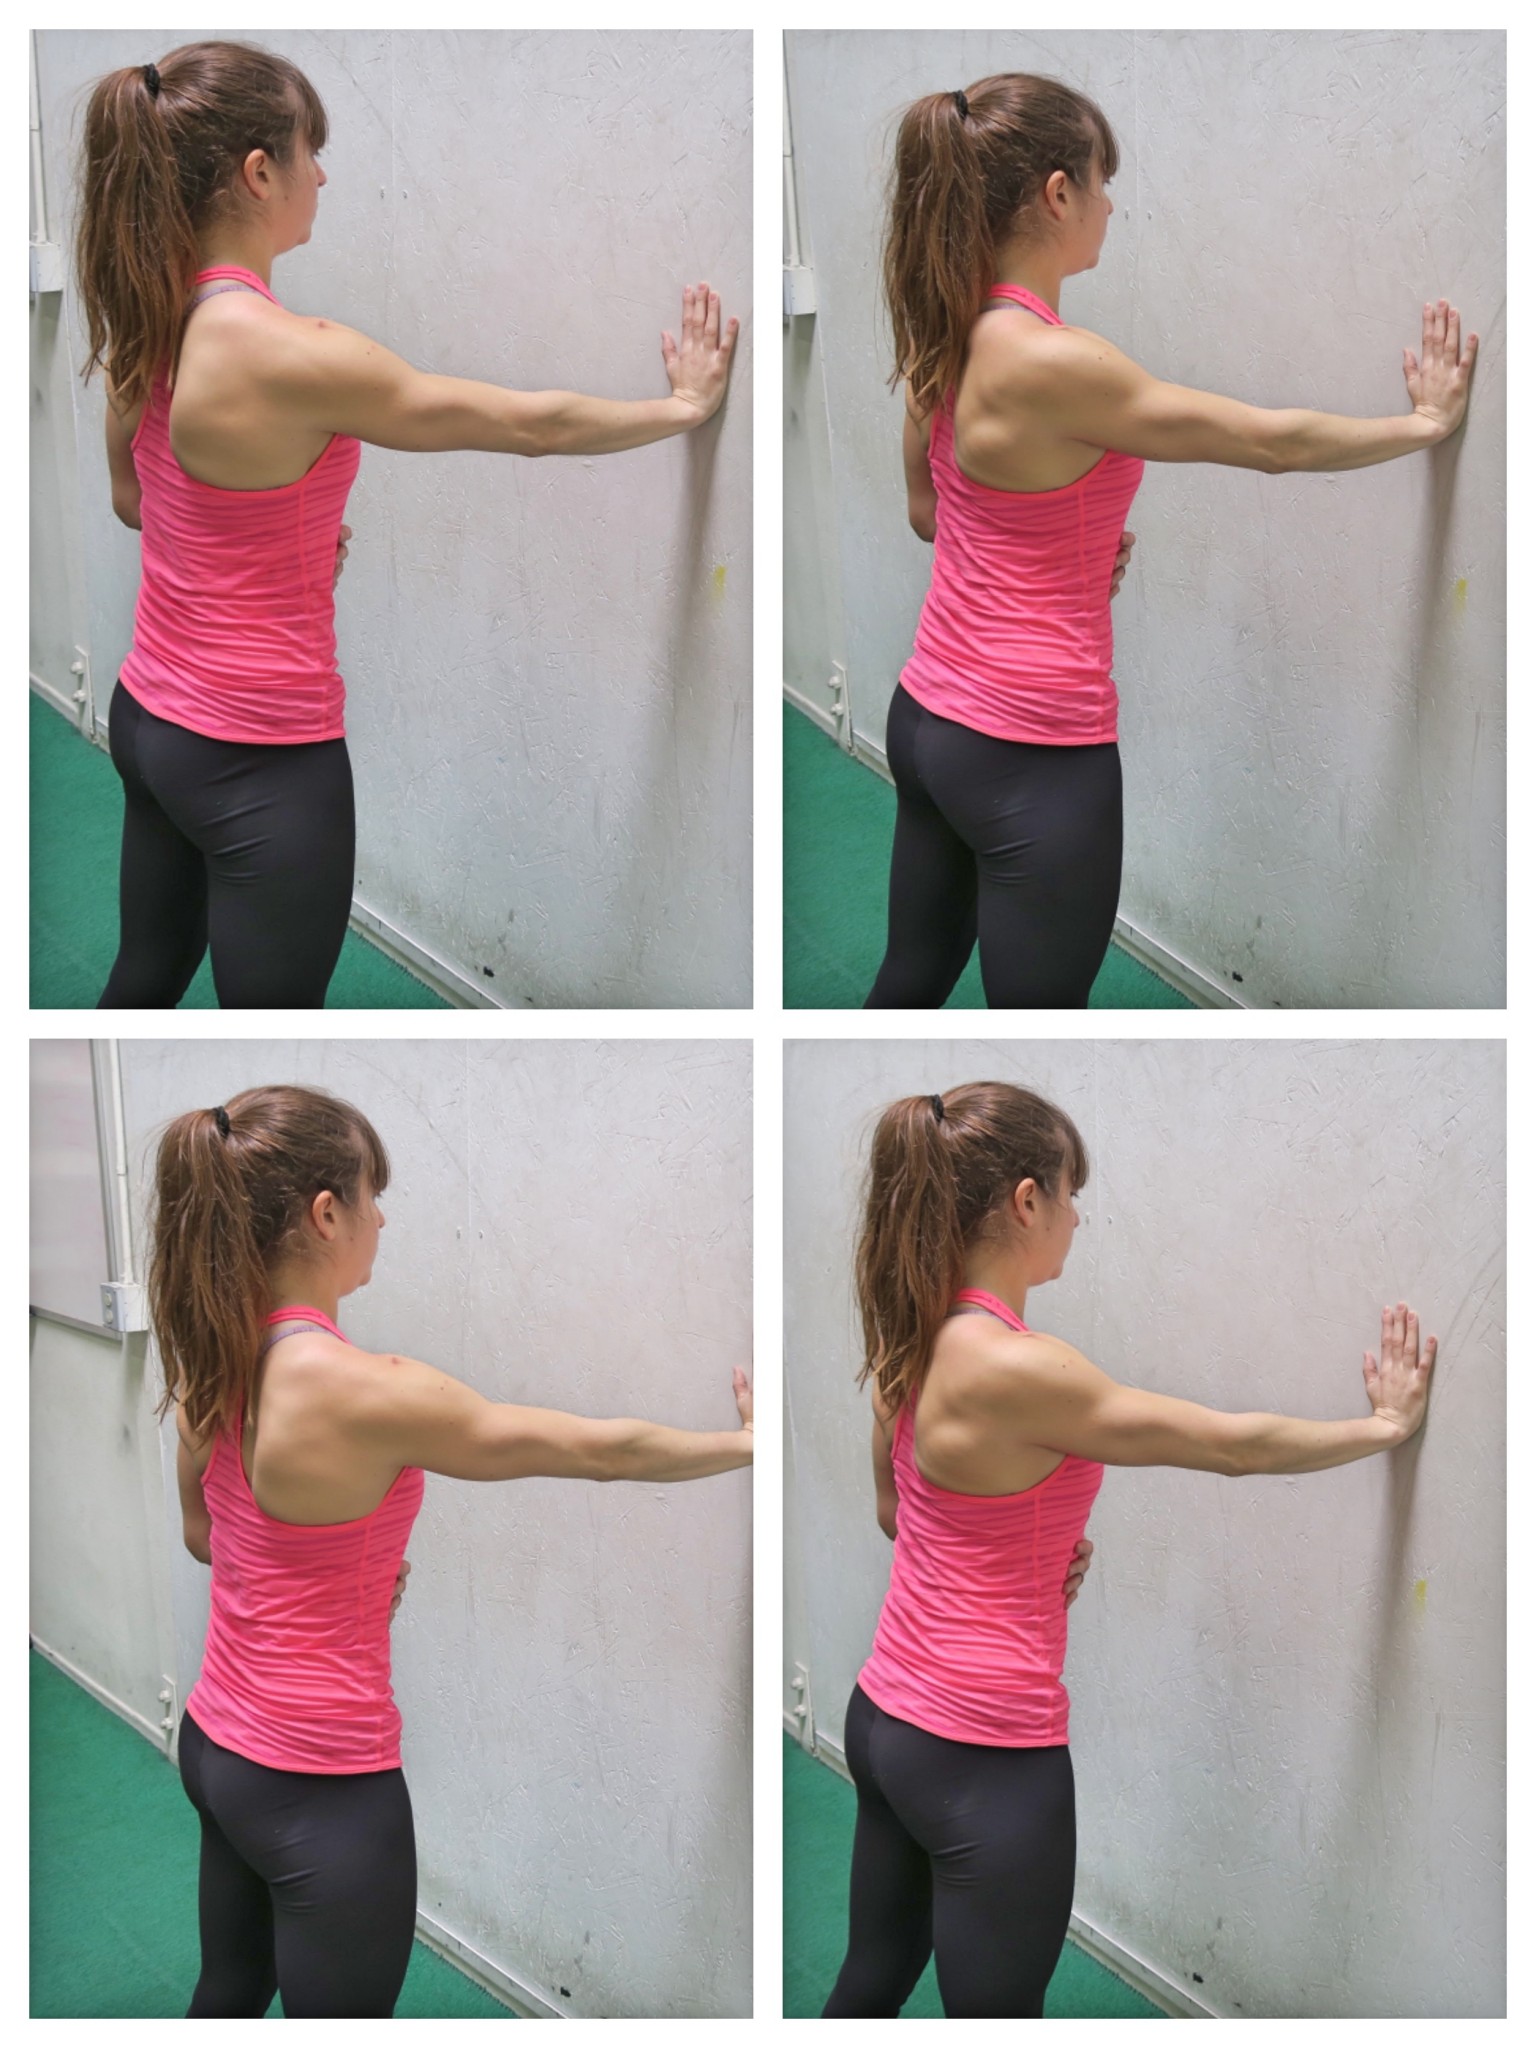
Exercise #3: Single Arm Scapular Push Ups
Part of having healthy shoulders is also having mobile, but stable shoulder blades.
Also, often we develop injuries on ONE SIDE to start. Which is why it is key to include Unilateral Activation Moves. These moves target each side independently so we can’t compensate and use our dominant side to perform the move. It also let’s us correct imbalances between both sides.
That is why these Single Arm Scapular Push Ups are key.
 They help us correct imbalances and improve our scapular mobility and stability. They also make it EASIER to prevent compensations.
All too often when people do scapular push ups from the ground they try to create a bigger range of motion by moving their hips instead of just creating the little bit of movement by retracting their shoulder blades. And they also all too often shrug and let their upper trap take over, which is easier to control doing this against the wall!
To do Single Arm Scapular Push Ups, set up facing a wall. Place one hand up on the wall at about shoulder height. Your arm should be straight, but make sure you aren’t shrugging. You can be at a slight incline to make the move harder by walking your feet back, but start standing more vertical to the wall so you can really focus on proper movement of your shoulder blade.
Then, keeping your elbow straight, press your chest toward the wall as you feel your shoulder blade retract back. You should feel your shoulder blade move toward your spine. Do not shrug your shoulder as you focus on moving the shoulder blade. Pause then relax back out.
Make sure you don’t shrug or bend your elbows or rotate to try to make the movement bigger. Keep your core tight and isolate that one side working. You will feel the muscles along the side of your back and your ribs working. You can even put the opposite hand below your armpit on the working side to feel those muscles working.
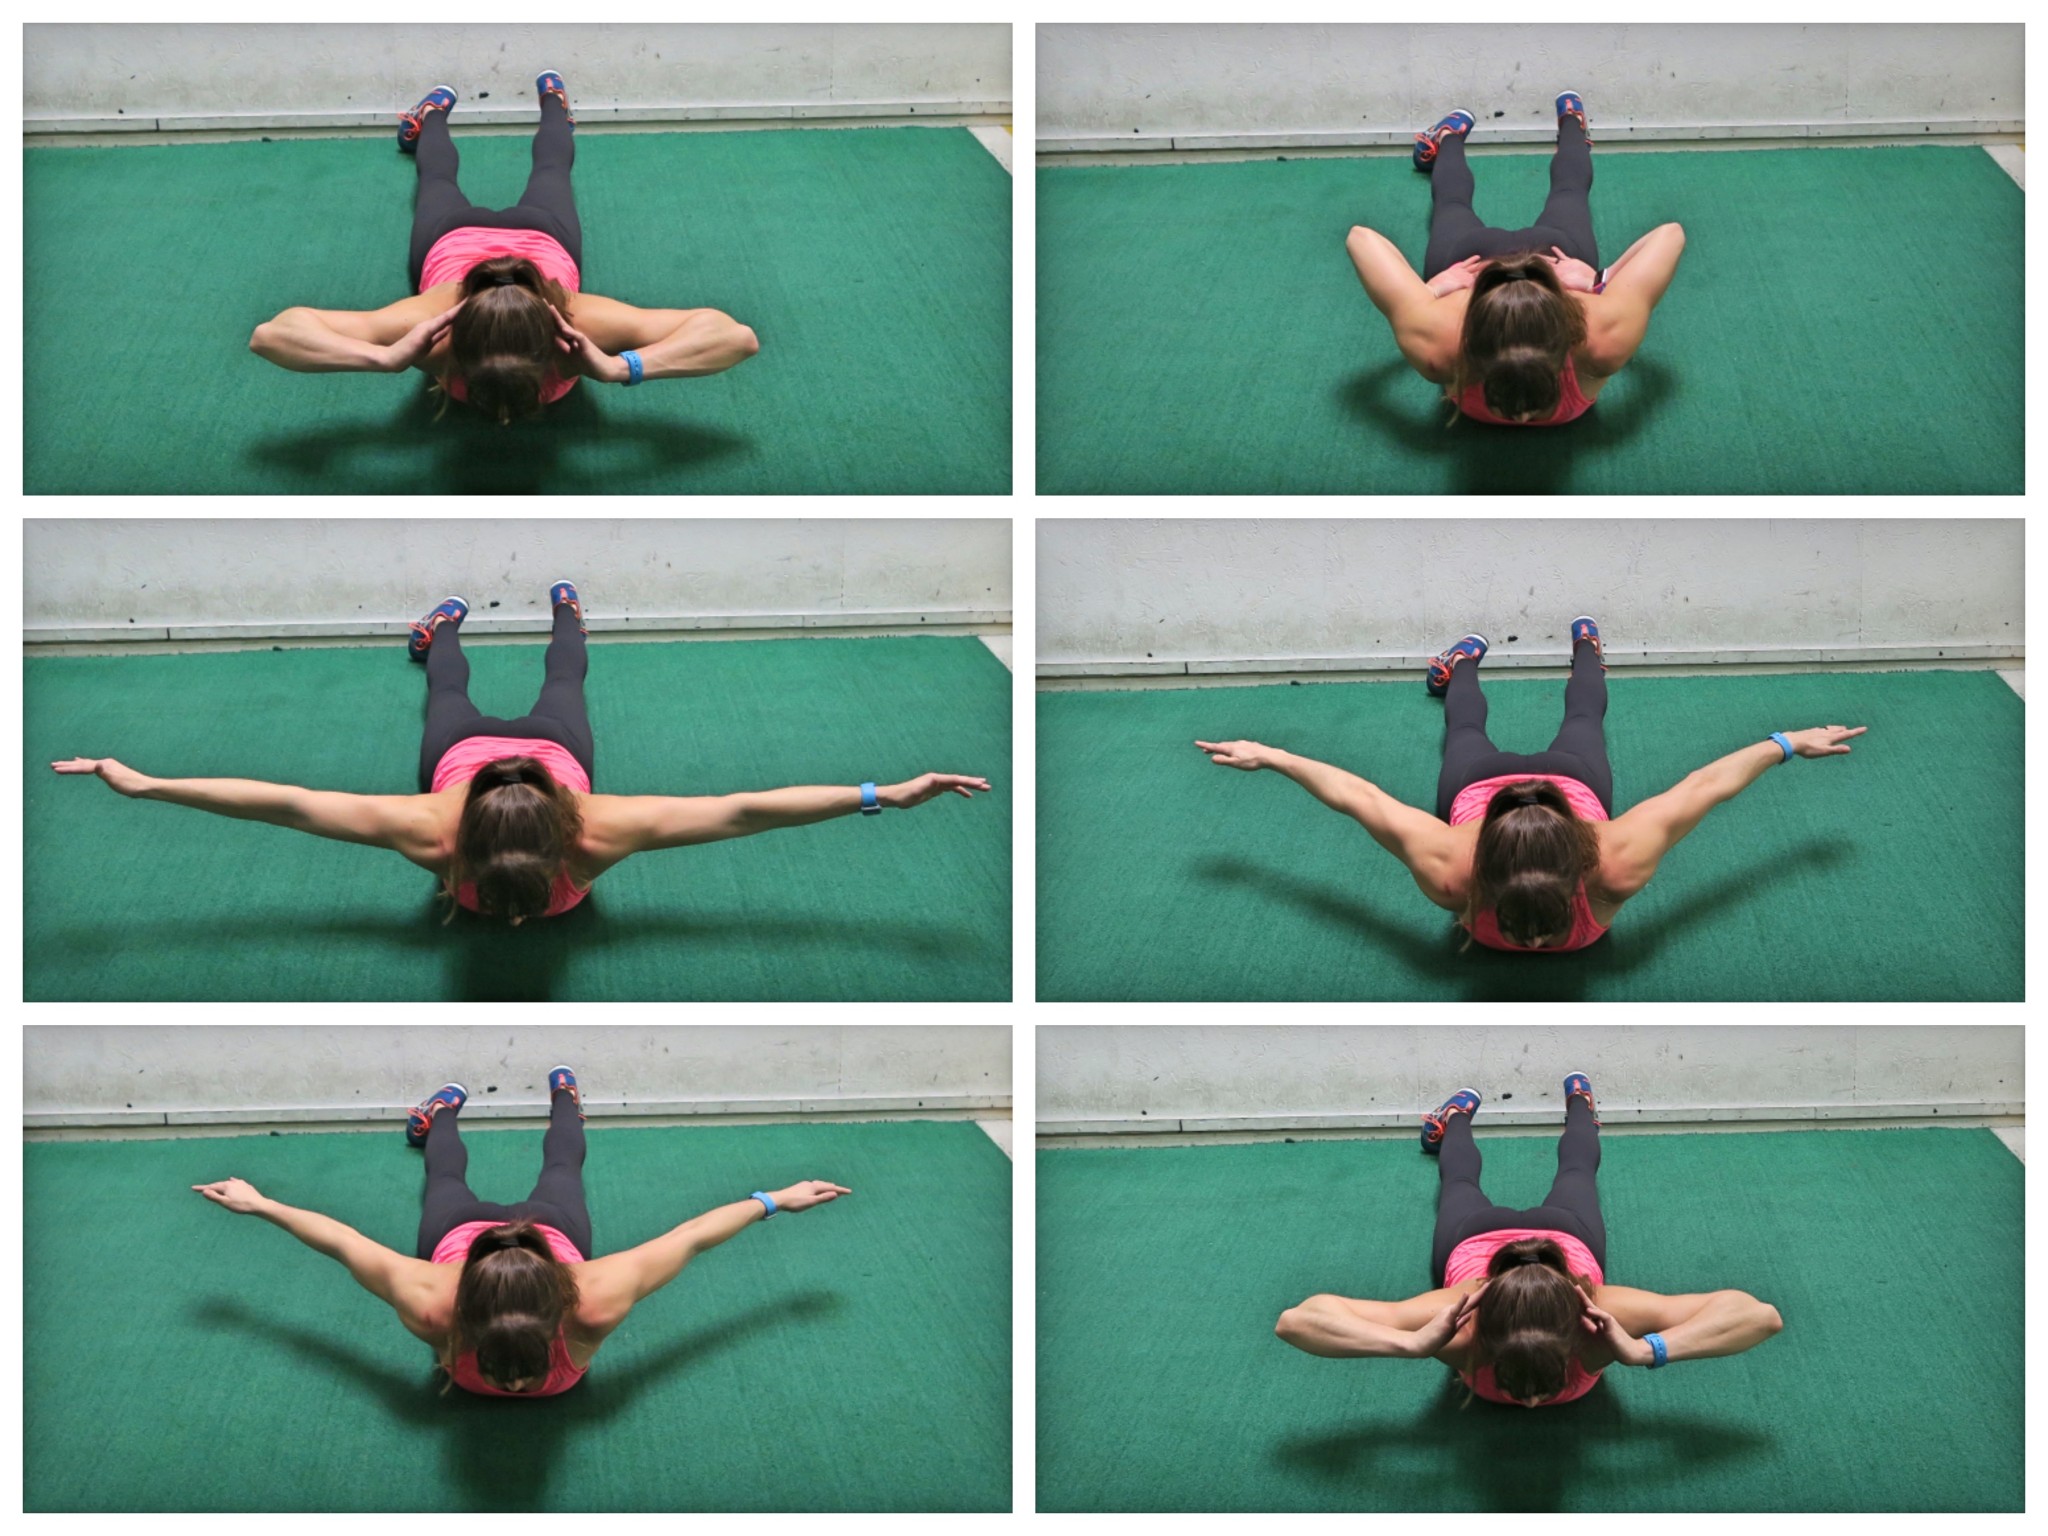
Exercise #4: Prone Snow Angels
To prevent and alleviate shoulder aches and pains, you need to improve your shoulder mobility and strengthen the muscles that stabilize your shoulder, which is why I use the Prone Snow Angel. This will work your back as you move your shoulder through internal and external rotation.
 To do Prone Snow Angels, lie face down on the ground with your legs relaxed. Place your hands behind your head and then lift your chest up slightly off the ground as with the cobra. Do not arch so much to start using your low back back but just enough to engage your upper back.
Then begin to straighten your arms up and out overhead before slowly moving them out to the side as if creating a snow angel.
As you bring your hands back and down toward your butt, flip your hands over, rotating your shoulders as you bend your elbows to bring the backs of your hands to your low back.
Then reverse the motion, bringing your hands back out to the sides then back behind your head. Make sure to keep your chest slightly up, but do not let your low back take over. Keep your neck also relaxed as you do this and really feel your upper back and the backs of your shoulders working to keep your arms off the ground as you perform the move.
Foam Rolling + Stretching + Activation
In this post I show you four moves that cover all three of these pieces that are key to not only preventing pain, but also eliminating pain so it never comes back.
I call this the RStoration Method. To learn more about the RStoration method, click the button below!
