WARM UP
Stretch and Roll Out:
Calves
Hamstrings
Quads
Hips/Glutes
Chest
Back
ACTIVATION
Complete 1 round of the following activation series.
CIRCUIT:
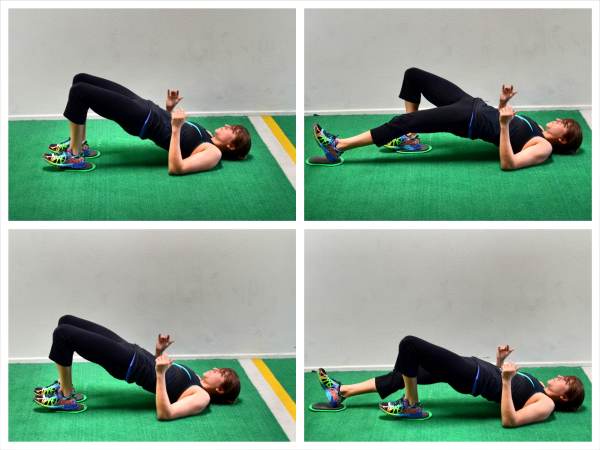
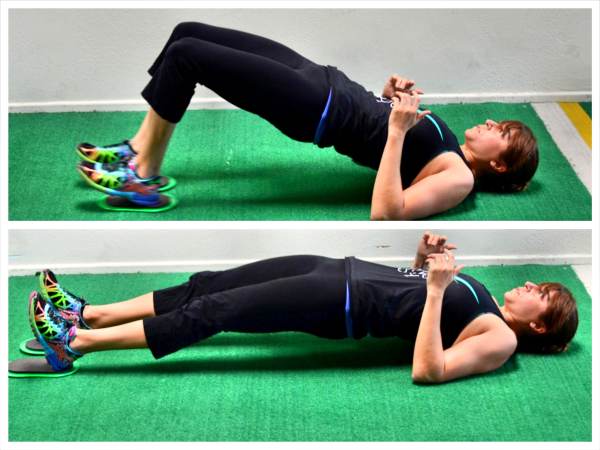
10 reps per side Glute Bridge with Alternating Overhead Reach
15 reps Scapular Push Ups
5 reps per side Sit Thru to Thoracic Bridge
WORKOUT
Complete 3-5 rounds of each superset. Do the exercises back to back and rest 45-90 seconds. This isn’t meant as a fast cardio workout. It is about choosing heavier weights and harder variations. Rest enough between rounds to go hard each and every time. If you are working out with a partner, you can each alternate who goes to pace each other.
SUPERSET #1:
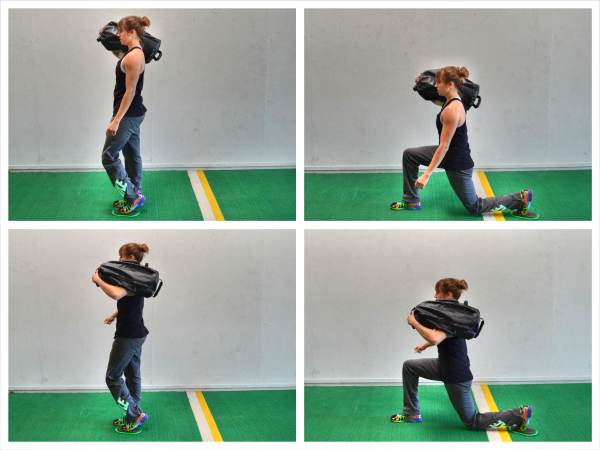
8-12 reps per side Unilaterally-Loaded Slider Reverse Lunge
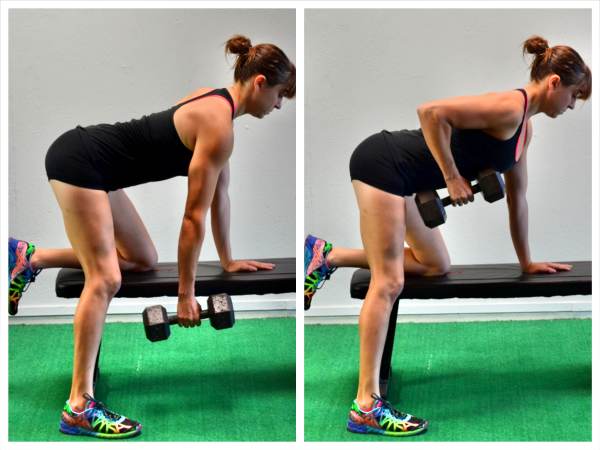
8-12 reps per side Single-Arm Dumbbell Row
SUPERSET #2:
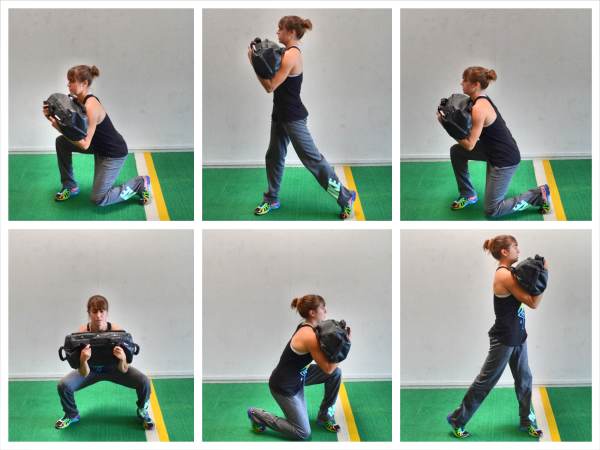
8-12 reps per side Duck Under Lunge
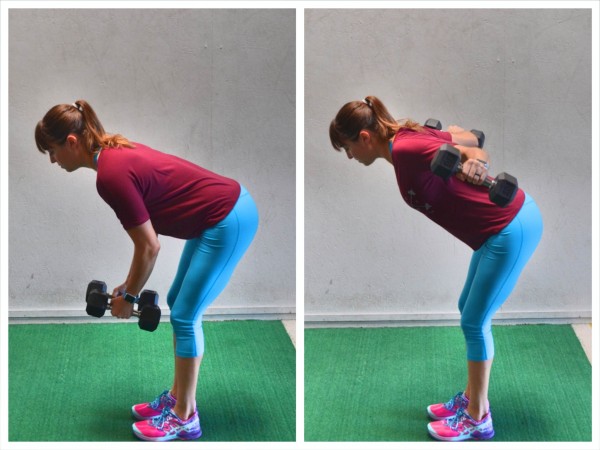
10-15 reps Back Flyes
SUPERSET #3:
10-15 reps Glute Bridge and Curl
6-10 reps per side Plank Pull Thrus
COOL DOWN
Stretch and Roll Out:
Calves
Hamstrings
Quads
Hips/Glutes
Chest
Back
NOTES:
Again you are not trying to rush through this but instead add weight and try more challenging variations while getting enough rest in between rounds to keep working at a high intensity.
EXERCISE DESCRIPTIONS:
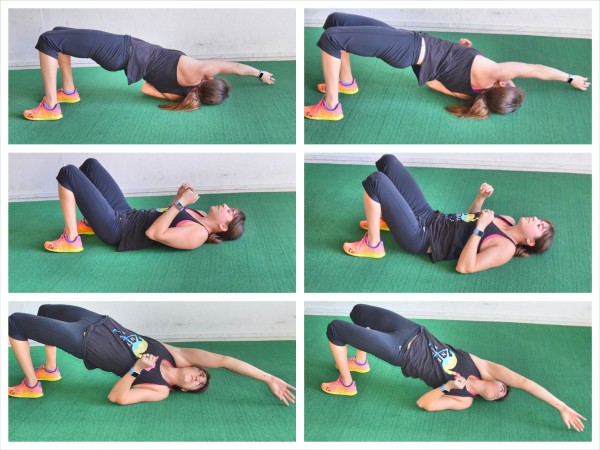
Glute Bridge with Alternating Overhead Reach – To do the Glute Bridge With Alternating Overhead Reach, set up as if you are doing the Basic Glute Bridge. Lie on your back with your knees bent and feet flat on the ground. Your feet should be about hip-width apart and your knees should be in line with your feet and hips. Your feet should be just beyond your fingertips when you stretch your arms down by your sides. For this variation, you can leave your arms down by your sides; however, bending your elbows can help you get a little more leverage for the bridge and reach. Then driving through your heels and upper back bridge up, bracing your abs and squeezing your glutes to extend your hips. As you bridge up, reach one arm up and across your body to try and touch the ground on the opposite side just above your shoulder. Stretch your back and feel your spine twisting and extending to reach, but do not hyperextend your low back to reach overhead. You want to get the mobility out of your mid and upper back not your low back. Hold for a second or two then bring your arm back across and down to the ground as you lower down out of the bridge. Then bridge back up and reach the opposite hand across and overhead. You should feel your glutes working to help you bridge up and may even feel one side slightly take over as you reach overhead. This move will force each side to work slightly independently.
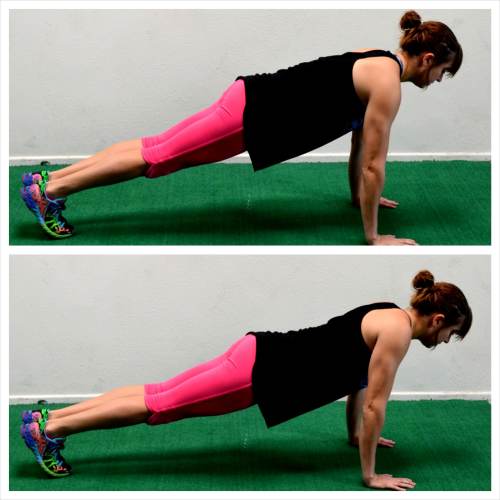
Scapular Push Ups – To do the Scapular Push Up, set up in a high plank position with your hands under your shoulders and your feet together. Your body should be in a nice straight line from head to your heels. Without bending your elbows or dropping your hips, pinch your shoulder blades together and press your chest out. Do not tuck your chin or jut your head forward. Also do not let your core wiggle or your elbows bend to try to increase your range of motion. You are not doing a push up. This is a very small range of motion where you are simply focused on pinching your shoulder blades together. Just pinch your shoulder blades together and then relax or even round your back up out of it (rounding your back at the top is another variation but can be very useful for correcting certain push up problems). Keep your core tight as you pinch your shoulder blades together. As you get stronger and build the mind-body connection you will find your range of motion increases. If you struggle to pinch your shoulder blades together without wiggling your core or bending your elbows, go down to your knees as if doing a push up from your knees. If you still struggle, bring your knees under your hips. Do not get caught up on doing this from your toes. Just focus on pinching the shoulder blades together.
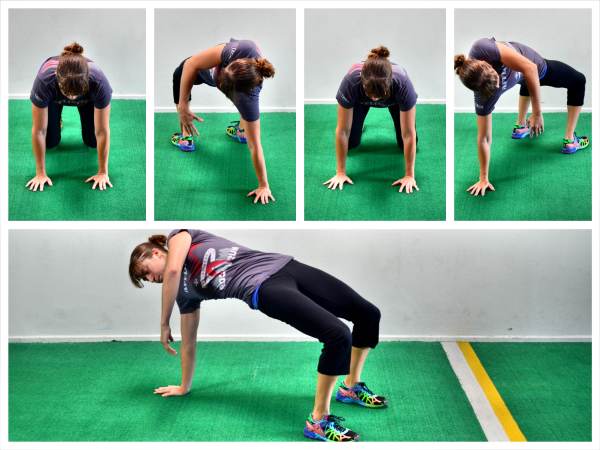
Sit Thru to Thoracic Bridge – To do Sit Thru to Thoracic Bridge, set up on your hands and knees with your hands under your shoulders and your knees under your hips. Flex your feet and lift up onto your hands and toes. Then lift your right hand and bring your left leg through and place your left foot flat on the ground. Rotate your hips up toward the ceiling, squeezing your glutes to lift them up as high as you can. While your lift your hips, reach your right hand down toward the ground, rotating your chest toward the floor. Feel your glutes working to keep BOTH hips up, while you reach your hand down. We have a tendency when we rotate to drop the hip on the side we are rotating toward. Make sure both hips stay up as high as possible. You should feel a nice rotation and stretch through your spine. You are twisting almost like someone wringing out a towel. Then drop your hips and step your foot back through while placing your hand back down on the ground. Step through and rotate to the other side, bridging your hips up as high as you can as you reach toward the ground.
Unilaterally-Loaded Slider Reverse Lunge – To do the Unilaterally-Loaded Slider Reverse Lunge, place the sandbag over one shoulder and the slider under the ball of one foot. Stand up nice and tall and do not lean away or toward the side holding the sandbag. Then slide the foot on the slider back and sink into a deep lunge, dropping your back knee down as close to the ground as possible. Keep your chest up as you lunge back and make sure to sit back in the heel of your front leg as you lunge back. You want to make sure to load the glute of the front leg. Drive through the standing heel and pull the foot on the slider back forward as you come up to standing. Make sure you keep your chest up nice and tall and do not lean or round forward as you come back up to standing. Squeeze your glute at the top and then repeat, lunging back. Do not lean to either side because of the unilateral load. Complete all reps on one side before switching. You can also use a kettlebell racked on one side or a dumbbell on one side if you don’t have a sandbag. Also, you can put the weight on your standing leg to make it easier or on the moving leg to make it harder.
Single-Arm Dumbbell Row – To do the Single-Arm Dumbbell Row, set up with one knee and hand on a bench or box. If you are going to be rowing on your right side, your left knee and hand will be on the bench. Press your chest out and feel the muscles of your back activate. You want your back to stay nice and flat as you row. Hold the dumbbell in your right hand with your right foot on the ground. Keeping your back flat, row the dumbbell up to your side. Drive your elbow up and back as you row and do not let your shoulder shrug. Feel the right side of your back working to row the dumbbell up. Do not row the weight up to your neck. Bring it in to your side at, or just below, chest height. Do not rotate a lot or swing to lift the weight. Once you’ve rowed the weight up, extend your arm all the way back down. Do not reach past full extension to try to drop the weight closer to the ground. You do not want to relax your back at the bottom of the row. Complete all reps on one side before switching. Slow down the tempo or add more weight to make the move more challenging.
Duck Under Lunge – To do the Duck Under Lunge, hold the sandbag up at your chest with your arms wrapped around it. You will then squat down, sitting your butt back while keeping your chest up. As you come back up out of the squat, you will rotate toward the right, pivoting your left foot. Stand up nice and tall, facing to the right with your back leg in triple extension. Do not let your foot stay put and your knee cave in. Then rotate and sink back down into a squat and then pivot and rotate up toward the left side, pivoting your right foot. Keep your chest up the entire time. Do not let your back round toward the ground. Also do not lean forward to try to get lower to the ground. Sink as low as you can in the squat without your form breaking down then quickly pivot up to each side. As you get comfortable with the move, try to make it as fluid as possible. The move should look like a “U” shape. Beginners may need to make it look more like a “V” until their hips open up more. Beginners may also need to drop the weight or not go as low.
Back Flyes – To do Back Flyes using dumbbells, hold a light dumbbell in each hand. Start light so that you can focus on your upper back and the backs of your shoulder’s working without engaging your upper traps, neck or lower back. Hinge over at the hips holding the weights with your arms hanging straight down toward the ground. Keep your back flat and slightly bend your knees. Make sure to drop your chest to about parallel to the ground. If you start to stand back up, you could start to overuse your upper traps instead of using your upper back. You do not want to turn this into an upright row. Then, bracing your abs, fly your arms out to the side. Keep your elbows soft as you lift your arms out to the sides and back toward the ceiling at about, or just below, shoulder height. Pinch your shoulder blades together as you fly your arms open and really feel your upper back and the backs of your shoulders working. Keep your neck relaxed as you fly. Lower back down and repeat the fly. Try not to swing, but really focus on using your back to lift. Also, make sure to keep your elbows soft as you fly your arms up and out. If you feel your neck and upper traps engaging, you can place your head against the wall or on top of a bench. Also, make sure your low back doesn’t engaged as you keep your back flat. You may need to brace your abs more or bend your knees slightly, especially if your hamstrings are tight.
Glute Bridge and Curl –
To do the Single-Leg Glute Bridge and Curl using a Valslide, slider or towel, place a slider under each foot and bring your feet in close to your butt. Then bridge up, engaging your abs and squeezing your glutes to extend your hips. Make sure to drive your elbows and upper arms down into the ground so that you don’t push yourself backward. Keeping your hips up and glutes and abs engaged, slide out one leg fully extending it. Then drag your foot back in, pulling the slider back in with your hamstring. As you curl your heel back in, extend the other leg out. Move in a controlled fashion and feel your hamstring work to pull the slider back in. If the Single-Leg move is easy, do the Two-Leg Bridge and Curl.
To do the Two-Leg Bridge and Curl, start in the glute bridge position with a foot on each slider like you did for the Single-Leg Variation. Make sure to engage your glutes and your abs as you drive down through your upper arms and back. Keeping your glutes engaged, slide your feet out away from your butt. Straighten your legs out in front of you as far as you can, keeping your hips up and your abs engaged. Your glutes may touch the ground, but you shouldn’t let your hips sag. They should lower because your legs are extending. Once you straighten your legs out fully, curl your heels back in, bringing your hips back up again into a glute bridge. Really pull your heels back in with your hamstrings by driving your heels into the sliders and dragging them back in. Do not let the hips sag toward the ground as you slide out or come back in. Your hips will lower as you extend and bridge back up as you curl back in. Make sure your abs stay tight to protect your low back with both variations. You want to feel your hamstrings, and even your glutes, working not your low back.
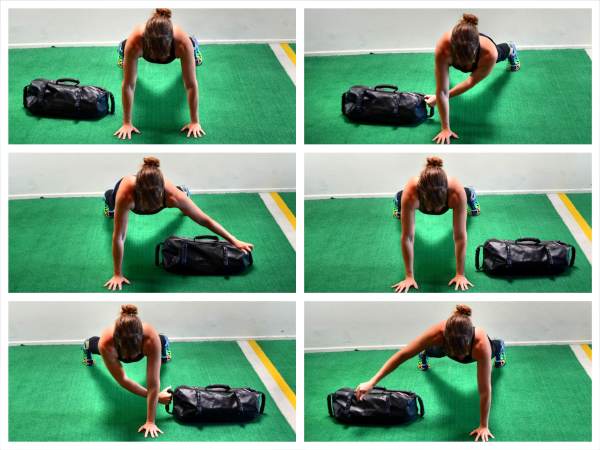
Plank Pull Thrus – To do Sandbag Plank Pulls, set up in a plank position from your hands and toes or hands and knees and place the sandbag on the ground to one side of your body just outside and below your shoulder. Make sure your hands are under your shoulders and then place your feet or knees wider apart to give you more stability. The closer together your feet are, the harder the move will be because you won’t have as wide or stable a base. If you feel your hips rocking side to side, widen your feet out. If the move is too easy, bring your feet closer together. Then reach your hand under your body and across to grab the sandbag. Squeeze your glutes and, without rotating your hips, pull the sandbag through and across to the other side of your body. Make sure your body stays in a nice straight line with your abs engaged as you reach through and pull. Do not let your hips go up in the air or sag toward the ground. You want to pull the sandbag all the way across and outside the other shoulder. If you can’t pull the sandbag all the way across or need to rotate your hips a lot to do so, it may be too heavy. Then reach through with the other hand to pull it back. To fight your body’s desire to rotate, you will need to engage your core and really squeeze your glutes. You do not want to feel this move in your low back. Keep alternating reaches until all reps are complete. Your goal is to keep a nice straight line from your head to your heels the entire time.