WARM UP
Stretch and Roll Out:
Calves
Hamstrings
Quads
Groin
Hips/Glutes
Back/Lats
Chest/Shoulders
WORKOUT
Complete 5-10 rounds of the circuit below. Complete 10 reps of each exercise then rest for 10 seconds between exercises. After each round, rest for 1-2 minutes.
CIRCUIT:
10 reps each side Alternating Single Leg Lunge
10 seconds Rest
10 reps Row to Rotational Press
10 seconds Rest
10 reps Decline Push Ups
10 seconds Rest
10 reps Oblique Knee Tuck
10 seconds Rest
10 reps each side Hamstring Sprinters
COOL DOWN
Stretch and Roll Out:
Calves
Hamstrings
Quads
Groin
Hips/Glutes
Back/Lats
Chest/Shoulders
EXERCISE DESCRIPTIONS:
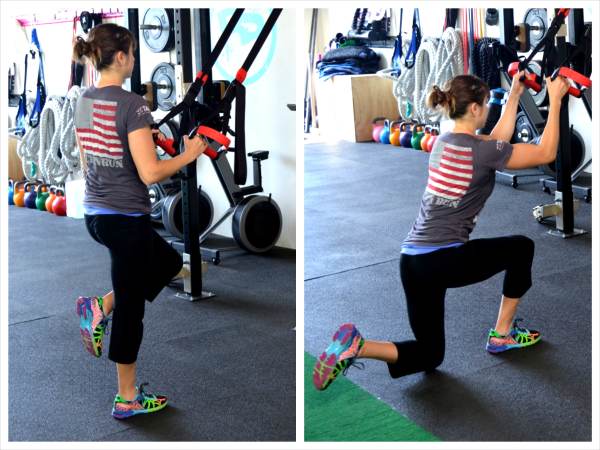
Alternating Single Leg Lunge – To do the Single Leg Lunge, hold a strap in each hand and step back so that there is tension in the straps. Then stand on one foot and bend the other knee bringing your foot up toward your butt. You want to drop the knee of the back leg down to the ground without touching your foot down. Sit your butt back and hinge over, dropping that back knee down to the ground. You want to make sure you are sitting back and driving through that standing heel. Do not rock forward and come up onto your toes. Also, make sure you don’t “swing” back on the straps. You want that knee to be over your ankle/foot. Touch your knee down then drive through your heel to come back up to standing. Squeeze your glutes at the top. Use the suspension trainer to help you balance and get back up, but do not turn this into an upper body exercise. Use your arms only as needed! Alternate sides until all reps are complete. Beginners may not be able to go all the way down and touch their knee to the ground. Start with the range of motion you can control while feeling your glutes work. Advanced exercisers may want to slow down the tempo to make this move harder or even hold only one suspension trainer strap.
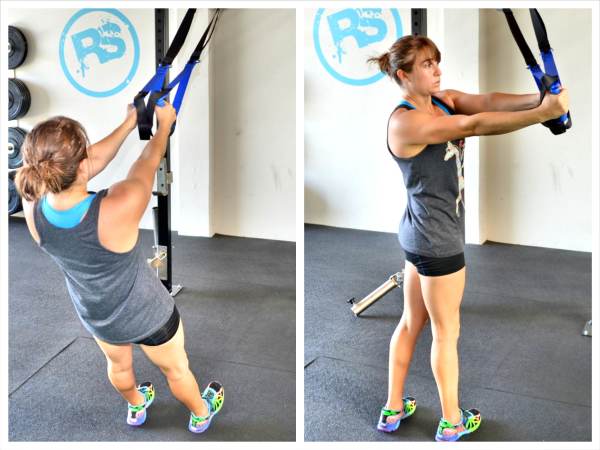
Row to Rotational Press – To do the Row to Rotational Press, hold a strap in each hand and walk your feet forward so that your body is at an appropriate incline. The closer to parallel to the ground you are, the harder the move will be. Start at more of an incline than you would for the Inverted Row because of the press portion of this movement. Once you are set at an appropriate incline, place your arms outstretched in front of you with your hands together. Then row your hands in toward your chest, driving your elbows down and back. Do not shrug your shoulders as you row. Once you’ve brought your chest up to your hands, rotate and press your hands out to the right. Then bring them back to the center of your chest and lower back down, straightening your arms out in front of you. Make sure to keep your shoulders down the entire time. Do not let them shrug up by your ears. You want to make the big muscles of your back work. Throughout the entire movement, keep your body in a straight line. Do not let your hips sag toward the ground or your low back arch as your row and press. Alternate presses, rowing up and pressing to the right and then the left. As you fatigue, do not bounce or swing to get up. If you need to make the movement easier as you fatigue, walk your feet back so that you are more vertical.
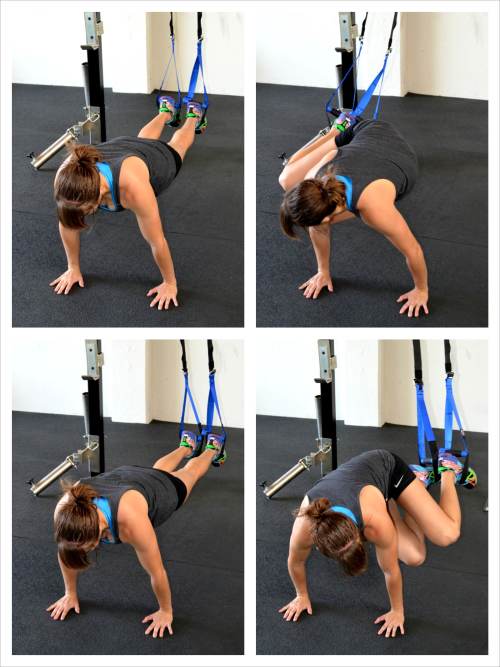
Decline Push Ups – The Decline Suspension Trainer Push Up is a more challenging push up variation. To make it more challenging, you will raise your feet up higher and put your body at a bigger incline. To make the move easier, you will lower the foot straps down closer toward the ground so that your feet are in line with your body. This move is very core intensive so beginners may want to start with a push up from the ground first. To do the Decline Suspension Trainer Push Up, place your feet in the straps and walk your hands out so that you are in a plank position with your hands under your shoulders and your body in a nice straight line. Squeeze your glutes and quads and draw your belly button in toward your spine. Keep your feet together and your body in a nice straight line as you lower your chest down toward the ground. Do not let your elbows flare out toward your shoulders. You want to create an arrow shape with your arms and body as you lower down. Then press back up, making sure your body moves together as one unit. Do not let your hips sag or your butt rise up toward the ceiling. To make the move harder, make the suspension straps shorter so that the push up is even more of a decline push up. You can also walk your hands forward and pull the suspension trainers straps forward so that when you do the push up, the straps are trying to pull you backward. This Decline Suspension Trainer Push Up is an advanced move to begin with. Do not attempt this if you can’t easily complete a perfect push up from your toes on the ground. Instead do the Incline Suspension Trainer Push Up if this is too advanced.

Oblique Knee Tuck – Place your feet in the suspension trainer straps and your hands on the ground under your shoulders. Your body should be in a nice straight line. Then pull your feet in toward your body, tucking your knees in toward your chest. As you tuck, bring them slightly to one side. After you tuck your knees in, you will straighten your legs straight back out. Do not let your hips sag as you straighten back out or your butt go up in the air. Make sure that as you straighten back out you move back center. Keep your body in a nice straight line. Repeat, tucking your knees in to the other side and then driving them back out to the center. Beginners may do mountain climbers in the straps or even from the ground.
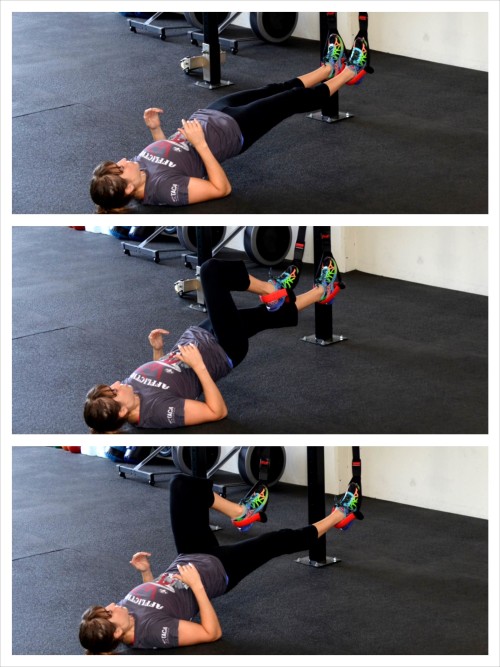
Hamstring Sprinters – Lie on your back with your heels in the straps and your legs out straight. Squeeze your glutes and drive through your upper back and heels to raise up into a straight leg glute bridge. Then bring one knee in toward your chest as you keep your hips up and your body in a straight line. Shoot that leg back out straight and bring in the other knee. Keep alternating legs, bring one knee at a time into your chest as if running. Move quickly while keeping your hips up. Do not let your hips sag down toward the ground. Beginners may need to start with either a glute bridge or the Hamstring Sprinters from towels on the ground.