The Interval Pyramid
MINUTES
SECOND INTERVALS
EXERCISES
ROUNDS
The Interval Pyramid
WARM UP
Stretch and Roll Out.
WORKOUT
Set a timer for 30 second intervals with a few seconds to transition between moves. Go right from one exercise to the next, completing all 12 moves. Then rest 1 minute and go back through all the moves! Regress moves if needed, but try not to rest during the 30 seconds on each exercise!
PYRAMID:
30 Jumping Jacks
30 Side Lunge to Hop
30 Shoulder Tap Push Ups
30 Full Body Crunch
30 Burpee Sit Thru
30 DB Squat to Press
30 Renegade Rows
30 Alternating Leg Lowers
30 Rainbow Split Squat Jumps
30 T Push Ups
30 Superman Banana
30 Snowboard Hop Burpees
1 minute
30 Snowboard Hop Burpees
30 Superman Banana
30 T Push Ups
30 Rainbow Split Squat Jumps
30 Alternating Leg Lowers
30 Renegade Rows
30 DB Squat to Press
30 Burpee Sit Thru
30 Full Body Crunch
30 Shoulder Tap Push Ups
30 Side Lunge to Hop
30 Jumping Jacks
COOL DOWN
Stretch and Roll Out.
NOTES:
See exercise descriptions below!
Get 6 Weeks Of Workouts NOW!
Love this workout? Then you’ll love my 6-Week Bodyweight Shred!
Exercise Descriptions:
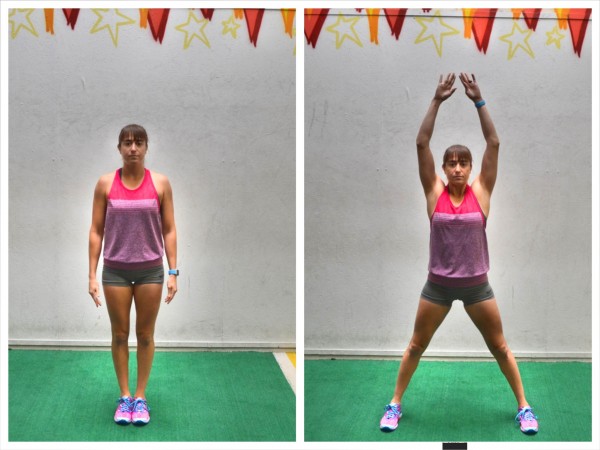
Jumping Jacks – To do the Basic Jumping Jack, start standing nice and tall with your feet together and arms down by your sides. You will then jump both your feet out to the sides so that your feet are shoulder-width apart or wider. As you jump your feet out wide, raise your arms up to the sides and overhead. Then bring your arms back down to your sides as you jump your feet back in together. Repeat, jumping your feet out wide as you raise your arms out to the sides and overhead. You can move quickly to get your blood pumping or even slow it down a bit if you are using for an active recovery move. Beginners or anyone with knee pain, may need to regress the move to the Step Jack.
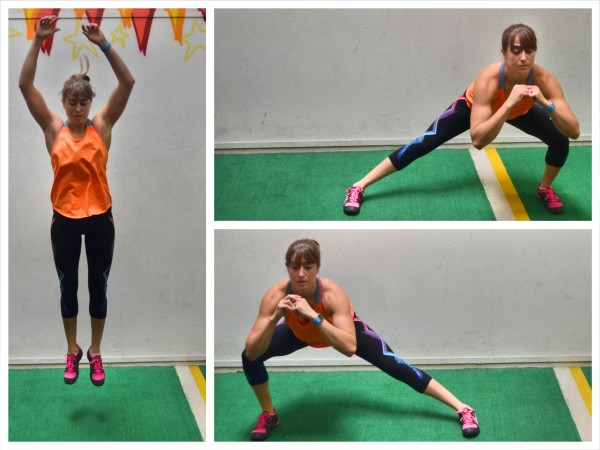
Side Lunge to Hop – To do the Alternating Side Lunges with Hop, stand tall with your feet together. Step one foot out to the side nice and wide. Bend the knee of the leg you stepped out to the side with, keeping the other leg straight, and sit your butt back to sink into the side lunge. Don’t be afraid to slightly lean forward as you hinge at the hips to sink your butt. Keep your back flat as you sit back. Then drive back up off your outside foot to come back to standing. Do not bend the other leg as you push off to come back up to standing. When you come back to standing, jump up toward the ceiling, reaching up overhead. Then lunge out to the other side before coming back center and jumping toward the ceiling. Keep alternating lunges until all reps are complete. Make sure your heels stay down as you lunge out to the side. You want to make sure to sit your butt back and load your glutes.
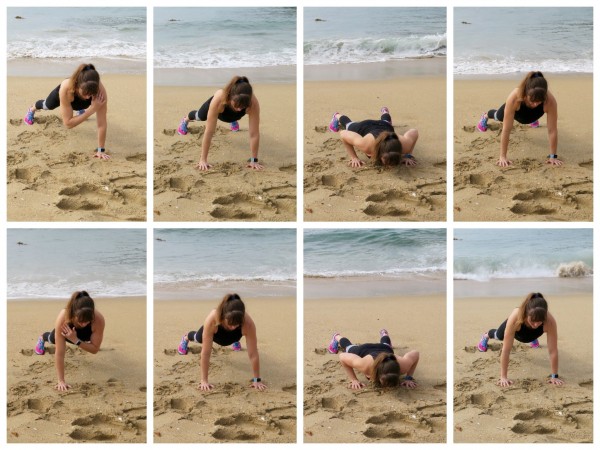
Shoulder Tap Push Ups – To do the Shoulder Tap Push Ups, set up in a high plank position from your hands and toes (advanced) or hands and knees (beginner). Place your hands under your shoulders and just outside your chest while your feet or knees should be wider apart to provide a more stable base. Bring your feet or knees together as the move becomes easier to make it harder on your core to stabilize. Then, bracing your abs and engaging your glutes so that your body is in a nice straight line, lift one hand up off the ground, moving it slowly to touch the opposite shoulder. Keep your hips square to the ground and do not rotate as you lift your hand to touch your shoulder. Do not let your butt go up in the air or your hips sag toward the ground. Touch your opposite shoulder then slowly place your hand back down on the ground and perform a Push Up, lowering your chest all the way to the ground. Do not let your elbows flare out as you do the Push Up. Try to keep your arms in close by your sides. Press back up to the top of the Push Up and then lift the other hand and tap your other shoulder. Do not rotate as you lift. Try to keep your body still and simply lift the hand to touch the opposite shoulder. As you do the Push Ups between each shoulder tap, make sure your body moves as one unit and stays in a nice straight line.
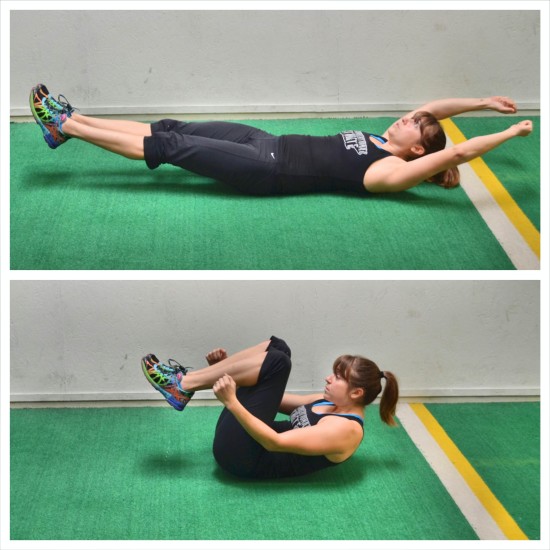
Full-Body Crunch – To do the Full-Body Crunch, lie on your back with your legs out straight in front of you and your arms reaching overhead. You can also place your hands behind your head or even across your chest. Then press your low back down into the ground and engage your abs as you lift your feet up off the ground. The higher up you keep your legs, the easier the move will be. Then tuck your knees in toward your chest as you crunch your upper body up, lifting your shoulder blades up as high off the ground as you can. Keep a space between your chin and your chest as you lift your shoulder blades up off the ground. You can keep your hands behind your head or pull your hands down from overhead and drive your elbows toward your knees. Crunch both your lower and upper body together, pressing your low back into the ground then relax your upper body back down as you kick your legs out straight. Do not touch your heels to the ground as you extend back out. The higher up you keep your legs as you straighten them back out, the easier the move will be. Do not let your low back come up as you straighten out. Keep your abs engaged. If your low back takes over, regress the move. Then crunch back up. Beginners can also do a knee tuck and then keep their knees bent and tap their toes down if kicking their legs out is too much to start.
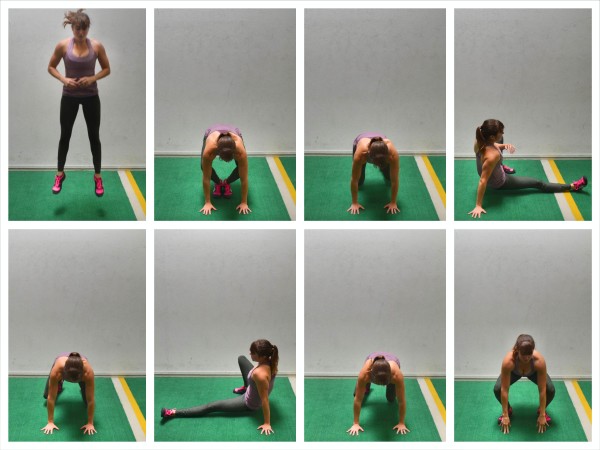
Burpee Sit Thru – To do the Burpee Sit Thru, start standing with your feet together. Then squat down and bend over to place your hands on the ground in front of your feet. As you place your hands on the ground, jump your feet back into a Bulldog position so that your knees are bent with your knees under your hips and your hands under your shoulders. From this bent-knee position, kick one leg under your body and through toward the opposite hand as you lift the opposite hand to “sit through.” Rotate open and try to kick through so that you could sit on the ground if needed. You can raise the lifted hand up toward the ceiling or simply lift it to your chest. Then quickly bring the leg back under your body as you lower your hand back down to come back to the Bulldog position. Then sit through on the other side. You will again kick the leg under your body and through as you lift your opposite hand. You want to rotate all the way through so you could actually sit if you lost your balance. Once you’ve performed a Sit Thru to both sides, jump your feet back in toward your hands and lift your hands up to come back up to standing. Jump up off the ground at the top and then repeat the movement. Beginners may find they want to jump back into more of a plank position to make the Sit Thru easier. Advanced exercisers with more mobility will want to perform the Sit Thru from more of a Bulldog hold starting position and will want to move as quickly as possible.
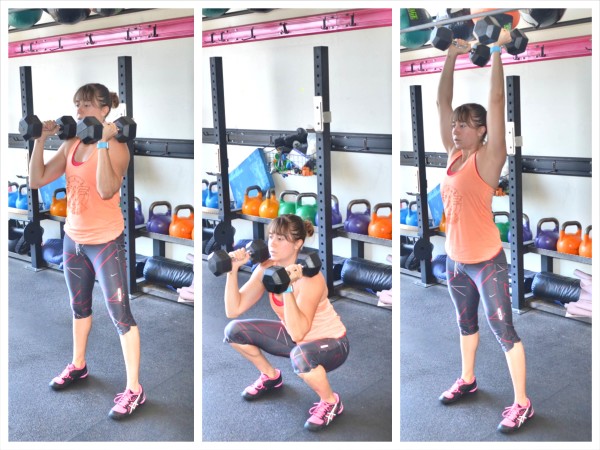
DB Squat to Press – To do the Dumbbell Squat to Press, grab a dumbbell in each hand and bring the weights up to your shoulders. You can hold the weights with your palms facing forward or with your palms facing in toward each other. Holding the weights at your shoulders, squat down sinking as low as you can. Then drive back up to standing and press the weights straight up overhead. Make sure you don’t go forward as you squat down. Also make sure to press the weights straight up. Do not let your arms go out wide or all over the place. The more you use your legs to press, the easier it should be on your upper body to press the weights. If you want to do a stricter press, squat then stand up and press once you are fully standing.
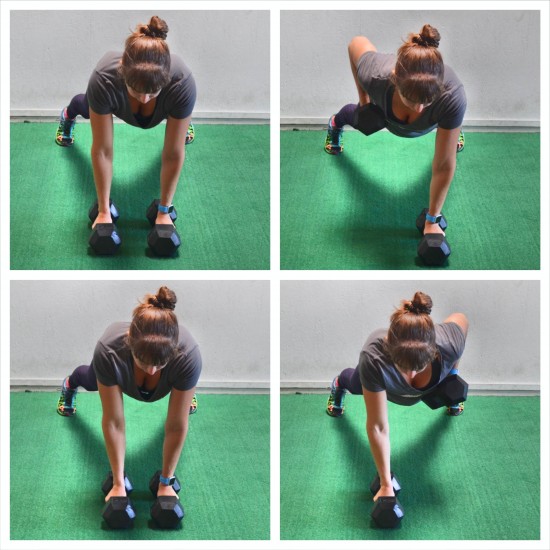
Renegade Rows – To do the Renegade Row, you can use dumbbells or kettlebells. Set two weights, whichever type you choose to use, on the ground under your shoulders. If you place your hands and the weights closer together, it will make the movement easier and help you balance and prevent rotation. Set up in a high plank position with each hand on a weight and your feet wider apart. Placing your feet wider apart will make it easier to stabilize and give your a wider base. If your hips rotate as you row, widen your base. If it is easy to stabilize, try bringing your feet closer together. Beginners may need to do this from their knees. In the plank position with your body in a nice straight line from your head to your heels, row one weight up toward your chest, driving your elbow down toward your hip and back up toward the ceiling. Make sure that as you row your brace your abs and squeeze your glutes. You want to fight your body’s urge to rotate as you row one weight up at a time. Keep your hips and chest square to the ground. Row the weight all the way up to your chest just below your pec. Keep your core tight and squeeze your glutes so that you don’t rotate open. Do not let your butt go up toward the ceiling or your hips sag. Then lower the weight back down and row the weight up on the other side. Keep alternating until all reps are complete. Keep your core braced and fight the rotation as you alternate rows. Move slowly and fight the urge to rotate. Do not rush the movement. Be in control the entire time.
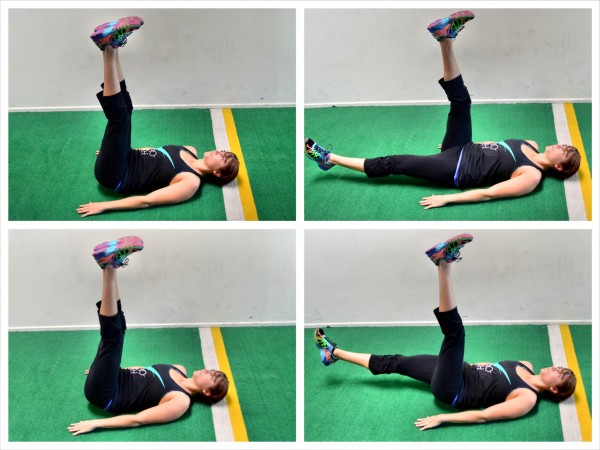
Alternating Leg Lowers – To do the Alternating Leg Lowers, engage your abs and press your low back into the ground as you raise both legs straight up toward the ceiling. Keeping your abs engaged and your low back against the ground, lower one leg down toward the ground. The closer to the ground you lower the leg, the harder your abs will have to work to stay engaged. The goal is to lower the leg so that your heel is just hovering off the ground. As you lower the leg, make sure to engage your glute as well. Then, keeping the leg straight, raise it back up toward the ceiling as you lower the other leg down. Alternate leg lowers, keeping the other leg straight up toward the ceiling. Fight to get your legs as straight as possible and work to lower the leg as close to the ground as possible. Don’t feel that you have to lower the leg all the way down if you can’t keep your core engaged. You can increase your range of motion as you become better able to activate your core.
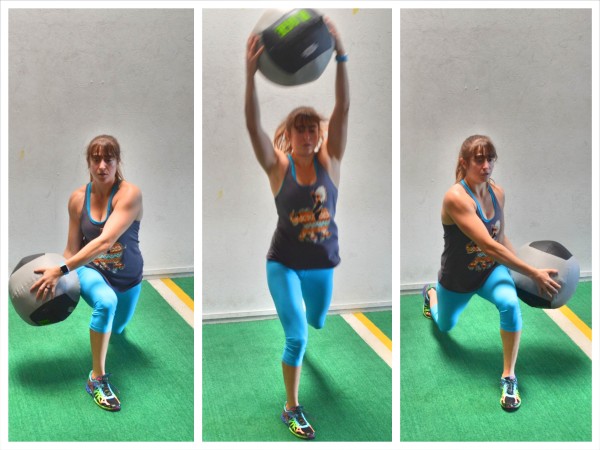
Rainbow Split Squat Jumps – Sub in a dumbbell instead of the med ball. To do Rainbow Split Squat Jumps, step one foot forward so you are in a nice wide stance. Hold a med ball or dumbbell in both hands and bring it outside that front leg. Sink into a deep lunge, bending the back knee down toward the ground as you bend the front knee. Bring the ball outside your front hip. Then jump up and as you do switch your legs so that you land with the opposite leg in front. As you jump and switch legs, swing the ball up overhead and down outside the other hip. When you land and bring the ball outside your other hip, sink straight into a lunge on the other side. Then jump back into a lunge on the first side, swinging the ball in a rainbow overhead and down to the other hip. Move quickly and try to get up off the ground. Get as deep in the lunges as you can as well. Make sure though that you don’t start to go forward, but land and sit back in the lunge a bit. Beginners may not be able to sink as low in the lunge and may need to do more of a step back with a hop instead of a jump from lunge to lunge.
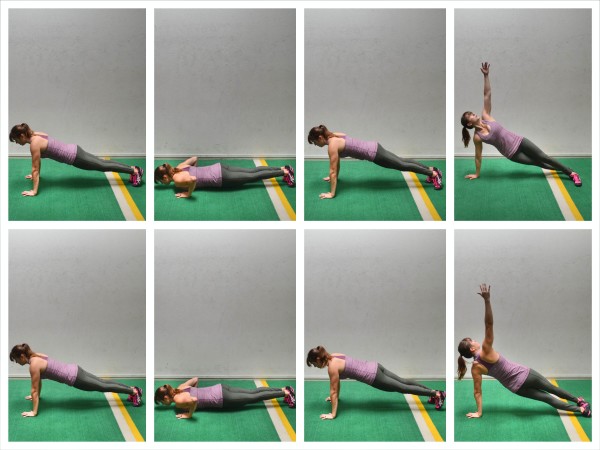
T Push Ups – To do the T Push Up, start at the top of a Push Up from your knees (beginner) or toes (advanced). Your legs should be close together and your hands should be under your shoulders and outside your chest. Brace your abs and engage your glutes and quads as you drive back through your heels to make sure your body is in a nice straight line. Then drop your chest to the ground between your hands to perform a push up. Keep your body in a nice straight line. Do not let your hips sag or your butt go up in the air. Also, make sure your elbows do not flare up by your shoulders. Press back up to the top of the push up, moving as one unit, then lift one hand and rotate open into a side arm balance or side plank. Pivot your feet to rock onto the outsides of your feet as you reach your top hand up toward the ceiling and rotate your body open. Do not let your shoulder shrug as you do this. Pause for a second, then rotate the hand back down and the feet back forward. Perform another push up and then a side arm balance on the other side. Keep alternating side arm balances after each push up. Beginners can do the movement from their knees or lift up onto their toes after the push up for the balance. They can also do this move off an incline.
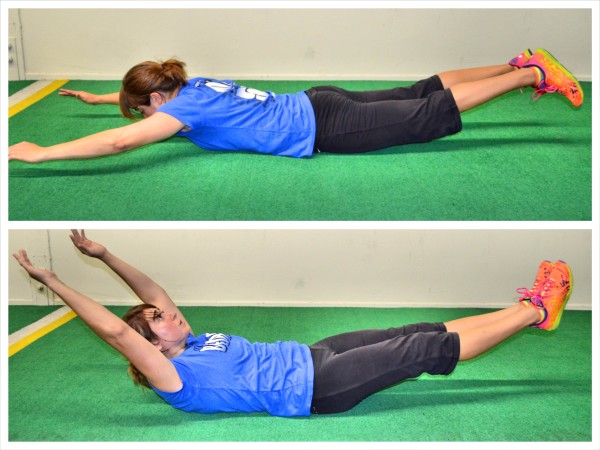
Superman Banana – To do the Superman Banana, set up at the top of Superman, lying face down on the ground with your arms stretched overhead and your legs out straight. Engage your glutes and back and raise your chest and quads up as high off the ground as you can. Then, keeping your arms and lower legs up off the ground, roll over onto your back. Try not to push off with your hands or feet as you roll. Once on your back, keep your belly button drawn in toward your spine and your legs and arms up off the ground. Your neck and head should be in a neutral position. This is “Banana.” You want to really press your low back into the ground and try to crunch your shoulder blades up off the ground as you keep your legs a few inches off the ground. Do not touch your heels down. Beginners may need to lift their legs up higher or even slightly bend their knees. Then roll back over into Superman. Again do not push off with your arms or legs if you can. Hold in each position (Superman and Banana) for a few seconds before rolling back over.
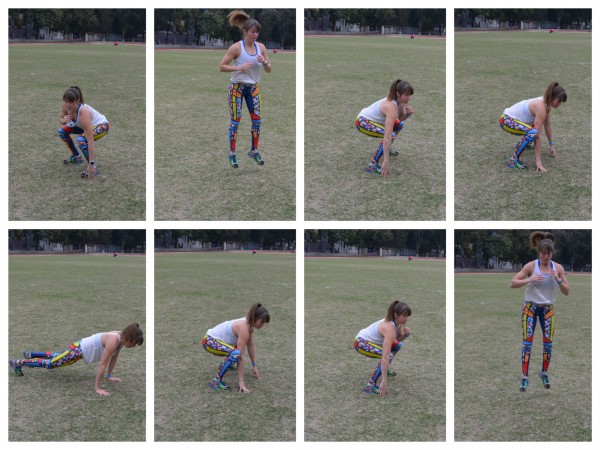
Snowboard Hop Burpees – To do Snowboard Hop Burpees, start with your feet in a slightly staggered stance and your back foot out in front of your front foot. Look forward over that front leg and then squat down to place your front hand down on the ground by your toe. Do not simply round over to place your hand on the ground. Squat down. Do not touch the ground if that means rounding over with your butt up. Then jump up and rotate, switching to land in the slightly staggered stance on the other side. Touch your hand back down to the ground as you sink into a squat on that side. Jump back up and rotate back to the first side. Then in the squat, place your hands down on the ground and jump your feet back into a plank position. Keep your core engaged and your body in a nice straight line. Jump your feet back in and come back into the squat. Jump and switch to a snowboard hop on the other side. Repeat 3 jumps and perform the jump back on the other side.
Start my 6-Week Bodyweight Shred!
Love this workout? Then check out my 6-Week Bodyweight Shred!