WARM UP
Stretch and Roll Out:
Calves
Quads
Hamstrings
Hips/Glutes
Chest/Back
Shoulders/Traps
WORKOUT
Complete 4 rounds of the first exercise, resting 60-90 seconds between rounds. Then rest 1-2 minutes and start the supplemental circuit. For the circuit, set a timer for 20 minutes and complete as many rounds as possible in that time. Rest only if needed but try to keep moving. Record how many rounds you complete and the weights used and try to increase next time!
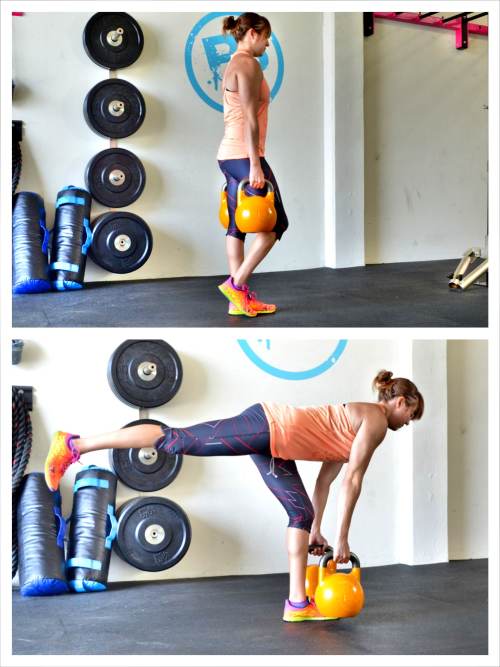
SINGLE LEG DEADLIFT:
8-15 reps per side Single Leg Deadlift
CIRCUIT:
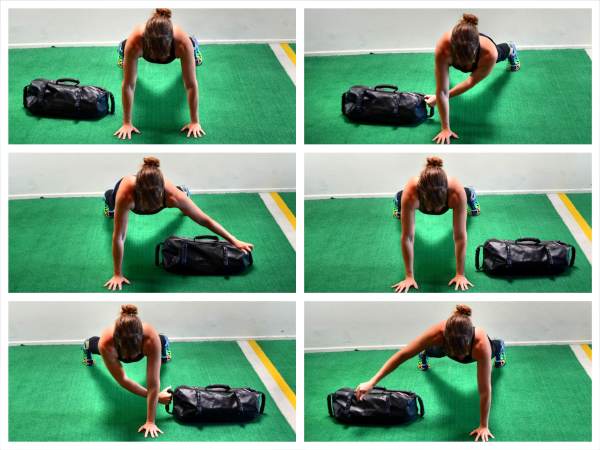
5 reps per side Sandbag Plank Pull Throughs
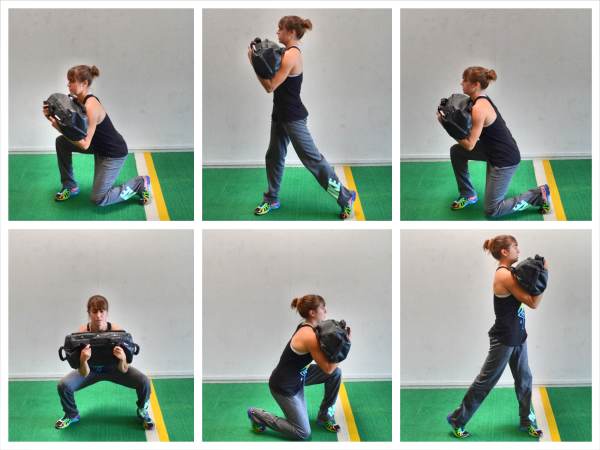
10 reps Duck Under Lunges
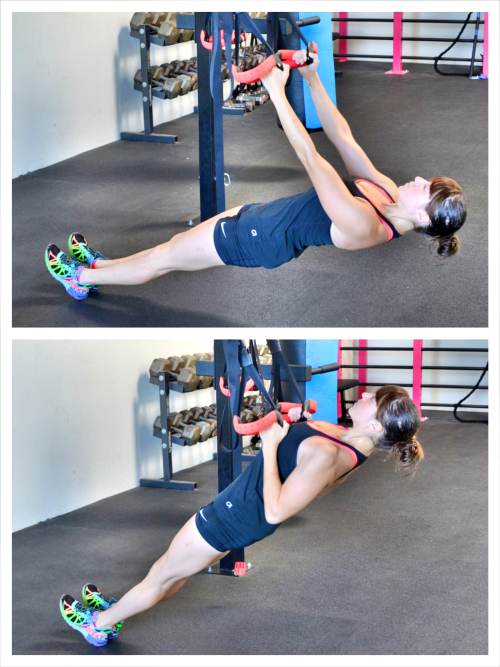
15 reps Inverted Rows
20 reps KB Swings
COOL DOWN
Stretch and Roll Out:
Calves
Quads
Hamstrings
Hips/Glutes
Chest/Back
Shoulders/Traps
NOTES:
Complete all four rounds of the Single Leg Deadlift before moving on to the circuit. With the circuit, use the heaviest weights possible while still being able to move quickly and not have to rest.
EXERCISE DESCRIPTIONS:
Single Leg Deadlift – To do this move you can use a barbell, sandbag, dumbbells or even kettlebells. To do the kettlebell Single Leg Deadlift, hold a kettlebell in each hand down by your sides. Stand on your right leg with your knee slightly bent and your left toe lightly touching the ground. Then lift your left leg back toward the wall behind you as you hinge over, keeping your back flat. As you hinge over, drop the kettlebells down and back. Do not reach them toward the ground and let your back round. Only lower them as far as you can without rounding or “squatting.” Your standing knee should be soft but isn’t going to bend extra as you hinge over. Make sure that as you hinge over you sit back in your heel and then drive through your heel to come back up to standing. You want to feel your hamstring and glute work.

Sandbag Plank Pull Throughs – To do Sandbag Plank Pulls, set up in a plank position from your hands and toes or hands and knees and place the sandbag on the ground to one side of your body just outside and below your shoulder. Make sure your hands are under your shoulders and then place your feet or knees wider apart to give you more stability. The closer together your feet are, the harder the move will be because you won’t have as wide or stable a base. If you feel your hips rocking side to side, widen your feet out. If the move is too easy, bring your feet closer together. Then reach your hand under your body and across to grab the sandbag. Squeeze your glutes and, without rotating your hips, pull the sandbag through and across to the other side of your body. Make sure your body stays in a nice straight line with your abs engaged as you reach through and pull. Do not let your hips go up in the air or sag toward the ground. You want to pull the sandbag all the way across and outside the other shoulder. If you can’t pull the sandbag all the way across or need to rotate your hips a lot to do so, it may be too heavy. Then reach through with the other hand to pull it back. To fight your body’s desire to rotate, you will need to engage your core and really squeeze your glutes. You do not want to feel this move in your low back. Keep alternating reaches until all reps are complete. Your goal is to keep a nice straight line from your head to your heels the entire time.

Duck Under Lunges – To do the Duck Under Lunge, hold the sandbag up at your chest with your arms wrapped around it. You will then squat down, sitting your butt back while keeping your chest up. As you come back up out of the squat, you will rotate toward the right, pivoting your left foot. Stand up nice and tall, facing to the right with your back leg in triple extension. Do not let your foot stay put and your knee cave in. Then rotate and sink back down into a squat and then pivot and rotate up toward the left side, pivoting your right foot. Keep your chest up the entire time. Do not let your back round toward the ground. Also do not lean forward to try to get lower to the ground. Sink as low as you can in the squat without your form breaking down then quickly pivot up to each side. As you get comfortable with the move, try to make it as fluid as possible. The move should look like a “U” shape. Beginners may need to make it look more like a “V” until their hips open up more. Beginners may also need to drop the weight or not go as low.

Inverted Rows – To do the Inverted Row, hold a suspension trainer strap in each hand or use a bar. Walk your feet out so that you are leaning back. The closer to parallel to the ground you get, the harder the move will be. Squeeze your core and glutes and press your chest out so there is tension between your shoulder blades. Make sure you don’t shrug your shoulders and that your body is in a nice straight line. Then row up, keeping your body in that nice straight line. Row until your chest comes up to the handles and then lower yourself back down. Don’t let your hips sink as you lower back down or your low back arch. Also, keep your chest pressed out the entire time (make sure you don’t round your thoracic spine at the bottom). Move in a controlled fashion as you keep tension between your shoulder blades the entire time. Make sure you row low and don’t shrug your shoulders at any point. Do not bounce off the bottom of your row or use momentum to get back up.

KB Swings – Click here for Kettlebell Swing form and some variations if you’ve never done it before.