WARM UP
Stretch and Roll Out:
Calves
Hamstrings
Quads
IT Bands
Adductors
Lats
Hips/Glutes
WORKOUT
Complete 1 rounds of the first circuit. Then complete 2-3 rounds of the second circuit before moving on to 3-5 rounds of the third circuit. Only rest between rounds of the third circuit. Rest up to 1 minute between rounds.
CIRCUIT #1:
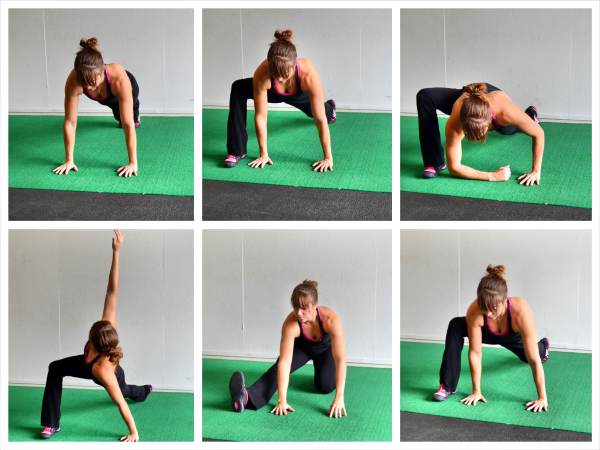
10-15 reps per side World’s Greatest Stretch with Hamstring Stretch
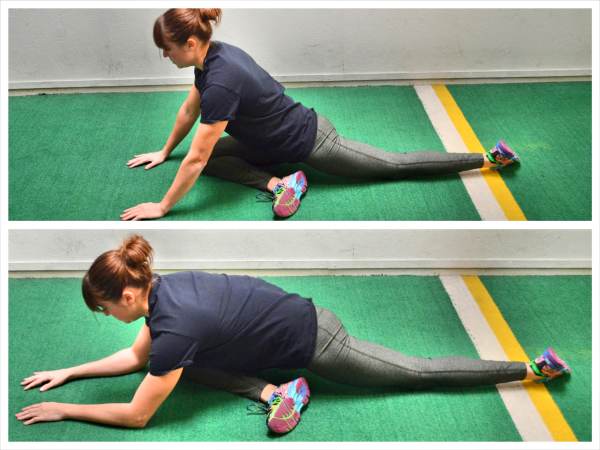
10-15 slow deep breaths each side Pigeon Pose
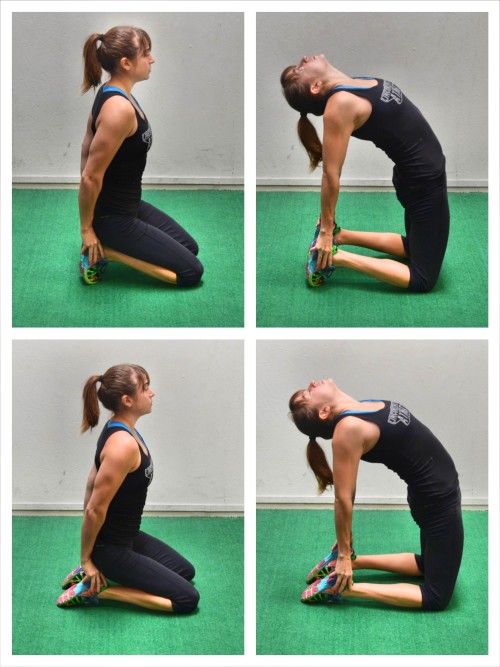
10-15 reps Kneeling Bridge
10-15 reps per side Frog Stretch with Rotation
10-15 reps per side Star Stretch
10-15 reps per side Standing Hamstring Stretch
CIRCUIT #2:
10-15 reps deep breaths or marches Pelvic Tilt
15-20 reps Glute Bridges
10-20 reps per side Plank with Reach Back and Out
CIRCUIT #3:
1 rep each side Lunge Matrix
3-5 reps each side Sandbag Get Up
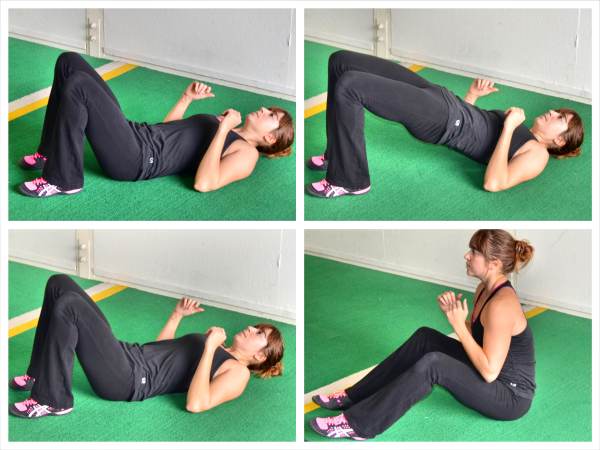
10-20 reps Glute Bridge To Sit Up
COOL DOWN
Stretch and Roll Out:
Calves
Hamstrings
Quads
IT Bands
Adductors
Lats
Hips/Glutes
NOTES:
While this workout is a good start to getting rid of your low back pain because it will stretch out your tight hips and back as well as strengthen your glutes and abs, it alone will not get rid of your pain. You need to stretch, roll out and activate the correct muscles a few times a week to get real results.
EXERCISE DESCRIPTIONS:
World’s Greatest Stretch with Hamstring Stretch – Start in a high plank position with your hands under your shoulders and feet together. Your body should start in a nice straight line. Step your right foot outside your right hand. Drop the right elbow down into the instep of your right foot. Then rotate open facing your right leg, stretching your right arm up toward the ceiling. Bring the right hand back down to the ground. Sit back on your left heel and straighten your right leg. Feel a stretch down your hamstring. Then bend the right leg and move back into the plank position with the foot outside the hand. Again drop the elbow and repeat the move on your right side. Complete all reps and then switch and do the stretch on the other side.
Pigeon Pose – Sit on the ground and bring one foot in front. If you bring your right leg forward, your knee should be pointing about to “2” on a clock. The more you bring your foot out so that your knee is bent to 90, the harder you will make the move. Straighten the back leg back behind you as much as possible. Rotate the leg in, turning the toe in so that your hips are square front. Then relax over your front leg. Hold and feel a stretch in your glute and outside your front hip.
Kneeling Bridge – Start by kneeling on both legs with your feet flexed. Sit back and place your hands on your heels. Then arch up off your heels and press your chest out, keeping your hands on your heels. Relax your head back and arch as much as you can, getting a nice stretch down your chest, core, hips and quads. Hold for 1-2 seconds and relax back down. Repeat. If you are less flexible, do this stretch with a couch, chair or table behind you. Kneel down and place your hands back behind you on the couch or table. Press your chest out and arch as much as possible away from the piece behind you while leaning your head back. Then relax back down and repeat.
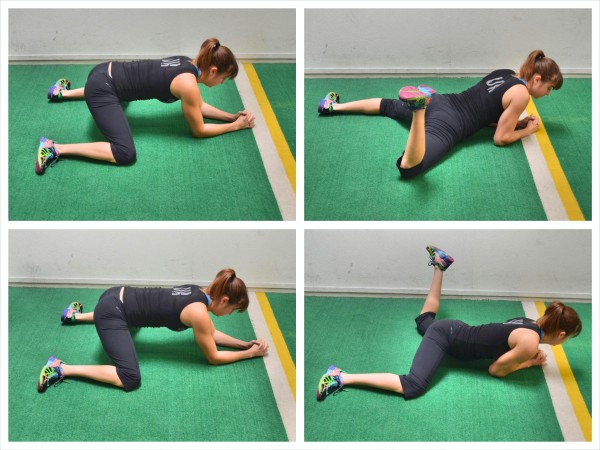
Frog Stretch with Rotation – Kneel on the ground and spread your knees as wide as possible. Lower yourself down to your forearms. Keep your feet in line with your lower leg and knees. Do not let your feet come together behind your butt. Sit your butt back between your knees as much as possible. Then come forward out of the stretch for a second before pressing your butt back as far as you can. As you come back forward, lower your body down to the ground and rotate your lower leg up and forward. Sit back again and then pivot the other hip. Keep alternating sides until all reps are complete.
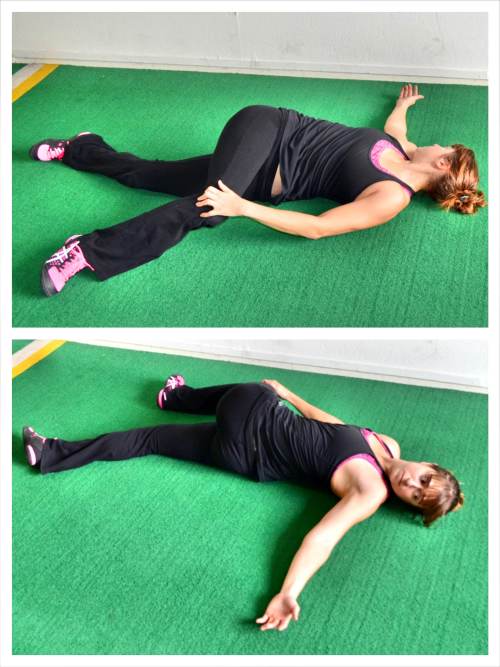
Star Stretch – Lie on your back with a foam roller or ball to your right side if you have one. Otherwise you will just press your knee toward the ground. Bend your left knee to about 90 degrees and pull it across your body. Place your knee on the roller or ball. Place your right hand on top of your knee to hold your knee onto the ball. Reach your left hand across your body and touch the floor on the right side with your palm. Then open that arm back up to the left side, trying to touch the back of the hand down to the ground. Try to open up the chest as much as possible without letting the knee move from the roller or ball. Hold for a second or two and then bring the hand back across and repeat. Complete all reps on that side before switching.
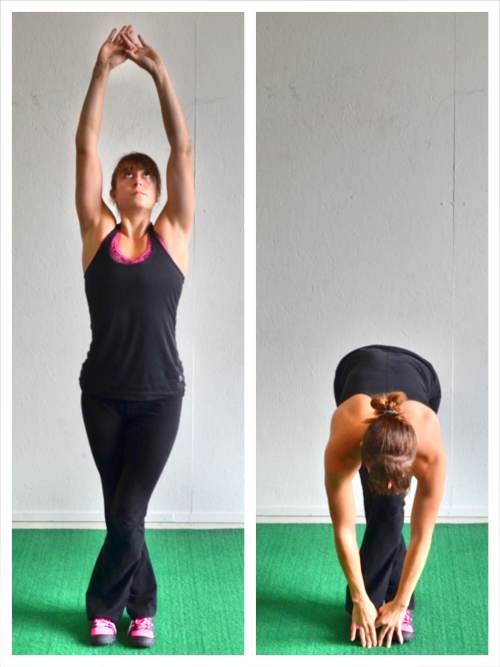
Standing Hamstring Stretch – Standing, cross your left leg over your right leg. Bring the left foot over and across until the big toe is even with the big toe of the right foot. You want your feet even so that your front leg (the left leg) is pressing the back leg (right leg) straight during the stretch. Clasp your hands together and reach up overhead. Get a nice big stretch. Then bend forward, reaching the hands down to the ground. Hold for 1-2 seconds. Then relax and step forward to repeat on the other side. If your hips/glutes are tight, you can also reach toward the instep of the back foot to stretch your IT Band.
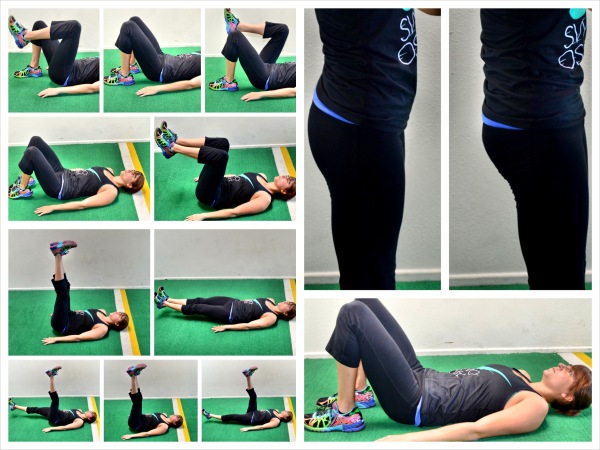
Pelvic Tilt – Lie on your back with your knees bent and your feet flat on the ground. You should almost be able to reach your hands down by your sides and touch your heels with your finger tips. Feel the space between your low back and the ground as you lie there. Then draw your belly button in toward your spine and press that space away. You should feel your low back against the ground. Beginners may need to hold there. More advanced exercisers will add in a march or even draw both knees in. To do the march, they will bring one knee at a time in toward their chest and then return their foot right back down to the ground. Their low back will never leave the ground as they march. If they can keep their core engaged while marching for 10-15 reps per side, they may then pull both knees in at one time and then lower their feet back down. Their knees will stay bent the entire time and their back will stay pressed against the ground. Complete 10-15 reps then move to the next exercise. Make sure you really focus on keeping your core tight and your back against the ground no matter which variation you do.
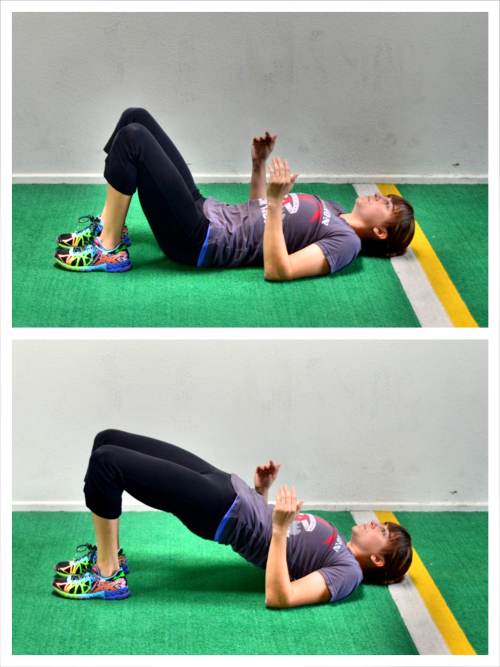
Glute Bridges – Lie on your back with your feet about hip-width apart. You should basically be able to touch your heels with your finger tips. Then bend your elbows to 90 degrees. Drive your elbows, shoulders and heels into the ground as you drive your hips up. Make sure your knees do not fall apart. Actively squeeze your butt as you drive your hips up. If you only feel your hamstrings working, make sure that you aren’t driving off your heels backward. You shouldn’t feel like you are driving back into your shoulders. You want to actual feel like you are driving your knees forward over your toes even though you are driving through your heels. Drive your hips straight up. Hold for 2-5 seconds at the top.
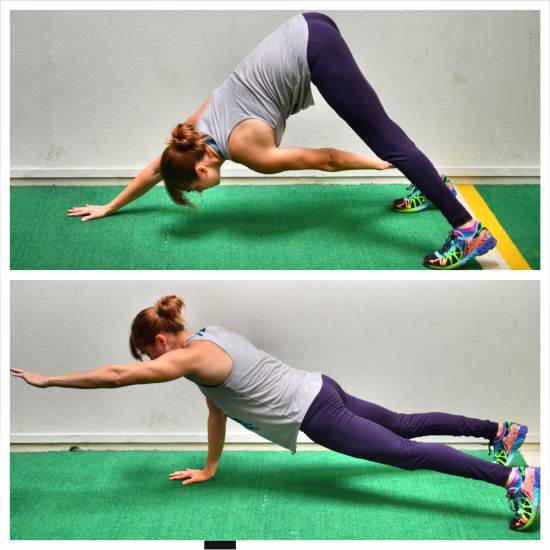
Plank with Reach Back and Out – This move is done from the hands and either your knees (beginner) or toes (advanced). To do this move from your knee, set up in the top of a push up with your hands under your shoulders and your body in a nice straight line down to your knees. Then sit back on your heels into a “child’s pose” position, reaching one hand back between your legs. Move forward back to the top of the push up as you reach the hand from between your legs out toward the wall beyond your head. You may even extend your hips more toward the ground. Just make sure to keep your abs engaged so that you don’t feel the extension out in your low back. Complete all reps on that side before switching to the other arm.
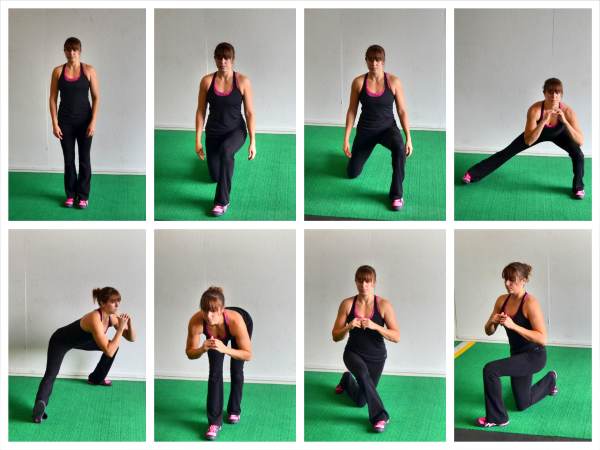
Lunge Matrix – The easiest way to remember all the lunges is to think about lunging around a clock. Start facing “12″ on the clock. Doing all the lunges first moving the left foot…
- Front Lunge: Step the left foot forward and sink down into a front lunge. Bend both the front and back knees. Make sure you do not lean forward as you lunge forward. Also make sure you drive off your front heel to push back to standing.
- Angled Front Lunge: After returning to standing after the front lunge, you will again lunge forward, but this time out at an angle. Lunge forward toward “11″ on the clock with your left foot. Bend both your back and front knees as you lunge forward, keeping both toes pointing straight ahead. Then drive off your left heel to come back to standing.
- Side Lunge: Again lunging with the left foot, step the left foot out toward “9″ on the clock. As you lunge out to the side, you are going to bend the left knee and sit your butt back. Keep your right leg straight. Both toes should be pointing straight ahead. Keep your leftt heel down as you sink into the lunge. Push your butt back and keep your chest up. Then drive back up to standing.
- Backward Rotational Lunge: Next you will lunge back toward “7″ on the clock with your left foot. Your left foot, when you step back, will be perpendicular to your right foot, which is pointing toward “12.” Push your butt back and sink into a lunge, bending the left knee while keeping the right leg straight. Do not let the left heel come up. Keep your chest up and sit your butt backward. Driving off your left heel, push back to standing. Make sure that your right toe doesn’t rotate but continues to point toward “12.” Also make sure your right leg does not bend.
- Backward Hinge: Again moving the left foot, step your left foot back so that the toe is even with the heel of your right foot. Both toes will point toward “12.” After taking the little step back, you are going to hinge over at the hips, pushing your butt back toward the wall behind you. You will feel a stretch down your hamstrings. Then stand back up and step forward.
- Curtsy Lunge: Take your left foot and step your left foot back behind your right leg. You will reach your left foot back to about “5″ on the clock. Make sure you step far enough back (do not keep your left foot too close to your right) that you can bend both knees and sink down into a deep lunge. Keep your right heel down on the ground and your chest up. Then come back to standing. Make sure that you feel this lunge in the outside of your right butt cheek when you lunge back with the left leg.
- Forward Cross Lunge: Lunge forward and across toward about “2″ on the clock with your left foot. Pivot your left foot so that your feet are perpendicular. Sink down into a lunge, bending both knees. Make sure your left heel stays down as you lunge. Then drive off your left heel to come back to standing.
- All seven lunges listed above completes the lunge sequence on one side.
- One rep will be all seven lunges.
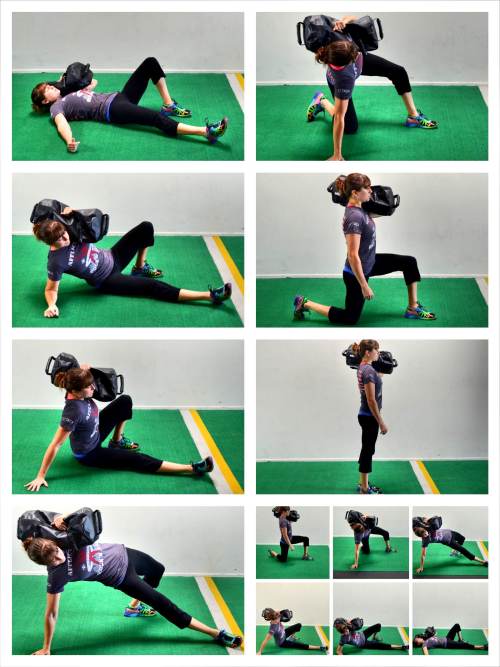
Sandbag Get Up – Start by lying on your back on the ground with your legs out straight. Place the sandbag over your right shoulder and hold it in place. Bend your right knee and place your foot flat on the ground. Straighten your left arm out to the side (not straight out at shoulder height, but not right by your body). Then roll up on to your left forearm. Prop yourself up nice and tall on your left forearm. Press through your right foot on the ground. Do not let your right knee cave in and keep your left leg out straight on the ground. Once up on your forearm, press up onto your left hand with your left arm going straight. Sit up nice and tall. Do not shrug your shoulders or round forward. Then from the seated position you are going to bridge up, lifting your hips up as high as you can. You will press down through your left hand as well as your left heel and right foot. Keep your right foot flat on the ground and your left leg out straight. Do not let your right heel come up. From the bridge position, slide your left leg back and under you so that you are in a kneeling position with your hand on the ground. Make sure you swing your leg back enough so that you are in a strong supported kneeling position that will allow you to lift your left hand off the ground. Staying nice and tall, lift your left hand and come to a kneeling position. Do not lean forward of slouch forward as you lift your hand up off the ground. Then stomp your right foot into the ground and come up to standing, bringing your left foot forward to be even with your right foot. Once standing, you will reverse the steps until you are again lying on your back. You will first go back to kneeling, stepping your left foot back. You will then place your left hand down on the ground out to the side and just a little back from your left knee. You will then bridge up and swing your left leg through so it is out straight in front of you. As you bridge, keep your right heel firmly planted on the ground. From there, you will return to a seated position supported by your left hand. Then you will relax down to your forearm and finally roll on to your back. Do not slouch as you move back down. Keep a nice tall posture throughout the entire move. Repeat 3-5 reps on this right side before switching. Beginners may just want to start by balancing something on their knuckles.
Glute Bridge To Sit Up – Lie on your back with your knees bent and feet flat on the ground about hip-width apart. Bridge up, lifting your hips as high as possible while driving through your heels. Lower your hips back down and let your feet move a little away from your butt. Then sit up, keeping your torso up nice and tall and your feet on the ground. Once you sit all the way up, lie back down, bring your feet back in and then bridge back up.
