WARM UP
Stretch and Roll Out:
Calves
Hamstrings
Quads
Hips/Glutes
Chest
Back
ACTIVATION
Complete 1 round of the following activation series.
CIRCUIT:
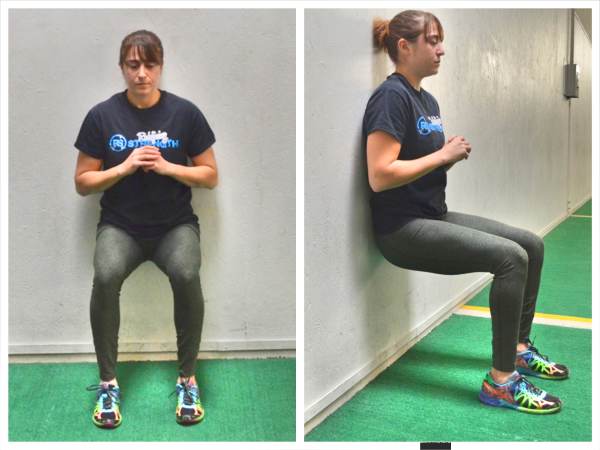
30 seconds Wall Sit
30 seconds Push Up Holds
30 seconds Banana Hold
WORKOUT
Complete 3-5 rounds of each superset. Do the exercises back to back and rest 45-90 seconds. This isn’t meant as a fast cardio workout. It is about choosing heavier weights and harder variations. Rest enough between rounds to go hard each and every time. If you are working out with a partner, you can each alternate who goes to pace each other.
SUPERSET #1:
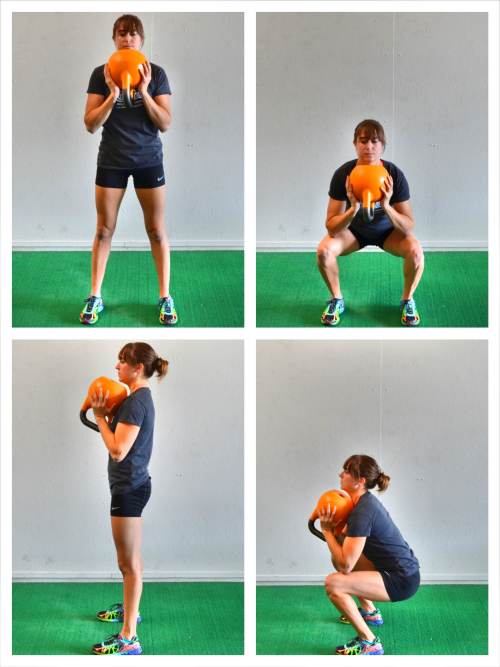
10-15 reps 3-Count Eccentric Goblet Squat
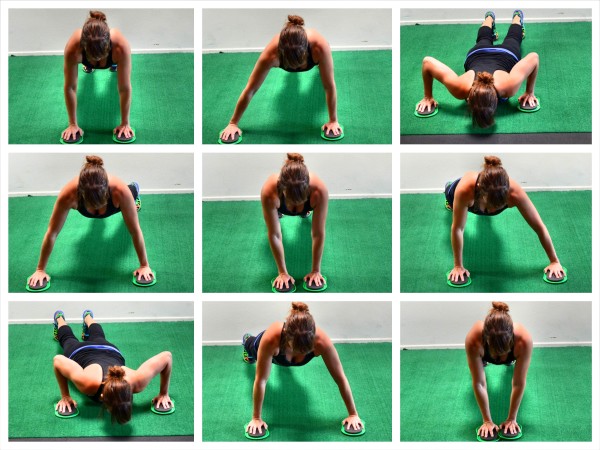
5-8 reps Fly to Push Ups
SUPERSET #2:
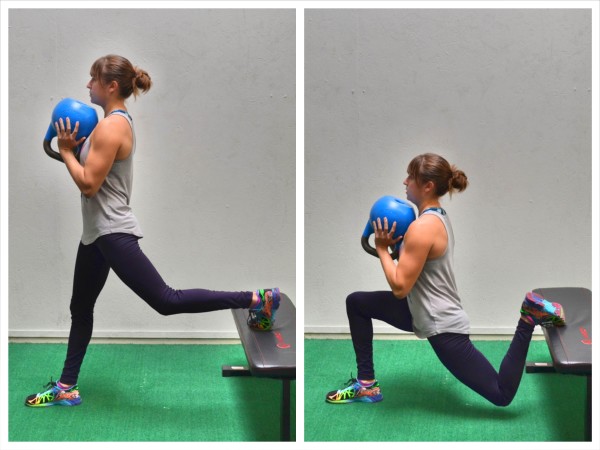
8-12 reps per side Balance Lunges
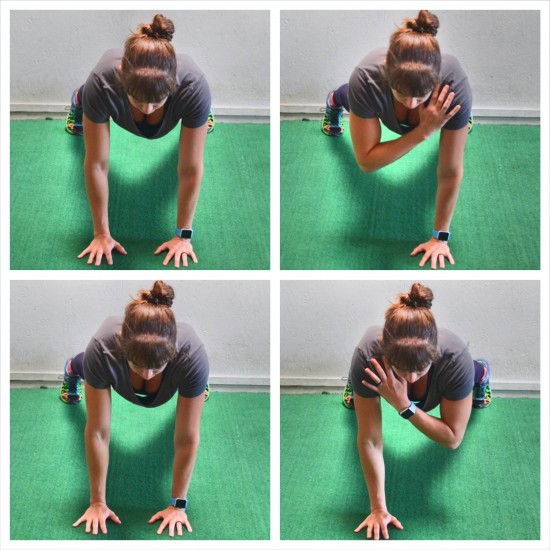
10-15 reps Plank with Shoulder Taps
SUPERSET #3:
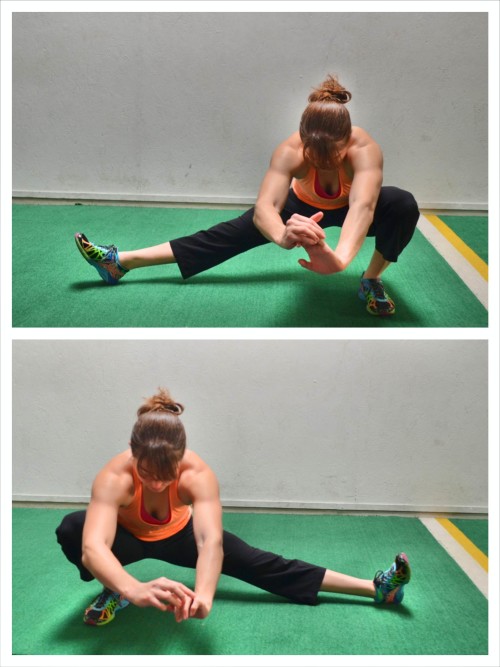
6-10 reps per side Cossacks Squats
10-15 reps per side Stability Press
COOL DOWN
Stretch and Roll Out:
Calves
Hamstrings
Quads
Hips/Glutes
Chest
Back
NOTES:
Again you are not trying to rush through this but instead add weight and try more challenging variations while getting enough rest in between rounds to keep working at a high intensity.
EXERCISE DESCRIPTIONS:
Wall Sit – To do the Wall Sit, stand with your back to a wall and your feet about hip-width apart. You can change up your exact foot position to hit slightly different aspects of your quads. Then sink down into a squat, pressing your back into the wall behind you as you try to get your quads as close to parallel to the ground as possible. When you sink into the squat, keep your ankles aligned under your knees and drive back into the wall through your entire foot. Do not rock forward onto your toes. Also, do not sink past parallel. Hold there and drive your back into the wall. If you start to feel this in your low back, make sure to brace your abs. Also, do not hunch or lean forward as you hold. Stay up nice and tall. To make this move easier, don’t sink as low in the squat or move your feet out just a bit from the wall. Do not let your ankles get too far out in front of your knees though.

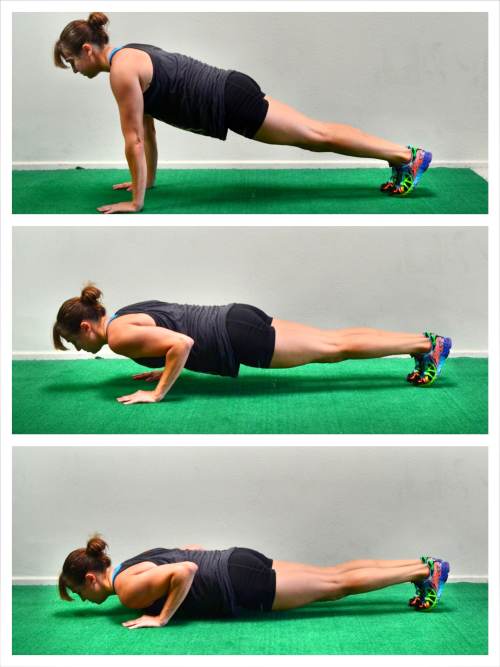
Push Up Holds – Choose one hold or alternate through them during the 30 seconds.
- High Push Up Hold – This is a great way to begin improving your lock out and core strength for push ups. Set up at the top of a push up with your feet together and your hands under your shoulders. Your body should be in a nice straight line from your head to your heels (with your legs straight). Tilt your pelvic under and hold in that position. Make sure your legs are engaged and you are driving back through your heels not coming forward onto your toes. Do not tuck your chin as you hold or shrug your shoulders. Keep your head in line with your spine. You can also hold from your hands and knees to make the plank hold easier.
- Mid-Push Up Hold – This is a great move to really work your core, chest and triceps. To do this move, set up in a push up position with your feet together and your hands under your shoulders. Press up to the top of the push up with your body in a nice straight line from your head to your heels. Keeping your body in a nice straight line, bend your elbows to about 90 degrees. Do not let your hips sink or your butt go up toward the ceiling as you hold at that mid-point. Do not tuck your chin as you hold or let your elbows flare way out. You want your arms and body to create an arrow shape (->) not a “T.” Hold as close to 90 degrees as you can. You can also do this from your knees to make it easier or even off an incline.
- Bottom Push Up Hold – This is the hardest of all three holds because often the hardest part of the push up is keeping everything engaged and pushing up from the bottom. This hold works on that. To do the Bottom Push Up Hold, set up at the top of a push up. With your body in a nice straight line and everything engaged, lower down until your chest is an inch off the ground. Make sure to engage your glutes and quads to keep your body in a nice straight line. Do not tuck your chin or let your hips sag toward the ground. Also do not let your butt go up in the air. Maintain a nice straight line from your head to your heels and hold an inch off the ground. Do not let your elbows flare way out as you hold. You can also do this from your knees or off an incline.
Banana Hold – To do the Banana and improve your mind-body connection so that you can engage your entire core (everything from your shoulders to your knees), start lying on your back with your legs out straight and your arms reaching overhead on the ground. Your legs should be together and your arms should be right by your head. Press your low back into the ground and draw your belly button in toward your spine as you lift your legs and arms up off the ground. Your neck and head should be in a neutral position between your arms and your legs should be together and out straight a few inches off the ground. Hold here, squeezing your legs together as you try to get your shoulder blades up off the ground while keeping your low back against the ground and abs engaged. Beginners may find they need to lift their legs up higher toward the ceiling or bend their knees to keep their low back against the ground and their abs engaged. Beginners can also try an easier variation of the Pelvic Tilt if they feel their low back taking over.
3-Count Eccentric Goblet Squat – Take one kettlebell and turn it upside down, holding it on the bell. Set your feet between hip-width and shoulder-width apart. Keep the kettlebell in at your chest. Draw your belly button in toward your spine. Sit your butt back and keep your weight in your heels as you squat down. Lower for a 3 count. Do not rush the lower. Keep your chest up and don’t let your back round forward. Sink your butt down as low as you can, keeping your heels on the ground. Then, driving through your heels, come back to standing quickly. Do not lean or rock forward as you stand up. Come all the way up and squeeze your glutes at the top then sink back down, again lowering for a 3 count. You may also do a double racked kettlebell front squat to make the weight heavier if you don’t have a single bell heavy enough.
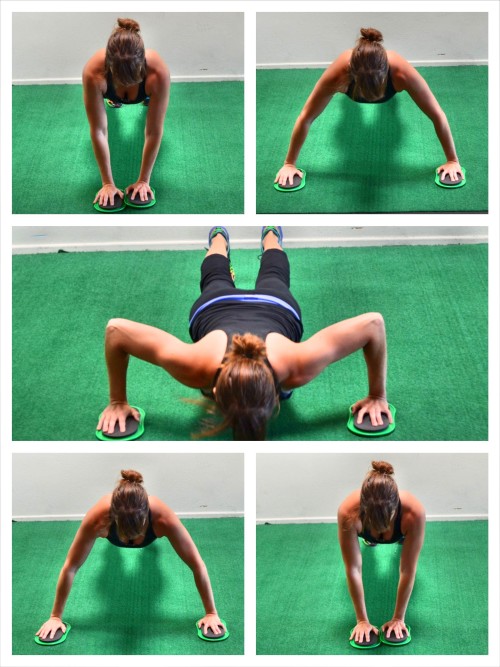
Fly to Push Ups – Depending on your fitness level, pick a variation of the Fly to Push Up that challenges you yet allows you to maintain perfect form.
To do the Beginner Fly to Push Up, set up in a push up position with one hand on a Valslide and the other hand on the ground. You can do this from your knees to make it easier or from your toes to make it harder. Then slide the hand on the slider out to the side and perform a push up. As you push up, slide the hand on the slider back in toward your hand on the ground. Repeat, completing all reps on one side before switching.
If the single slider Fly to Push Up is too much, this move can be done by just stepping the hand out to the side on the ground or even on an incline. To advance the Fly to Push Up, you will use two sliders. Again this variation can be done from your knees (easier) or toes (harder). Start at the top of a push up and then slide one hand out to the side and perform a push up. Push up and slide the hand back into the starting position. Even though this is a wider push up, don’t let your elbows flare way out by your ears. Slide the other hand out on the slider and perform a push up. Keep alternating sides until all reps are complete.
You can advance the movement further by sliding both hands out to the side as you lower into the push up and then pull them back in as you come back up out of the push up. You will perform the fly as you perform the push up instead of sliding out, doing a push up and sliding back in. With all the different variations, do not let your butt go up in the air or your hips sag toward the ground as you do the push up. Also make sure not to shrug or let your elbows flare up by your ears. You want to create more of an arrow position (->) with your arms and upper body than a “T” as you do the push up.
Balance Lunges – Place your back foot up on a box. Hop your front foot out so you are in a nice wide stance with your back foot up on the box. Then sink down into a lunge, dropping your back knee toward the ground as you bend your front knee to 90 degrees. Really sit back into the lunge. Make sure you aren’t going forward onto your front toe and that your front knee is not going past your toe. You want to sit back to make your glute work. You should also feel a nice stretch in the front of the leg that is back when doing this move. Beginners may want to use a super low box or do the move from the ground as a split squat. More advanced exercisers, or if you don’t have weights, you may want to do it with your back foot in a suspension trainer. You can also add weight to make the move more challenging.
Plank with Shoulder Taps – To do Planks with Shoulder Taps, set up in a high plank position from your hands and toes (advanced) or hands and knees (beginner). Place your hands under your shoulders and closer together while your feet or knees should be wider apart to provide a more stable base. Bring your feet or knees together as the move becomes easier to make it harder on your core to stabilize. By having your hands closer together and more centered under your chest, you will also provide yourself with a more stable base. It is very important that you remain stable with this move or you can stress your shoulder. Then, bracing your abs and engaging your glutes so that your body is in a nice straight line, lift one hand up off the ground, moving it slowly to touch the opposite shoulder. Keep your hips square to the ground and do not rotate as you lift your hand to touch your shoulder. Do not let your butt go up in the air or your hips sag toward the ground. Touch your opposite shoulder then slowly place your hand back down on the ground. You want to move at a very controlled pace. Lift the other hand and tap your other shoulder. Do not rotate as you lift. Try to keep your body still and simply lift the hand to touch the opposite shoulder.
Cossacks Squats – To do the Cossack Squat, stand with your feet nice and wide apart as if you are going to do a Side Lunge (feet will be wider than shoulder-width). Shift your weight to one side, bending that knee and sinking down into a side lunge as you rotate the toe of your straight leg up toward the ceiling. Sink as low to the side as you can, dropping your butt down to the ground while keeping your heel on the ground. You will feel like you are sinking into a deep squat on one side as your other legs stays out straight with the toe up. Then push back up out of the squat and shift to a squat on the other side, sitting down as low as you can while keeping your heels down. Beginners may not be able to sink as low in the squat. Do not try to sink lower by squatting down and letting your heel come up. Sink only as low as you can while keeping your heels down. Advanced exercisers can hold a weight goblet style.
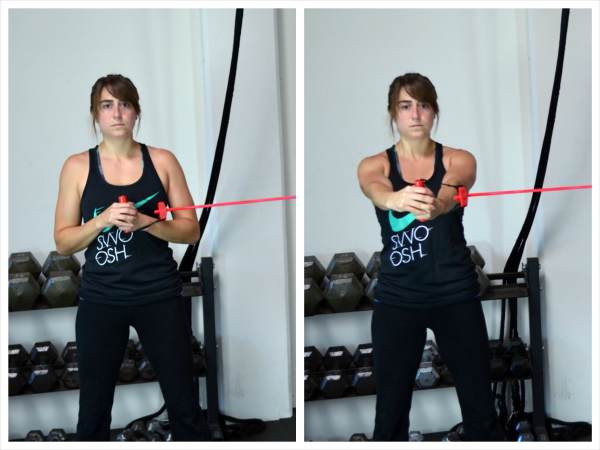
Stability Press – To do the Stability Press, you can use a resistance band or cable. If you are using a band, anchor the band and then hold one handle in both hands. Turn to the side so you are sideways to the anchor point and step away from the anchor point so that there is tension in the band. You want to make sure there is tension or the move won’t be challenging. Stand with your feet no more than shoulder-width apart. The closer your feet are together, the harder the move will be. Choose a stance though that challenges you while allowing you to maintain good form and not lean away. As you become stronger, bring your feet closer together and then even try a heavier band or walk further from the anchor point. Bring your hands into the center of your chest and squeeze your glutes while you brace your abs. Standing up nice and tall with your chest pressed out, slowly push the band straight out from the center of your chest until your arms are straight out. It should be a struggle to press the arms straight out because the band is trying to rotate you back toward the anchor point. Your core should have to work to stabilize and press straight out from your chest. Do not let your arms rotate open and go back toward the anchor. You want to press straight out from the center of your chest without shrugging your shoulders. Maintain a nice tall posture with your shoulder blades drawn down and back and your core engaged. Make sure you also don’t lean away. Then slowly bring your arms back in and repeat. Move slowly to really have to fight the band. If you move too quickly, you won’t get as much out of the move and you’ll probably get sloppy and let yourself rotate toward the anchor point or even shift open and push away. Also, if you allow your stance to rotate open or if you lean away, it will make the movement easier and won’t force that inside side (the side closest to the anchor point) to really work to stabilize. Complete all reps on one side before turning and facing the other way to work the other side. Really consciously engage your glutes before starting to press.