WARM UP
Stretch and Roll Out:
Foot
Calves/Shins
Hamstrings
Quads
Groin
Hips/Glutes
Back/Lats
ACTIVATION:
Complete 2 rounds of the following circuit. Hold each move for 30 seconds.
CIRCUIT:
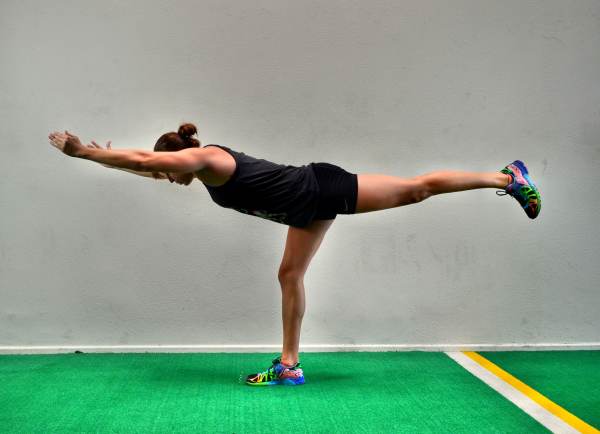
30 seconds Warrior III
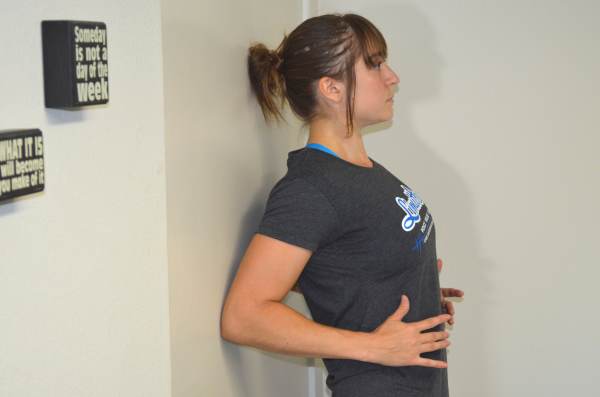
30 seconds Scapular Wall Hold
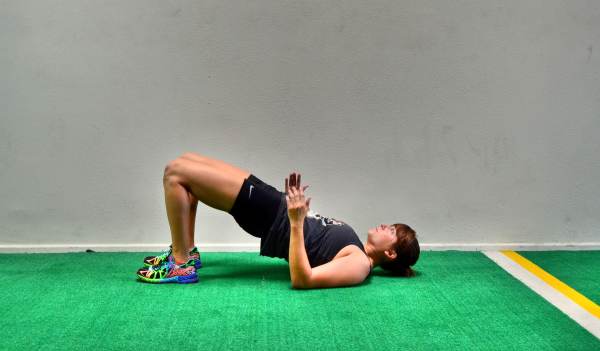
30 seconds Glute Bridge Hold
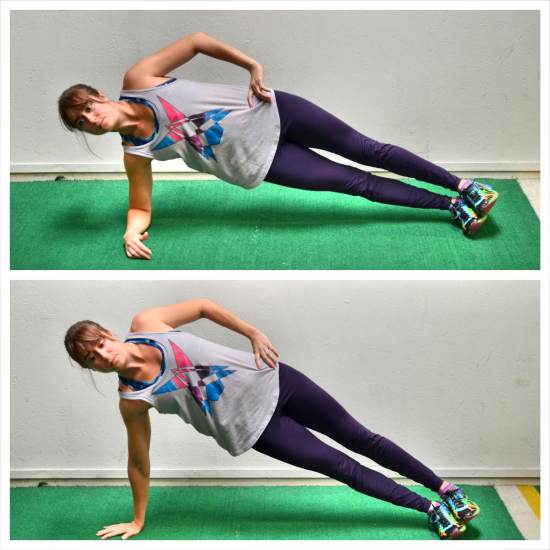
30 seconds each side Side Plank Holds
WORKOUT
After completing the Activation circuit, complete 4-6 rounds of each superset. Rest up to 1 minute between rounds of each superset and up to 2 minutes between supersets. Then rest up to 2 minutes before doing your 5 minutes of Conditioning.
SUPERSET #1:
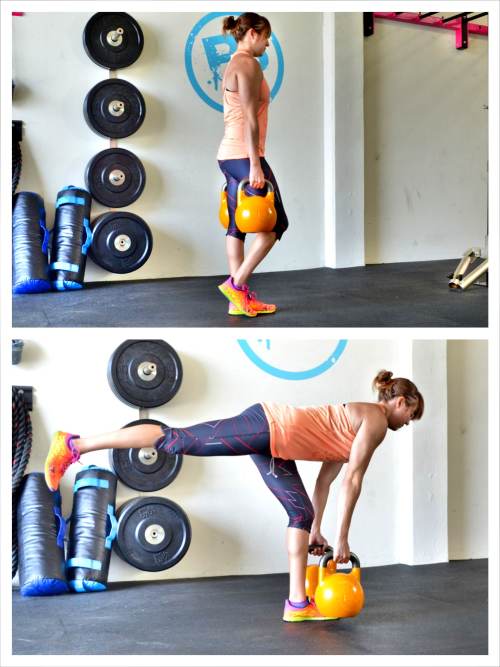
8-12 reps per side Single Leg Deadlifts
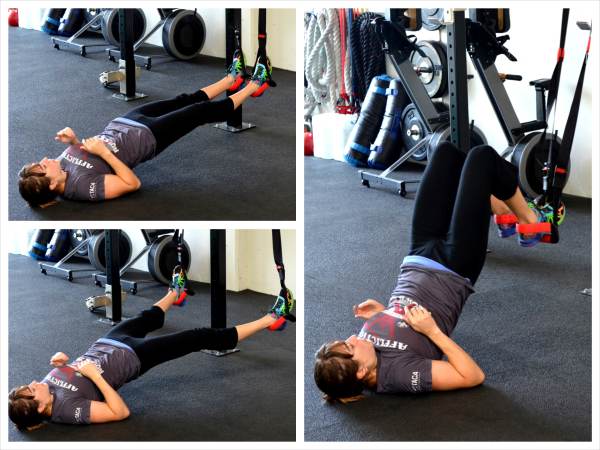
15-20 reps Suspension Trainer Glute Cherry Bombs
SUPERSET #2:
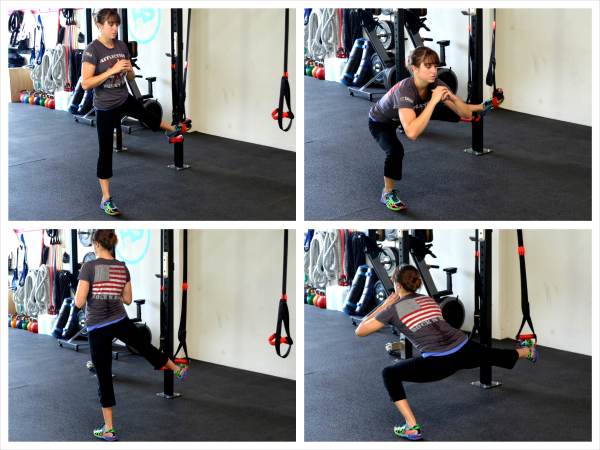
8-12 reps per side Suspension Trainer Side Balance Lunges
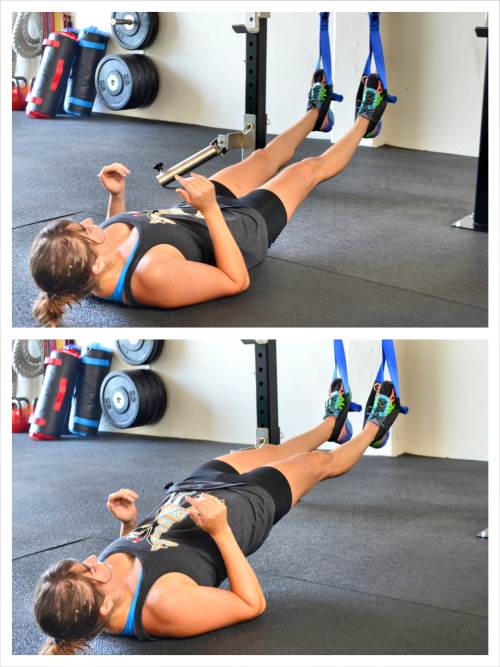
15-20 reps Straight Leg Glute Bridge
CONDITIONING:
Set a timer for 5 minutes. Go through the ladder, mixing up the drills and walking/jogging back to the start before going through another drill. Check out this post for Agility Ladder Drills to try.
COOL DOWN
Stretch and Roll Out:
Foot
Calves/Shins
Hamstrings
Quads
Groin
Hips/Glutes
Back/Lats
NOTES:
Make sure to really roll out and stretch your feet and lower legs. This workout can really help you prevent and alleviate foot and ankle injuries.
Use the activation exercises to get your glutes firing while also building stability in your feet and ankles. Then use the workout to strengthen your feet and lower legs as well as your hamstrings and glutes. The moves will also improve your balance.
The Conditioning at the end will improve your mind-body connection. Make sure to do the agility ladder drills quickly but correctly. Speed is only beneficial if they are done well!
EXERCISE DESCRIPTIONS:
Warrior III – To do the Warrior III pose, balance on one foot with your knee slightly bent. Hinge over at your hips, lifting your back leg toward the wall behind you as you lean your chest over. Pretend you are driving your foot straight back into the wall behind you. As you hold the pose, keep your back flat and your core tight. Reach your hands overhead or back behind you. Hold in this position. Do not let your back round or your other foot touch down. You want a nice straight line from the bottom of your lifted heel to the top of your head. Make sure you do not lock the standing leg out as you hold. Also make sure your hips don’t rotate open up as you hold. Squeeze your glutes to keep your hips level. Beginners may need need to use the wall behind them to help them balance. Stand with a wall behind you and when you hinge over have the lifted foot lightly touch the wall behind you to help you balance.

Scapular Wall Hold – To do the Scapular Wall Hold, stand with your back to the wall just a few inches away. Bend your arms to 90 degrees and drive your elbows back and your chest out. Lean back and place your elbows on the wall with your chest pressed out and your shoulder blades drawn down and back. Do not shrug your shoulders as you drive your elbows back and pinch your shoulder blades down and together. You want to open your chest up toward the ceiling as you lean on your elbows against the wall. Do not let your upper arms or back touch the wall. Relax your head back instead of tucking your chin. Pinch your shoulder blades down and back while keeping your core tight as you lean into the wall. Squeeze your glutes and don’t arch your low back. Really press your chest out so that you feel this move low between your shoulder blades. You don’t have to be at a huge incline or have your feet very far from the wall to feel this move. You may want to work your feet away from the wall as you get stronger, but even very advanced lifters should feel this between their shoulder blades while standing almost upright if they are consciously contracting.
Glute Bridge Hold – To do the Basic Glute Bridge Hold, bend your knees and put your feet flat on the ground just close enough that you can graze your heels with your fingertips when you stretch your arms down by your side. Your feet should be about hip-width apart. You can change up how far your heels are from your butt. If they are further out, you may engage more hamstring. While keeping your heels in closer to your butt will isolate more glute. Then bend your elbows to 90 degrees so that only your upper arms are on the ground. Drive up through your heels and upper back and arm to lift your glutes up off the ground. Drive your hips up as high as possible, squeezing the glutes hard. Keep your belly button drawn in so you don’t hyperextend your back. Do not push backward off your heels. Make sure you are driving straight up almost as if driving your knees forward over your toes. Also, make sure that your knees aren’t caving in or falling open. Squeeze your glutes and hold at the top. Concentrate on feeling your glutes work. Don’t just go through the motions. Actually think about the muscles that should be working!
Side Plank Holds – You can do the Side Plank from your forearm or hand. Doing the Side Plank from your hand is harder and requires more core and shoulder stability. Stacking your feet on top of each other instead of having one foot in front of the other also makes the move harder. Beginners will want to start with a Side Plank from their forearm and knees or knee (you can bend your bottom knee and have your top leg out straight instead of stacking both knees on top of each other). To do the Basic Side Plank from your forearm, set up on your side and prop yourself up on your forearm with your elbow right below your shoulder. Your legs should be out straight. You can either stack your feet or place your top foot on the ground in front of your bottom foot. Then, driving through your forearm and the sides of your feet, lift your bottom hip up off the ground as high as possible while keeping your body in a nice straight line. Squeeze your belly button in toward your spine and keep your glutes tight. Do not let your chest rotate forward toward the ground or your top hand touch the ground. Keep your top hand on your hip or reach it up toward the ceiling.
Single Leg Deadlifts – To do the kettlebell Single Leg Deadlift, hold a kettlebell in each hand down by your sides. Stand on your right leg with your knee slightly bent and your left toe lightly touching the ground. Then lift your left leg back toward the wall behind you as you hinge over, keeping your back flat. As you hinge over, drop the kettlebells down and back. Do not reach them toward the ground and let your back round. Only lower them as far as you can without rounding or “squatting.” Your standing knee should be soft but isn’t going to bend extra as you hinge over. Make sure that as you hinge over you sit back in your heel and then drive through your heel to come back up to standing. You want to feel your hamstring and glute work.
Suspension Trainer Glute Cherry Bombs – To do the Glute Cherry Bomb, place your heels in the suspension trainer straps and lie on your back on the ground. With your legs out straight and your feet close together, bridge up, squeezing your glutes and driving through your heels. Keep your core engaged so you don’t hyperextend your low back. Then curl your heels in toward your butt while maintaining the nice high bridge. Keep your glute engaged. Straighten your legs back out then and, keeping the nice straight bridge, move both feet out laterally, opening your legs up. Keep your hips up high as you spread your legs. Feel the outside of your butt work to open your legs up. Then bring your feet back together and repeat, curling your heels in toward your butt. This is an advanced movement. Beginners may not want to include the curl or may only want to do a single leg curl instead of the double leg curl.
Suspension Trainer Side Balance Lunges – To do the Side Balance Lunge, place one foot on its side in a suspension trainer strap and face to the side. Your leg should be out straight to the side in the strap. Then bend the standing leg and push your butt back as you sink down into a lunge. Let the leg with the foot in the strap slide out to the side as you sit back and down. Keep your chest up. You may hinge forward a bit as you sink but do not let your back round. Then, driving through the standing heel, come back to standing, pulling the leg in the suspension trainer back in toward your standing leg. You will feel your adductors work to pull the leg back in. Do not bend the leg in the suspension trainer. Also make sure to squeeze your glutes as you come back up to standing. Complete all reps on one side before switching. Beginners may want to hold the other strap in their hands to help them balance. Make sure that you don’t put the strap for your foot up too high. The height of the strap will be very dependent on your hip mobility.
Straight Leg Glute Bridge – To do the Straight Leg Glute Bridge, place your heels in the CoreX foot straps. Lie back on the ground with your legs out straight in front of you. You can either bend your elbows to 90 degrees or leave your arms on the ground down by your sides. Squeezing your glutes and driving down through your heels, lift your hips up as high as you can while keeping your legs straight. Keep your abs engaged so that you don’t hyperextend your low back as you lift. Hold at the top for a second and lower back down.