WARM UP
Stretch and Roll Out:
Lats
Upper Back
Traps
Shoulders
Chest
Forearms
ACTIVATION
Complete 1 round of the activation exercises below.
CIRCUIT:
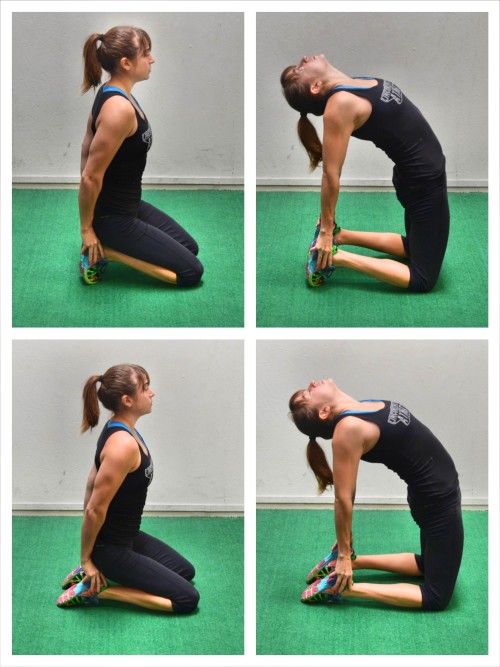
10 reps Camel
15 reps Scapular Push Ups
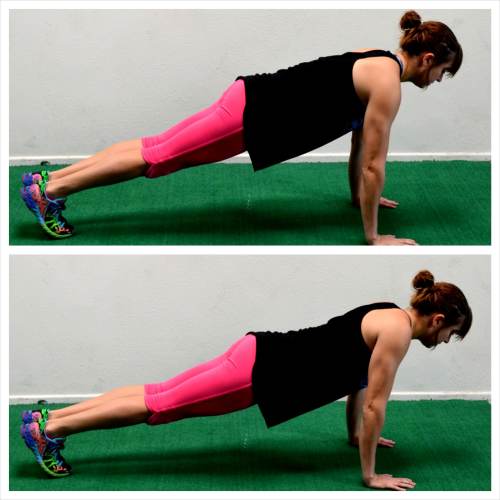
10 reps Dive Bomer Push Ups
WORKOUT
Complete the pyramid as fast as possible and record your time.
You will do 1 rep of each exercise. Then you will return to the first move and do 2 reps of each move. Each “round” you will add a rep until you complete 10 reps of each move. Then you will go back down, doing 9 reps, then 8 reps, then 7 reps, back down to 1 rep of each move.
PYRAMID:
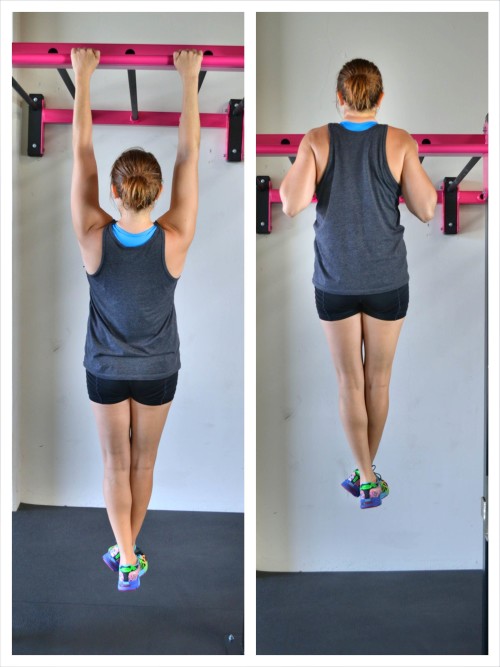
1-10-1 reps Pull Ups
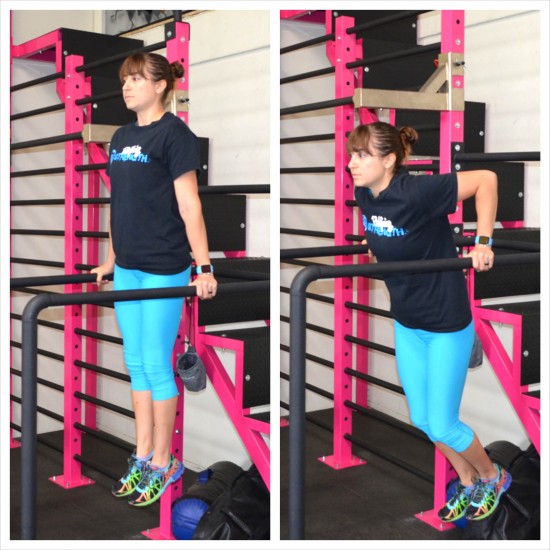
1-10-1 reps Dips
1-10-1 reps Inverted Rows
1-10-1 reps Push Ups
COOL DOWN
Stretch and Roll Out:
Lats
Upper Back
Traps
Shoulders
Chest
Forearms
NOTES:
Remember 1 rep of each move then 2 reps then 3 reps then 4 reps, up to 10 and then back down.
You can do assisted variations of each move as needed, but don’t regress it just so you can complete all reps easily in a row. It is ok to have to rest between reps as the reps increase.
Make sure that you challenge yourself and that you simply can’t cruise through the workout. Choose variations of each move that challenge you for all the reps.
EXERCISE DESCRIPTIONS:
Camel – To do the Camel, kneel on the ground with your knees about hip-width apart and your feet flexed. If you point your toes instead, this will make the move harder and require more flexibility (bottom two photos). Also, flexing your feet will stretch the bottom of your feet more while pointing your toes will get your shins more. With either your feet flexed or pointed, sit back on your heels and place your hands on your heels. Then arch your hips up and away, as you press your chest out and lift your glutes up off your heels. Keep your hands on your heels as you arch away and squeeze your glutes to fully extend your hips. Do not hyperextend your low back. Engage your glutes to stretch out your hips. Relax your head back and arch as much as you can, getting a nice stretch down your chest, core, hips and quads. Do not let your shoulders shrug and really focus on opening your chest up. Hold for 1-2 seconds and relax back down. Repeat, arching back up. You can also make this a static stretch by simply holding the pose for 15-20 seconds. If you are less flexible and can’t place your hands on your heels, you can do this stretch with a couch, chair or table behind you. Kneel down with the coach or table behind you. Place your hands back behind you on the couch or table. If you are at your desk, you can use your desk or chair. Keeping your arms straight behind you, press your chest out and arch away from the piece behind. Relax your head back and really squeeze your glutes to arch away.

Scapular Push Ups – To do Scapular Push Ups, set up in a high plank position with your hands under your shoulders and your feet together as if you are going to do a push up. Your body should be in a nice straight line from head to your heels. Then, without bending your elbows, press your chest out and pinch your shoulder blades together. Do not tuck your chin or allow your hips to drop toward the ground. Your elbows should not bend. You are not doing a push up. You are simply pinching your shoulder blades together. This move has a very small range of motion. All you are doing is pinching your shoulder blades together and then relaxing or even rounding your back up out of it (round your back at the top is another variation but can be very useful for correcting certain push up problems).
Dive Bomer Push Ups – This move can be done from the knees by beginners or from the toes by more advanced exercisers. To do this from the knees, set up at the top of a push up with your hands outside your chest and your body in a straight line down to your knees. Sit back onto your heels as if doing a child’s pose stretch. Keep your hands in their original position. Then start to move forward back into the push up position, but keep your head and chest close to the ground as you go forward. Keep your upper body as close to the ground until your chest is in between your hands. Arch, opening your chest up toward the ceiling as if you are doing upward facing dog. Get a nice stretch at the top, making sure to press down through your palms and elongate your neck. Do not let your shoulders shrug up by your ears. Hold for a second and then sit back into the child’s pose stretch and repeat. To advance this move, set up on your hands and toes. Hands should be just outside the chest and your feet should be together or about hip-width apart. Push back into a downward dog pose. Start to move back forward, keeping the chest and head as close to the ground as possible. As your chest passes through your hands, arch up and move into an upward facing dog stretch. Hold for a second and then move back into the downward dog stretch.
Pull Ups – To do a Perfect Pull Up, start hanging from the bar with your palms facing away from you. Hanging with your arms straight off the bar, press your chest out and up and feel your shoulder blades draw down and together. Leading with your chest, pull yourself up to the bar. Ideally you want to bring your chest all the way up to the bar as you draw your shoulder blades down and back. Then slowly lower yourself down until your arms are fully extended.Your arms should fully extend at the bottom but you do not want to relax the tension in your back. Make sure to lead with your chest and do not let your shoulders shrug. Do not bounce or swing at the bottom. You do not want to use momentum to pull back up. Only on the last couple of reps should you ever swing at all or kick your legs. You want clean reps, but to eek out an extra rep or so and go past failure, you can use a little momentum. For Pull Up variations for beginners or even to advance the move, click here.
Dips – To do the Basic Parallel Bar Dip, place a hand on each bar and grip the bar tightly. Jump or press up so that your weight is held by your arms and your arms are fully extended with your chest pressed out and your shoulders down. Do not shrug your shoulders as you hold at the top of the dip. You can keep your legs down straight or bend your knees. When you do Dips, you can lean forward a bit to target your chest more or you can stay more upright to focus on your triceps more. From the top of the dip, slowly bend your elbows and lower your body down toward the ground. You want to lower yourself down until your upper arms are about parallel to the ground. Then drive back up through your hands until you are fully extended at the top. Keep your core tight and squeeze your glutes as you press up so you don’t arch your low back. Also, try to keep your head in line with your spine as you dip and press. Once you’ve locked your arms out at the top of the dip, lower back down and repeat. Again, you can stay more upright to work more tricep or lean forward a bit more to work the chest. For more Dip Variations for beginners and Push Up Variations, click here.
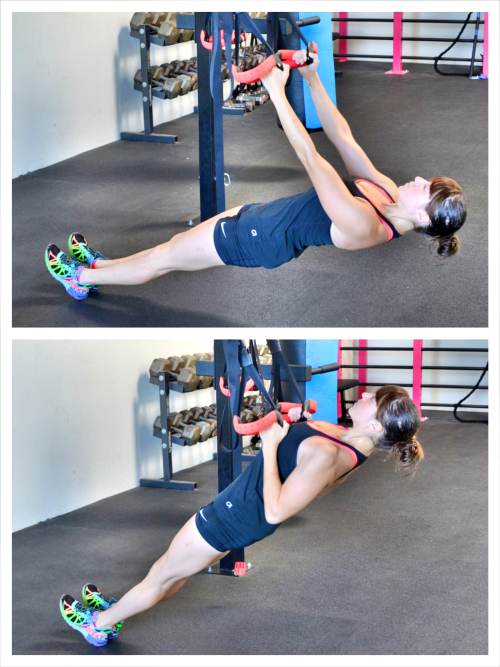
Inverted Rows – To do the Basic Inverted Row, you can either use a Suspension Trainer or a Bar. Using a Suspension Trainer, hold a handle in each hand with your palms facing in. Walk your feet forward so that your body is at an incline. The closer to parallel to the ground you get, the harder the move will be. Hang from the straps with your body in a nice straight line and your chest pressed out. Engage your core and glutes and keep your legs straight. You want a nice straight line from your head to your heels. Do not let your low back arch or your hips sag toward the ground. Then drive your elbows down and back to row your chest up to the handles. Keep your body in a nice straight line as you row up and do not bounce off the bottom. Keep your wrists straight as you row up. Also, do not shrug your shoulders. Then lower back down. Do not lose tension at the bottom. Make sure to keep the chest pressed out and your body in a nice straight line. Do not swing to row back up. Make sure to feel your back and arms working to row and not just your arms. Focus on feeling your back pull.
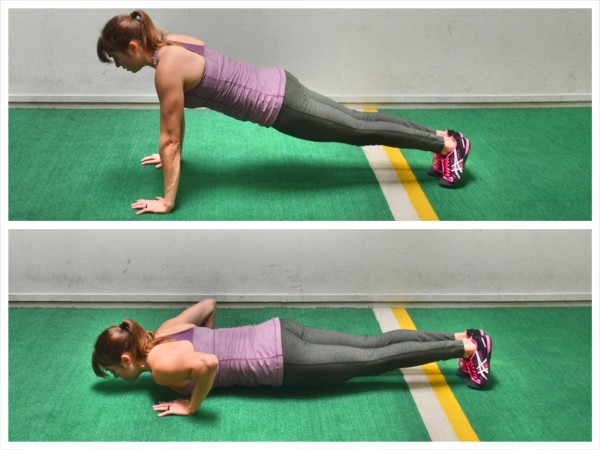
Push Ups – To do the Basic Push Up, set up in the high plank position with your hands under your shoulders and your arms locked out while your feet are together and your body is in a nice straight line from your head to your heels. Make sure you can drive back through your heels and that your feet aren’t too far back so that you are up on your toes. Squeeze your glutes and legs together as you brace your abs and drive back through your heels to engage your legs (especially your quads). You want to make sure to squeeze your legs together to help hold your body in a nice straight line. By squeezing your legs together, your adductors will engage. By engaging your core before you even lower, your hips shouldn’t drop toward the ground and your butt shouldn’t go up in the air toward the ceiling as you perform the Push Up. By engaging your core before you do the Push Up, you will help your body move as one unit. Make sure that as you set up, your head isn’t tucked toward the ground or jutting forward. Your back should also not be excessively arched or rounded. Your body should be in a nice straight line with your core engaged. While in the high plank position, remember your hands should be below your shoulders and right outside your chest. Your finger tips should be pointing straight ahead and your hands should be pressing into the ground and away from each other as if trying to tear a piece of paper between them. You can play around with exact hand with to place more emphasis on different muscles. As you lower down to do the Push Up, you should lower your chest directly between your hands, keeping a nice straight line with your body. Your elbows shouldn’t flare out from your body. Your elbows should make an arrow shape with your body. Like this (–> ). You do not want your arms to create a “T” with your body or you will put more strain on your shoulders and risk injury. You also don’t need to keep your arms right in by your sides unless you want to work more tricep. Your shoulders, elbows and wrists should all be in a straight line as you lower. Your body should move as one unit toward the ground. Touch your chest to the ground when you lower with everything moving together. Hips shouldn’t move back up first or touch the ground first. Your head also shouldn’t jut forward as you lower and lift. Everything should move as one without your hips sagging or your elbows flaring out as you lower or lift. Keep your head in line with your spine. Only if you engage your entire core will your body move as one unit down to the ground and back up. Once you touch your chest to the ground, press back up to the starting position and lock out your arms and then repeat, lowering your chest back down to the ground as you keep your body in a nice straight line.