WARM UP
Stretch and Roll Out:
Wrists/Forearms
Chest/Back
Shoulders/Traps
Hips/Glutes
WORKOUT
Complete 3-5 rounds of each circuit. Try not to rest between exercises, but rest up to 1 minute between rounds. Rest 1-2 minutes between circuits.
CIRCUIT #1:
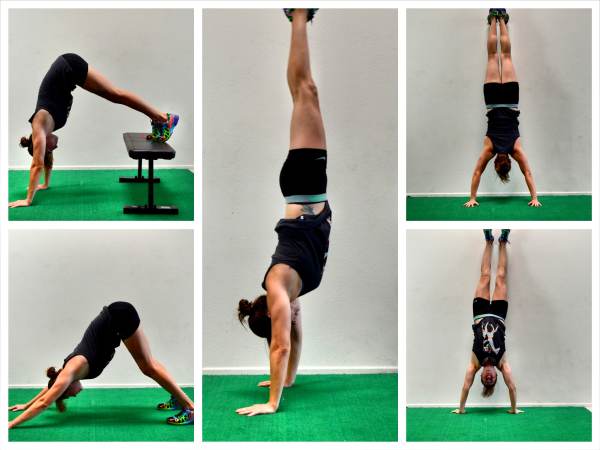
30 seconds Handstand Hold
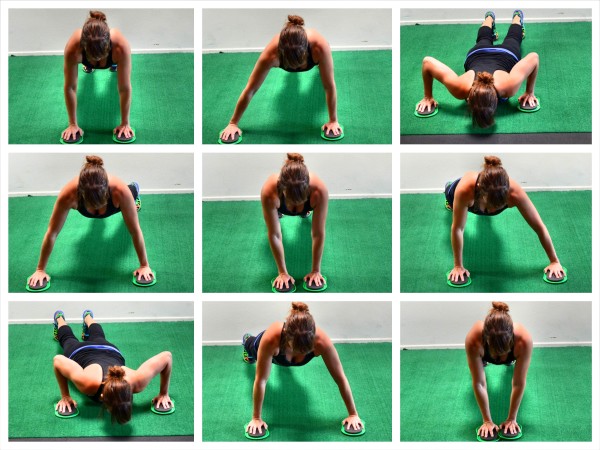
10 reps Fly to Push Up
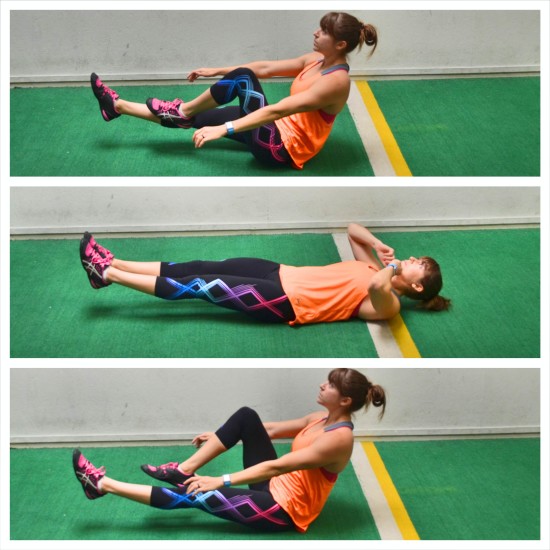
10-15 reps per side Sprinter Sit Ups
CIRCUIT #2:
30 seconds Scapular Wall Hold
15 reps Inverted Rows or Scapular Wall Rows
10-15 reps Superman
COOL DOWN
Stretch and Roll Out:
Wrists/Forearms
Chest/Back
Shoulders/Traps
Hips/Glutes
NOTES:
Complete the hold then move right into the next two exercises. Rest only between rounds.
EXERCISE DESCRIPTIONS:
Handstand Hold – The most basic Handstand Hold is very similar to the downward dog. Start on your hands and knees. Then push back and up, raising your hips up toward the ceiling as you straighten your arms and press your chest back toward your legs. Focus on getting your back flat and a nice straight line from the heels of your hands up to your tailbone. You want your arms to be in line with your torso (aka biceps by the ears). Push your butt back and up. Do not worry about keeping your legs straight like in downward dog. Also, do not walk your feet in toward your hands. Push your butt up and create a nice straight line with your back. To advance that basic hold, place your feet up on a table. Walk your hands in toward the table and press your butt up in the air. You want to straighten your arms so your head is hanging down between your hands straight down toward the ground. Create a nice straight line from your palms up to your tailbone. Do not worry about straightening your legs. The higher the box, the harder the move. To do a Full Assisted Handstand, you can walk your feet up a wall. The closer to the wall you get, the harder the move will be. From there, you can move into a full handstand. No matter which variation you are currently able to do, you are going to create stability and strength throughout your core by doing Handstand Holds!

Fly to Push Up – To do the Beginner Fly to Push Up, set up in a push up position with one hand on a Valslide and the other hand on the ground. You can do this from your knees to make it easier or from your toes to make it harder. Then slide the hand on the slider out to the side and perform a push up. As you push up, slide the hand on the slider back in toward your hand on the ground. Repeat, completing all reps on one side before switching.
If the single slider Fly to Push Up is too much, this move can be done by just stepping the hand out to the side on the ground or even on an incline. To advance the Fly to Push Up, you will use two sliders. Again this variation can be done from your knees (easier) or toes (harder). Start at the top of a push up and then slide one hand out to the side and perform a push up. Push up and slide the hand back into the starting position. Even though this is a wider push up, don’t let your elbows flare way out by your ears. Slide the other hand out on the slider and perform a push up. Keep alternating sides until all reps are complete.
You can advance the movement further by sliding both hands out to the side as you lower into the push up and then pull them back in as you come back up out of the push up. You will perform the fly as you perform the push up instead of sliding out, doing a push up and sliding back in. With all the different variations, do not let your butt go up in the air or your hips sag toward the ground as you do the push up. Also make sure not to shrug or let your elbows flare up by your ears. You want to create more of an arrow position (->) with your arms and upper body than a “T” as you do the push up.
Sprinter Sit Ups – Lie on your back and raise both legs straight out off the ground. Beginners may keep one leg on the ground. Crunch your upper body up so that you are sitting on your sit bones and then bring one knee into your chest. Lie back down and straighten both legs back out. Then bring the other knee into the chest as you crunch back up. Keep alternating, trying to keep both legs off the ground when you straighten back out. Do not let your chest cave when you crunch up. Keep your back flat as you crunch up and bring one knee in.
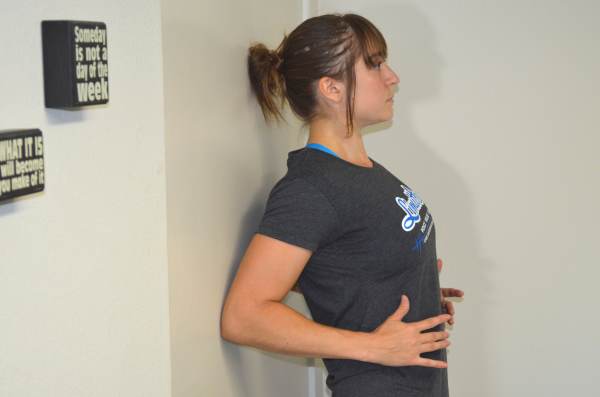
Scapular Wall Hold –To do the Scapular Wall Hold, stand about six inches from the wall. With your back to the wall and your elbows bent in by your side, drive your chest out and your elbows back. Then lean back against the wall on your elbows. Only your elbows should touch as you lean back. Draw your shoulder blades down and back and make sure to drive your chest out and open toward the ceiling. Do not shrug your shoulders and keep your body in a nice straight line as if holding a plank. Keep your head in line with your spine and do not tuck your chin. Walk your feet back toward the wall to make the move easier or walk them away to make the move harder. Make sure to drive the chest out and draw your shoulder blades down and together as you hold.
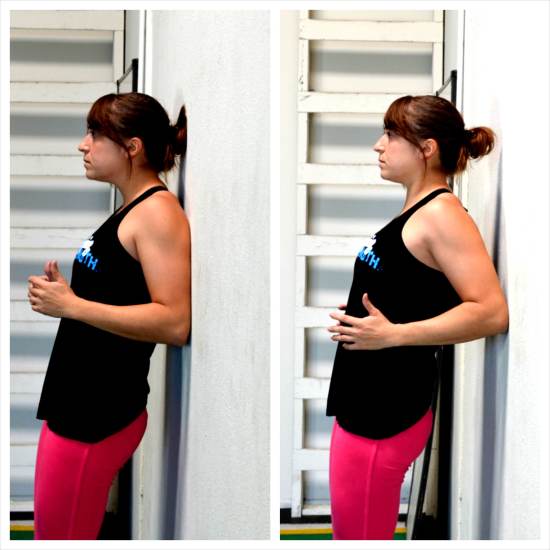
Inverted Row/Scapular Wall Row/Corner Row – Stand in a corner with your back relaxing against the walls and your feet about six inches from the corner. (You can also do this just off the wall like demonstrated above if you don’t have a useable corner.) Place an elbow against each wall with your elbows bent. With your body in a nice straight line, drive off the wall with your elbows, pressing your chest out and pinching your shoulder blades down and back. Relax back into the corner, keeping your body in a nice straight line from your head to your heels. Do not arch your low back as you press out. Also, make sure not to shrug your shoulders. The further from the corner that you walk your feet out, the harder the Corner Row will be. If you have a suspension trainer, you can do Inverted Rows instead.
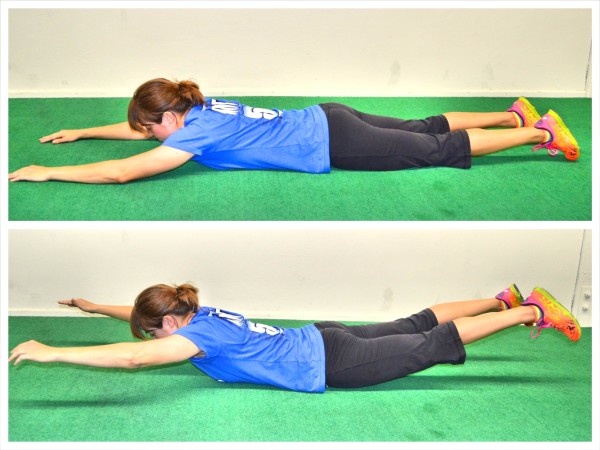
Superman – Lie face down on the ground with your arms out straight overhead on the ground and your legs out straight behind you. Everything should be relaxed and your neck should be in a neutral position. Then squeeze your glutes, back and shoulders to raise your chest and legs up off the ground. Try to get your chest up as high as possible as well as your quads. Keep your neck in a neutral position. Hold up off the ground for a second then lower back down and repeat the lift. Keep your arms and legs straight as you lift but do not lock them out. Do not bend your knees to try to get your quads higher up off the ground. Make sure to really squeeze your glutes as you lift so your low back doesn’t do all the work. And also make sure not to shrug as you lift your upper body up.