Battling Ropes Conditioning Workout

Battling Ropes Conditioning Workout

WARM UP
Stretch and Roll Out:
Calves
Hamstrings
Quads
Groin
Hips/Glutes
Back/Lats/Traps
Chest/Shoulders

WORKOUT

Complete one 5-minute round of each of the five circuits. Complete as many rounds of the exercises as possible, resting only as needed during the 5 minutes. Rest 1-3 minutes between circuits.

CIRCUIT #1:
5-8 reps per side Stage Coach with Alternating Backwards Lunges
3-5 reps each side Circle Crawls
5-8 reps per side Alternating Leg V-up

CIRCUIT #2:
4-6 reps 6ft Side Shuffle
10-20 reps Sidewinders
4-8 reps each side Sit Thrus

CIRCUIT #3:
5-8 reps per side Alternating Waves with Side-to-Side Lunge
10-20 reps per side Mt. Climbers
10-15 reps Snow Angels

CIRCUIT #4:
5-10 reps per side Lateral Hurdle Hops
10-20 reps Rainbows
5-10 reps per side Plank Reach Back and Out

CIRCUIT #5:
10-20 reps Stage Coach Forward/Backward Hops
5-10 reps each side Plank with Reach Thru
10-15 reps Glute Bridge to Sit Up

COOL DOWN
Stretch and Roll Out:
Calves
Hamstrings
Quads
Groin
Hips/Glutes
Back/Lats/Traps
Chest/Shoulders

NOTES:

Do not go to failure on any exercise so you can keep moving quickly. You want to get as much work done in the 5 minutes as possible; therefore, you want to rest as little as possible.

Stop short of being completely fatigued on each exercise so you can keep moving!

EXERCISE DESCRIPTIONS:

Stage Coach with Alternating Backwards Lunges – Loop the rope around an anchor and hold one side in each hand. Pull the rope out straight then take a step or two in. Hold the rope with the handles facing up. Your arms should be bent slightly and your feet should be about hip-width apart. Bend your knees slightly and then as you stand back up, pull up on the ropes with your arms. Then as you slam the rope back down, lunge backward. Move quickly, making small fast waves. Your arms will move faster than you lunge. Don’t worry about big slams. Keep your chest up and shoulders back as you create the waves and lunge backward alternating legs. Don’t round forward. As you advance, step forward closer to the  anchor so there is more slack in the rope. Also, lunge more quickly.
Circle Crawls – Set up on your hands and knees. Flex your feet and lift up onto your hands and toes. Your knees should be under your hips and your hands should be under your shoulders. Pretend their is a string attaching your belly button to the ground. You may even want to put something on the ground under your belly button to keep you centered. Then begin to circle over that spot. Do one full circle one direction then switch and do a complete circle the other way. To move in a circle, you will take a step with the opposite hand and leg. Make sure to move both your hands and feet. You do not just want to move your feet and circle around your hands! Beginners may need to do a baby crawl on their hands and knees to start.

circle-crawl
Alternating Leg V-Up – Lie flat on your back with your legs out straight in front of you. Beginners will rest the leg not being raised up on the ground while advanced exercisers will keep both feet off the ground at all times. Lift one leg up toward the ceiling. Crunch the upper body up and reach the opposite arm up toward the toes of the raised leg. Then lower that leg and lower your upper body down. Raise the other leg and the opposite arm to touch it as you crunch up. Keep alternating sides.

alternating-leg-v-up
Side Shuffle – Set up two cones about 6ft apart. Face one direction with your feet about shoulder-width apart. Take a step laterally with one foot and then step the other foot the same way. Shuffle sideways from cone to cone, keeping your chest up.

shuffle
Sidewinders – Loop the rope around an anchor and hold one side in each hand. Keep more slack in the rope than you would with other battling ropes moves. Relax your arms and stand with your feet between hip-width and shoulder-width apart. Then sweep your arms to the right, rotating through your core even pivoting a little up onto your left toes. Then quickly sweep your arms to the left. Sweep back and forth. Keep your arms more relaxed and only slightly bent. Use your core to push and pull from side to side. You shouldn’t do huge rotations. Your arms and the rope should stay out in front of you. The ropes should make snake-like waves on the ground and swish side to side. They should not move up and down off the ground.

battling-ropes-core-exercise
Sit Thrus – Start on your hands and knees. Flex your feet and press up onto your hands and toes with your hands under your shoulders and your knees under your hips. You will then rotate open toward the right and bring your left leg under and through toward where your right hand is. As you bring your left leg forward and through, lift your right hand. You should be almost sitting with your left hand down to support you. Then bring the left leg back through so you are back in the starting position. Next rotate to the left and kick your right leg through and forward as you lift your left hand. Move as quickly as you can back and forth. Beginners may need to move slowly or even start in a more spread out position with their legs out straight.

sit-thrus
Alternating Waves with Side-to-Side Lunge – Set your feet nice and wide so that you can go side lunge to side lunge without moving your feet. Hold an end of the rope in each hand. Start with alternating waves and then sink down into a side lunge on one side, bending that knee. Then stay low and move across to a lunge on the other side while keeping the alternating waves going. Do not round your back forward. Keep your chest up nice and tall and your heels down as you create the waves and move side to side.
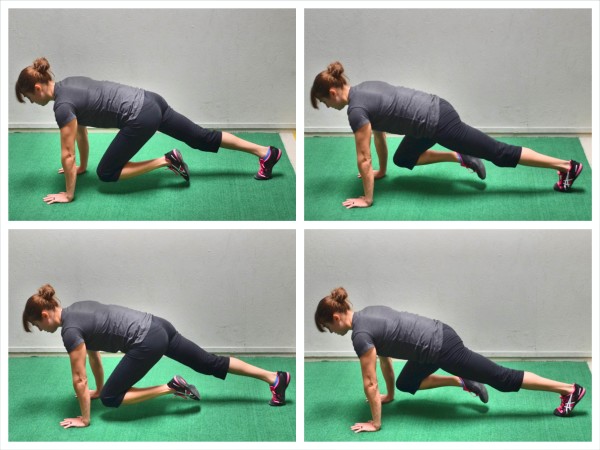
Mt. Climbers – Set up in a high plank from your hands and toes. Bring your right knee in toward your chest. Then drive the foot back out and bring your left knee in toward your chest. As you bring each knee in, you will just lightly tap the toe of that leg on the ground. Do not put weight on that front leg. Go as fast as you can, alternating knee drives. Mountain Climbers should look like you are “running” with your hands on the ground. Beginners may need to go slowly to start or even put their hands up on a low table or bar to perform incline mountain climbers. Advanced exercisers will want to “run” as quickly as possible or even add sliders or a towel under their feet.

mountain-climbers
Snow Angels – Start seated on your butt with your knees bent and feet flat on the ground. Advanced exercisers will then lift their feet off the ground while beginners will keep their feet on the ground. Hinge back and reach your arms overhead. Keeping your arms pretty straight arch them down toward the ground as if creating a snow angel. Then sweep them back up, remaining balanced on your butt. Do not round forward. Stay up nice and tall. Keep sweeping your arms until all reps are complete.
Lateral Hurdle Hops – Start with your feet together standing nice and tall. You can place a hurdle on the ground or something else to jump over. Beginners may not want to use anything. Set up sideways to the hurdle. Keeping your feet close together, squat down a little and then jump sideways over the hurdle, landing in a shallow squat. Try to go right back into a hop back over. Beginners may need to pause after every jump. Do not land with legs locked out.
Rainbows – Loop the rope around an anchor and hold one side in each hand. Pull the rope out straight then take a step or two in. Hold the rope with the handles facing up. Keep your hands pretty close together. Rotate the handles outside your right hip and pivot your left leg. Then pull the rope up and then over toward your left hip. Pivot your right leg as you bring the rope to your left hip. Then arch back up bringing the rope up toward your shoulder than back down to your right hip. Keep pivoting and rotating the rope from hip to hip, arching up toward your shoulders as you bring the rope from one hip to another.
Plank Reach Back and Out – This move is done from the hands and either your knees (beginner) or toes (advanced). To do this move from your knee, set up in the top of a push up with your hands under your shoulders and your body in a nice straight line down to your knees. Then sit back on your heels into a “child’s pose” position, reaching one hand back between your legs. Move forward back to the top of the push up as you reach the hand from between your legs out toward the wall beyond your head. You may even extend your hips more toward the ground. Just make sure to keep your abs engaged so that you don’t feel the extension out in your low back. Complete all reps on that side before switching to the other arm.

plank-with-reach
Stage Coach Forward/Backward Hops – Loop the rope around an anchor and hold one side in each hand. Pull the rope out straight then take a step or two in. Hold the rope with the handles facing up. Your arms should be bent slightly and your feet should be about hip-width apart. Start creating the waves with both arms moving together. As you create the waves, hop forward from foot to foot. Once you go forward a few hops, hop from foot to foot backwards. Keep both arms moving together as you hop. Each hop is one rep.
Plank with Reach Thru – Set up in the high plank position on your hands and knees (beginner) or toes (advanced). Then reach one hand under your armpit and toward the far wall. You don’t just want to reach under your armpit to pat yourself on the back. Make sure your hips stay down as you reach through. Then pivot open, rotating into a side plank. You will reach the hand that reached under your armpit up toward the ceiling while rotating onto the sides of your feet or knees. Then reach the hand back down and under the armpit. Move back into a high plank position. Complete all reps on that side before switching and reaching the other way.

plank-with-reach-under
Glute Bridge to Sit Up – Lie on your back with your knees bent and feet flat on the ground about hip-width apart. Bridge up, lifting your hips as high as possible while driving through your heels. Lower your hips back down and let your feet move a little away from your butt. Then sit up, keeping your torso up nice and tall and your feet on the ground. Once you sit all the way up, lie back down, bring your feet back in and then bridge back up.

glute-bridge-to-sit-up

Battling Ropes Speed and Agility Workout

Battling Ropes Speed and Agility Workout

WARM UP
Stretch and Roll Out:
Calves
Quads
Hamstrings
Groin
Hips/Glutes
Back
Shoulders/Traps
Chest

WORKOUT

Perform 3-5 rounds of each circuit. Do not rest between exercises. Take 30 seconds to 2 minutes of rest between rounds. Rest 2-3 minutes between circuits.

CIRCUIT #1:
20 seconds Circle Shuffle
20 seconds Rope Slams
20 seconds Heavy Bear Hug Carry

CIRCUIT #2:
20 seconds X Cone Drill
20 seconds Rope Figure 8s
20 seconds Glute Bridge with Reach Overhead

CIRCUIT #3:
20 seconds Sprint with Down Up
20 seconds Side-to-side Stage Coach
20 seconds Rainbow Medball Slams

COOL DOWN
Stretch and Roll Out:
Calves
Quads
Hamstrings
Groin
Hips/Glutes
Back
Shoulders/Traps
Chest

NOTES:

Set a timer for 20 seconds with 5-8 seconds to transition from exercise to exercise. Do not give yourself time to rest only time to get set so you can work for the full 20 seconds.

EXERCISE DESCRIPTIONS:

Circle Shuffle – Set up a cone or something to shuffle around. Set your feet about shoulder-width apart and squat down a little. Face the cone. Make circles around the by side shuffling. Some circles should be full circles. Others may be half or even quarter circles. Mix it up, shuffling back and forth.
Rope Slams – Loop the rope around an anchor and hold one side in each hand. Pull the rope out straight then take a step or two in. Hold the rope with the handles facing up. Your arms should be bent slightly and your feet should be about hip-width apart. Bend your knees and squat down. Do not squat too low. Then explode up, pulling up on the ropes with your arms. Then slam the rope back down, squatting back down as you land. Make big waves and use your legs like you would if you were performing a jump squat. Right after you slam the rope down, jump back up and pull the rope right back up into another slam.
Heavy Bear Hug Carry – Turn the sandbag the long way and hug it in the middle, squeezing it tight in toward your chest. You can also use a heavy bag or any other bag. Keeping your chest up and the sandbag hugged tight, start to walk around. Squeeze your butt and pull your belly button in toward your spine as you walk. Do not lean back.
X Cone Drill – Set up four cones no more than 8 ft apart. Start in the center. Sprint forwards, back pedal back, shuffle to each of the side cones. Mix up the directions you move in. Always sprint forward though and back pedal back. Shuffle only to the side cones. Keep moving though but not in a consistent pattern.
Rope Figure 8s – Loop the rope around an anchor and hold one side in each hand. Pull the rope out straight then take a step or two in. Hold the rope with the handles facing up. Pull the rope down and toward the right. Then pull it up and around on the right and back to the center. Then pull it down and across to the left. Pull it up on the left and then back to center. Draw a figure eight with the rope, using your legs to help you create the figure 8. Move quickly using your core to power your moves.
Glute Bridge with Reach Overhead – To do this move, set up in a glute bridge. Drive through your heels and get your hips up as high as you can. Keeping your core and glutes tight, reach one arm across your body and overhead as if you are reaching for something over your shoulder and behind you. You will bridge up onto one shoulder, keeping your hips up. Come back to center, lower the hips down and then bridge back up and reach across and back over the other shoulder. Repeat alternating sides and rotating the core while in the glute bridge.
Sprint with Down Up – Set cones between 20 and 30ft apart. Drop to the ground so that you are belly down and then get up and sprint to the cone. When you reach the cone, drop down again and then sprint back. You can modify this move by not going all the way down and instead just lower yourself into a high plank position or you can completely skip the down-up.
Side-to-side Stage Coach – Loop the rope around an anchor and hold one side in each hand. Pull the rope out straight then take a step or two in. Hold the rope with the handles facing up. Your arms should be bent slightly and your feet should be about hip-width apart. Bend your knees slightly and then as you stand back up, pull up on the ropes with your arms. Then as you slam the rope back down, squat back down just a little. Slam the ropes to one side of your hip. Move quickly, making small fast waves. Don’t worry about big slams. Then bring the rope back and across to the other hip. Keep the stage coach waves moving side to side. Keep your chest up and shoulders back as you create the waves. Don’t round forward or keep your legs locked out. Create as many waves as possible. As you advance, step forward closer to the  anchor so there is more slack in the rope.
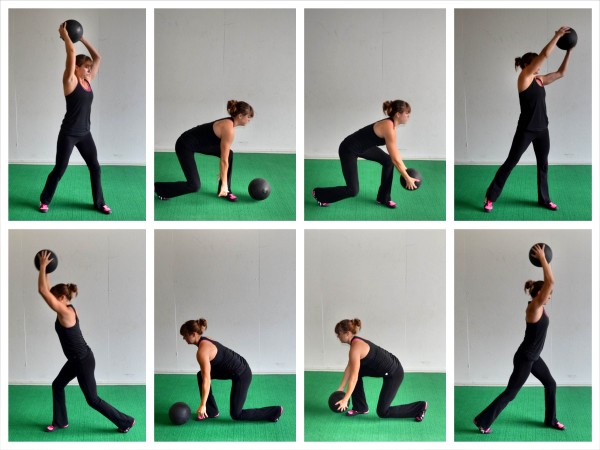
Rainbow Med Ball Slams – Grab a med ball. Pivot your back foot, raise your hands overhead and slam the ball down to one side of your body. Squat a little as you throw and pick it up. When you pick it back up, pivot and rotate to slam the ball down on the other side of your body. You are basically creating an arch or “rainbow” over your head by slamming it from overhead on each side.

med ball slams

Battling Ropes Interval Workout

Battling Ropes Interval Workout

WARM UP
Stretch and Roll Out:
Wrists/Forearms
Shoulders
Traps
Upper Back

WORKOUT

Perform 3-6 rounds of each exercise. Rest for 1-2 and a half minutes between rounds (1 minute advanced, 2 and a half minutes beginner).

CIRCUIT #1:
1 minute Stage Coach

CIRCUIT #2:
1 minute Sidewinders

CIRCUIT #3:
1 minute Alternating Arms Waves

CIRCUIT #4:
1 minute Rainbows

COOL DOWN
Stretch and Roll Out:
Wrists/Forearms
Shoulders
Traps
Upper Back

NOTES:

Go as fast as you can for the entire minute. Beginners may need to start with 30 seconds if they haven’t used the ropes much.

EXERCISE DESCRIPTIONS:

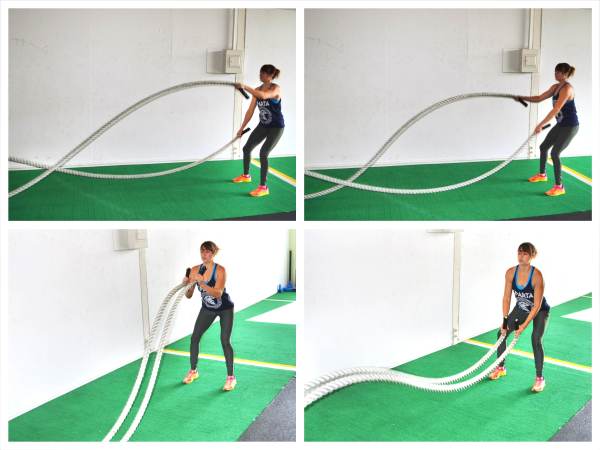
Stage Coach – Loop the rope around an anchor and hold one side in each hand. Pull the rope out straight then take a step or two in. Hold the rope with the handles facing up. Your arms should be bent slightly and your feet should be about hip-width apart. Bend your knees slightly and then as you stand back up, pull up on the ropes with your arms. Then as you slam the rope back down, squat back down just a little. Move quickly, making small fast waves. Don’t worry about big slams. Keep your chest up and shoulders back as you create the waves. Don’t round forward or keep your legs locked out. Create as many waves as possible. As you advance, step forward closer to the  anchor so there is more slack in the rope. (Alternating Arms Top, Stage Coach Bottom)

battling-ropes
Sidewinders – Loop the rope around an anchor and hold one side in each hand. Keep more slack in the rope than you would with other battling ropes moves. Relax your arms and stand with your feet between hip-width and shoulder-width apart. Then sweep your arms to the right, rotating through your core even pivoting a little up onto your left toes. Then quickly sweep your arms to the left. Sweep back and forth. Keep your arms more relaxed and only slightly bent. Use your core to push and pull from side to side. You shouldn’t do huge rotations. Your arms and the rope should stay out in front of you. The ropes should make snake-like waves on the ground and swish side to side. They should not move up and down off the ground.

battling-ropes-core-exercise
Alternating Arms Waves – Loop the rope around an anchor and hold one side in each hand. Pull the rope out straight then take a step or two in. Your arms can be straight or bent depending on which is more comfortable. Your feet should be about hip-width apart. You can be more in a squat or your legs can be straighter. Don’t be afraid to use your legs as you create waves and either move up and down with them together or slightly step one foot at a time. To create the waves, lift one arm up as you pull the rope down with the other. Then switch pulling one up and the other down. Alternate as quickly as possible using the legs as needed.
Rainbows – Loop the rope around an anchor and hold one side in each hand. Pull the rope out straight then take a step or two in. Hold the rope with the handles facing up. Keep your hands pretty close together. Rotate the handles outside your right hip and pivot your left leg. Then pull the rope up and then over toward your left hip. Pivot your right leg as you bring the rope to your left hip. Then arch back up bringing the rope up toward your shoulder than back down to your right hip. Keep pivoting and rotating the rope from hip to hip, arching up toward your shoulders as you bring the rope from one hip to another.

The Sandbag Glute Workout

The Sandbag Glute Workout

WARM UP
Stretch and Roll Out:
Calves
Hamstrings
Groin
Hips/Glutes
Back

WORKOUT

Complete 3-5 rounds of each circuit. Rest 30 seconds to 1 minute between rounds and 1-2 minutes between circuits.

CIRCUIT #1:
8-12 reps per side Zercher Side Lunge
8-12 reps per side Single Leg Glute Bridge Off Box

CIRCUIT #2:
8-12 reps per side Single Leg Deadlift
15-20 reps Reverse Hypers

CONDITIONING
Perform 3-5 rounds of the conditioning below. The exercise should be performed for 20 seconds with 40 seconds to 1 minute of rest between rounds.

20 seconds Pivoting Squat

COOL DOWN
Stretch and Roll Out:
Calves
Hamstrings
Groin
Hips/Glutes
Back

NOTES:

EXERCISE DESCRIPTIONS:

Zercher Side Lunge – Start standing with the sandbag up at your chest. Do not let the sandbag sink or you elbows drop toward the ground. Keep the sandbag up under your chin. Then step out to the side with one foot. Keep both feet pointing straight ahead as you sink down into the leg that stepped out. Sit your butt back as you bend the knee of the leg that stepped out. Keep the other leg straight as you sink into the side lunge. Make sure both heels stay down as you lunge. Do not lean forward too much. Keep your chest up and back flat. Then driving off the heel that stepped out, come back to standing. You should be able to drive right back up to standing without bending the other leg. If you can’t drive right back up to standing, the weight is too heavy or you lunged out too far. Beginners may want to start with just bodyweight and not lunge out as far.  Alternate lunges to each side until all reps are complete.
Single Leg Glute Bridge Off Box – Beginners should do a single leg bridge from the ground or even a two leg bridge if they can’t get their hips up as high with the single leg bridge. Intermediate exercisers may want to do a two leg glute bridge with their heels up on the box. The single leg glute bridge off the box is an advanced progression. To do the glute bridge off the box, place your heels on the box. Your butt should be right against the box. Bend your arms to 90 degrees with just your upper arm on the ground. Lift one leg up and point the toe toward the ceiling. Do not bend that leg or use it to help you bridge up. Drive through the heel on the box and press your hips up as high as you can. Squeeze your glutes and keep your core tight as you bridge up. Hold for a second or two and then lower down. Complete all reps on one side before switching.

single-leg-bridge-off-box
Single Leg Deadlift – For this move you can hold a sandbag in a couple of different ways. Beginners will want to hold the sandbag in both hands in front of them while more advanced exercisers may want to do a suitcase single leg deadlift, holding the sandbag in the opposite hand from the standing leg. The suitcase deadlift will force you to use your core more to prevent rotation. Whichever you do, use a weight that challenges you. Stand on one foot with the knee of that standing leg slightly bent. Hinge over at your hips, sweeping the other leg back toward the wall behind you. Pretend you are driving the heel of the lifted foot straight into the wall behind you. Lean forward with your upper body as you hinge forward, keeping the back nice and flat. Make sure that as you hinge, you are sitting into the heel of your standing leg. Do not lean forward and come up onto your toes. To stand back up, drive through the heel of your standing leg and squeeze your glute at the top. Try not to tap the other foot down at all or at least not till you are fulling standing. Complete all reps on one side before switching to the other leg.Beginners may also use a slider to help guide them and help them maintain balance. Place the slider under the leg to be “lifted.” But instead of lifting the leg off the ground, as you hinge over, you are going to slide the leg back on the slider. Keep your back flat and your standing leg bent. To stand back up, slide the slider back in as your torso comes back up.

sandbag-single-leg-deadlift
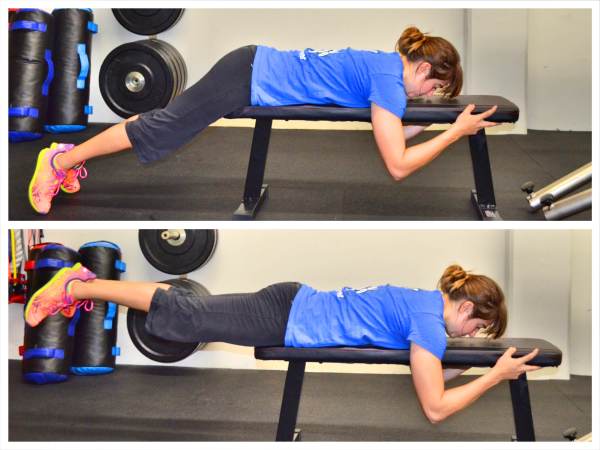
Reverse Hypers – Lie face down on a table, bench or box. Make sure your hips are right at the edge. Hold on to something in front of you if you want. Keep your upper body relaxed. Squeeze your legs together and point your toes out. Lift your legs to basically parallel to the ground, keeping your legs straight. Do not hyperextend your back and lift way higher than parallel. You do not want to feel this in your low back. Hold for 2-5 seconds and then lower down. Keep your core tight and really squeeze your glutes as you lift.

glute-activation-exercsie
Pivoting Squat – Hold the sandbag on the handles with your palms facing each other. Set your feet about shoulder-width apart, maybe a little bit wider. Pivot to the left, bringing the sandbag outside your knee. When you pivot, you are going to come up on the back toe (the right toe in this case) and bend both knees. You will then swing the sandbag up and around the front and pivot to the right. Bring the sandbag outside your right knee as you pivot your left toe so that you are lunging to the right. Move as quickly as possible pivoting from side to side. Beginners may want to “place” the sandbag on each side instead of swinging it to give them more control.

The Full Body Kettlebell Workout

The Full Body Kettlebell Workout

WARM UP
Stretch and Roll Out:
Calves
Quads
Groin
Hips/Glutes
Back
Lats
Chest
Shoulders

WORKOUT

Complete 3-5 rounds of the circuits below. Rest 30 seconds to 1 minute between rounds and 1-2 minutes between circuits.

CIRCUIT #1:
8-15 reps Goblet Squat
8-12 reps per side Single Arm Kettlebell Chest Presses

CIRCUIT #2:
8-15 reps per side Bulgarian Split Squat
8-15 reps per side Renegade Row

CONDITIONING
Complete 3-5 rounds of the exercise below.
30 seconds on, 30 seconds – 1 minute off
Farmer’s Walk

NOTES:

This workout involves a couple anti-rotational moves – the chest presses and the renegade rows. Keep your core tight on both and fight your body’s urge to rotate. Advanced exercisers will want to go heavy on these lifts and may even work down toward their five rep max. Beginners will want to stick with lighter reps in the higher rep range.

EXERCISE DESCRIPTIONS:

Goblet Squat – Take one kettlebell and turn it upside down, holding it on the bell. Set your feet between hip-width and shoulder-width apart. Keep the kettlebell in at your chest. Draw your belly button in toward your spine. Sit your butt back and keep your weight in your heels as you squat down. Keep your chest up and don’t let your back round forward. Sink your butt down as low as you can, keeping your heels on the ground. Then, driving through your heels, come back to standing. Do not lean or rock forward as you stand up. Come all the way up and squeeze your glutes at the top then sink back down. You may also do a double racked kettlebell front squat to make the weight heavier if you don’t have a single bell heavy enough.

kettlebell-front-squat
Single Arm Kettlebell Chest Presses – Beginners may lie on their backs on a bench while more advanced lifters will want to hold a glute bridge with only their upper back on the bench. Slide your hand through the handle and rest the kettlebell on the back of your forearm. With your back on the bench (and in either a glute bridge or complete on the bench), press the kettlebell up toward the ceiling. When your arm is straight, lower the weight back down toward your chest. Do not let your elbow flare way out. Once you bring the kettlebell down to your chest, press back up. Do not let your body rotate as you press. Keep your core tight and your glutes engaged. Complete all reps on one side before switching. If you do not have a bench, you may do this move on the ground.

kettlebell-chest-press

Bulgarian Split Squat – Place your back foot up on a table, bench, chair or box. Do not let the chair or bench be too high. Hop your front foot out so you are in a nice wide stance with your back foot up on the box. Then sink down, dropping your back knee toward the ground. Really sit back into the lunge. Make sure you aren’t going forward and that your front knee is not going past your toe. You should feel a nice stretch in the front of the leg that is back when doing this move. Beginners may want to use a super low box or do the move from the ground.

bulgarian-split-squat
Renegade Row – For this move you will need two kettlebells. Set them on the ground just outside your chest. Set up in a high plank position with each hand on a kettlebell handle. Beginners may need to do this from their knees while more advanced exercisers will do this on their toes. If you are doing this on your toes, set your feet between hip-width and shoulder-width apart. A wider stance will make the move easier by making it easier to balance. Once in the plank, row one kettlebell up toward your chest, driving your elbow up toward the ceiling. Row the bell all the way up to your chest just below your pec. Keep your core tight and squeeze your glutes. Do not let your hips go up toward the ceiling or rotate to the side. After rowing the weight up to your chest, lower the weight back down and then row up on the other side. Keep alternating until all reps are complete.

renegade-row
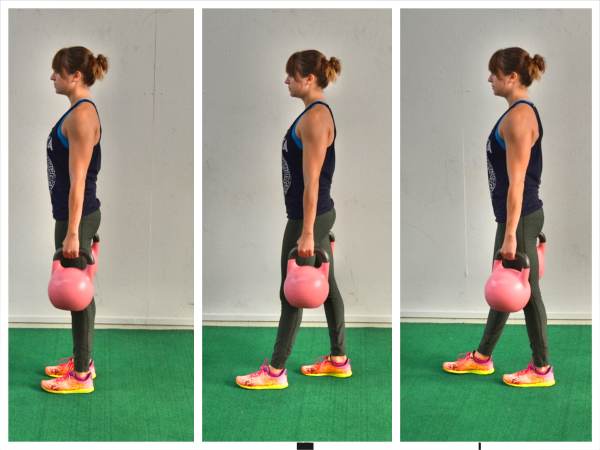
Farmer’s Walk – Hold heavy kettlebells in each hand. Do not let them rest on your legs. Hold them just off your thighs. Walk around for 30 seconds, maintaining perfect posture. You want to use weights that challenge you and make you want to drop them just before the time is out. Do not let your head jut forward or your shoulders round. Do not let the weights rest on your legs. Keep your core tight and glutes engaged as you walk with your shoulders down and back and your head up.

farmers-walk