The Trainer’s Tool Box – Foam Rolling Essentials!

Foam Rolling…
- What is it?
- Is it worthwhile and what are the benefits?
- How do you do it!?
Ok…so let me first explain what the heck foam rolling even is!
What is Foam Rolling?
Foam rolling is SMR or self-myofascial release. Looking at it in the most basic way…
It’s a massage you can give to yourself!
You can use rollers, balls and other tools to help relax tight muscles so you can move and feel better.
By applying pressure and HOLDING on a trigger point or knot, you can help the muscle relax and release through a process called autogenic inhibition.
So…YES…Foam rolling is 100% worthwhile! Relaxing tight muscles is an ESSENTIAL part of getting your body to move optimally.
What are the benefits?
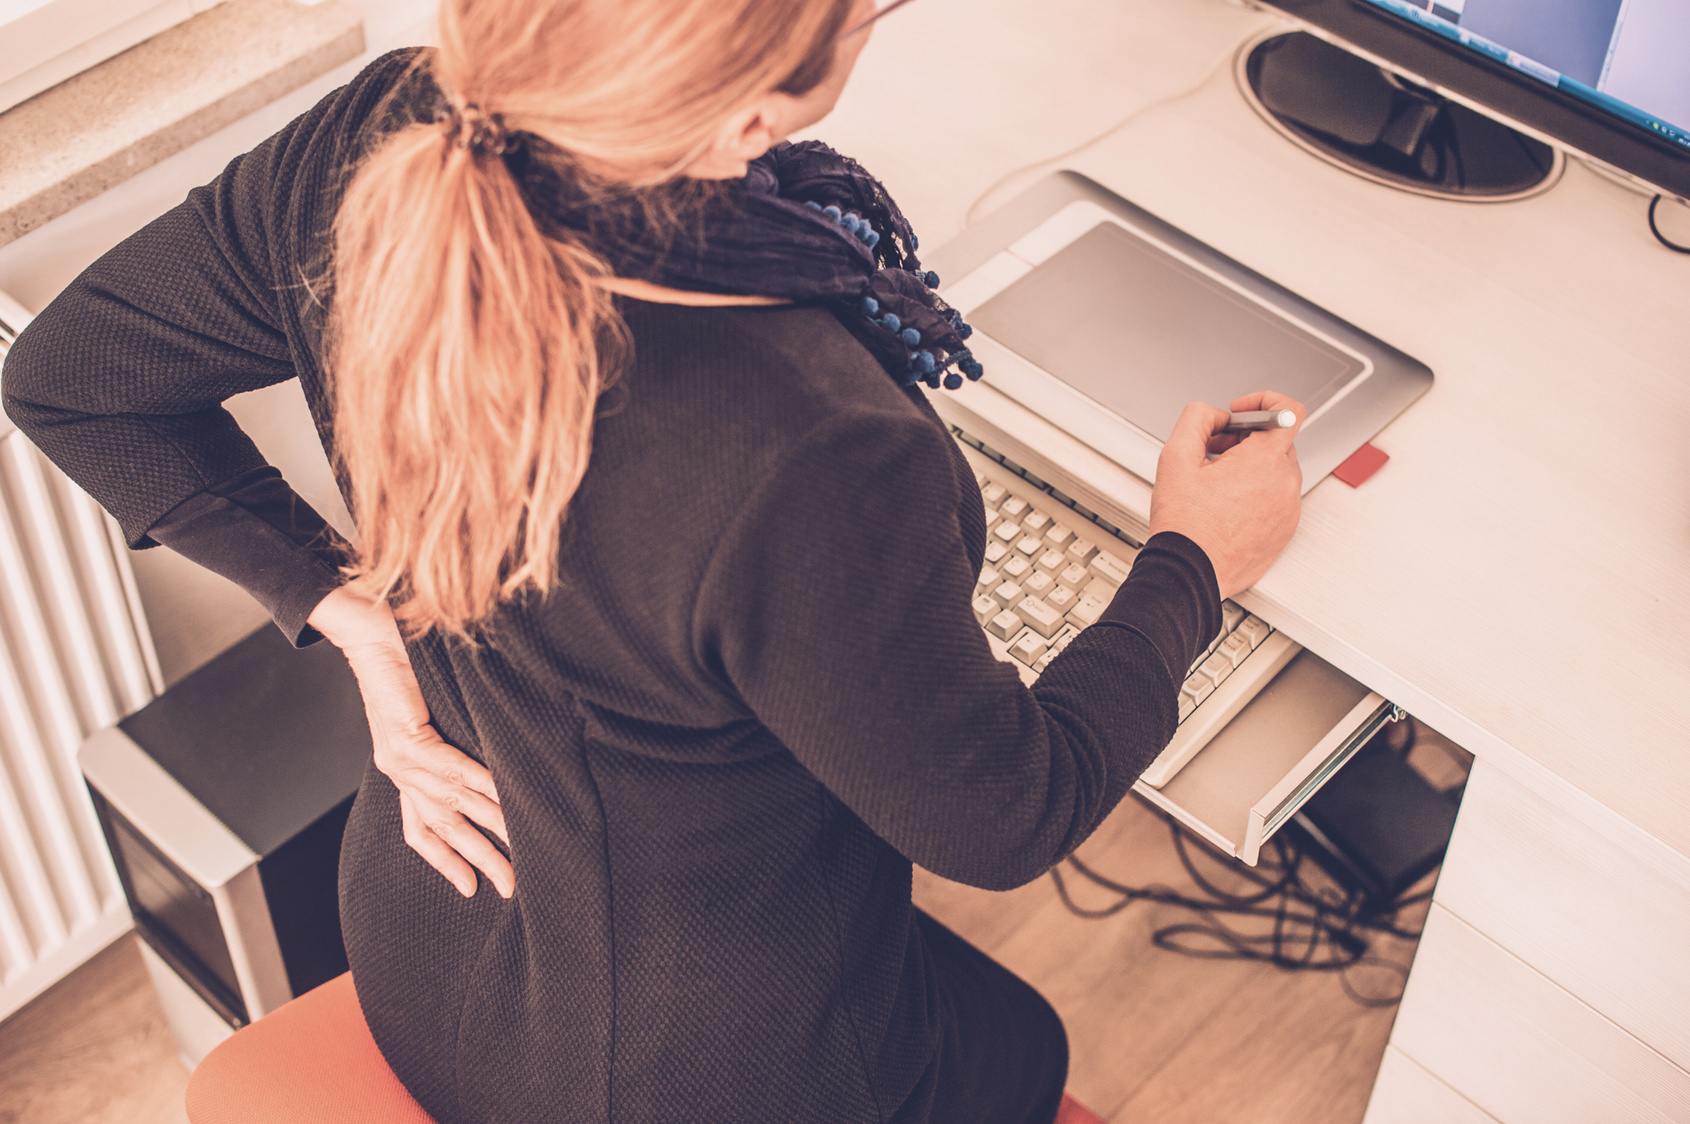
Because of our modern lifestyle (sitting hunched over a computer, walking and texting, driving in cars…), we develop poor posture which can lead to muscular imbalances, immobility and compensations…All of which can lead to injury.
Knots and trigger points can cause restrictions and alterations that results in a change to motion about a joint. When this happens there can be a change in your normal neural feedback to your central nervous system aka a change in your mind-body connection.
Over time this can lead to your body being less efficient and overusing muscles, and even other joints, that aren’t meant to really carry the load.
For instance, tight hip flexors can lead to your glutes being underactive, which in turn can lead to you recruiting the muscles of your lower back to carry the load your glutes really should be carrying. And this can lead to low back aches, pains and even injury.
Or for another example…Say your wrists aren’t flexible due to spending too much time with your wrists in flexion (aka typing on the computer and using a mouse). You then go do push ups and end up with elbow pain.
Why may this happen?
Because you compensate to replicate the movement. AKA because you lack wrist extension, your body will try to “make up” the lack of wrist mobility someplace else…and in this case, you may take it out on your elbow.
This is why foam rolling is step number one in preventing this cycle of improper movement, pain and injury. It can help you lift more and run faster by helping your body work more effectively and efficiently!
Just to list some of the benefits of Self-Myofascial Release…
- Muscle relaxation
- Corrects muscle imbalances (by relaxing tight and overactive muscles)
- Improves joint range of motion
- Maintains optimal length-tension relationships of muscles
- Increases extensibility (the ability to be stretched) of musculotendinous junction
- Improves neuromuscular efficiency (aka the mind-body connection)
So now you’re sold on why you should be foam rolling. Now the question is, HOW do you do it!?
How to Foam Roll CORRECTLY!
I’m going to tell you right here and now…If you’ve been foam rolling but quickly rolling up and down on the roller or ball, you aren’t getting the full benefit of SMR!
Rolling quickly up and down over the muscle doesn’t help the muscle relax or the trigger point release.
In order to actually get the muscle to relax and reap the benefits of foam rolling, you’ve got to HOLD on any knots you find and breathe and relax as you hold. By applying pressure and holding on the knot, you stimulate the Golgi Tendon Organs past a certain threshold which inhibits the muscle spindle activity and decreases muscular tension.
This is called “autogenic” inhibition because the contracting muscle is inhibited by its own receptors. AKA the muscles relaxes itself.
And as you hold, you can flex and relax the muscle you’re applying pressure to. By tensing and relaxing as you hold, you can also help the muscle relax and release itself more quickly.
Below are some of my favorite foam rolling tools and even some key moves to do with them!
And for complete disclosure, because I believe in these tools, I’ve become an affiliate for them. Many companies have reach out to me about promoting their products but these are the ones I have at home and at my gym.
Simple Mobility Tool – Want less neck, shoulder and even low back pain? Then you’ll want to try the Mobilizer from Simple Mobility Tools. The Mobilizer is a great way to loosen tight muscles along your spine, improve your thoracic extension and even relax your neck to help with tension headaches and neck aches and pains.
To use the Mobilizer for your spine, lie on your back with your knees bent and feet flat on the ground. Place the Mobilizer along your spine in your mid-back.
You want a wheel on each side of your spine. Relax back over even extending your arms overhead.
Breathe and hold as you relax over the Mobilizer. Then slowly sweep your arms down and out to the sides before bringing them up to cross them over your chest. Crunch up as you cross your arms over your chest and then relax back over and extend your arms back overhead. Do this a few times then move the roller higher up on your back. Work all the way up to your shoulders.
You can also use the Mobilizer in your low back, but make sure to select a Mobilizer that doesn’t cause you to hyperextend your low back. You will also want to tuck one knee in at a time instead of crunching your upper body up as you hold.
You can also use the Mobilizer on your neck which is honestly my FAVORITE place to use it. Lie on your back on the ground with your feet flat on the ground. Place the Mobilizer at the base of your skull as you lie back. You want a wheel on each side of your spine as you relax over it.
You can place your hands behind your head to support your head. Relax and breathe as you hold. You can also very slightly turn your head back and forth. This should be a very very slightly rock or wiggle. You can also move the roller down your neck toward your shoulders, but start by focusing right at the base of your skull at that suboccipital region.
When selecting a Mobilizer to use for these moves, you have three different Mobilizer sizes to pick from. Pick one based on which move you are doing. Smaller may be better if you are just starting out. Also, smaller may be better if your focus is your lower back while the green or blue may be bigger especially if focusing on your neck.
Want a Mobilizer? Get one HERE for 15% off with code RS15.
Posture Ball – One of the muscles we all too often ignore, but so desperately need to loosen up is our PECS aka our CHEST! Tight chest muscles can contribute to that forward rounded, hunched posture we develop from sitting at a computer working for 9 hours a day.
And when your chest gets tight not only can it perpetuate poor posture, but it can also lead to compensations that cause shoulder aches and pains, such as rotator cuff injuries, and neck and upper back pain.
Ever feel like your upper back is constantly tight no matter what? Even try rolling it out, but feel like it just gets achy again a second later?
It may be because tight pec muscles are actually causing your back to “feel” tight because he muscles are actually over lengthened as we hunch forward! Sometimes we feel a muscle is tight because it is actually overstretched.
And by rolling out your chest, you may find you actually relax some of those knots in your back!
One of my favorite tools to roll out the chest, and even the lats for that matter which can also contribute to rounded shoulders, is the Posture Ball.
To target just your chest using the posture ball, place the ball on the ground and lie face down on top of it with the ball starting right at the side and top of your chest beside your shoulder joint and below your collarbone. It will feel like it is just in front of your armpit.
Holding the ball there, begin to sweep your arm overhead and then back down toward your legs. You can sweep your arm almost as if making snow angels. Or you can move your arm overhead and then tuck it under to reach down toward your feet and rotate your shoulder a bit. You can make full and partial sweeps to dig into a spot.
Then move the ball a little more toward your sternum and repeat. You can work all along underneath your collarbone, holding on any tight spots and moving your arm. You can also work down as if you are going to go down around your armpit.
Once you roll out one side, move the ball to your other side.
To roll out your chest, lats and even your serratus anterior, which can all contribute to poor posture and shoulder aches and pains if they are overactive and tight, you can also use the Posture Ball in what’s called the Shoulder U.
To do the Shoulder “U,” lie face down on the ground with the ball under your chest as if you’re going to roll out your chest. Move your arm as if making a snow angel and hold on any tight spots in your chest. This starting position is just the chest foam rolling from above.
After rolling out your chest, move the ball toward your armpit and then begin to roll the ball right under your armpit and across your ribs. You can hold on any tight spots and relax and breathe. As you move the ball to your ribs, reach your hand overhead and then make small movements lowering it down in front of you before extending back overhead.
Continue moving the ball under your armpit to the side of your back, especially the muscles where your arm and back connect at the back and top of your armpit. Hold on any tight spots as you move the ball around your back.
From here you can roll it down the side of your back a bit and then up your back up and around your shoulder blade. As you work the ball around your shoulder blade and up the middle of your back, you can even pull your arm across your chest to reach under your shoulder blade more. As you hold, pull the arm across your chest then relax the arm back open. Work up and down the shoulder blade then roll it back around front, going under your armpit before bringing it back into your chest.
As you go, make sure to hold on any tight spots instead of simply rolling quickly over them.
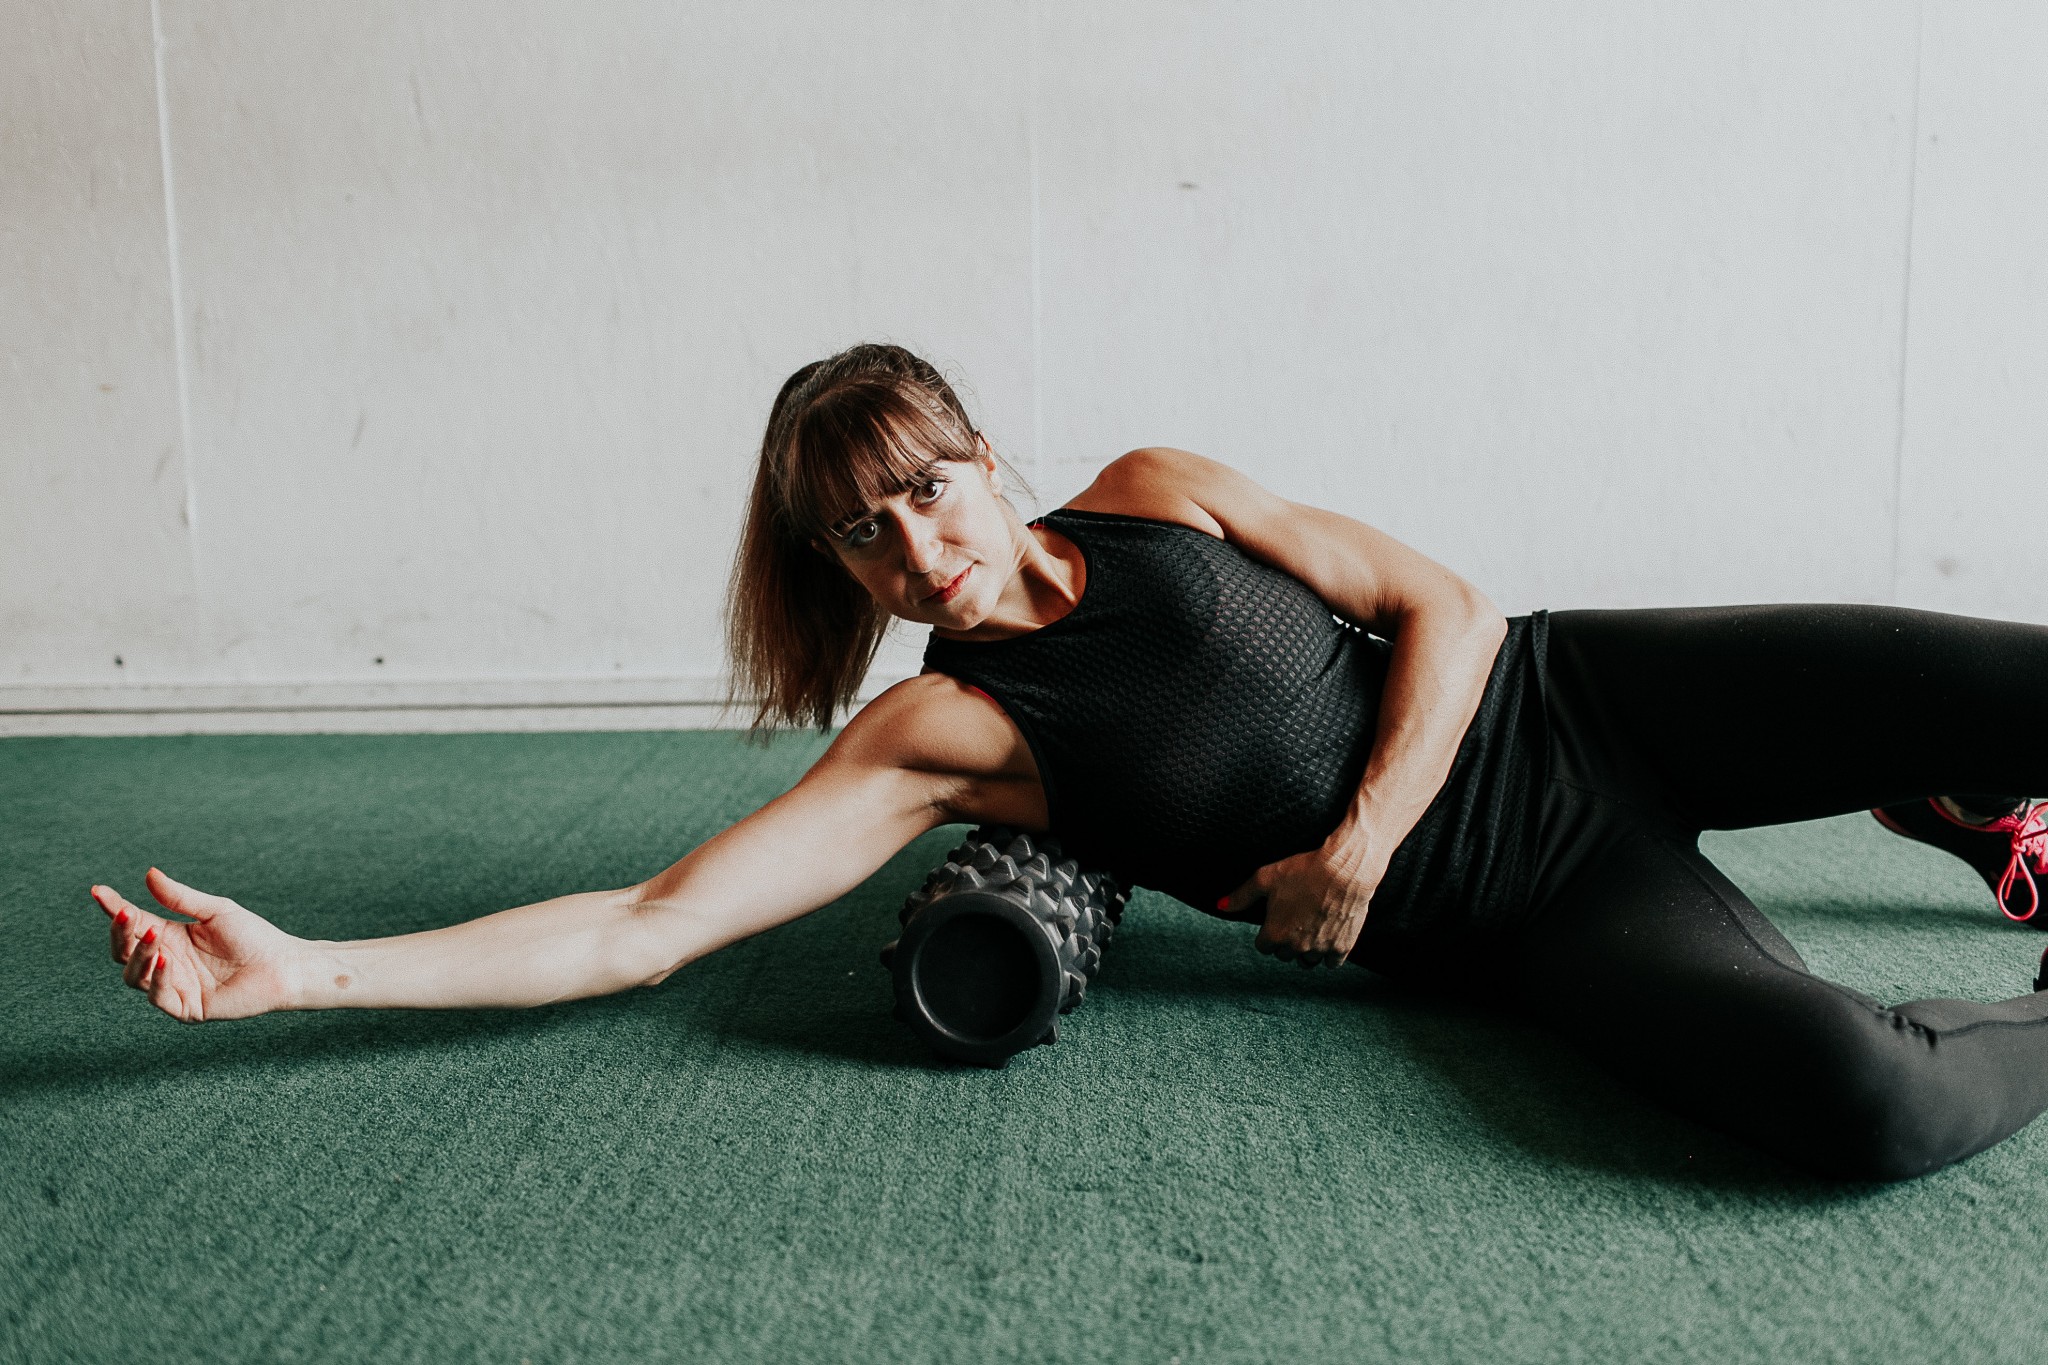
Rollga Roller – If you want a roller that actually does a great job of combining a peanut with a roller with a posture ball, the Rollga Roller should be your go to!
The Rollga Roller combines the benefits of a roller, aka the ability to cover your bigger muscles more quickly, with the abilities of a ball or smaller roller because of the ridges and grooves that allow you to get into those harder to reach places.
That is what makes the Rollga Roller a great tool to roll out your lats, chest and even your quads!
To use the Rollga on your lats, start by lying on your side with the roller under one armpit with the ridge right on your side so it digs into the muscle. Extend that bottom arm up and overhead.
Then rock forward and backward on the roller, rotating your chest toward the ground and then up toward the ceiling. Feel that ridge pressing into the muscle. Then hold again on any tight spots and even move your arm down in front of you and back overhead.
Then move the roller lower down the side of your back. Use that ridge to really dig into any tight spots you find. Hold and rock forward and backward or even move your arm up and down.
As you work down your side, you may want to rotate slightly more toward your back. Work all the way from your armpit to about the end of your rib cage.
The Rollga is great for your quads as well because of the ridges that can be used to dig into tight spots even more.
To roll out your Quads, take the Rollga and lay over it as if you are about to do a plank. If you know where you are tight, you can even place the edge of the ridge on the roller into the tight spot to help you dig it out more.
Start with the roller right above your knees. Rock side to side and then move it up a little higher on the front of your legs. As you rock and move the roller higher, make sure to pause and hold on any extra tight spots until the pain lessens a bit. You can even flex and relax your quad as you hold to help the muscle relax and release.
Work your way all the way up to your hips. Use the ridge of the roller to help you dig into the TFL as you rock open a bit onto your side and get that outer aspect of your hip. You can rock forward and backward as you hold or even lift and lower your leg. But use that ridge to dig into your hip.
To apply more pressure as you work up your quad, place only one leg down on the roller with your other leg crossed over.
Unlike most rollers that really can’t be safely used to roll out your chest, the end of the Rollga can be used like the Posture Ball.
To use the Rollga to roll out your chest, stand the roller on it’s end so one of the round ends is angled up toward the ceiling. Kneeling over it, angle the end into the side of your pec right by your shoulder joint. Lean into the roller as it presses into your chest.
Then begin to sweep your arm up toward your head and back down toward your side. Sweep your arm up and down a few times then adjust the roller toward your sternum and repeat the arm sweeps. You can also work it down your pec and around the shoulder joint toward your armpit.
As you hold on any tight spots, breathe and relax. While you can do the arm sweeps overhead and back down, you can also open and close your arm, lifting it out to the side and then lowering it back down toward the ground.
After working on one side, switch the roller to the other side and repeat.
The Rollga Roller also comes in more than one firmness. Beginners, or anyone more sensitive to massage, may need to start with a softer roller.
However, if you like a deep tissue massage or want to more quickly release tight muscles and can handle more pressure, you can go with a firmer Rollga. The one I use is the Rollga Firm Sunrise.
The great part is you have options to pick the pressure right for you and to even get a more firm roller as you find you loosen up because you’re rolling consistently!
Rollga Helo 3 in 1 Activator – This tool, the Helo 3 in 1 Activator, takes what I love about the lacrosse ball and combines it with some neat grooves to make it even more effective at getting those harder to roll out areas, like your shins, glutes and chest. And boy do the little ridges feel good on your feet!
Rolling out your feet is more important that we realize. It can have a huge impact not only on the muscles and fascia in our feet, but even on our central nervous system. And the texture of the Helo makes it perfect to stimulate the nerves in the bottom of your feet as you relax the muscles.
To roll out your feet, simply place the Helo on the ground with the ridges up. Then stand and place your foot on top of the Helo. Press down into the Helo as you relax your foot over it. After holding on any tight spots, rock gentle on the Helo, rolling the ridges under your foot.
And not only does the special design of the Helo come in handy for your feet, but the ridges are great for your Shins, Glutes and Chest.
To roll out your shins, sit on your butt with one knee bent in front of you and the foot flat on the ground.
Take the Helo in both hands and dig one of the ridges into the muscle on the outside/front of your lower leg under your knee. Do not dig it into the bone.
The ridges in the Helo are the perfect size to work in your shin along your shinbone. Make small circles as you press into the muscle. Even press and hold a little harder on any tight spots. Then move the Helo lower down your shin and repeat. Love that you can really target any knots using the ridges on the side!
Same goes for the Glutes and Chest.
Just like with a ball, you can sit on the Helo to roll out your glutes; however, unlike a ball, you can angle the ridges into any specific tight spots you have, which makes it such a great tool to really reach those trigger points.
As you sit and hold on the Helo, even lift and lower your leg to help tense and relax the muscle. This can help any knots release more quickly.
The Helo is also the perfect tool to roll out your chest if you want to apply a bit more pressure than you can with the Rollga Roller or Posture Ball.
To roll out your chest with the Helo, stand in a doorway facing the wall. Place the Helo between your chest and the wall. You can even angle it so the ridges will be facing your chest. This is great if you have knots you want to target. Make sure to start the Helo in your chest by your shoulder joint under your collarbone so you can extend your arm forward through the doorway.
Press into the Helo and raise the arm on that side up toward the ceiling and back down. Using the Helo in the doorway makes it way easier for you to dig in and move your arm as you you hold. Hold on any tight spots as you move your arm.
Then move the Helo to the next tight spot. If the ridge applies to much pressure, you can also use the smooth side of the Helo to roll out your chest.
On top of these four areas, you can also use the Helo on your upper back, lats, calves and even your hamstrings. It really is the perfect way to dig into any tight spots that are hard to reach with the roller. Plus, the ridges allow you to really pinpoint knots more than you even can with a normal ball!
To get your own Rollga Helo, click here. To get 20% off, enter code CoriRS at checkout.
Tiger Tail – Handheld rollers are great if you feel uncomfortable getting down on the ground and want even more control over the exact amount of pressure you apply.
They are perfect to use on your calves, peroneals, quads and hamstrings especially. Heck, you can even have a partner use one to help you roll out too!
If you’re looking to get your own Tiger Tail, they hooked me up with a great deal for my clients. Just enter code – corihookedmeup$ when you check out!
For a complete program to help you get started foam rolling, check out my RStoration Program!
For even more foam rolling moves, check out these articles too:


 Knots and trigger points can cause restrictions and alterations that results in a change to motion about a joint. When this happens there can be a change in your normal neural feedback to your central nervous system aka a change in your mind-body connection.
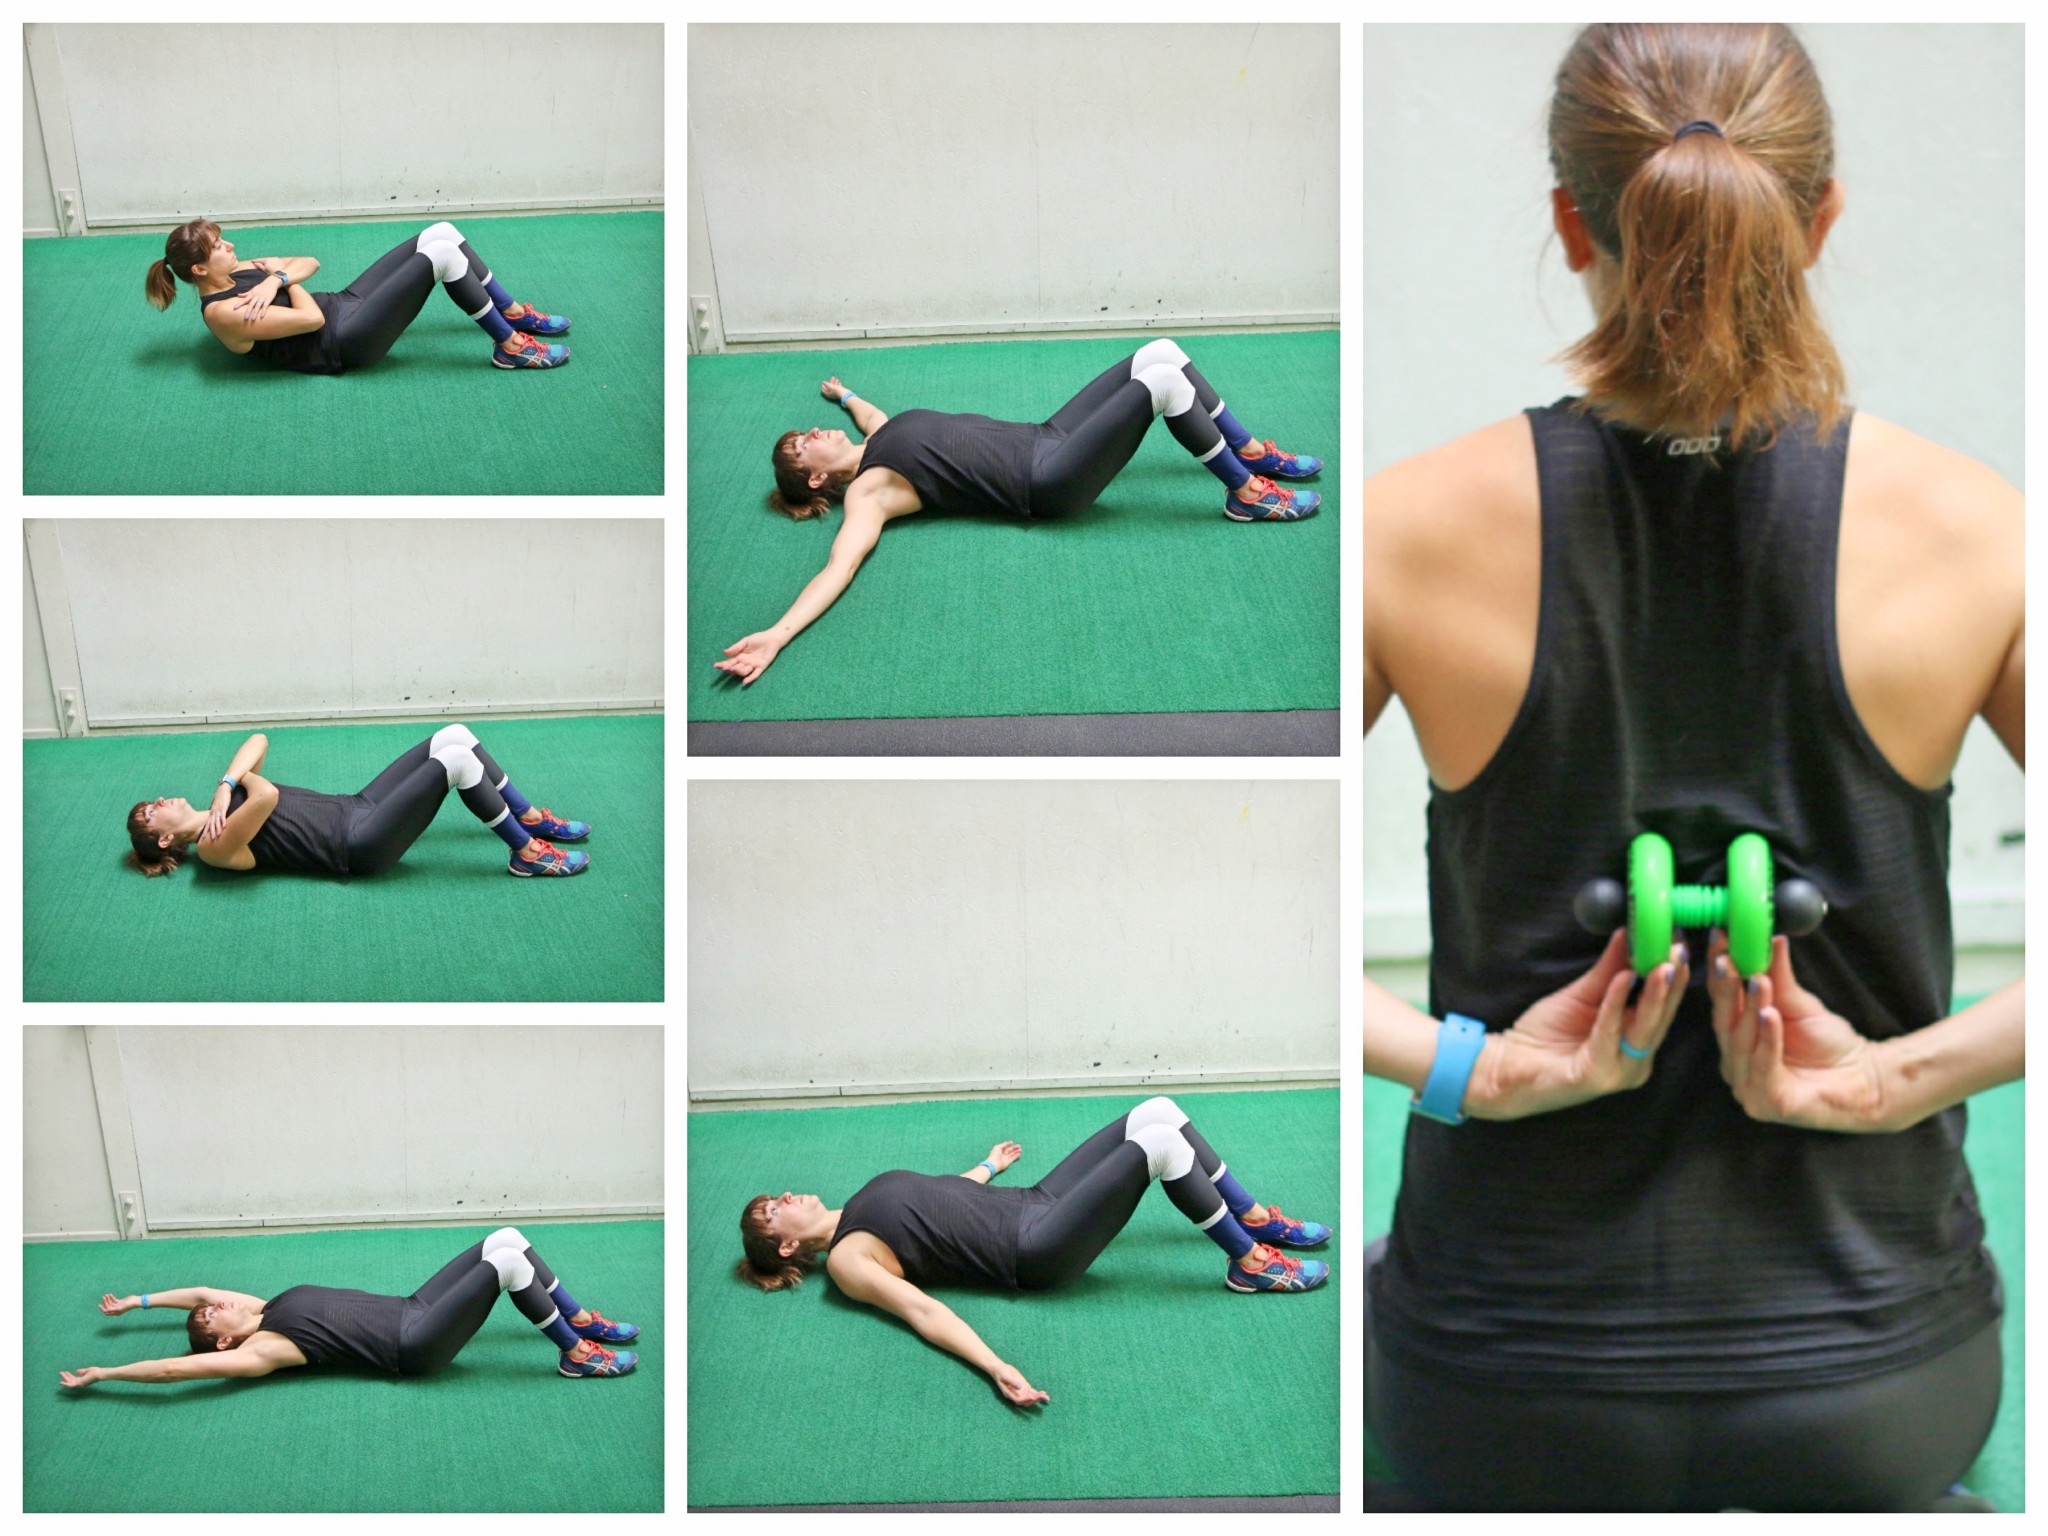 You want a wheel on each side of your spine. Relax back over even extending your arms overhead.
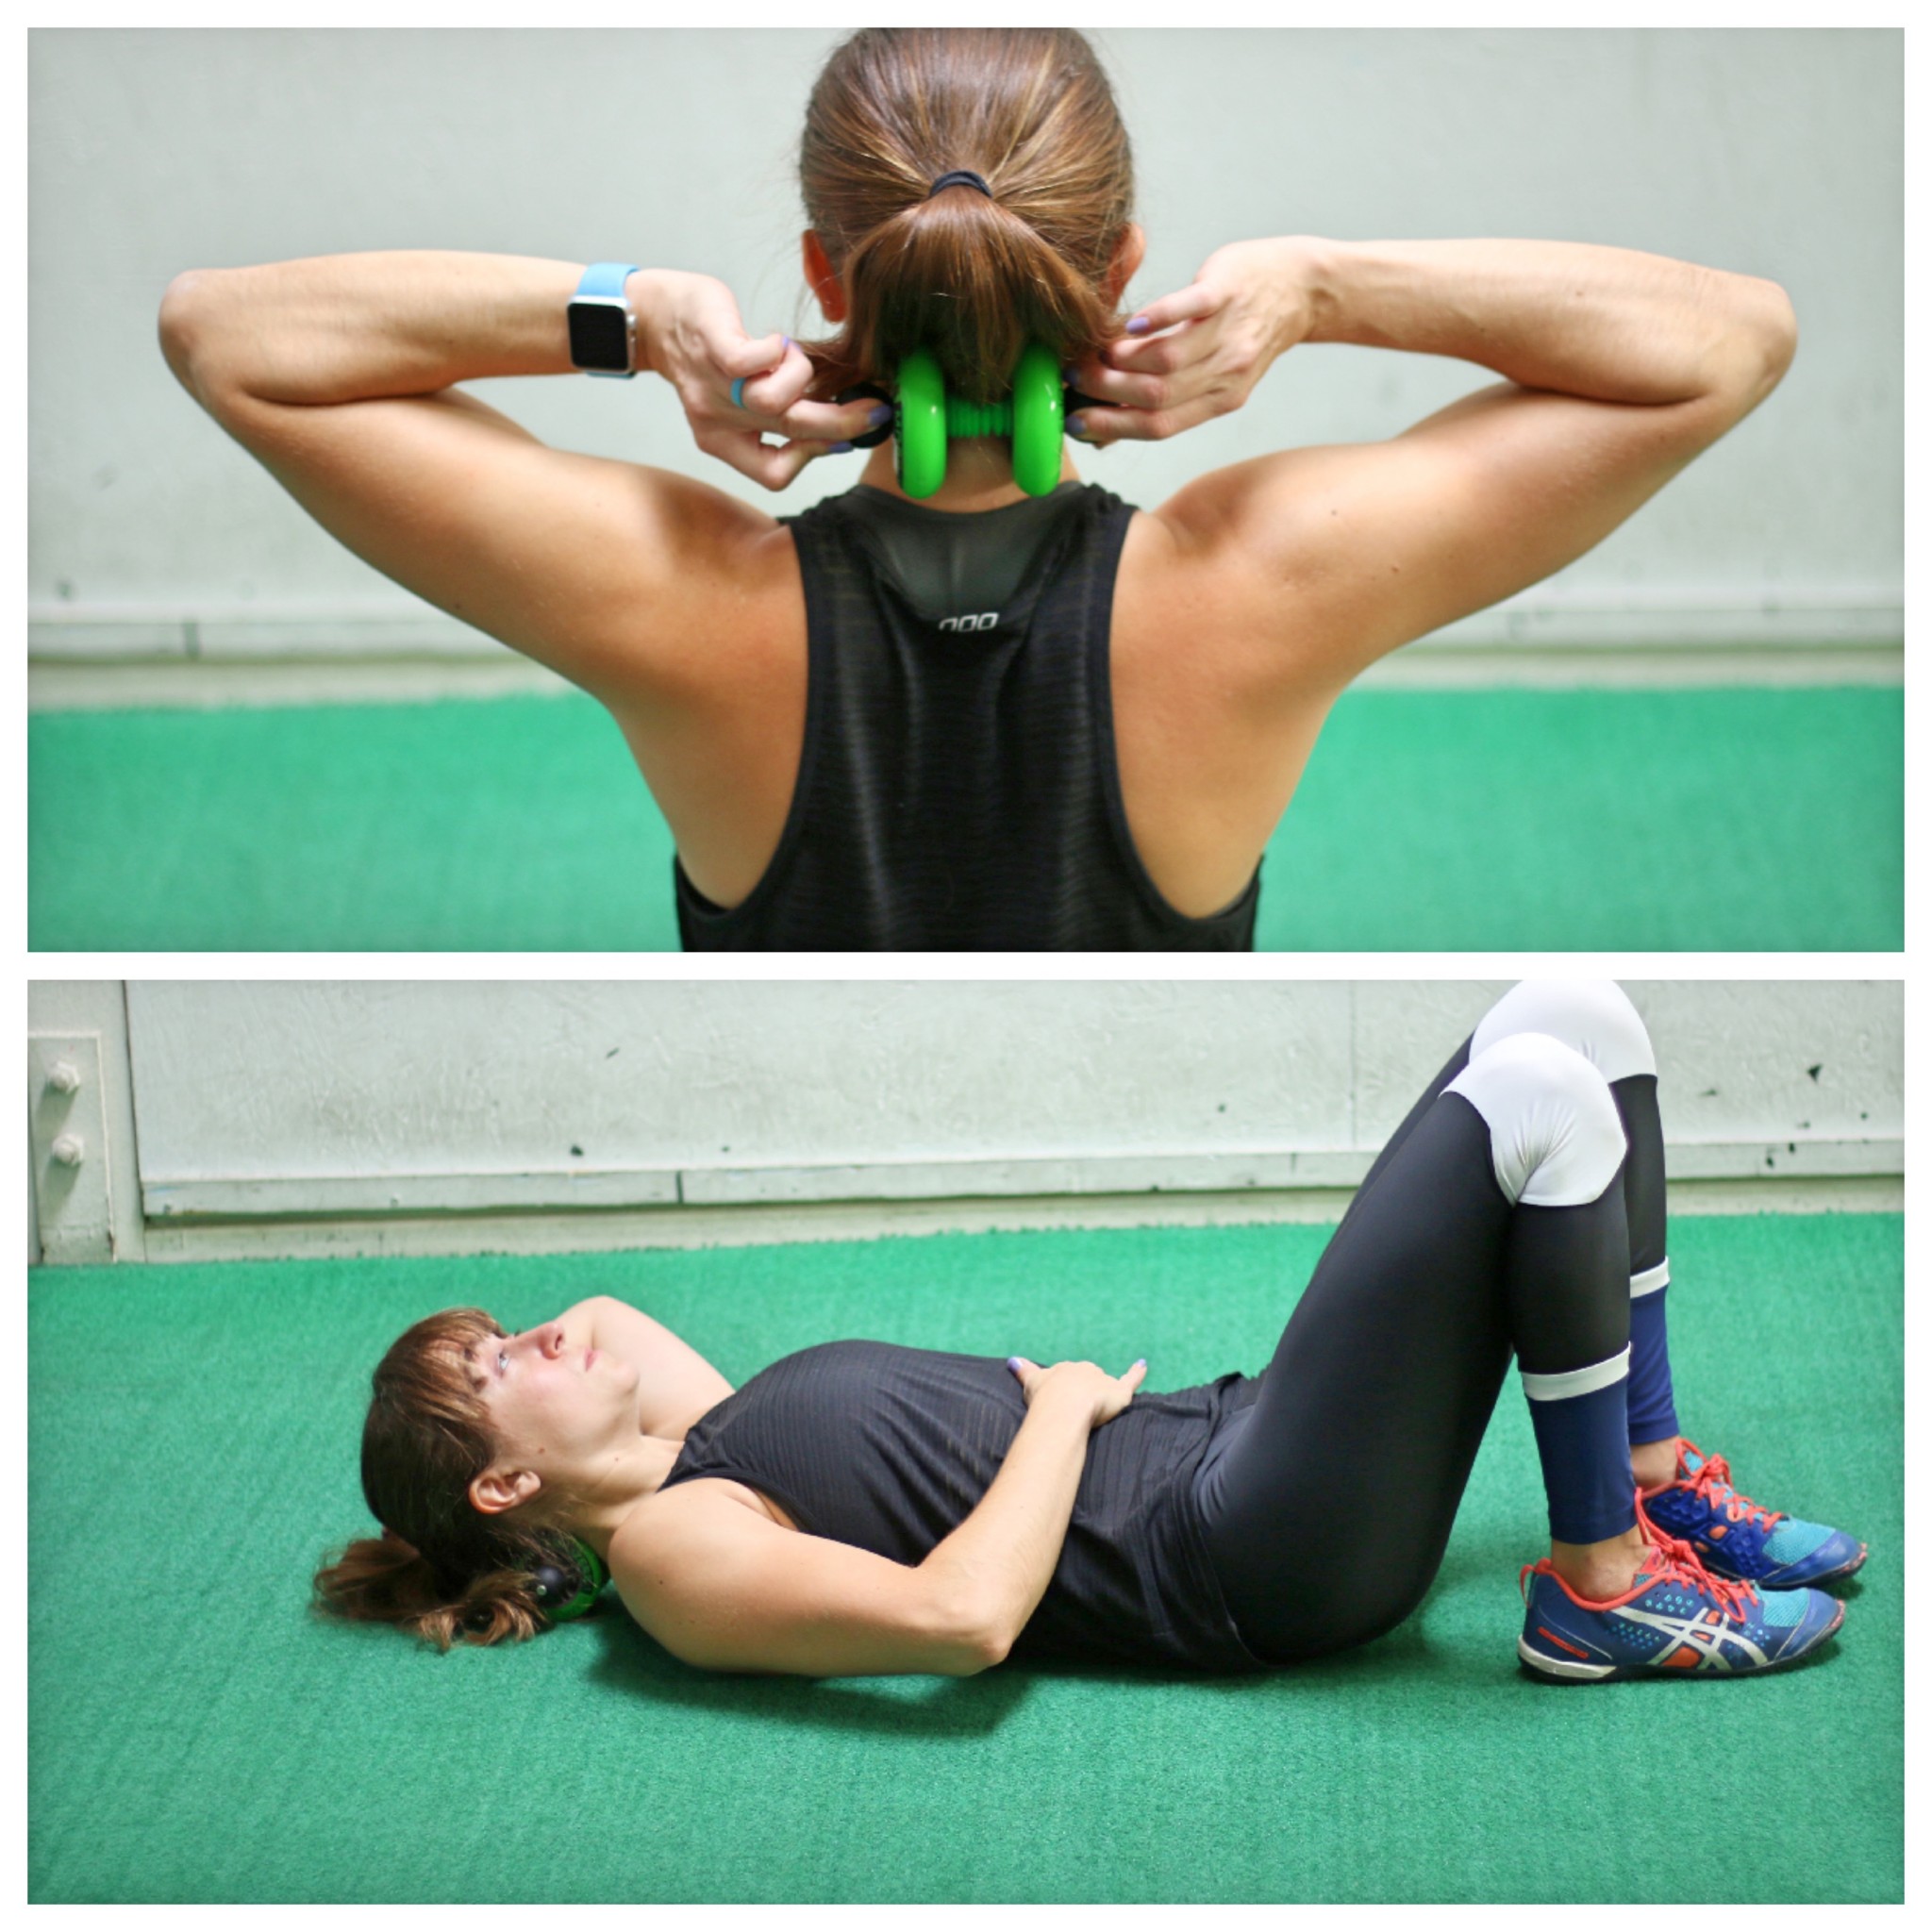 You can place your hands behind your head to support your head. Relax and breathe as you hold. You can also very slightly turn your head back and forth. This should be a very very slightly rock or wiggle. You can also move the roller down your neck toward your shoulders, but start by focusing right at the base of your skull at that suboccipital region.
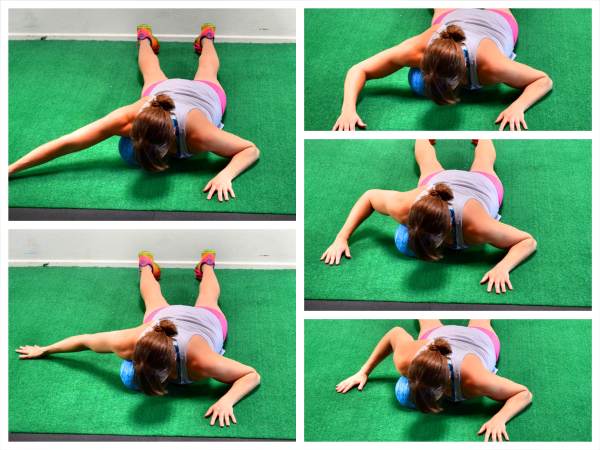 Holding the ball there, begin to sweep your arm overhead and then back down toward your legs. You can sweep your arm almost as if making snow angels. Or you can move your arm overhead and then tuck it under to reach down toward your feet and rotate your shoulder a bit. You can make full and partial sweeps to dig into a spot.
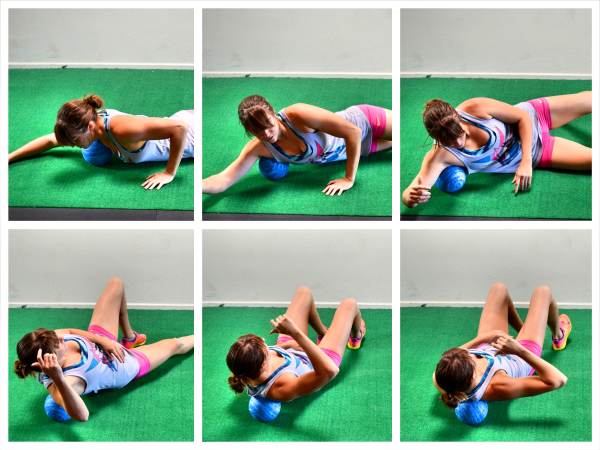 After rolling out your chest, move the ball toward your armpit and then begin to roll the ball right under your armpit and across your ribs. You can hold on any tight spots and relax and breathe. As you move the ball to your ribs, reach your hand overhead and then make small movements lowering it down in front of you before extending back overhead.
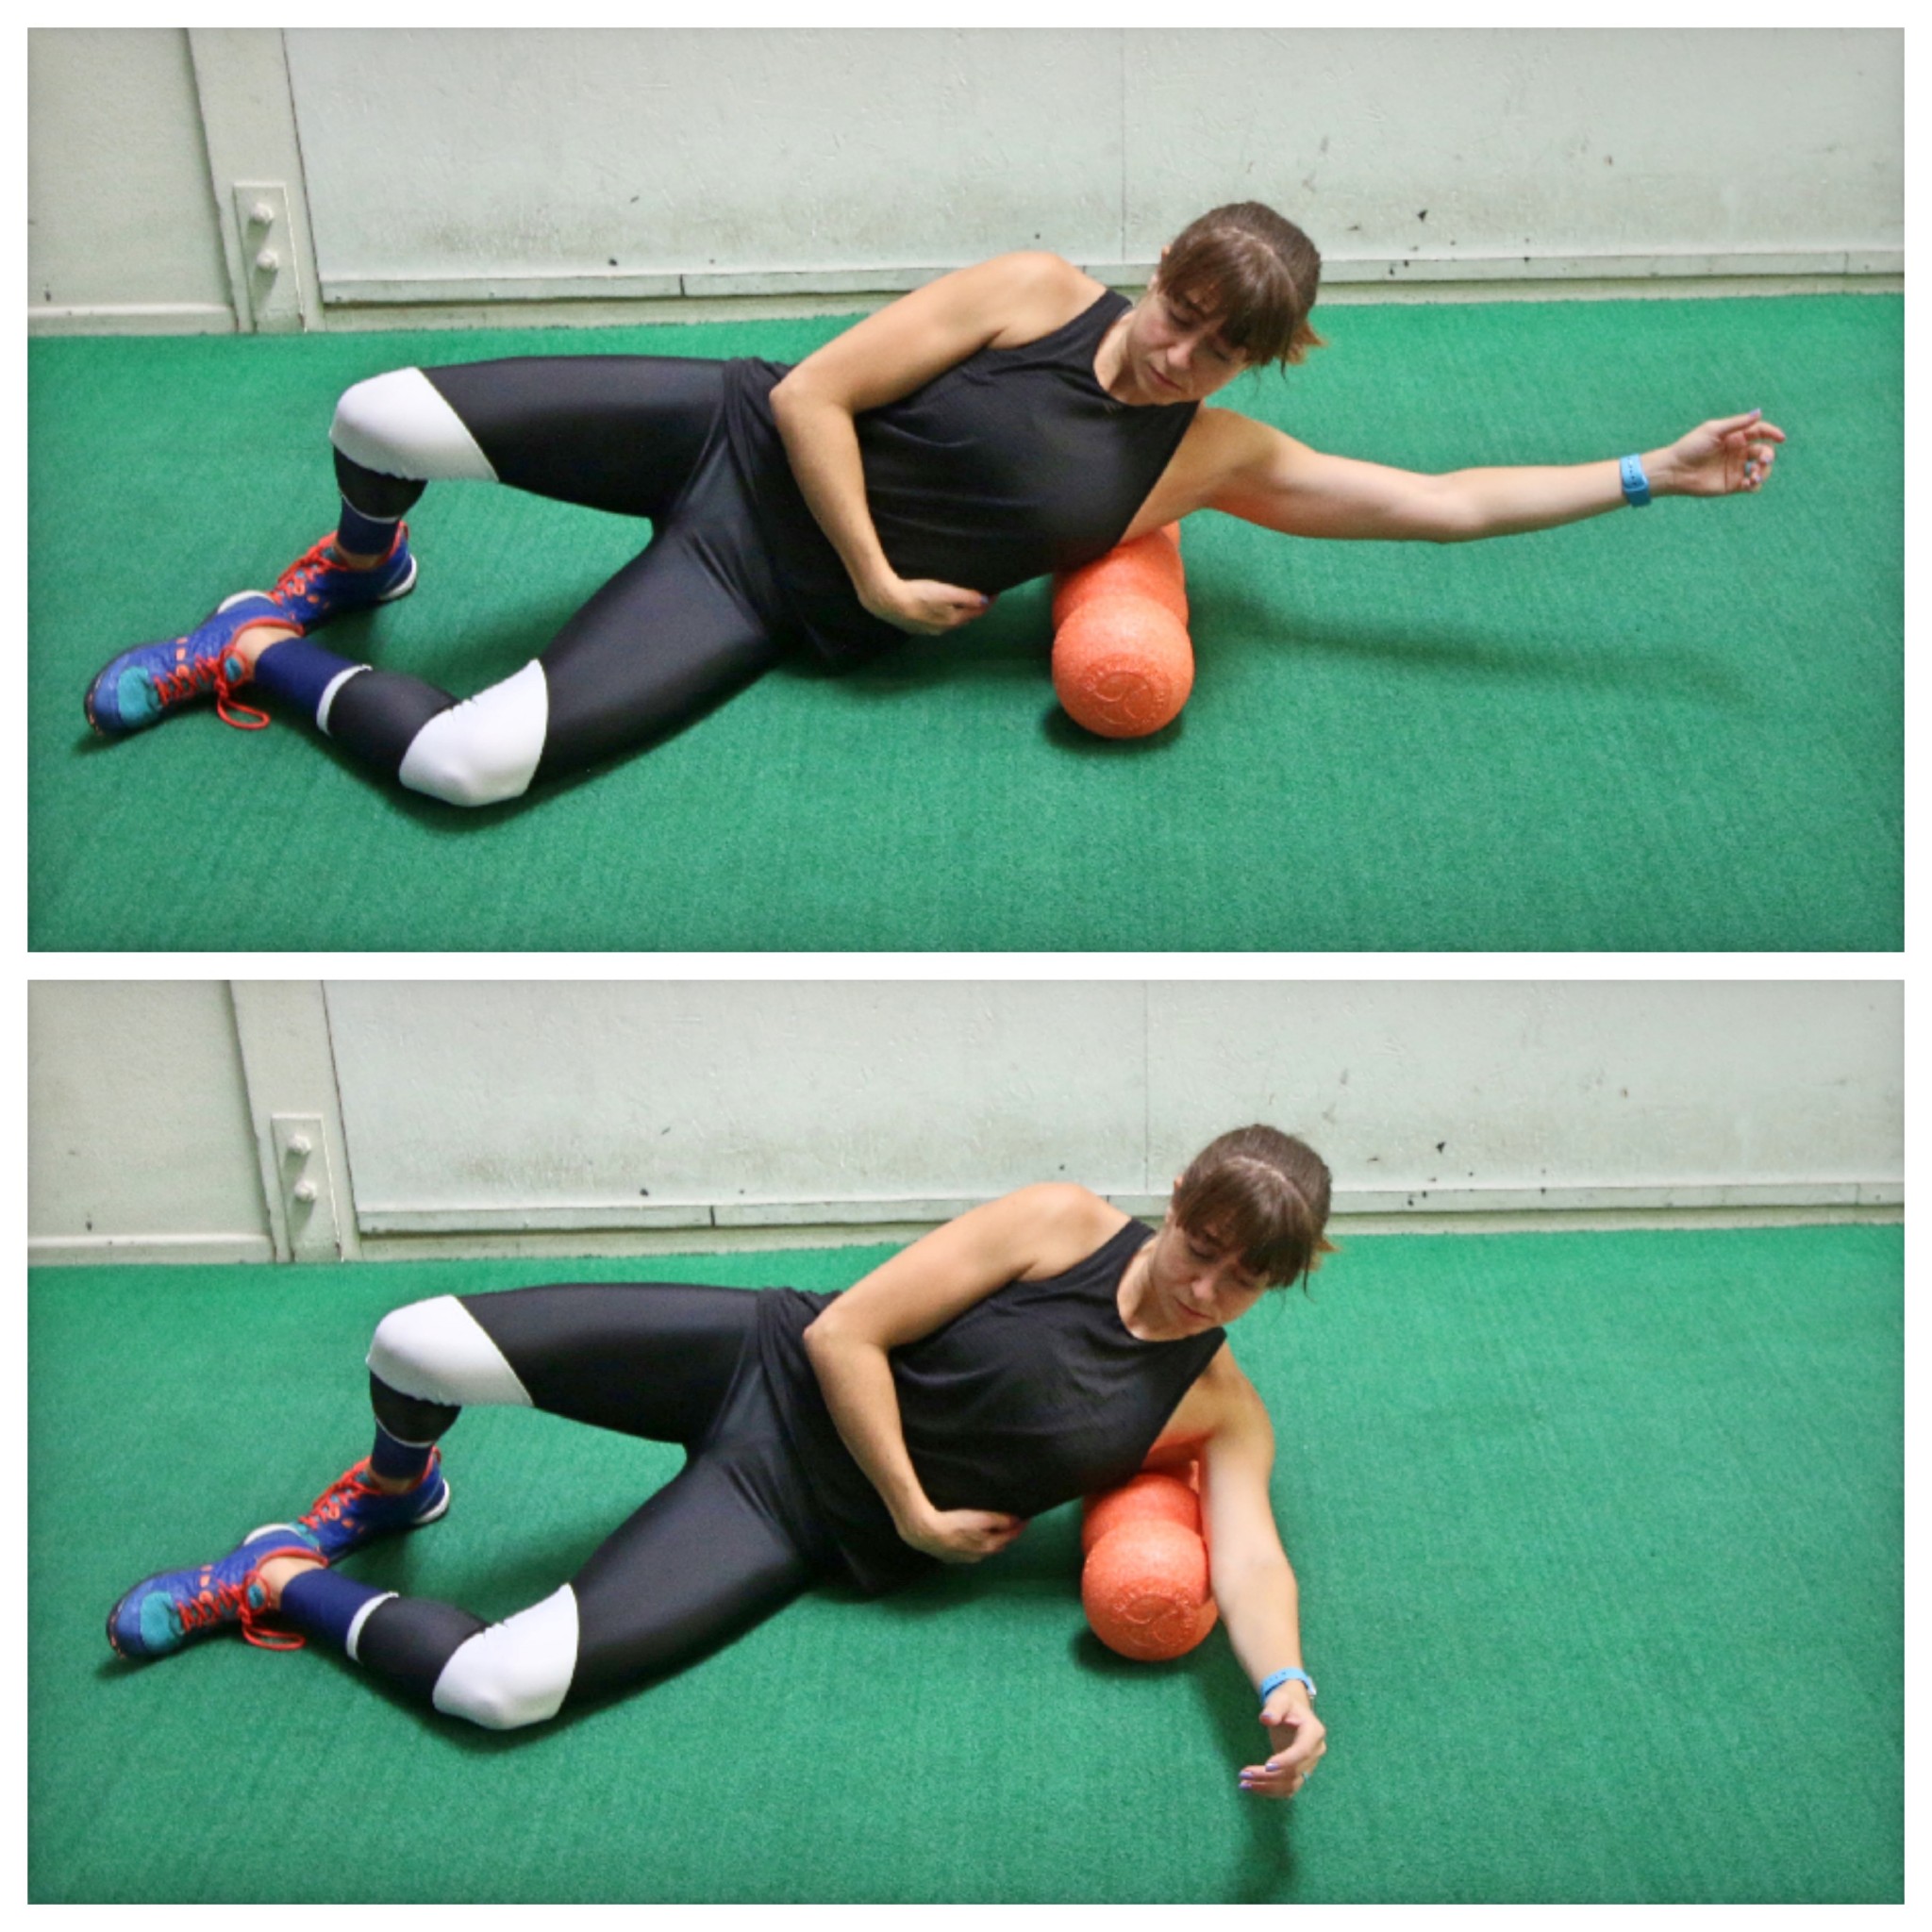 Then rock forward and backward on the roller, rotating your chest toward the ground and then up toward the ceiling. Feel that ridge pressing into the muscle. Then hold again on any tight spots and even move your arm down in front of you and back overhead.
 Start with the roller right above your knees. Rock side to side and then move it up a little higher on the front of your legs. As you rock and move the roller higher, make sure to pause and hold on any extra tight spots until the pain lessens a bit. You can even flex and relax your quad as you hold to help the muscle relax and release.
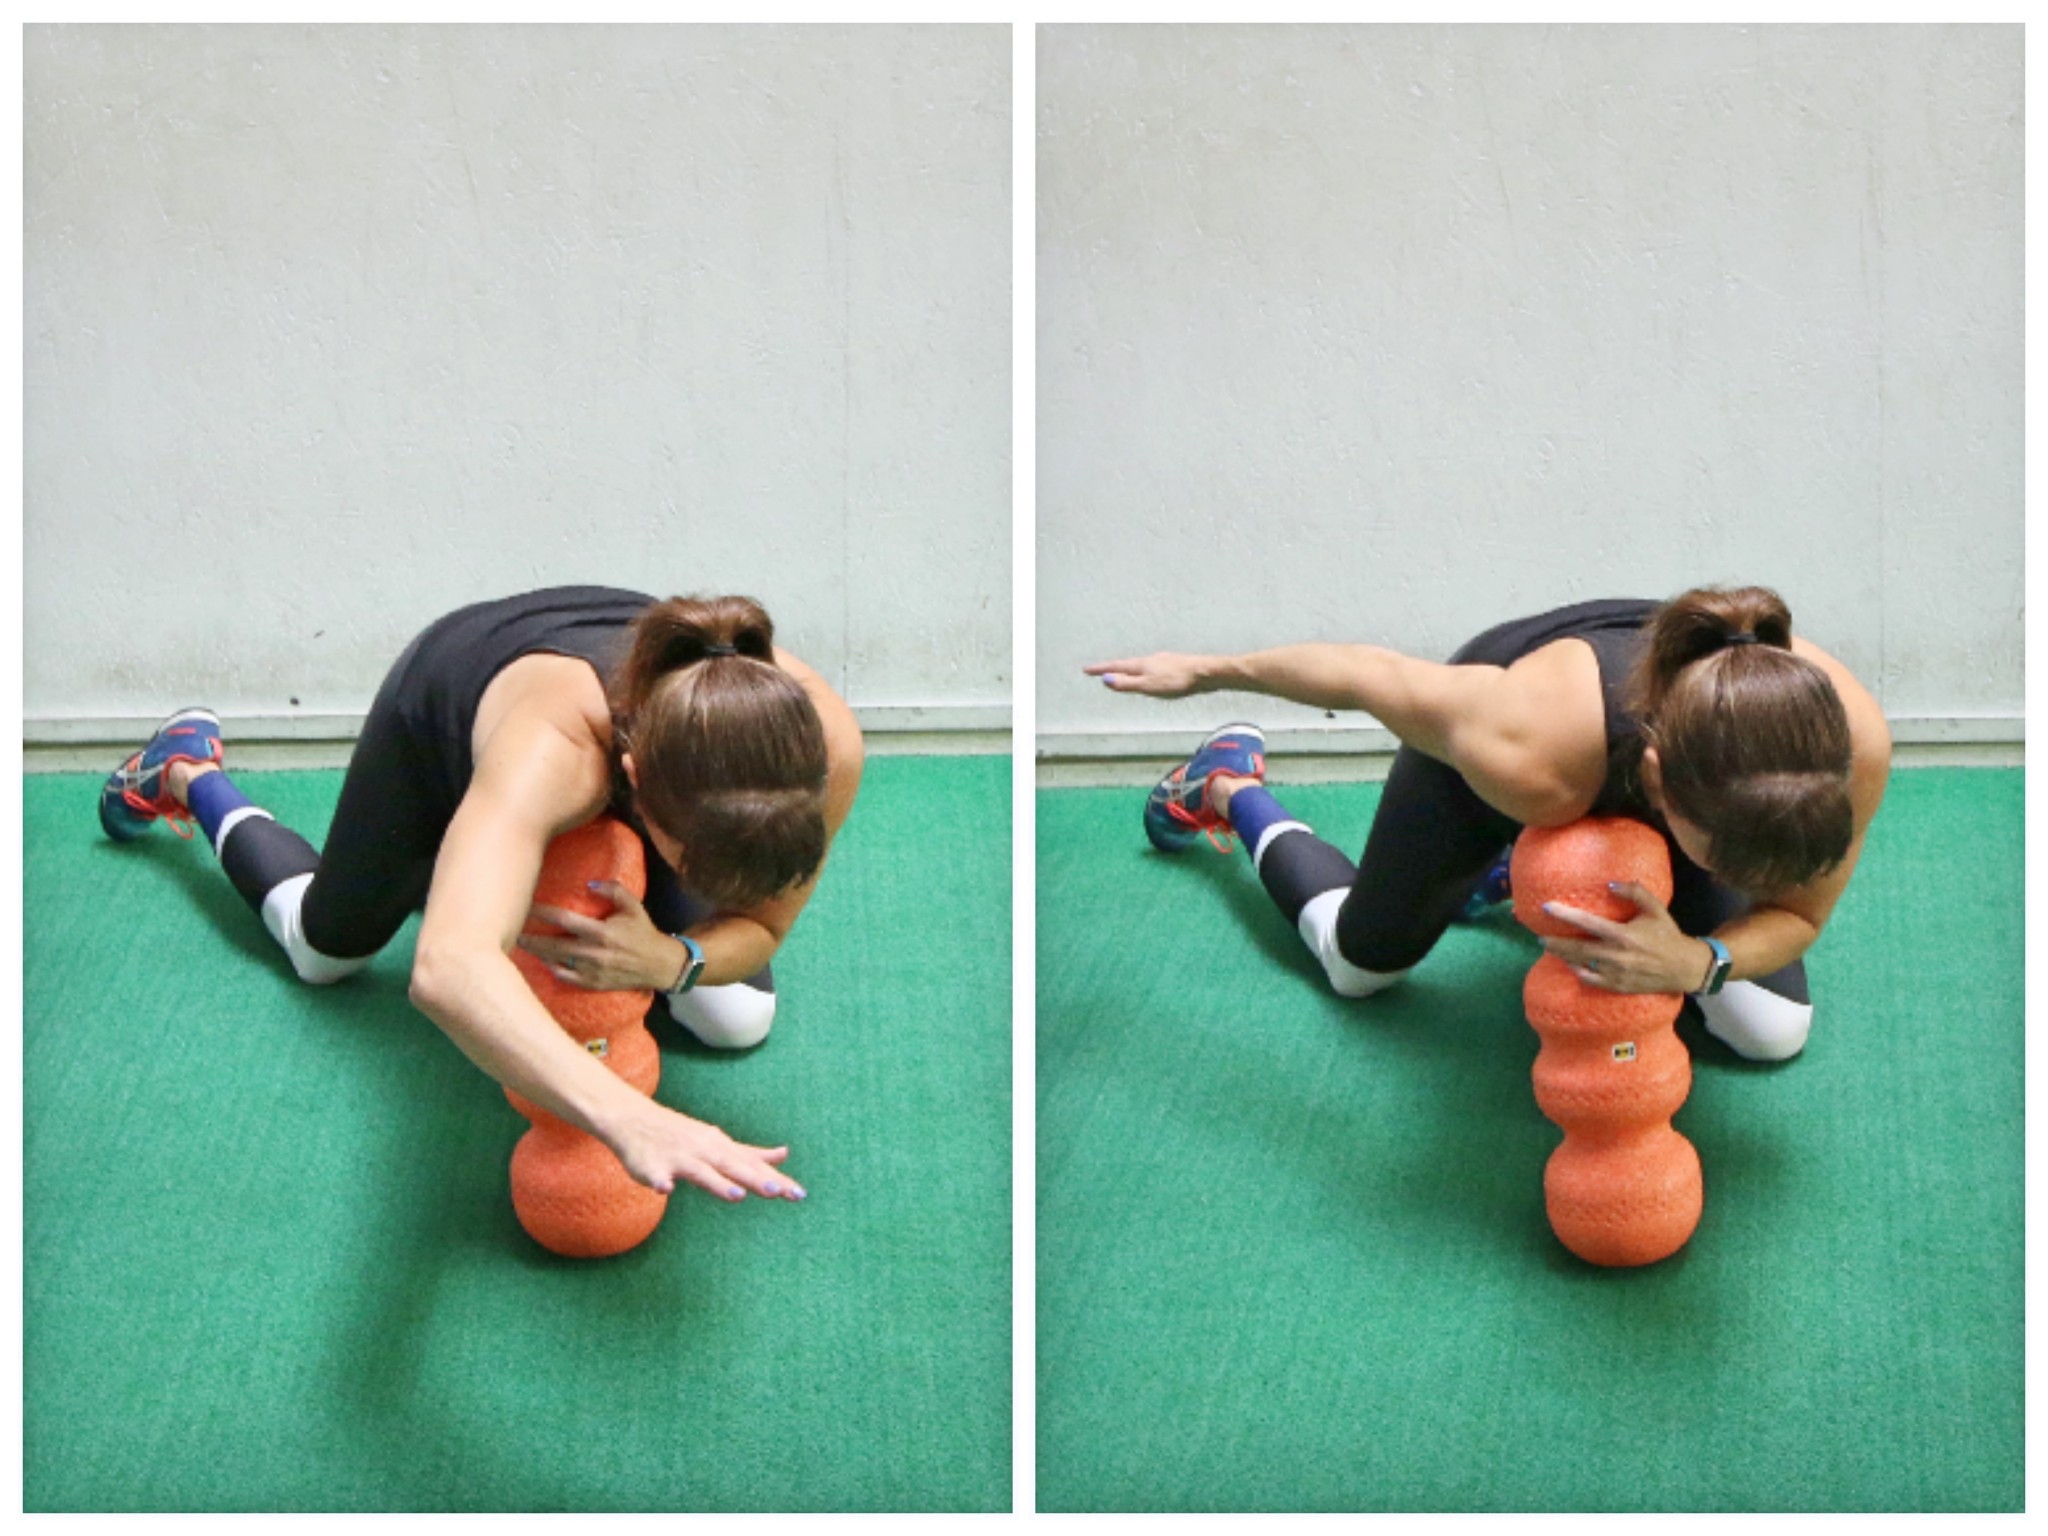 Then begin to sweep your arm up toward your head and back down toward your side. Sweep your arm up and down a few times then adjust the roller toward your sternum and repeat the arm sweeps. You can also work it down your pec and around the shoulder joint toward your armpit.
 Take the Helo in both hands and dig one of the ridges into the muscle on the outside/front of your lower leg under your knee. Do not dig it into the bone.
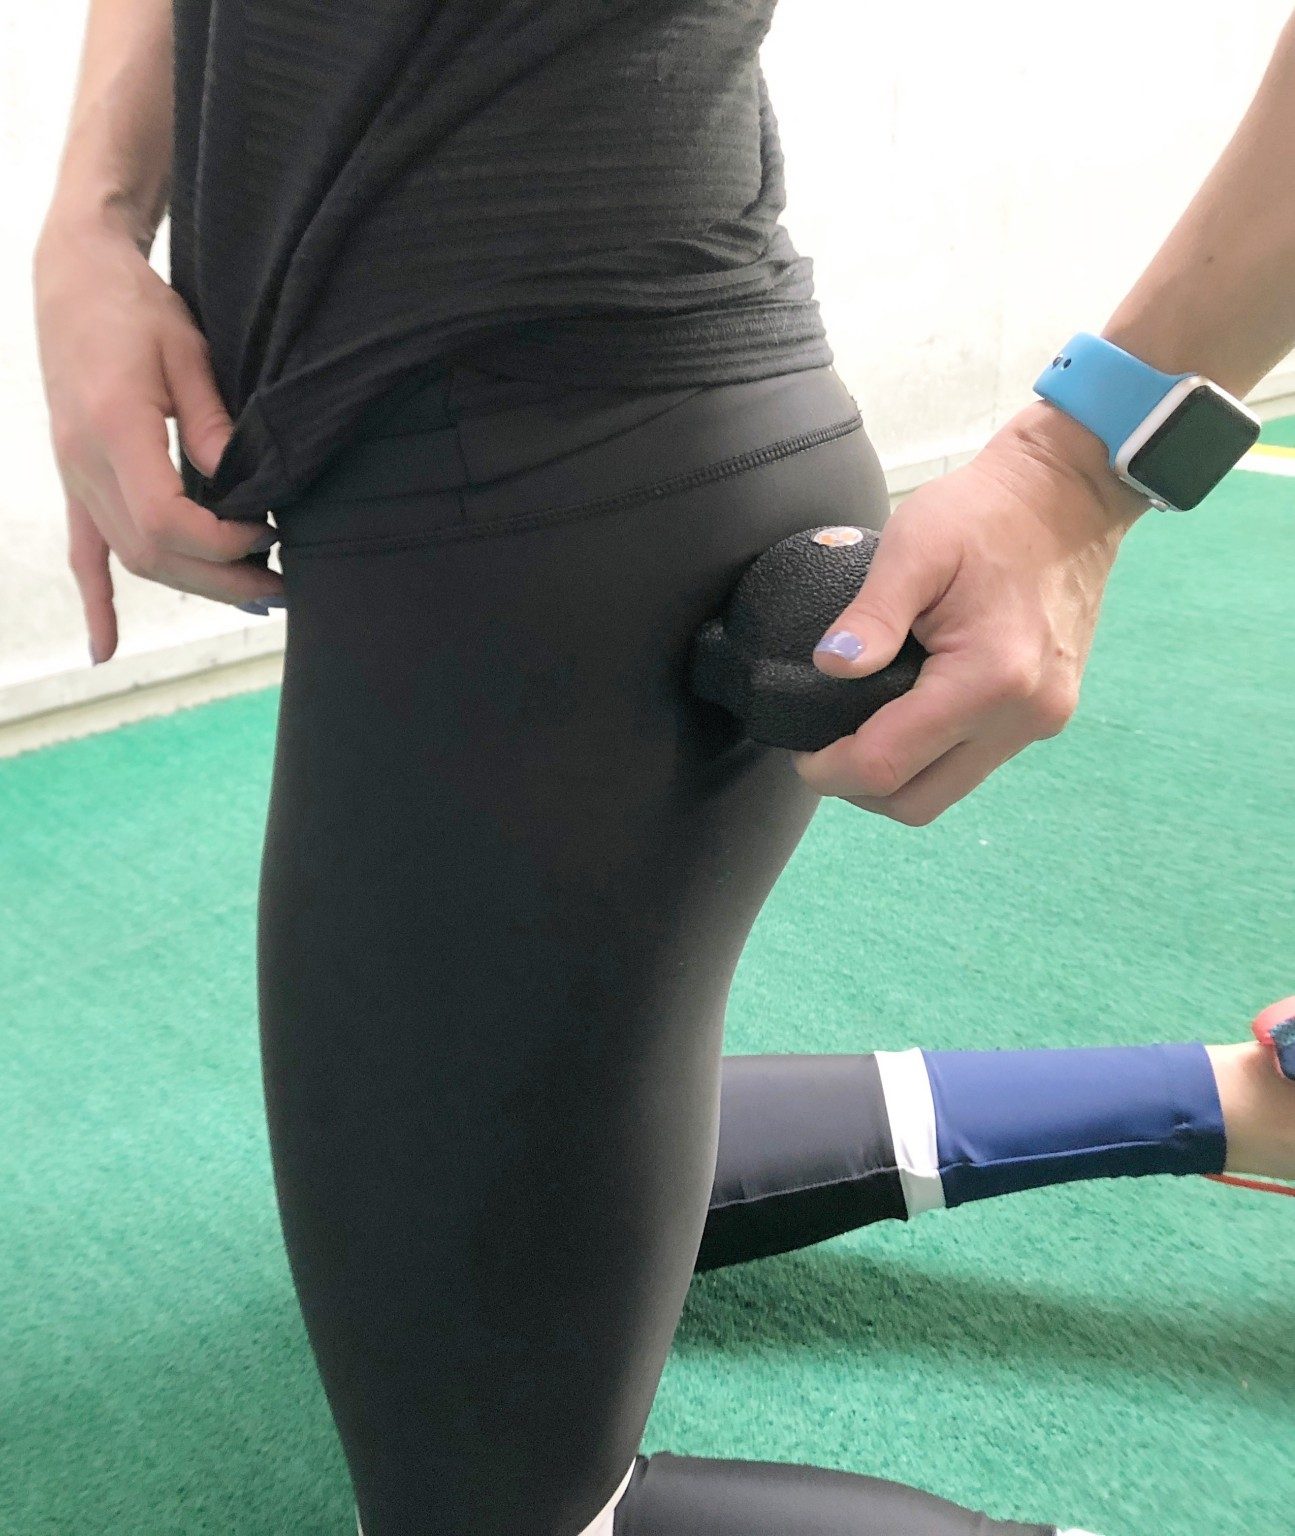 Just like with a ball, you can sit on the Helo to roll out your glutes; however, unlike a ball, you can angle the ridges into any specific tight spots you have, which makes it such a great tool to really reach those trigger points.
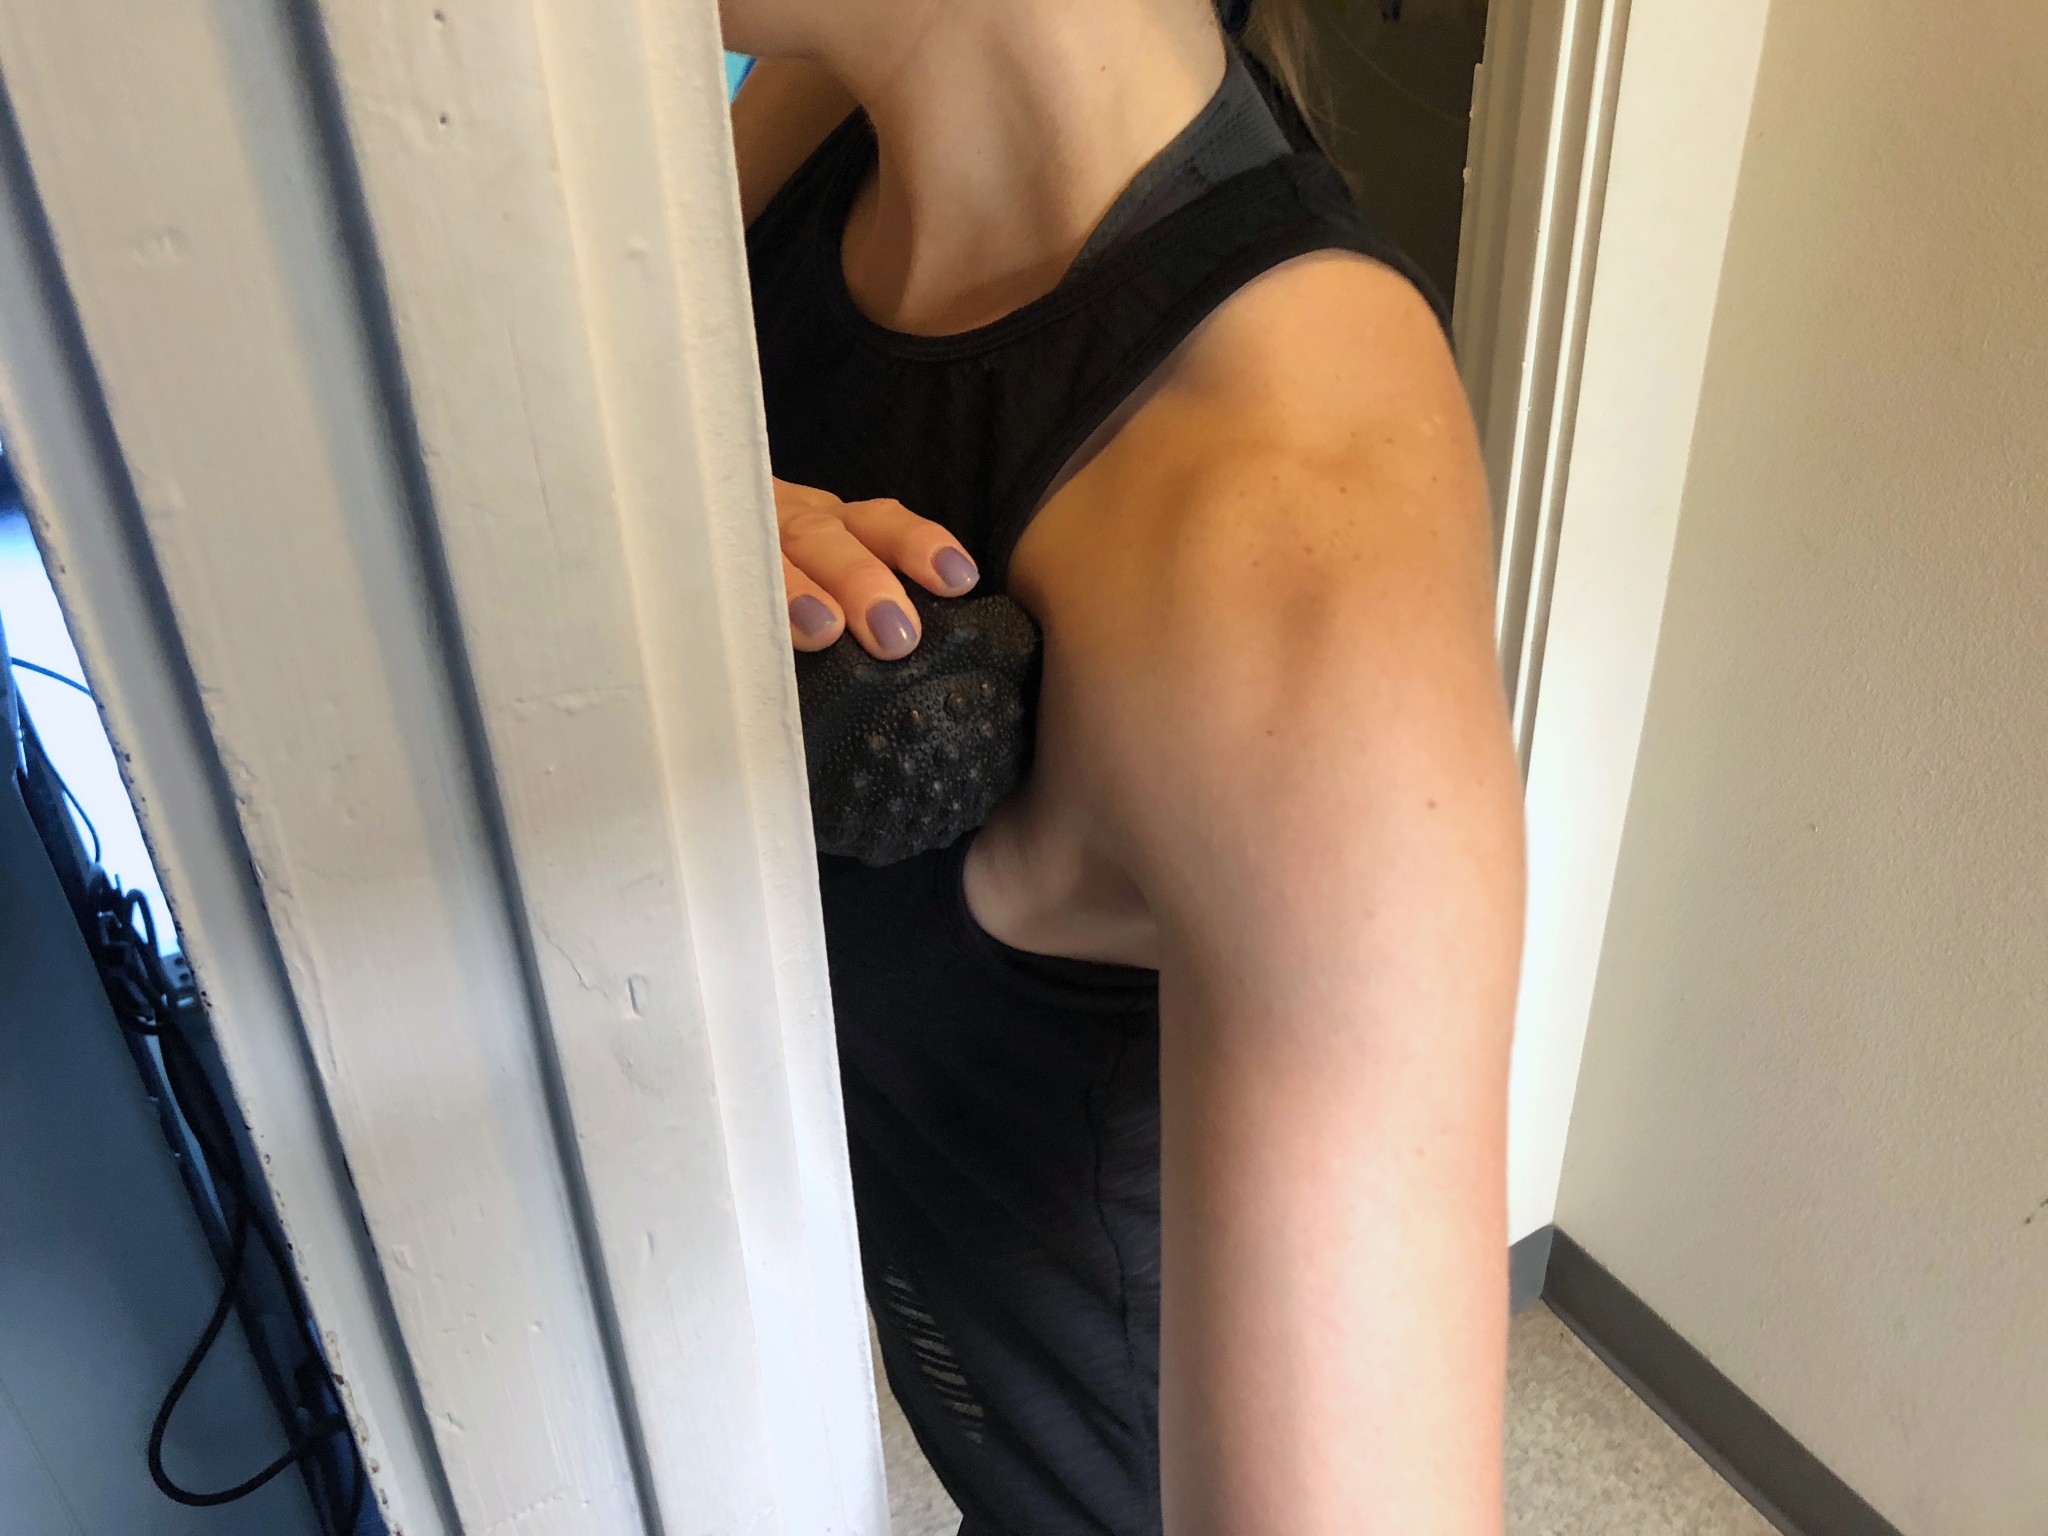 Press into the Helo and raise the arm on that side up toward the ceiling and back down. Using the Helo in the doorway makes it way easier for you to dig in and move your arm as you you hold. Hold on any tight spots as you move your arm.