The first step in preventing and alleviating upper body aches and pains is to relax tight muscles to help start correcting imbalances and restore normal muscle length-tension relationships.
That means you must foam roll.
Foam rolling can help you relax tight muscles so that you can then stretch, activate and strength to get the correct muscles working. If you don’t first loosen tight muscles, you may not be engaging the correct muscles when you workout.
And if you aren’t engaging the correct muscles, you may only be perpetuating imbalances, compensations and injury.
Below are 11 Upper Body Foam Rolling Moves to help you correct imbalances and loosen tight muscles caused by sitting hunched over a computer all day so that you can prevent and alleviate injuries.

11 Upper Body Foam Rolling Moves
These 11 Upper Body Foam Rolling Moves will help you loosen up your entire arm as well as your chest, back, traps and shoulders.
And you may find you need to use more of them than you think. Just because you have pain in one area of your upper body, doesn’t mean you should simply roll out that one specific area.
For instance, shoulder pain may be caused by tight muscles in your forearm, upper arm or even your upper back. Therefore, if you simply roll exactly where it hurts, you may not actually be correcting the problem. Sometimes you need to search around the pain to find trigger points and tight muscles that may be causing the problem.
Forearm Foam Rolling – Many of our activities throughout the day put our hands and wrists in flexion, which can make our forearms tight and lead to wrist pain, elbow pain and even shoulder pain.
Tight, overused forearm muscles can directly lead to pain as well as compensation and imbalances that create injury further up your arm and upper body. Limited mobility in our wrists and elbows because of tight forearms can lead to improper functioning as high up as our shoulder.
So if you are suffering from shoulder pain, you may want to investigate your forearms and see if they are tight. Also, if you’ve ever wondered why your wrists get angry with push ups or handstands, you may want to roll out and even stretch your forearms!
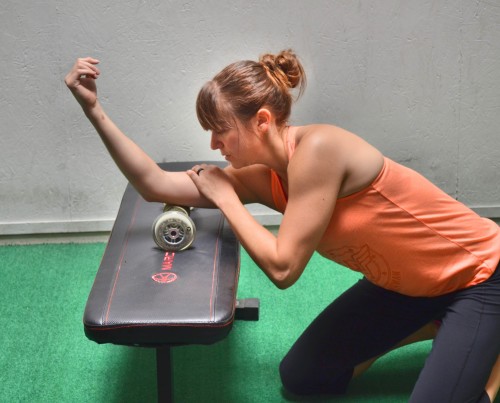
A ball or roller can be used to release trigger points in both your flexors and your extensors (so both sides of your forearm).
To roll out your forearm, place a small ball or roller up on a table or desk. Place your forearm over the ball with it right below your elbow. You can start with the underside of your forearm down on the ball.
Then press down on your forearm with your other hand to press it into the ball. Start to make small circles on the ball to dig in more. Hold on any tight spots. If you find a tight spot, you can also tense and relax your forearm to help the ball dig in further. To tense and relax your forearm, you can flex and extend your wrist or even make a fist and then relax your hand.
By flexing and relaxing the muscles, you help the ball dig in and release the tight spot.
Roll the ball all along the fleshy part of the underside of your forearm. Then move to the outside of your forearm. Make sure to get the outside and inside of your forearm as there can be trigger points in both spots causing potential wrist and elbow pain.
Don’t waste time on any areas that aren’t tight or sore. Seek out and spend time on any areas of pain.
Apply as much pressure as you can handle and use as small and hard a ball or roller as you can.
Tricep Foam Rolling – Shoulder and elbow pain could also be due to tightness of your triceps since your triceps connect to both joints and could cause imbalances and a limited range of motion leading to compensation and poor movement patterns.
And because we have a tendency to do more pushing exercises, it is important that we roll out our triceps to keep them at the proper length-tension relationship so that they function correctly.
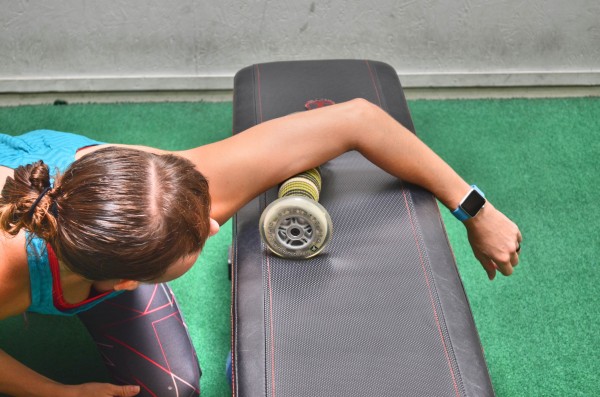
To roll out your triceps, you can use a ball or roller. Take the ball or roller and place it up on a desk or table so that you have leverage to press down and dig out your tricep.
Then place the backside of your upper arm (your tricep) on the roller or ball right above your elbow. Use your other hand to press your arm down into the ball or roller. Then rock your upper arm side to side very slightly. Hold on any tight spots you find.
If you find a tight spot, you can extend and bend your elbow to flex and relax your tricep over the ball or roller.
Work your way up your tricep to your shoulder. You can even rock and work toward your inner and outer upper arm.
You can also use a ball or roller against a wall if you don’t have a table or desk since it will give you more leverage than laying on the ground.
Bicep Foam Rolling – A tight bicep, like a tight tricep, can also lead to shoulder and elbow pain as the muscle connects to both joints. And, although the bicep doesn’t connect to the muscles of our neck, it can also contribute to neck pain. Therefore, you need to roll out your bicep to keep it loose and functioning properly so that it also doesn’t pull other muscles out of alignment.
Rolling out your biceps may also make it easier for you to activate and use the muscles of your back when you lift and perform rowing, pulling movements.
To roll out your biceps, you will place a ball or roller up on a table or desk like you did to roll out your triceps. You will then rotate your chest toward the ground and place your bicep down on the roller or ball right above the inside of your elbow.
Rock slightly side to side to dig out your bicep. Hold if you find an especially tight spot and even flex and relax your bicep by flexing and extending your elbow if your desk or table allows.
Then move the roller higher up your bicep toward your shoulder. Again rock side to side and hold on any tight spots.
If you don’t have a table or desk you can use, you can also do this against a wall although you may not be able to flex and extend your arm then.
Shoulder Foam Rolling – Because many of us sit hunched over a computer all day and do more pushing movements than pulling, the fronts of our shoulders (our anterior deltoids) can become tight and overactive. We can also have trigger points in our medial and posterior deltoids as well as all of our rotator cuff muscles that can cause not only shoulder pain but also neck pain.
Overactivity of some of these muscles around our shoulder joint can not only lead to shoulder injury, but can cause the big muscles of our back to become inactive. Therefore it is important that we roll out right around our shoulder.
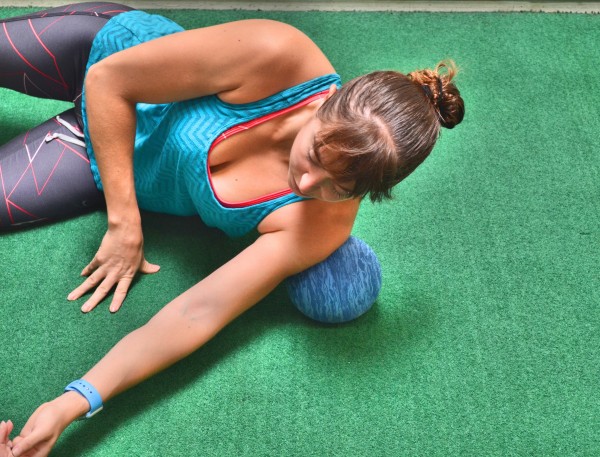
To roll out your shoulder, a ball works best. A smaller ball can work well against a wall or a larger ball can work well against the ground depending on what you have (and even where you are rolling out and if it is appropriate to lay on the ground!).
If you use a larger ball, place it on the ground and the lie on your side with your shoulder on the ball.
Begin to circle your shoulder on the ball. Roll the ball around from the front of your shoulder, even hitting your chest, around the side of your shoulder and even back toward your armpit. Hold on any tight spots.
Do not simply roll the ball around quickly over your shoulder. Try to hold on any tight spots. Also, using a smaller, harder ball will dig in more to help release the muscle.
Trap/Upper Back Foam Rolling – If you sit at a desk all day hunched over a computer, your upper traps are most likely overactive and tight. Tight traps contribute to neck, shoulder and upper back pain and injury and can prevent the big muscles of your back from engaging correctly.
If the big muscles of your back don’t engage correctly not only are you at risk for injury because of poor movement patterns and small muscles doing work they can’t handle, but you also won’t be able to lift as much during your workouts.
For instance, if you struggle to do Pull Ups, it may be because your back muscles aren’t engaging correctly, partly due to the fact that small muscles like your traps are overactive and try to do work when they shouldn’t be taking over.
Also, while poor posture is a cause of tight traps, tight traps perpetuate the problem.
So foam rolling your traps, especially upper traps, is important to improve your posture, alleviate and prevent pain and injury and also help you lift more and do more Pull Ups.
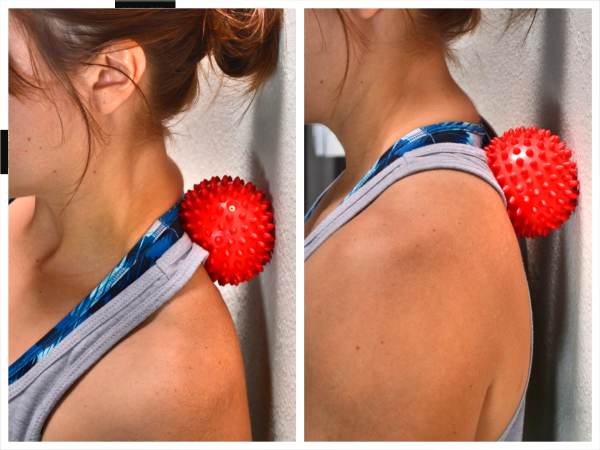
To roll out your traps, a ball works best, especially against a wall. Using a ball against the ground can help you apply more pressure; however, it does give you less control and can make it harder to maneuver the ball. Using a smaller, harder ball can also help you dig in more.
Stand with your back to the wall and place the ball right behind and to one side of the base of your neck. Press back into the ball. Roll the ball up toward the top of your trap at the base of your neck and even out toward your shoulder. Hold on any tight spots.
To roll the ball up toward the top of your trap, you may have to rotate your body, moving your shoulder back toward the wall as you sort of angle yourself with the side of your head toward the wall.
You can then roll the ball back toward your shoulder blades and even down the side of your back under your shoulder blade. You can work all down your shoulder blade and then even along your spine and back up. Hold on any tight spots. Then switch the ball to the other side.
As you work along your shoulder blades, you can even pull the arm on that side across your chest or lift and lower it to help you dig in more to any knots or trigger points.
Chest Foam Rolling – When we sit hunched over or with our arms forward on the steering wheel as we drive, our chest can become tight. And then generally, we also perform more pushing movements and exercises throughout the day, which only contribute to and perpetuate the tightness.
And this tightness of our chest muscles can lead to shoulder, neck and upper back pain as well as perpetuate poor posture and even prevent us from lifting more because our back muscles don’t activate and engage correctly. (It can even hurt our Push Ups because we don’t engage the big muscles correctly and instead overuse smaller muscles that can’t handle the load.)
To roll out your chest, you can either use a bigger foam ball against the ground or you can use a smaller, harder ball in a doorway.
Foam Ball Chest Rolling:
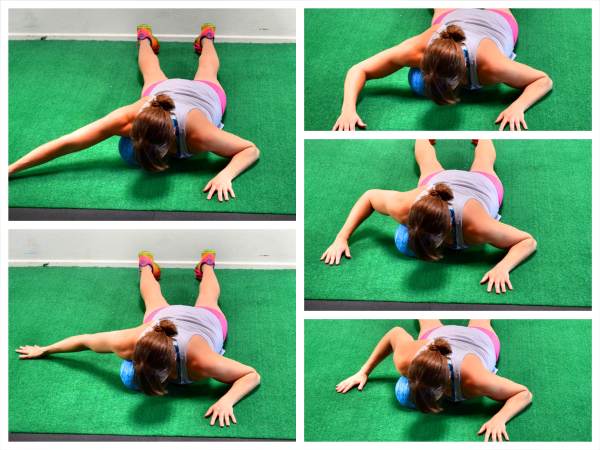
To roll out your chest using a foam ball against the ground, place the ball on the ground and lie face down on top of it with the ball starting right at the side and top of your chest beside your shoulder joint and below your collarbone.
Holding the ball there, begin to sweep your arm overhead and then back down toward your legs. You can sweep your arm almost as if making snow angels. Or you can move your arm overhead and then tuck it under to reach down toward your feet and rotate your shoulder a bit. You can make full and partial sweeps to dig into a spot.
Then move the ball a little more toward your sternum and repeat. You can work all along underneath your collarbone, holding on any tight spots and moving your arm.
Once you roll out one side, move the ball to your other side just inside your shoulder joint and under your collarbone.
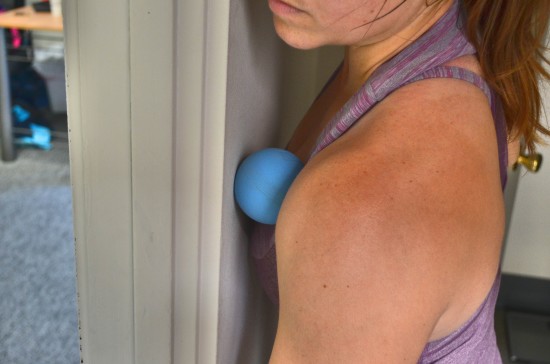
Doorway Foam Rolling:
To roll out your chest in a doorway, it is best to use a smaller, harder ball. Stand facing the wall besides the doorway and place the ball between your chest and the wall. You want to be right on the edge of the wall so that you can extend your arm forward through the doorway.
Start with the ball in your chest besides your shoulder and below your collarbone. Press into the ball and raise the arm on the side you are digging into up toward the ceiling and back down. Because you are in a doorway, you can raise the arm straight out in front of you as you swing the arm very slowly up toward the ceiling and down toward the ground. Hold on any tight spots as you move your arm.
You can also roll the ball along the muscles below your collarbone and even down around your shoulder toward your armpit. Hold on any tight spots you find and even lift and lower your arm.
Then switch and do the other side.
Chest-Shoulder “U” – Tight lats and chest muscles can all contribute to poor posture, neck and shoulder pain. There can be trigger points all around your shoulder joint that can cause pain, compensation and lead to injury.
That is why it is important to not only roll out your chest and back, but also all of the muscles around your shoulder.
A great move to hit many of the muscles around your shoulder is the Chest-Shoulder U Foam Rolling Move.
To do the Chest-Shoulder “U,” a bigger foam ball works best. Lie face down on the ground with the ball under your chest, under your collarbone and right beside your shoulder. Begin to roll out your chest. Hold on any tight spots in your chest and even move your arm like you would for the Foam Ball Chest Rolling Move described above.
After rolling out your chest, roll the ball right along the muscles around your shoulder joint and then under your armpit. You can hold on any tight spots and relax and breathe.
Continue moving the ball under your armpit to the side of your back, especially the muscles where your arm and back connect at the back and top of your armpit. Hold on any tight spots as you move the ball around your back.
From here you can roll it down the side of your back a bit and then up your back around your shoulder blade. Work up and down the shoulder blade then roll it back around front, going under your armpit before bringing it back into your chest.
As you go, make sure to hold on any tight spots instead of simply rolling quickly over them.
Once you’ve rolled out one side and made a few “U’s,” switch the ball to the other side and complete the “U around your shoulder and shoulder blade.
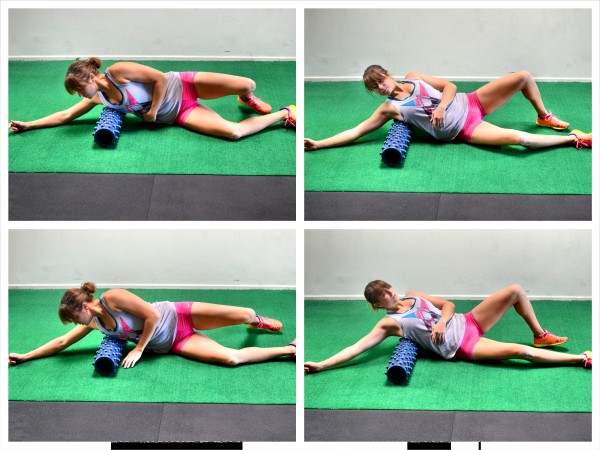
Lat Foam Rolling – Your lats can become tight from sitting hunched over a computer all day, which can lead to problems and injuries from your hip to your neck. Your lats are also a big muscle that have to work with your glutes during many movements so if they aren’t functioning correctly even your lower body is at risk for injury.
That is why you need to make sure to foam roll out your lats.
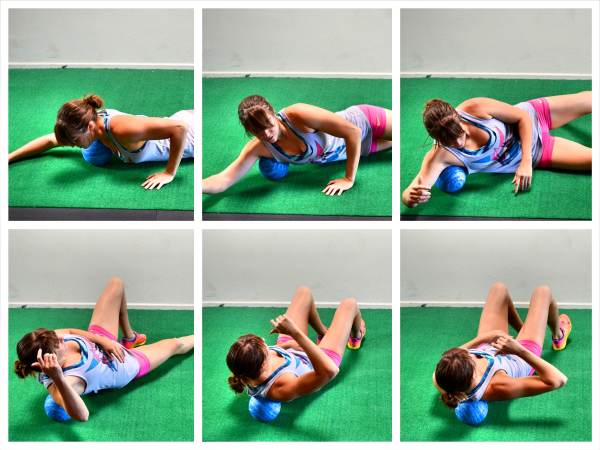
To roll out your lats a roller is best although you can use a foam ball or even a tennis ball.
Start by lying on your side with a roller under one armpit. Extend the arm on the side with the roller up above the roller. Then rock forward and backward on the roller, rotating your chest toward the ground and then up toward the ceiling as you roll on the roller so it hits toward your ribs and then toward your back.
Hold on any tight spots you find then move it lower down the side of your back. Hold on any tight spots as you go and make sure to rock forward and backward as you make your way down your side.
As you work down your side, you may want to rotate slightly more toward your back. Work all the way from your armpit to about the end of your rib cage.
Be careful when rolling lower down your back into your low back. You do not want to arch over the roller and hyperextend your low back.
Thoracic Extension – If you find yourself sitting hunched over often throughout the day, it means your back is in flexion. That probably means your Thoracic Extension isn’t what it should be. The constant flexion and lack of Thoracic Extension could lead to neck, shoulder, upper back, lower back and even hip pain and injury.
When one area isn’t as mobile as it should be, we try to compensate by asking other areas to make up for the lack of mobility. This is part of what leads to injury.
Plus generally if we don’t have proper Thoracic Extension, the muscles of our back don’t engage correctly, which can also lead to and perpetuate injury.
That is why it is important that we use the foam roller to work on our Thoracic Extension.
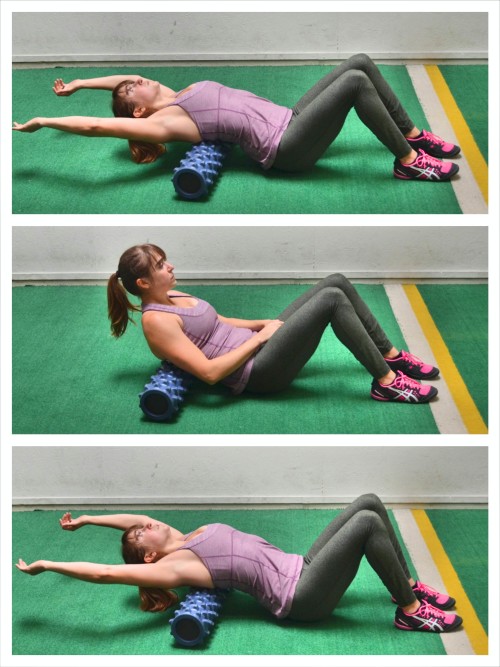
To work on your Thoracic Extension using a roller, place the roller on the ground and lie back over the roller with the roller at about your mid-back. You do not want to do this move with the roller in your low back or you could hyperextend your low back.
Cross your hands over your chest and, keeping your butt on the ground, extend your back over the roller. As you extend back over the roller, reach your hands overhead and relax your head and neck. Try to touch the backs of your hands to the ground behind you without lifting up your butt or putting the move all in your low back. Focus on extending your mid and upper back over the roller.
Sit back up and cross your hands back over your chest. You can then repeat, relaxing and extending back over as you relax your arms back overhead.
Perform the extension a few times, especially if the area feels tight, and then move the roller higher up on your back and, again with your butt on the ground, extend back over the roller. Hold for a second or two as you extend so that you can breathe and relax more over the roller.
Work all the way up your mid to upper back. Do not do this on your lower back.
You can use a Rumble Roller, so a roller with “nobs” instead of a flat roller, if you want to dig in more.
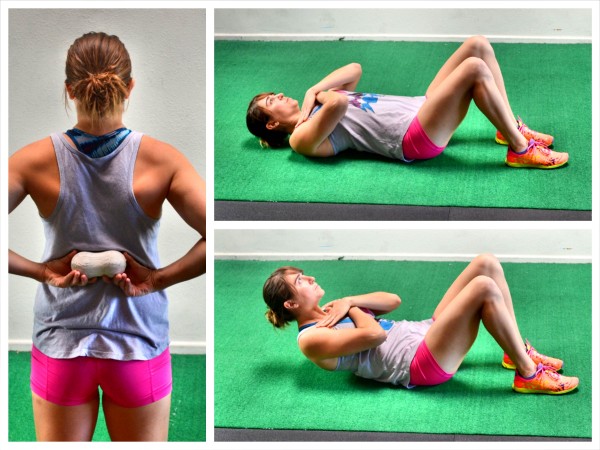
Peanut Foam Rolling – The Peanut is a great homemade tool that anyone with a desk job should have. It allows you to roll out the muscles along your spine from the base of your neck to your low back. It can help keep your spine mobile and your back, neck, shoulders and hips feeling good.
For tips on how to make your own Peanut, click here.
To use the Peanut to roll out and target your upper back (and even help with your thoracic extension), you will place the Peanut so a ball is on either side of your spine. Start with the Peanut in your mid-back while lying on your back on the ground.
Bend your knees and place your heels on the ground. Cross your hands over your chest and relax back onto the ground over the Peanut. Then “crunch” your upper body up, tensing the muscles of your back. Do not crunch up so high that you come up of the balls. You just want to tighten the muscles before you relax back down onto the ground.
By “crunching up” and contracting the muscles, you can help the muscles release when you relax back over the Peanut.
Perform a few crunches and even simply relax over the Peanut, holding on any tight spots, before moving it up higher on your spine. Repeat the crunches in the new spot.
As you work up your back, you can even extend your arms overhead like you did with the Thoracic Extension. You can also make “snow angels” with your arms, sweeping them along the ground overhead and then back down by your sides.
All of this can help you release any tight spots.
Using these 11 Upper Body Foam Rolling Moves, you can begin to relax and loosen tight muscles in your upper body. Once you’ve foam rolled though, the program isn’t over. You then need to make sure to stretch, activate and strengthen!
If you love these moves, and want more foam rolling moves, as well as the activation exercises and stretches you need to keep your neck, shoulders and back mobile and healthy, you’ll love my Arm Burners program. This course will help you build a lean, strong upper body while preventing injury!
Or check out some articles to help you stretch, activate and prevent pain below:


Hi Cory,
Thank you so much for your info. I find them very helpful. You are such an inspiration:)).
I am a dentist and often have left shoulder pain. I have start strength training with a trainer for about 10 months and have got stronger overall but still have shoulder pain issue from time to time. I will definitely do that foam rolling more. If you have any suggestions on what excercises I should do to deal with that issue, I’d love to hear from you. I love my job and love to be able to do it for the longest time possible. I am now 42 years old.
Where did you purchase all the foam rollers that you use in your video?
Many thanks,
Maria
You should check out my post on shoulder pain. I actually have a number of clients who are dentists and because you are rounded forward and reaching often, you definitely need to roll your traps and chest. Activating your back can also help with things like scapular band flys!
Oh and thank you! And the rollers are all from amazon:
Posture Ball – https://goo.gl/9CgrSL
Rumble Roller – https://goo.gl/2wx7Cq
Trigger point quad roller – https://goo.gl/Ptfr5u
Hi Cori,
Thank you so much for the shoulder rehabilitation exercises you sent me,I get a lot from your information.
Kindest regards
Ray Cachia
Glad they helped!
Great content! This is exactly the sort of thing I was looking for. Thanks for your help
Glad it helps!