WARM UP
Stretch and Roll Out:
Feet/Calves/Shins
Hamstrings
Quads
Groin/It Band
Hips/Glutes
Chest/Shoulders/Traps
Back/Lats
ACTIVATION
Complete 1 round of the following circuit.
CIRCUIT:
10 reps each way 3-Way Leg Swings
10 reps per side Fire Hydrants
10 reps per side Bird Dog
5 reps per side Thoracic Bridge with Sit Thru
AGILITY LADDER
Set a timer for 3-5 minutes. Run through drills on the Agility Ladder walking back to the start between drills. Move quickly through the drills, but only speed them up if you can do them correctly. Don’t go fast if you aren’t getting the steps correct!
For Drills, click here.
WORKOUT
Complete 3-5 rounds of each circuit, resting as needed between rounds of the circuit. Try to go from one exercise to the next and rest no more than 1-2 minutes between rounds. Rest 2-3 minutes between circuits.
CIRCUIT #1:
15-20 reps Weighted Glute Bridges
8-12 reps per side Airborne Lunges
10-15 reps per side High-to-Low Wood Choppers
CIRCUIT #2:
10-15 reps per side Single Leg Deadlift
15-20 reps Reverse Hypers
10-15 reps Hanging Knee Tucks to Kick Out
COOL DOWN
Stretch and Roll Out:
Feet/Calves/Shins
Hamstrings
Quads
Groin/It Band
Hips/Glutes
Chest/Shoulders/Traps
Back/Lats
NOTES:
For some great foam rolling moves and stretches for runners, check out this post on how to Alleviate Common Running Injuries.
If you are new to strength training, stay in the higher rep range with a bit lighter weight. As you consistently lift, you want to go up in weight and even down in reps. To get the best results, as your body adjusts, you need to challenge yourself more and more with weights.
EXERCISE DESCRIPTIONS:
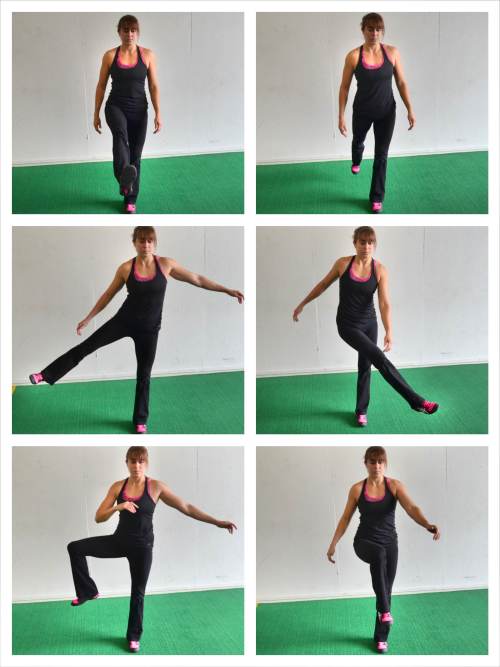
3-Way Leg Swings – To do 3-Way Leg Swings, start standing on one foot. Keeping both legs fairly straight, but not locked out, swing the other leg forward and backward. Swing from the hip. The bigger your swings are, the more your standing leg will have to work to balance. Do not hold on to anything as you do this move. If you need to at the beginning, just perform smaller swings and tap your foot down as needed to reset and stabilize. Perform 10-20 forward/backward swings. Then, still balancing on the same leg, start to swing your leg right to left in front of you, swinging from the hip. Again the bigger the swing, the harder the move will be. Complete 10-20 lateral swings. After performing the lateral swings, try a rotational swing while still standing on the same leg. Bend the raised knee to 90 degrees with your bent leg out in front of you. Then open the knee out to the side, keeping the knee bent. Bring the bent leg back in front of you and repeat. Complete 10-20 swings here before performing all three swings on the other leg.
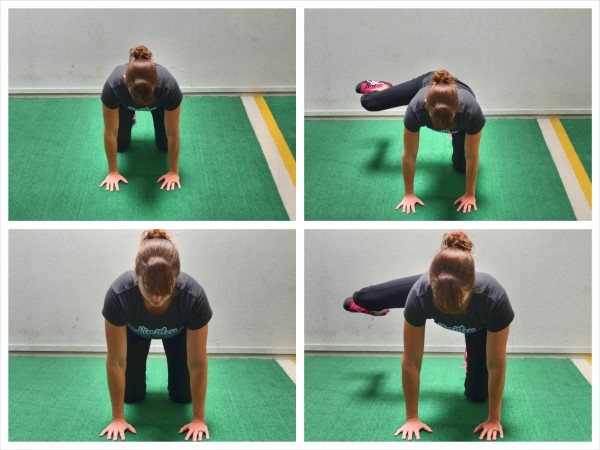
Fire Hydrants – Start on your hands and knees with your hands under your shoulders and your knees under your hips. Flex your feet. Then, keeping your arms straight and your feet flexed, raise your right leg out to the side with the knee bent to 90 degrees. As you raise your leg out to the side, keep your ankle in line with your knee. Do not let your foot get above your knee or your knee go up above your foot. Your lower leg should stay in line and be parallel to the ground. Also, don’t simply lean away to get your leg up higher. Keep your core tight and lift from the hip using your glute. Hold at the top then lower back down. Make sure to hold for 1-2 seconds. Do not rush through the lift. Make sure you do not bend your arms to get your leg up higher. Squeeze your butt and make sure you feel it activate. Range of motion isn’t important as long as you feel your glute working. You may even feel this in the glute of the leg down because it is working to stabilize. Complete all reps on one side before switching.
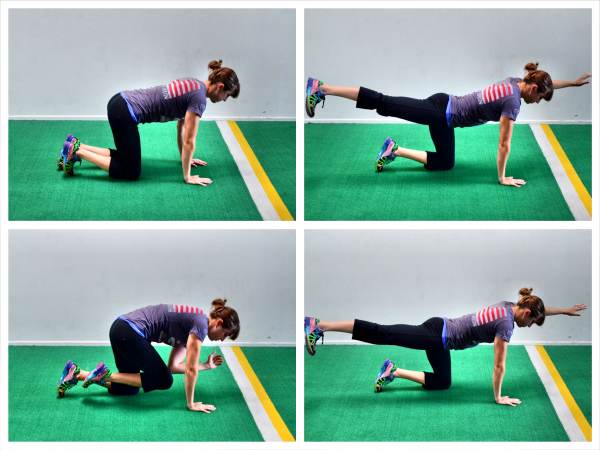
Bird Dog – To do the Basic Bird Dog, start on your hands and knees on the ground with your hands under your shoulders and your knees under your hips. Flex your feet. Kick your right leg back and drive your heel into the wall behind you as you raise your left arm out toward the wall in front of you. Try to get your leg and arm to about parallel to the ground but don’t worry about lifting your leg or arm up super high. There is no need to go past parallel. Really try to drive your arm and leg toward opposite walls as you keep your core engaged and squeeze your glutes. You do not want to hyperextend or arch your low back just to reach your arm or leg up higher. Also make sure to keep your chest and hips square to the ground as you reach out. Hold for a second or two at the top then, as you lower your arm and leg back down, bend them and bring them together under your body. Try to touch your elbow to your knee before extending back out. Complete all reps on one side before switching to the other side. All reps should be done in a slow and controlled manner. You should even hold for a second or two at the top of the move. A longer hold at the top will make this move even more challenging. For a more challenging variation, click here.
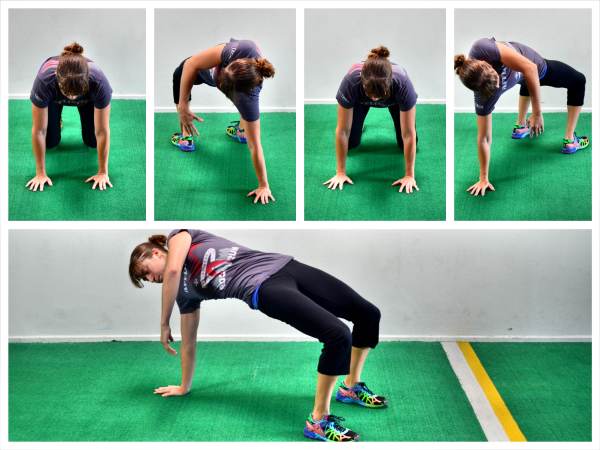
Thoracic Bridge with Sit Thru – To do the Thoracic Bridge with Sit Thru, set up on your hands and knees with your hands under your shoulders and your knees under your hips. Flex your feet and lift up onto your hands and toes. Then lift your right hand and bring your left leg through and place your left foot flat on the ground. Rotate your hips up toward the ceiling, squeezing your glutes to lift them up as high as you can. Then with your hips bridged up and your glutes engaged, reach your right hand down toward the ground, rotating your chest toward the floor. Feel your glutes working to keep BOTH hips up, while you reach your hand down and feel a nice stretch through your spine. We have a tendency when we rotate to drop the hip on the side we are rotating toward. Make sure to keep both hips up as high as possible. You should feel a nice rotation and stretch through your spine almost like someone wringing out a towel. Then drop your hips and step your foot back through while placing your hand back down on the ground. You should be back in that starting position with your knees under your hips and your hands under your shoulders. Do not let your legs straighten out as you sit thru and bridge up to each side. Step through and rotate to the other side, bridging your hips up as high as you can as you reach toward the ground. Keep alternating sides until all reps are complete.
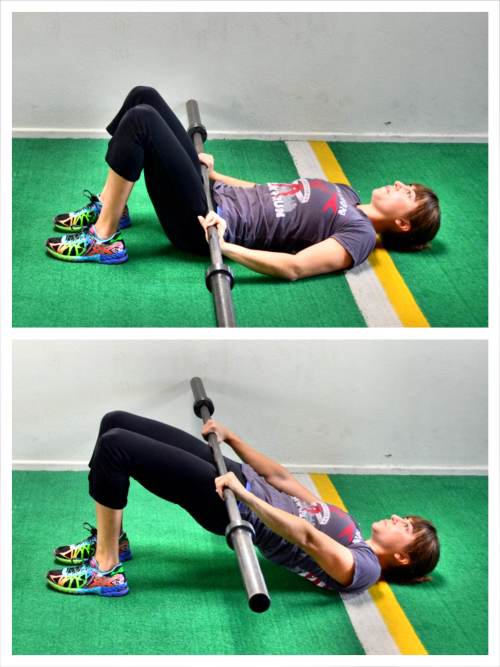
Weighted Glute Bridges – To do Weighted Glute Bridges, a barbell works best although you can use a kettlebell or even plate weight as well. Using a barbell, sit on the ground with your legs out straight and roll or place the barbell over your hips. Lie back and bend your knees, placing your feet flat on the ground and your heels close to your butt. Play around with your exact foot positioning so that you feel your glutes working during the movement and not simply your hamstrings taking over. Holding on to the barbell and pressing it down toward your thighs, bridge your hips up and squeeze your glutes. Make sure to drive through your heels and upper back to lift straight up and extend your hips while keeping your core tight. Do not let your knees fall open and do not hyperextend your low back as you squeeze your glutes at the top. Hold for a second or two and lower back down. As you lift, you may find you want to press the barbell down and away onto your thighs to help you squeeze your glutes at the top and keep your core engaged. Before bridging up, you may find it helpful to first perform the Pelvic Tilt so that your abs are engaged when you bridge. Add weight to progress the movement as long as you continue to engage your glutes and fully extend your hips.
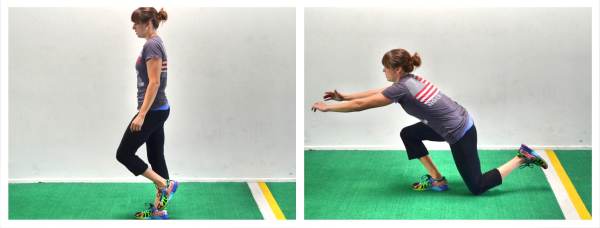
Airborne Lunges – To do the Airborne Lunge, stand on your right foot and bend your left knee, bringing your heel back up toward your butt. Then begin to bend your right knee as you hinge over and sit your butt back. You are going to lunge down, dropping your left knee to the ground. Do not touch the left foot down when you drop the knee to the ground. Also make sure not to reach the left knee back too far when you lunge down. Keep it just a little behind your right foot so that you are almost slightly squatting. Lean forward as needed to counterbalance but do not round your back forward. You want to hinge forward at the hips as you sit your butt back. To come back to standing, drive up through your right heel and feel your leg and glute work to straighten your leg as you bring the left knee up off the ground. Come up to standing nice and tall. Complete all reps on one side before switching. Make sure you engage your core and keep your standing heel on the ground at all times. Do not let your standing heel come up as you touch your other knee down. Also, make sure you feel this move in the glute of your standing leg and not your low back. To advance this move, you can add weight. Beginners may not be able to touch their knee to the ground or they may need to use the Suspension Trainer to help them balance. (Click here for a description of the Beginner Airborne Lunge also called the Single Leg Lunge.)
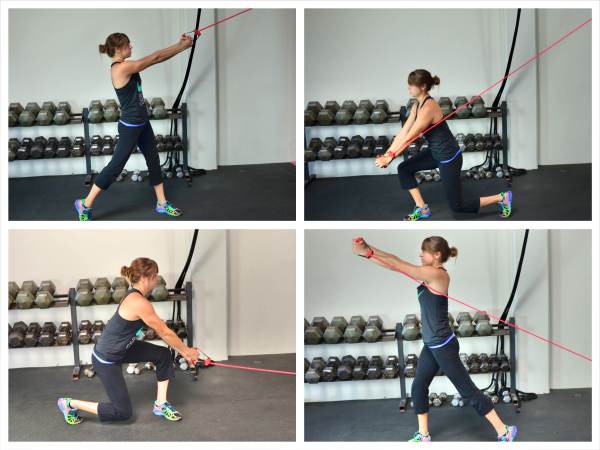
High-to-Low Wood Choppers – To do the High-to-Low Wood Chopper, anchor the band up high and reverse your position. You will start with your arms reaching up and outside your shoulder closest to the anchor point. Make sure there is tension on the band. Your back leg should be in triple extension with your ankle, knee and hip all in line. (This position will also protect your knee since everything is properly aligned.) Then pivot and bend your knees to bring the band down and across your body to outside your opposite knee. Once you’ve brought the band outside your knee, you will then pivot back to standing, bringing the band across your body and up outside your shoulder. Move slowly and make sure there is tension on the band the entire way. When you bring the band down and across your body, do not round your back to reach lower as you bring the band down. Keep your chest up. Just reach down outside the knee as you pivot your feet. With both moves, you need to keep tension on the band at all times and stay in control of the movement. Do not let the band pull you back. And you want to make sure to pivot your feet. When you pivot, you keep your knee in a safe position. Plus the pivot puts your back leg in triple extension, which is an important position to generate more force and power. (Top two photos.)
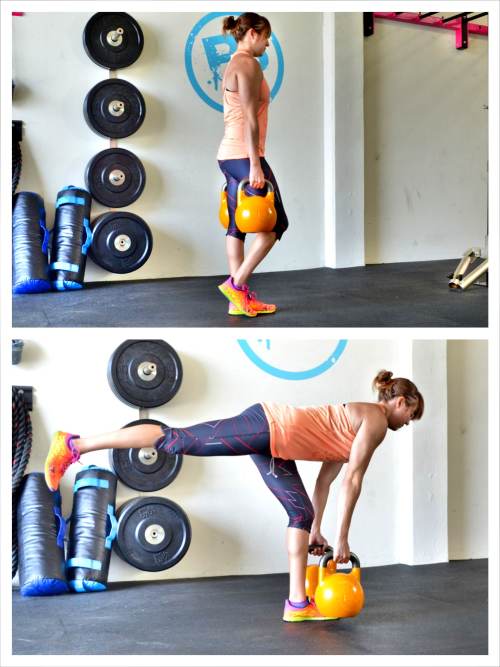
Single Leg Deadlift – To do the Single Leg Deadlift (using kettlebells although you can also use dumbbells, sandbags or a barbell), hold a kettlebell in each hand down by your sides. Stand on your right leg with your knee slightly bent and your left toe lightly touching the ground. Then raise your left leg back toward the wall behind you as you hinge over, keeping your back flat. Make sure your hips stay level and you really reach your butt back as you hinge over. Also make sure to drop the kettlebells down and back toward your foot on the ground instead of reaching them out in front of you. Also do not worry about the kettlebells touching the ground. If your mobility allows you to touch them down great, but do not reach them toward the ground and let your back round. Only lower them as far as you can without rounding or “squatting.” Your standing knee should be soft as you hinge over and push your butt back but you shouldn’t start to squat as you hinge over. Make sure that as you hinge over you sit back in your standing heel and then drive through your heel to come back up to standing. You want to feel your hamstring and glute work. You want to really focus on pushing your butt back as you hinge over instead of simply leaning forward. This move only works if you load that glute. Also make sure that at the top of the move, you come completely up to standing and squeeze your glutes. Do not touch that other foot down until you are standing. You do not want the other leg to assist you in performing the full range of motion.
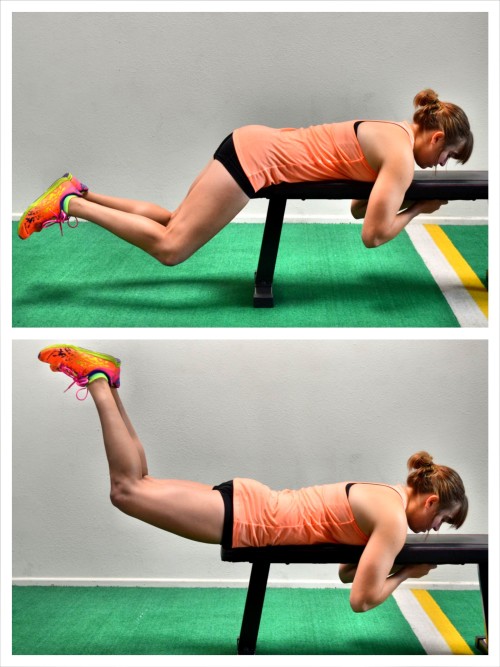
Reverse Hypers – Lie face down on a bench, box or table. Place your hips right on the edge of the bench and hold on to the bench or something in front of you. Keep your upper body relaxed as you hold. If your hips are too far on the bench, you are more likely to hyperextend your low back in an attempt to get your hips up higher so make sure your hips are on the edge of the bench, but not too far off. Place your heels together and bend your knees to about 90 degrees. Flex your feet. You can choose to turn your toes out to hit a slightly different aspect of your glutes as well. Then, with your knees bent, kick your heels back and up toward the ceiling, squeezing your glutes to lift as you press your hips and pubic bone down into the bench. You can sort of drive up and out a bit to really get your glutes to work. Make sure to squeeze your glutes and brace your core as you drive your heels up and extend your hips. You do not want your low back taking over. Lift your legs and extend your hips so that you raise your legs and quads to about parallel to the ground. Then lower back down. Only lift higher if you don’t feel your lower back take over. You want to focus on and make sure your glutes are working to lift NOT your low back. The most important part is that you feel your glutes tighten and that you are extending from your hips. Hold at the top for a second or two and then lower back down.
Hanging Knee Tucks to Kick Out- Hang from the bar with both palms facing away. Then tuck both knees up to about hip height. When your quads are parallel to the ground, straighten your knees. Lift your legs out in front of you then bend your knees again before returning to the starting position. Don’t kick out quickly or go straight down from the legs out position. Kick the legs out then bring them back in before lowering back down.
