If you want to develop a stronger core, you don’t need any fancy equipment or even any weight other than your own bodyweight.
You also shouldn’t waste your time doing a million crunches every day. While crunches can be useful occasionally and do have a time and a place, they aren’t the best or the most efficient exercises to help you strengthen and tone your core.
Below are 10 Bodyweight Crunchless Core Exercises you should include in your workouts if you want to truly strengthen your core. These moves will work everything from your shoulders to your knees, down your frontside and your backside.
10 Bodyweight Crunchless Core Exercises
These 10 core exercises will work your core in different planes of motion to strengthen everything from your shoulders to your knees. Include a few in your workouts every few days along with Planks and Pelvic Tilts!
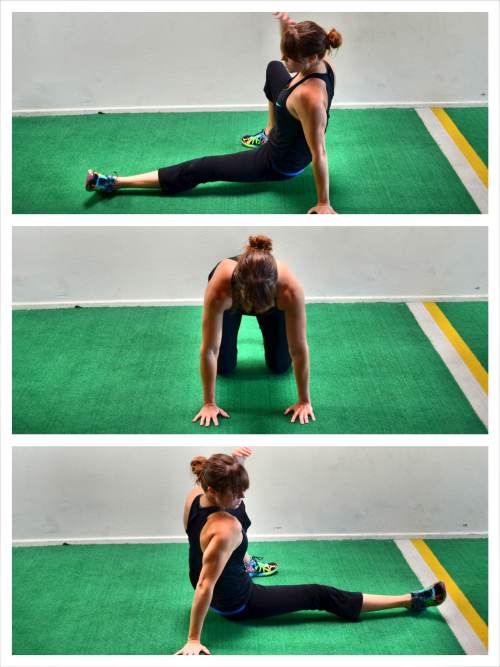
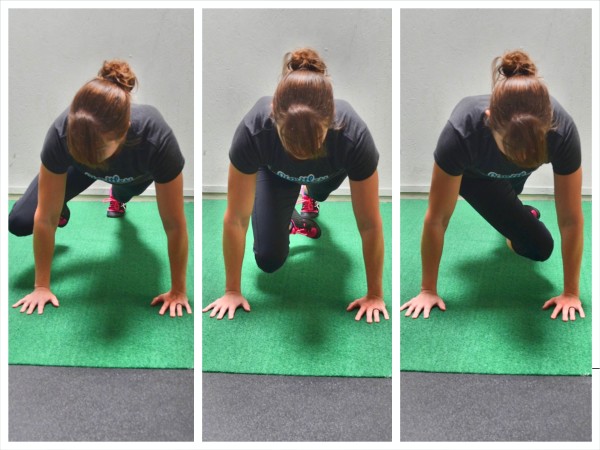
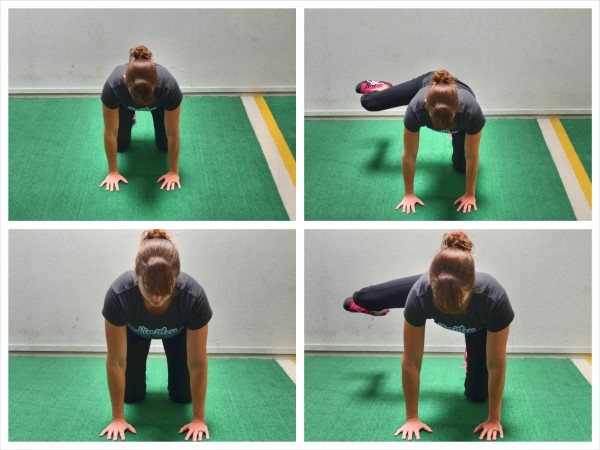
1. Sit Thru:
The Sit Thru is a great rotational exercise to improve your hip mobility while also strengthening your shoulders, abs and quads.

To do the Sit Thru, start on your hands and knees with your hands under your shoulders and your knees under your hips. Flex your feet and press up onto your hands and toes.
Rotate open toward the right and kick your left leg under and through toward where your right hand is. As you bring your left leg forward and through, lift your right hand. You want to rotate all the way through with your left leg out straight so that you are almost sitting with your left hand down to support you. You want to “sit through.”
Then bring the left leg back through so you are back in the starting position. Next rotate to the left and kick your right leg through and forward as you lift your left hand. Move as quickly as you can back and forth.
Beginners may need to move slowly or even start in a more spread out position with their legs out straight instead of their knees under their hips.
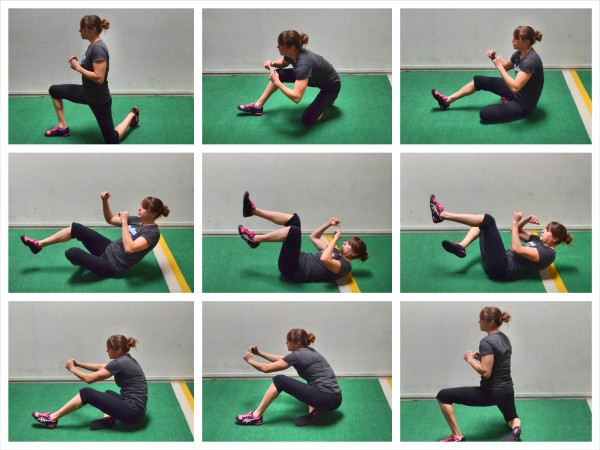
2. Rocking Chair Abs:
Improving your hip extension and getting your glutes activated are two important pieces of building a stronger core. And the Rocking Chair Abs exercise will not only improve your hip extension and glute activation, but will also improve your core sequencing to improve your coordination.
To do Rocking Chair Abs, start half-kneeling with your back knee slightly turned out and your hips extended and glutes squeezed. Your chest should be up nice and tall.
Then sit your butt back and round your back as you tuck and roll onto your back. As your roll back, switch the leg crossed underneath so that when you roll back up you can come to a half-kneeling position on the other side.
Use your arms for momentum only if needed. Less arm swing makes the move tougher. Less momentum in the roll makes the move harder.
Do not touch your hands down to help you come back up to half-kneeling. Keep alternating sides, squeezing your glutes at the top. Press your chest out and half-kneel nice and tall at the top.
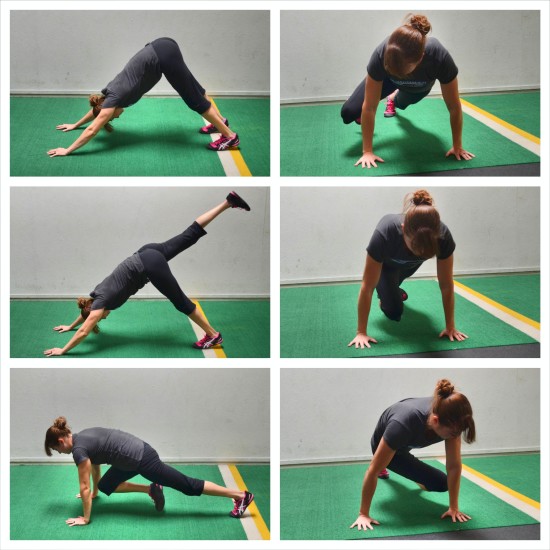
3. Downward Dog Abs:
The Downward Dog is not only a great stretch but also a great way to build core and shoulder strength. And when you add in an extra knee drive to target the abs more, you make it an even better core exercise. With the knee drive, you work your quads, hips and abs even more, including your obliques.
To do Downward Dog Abs, set up in Downward Dog. Start in the high plank position. Then push your butt back and up toward the ceiling as you press your chest back toward your legs between your straight arms.
Focus on getting your back flat and a nice straight line from the heels of your hands up to your tailbone. You want your arms to be in line with your torso (aka your biceps by the ears).
Push your butt back and up as you hold the downward dog position and try to drive your heels down toward the ground. Do not walk your hands in too close to your feet as you hold just to try to get your heels down.
Then raise your right leg up in the air, kicking your heel up toward the ceiling. Drive your right knee in toward your chest. As you drive your knee forward, shift your weight forward into a front plank. Try to get your body in a nice straight line and your shoulders over your arms.
Then kick your right heel back up toward the ceiling and move back into Downward Dog.
You can then switch sides or you can perform another knee drive with the right, bringing your knee in toward your opposite elbow or the outside of the same elbow.
Once you’ve done a few knee drives on one side, switch sides.
Changing the angle of the knee drive, hits your core from different angles!
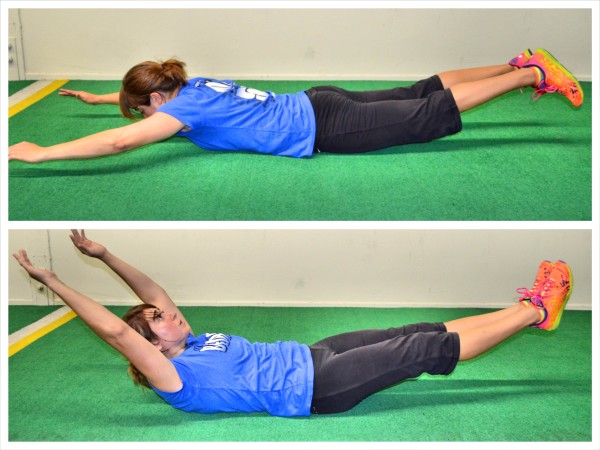
4. Superman Banana:
When you work your core, you need to learn how to use the Pelvic Tilt during more compound exercises to protect your low back and prevent it from doing work it can’t handle. Your core training also needs to strengthen your low back and glutes.
And the Superman Banana is a crunchless core exercise that does both.
To do the Superman Banana, lie face down on the ground and reach your hands overhead with your legs out straight behind you. Then, squeezing your glutes, lift your chest and legs up off the ground. Try to get your chest up as high as you can and your quads up off the ground if possible.
You should feel this in your back and glutes. This is the Basic Superman.
Keeping your arms and lower legs up off the ground, roll over onto your back. Try not to push off with your hands or feet as you roll. You may need to use your arms just a little especially if you are a beginner, but the goal is to roll without pushing off.
Once on your back, keep your belly button drawn in toward your spine and your legs and arms up off the ground. Your neck and head should be in a neutral position. This is “Banana.” Beginners may find they need to lift their legs up higher toward the ceiling or bend their knees to keep their low back against the ground and their abs engaged.
Then roll back over into Superman. Again do not push off with your arms or legs. Hold in each position (Superman and Banana) for a few seconds before rolling back over.
For other variations of the Superman Banana, check out this post on the Basic Superman Exercise.
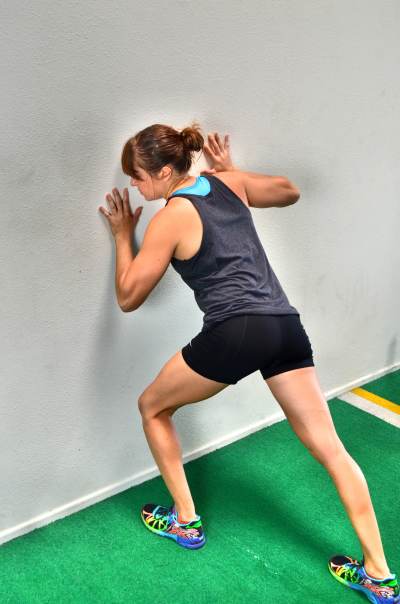
5. Wall Push:
With Planks, Pelvic Tilts and many other core moves, we need to concentrate on engaging the correct muscles to make sure they are working because our mind-body connection is often inhibited by our poor posture seated at a computer all day.
With the Wall Push, you will get the most out of it if your concentrate on engaging all of the muscles of your core to push into the wall as hard as you can. If you don’t push as hard as you can, you won’t get near as much out of the movement.
To do the Wall Push, stand a foot or two from a wall.
Stand in a staggered stance and place your hands on the wall. Push into the wall with your arms bent (the closer you get to the wall, aka the more your arms are bent, the stronger your position will be).
Push as hard as you can against the wall as if you are trying to move it. Keep everything engaged as you drive into the wall. You can switch and stagger your feet the other way after holding for awhile.
If you have a partner available, have them push you from every angle to force you to engage more. Do not let your partner move you as you push. They aren’t trying to push you over, but they are trying to force you to brace harder.
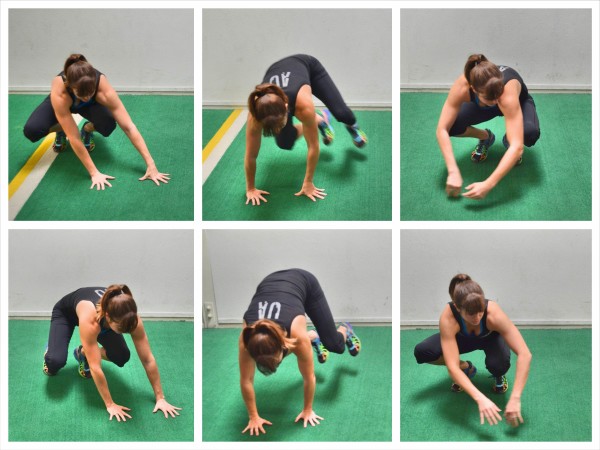
6. Crawling:
Crawling is a great core and cardio exercise to work everything from your shoulders to your knees. Plus, crawling will help improve your mind-body connection and your coordination.
For 21 different crawling exercises, check out these Crawling Variations!
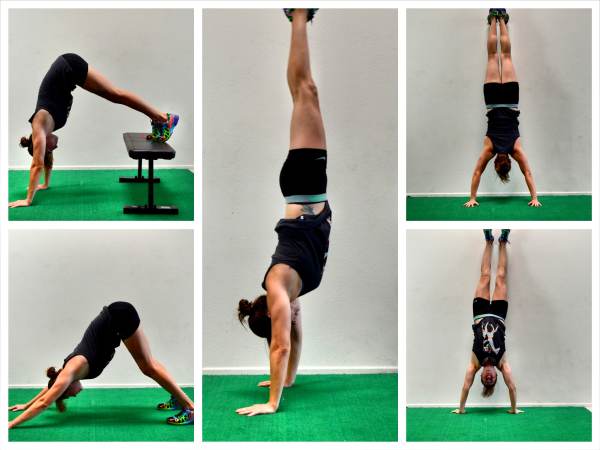
7. Handstands:
Handstand variations are a great way to strengthen your upper body and build core stability and strength. However, a full handstand is an extremely tough exercise to do.
Check out this How to do a Handstand post to help you progress toward a freestanding handstand and strengthen your core.
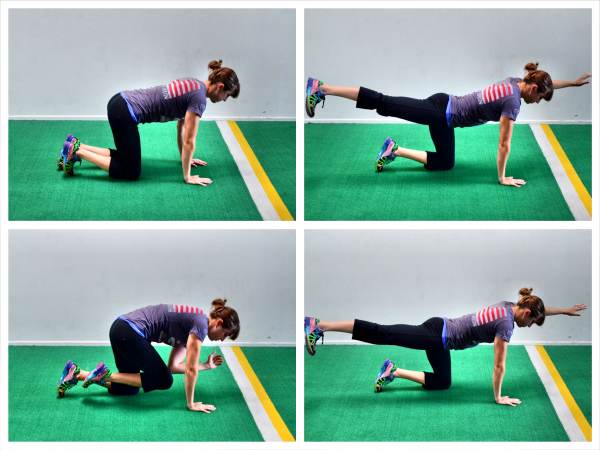
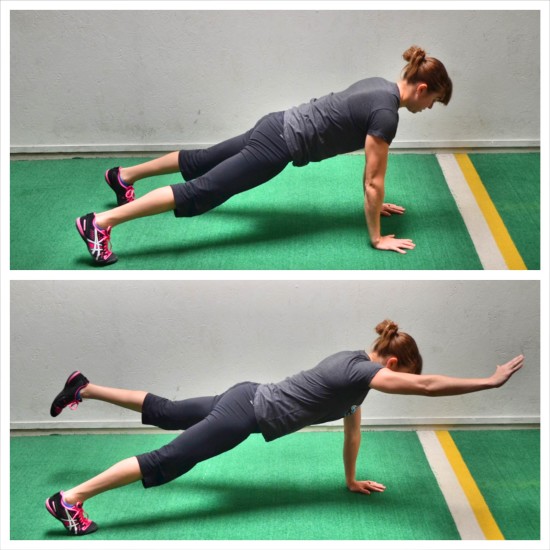
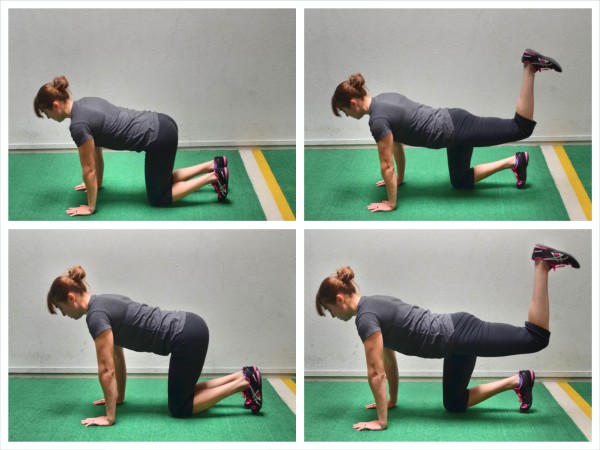
8. Bird Dogs:
The Bird Dog is a great exercise for beginners and advanced exercisers alike to build core stability and get their glutes activated and working.
To do the Basic Bird Dog, start on your hands and knees on the ground with your hands under your shoulders and your knees under your hips. Flex your feet.
Kick your right leg back and drive your heel into the wall behind you as you raise your left arm out toward the wall in front of you. Try to get your leg and arm to about parallel to the ground but don’t worry about lifting your leg or arm up super high. There is no need to go past parallel.
Really try to drive your arm and leg toward opposite walls as you keep your core engaged and squeeze your glutes. You do not want to hyperextend or arch your low back just to reach your arm or leg up higher. Also make sure to keep your chest and hips square to the ground as you reach out.
Hold for a second or two at the top then, as you lower your arm and leg back down, bend them and bring them together under your body. Try to touch your elbow to your knee before extending back out.
Complete all reps on one side before switching to the other side. All reps should be done in a slow and controlled manner. You should even hold for a second or two at the top of the move. A longer hold at the top will make this move even more challenging.
To do the Advanced Bird Dog, set up in the high plank position from your hands and toes with your hands under your shoulders and your feet about hip-width apart. If you bring your feet closer together, it will make the move more challenging.
Then lift your opposite leg and arm up as if you are doing the Basic Bird Dog. Keep your core engaged and squeeze your glutes as you lift the leg and arm. Do not let your body rotate open or your hips sag toward the ground. Do not let your butt go up toward the ceiling.
Hold for a second or two at the top and then lower back down and repeat on the same side. You can also perform a longer hold to make the move more challenging. There is no tuck under the body with this variation.
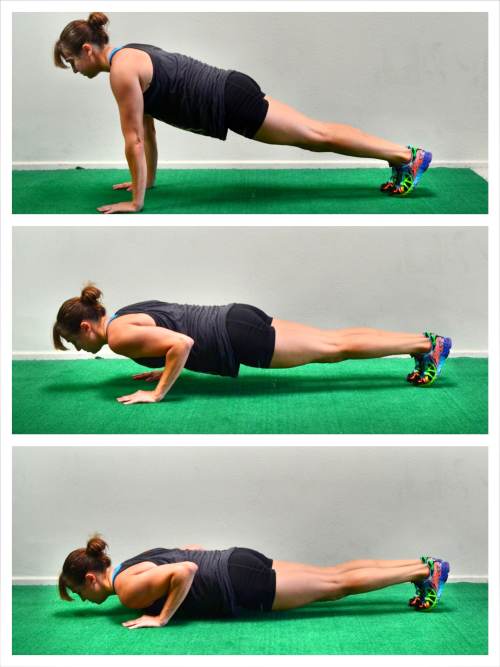
9. Push Up Holds:
A Push Up is basically a moving Plank. And with Push Up Holds you are holding a Plank at three different points in the Push Up to not only strengthen your upper body, but also strengthen your core.
By doing Push Up Holds, you help your body learn to engage properly to keep everything in a nice straight line as you perform the movement.
Below are three great Push Up Holds to strengthen your core and upper body.
High Push Up Hold – This is a great way to begin improving your lock out and core strength for push ups. Set up at the top of a push up with your feet together and your hands under your shoulders. Your body should be in a nice straight line from your head to your heels (with your legs straight). Tilt your pelvic under and hold in that position. Make sure your legs are engaged and you are driving back through your heels not coming forward onto your toes. Do not tuck your chin as you hold or shrug your shoulders. Keep your head in line with your spine. You can also hold from your hands and knees to make the plank hold easier.
Mid-Push Up Hold – This is a great move to really work your core, chest and triceps. To do this move, set up in a push up position with your feet together and your hands under your shoulders. Press up to the top of the push up with your body in a nice straight line from your head to your heels. Keeping your body in a nice straight line, bend your elbows to about 90 degrees. Do not let your hips sink or your butt go up toward the ceiling as you hold at that mid-point. Do not tuck your chin as you hold or let your elbows flare way out. You want your arms and body to create an arrow shape (->) not a “T.” Hold as close to 90 degrees as you can. You can also do this from your knees to make it easier or even off an incline.
Bottom Push Up Hold – This is the hardest of all three holds because often the hardest part of the push up is keeping everything engaged and pushing up from the bottom. This hold works on that. To do the Bottom Push Up Hold, set up at the top of a push up. With your body in a nice straight line and everything engaged, lower down until your chest is an inch off the ground. Make sure to engage your glutes and quads to keep your body in a nice straight line. Do not tuck your chin or let your hips sag toward the ground. Also do not let your butt go up in the air. Maintain a nice straight line from your head to your heels and hold an inch off the ground. Do not let your elbows flare way out as you hold. You can also do this from your knees or off an incline.
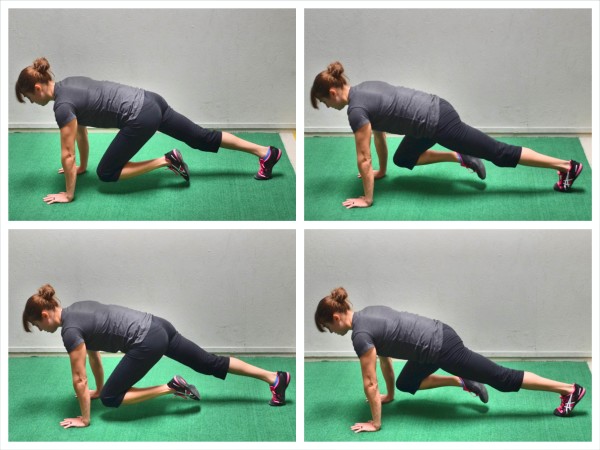
10. Mountain Climbers:
Mountain Climbers are a great cardio exercise that also work your shoulders, triceps, abs, hips and quads. You can do Mountain Climbers without any equipment, with towels or sliders or even with a Suspension Trainer.
You can also do Mountain Climbers with 3 different knee drives to hit different aspects of your core.
To do the Basic Mountain Climber, set up in a high plank position with your feet together and legs out straight behind you. Your hands should be under your shoulders and your body should be in a nice straight line from your head to your heels. Make sure to brace your core so that you don’t feel this in your low back.
Then, maintaining the nice plank position, bring your right knee in toward your chest. Your left leg should still be out straight. Make sure your butt doesn’t go up in the air as you run the knee in.
Then slide the foot back out as you bring your left knee in toward your chest. “Run” your knees in as quickly as possible until all reps are complete. The faster you go, the harder the move will be.
Do not let your butt go up in the air or your hips sag as you run your knees in.
You can also do a Spiderman Mountain Climber, running your knees in toward the outside of the same elbow, or a Cross-Body Mountain Climber, running your knee in toward the opposite elbow.
These variations will hit slightly different aspects of your abs.
BONUS:
Bodyweight Glute Activation Moves, including Fire Hydrants and Donkey Kicks:
Your glutes are one of the biggest muscle group in your body and a very important part of your core. They are also generally underactive because we sit all day at a desk.
So if you want a stronger core and less low back pain, you need to get your glutes activated and working.
Two great bodyweight exercises to get your glutes firing are Fire Hydrants and Donkey Kicks.
To do Fire Hydrants, start on your hands and knees with your hands under your shoulders and your knees under your hips. Flex your feet.
Then, keeping your arms straight and your foot flexed, raise your right leg out to the side. Keep your knee bent to 90 degrees as you raise and your ankle in line with your knee. Do not let your foot get above your knee or your knee go up above your foot. Your lower leg should stay in line and be parallel to the ground.
Hold at the top then lower back down. Make sure to hold for 1-2 seconds. Do not rush through the lift.
Make sure you do not bend your arms or lean away from the leg being raised just to get the leg up higher. Squeeze your butt and make sure you feel it activate. Range of motion isn’t important. Feeling the glute raise the leg and hold is all that matters.
Complete all reps on one side before switching.
To do the Donkey Kick, start on your hands and knees with your hands under your shoulders and your knees under your hips. Flex your feet.
Keeping your arms straight and your core engaged, drive your right foot up and back toward the ceiling, keeping your right knee bent to 90 degrees and your foot flexed.
Keep your core braced and squeeze your glutes as you kick your heel up and back. Do not let your right knee flare out as you lift or your low back arch. Try to get your quad to about parallel to the ground. Only kick up higher if you are extending from the hip. You do not want to hyperextend your low back just to kick up higher otherwise you will start working your back instead of your glutes.
Hold for a second or two at the top and lower back down. To make the move more challenging, hold for a bit longer at the top.
Complete all reps on one side before switching. Make sure you don’t rock forward and bend your arms just to kick up higher as you perform the move.
More Core Exercises
If you are new to working out or suffer from low back pain, you should start with the Pelvic Tilt Progression and perfecting your Plank Form before including some of these movements in your workouts. The Pelvic Tilt and Plank will help you learn to engage your core so it works during the Bodyweight Crunchless Core Exercises above.
And if you like these 10 Bodyweight Crunchless Core Exercises, check out these 10 Hanging Ab Exercises.
For more Core Training Exercises, check out these 25 Core Training Moves as well.


Thanks for the simple exercises that an old man like myself can do to help my stomach firm up . Appreciative 🙂
Glad they help!