The 15-Minute Battling Ropes Tsunami Workout

The 15-Minute Battling Ropes Tsunami Workout

WARM UP
Stretch and Roll Out:
Hips/Glutes
Back
Lats
Chest
Shoulders

WORKOUT
Complete 5 rounds of each circuit. Work for 20 seconds, rest for 40 seconds.

CIRCUIT #1:
20 seconds Basic Tsunami Wave
40 seconds of Rest

CIRCUIT #2:
20 seconds Sidewinder Tsunami Wave
40 seconds of Rest

CIRCUIT #3:
20 seconds Rainbow Tsunami Wave
40 seconds of Rest

COOL DOWN
Stretch and Roll Out:
Hips/Glutes
Back
Lats
Chest
Shoulders

NOTES:
To do any variation of the Tsunami waves in this workout, tie a 50ft (1.5 inch or 2 inch) rope to a pole. You want to just tie one end to an anchor point without losing too much of the length of the rope.

Beginners should definitely use a 1.5 inch rope while more advanced exercisers may want to try a 2 inch rope. However, if you just have an 1.5 inch rope, you can simply step in and keep more slack in the rope to make the moves harder.

Work as hard as you can for the 20 seconds and recovery in the 40 seconds so you an do the exact same amount of work the next round. Beginners may need to do fewer rounds of each circuit and rest longer, making this workout potentially a bit longer than 15 minutes.

EXERCISE DESCRIPTIONS: 
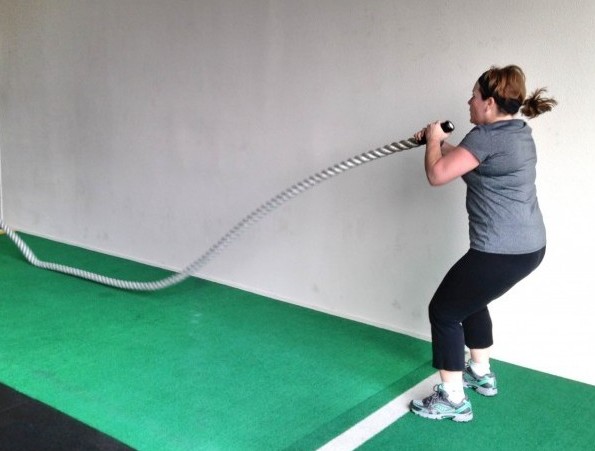
Basic Tsunami Wave – Attach the end of a 50ft rope to an anchor point without losing too much of the length of the rope. Holding the rope in both hands, squat down just a little with your arms straight down. As you quickly jump up, pull your arms up toward the ceiling. Then snap your arms back down as you land. Small quick hops with a slight hinge as you raise and lower your arms to create quick small waves. You aren’t trying to jump high off the ground. You are just hopping an inch off the ground and stomping your feet right back down to help you generate more power and not just depend on your arms. Everything should move quickly together.
tsunamis
Sidewinder Tsunami Wave – Attach the end of a 50ft rope to an anchor point without losing too much of the length of the rope. Keep more slack in the rope than you would with other battling ropes moves. Relax your arms, holding the rope in both hands, and stand with your feet between hip-width and shoulder-width apart. Bend your knees slightly and hinge slightly forward. Do not let your back round. Keep your chest up nice and tall. Then sweep your arms to the right, rotating through your core and pivoting your back foot. Then quickly sweep your arms to the left. Sweep back and forth. Keep your arms more relaxed and only slightly bent. Use your core to push and pull from side to side. You shouldn’t do huge rotations. Your arms and the rope should stay out in front of you. The rope should make snake-like waves on the ground and swish side to side.
battle-rope-tsunamis
Rainbow Tsunami Wave – Attach the end of a 50ft rope to an anchor point without losing too much of the length of the rope. Pull the rope out straight then take a step or two in. Hold the rope with both hands with the handle facing up. Bring your hands and the rope down outside your right hip and pivot your left leg. Then pull the rope up and over toward your left hip. Pivot your right leg as you bring the rope to your left hip. Then arch back up bringing the rope up toward your shoulders than back down to your right hip. The rainbow is created as you arch from one hip up to your shoulders and back down to the other hip. Keep pivoting and rotating the rope from hip to hip, arching up toward your shoulders as you bring the rope from one hip to another.
battle-rope-rainbows

Using The Eccentric Back And Butt Workout

Using The Eccentric Back And Butt Workout

WARM UP
Stretch and Roll Out:
Calves
Hamstrings
Quads
Groin
Hips/Glutes
Back/Lats/Traps
Chest
Wrist/Forearms

WORKOUT

Complete 3-5 rounds of each circuit. The goal of this workout is to slow down the tempo of your reps. Rest up to a minute and a half between rounds and up to 2 minutes between circuits.

CIRCUIT #1:
8-15 reps per side 5 Count Single Leg Deadlift
5-15 reps 5 Count Pull Up

CIRCUIT #2:
10-20 reps per side 5 Count SB Get Up Bridge
10-20 reps 5 Count Cobra

COOL DOWN
Stretch and Roll Out:
Calves
Hamstrings
Quads
Groin
Hips/Glutes
Back/Lats/Traps
Chest
Wrist/Forearms

NOTES:

Air on the side of taking more rest instead of having to rest during an exercise or rush through the rep because you are fatigued.

Keep the slow tempo of your reps even if that means you have to do fewer reps than normal or lighter weight than normal.

EXERCISE DESCRIPTIONS:

5 Count Single Leg Deadlift – For this move, you can hold dumbbells or kettlebells in each hand. You can also hold a single bell to make the move easier. Beginners should start with bodyweight. Use a weight that challenges you, but remember you may need to go lighter to start since you are slowing down the tempo. Stand on one foot with the knee of that standing leg slightly bent. Hinge over at your hips, sweeping the other leg back toward the wall behind you. Take 5 seconds to hinge over. Pretend you are driving the heel of that foot straight into the wall behind you. Lean forward with your upper body as you hinge forward, keeping the back nice and flat. Make sure that as you hinge, you are sitting into the heel of your standing leg. Do not lean forward and come up onto your toes. Remember to lower down for a 5 count. To stand back up, drive through the heel of your standing leg and squeeze your glute at the top. Come up quickly. Try not to tap the other foot down at all or at least not till you are fulling standing. Then slowly lower back down, taking 5 seconds to hinge over. Complete all reps on one side before switching to the other leg.

kettlebell-single-leg-deadlift
5 Count Pull Up –  Hang from the bar with your palms facing away (you may also sub in chin ups or a neutral grip pull up). Press your chest out and draw your shoulder blades down and back. Then pull your chin up above the bar. Once your chin reaches above the bar, take 5 seconds to lower back down. Go as slowly as you can to straighten your arms. Do not kip or swing to pull back up quickly. Then again take 5 seconds to lower back down. Beginners may want to do an assisted pull up (band, machine or feet) or a jumping pull up. To do a jumping pull up, hang from the bar with your feet on the ground. Then use your legs and jump your chin up above the bar. Once at the top of the pull up, slowly lower down for a 5 count. Then jump right back up to the top of the pull up.

pull up back exercise
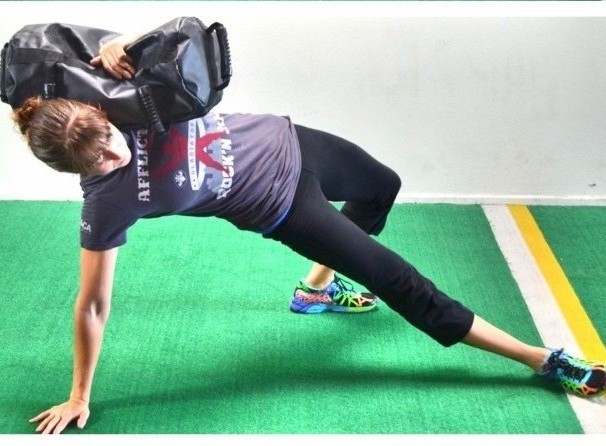
5 Count SB Get Up Bridge – Starting on your right side, sit on the ground with your left hand right behind you on the ground and your left leg out straight. Your right arm will be wrapped over a sandbag on your shoulder (beginners may start with no weight) and your right knee will be bent with your right foot flat on the ground. Do not bring your right foot in too close to your butt. Driving through your right foot, left heel and left hand, raise your hips up toward the ceiling. Keep your core tight and bridge up as high as you can. Try to get your body into a nice straight line. Squeeze your glutes and make sure your right heel stays down. Try not to press too much off of your left hand or you will push yourself forward and put more strain on your shoulder and less on your glutes. Hold for a second at the top and then take 5 second to lower back down to the ground. Only advanced exercisers who can maintain that slow pace should add weight. If weight is used for the bridge, hold a sandbag on your shoulder. Complete all reps on one side before switching.

turkish-get-up-bridge
5 Count Cobra – Lie face down on the ground with your arms down by your sides and your legs straight out. Your palms should be facing up. Then lift your chest up as high off the ground as you can, pinching your shoulder blades down and back. Keep your head in line with your spine as you lift. Squeeze your glutes so you don’t feel this straining your low back. Hold for a second at the top, keeping your chest as high off the ground as possible, then slower lower down, counting to 5. More advanced exercisers may want to hold light weights in their hands. Do not let your shoulders shrug. Make sure that you move slowly controlling your decent.

cobra back exercise

The Partner Chain Workout

The Partner Chain Workout

WARM UP
Stretch and Roll Out:
Calves
Hamstrings
Quads
Groin
Hips/Glutes
Back/Lats
Chest/Shoulders
Wrist/Forearms

WORKOUT

Complete 3-5 rounds of each circuit. One partner will go and then the other. Your rest will be when your partner goes. In between circuits rest up to 2 minutes.

CIRCUIT #1:
20-50ft Chain Sprint
1 Chain length Front Plank Pulls

CIRCUIT #2:
20-50ft Chain Sprint
1 Chain length Lateral Plank Pulls

CIRCUIT #3:
20-50ft Chain Sprint
1 Chain length Backward Plank Pulls

COOL DOWN
Stretch and Roll Out:
Calves
Hamstrings
Quads
Groin
Hips/Glutes
Back/Lats
Chest/Shoulders
Wrist/Forearms

NOTES:

In this workout, you will sprint with the chain behind you. It will then be stretched out along the ground. When you do the plank pulls, you will pull it into a pile on that side so that when your partner sprints, they will drag it back out on the ground. Battling ropes can also be used if the chain is too heavy or you simply don’t have one. Beginners may also need more rest and might not be ready to go right after their partner finishes. Rest more if needed. You do not want to rest once you’ve begun the round.

EXERCISE DESCRIPTIONS:

Chain Sprint – Hold the chain behind you or strap it on around your waist or to a harness. Sprint, driving with the opposite arm and leg. Keep your head in line with your body as you sprint and don’t round forward. Sprint all the way down, letting the chain stretch out behind you.
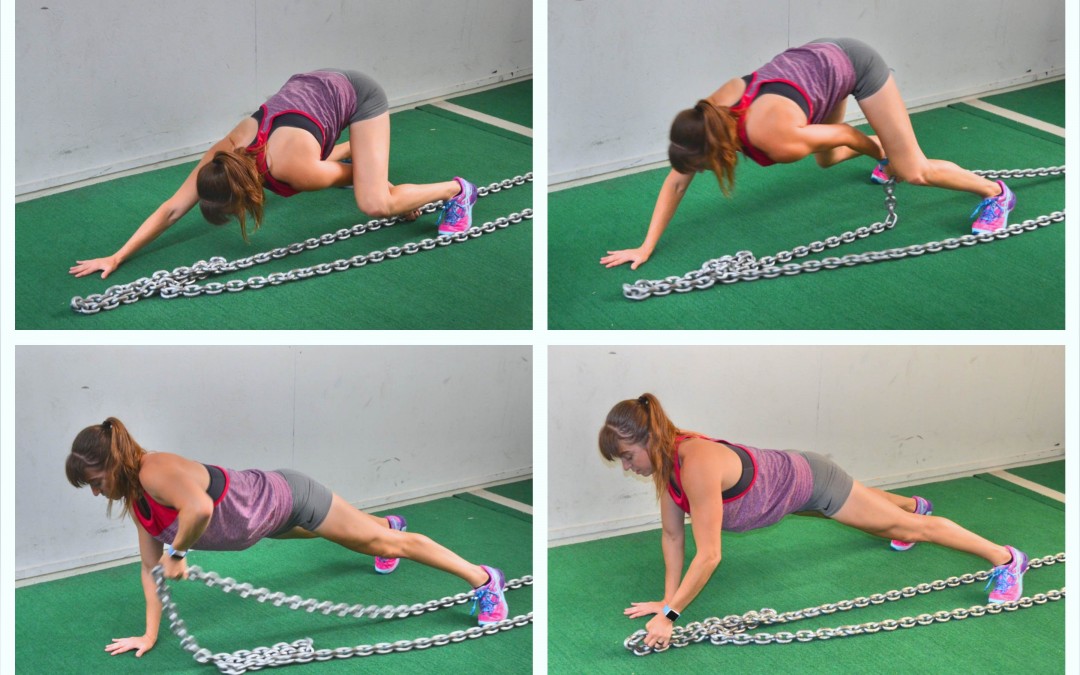
Front Plank Pulls – Set up in a high front plank over the chain so that you can reach forward to grab the chain. Beginners will do this from their knees while advanced exercisers will do the plank from their toes. If you are doing this from your toes, set your feet about hip-width apart. Then reach forward and grab the chain and pull it down toward your chest. You can either sit back toward your heels as you pull or you can maintain a strict plank for an anti-rotational pull variation. Once you pull down to your chest, reach up again with the same hand and pull again until you’ve pulled the chain all the way in. Alternate arms each round.

plank-chain-pull
Lateral Plank Pulls -Set up in a high plank position with the chain going across you so you can pull it laterally. You can be in a plank position from your hands and knees (beginner) or hands and toes (advanced). Place your feet about hip-width apart. Reach under and across your body to grab the chain. Then pull it across, sitting back into the side you are pulling toward. Use your glutes to powerfully pull the chain under and through. You can also mix it up and do an anti-rotational pull where you stay in a strict plank as you pull across instead of sitting back as you pull. Pull until the chain has been totally pulled back in. Alternate sides each round.

lateral-plank-pull
Backward Plank Pulls – Set up in a high front plank over the chain with your feet toward the stretched out chain. Beginners will do this from their knees while advanced exercisers will do the plank from their toes. Set your feet or knees about hip-width apart over the chain. Sit your butt back toward your heels as you reach your hand back and through your legs to grab the chain. Then drive your hips forward as you pull the chain up toward your head. Once you pull as far as you can, sit back again and reach through with the same hand. Switch sides after each round. Pull the entire chain in until it is in a pile in front of your head.

backward-plank-pull

The 30-Minute Full Body Sandbag Workout

The 30-Minute Full Body Sandbag Workout

WARM UP
Stretch and Roll Out:
Calves
Hamstrings
Quads
Groin
Hips/Glutes
Chest/Shoulders/Traps
Back/Lats

WORKOUT

Set a timer for 30 minutes and complete as many rounds of the circuit below as possible.

CIRCUIT:
10-20 reps Sandbag Good-morning
10-20 reps Sandbag Row
20-50ft Sandbag Forward Crawl With Pull

COOL DOWN
Stretch and Roll Out:
Calves
Hamstrings
Quads
Groin
Hips/Glutes
Chest/Shoulders/Traps
Back/Lats

NOTES:

Try to rest as little as possible and complete as many rounds of possible. This workout should get your heart rate up because you are moving quickly. Use as heavy a weight as you can without going to failure on any exercise.

EXERCISE DESCRIPTIONS:

Sandbag Good-morning – Hold a sandbag up at your chest with your feet no wider than hip-width apart. Hinge over, keeping your back flat. Your knees should be soft as you hinge over and push your butt back toward the wall behind you. You should feel a nice stretch down your hamstring as you hinge over. Do not let your back round toward the ground. Keep your weight in your heels. Come back up to standing, driving through your heels and squeezing your glutes at the top. Do not let the sandbag sag. Keep it up at your chest as you hinge.

front-loaded-good-morning
Sandbag Row – Hold a handle in each hand. You can change up your grip (holding parallel or with your palms facing away or toward you). Bend your knees slightly and hinge over with your arms hanging straight down and your back flat. Then row the sandbag up to your chest, driving your elbows straight up toward the ceiling. Do not curl your forearms up toward your chest as you row. Then make sure your back doesn’t round toward the ground as you lower the sandbag back down. Do not use your legs to lift and lower the weight. Keep your core tight and your back still and flat as you row.

sandbag-row
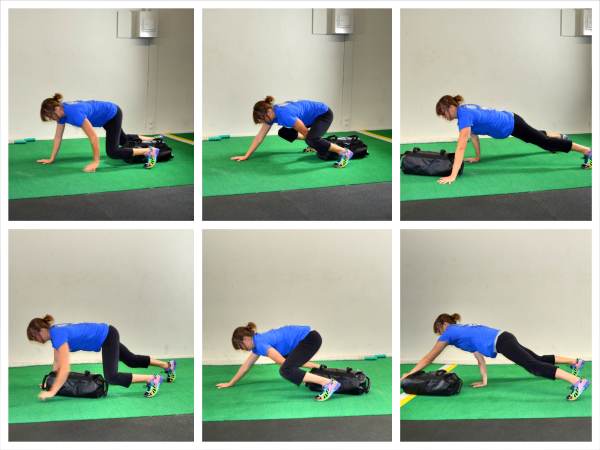
Sandbag Forward Crawl With Pull – Set up in the bull dog position on your hands and toes with your knees under your hips and your hands under your shoulders. The sandbag should be between your feet on the ground. Then reach one hand back to grab the sandbag. As you reach back, sit your butt back toward your heels. Then drive your hips forward to help you pull the sandbag forward toward your head. Pull the sandbag up as far as you can. Then crawl forward moving the opposite arm and leg until the sandbag is again between your feet. Then sit back again and pull the sandbag forward. Try to alternate which arm you pull with.

forward-crawl-with-sandbag

The Sled Quad Killer Workout

The Sled Quad Killer Workout

WARM UP
Stretch and Roll Out:
Feet
Shins
Calves
IT Bands
Hips/Glutes
Groin
Quads
Hamstrings 

WORKOUT

Set a timer for 15 minutes for each circuit. Do as many rounds as possible in each 15 minute round. Do not go to failure so that you can keep moving from exercise to exercise.

CIRCUIT #1:
8-12 reps per side Single Leg Squats
20-50ft Reverse Sled Drag

CIRCUIT #2:
8-12 reps per side Balance Lunge
20-50ft Sled Frog Hops

COOL DOWN
Stretch and Roll Out:
Feet
Shins
Calves
IT Bands
Hips/Glutes
Groin
Quads
Hamstrings 

NOTES:

For the reverse sled drags, add as much weight as you can handle. With the frog hops, make them heavy, but not so heavy that you can’t move explosively forward without pausing between jumps.

If you need to rest between rounds at all, stretch out your hips and quads quickly.

EXERCISE DESCRIPTIONS:

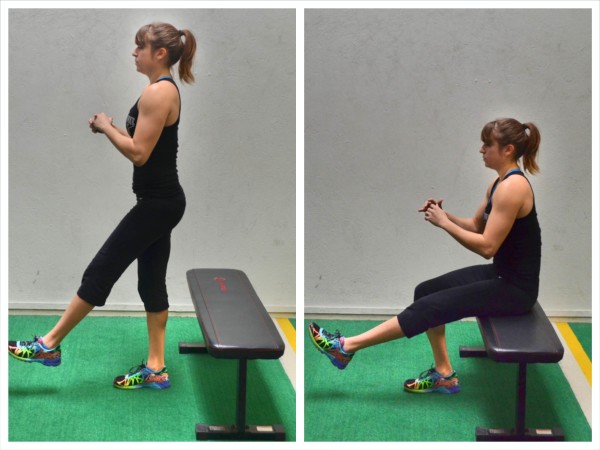
Single Leg Squats – Choose a variation of the single leg squat that is right for you. Beginners may use a box step while more advanced lifters may use a doorway, TRX or XT straps for balance. If you can do a full pistol squat or use a plate weight to counter balance you, do that variation. Choose as hard a variation as you can do. To perform the basic single leg squat to bench, you will start by standing on one leg. Hold the other leg straight out in front of you. Lower yourself down until you are sitting on the box or table. Then driving off the heel on the ground, stand back up. Do not lean way forward or touch your raised foot to the ground. If you use a box, the more you allow yourself to sit down, the easier the move will be. The more you just lightly touch the box and come right back up, the harder the move will be. Also the lower the box you use or the lower down you go on any variation, the harder the move will be.

single-leg-squat
Reverse Sled Drag – Hook a strap and handles up to a sled. Then stand facing the sled with a handle in each hand. Bend your knees and sink into a little squat. Keep your chest up and your back flat with your arms out straight in front of you. Then start walking backward. Stay as low as possible and do not let your back round forward as you walk backwards.

reverse sled drag
Balance Lunge – Place your back foot up on a table, bench, chair or box. Do not let the chair or bench be too high. Hop your front foot out so you are in a nice wide stance with your back foot up on the box. Then sink down, dropping your back knee toward the ground. Really sit back into the lunge. Make sure you aren’t going forward and that your front knee is not going past your toe. You should feel a nice stretch in the front of the leg that is back when doing this move. Beginners may want to use a super low box or do the move from the ground.

bulgarian-split-squat
Sled Frog Hops – If your sled has higher handles, use that side. Set your feet about hip-width apart and place your hands on the handles with your arms out straight. Lean your chest forward a bit with your back flat, pressing your arms straight into the sled. Sit your butt back a little then drive your hips forward, sliding the sled forward as you jump. Sink right back down into a little half squat then jump forward again. Try not to pause between hops. Try to move quickly while doing as big of jumps as possible.

sled-frog-hops