The Glute And Inner Thigh Workout

The Glute And Inner Thigh Workout

WARM UP
Stretch and Roll Out:
Calves
Quads
Groin
Hamstring
Hips/Glutes
Back/Chest
Shoulders/Forearms

WORKOUT

Complete 3-5 rounds of each circuit, resting as needed between rounds. Rest 1-2 minutes between circuits. Focus on adding weight or trying more challenging variations; however, make sure that you use a full range of motion. Don’t add weight at the expense of not completing a full range of motion!

CIRCUIT #1:
20 reps Glute Bridge with Squeeze
6-8 reps per side Cossack Squat
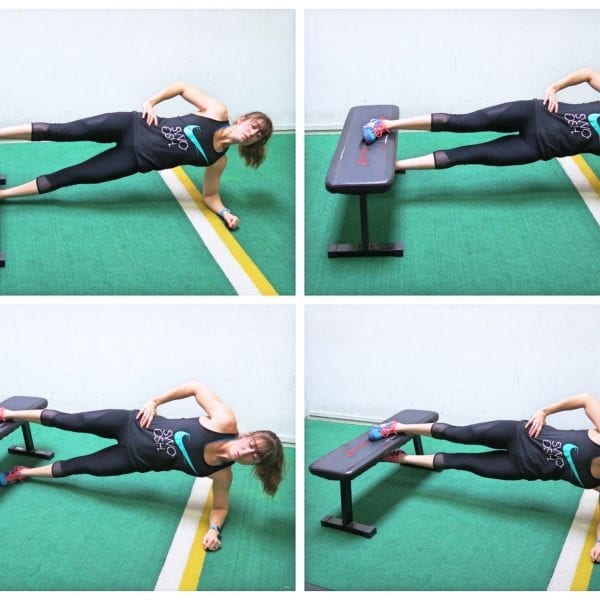
8-12 reps per side Side Plank Bench Lift

CIRCUIT #2:
10 reps per side Side Plank Clams
10-15 reps Sumo Squat
10-15 reps Peek-a-boo

COOL DOWN
Stretch and Roll Out:
Calves
Quads
Groin
Hamstring
Hips/Glutes
Back/Chest
Shoulders/Forearms

NOTES: Modify moves as needed, and add weight to make moves more challenging if you can still work through a full range of motion. This workout should help activate your glutes, strengthen your adductors while also improving your mobility!

For descriptions of each move, Elite Library Members can click the links below. Not a member, click here to learn more about our Exercise Library or see this post 21 Inner Thigh Moves for a video of the moves.

EXERCISE DESCRIPTIONS:

Glute Bridge with Squeeze
Cossack Squat
Side Plank Bench Lift
Side Plank Clams
Sumo Squat
Peek-a-boo

The Strengthen Those Glutes Workout

The Strengthen Those Glutes Workout

WARM UP
Stretch and Roll Out:
Calves
Quads
Groin
Hamstring
Hips/Glutes
Back/Chest

ACTIVATION

Complete 1-2 rounds of the following activation circuit. Complete all 4 moves on one side before completing them on the other side.

CIRCUIT:
10 reps each way each side Quadruped Hip Circles
15 reps each side Fire Hydrants
10 reps each side Forearm Donkey Kicks
20 reps Quadruped Straight Leg Pulses

WORKOUT

Complete 5 rounds of the first exercise, resting about 60-90 seconds between rounds. Then rest 1-2 minutes and move on to the circuit. Complete 3-5 rounds of the circuit, resting as needed. Then rest 1-2 minutes and complete the burnout.

EXERCISE:
8-12 reps Barbell Hip Thruster

CIRCUIT:
10-15 reps per side Side Plank Clams
8-12 reps per side Side to Curtsy Lunge
10-15 reps per side Low to High Wood Choppers **

BURNOUT:
Complete 8 rounds, working 20 seconds, resting 10 seconds in between.
20 seconds Band Pull Thrus
10 seconds Rest

COOL DOWN
Stretch and Roll Out:
Calves
Quads
Groin
Hamstring
Hips/Glutes
Back/Chest

NOTES:

Focus on really challenging yourself with weight on the Hip Thrusters, even if that means slightly lower reps or even longer rest between rounds. On the circuit, you will still want to challenge yourself with weight; however, you should rest less between rounds and move from one exercise to the next.

On the burnout, move quickly and focus on your glutes engaging. Don’t rest during the 20 seconds of work. Instead have a lighter band ready in case you need to regress so that you can keep moving.

**If you don’t feel your glutes working during the Woodchopper, try the Band Hip Rotations.

Lower Body Blast

Lower Body Blast

WARM UP
Stretch and Roll Out:
Calves
Quads
Hamstrings
Adductors
Hips/Glutes

WORKOUT

Set a timer for 20 minutes. Complete as many rounds of the circuit below as you can in that time. Challenge yourself with weights and variations, but make sure you can keep moving quickly and don’t have to spend a long time resting.

CIRCUIT:
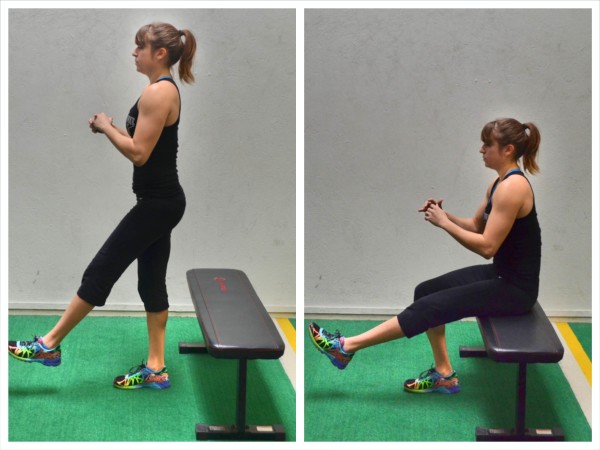
5 reps per side Single Leg Squats
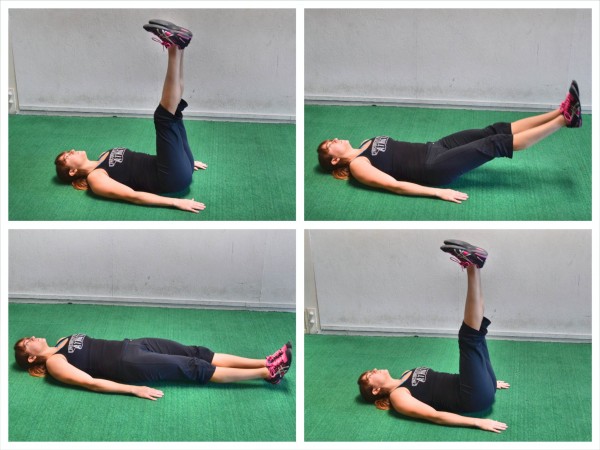
10 reps Leg Lowers
15 reps Glute Bridges Off Box
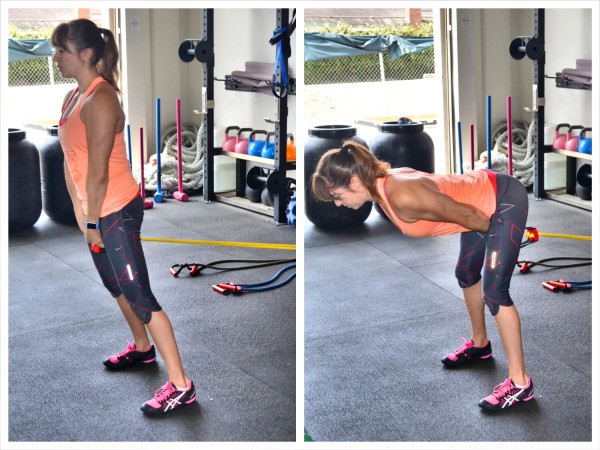
20 reps Kettlebell Swings

BURN OUT – The Quad Killer:
Set a timer for 20 seconds of work, 10 seconds of rest, 10 rounds. Cycle through the Wall Sit, Squat Pulses and either Squats for reps or Squat Jumps. Keep moving the entire 20 seconds and do not rest during that time. Burn out those quads!

COOL DOWN
Stretch and Roll Out:
Calves
Quads
Hamstrings
Adductors
Hips/Glutes

NOTES:
It is very important that you move quickly from one move to the next while still challenging yourself with each move. Record the rounds you complete and to try to beat it next time!

EXERCISE DESCRIPTIONS:
Single Leg Squats – 
To do the Single Leg Squat to bench, choose a bench that is as low as possible. The lower the bench, the harder the move. Stand in front of the bench and lift one leg out in front of you. Then sit back and squat to the bench. The more you completely sit and reset on the bench, the easier the move will be, especially if you lift your standing leg and then stomp it back into the ground. If you just barely touch and go, you may find that the move is harder. Also, the more you swing your arms, the more momentum you will have to help you stand back up. Make sure to keep the heel of the standing leg down as you squat and drive back up to standing.

single-leg-squat
Leg Lowers – To do Leg Lowers, lie on your back with your arms behind your head or down by your sides and brace your abs by setting up in the pelvic tilt. Then lift your legs straight up toward the ceiling, keeping them together and as straight as possible. Then with your low back firmly against the ground and your abs braced, lower both your legs down toward the ground. Lower them as close to the ground as possible without touching or without letting your low back come up off the ground. Keep your legs as straight as possible as you lower them down. Then lift them back up, keeping your low back against the ground and your legs striaght. Use your abs to lift and lower. If at any point while you lift and lower your legs, your low back comes up off the ground, stop and reset. Then either decrease your range of motion (not lowering as close to the ground) or regress to single leg lowers, lowering one leg down at a time. If you can keep your abs engaged and not let your low back take over, lower your legs down so your heels are no more than an inch off the ground before raising them back up. You should also engage your glutes as you lower down and hover just off the ground. And make sure that your legs stay as straight as possible throughout the movement.

leg-lowers
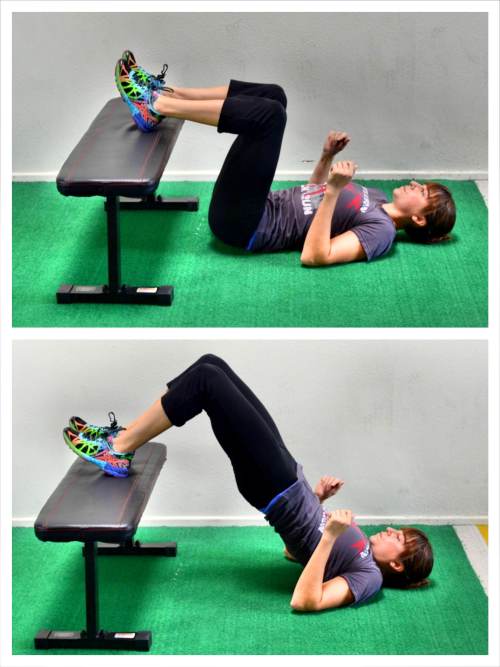
Glute Bridges Off Box – To do the Glute Bridge Off Box, place your heels up on the box or right on the edge. You want your knees bent to about 90 degrees or your butt to be even closer to the box. Do not let your butt get too far away from the box. You may need to play around with exact positioning so that you feel your glutes working and not your low back or hamstrings taking over. Bend your arms to 90 degrees with just your upper arms on the ground. Then driving through your heels on top of the box, press your hips up as high as you can. Squeeze your glutes and keep your core tight as you bridge up so that you don’t hyperextend your low back. Also, do not let your knees fall in or out as you lift up. Keep your knees in line with your hips and ankles. Hold for a second or two and then lower down.

glute-bridge-feet-on-box
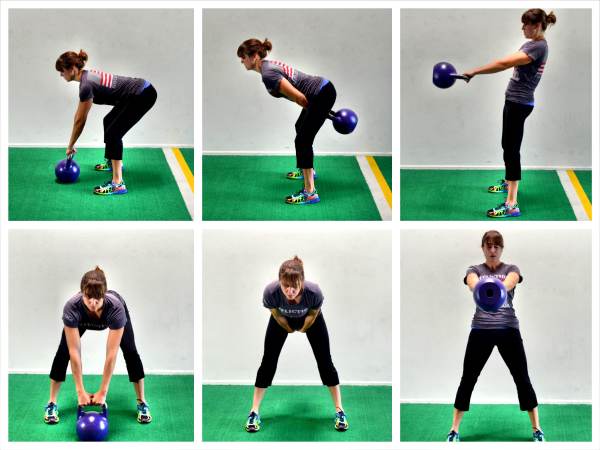
Kettlebell Swings – To do the Kettlebell Swing, set the kettlebell (or bell) down on the ground and slightly in front of you. Hinge over, bending your knees slightly and pushing your butt back as you lean forward. Keep your back flat and then reach your arms out and place both hands on the handle, tilting the bell back toward you. Hike the kettlebell back between your legs like you would a football. Pull it back and up between your legs toward your butt. To power the bell up and forward, squeeze your glutes and drive your hips forward as you stand up nice and tall. Pop your hips forward and propel the kettlebell up off your hips. Do not worry about how high the bell goes. It shouldn’t go higher than your shoulders. Squeeze your glutes as you stand tall. You may lean back a little at the top, but make sure you are squeezing your glutes and not loading your low back. Then, keep your glutes tight, wait as the bell comes back down before you hinge back over. Your forearms need to connect with your hips before you hinge back over and bring the bell back down and through your legs. Do not lean forward and hinge over before the kettlebell comes back down. You want to maintain the connection between your hips and forearms to protect your low back. Also, don’t allow the kettlebell to sink low between your legs. You want the bell up close to your crotch. As your forearms connect and you hinge over, sitting your butt back, make sure to lean forward to counterbalance the kettlebell going back through your legs. Let the kettlebell reach through toward the wall behind you. If the bell comes up and taps you in the butt, it may be too light. Then squeeze your glutes again and thrust the kettlebell back up as you come back up to standing. With the swing, you may keep a straighter leg or bend your knees a little as you swing. They are both acceptable just different styles. Make sure to squeeze your glutes at the top of each swing and make sure you don’t come up onto your toes. While you may lean back a little, you don’t want to lean back and load your low back. You should not feel this move in your low back at all. Maintaining the connection between your forearms and hips as you hinge is essential for keeping your glutes working and your low back from feeling strained. Do not sit your butt back while the kettlebell is still out in front of you. You almost want the kettlebell to be pulling you back and that is why you are hinging over. The hinge is a reaction to the bell instead of you anticipating the kettlebell coming back down and hinging over before it lowers. Start small with the swing to focus on the connection. You don’t have to get the kettlebell all the way up to your chest to get a lot out of the movement.

kb-swing

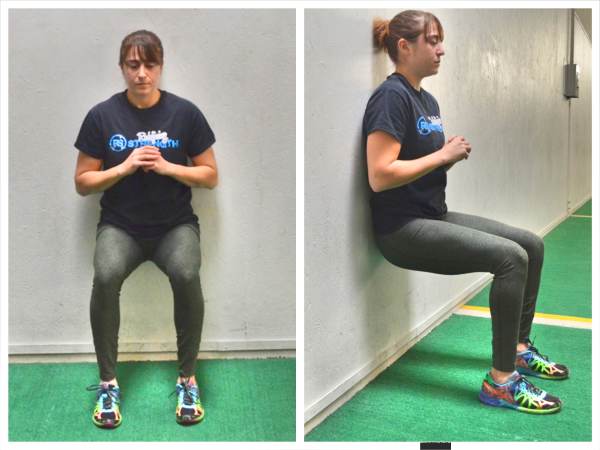
Wall Sit – To do the Wall Sit, stand with your back to a wall and your feet about hip-width apart. You can change up your exact foot position to hit slightly different aspects of your quads. Then sink down into a squat, pressing your back into the wall behind you as you try to get your quads as close to parallel to the ground as possible. When you sink into the squat, keep your ankles aligned under your knees and drive back into the wall through your entire foot. Do not rock forward onto your toes. Also, do not sink past parallel. Hold there and drive your back into the wall. If you start to feel this in your low back, make sure to brace your abs. Also, do not hunch or lean forward as you hold. Stay up nice and tall. To make this move easier, don’t sink as low in the squat or move your feet out just a bit from the wall. Do not let your ankles get too far out in front of your knees though.

wall-sit
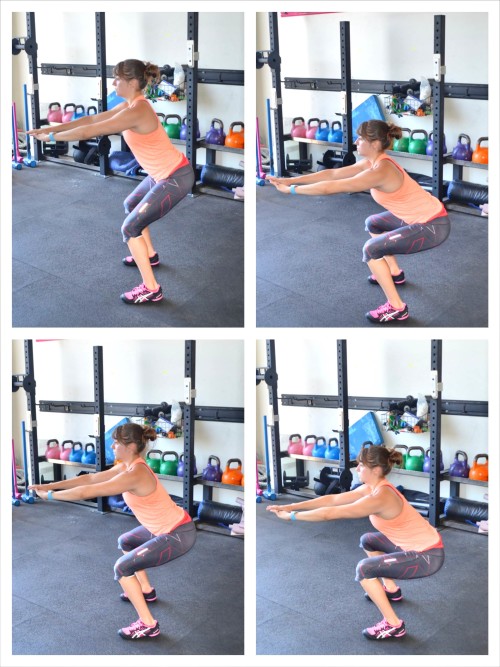
Squat Pulses – To do Squat Pulses, stand with your feet between hip-width and shoulder-width apart. Then sit your butt back and sink into a squat. Pulse up and down, coming up toward the top of the squat and then sinking back down. Stay within that working range sometimes doing bigger movements and sometimes small pulses right around the bottom of the squat.

squat-pulses
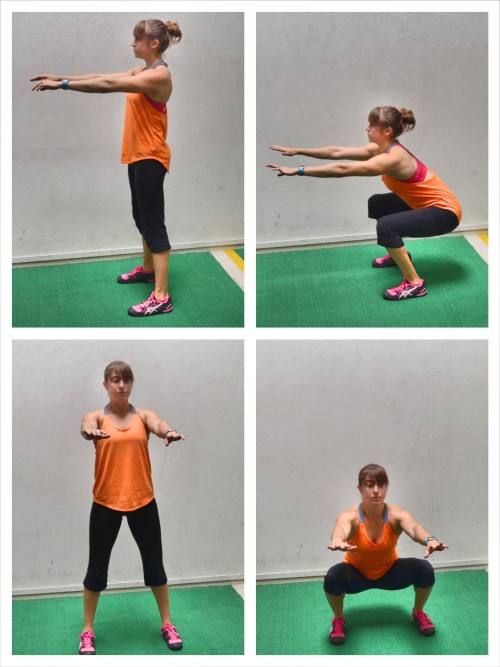
Squat Reps – To do the Basic Bodyweight Squat, stand nice and tall with your feet about hip-width to shoulder-width apart. Your feet should be parallel and pointing straight ahead. You can place your hands across your chest on your shoulders or reach your hands out in front of you. Then squat down, sitting your butt back and down as you. Bend your knees to sit back and squat as you keep your chest up. Keep your heels down as you drop your butt as close to the ground as you can. Do not let your back round or chest fall forward as you squat. Also, make sure to keep your heels down. Only squat as low as your mobility allows. Then come back up to standing, driving through your heels. Do not come forward onto your toes or lean forward as you stand back up. Squeeze your glutes at the top. If your back rounds or if you shift your weight to one side or the other as you squat, do not squat as low and work on your mobility before increasing weight. You may also need to work on correctly imbalances if you shift your weight to one side or the other. Also beware of your knees caving in or bowing out. Your hips, knees and ankles should all be in line as you squat.

basic-squat-form
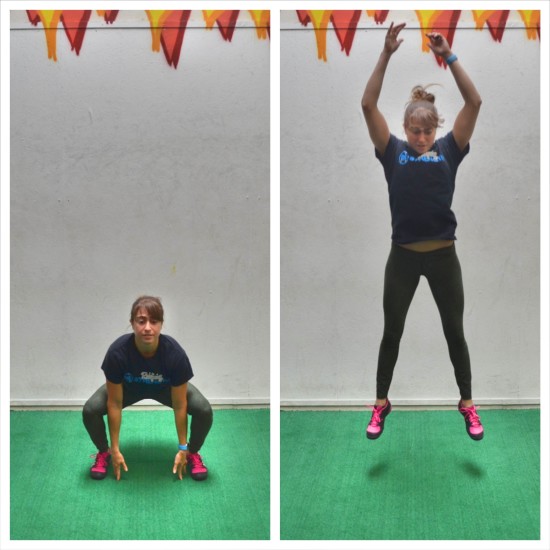
Squat Jumps – To do Squat Jumps, stand with your feet between hip-width and shoulder-width apart. Sit your butt down and back into as low a squat as you can with good form (aka your heels stay down and your chest stays up and your knees don’t cave in). You can then swing your arms back as you squat or reach your hands down to touch the ground. Then explode up out of the squat and jump as high off the ground as possible. You can swing your arms and reach your hands overhead to help propel you up. As you jump, extend your body fully. As you land, sink right back into the squat so you can explode right back up. Do not land with your legs straight. Make sure to bend your knees as you land and try to land softly to protect your knees. Beginners may need to rest between each rep; however, that doesn’t mean landing with your legs straight. You should never land with your legs completely locked. Bend your knees to help you absorb the impact of landing even if you pause between jumps. Beginners can also start with a quick Basic Bodyweight Squat and even come up onto their toes as the stand up instead of completely leaving the ground. If they have good mechanics, they may want to leave the ground but not jump as high. To make the move harder, jump up and sink right back into the squat to repeat as quickly as possible. Really focus on a soft landing and then exploding quickly into as high a jump as you can.

squat-jump

The Bodyweight Butt Blaster

The Bodyweight Butt Blaster

WARM UP
Stretch and Roll Out:
Calves
Quads
Hamstrings
Adductors
Hips/Glutes

ACTIVATION

Complete 2 round of the following circuit.

CIRCUIT:
15 reps Frog Bridges
15 reps per side Side Plank Clams

WORKOUT

Set a timer for 5 minute rounds. Complete as many rounds of each circuit as you can in that time. Try not to rest but to go from one move to the next. Keep the reps short while still challenging yourself. You want to push hard without going to failure so that you can keep moving the entire time. Rest 1-2 minutes between circuits. Then rest 1-2 minutes before completing 5 rounds of the Burn Out.

CIRCUIT #1:
4-6 reps per side Alternating Side Lunges with Hop
6-10 reps Glute Bridges Off Box
4-6 reps Toes to Bar OR Leg Lowers

CIRCUIT #2:
4-6 reps per side Alternating Curtsy Lunge
4-6 reps per side Single Leg Deadlift Hops
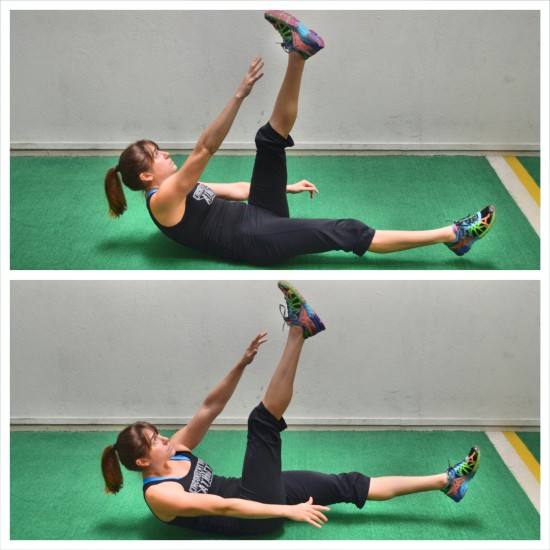
4-6 reps per side Alternating Leg V-Ups

CIRCUIT #3:
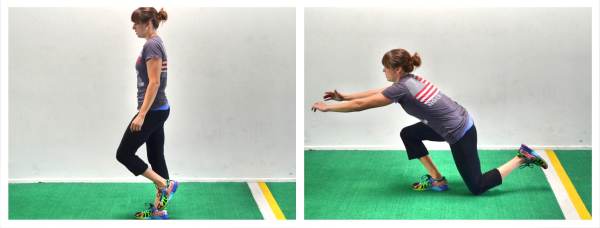
4-6 reps per side Airborne Lunges
8-12 reps Reverse Hypers
4-6 reps per side Side Plank with Leg Raise

BURN OUT:
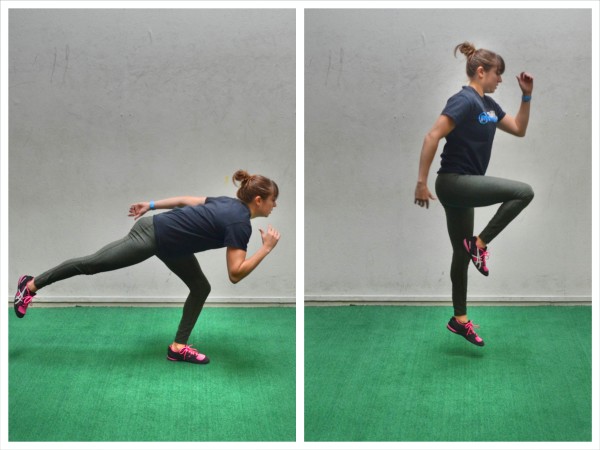
30 seconds Skater Hops
15 seconds Rest

COOL DOWN
Stretch and Roll Out:
Calves
Quads
Hamstrings
Adductors
Hips/Glutes

NOTES:
It is very important that you move quickly from one move to the next while still challenging yourself with each move. Don’t just do the top of the rep range to do the most. Do the rep range that challenges you while still allowing you to move to the next thing without having hit failure so that you have to rest. Record the reps and rounds you complete in each five minute circuit to try to beat it next time!

EXERCISE DESCRIPTIONS:

Frog Bridges – To do the Frog Bridge, place the bottom of your feet together and bend your knees as if doing the butterfly stretch. The closer you bring your feet in toward your crotch, the more mobility you need to do the move. Find a comfortable placement and allow your knees to fall open. Lie on your back on the ground with the outside of your feet down. Straighten your arms down by your sides then bend your elbows to 90 degrees so that only your upper arms are against the ground. Driving through your upper arms and the outsides of your feet, bridge up while keeping your knees open. Squeeze your glutes as you lift and pause at the top. Then lower back down. Keep your core engaged and really drive down through your upper arms so that you don’t push yourself backward. Do not let your knees close. Keep them relaxed and open. Concentrate on your glutes working to lift. Make sure to pause and engage your glutes at the top. If you feel your hips too much, don’t bring your heels in as close to your body. frog-bridge

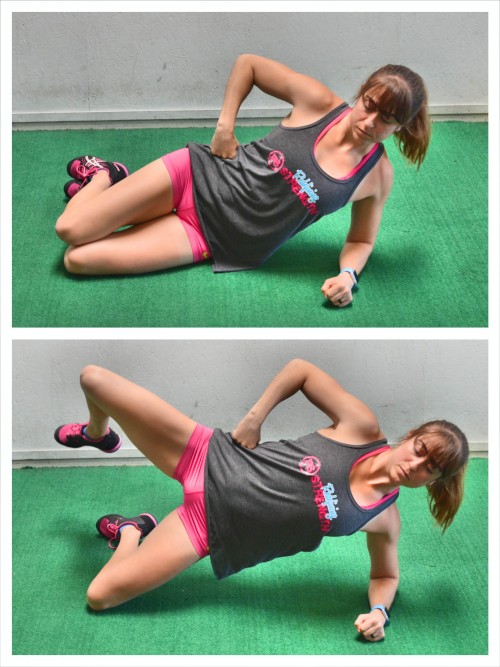
Side Plank Clams – To do the Side Plank Clam, lie on your side propped up on your forearm with your elbow underneath your shoulder. Bend your knees so that your feet and lower legs are behind you. You can place your top hand on your hip or reach it up toward the ceiling, but don’t touch it down to the ground. With your legs stacked, lift your hip up off the ground, driving through your knee and forearm. As you lift your hips up, lift your top leg up and toward the ceiling, keeping the knee bent. Open up as high as you can then lower the leg back down. As you lower the leg back down, lower your hip back down to the ground. Repeat, lifting up and, as you do, raise your top leg up toward the ceiling. Complete all reps on one side before switching. Make sure you are lifting straight up and not rotating toward the ground or open toward the ceiling. Also keep your elbow under your shoulder and do not get too spread out. When you lift the top leg, don’t rotate open as you do. Really focus on lifting with your glute. side-plank-leg-raise

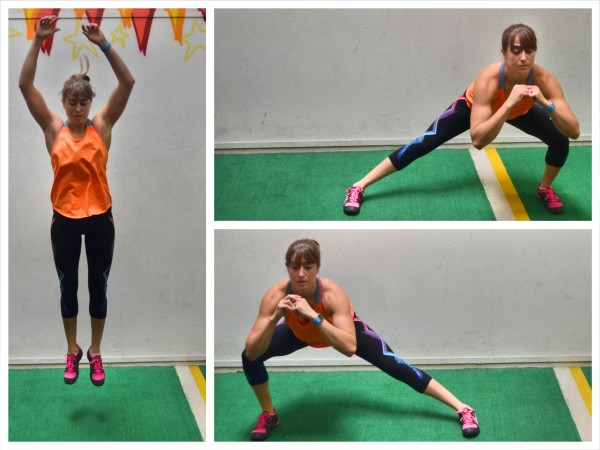
Alternating Side Lunges with Hop – To do Side Lunges with Hop, stand tall with your feet together. Step one foot out to the side nice and wide. Bend the knee of the leg you stepped out to the side with, keeping the other leg straight. Sit your butt back and lean over as you sink into the side lunge. Keep your back flat as you sit back. Then drive back up off your outside foot to come back to standing. When you come back to standing, jump up toward the ceiling, reaching up overhead. Then lunge out to the other side before coming back center and jumping toward the ceiling. Keep alternating lunges until all reps are complete. Make sure your heels stay down as you lunge out to the side. You want to make sure to sit your butt back.
side lunges with hop

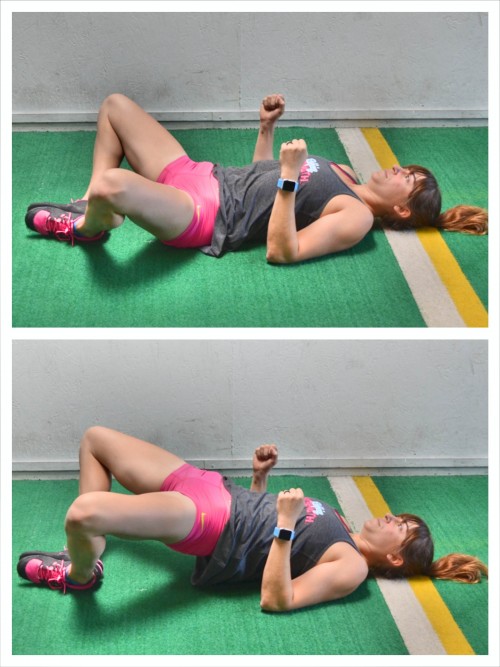
Glute Bridges Off Box – To do the Glute Bridge Off Box, place your heels up on the box. You want your knees bent to 90 degrees or your butt to be even closer to the box. Do not let your butt get too far away from the box. Bend your arms to 90 degrees with just your upper arms on the ground. Then driving through your heels on top of the box, press your hips up as high as you can. Squeeze your glutes and keep your core tight as you bridge up so that you don’t hyperextend your low back. Also, do not let your knees fall in or out as you lift up. Keep your knees in line with your hips and ankles. Squeeze at the top and then lower down and repeat.
glute-bridge-feet-on-box

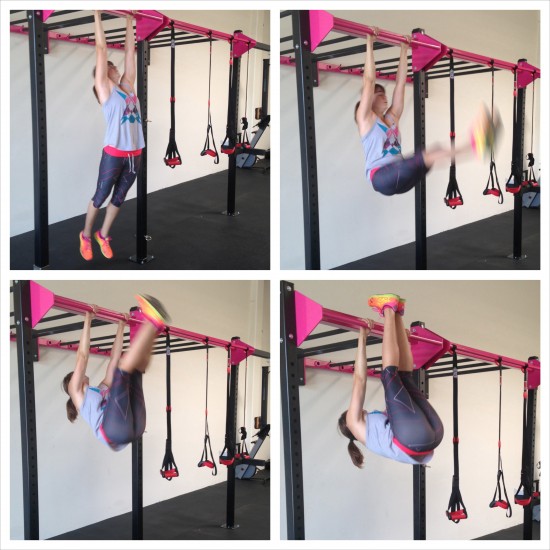
Toes to Bar OR Leg Lowers – To do Toes to Bar, you will raise your straight legs all the way up so that your toes touch the bar. To start, hang from the bar with your legs straight and together. Then engage your lats and pull as you raise your straight legs up toward the bar. Raise them all the way up so your feet touch the bar. Then slowly lower down. Hanging Toes to Bar
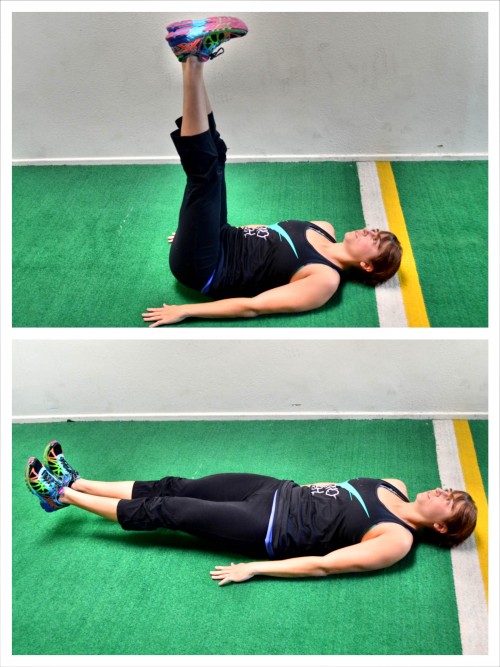
For the Leg Lowers, set up in the pelvic tilt with your legs raised up toward the ceiling. Then with your low back firmly against the ground and your abs braced, lower both your legs down toward the ground. If at any point while you lower your legs, your low back comes off the ground, stop and reset or regress and only lower one leg at a time. Then either decrease your range of motion or regress to the single leg lowers. However, if you can keep your abs engaged, lower your legs down so your heels are no more than an inch off the ground before raising them back up. You should also engage your glutes as you lower down. And make sure that your legs stay as straight as you can throughout the motion. leg-lower-ab-exercise

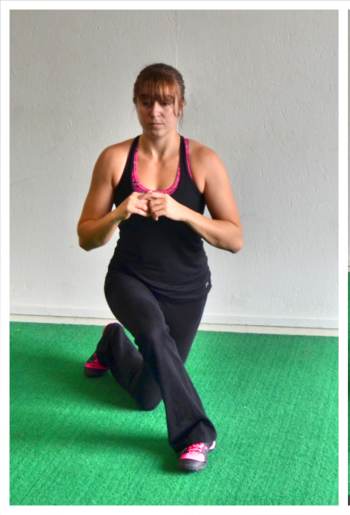
Alternating Curtsy Lunge – To do Alternating Curtsy Lunges, you can start on your left side and take your left foot and step back behind your right leg. You will reach your left foot back to about “5″ on the clock. Make sure that you step far enough back (aka do not keep your left foot in too close to your right) that you can bend both knees and sink down into a deep lunge. Keep your right heel down on the ground and your chest up as you lunge back. Then come back to standing, driving off your front heel and the ball of your back foot. Make sure that you feel this lunge in the outside of your right butt cheek when you lunge back with the left leg. Then once standing again with your feet together, step your right foot back and across behind your left leg. Again come back up to standing. Lunge as deep as you can and move quickly alternating lunges.
curtsy-lunge

Single Leg Deadlift Hops – To do the Single Leg Deadlift Hop, stand on one leg with the knee soft and the toe of your other foot lightly touching the ground. Hinge over, pushing your butt back and leaning your chest over toward the ground. Keep your back flat as you hinge over and lift your other leg back toward the wall behind you.  You will want to swing your arms as if running as you do the hinge and hop. As you hinge over, the opposite arm of your standing leg should be forward while the same arm will be back. Hinge over quickly, bending the standing leg just a little. Then quickly drive back up to standing, exploding up off the ground as you come back up. As you jump up off the ground, bring the back knee up and forward. Your chest should be up nice and tall as you hop off the ground. Your other arm will also swing forward as you jump while the arm that was forward in the hinge goes back. Using your arms can help propel you up higher. Land back on the same leg and hinge back over before jumping back up. You do not have to jump super high for this move to challenge you. Focus on landing only on one leg and maintaining your balance throughout the reps. If you really struggle with balance, don’t actually jump just move quickly as if you are going to jump up at the top. single-leg-deadlift-hop

Alternating Leg V-Ups – To do Alternating Leg V-Ups, Lie flat on your back with your legs out straight in front of you. Beginners will rest the leg not being raised up on the ground while advanced exercisers will keep both feet off the ground at all times. Lift one leg up toward the ceiling. Crunch the upper body up and reach the opposite arm up toward the toes of the raised leg. Then lower that leg and lower your upper body down. Raise the other leg and the opposite arm to touch it as you crunch up. Keep alternating sides.
alternating-leg-v-up

Airborne Lunges – To do the Airborne Lunge, stand on your right foot and bend your left knee, bringing your heel back up toward your butt. Then bend your right knee and sit back into your right heel as you lunge down, dropping your left knee to the ground. Do not touch the left foot down when you drop the knee to the ground. Do not reach the left knee back too far when you lunge down. Keep it just a little behind your right foot so that you are almost slightly squatting. Lean forward as needed to counterbalance but do not round forward. To come back to standing, drive up through your right heel and straighten the leg. Complete all reps on one side before switching. Make sure you engage your core and keep your standing heel on the ground at all times. Also, make sure you feel this move in the glute of your standing leg. Beginners may need to hold a pole or use a Suspension Trainer and not sink as low to start. airborne-lunge

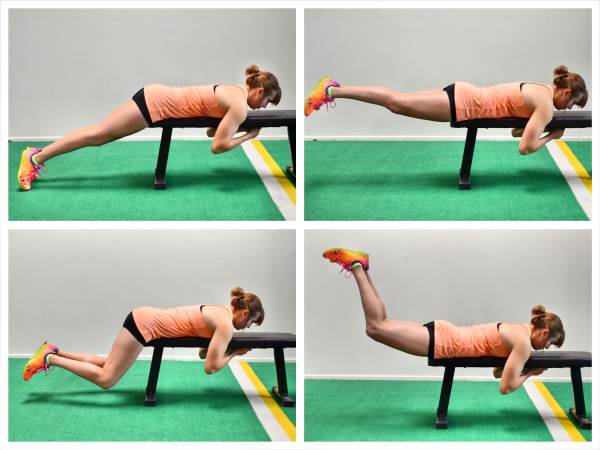
Reverse Hypers – Choose Bent or Straight. You can even switch it up each time you do the workout but stick with one the entire workout. To do the Bent-Knee Reverse Hypers (bottom), lie face down on a bench, box or table. Place your hips right on the edge of the bench and hold on to the bench or something in front of you. If your hips are too far on the bench, you are more likely to hyperextend your low back in an attempt to get your hips up higher. Place your heels together and bend your knees to about 90 degrees. Flex your feet. You can choose to turn your toes out to hit a slightly different aspect of your glutes as well. Then, with your knees bent, kick your heels up toward the ceiling, squeezing your glutes to lift. You can sort of drive up and out a bit to really get your glutes to work. Make sure that you squeeze your glutes as you lift and don’t hyperextend your low back just to get up higher. Lift so that your quads are about parallel to the ground and lower back down. Only lift higher if you don’t feel your lower back take over. You want to focus on and make sure your glutes are working to lift NOT your low back. The most important part is that you feel your glutes tighten. To do a Straight-Leg Reverse Hyper (top), you will set up like you are going to do the Bent-Knee Variation, however, you will keep your legs straight. Still place your heels together though. And you can also choose to turn your toes out to hit a slightly different aspect of your glutes. Then, keeping your legs straight, raise your heels up toward the ceiling. Squeeze your glutes as you lift. Lift till your legs are about parallel to the ground and lower back down. Only lift higher if you don’t feel your lower back take over. You want to focus on and make sure your glutes are working to lift NOT your low back. If you do feel your low back, make sure you are pressing your pelvic down into the bench as you squeeze your glutes to lift. Hold at the top and lower back down.
reverse-hyper-glute-exercise

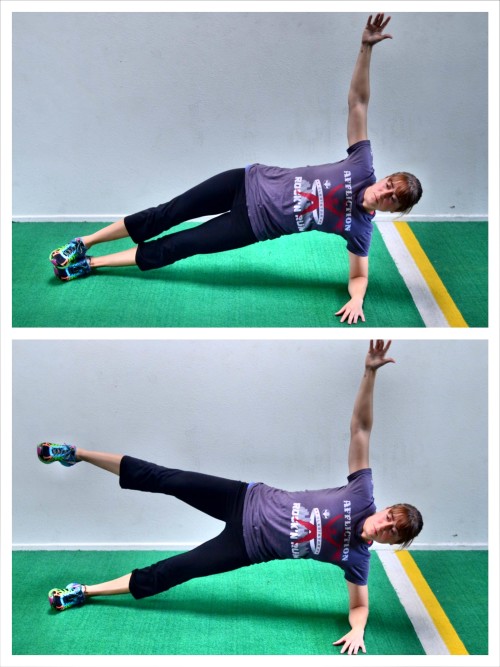
Side Plank with Leg Raise – To do the Side Plank with Leg Raise, set up in a Side Plank from your forearm. Set up on your side and prop yourself up on your forearm with your elbow right below your shoulder. Your legs should be out straight. Stack your feet. Then, driving through your forearm and the sides of your feet, lift your bottom hip up off the ground as high as possible while keeping your body in a nice straight line. Squeeze your belly button in toward your spine and keep your glutes tight. Do not let your chest rotate forward toward the ground or your top hand touch the ground. Keep your top hand on your hip or reach it up toward the ceiling. Then, holding the Side Plank, lift and lower your top leg up and down. Do not let your hips drop toward the ground as you lift the top leg. This is a challenging move. Beginners may need to start in a Side Plank from their knees.
side plank with leg raise

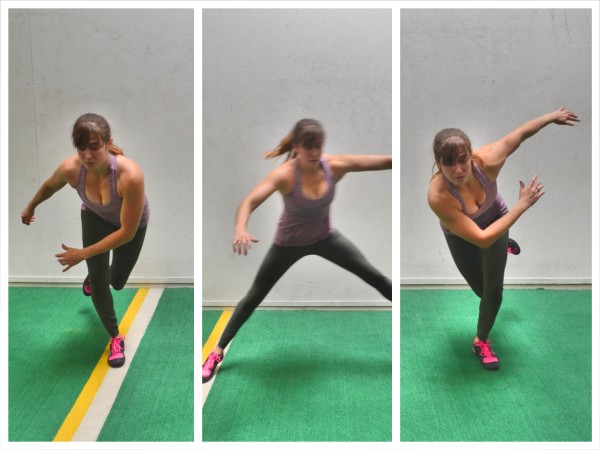
Skater Hops – To do Skater Hops, start standing to one side of the space you have to use. This is a lateral hop so make sure you have space to jump to one side. Starting to the right, shift your weight so that you are standing on your right foot. Sink down into a little squat and swing your arms down in front of you and out to the right. Then explode up off the right leg and jump to the side, landing on your left leg. Keep your chest facing straight ahead as you jump and land. As you land on that left leg, sink into a slight squat, pushing your butt back so that you load your glute to help you jump back laterally to the right. Use your arms to not only help you balance but also help propel you further when you jump. Let them swing toward whichever side you are jumping to. Then push off your left leg and jump back right, landing on your right foot. Try not to touch the other foot down when you land. Only touch the other foot down if you need to for balance. Beginners may need to go slower and not jump as far to each side. While this is a cardio move, you also want to use it to work on your balance. Beginners will want to hold for a second on each leg and balance. As you advance, do not pause on either side of the jump to balance. You want to jump as far to each side as you can as quickly as possible! skater-hops

The Leg Isometric Workout

The Leg Isometric Workout

WARM UP
Stretch and Roll Out:
Feet
Shins
Calves
IT Bands
Hips/Glutes
Groin
Quads
Hamstrings 

WORKOUT

Complete 3-5 rounds of each of the circuits below. Perform each move back to back, only resting as needed between rounds and circuits.

CIRCUIT #1:
20-45 seconds each side Warrior III
20-45 seconds each side Standing Splits
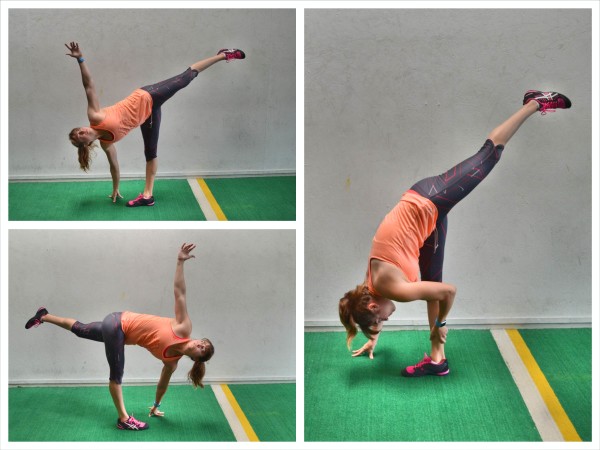
20-45 seconds each side Half Moon
20-45 seconds each side Twisting Half Moon
Up to 45 seconds rest. Include a few static stretches for hips, glutes, hamstrings and calves as needed.

CIRCUIT #2:
20-45 seconds each side Crescent
20-45 seconds each side Scissor Hamstring Stretch
20-45 seconds each side Warrior II
20-45 seconds each side Extended Triangle
Up to 45 seconds rest. Include a few static stretches for hips, glutes, hamstrings and calves as needed.

COOL DOWN
Stretch and Roll Out:
Feet
Shins
Calves
IT Bands
Hips/Glutes
Groin
Quads
Hamstrings 

NOTES:

You can do this workout one of two ways – More advanced exercisers will want to go through the entire circuit on one side then switch sides.

Beginners may want to give each side a rest after each exercise so may alternate legs on each move.

Some good stretches for during the rest periods can be found here.

Try to lengthen the time you hold each as you become stronger and can hold with good form. However, since you want to move quickly from one move to the next, do not hold so long that you have to rest between moves.

EXERCISE DESCRIPTIONS:

For all the Isometrics in this workout, click here. You can also add some variety and use this basic routine while subbing in some of the other moves!

yoga poses for glutes and balance

For instance, especially if the outside of your hips and glutes are tight, you may want to do Twisting Extended Triangle instead.

You can also sub in Warrior I instead of II to hit your hips from a different angle. Mix it up and choose isometrics that target your tightest areas even!