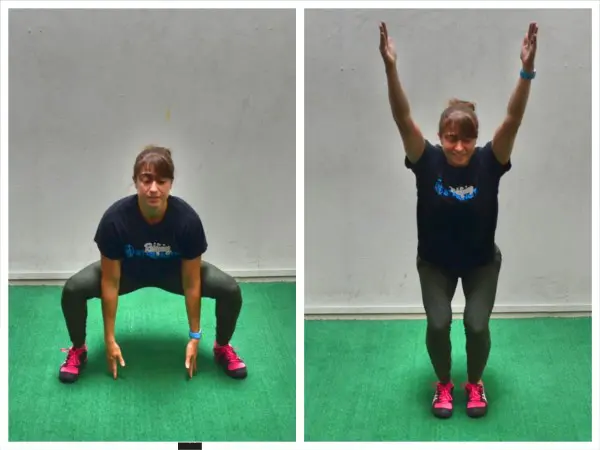
The No Equipment Needed Coordination Workout

The No Equipment Needed Coordination Workout

WARM UP
Stretch and Roll Out:
Calves
Hamstrings
Quads
Groin
Hips/Glutes
Chest/Shoulders/Traps
Back/Lats

WORKOUT

Complete 2-3 rounds of the first circuit and 3-5 rounds of the second circuit. Rest no more than 30 seconds between rounds of the first circuit and 30 seconds to 1 minute between rounds of the second circuit. Rest 1-2 minutes between circuits.

CIRCUIT #1:
Isometric Drills:
30 sec – 1 min Toe Hold
30 sec – 1 min Squat Hold
30 sec – 1 min Scapular Hold
30 sec – 1 min High Plank Hold
30 sec – 1 min Glute Bridge Hold

CIRCUIT #2:
10-15 reps per side Forward Lunge with Reach
10-15 reps per side Plank with Reach Back and Out
20 seconds Seal Rolls

COOL DOWN
Stretch and Roll Out:
Calves
Hamstrings
Quads
Groin
Hips/Glutes
Chest/Shoulders/Traps
Back/Lats

NOTES:
This can be a great recovery workout or a workout used to prevent injury and correct imbalances. This workout will be as hard as you make it. If you don’t focus on activation during the holds, they won’t be as challenging as they can be. Even the advanced exerciser will feel this workout if they really focus on activating the correct muscles.

EXERCISE DESCRIPTIONS:
Toe Hold – Stand with your feet only a few inches apart. Then lift up onto your toes. Do not rock to the outside of your feet. Try to get up onto your big toe as much as possible. Hold that position. To make this move harder, do a single leg balance, lifting up onto the ball of only one foot.
Toe Hold Isometric
Squat Hold – Place your feet between hip-width and shoulder-width apart. Sink down until your thighs are parallel to the ground. To make it easier, do not sink as low. Keep your core engaged and your chest up. Do not lean forward too much. Make sure to sit back on your heels when you squat. You should not be on your toes at all. Do not sink below 90 degrees with this move as that actually makes it easier. And do not let your knees collapse inward. If you want to make this move harder, you could hold a weight at chest height. Make sure to keep your core tight and back flat. Beginners may want to start  with a wall sit if they can’t sink down very low without their chest falling forward. Sink down as low as you can, but not below having your knees bent to 90 degrees. Press your back into the wall. Drive back off your heels, pressing yourself firmly into the wall and hold.
squat hold
Scapular Hold – Stand with your back to the wall. Step a couple of inches away and bend your arms to 90 degrees. Keep your elbows in by your sides and drive them back toward the wall. Lean onto your elbows on the wall. Do not let your upper arms or back touch the wall. Relax your head back. Pinch your shoulder blades down and back while keeping your core tight as you lean into the wall. You should feel this move low between your shoulder blades. To advance the move, move your feet a bit further from the wall.
bat-wing
High Plank Hold – Set up on your hands and toes (advanced) or hands and knees (beginner). Feet are together and hands are underneath your shoulders. Draw your belly button into your spine and squeeze your quads, glutes and adductors. Your shoulder blades should be down and back and your shoulders shouldn’t be up by your ears. Do not let your upper back round. Keep your head in line with your spine. If you really draw your belly button in and tilt your pelvic forward, your abs should almost instantly start shaking.
front-plank
Glute Bridge Hold – Lie on your back. Bend your knees and place your feet flat on the ground about hip-width apart. Bring your heels in close enough to your butt that you can touch your heels when you extend your arms down by your sides. Then bend your arms to 90 degrees with only your forearms on the ground. Drive up through your heels, lifting your glutes up as high off the ground as you can. Squeeze your butt and keep your core tight. Do not hyperextend your low back. Also make sure your knees do not fall open and you are not pushing yourself backward. You want to drive straight up. Beginners will want to stick with a two-leg glute bridge while more advanced exercisers will want to progress to a single leg glute bridge.
glute-bridge-activation
Forward Lunge with Reach – Standing with your feet together, take one big step forward. Bend your front knee as you step forward, keeping your front heel down as you lunge forward. As you lunge, hinge forward and reach your hands overhead. Do not come up onto your front toe as you lean your torso over keeping your back flat. Keep your weight in your front heel and your back leg straight. Then come back up and step your front foot back. Complete all reps on one side before switching.
anterior-reach-lunge
Plank with Reach Back and Out – This move is done from the hands and either your knees (beginner) or toes (advanced). To do this move from your knee, set up in the top of a push up with your hands under your shoulders and your body in a nice straight line down to your knees. Then sit back on your heels into a “child’s pose” position, reaching one hand back between your legs. Move forward back to the top of the push up as you reach the hand from between your legs out toward the wall beyond your head. You may even extend your hips more toward the ground. Just make sure to keep your abs engaged so that you don’t feel the extension out in your low back. Complete all reps on that side before switching to the other arm.
plank-with-reach
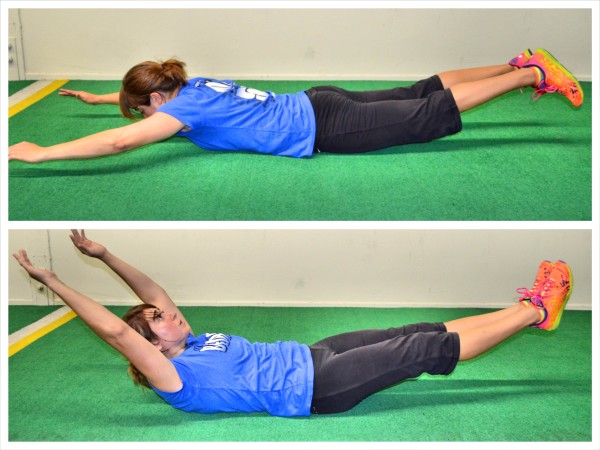
Seal Rolls – Lie on your back with your legs out straight and your arms overhead. Crunch up a little lifting your upper back and legs off the ground. Trying to keep your arms and legs off the ground, roll over onto your belly. Keep your chest and legs off the ground once you roll over. Then roll back over onto your back. Keep rolling back and forth, trying not to push off with anything.
superman-banana

Playground Swing Full Body Workout

Playground Swing Full Body Workout

WARM UP
Stretch and Roll Out:
Calves
Hamstrings
Quads
Groin
Hips/Glutes
Chest
Back/Lats

WORKOUT

Complete 3-5 rounds of the circuit below. Rest 30 seconds to 1 minute between rounds.

CIRCUIT:
8-15 reps each side Swing Balance Lunges
10-20 reps Swing Rows
10-20 reps Swing Decline Push Ups
10-20 reps Swing Knee Tucks

COOL DOWN
Stretch and Roll Out:
Calves
Hamstrings
Quads
Groin
Hips/Glutes
Chest
Back/Lats

NOTES:

This is going to be a very challenging workout. It can also be done on a suspension trainer at home or at the park.

EXERCISE DESCRIPTIONS:

Swing Balance Lunges – Place your back foot up on the swing and hop your front foot out so you are in a nice wide stance. Then lunge down, dropping your back knee toward the ground. Really sit back into the lunge. Make sure you aren’t going forward and that your front knee is not going past your toe. You should feel a nice stretch in the quad of the leg that is back when doing this move. If the swing is too hard because it causes too much instability, you can do this move with your foot up on a bench instead. Beginners may even want to start with a basic split squat on the ground.

balance-lunge
Swing Rows – Be careful with this move as the chains can pinch. Grab one chain in each hand and walk your feet forward so you are at an incline. The closer to parallel to the ground you get, the harder the move will be. Keeping your body in a nice straight line, straighten your arms out. Squeeze your glutes and draw your belly button in toward your spine. Press your chest out and then row up. Bend your elbows and pull your hands and the chain in toward your chest. Your body should be in a nice straight line as you row up and as you go back down.

inverted-row
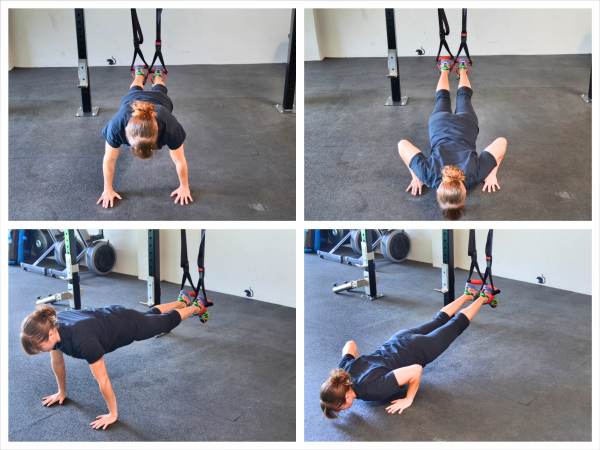
Swing Decline Push Ups – Set up with your ankles in a swing and your hands on the ground under your shoulders. Your body should be in a nice straight line. Your belly button should be pulled in and you should squeeze your glutes tight. Then, keeping your body in a straight line, bend your elbows and drop your chest toward the ground. Do not let your elbows flare way out or your shoulders shrug up as you lower down. Then press back up, keeping your body in a nice straight line. Beginners may need to start with push ups from the ground or incline push ups with their hands on the swing. Beginners can also do incline push ups from a bench.

decline-push-up
Swing Knee Tucks – Place your ankles in a swing and your hands on the ground under your shoulders. Your body should be in a nice straight line. Then pull the swing in toward your body, tucking your knees in toward your chest. Once you tuck your knees in, you will straighten your legs back out. Do not let your hips sag as you straighten back out or your butt go up in the air. Keep your body in a nice straight line. Repeat, tucking your knees in and driving your legs back out straight. You can also do oblique knee tucks, bringing your knees in toward one side and then the other. Beginners may do mountain climbers on the ground.

suspension-trainer-knee-tucks


Playground Lower Body Workout

Playground Lower Body Workout

WARM UP
Stretch and Roll Out:
Calves
Hamstrings
Quads
Groin
Hips/Glutes

WORKOUT

Complete 3-5 rounds of each circuit. Rest 30 seconds to 1 minute between rounds and 2-3 minutes between circuits.

CIRCUIT #1:
8-15 reps each side Lateral Bench Step Ups
8-15 reps each side Power Bench Step Up

CIRCUIT #2:
8-15 reps each side Bench Step Downs
8-15 reps each side Lateral Bench Shuffle

COOL DOWN
Stretch and Roll Out:
Calves
Hamstrings
Quads
Groin
Hips/Glutes

NOTES:

Choose as high a bench as you can manage. The lower the bench the easier it will be. You can also use stairs or any platforms on the playground that are the correct height. This can easily be performed at home or at the gym as well with a box or step.

Because you won’t necessarily add weight, you can challenge yourself even more by doing timed circuits instead. Set a timer for 15 minutes for each circuit and see how many rounds you can do!

EXERCISE DESCRIPTIONS:

Lateral Bench Step Ups – The higher the bench you use, the harder this move will be. Do not use a bench that is too high. If you have to push off the foot on the ground or if you really lean forward to propel yourself up, the bench is too high. Stand with the bench next to your right side. Place your right foot on top of it without rotating toward the bench. Drive up through the heel of the foot on the bench until you are standing on the bench. Drive the left knee up as you lift up onto the box. Then step back down and repeat. Keep your chest up as you drive up. Do not lean forward or let your heel on top of the bench come up. Complete all reps on one side before switching.

lateral-step-up
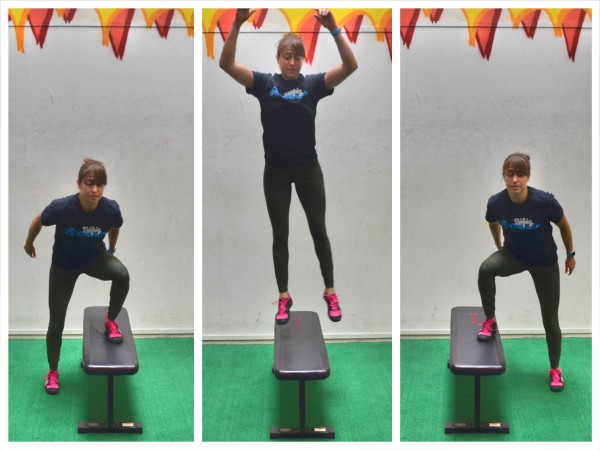
Power Bench Step Up – Pick a  bench that you can explode up off of that isn’t too high. Beginners should use a lower bench while advanced exercisers will want to use a higher bench but something they can easily step onto. Place one foot on top of the bench. Driving up off the foot on top of the bench, jump up in the air. In the air, switch and land with the other foot on top of the bench. Touch the other toe to the ground and then explode back up, pushing up off the foot on the bench. Jump up as high as possible, driving off the foot on the bench to switch and land with the other leg on top of the bench. Keep alternating until all reps are complete.

power-step-ups
Bench Step Downs – Start standing on the bench so that you can step off of it to the side with your left foot. Your right foot will be on the edge of the bench as if you are going to step down onto your left foot. Slowly hinge forward, keeping your back flat. Push your butt back as you bend your right knee, dropping your left foot toward the ground. Do not touch your left foot down. Once you go as low as you can, drive right back up to standing. Do not do more than touch your left toe down. You don’t want to be able to push off your left foot at all. Make sure you are only driving through your right heel and not using your left foot on the ground.

step-down
Lateral Bench Shuffle – Pick bench that you can explode up off of that isn’t too high. Beginners should use a lower bench while advanced exercisers will want to use a higher bench but something they can easily step onto. You should be standing facing forward with the bench to one side. You will place your foot laterally on top of it. If the bench is on your right, place your right foot on top. Driving up off the foot on top of the bench, jump up in the air. In the air, switch and land with the other foot on top of the bench, shuffling over the bench and on to the other side. Touch the other toe to the ground and then explode back up, pushing up off the foot on the bench. As you jump up and switch which foot is on the bench, you are shuffling back and forth over the bench. Jump up as high as possible, driving off the foot on the bench to switch and land with the other leg on top of the bench. Keep alternating until all reps are complete. If you can’t move quickly, use a lower bench. If there is no bench that you can go over because they all have backs, you can use a tree stump or a log or even find something to use as a hurdle and do hurdle hops instead of the bench shuffle.

box-shuffle

Metabolic 30/15 Interval Workout

Metabolic 30/15 Interval Workout

WARM UP
Stretch and Roll Out:
Calves
Hamstrings
Quads
Groin
Hips/Glutes
Chest
Back/Lats

WORKOUT

Perform one round of the isometric circuit below. Hold each exercise for 30 seconds to 1 minute. Rest no more than a minute before starting circuit 2.

CIRCUIT #1:
Toes
Squat Hold
Scapular Hold
High Plank
Glute Bridge

Perform 3-6 rounds of circuit #2. Rest for 15 seconds between each exercise and 1 minute between each round. Beginners may find they need more rest between rounds.

CIRCUIT #2:
30 seconds Burpee Sit Thrus
15 seconds Rest
30 seconds Lateral Ski Hops
15 seconds Rest
30 seconds Push Ups
15 seconds Rest
30 seconds Full Body Crunch

COOL DOWN
Stretch and Roll Out:
Calves
Hamstrings
Quads
Groin
Hips/Glutes
Chest
Back/Lats

NOTES:

Do as much work as possible in 30 seconds. Do whatever level of the exercise allows you to keep moving the entire time. You should be challenged but you don’t want to have to rest during the 30 seconds of work.

EXERCISE DESCRIPTIONS:

Toes – Stand with your feet only a few inches apart. Then lift up onto your toes. Do not rock to the outside of your feet. Try to get up onto your big toe as much as possible. Hold that position. To make this move harder, do a single leg balance, lifting up onto the ball of only one foot.
Squat Hold – Place your feet between hip-width and shoulder-width apart. Sink down until your thighs are parallel to the ground. To make it easier, do not sink as low. Keep your core engaged and your chest up. Do not lean forward too much. Make sure to sit back on your heels when you squat. You should not be on your toes at all. Do not sink below 90 degrees with this move as that actually makes it easier. And do not let your knees collapse inward. If you want to make this move harder, you could hold a weight at chest height. Make sure to keep your core tight and back flat. Beginners may want to start  with a wall sit if they can’t sink down very low without their chest falling forward. Sink down as low as you can, but not below having your knees bent to 90 degrees. Press your back into the wall. Drive back off your heels, pressing yourself firmly into the wall and hold.

squat hold
Scapular Hold – Stand with your back to the wall. Step a couple of inches away and bend your arms to 90 degrees. Keep your elbows in by your sides and drive them back toward the wall. Lean onto your elbows on the wall. Do not let your upper arms or back touch the wall. Relax your head back. Pinch your shoulder blades down and back while keeping your core tight as you lean into the wall. You should feel this move low between your shoulder blades. To advance the move, move your feet a bit further from the wall.

bat-wing
High Plank – Set up on your hands and toes (advanced) or hands and knees (beginner). Feet are together and hands are underneath your shoulders. Draw your belly button into your spine and squeeze your quads, glutes and adductors. Your shoulder blades should be down and back and your shoulders shouldn’t be up by your ears. Do not let your upper back round. Keep your head in line with your spine. If you really draw your belly button in and tilt your pelvic forward, your abs should almost instantly start shaking.

front-plank
Glute Bridge – Lie on your back. Bend your knees and place your feet flat on the ground about hip-width apart. Bring your heels in close enough to your butt that you can touch your heels when you extend your arms down by your sides. Then bend your arms to 90 degrees with only your forearms on the ground. Drive up through your heels, lifting your glutes up as high off the ground as you can. Squeeze your butt and keep your core tight. Do not hyperextend your low back. Also make sure your knees do not fall open and you are not pushing yourself backward. You want to drive straight up. Beginners will want to stick with a two-leg glute bridge while more advanced exercisers will want to progress to a single leg glute bridge.

glute-bridge-activation
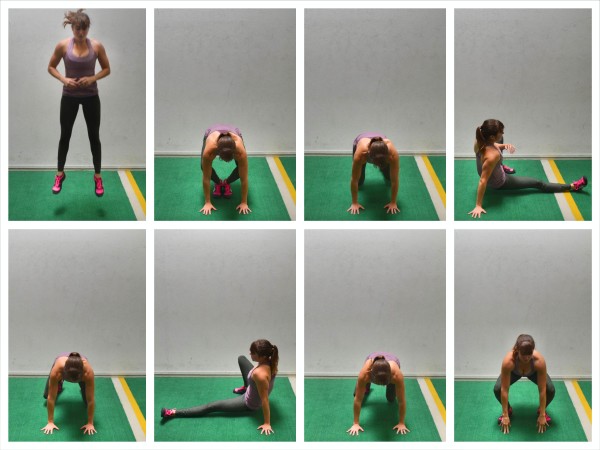
Burpee Sit Thrus – Start standing with your feet together. Then place your hands on the ground in front of your feet. Jump your feet back so you are in the crawling/bull dog position. Beginners may need to step their feet back instead of jumping them back. Once you are in the bull dog position, you are going to perform a sit thru each way. Kick your left leg under and through as you lift your right hand and replace it with your left leg. Then bring your leg back under into the bull dog position and kick through the other way, rotating open. Once you’ve completed a sit thru on each side, jump your feet back in and stand up.  As you stand back up, you are going to jump up off the ground. Beginners may not want to include the jump at the top. After you jump, go right back down and repeat the move.

burpee variations
Lateral Ski Hops –  Keep your feet together and squat down. Then with your feet together, jump side to side. Try to jump as far to each side as quickly as possible. Beginners may want to pause in a squat after each jump to balance.
Push Ups – Beginners will do either an incline push up with their hands up on a bench or a push up from their knees. Advanced exercisers will do a push up from their hands and toes. For any variation, start by lying on the ground with your legs together. Place your hands outside your chest. Draw your belly button in toward your spine and squeeze your glutes. If doing this move from your toes, you will then press up onto your hands and toes. Your body should move in one straight line. Everything should move together as you press up to the top of the push up with the arms full extended. Do not let your butt go up in the air or your hips sag toward the ground. Do not tuck your chin. Keep your head in line with your spine. Make sure to keep your core tight so your low back doesn’t arch. Then lower back down, making sure your body moves as one unit. Touch your chest to the ground and then lift right back up. If your body doesn’t move together, if you do the “worm” as you press up or down, regress to your knees or an incline push up. Move quickly even if that means regressing the move. It is better to do an easier variation and move the entire 30 seconds than to do a harder variation and have to rest during the 30 seconds.

basic-push-up
Full Body Crunch – Lie on your back with your legs out straight. You can place your hands behind your head or across your chest. Lift your feet up off the ground and tuck your knees in toward your chest as you crunch your upper body up. Keep a space between your chin and your chest as you lift your shoulder blades up off the ground. Crunch both your lower and upper body together then relax your upper body back down as you kick your legs out straight. Do not touch your heels to the ground until all reps are complete. Beginners may need to keep their feet up higher in the air while more advanced exercisers will kick their legs out close to the ground, keeping them only an inch or two up off the ground. After you kick your legs out, crunch everything back together.

full-body-crunch

The 15-Minute Leg Destroyer

The 15-Minute Leg Destroyer

WARM UP
Stretch and Roll Out:
Calves
Quads
Hamstrings
Groin
Hips/Glutes

WORKOUT

Set timer for 15 minutes. Complete as many rounds of the circuit below as possible, resting only as needed. Record how many rounds and reps you complete.

CIRCUIT:
8-12 reps per side Split Squats
10-20 reps Squat Jacks
5-10 reps per side Sit Thrus

COOL DOWN
Stretch and Roll Out:
Calves
Quads
Hamstrings
Groin
Hips/Glutes

NOTES:

Do not go to failure on any move because that will cause you to need to rest. Stop a few reps short so you can keep moving from exercise to exercise. Rest only as needed because your goal is to do as much work in the 15 minutes as possible.

EXERCISE DESCRIPTIONS:

Split Squats –  Step one foot forward into a wide lunge stance. Keeping your chest up nice and tall, bend your knees as if you are kneeling onto the ground. Keep your front heel down and drive through that heel to come back to standing. Do not step your feet back together once you stand back up. Keep the wide stance, sinking down and standing back up on that side until all reps are completed. Then step back and step the other foot forward. Hold dumbbells in each hand to make the move harder.

split squat
Squat Jacks – Squat jacks are a variation of the basic jumping jack. Start with your hands by your side and your feet together. Then squat down with your feet together. Get as low as you can. Then jump your feet out to between about hip-width and shoulder-width apart. Stay low in the squat even as you jump out. As you jump out, also bring your hands up and together overhead. When you jump back in, bring your hands back down to your sides. Stay low in the squat the entire time.

jumping-jack-variation
Sit Thrus – Start on your hands and knees. Flex your feet and press up onto your hands and toes with your hands under your shoulders and your knees under your hips. You will then rotate open toward the right and bring your left leg under and through toward where your right hand is. As you bring your left leg forward and through, lift your right hand. You should be almost sitting with your left hand down to support you. Then bring the left leg back through so you are back in the starting position. Next rotate to the left and kick your right leg through and forward as you lift your left hand. Move as quickly as you can back and forth. Beginners may need to move slowly or even start in a more spread out position with their legs out straight.

sit-thrus