The Push Up Challenge Workout

The Push Up Challenge Workout

WARM UP
Stretch and Roll Out:
Wrists/Forearms
Chest
Shoulders
Traps
Upper Back

ACTIVATION

Complete 1 round of the circuit below to get your body read to do push ups.

CIRCUIT:
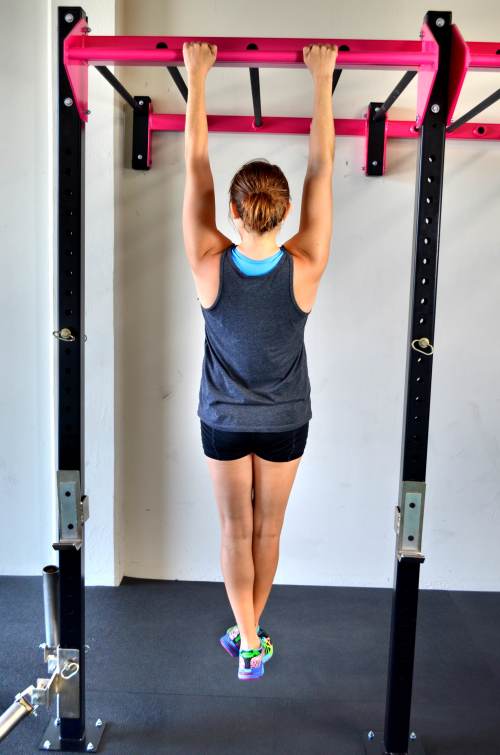
30 seconds Dead Hang
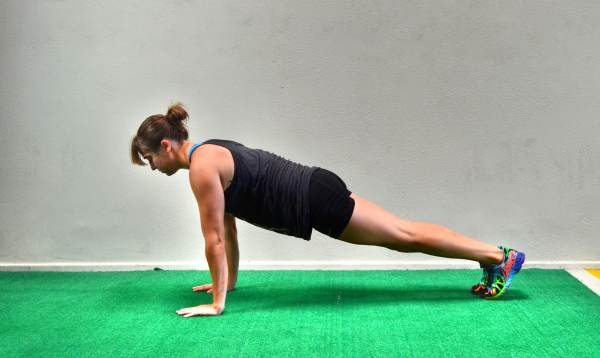
30 seconds High Plank Hold
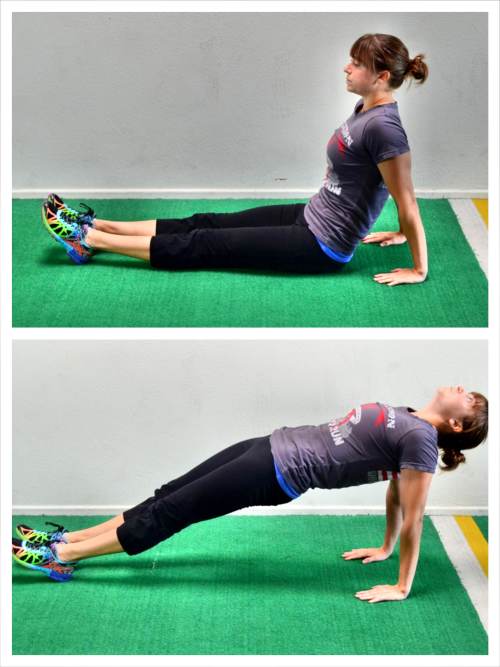
30 seconds Posterior Plank
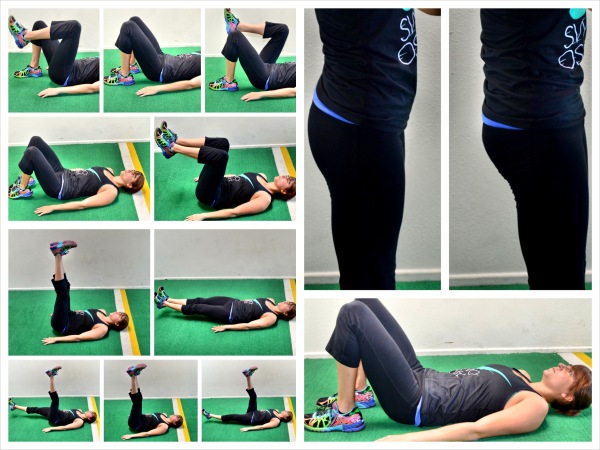
30 seconds Pelvic Tilt

WORKOUT

Complete the 3 minute push up test then rest 1-2 minutes before moving on to the second circuit. Complete 6-8 rounds of the second circuit. Focus on the push up variations that target your weak points. Rest 15-30 seconds between rounds.

CIRCUIT #1:
3 minute Push Up Test

CIRCUIT #2:
15 seconds Push Ups (Pike press, staggered, close grip, wide grip, eccentric only, incline, push up with release at bottom)
15 seconds Scapular Wall Holds or Lying Bat Wing (or Inverted Row Hold)
15-30 seconds Rest

NOTES:

Don’t do this workout more than every other week unless you cut out the 3 minute push up test. Once a month is actually best to test and see your progress. Any more than that and you will just keep burning yourself out. The second circuit though is perfect to improve your push up work capacity.

Also, make sure to pick a push up variation that you can do the entire 15 seconds. If you can’t keep moving, regress to an incline push up instead of letting your form break down or resting. The point is to keep moving while working on your weak points.

Feel free to post your 3 minute push up test score in the comments!

EXERCISE DESCRIPTIONS:
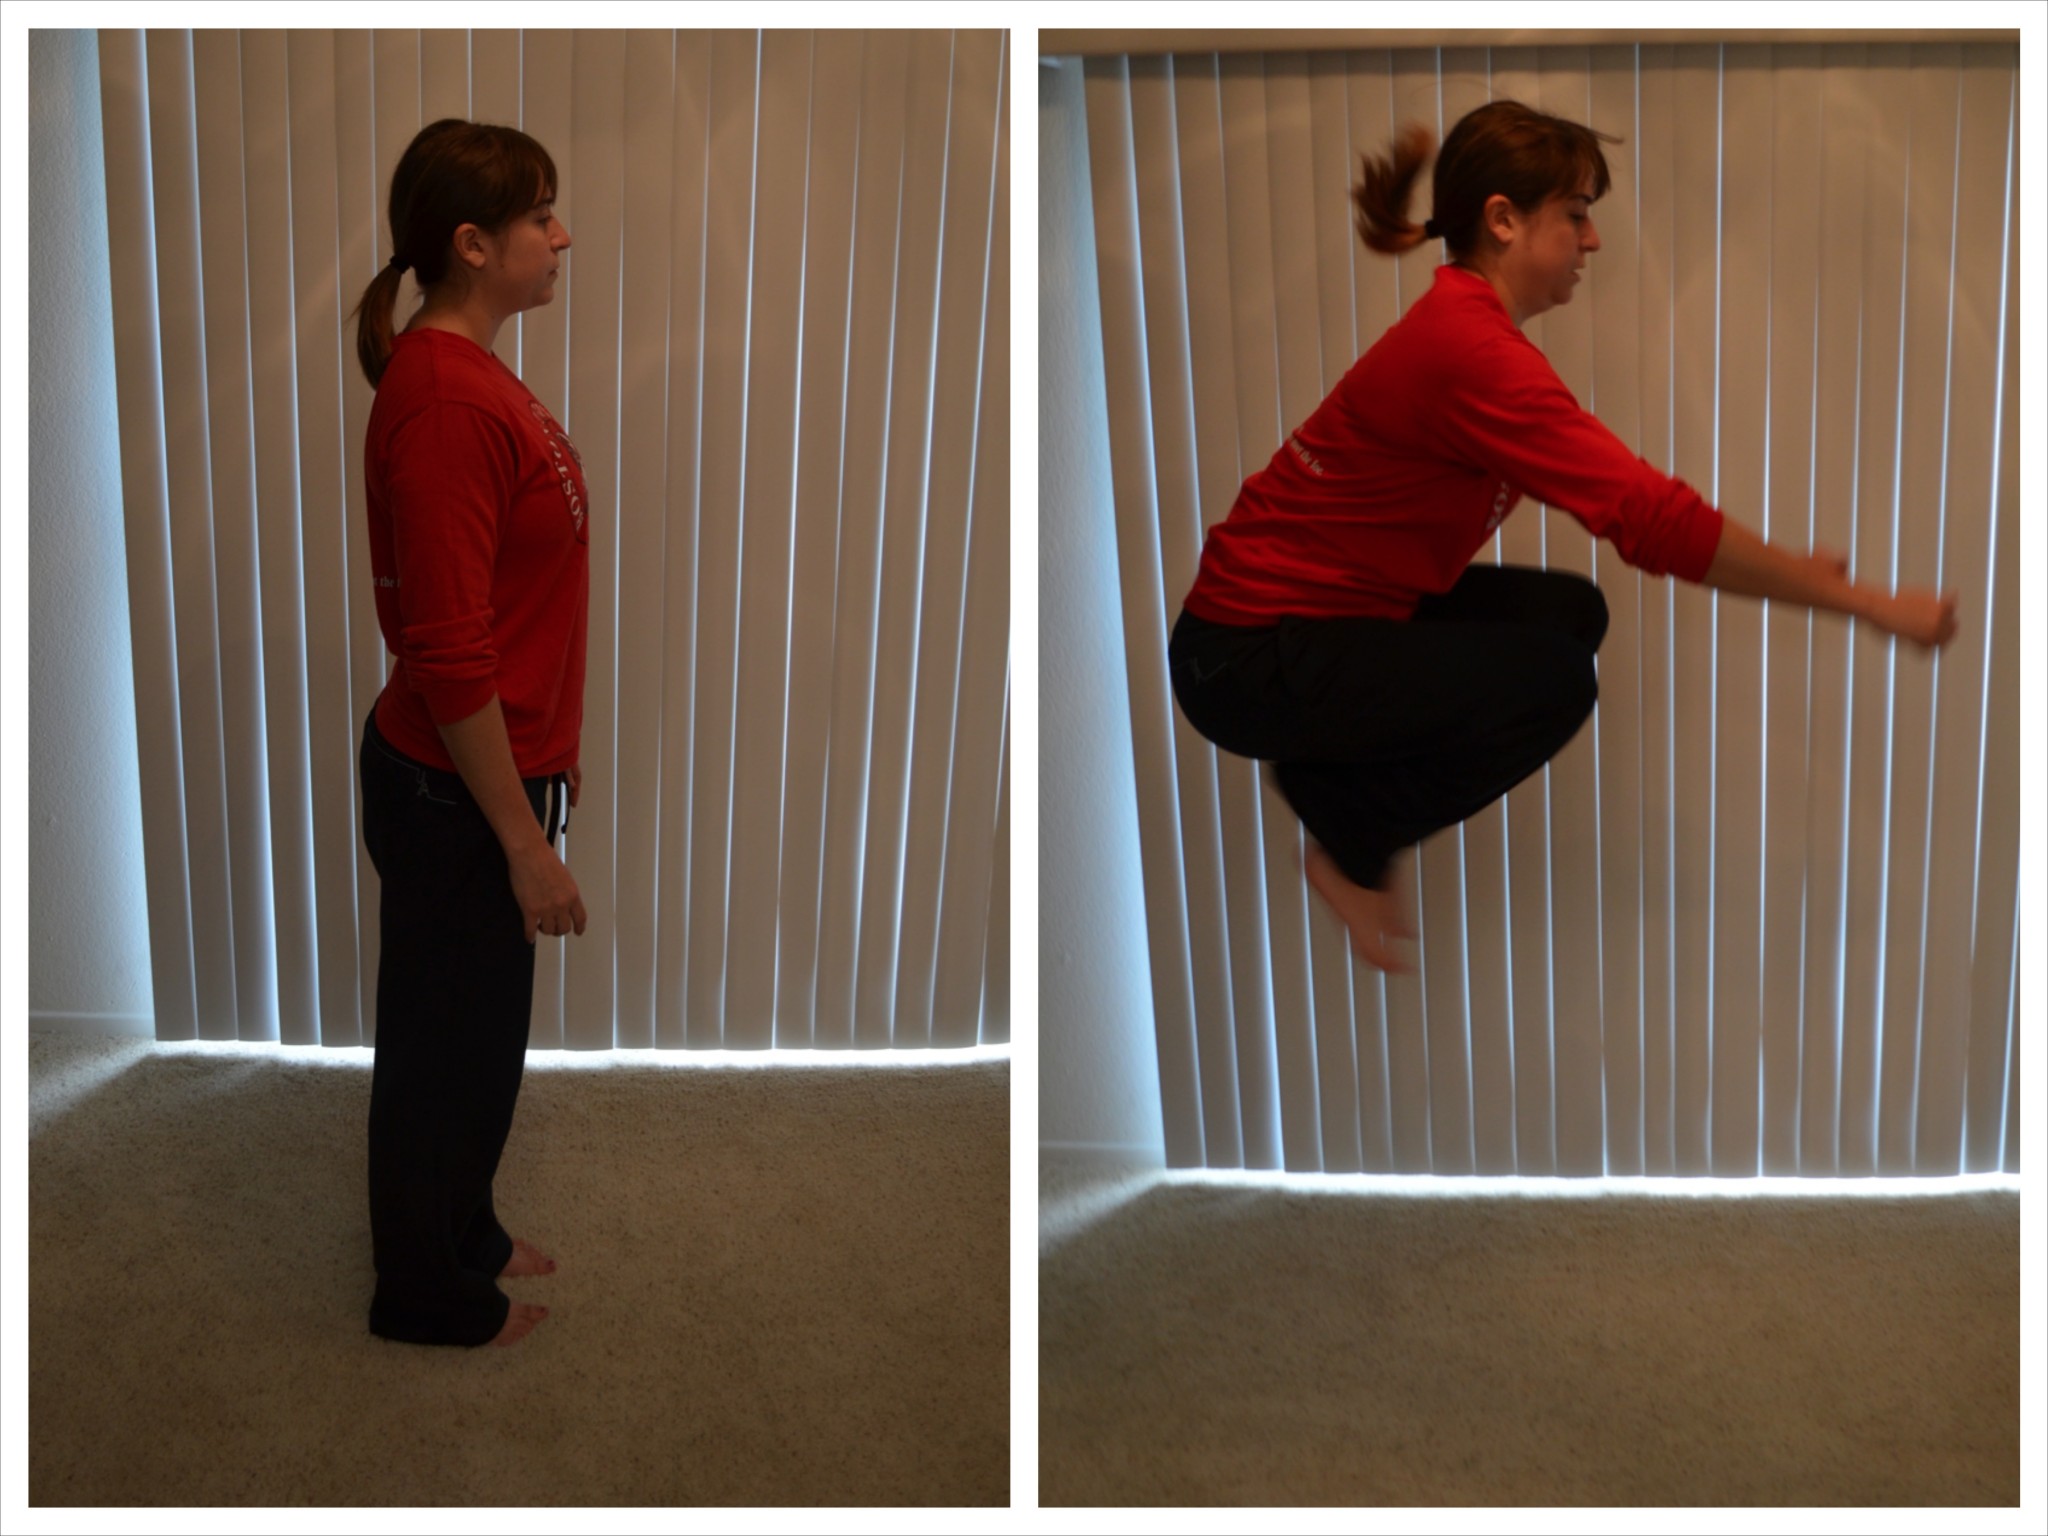
Dead Hang – Hold on to a pull up bar or suspension trainer and hang from the bar. Your hands can be facing toward you or away from you. As you hang, do not let your shoulders shrug up. Keep your chest pressed out and your core tight. Your legs should hang down toward the ground. Do not tuck your knees up toward your chest.

dead-hang
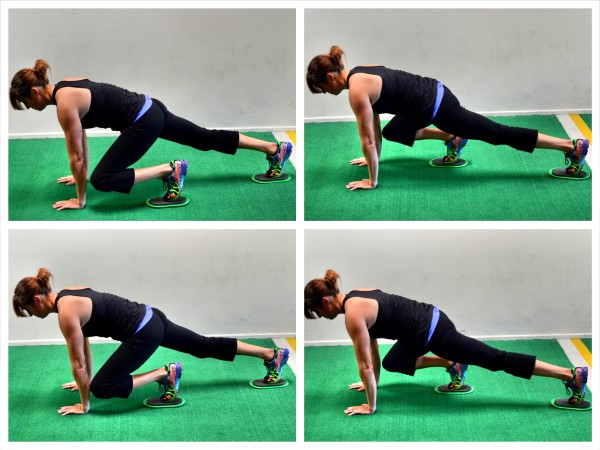
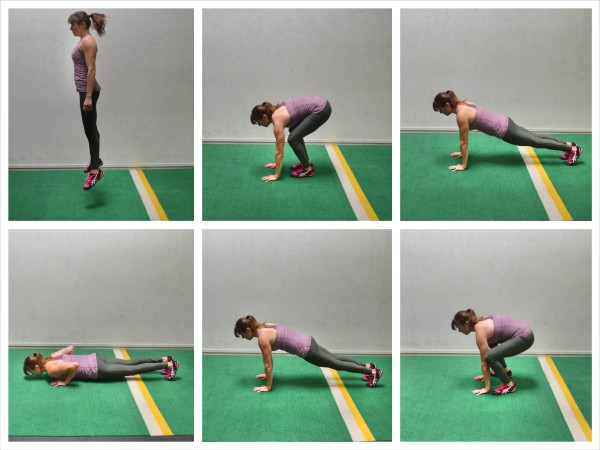
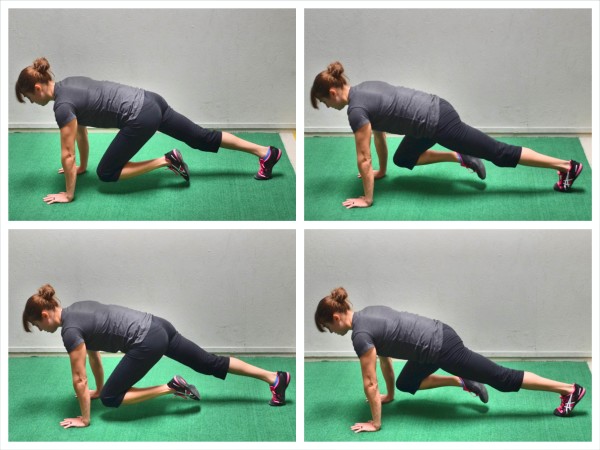
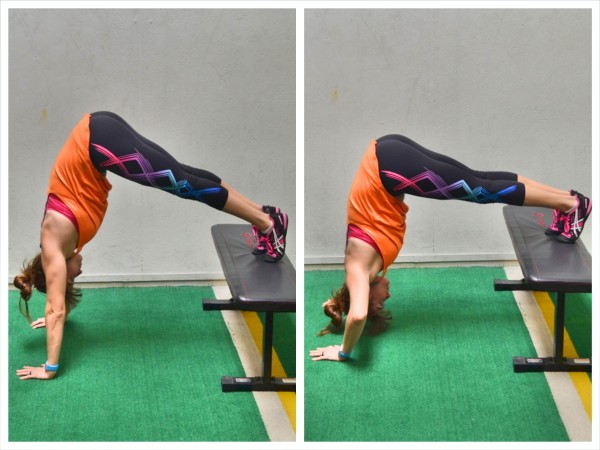
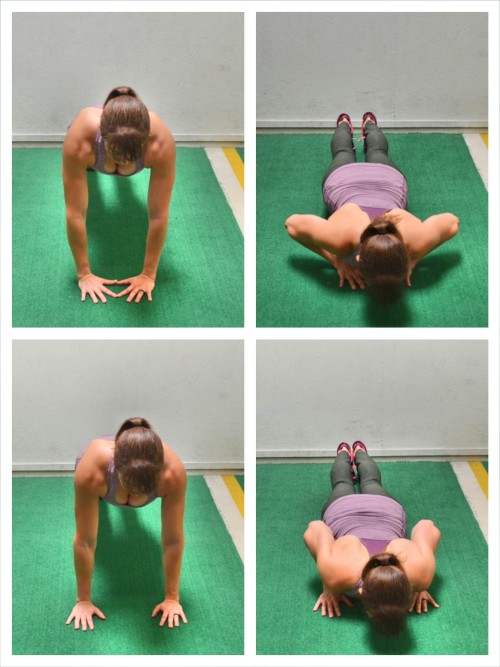
High Plank Hold – Set up on your hands and toes (advanced) or hands and knees (beginner). Feet are together and hands are underneath your shoulders. Draw your belly button into your spine and squeeze your quads, glutes and adductors. Your shoulder blades should be down and back and your shoulders shouldn’t be up by your ears. Do not let your upper back round. Keep your head in line with your spine. If you really draw your belly button in and tilt your pelvic forward, your abs should almost instantly start shaking.

high-plank
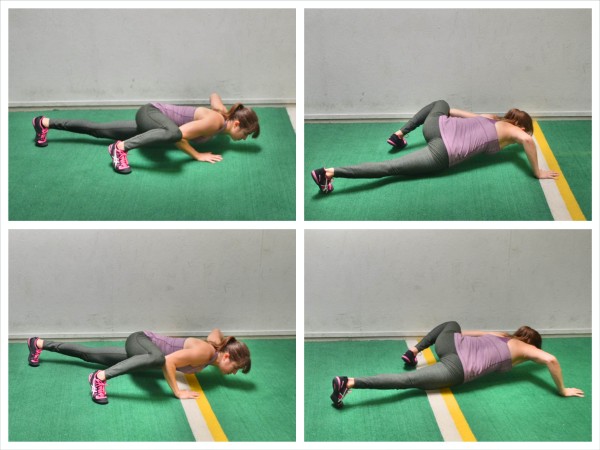
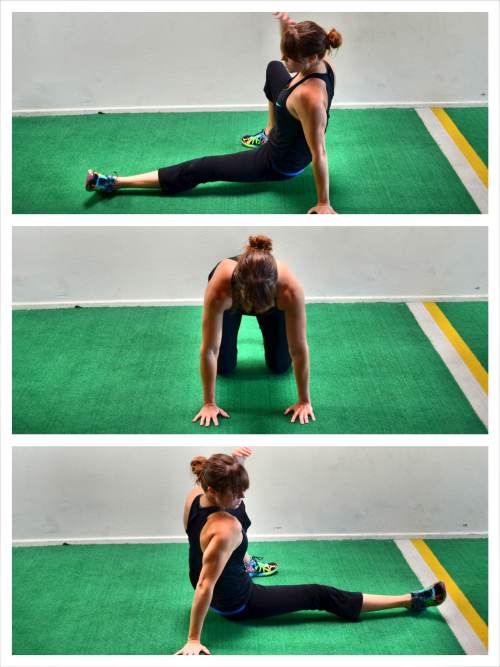
Posterior Plank – Start seated on the ground with your legs out straight and your hands on the ground behind your butt. Your finger tips should be pointing toward your butt. Drive through your hands and heels and raise your hips up off the ground toward the ceiling. Press your chest up and out as you raise your hips. Keep your legs straight as you bridge up and relax your head back.  Your body should be in a nice straight line at the top. Beginners may need to bend their legs a bit to hold the bridge at the top.

posterior plank
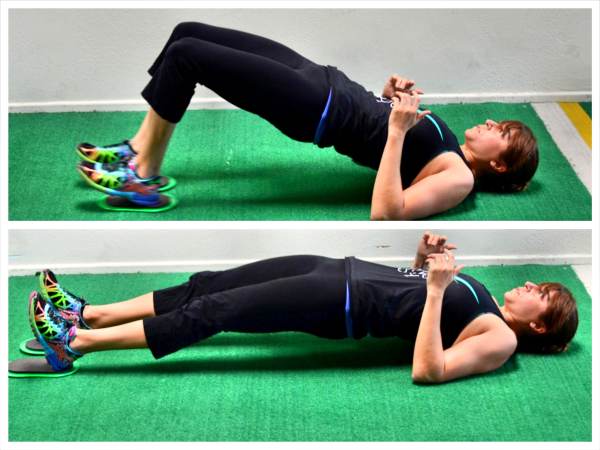
Pelvic Tilt – Lie on your back with your knees bent and your feet flat on the ground. You should almost be able to reach your hands down by your sides and touch your heels with your finger tips. Feel the space between your low back and the ground as you lie there. Then draw your belly button in toward your spine and press that space away. You should feel your low back against the ground. Beginners may need to hold there. More advanced exercisers will add in a march or even draw both knees in. To do the march, they will bring one knee at a time in toward their chest and then return their foot right back down to the ground. Their low back will never leave the ground as they march. If they can keep their core engaged while marching for 10-15 reps per side, they may then pull both knees in at one time and then lower their feet back down. Their knees will stay bent the entire time and their back will stay pressed against the ground. Complete 10-15 reps then move to the next exercise. Make sure you really focus on keeping your core tight and your back against the ground no matter which variation you do.

exercise-for-low-back-pain
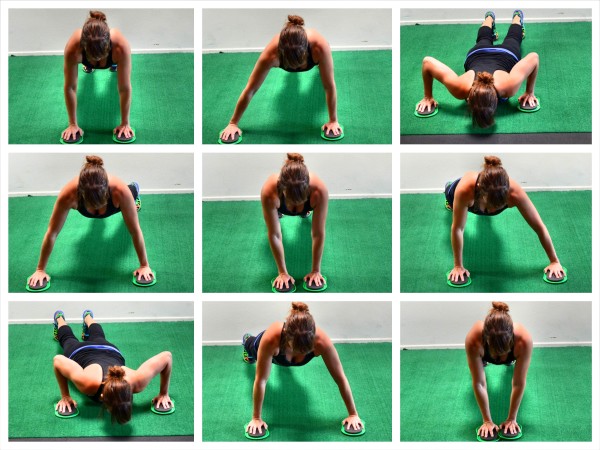
3 minute Push Up Test – For this test, you have three minutes to do as many push ups as possible. You may sit back on your heels and rest whenever you need. For the push ups to count, you must drop your chest to the ground and lock your arms out at the top. Your body must move in a nice straight line. If your form breaks down, the push up doesn’t count. It is best to have someone to count for you.
Push Ups (Pike press, staggered, close grip, wide grip, eccentric only, incline, push up with release at bottom) – Mix up the type of push ups you do for the 15 seconds and really target your weak points or challenge yourself to do new and difficult variations to become stronger. If your shoulders are weak, the pike press or staggered push up could be a great option. If your triceps are weak, try the close grip or even push up to dip. If you want to work your chest, try a wide grip push up. If your core fails and your range of motion isn’t great, try an eccentric only or push up with release. Here are some other great and fun push up variations.

diamond-push up
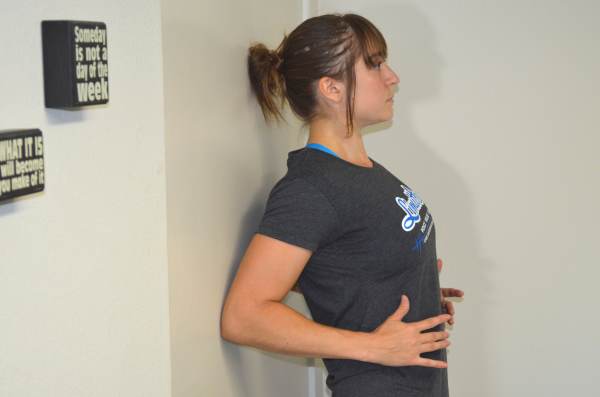
Scapular Wall Holds or Lying Bat Wing (or Inverted Row Hold) – For descriptions of all Bat Wing Variations, click here. To do the Scapular Wall Hold, stand with your back to the wall. Step a couple of inches away and bend your arms to 90 degrees. Keep your elbows in by your sides and drive them back toward the wall. Lean onto your elbows on the wall. Do not let your upper arms or back touch the wall. Relax your head back. Pinch your shoulder blades down and back while keeping your core tight as you lean into the wall. You should feel this move low between your shoulder blades. To advance the move, move your feet a bit further from the wall.

bat-wing

The Towel Cardio Workout

The Towel Cardio Workout

WARM UP
Stretch and Roll Out:
Calves
Hamstrings
Quads
Groin
Hips/Glutes
Chest/Shoulders/Traps
Back/Lats

WORKOUT

Complete 5-8 rounds of the circuit below. Rest 1-3 minutes between rounds. Try to start the next round as soon as you are recovered enough to do the same amount of work you did the round before.

CIRCUIT:
30 seconds Towel Taz
15 seconds Rest
30 seconds Lunge Run
15 seconds Rest
30 seconds Fly to Push Up
15 seconds Rest
30 seconds Mt. Climbers
15 seconds Rest
30 seconds Glute Bridge to Curl
1-3 minutes Rest

COOL DOWN
Stretch and Roll Out:
Calves
Hamstrings
Quads
Groin
Hips/Glutes
Chest/Shoulders/Traps
Back/Lats

NOTES:

Do as many reps as you can in the 30 seconds. Do not stop moving during those 30 seconds even if it means regressing the exercise. Rest as much as needed between the rounds so that you are truly ready to work.

Most of the Towel Moves are shown with sliders which can also be used if you have them.

EXERCISE DESCRIPTIONS:

Towel Taz – Grab a bath towel,moving blanket, fleece blanket or whatever you have on hand. The bigger and heavier the towel, the harder the move will be. Grab a corner of the towel in each and and start shaking the towel as powerfully and as quickly as you can up and down while moving quickly around from side to side, in a circle, forwards, backwards and every which way. Move quickly, taking only a few steps in each direction as you shake the towel. Keep your chest up and do not round your back. You can shake the towel up and down and in and out. The quicker you move, the harder the move will be.

towel-taz-full-body-cardio
Lunge Run – Place a towel under each foot and step one foot forward. Sink down into a lunge, bending both knees. Pop up out of the lunge and slide the front foot back and the other foot forward. Sink down and then pop back up and switch stances again. It is almost like you are doing split squat jumps but without the jump. Keep alternating lunges until all reps are complete.
Fly to Push Up – This can be done from the knees or the toes. Start at the top of your push up with one hand on the towel. Then slide the hand out to the side and perform a push up. After the push up, slide the hand back into the starting position. Even though this is a wider push up, don’t let your elbows flare way out by your ears. Beginners can do this without the towel and just step the hand out, do a push up and then step the hand back in. Intermediates may use the towel and slide out, do a push up and then slide back in. Advanced may put a towel on both hands and slide one out, do a push up, then slide it back in. Once they slide that hand back in, slide the other out and do a push up then slide that one back in. Keep alternating flyes until all reps are complete if you do the advanced variation. All push up to fly variations can be done from the knees or the toes.

slider-fly-to-push-up
Mt. Climbers – Set up in a high plank from your hands and toes with a towel under each foot. Bring your right knee in toward your chest, sliding your foot in. Then slide the foot back out and bring your left knee in toward your chest. Go as fast as you can, alternating knee drives. Mountain Climbers should look like you are “running” with your hands on the ground. Beginners may not be able to use the towels. They may also need to go slower or even put their hands up on a low table or bar to perform incline mountain climbers.

slider-mt.-climbers
Glute Bridge to Curl – Beginners may need to start with a single leg bridge and curl while more advanced exercisers may do the two-leg bridge and curl. A beginner may want to start with the towel under only one foot and slide out one leg at a time. To perform the two leg curl, place both feet on a towel about hip width apart. Start in the bridge position and slide your feet out. Keep your hips off the ground and your glutes engaged as you slide out. Then curl the heels back in, bringing the hips up again into a glute bridge. Do not let the hips sag toward the ground as you slide out or come back in.

two-leg-bridge-and-curl

The Badass Bodyweight Blast

The Badass Bodyweight Blast

WARM UP
Stretch and Roll Out:
Calves
Hamstrings
Quads
Groin
Hips/Glutes
Back/Lats
Chest/Shoulders
Wrist/Forearms

WORKOUT

Complete 3-5 rounds of each circuit. Rest 20 seconds between each round and up to 3 minutes between circuits.

CIRCUIT #1:
20 seconds Burpees
20 seconds Lateral Crawling
20 seconds Rest

CIRCUIT #2:
20 seconds Split Squat Jumps
20 seconds 90 Degree Squat Jumps
20 seconds Rest

CIRCUIT #3:
20 seconds T Push Up
20 seconds Sprinter Sit Up
20 seconds Rest

CIRCUIT #4:
20 seconds Circle Shuffle, Sprawl, Sit Thru
20 seconds Mountain Climbers
20 seconds Rest

COOL DOWN
Stretch and Roll Out:
Calves
Hamstrings
Quads
Groin
Hips/Glutes
Back/Lats
Chest/Shoulders
Wrist/Forearms

NOTES:

Do not stop moving during the 20 seconds of work. It is better to have to rest longer between rounds and circuits than to stop during the 20 seconds. Do a modified variation of an exercise to keep moving quickly rather than a harder variation where you need to rest during the 20 seconds you have to do work.

EXERCISE DESCRIPTIONS:

Burpees – Start standing with your feet together. Then place your hands on the ground in front of your feet. Jump your feet back so you are in the high plank position. Beginners may need to step their feet back instead of jumping them back. Advanced lifters will then do a push up, dropping their chests to the ground. If you can’t move quickly while including the push up or you can’t do a full push up, you will simply jump your feet back then jump them back in with no push up in between. If you do include the push up, once you press back up, jump your feet back up to your hands. As you stand back up, you are going to jump up off the ground. Beginners may not want to include the jump at the top. After you jump, go right back down and repeat the move.

basic-burpee
Lateral Crawling – Set up on your hands and knees with your knees under your hips and your hands under your shoulders. Then flex your feet and lift up onto your toes. Place your hands close together and your feet about shoulder-width apart. Then step your left hand to the left so your hands are apart as you step your right foot together withyour left. Then step your right hand to meet your left hand as you move your left foot to the left. Keep moving the opposite arm and leg laterally until you’ve completed your 20-50ft then crawl laterally back.

lateral-crawl
Split Squat Jumps – Step one foot backward into a lunge. Sink into a deep lunge, bending both knees as if kneeling down to the ground. Then jump up and as you jump, switch into a lunge on the other side. Sink down into the lunge on the other side once you land and then explode back up and while jumping switch back into a lunge on the first side. Beginners may need to do quick step back lunges instead of jumping to switch. The lower you go in the lunge and the quicker you jump and switch, the harder the move will be.

lunge-jumps
90 Degree Squat Jumps – One rep of the 90 Degree Rotational Squat Jumps is actually four squat jumps. You will start facing forward with your feet about hip-width to shoulder-width apart. Squat down and then as you jump up, rotate to the right about 90 degrees. As you land go right back into a squat to load for the next jump. Do not land with your legs straight even if you are a beginner. Beginners may not be able to go right back into the squat, which is ok. Everyone will squat though before jumping back center. When you land back center, squat down and jump 90 degrees to the left. Then load again and jump back to the center. That is one rep.  Repeat by jumping back to the right.

rotational squat jumps
T Push Up – Set up in a regular push up position from your hands and knees (beginner) or hands and toes (advanced). Your hands should be outside your shoulders and your legs should be together. Your body should be in a nice straight line. Squeeze your glutes and draw your belly button in toward your spine. Do not let your hips sag or go up toward the ceiling and don’t tuck your head. Once at the top of a push up, do a push up and then when you push back up to the top, rotate open balancing on one hand as if you are doing a side plank. Hold and then rotate back to a push up position. Do another push up and rotate to the other side. Keep your body in a nice straight line as you do a push up and make sure to really rotate open into a side plank.

side-plank-push-up
Sprinter Sit Up – Lie on your back and raise both legs straight out off the ground. Beginners may keep one leg on the ground. Crunch your upper body up so that you are sitting on your sit bones and then bring one knee into your chest. Lie back down and straighten both legs back out. Then bring the other knee into the chest as you crunch back up. Keep alternating, trying to keep both legs off the ground when you straighten back out. Do not let your chest cave when you crunch up. Keep your back flat as you crunch up and bring one knee in.

sprinter-sit-up
Circle Shuffle, Sprawl, Sit Thru – Place a cone or some object to circle around. Bend your knees with your feet about shoulder-width apart. Then move laterally, shuffling around the cone. Make full circles, half circles and even quarter circles, moving both ways. Mix it up. Circle around the cone both ways. While circling mix in a sprawl and sit thru occasionally. So while circling, drop down to the ground in the top of a crawl or bull dog hold. To do the sit thru, flex your feet and press up onto your hands and toes with your hands under your shoulders and your knees under your hips. You will then rotate open toward the right and bring your left leg under and through toward where your right hand is. As you bring your left leg forward and through, lift your right hand. You should be almost sitting with your left hand down to support you. Then bring the left leg back through so you are back in the starting position. Next rotate to the left and kick your right leg through and forward as you lift your left hand. Once you’ve done a sit thru to each side, stand back up and begin shuffling again.

circle shuffle with sit thru
Mountain Climbers – Set up in a high plank from your hands and toes. Bring your right knee in toward your chest. Then drive the foot back out and bring your left knee in toward your chest. As you bring each knee in, you will just lightly tap the toe of that leg on the ground. Do not put weight on that front leg. Go as fast as you can, alternating knee drives. Mountain Climbers should look like you are “running” with your hands on the ground. Beginners may need to go slowly to start or even put their hands up on a low table or bar to perform incline mountain climbers. Advanced exercisers will want to “run” as quickly as possible or even add sliders or a towel under their feet.

mountain-climbers

The Badass Bodyweight Workout

The Badass Bodyweight Workout

WARM UP
Stretch and Roll Out:
Calves
Hamstrings
Quads
Groin
Hips/Glutes
Back/Lats
Chest/Shoulders
Wrist/Forearms

WORKOUT

Complete 3-5 rounds of each circuit. Rest 30 seconds to 1 minute between rounds.

CIRCUIT #1:
10-15 reps each side Single Leg Squats
30 sec – 1 min Handstands
15-20 reps Tuck Jumps
30 sec – 1 min Scapular Hold
5-10 reps each side Sit Thrus

CONDITIONING:

Complete 5-10 rounds of conditioning. Crawl for 30 seconds then rest for 30 seconds to 1 minute.

Crawling (Bear, Gorilla, Alligator, Crab…Mix it up!)

COOL DOWN
Stretch and Roll Out:
Calves
Hamstrings
Quads
Groin
Hips/Glutes
Back/Lats
Chest/Shoulders
Wrist/Forearms

NOTES:

These are some more challenging bodyweight exercises that will also help you develop full body strength and stability. It will make you into a “badass” so that you can lift more weight and move better and faster.

EXERCISE DESCRIPTIONS:

Single Leg Squats – Choose a variation of the single leg squat that is right for you. Beginners may use a box step while more advanced lifters may use a doorway, TRX or XT straps for balance. If you can do a full pistol squat or use a plate weight to counter balance you, do that variation. Choose as hard a variation as you can do. To perform the basic single leg squat to bench, you will start by standing on one leg. Hold the other leg straight out in front of you. Lower yourself down until you are sitting on the box or table. Then driving off the heel on the ground, stand back up. Do not lean way forward or touch your raised foot to the ground. If you use a box, the more you allow yourself to sit down, the easier the move will be. The more you just lightly touch the box and come right back up, the harder the move will be. Also the lower the box you use or the lower down you go on any variation, the harder the move will be.

single-leg-squat
Handstands – Beginners will want to do a modified handstand, almost like a downward dog. Set up on your hands and knees. Then push your butt up in the air and drive your chest back toward your knees. Try to get your back as flat as possible, driving your butt up. Do not worry if your legs stay straight. The most important part is pressing your chest toward your knees so your back stays flat.  To advance, you can put your feet up on a table or chair. However, the hardest variation is walking your feet up the wall and walking your hands back toward the wall. The closer and more parallel to the wall you are the harder the hold. You can also do hip touches (lifting one hand at a time to touch your hips) or walk laterally along the wall to make the hold harder. Make sure that on each variation, you draw your shoulder blades down and back and draw your belly button in toward your spine. Squeeze your glutes also to keep your low back safe.

handstand holds
Tuck Jumps – Stand with your feet together. As you jump up, tuck your knees in toward your chest. Then shoot your legs back out to land softly on the ground. You are not squatting with this jump, simply tucking your knees.

Tuck Jump

Scapular Hold – Stand with your back to the wall. Step a couple of inches away and bend your arms to 90 degrees. Keep your elbows in by your sides and drive them back toward the wall. Lean onto your elbows on the wall. Do not let your upper arms or back touch the wall. Relax your head back. Pinch your shoulder blades down and back while keeping your core tight as you lean into the wall. You should feel this move low between your shoulder blades. To advance the move, move your feet a bit further from the wall.

bat-wing
Sit Thrus – Start on your hands and knees. Flex your feet and press up onto your hands and toes with your hands under your shoulders and your knees under your hips. You will then rotate open toward the right and bring your left leg under and through toward where your right hand is. As you bring your left leg forward and through, lift your right hand. You should be almost sitting with your left hand down to support you. Then bring the left leg back through so you are back in the starting position. Next rotate to the left and kick your right leg through and forward as you lift your left hand. Move as quickly as you can back and forth. Beginners may need to move slowly or even start in a more spread out position with their legs out straight.

sit-thrus

The Towel Glute and Hamstring Workout

The Towel Glute and Hamstring Workout

WARM UP
Stretch and Roll Out:
Calves
Hamstrings
Quads
Groin
Hips/Glutes
Low Back

WORKOUT

Complete 3-5 rounds of each circuit. Rest no more than 60 seconds between rounds and no more than 2 minutes between circuits.

CIRCUIT #1:
10-15 reps each side Side Lunge
15-20 reps Self-Resisted Hamstring Curl

CIRCUIT #2:
10-15 reps each side Curtsy Lunge
10-15 reps Glute Bridge with Curl

COOL DOWN
Stretch and Roll Out:
Calves
Hamstrings
Quads
Groin
Hips/Glutes
Low Back

NOTES:

Beginners may need to do the moves without the towels as they fatigue. Also, sliders (Valslides) may be used instead if you have a carpet.

EXERCISE DESCRIPTIONS:

Side Lunge – Please be careful the first time you try this lunge as it is easy to go too far out and not be able to get back up since there is no traction. To do this move, place the towel under one foot. Slide that foot out to the side, sitting back into the lunge. Then to stand back up, drive through the foot not on the towel. Do not allow yourself to go forward. Make sure to really sit back and then up drive off the heel. Keep your chest up and back flat as you lunge.

towel-side-lunges
Self-Resisted Hamstring Curl – Lie on your stomach. Bend your knees to 90 degrees with your feet up toward the ceiling. Place a towel between your flexed feet and then reach behind your back and hold the towel with one or both hands. Pull the towel toward your back, pulling your feet in toward your butt. Resisted the pull with your feet. Once you pull your feet in to your butt, start to pull back out with your feet. Resist your feet going back to the start by pulling on the towel with your hands. You should feel your hamstrings working to resist the pull of your arms. Move slowly to make your hamstrings really work.
Curtsy Lunge – Stand with your feet together. Place the towel under one foot and slide that foot back and across behind the other foot. Sink into as deep a lunge as you can handle. Make sure to really sit back on that front heel as you reach the other foot back and behind. Keep your chest up. You should feel this in the outside of your front glute. Then driving through that front heel, come back to standing. Pull the back foot forward and across so you are standing with both feet together.
Glute Bridge with Curl – Beginners may need to start with a single leg bridge and curl while more advanced exercisers may do the two-leg bridge and curl. A beginner may want to start with the towel under only one foot and slide out one leg at a time. To perform the two leg curl, place both feet on a towel about hip width apart. Start in the bridge position and slide your feet out. Keep your hips off the ground and your glutes engaged as you slide out. Then curl the heels back in, bringing the hips up again into a glute bridge. Do not let the hips sag toward the ground as you slide out or come back in.

two-leg-bridge-and-curl