Many of us spend far too much time hunched over our technology.
And as a result…
Well…
Our posture sucks!
And this “desk job,” “too much texting” posture can lead to aches and pains!
It can also create mobility restrictions, compensations and imbalances that result in INJURIES when we workout!
For example, ever feel your lower back or neck get achy after you say….do an overhead shoulder press?
Well because you sit rounded forward all day, chances are your thoracic extension and shoulder mobility are limited. You probably also have that forward head posture all too many of us get.
So, as a result, when you try to press overhead during your workout, you compensate to replicate the movement. Basically, your body takes the path of least resistance.
When an area isn’t as mobile as it should be, like our thoracic spine (mid and upper back) and shoulders, we seek out mobility from other areas, like our lower backs.
What does that mean?
Your lower back ends up feeling achy because you’re arching it to press the weight overhead because you’re lacking proper thoracic extension!
That is why we need to take steps to relax those tight muscles, which means starting our mobility sessions with FOAM ROLLING!
We want to foam roll tight and overactive muscles, stretch tight and shortened muscles then activate underactive ones!
Click here to learn more about this full 3-part RStoration process I’ve outlined above!
Below are 10 Foam Rolling Moves Everyone With A Desk Job Should Do.
While foam rolling alone won’t complete reverse our bad posture, it is the best place to start. It can provide some temporary relief AND allow us to get better results from our stretching and especially our ACTIVATION!
So before I dive into the 10 moves you want to do to reverse your desk job posture, I want to explain a bit more about when to foam roll, how foam rolling works and why it’s that first step in the prehab process!
When Should You Foam Roll?
Even though foam rolling doesn’t seem like it would “warm up” your body, the point of a warm up is not only to get your blood pumping but to prime your body to move well.
So while foam rolling can be used post workout and as part of your recovery routine, it should be that first step in your warm up!
Foam rolling has a short term positive effect on your range of motion. So it is that first piece to improving your range of motion AND relaxing overactive muscles so you are able to get the correct muscles activated and working.
Now you may be thinking, “But if foam rolling RELAXES muscles, won’t it have a negative impact on your performance?”
The answer is NO!
The reason it is done first before stretching or activation is because foam rolling can improve the tissue’s ability to lengthen during stretching, which allows you to use stretching to not improve your flexibility but also your mobility.
Also, you aren’t focusing on those underactive muscles or the muscles you want to fire optimally during your workout. You’re actually trying to start by rolling muscles that tend to want to work when they SHOULDN’T.
By relaxing overactive muscles, you allow your body to more easily establish the mind-body connection with those underactive muscles so they are recruited properly during our workouts.
For instance, if you tend to always feel your hamstrings working during glute bridges, you may roll your hamstrings to help prevent them from compensating so you can more easily get your glutes working!
How Does Foam Rolling Work?
To better understand why foam rolling, and the “relaxation” it provides, is so key PRIOR to your workout, you need to understand the basics of how foam rolling works.
Foam rolling works through autogenic inhibition or very simply put, the muscle relaxing itself because of the pressure applied by a trigger point tool.
When you apply and sustain pressure to a trigger point with a foam roller, you can cause the Golgi Tendon Organs to “turn off” muscle spindle activity, allowing the muscle fibers to unknot, stretch and realign.
When you reduce the soft-tissue tension, you can decrease pain, restore muscles to their proper length-tension relationships and improve their function.
AKA you help them contract better so you can perform better!
What Are The Benefits Of Foam Rolling?
A quick list of the benefits…
- Muscle relaxation
- Corrects muscle imbalances (by relaxing tight and overactive muscles)
- Improves joint range of motion
- Maintains optimal length-tension relationships of muscles
- Increases extensibility (the ability to be stretched) of musculotendinous junction
- Improves neuromuscular efficiency (aka the mind-body connection)
Trigger points can restrict or alter joint range of motion which can result in a change of neural feedback to the central nervous system.
This can cause our neuromuscular system to become less efficient, which can lead to premature fatigue, chronic pain and injury and less efficient performance over time.
To sum it all up – You want to use foam rolling before to prime your body to work correctly so you can get the most out of your workout and lower your risk for injury!
How To Use Foam Rolling:
When you use foam rolling as part of your warm up, you want to focus on any tight muscles that may alter the movement patterns you want to perform or inhibit the correct muscles from working.
While you may foam roll at other times, if you’re doing a leg workout, you want to focus on the tight muscles that may affect your workout. Rolling out your chest, which may be tight from sitting, may be done at another time if you’re short on time.
You always want to make sure your priority is addressing muscles that will be used during your workout or that may affect the movements you are going to perform.
Make sure to address commonly overactive muscles caused by sitting or hunching during the day OR, if you don’t know for sure what is tight, even do a little “search and destroy” mission at some point then focus on the specific areas of tightness you find.
Once you know what muscles to focus on, to relax those trigger points, you will want to hold on those points and, as you hold, tense and relax the muscle and breathe.
Often we want to roll quickly back and forth over an area, but if we want to help the muscle relax itself, we need to hold on that trigger point. Hold and breathe for up to 30 seconds then move on.
You want make sure you’ve selected a trigger point tool that applies pressure and digs in, but that allows you to actively relax.
If you can’t relax because of the pressure, you will continue to tense against it and that won’t help you release the “knot” or relax your central nervous system.
The benefit comes from being able to relax and reduce the muscle tension. So while harder may dig in more, that is only beneficial if you can relax as you apply pressure!
Spend just a few minutes on those key muscles prior to your workout.
After foam rolling, you will then want to use dynamic stretches to improve your range of motion, warm up your body and help maintain the mobility and flexibility you’ve started creating through foam rolling.
10 Foam Rolling Moves Everyone With A Desk Job Should Do:
1. Calves/Peroneal Foam Rolling – Because most of us sit all day, or…ahem…even wear high heels that cause our ankles to be in plantar flexion for hours at a time, our calves can become tight. This tightness can lead to ankle mobility restrictions that creates compensations and injuries even further up our body.
Ever have an ankle injury even 10 years ago and now have a HIP issue? They may be connected – I call it the ankle-butt connection!
Plus, limited ankle mobility can affect how low we can squat in our workouts (yes, it may be tight calves limiting your ability to get lower in your squats!).
To roll out your calf, place one calf over the foam roller, or on top of a ball on a block if you want to apply more pressure, with the roller below your knee in the “meaty” part of your calf.
Cross the other leg on top of the leg on the foam roller or ball to apply more pressure and focus on each side individually.
Rock right to left or side-to-side a couple of times (very SMALL rocks as you hold on a spot) and even circle you foot as you relax and apply pressure. Hold here then move the roller to hold on another tight spot on your calf. You can work toward your lateral or medial calf to find and relax the tightest spots!
Don’t spend any time on areas that aren’t tight. If you find a super tight spot, make 10 circles with your foot and even flex and relax your calf (flexing and dropping your foot) 5 times before you move to the next spot.

To roll out your peroneals or the sides of your lower legs, take a ball or roller and place it on the ground with the side of your lower leg on top. You’ll bend your knee in front of you to relax the outside of your lower leg down onto the ball or roller.
Press down on your lower leg with your hand to apply more pressure so that the ball or roller digs in. Start with the roller/ball right below your knee. You can work down toward your ankle, but focus on the meat of the muscle.
Hold on any tight spots and even move your leg to make circles on the ball. You can also rock a bit forward (toward your shin) or backward (toward you calf) to hit different angles.

2. Hamstring Foam Rolling – Our hamstrings are a muscle group that often benefit from rolling because they “feel” tight even though they aren’t necessarily shortened and in need of stretching. (If you’re stretching your hamstrings a ton, here’s why you may want to STOP stretching your hamstrings…)
Foam rolling our hamstrings, especially before glute activation, can be super helpful if we struggle to activate our glutes and we tend to feel our hamstrings working instead!
To roll out your hamstrings, it is best to use a roller on the ground or ball up on an elevated surface. The ball is honestly the best way to really apply the pressure you need.

Rolling out on the ground doesn’t give you enough leverage. You want to sit on something that allows you to place all of your bodyweight down into the ball ideally.
Place the ball or roller right below your butt on one leg. Rock side-to-side on the roller. If you find a tight spot, you can then lift the leg up straight in front of you and relax it back down.
If you are sitting on something, you may find you have to manual adjust the ball instead of letting it roll up or down on your leg. Move the ball down your hamstring and repeat, rocking side to side and lifting and lowering your leg.

Make sure to spend extra time on tight spots. You don’t need to waste times on areas that aren’t tight.
I highly recommend a small hard ball for this or a spikey roller as it helps you really dig in.
3. Hip Foam Rolling (TFL and Rectus Femoris Foam Rolling) – When you sit all day, your hip flexors are in constant flexion – they are constantly shortened. When our hips become “locked up,” our glutes generally don’t activate as effectively or efficiently as they should. This can lead to lower back, hip and knee pain.
Two key hip flexor muscles to roll out, both easier than the PSOAS which gets so much “love,” are the TFL and rectus femoris.
The TFL can even impact your lower leg and ANKLE mobility through your IT Band, creating tibial external rotation!
And the rectus femoris is the only quad muscle to cross both the hip AND the knee so tightness of this muscle can lead to pain at either joint!
That is why you need to roll out your hips!
To roll out your TFL, it is best to use a ball as it will dig in more than the roller.
Place the ball on the ground, right at the top and outside of the front of your hip. Think about pushing the ball almost into the hip socket.

Hold here and even lift and lower that leg to tense and relax the muscle. You can prop yourself up on your arm or relax fully over the ball.
You can also move the ball slightly down into your thigh or even back to hit any trigger points in your glute medius.
To roll out your rectus femoris, you can use a roller and even hit your entire quad or you can focus just on this muscle with a ball.

Place a ball on the ground and lie face down supported on your forearms with the ball right in the middle of your thigh.
Hold there for a second or two, flexing and relaxing your quad to help the ball dig in more if there are any knots. Then move the ball slightly up or down the middle of your thigh. You can work up toward your hip or down toward your knee, focusing on that muscle in the middle of the front of your thigh.
4. Glute/Piriformis Foam Rolling – Piriformis issues are all too common. So in order to prevent piriformis issues, sciatica, lower back and hip pain, you want to roll out your butt!
Just be careful if you do have sciatic issues that you don’t compress the nerve or that you avoid rolling out if you find it causes irritation of that nerve!
To roll out your piriformis, use a ball. The harder the ball, the better you will be able to dig in. If you only have a roller, crossing one ankle over the other knee (as if stretching your glute) can help you better apply pressure to relax the muscle.
Using a ball, place the ball on the ground and sit on it with your hand or forearm behind you to help support you.
You want to start the ball where the top of your jean pocket would be on your butt.

Roll the ball around, searching for any tight spots. Then hold when you find one. Holding on that spot, lift and lower the leg up and down to dig into the spot more.
After you do a few leg lifts, bring the knee in toward the chest then straighten it back out a few times.
Then move onto the next spot.
You can also relax fully back instead of holding yourself up.
5. Lower Back Foam Rolling – Our lower back can become overworked. This foam rolling move can provide some immediate relief!
The best way to roll out your back is using a peanut, which is really two balls taped together. However, you can also use a single ball if that is all you have.
To roll out your lower back using a peanut, place the peanut on the ground so that a ball will be on each side of your spine.

Lie back on the ground with the peanut starting above your butt and tuck one knee in at a time toward your chest. You can alternate marches or even simply hold here.
Then move the balls up higher, making your way all the way up your back.
This tool is even a great way to work on your thoracic extension.
As you reach your mid to upper back, start performing a crunch with your upper body instead of tucking your knees to your chest.

6. Bicep Foam Rolling – Because we spend so much time at our computer, often our elbows are flexed for hours at a time, which can cause our biceps to become tight.
And then we often even go into our workouts, and end up doing back exercises we feel more in our arms! (This is partly due to our need to work on our back activation and scapular mobility! If you do find you only feel your arms during back exercises, this post will help – HELP! I Only Feel My Biceps During Back Exercises!)
All of this can lead to bicep tightness, which can cause elbow AND shoulder issues!

To roll out your biceps, you will place a ball or roller up on a table or desk like you did to roll out your triceps. You will then rotate your chest toward the ground and place your bicep down on the roller or ball right above the inside of your elbow.
Rock slightly side to side to dig out your bicep. Hold if you find an especially tight spot and even flex and relax your bicep by flexing and extending your elbow if your desk or table allows.
Then move the roller higher up your bicep toward your shoulder. Again rock side to side and hold on any tight spots.
If you don’t have a table or desk you can use, you can also do this against a wall although you may not be able to flex and extend your arm then.
7. Chest Foam Rolling – That rounded posture we all tend to get? Tight pecs are part of the problem! I know it’s often our neck and back that FEEL tight, but our pecs can be shortened and in need of foam rolling if we want to improve our shoulder mobility!
To roll out your chest, you can use a larger foam ball against the ground or a smaller ball against the wall (You can also use a smaller ball against the ground just make sure to elevate it on some books especially if you have carpet!)
If you use the ball against the wall or even on the ground, place the ball right in the side of your chest by your shoulder joint. Do not place it on your shoulder joint.

Then reach your hand up overhead and back down toward your feet. If you are using the ball against a wall in a doorway, reach your hand out in front of you, bringing it up overhead and then down toward the ground.
Roll the ball from your shoulder along the bottom of your collarbone to dig out your entire chest. Hold on any tight spots.
8. Lat Foam Rolling – Rounded shoulders? Guess what?! Tight lats are part of the problem! If you want to improve your shoulder mobility and prevent neck, shoulder and upper back aches and pains, you need to roll your lats!
To roll out your lats a roller is best although you can use a foam ball or even a tennis ball.
Start by lying on your side with a roller under one armpit. Extend the arm on the side with the roller up above the roller. Then rock forward and backward on the roller, rotating your chest toward the ground and then up toward the ceiling as you roll on the roller so it hits toward your ribs and then toward your back.

Hold on any tight spots you find then move it lower down the side of your back. Hold on any tight spots as you go and make sure to rock forward and backward as you make your way down your side.
As you work down your side, you may want to rotate slightly more toward your back. Work all the way from your armpit to about the end of your rib cage.
Be careful when rolling lower down your back into your low back. You do not want to arch over the roller and hyperextend your low back.
9. Upper Back Foam Rolling – Whether you have tight upper traps, an overactive levator scapulae or just annoying knots behind your shoulder blades, this move gets them all! It can help you prevent neck, shoulder and upper back aches and pains!

To roll out your upper back, traps and shoulders with a ball, stand with your back to a wall and place the ball to the side of the base of your neck. Press the ball into the wall and roll it down along your shoulder blade.
Hold on any tight spots. You may even want to pull your arm across your chest as you dig out under the shoulder blade.
You can also use the ball against the wall to dig out right at the top of your armpit behind your shoulder and all along your upper back from the base of your neck to the bottom of your shoulder blade.
If you want to apply more pressure with the ball, you can use a harder ball or use the ball against the ground instead of the wall.
10. Forearm Foam Rolling – An often neglected area when it comes to foam rolling, but an important one to target since so many of us have wrist and elbow problems because our flexor muscles in our forearms are tight and overactive.

To roll out your forearm you can use almost any tool (ball or roller). Place the ball or roller down on a hard surface such as a table or desk. Place your forearm on top of the roller. You will want to hit both sides of your forearm focusing right under your elbow on both sides.
Press your forearm down into the ball or roller with your other hand.
Hold on any tight spots and even circle your hand or flex and extend your wrist as you hold to tense and relax your forearm.
BONUS MOVES:
Feet – All too often our feet get sore and achy from wearing shoes that don’t properly support us. To alleviate foot pain (this is great if you’ve had plantar fasciitis), roll out the bottom of your foot with a tennis ball or even a golf ball. Just stand on top of the ball and roll it down the length of your foot.

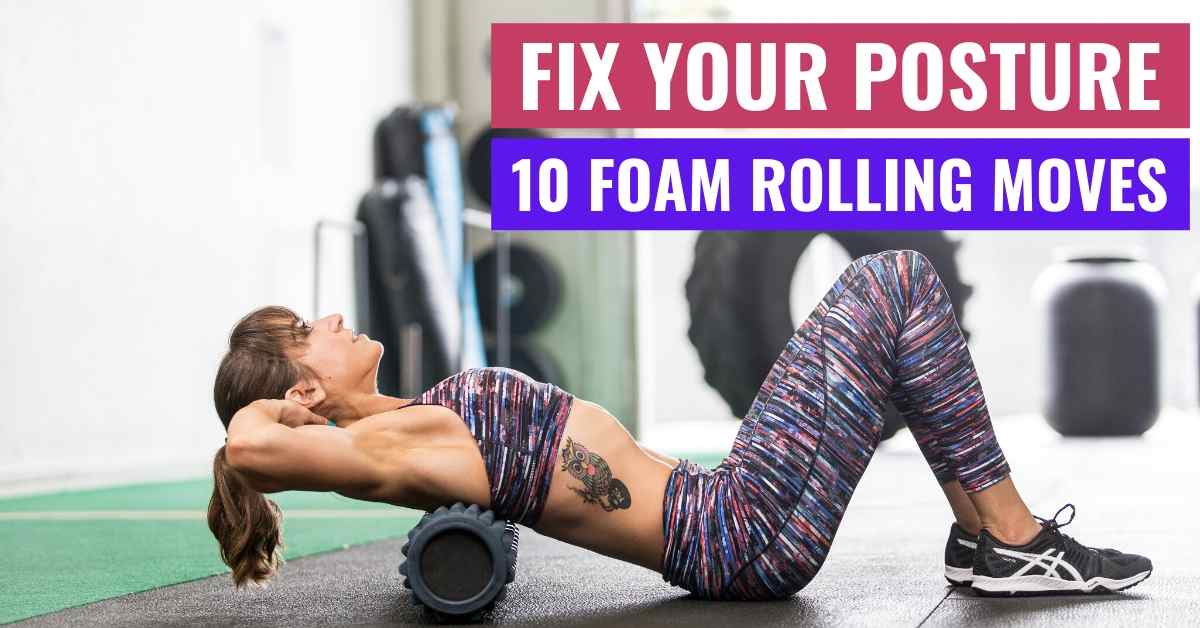
Thoracic Spine – Because we sit rounded forward all day, many of us lack proper thoracic extension as I mentioned earlier. You can use the peanut or even a roller to work on this and improve your extension!
To work on your Thoracic Extension using a roller, place the roller on the ground and lie back over the roller with the roller at about your mid-back. You do not want to do this move with the roller in your low back or you could hyperextend your low back.

Cross your hands over your chest and, keeping your butt on the ground, extend your back over the roller. As you extend back over the roller, reach your hands overhead and relax your head and neck. Try to touch the backs of your hands to the ground behind you without lifting up your butt or putting the move all in your low back. Focus on extending your mid and upper back over the roller.
Sit back up and cross your hands back over your chest. You can then repeat, relaxing and extending back over as you relax your arms back overhead.
Perform the extension a few times, especially if the area feels tight, and then move the roller higher up on your back and, again with your butt on the ground, extend back over the roller. Hold for a second or two as you extend so that you can breathe and relax more over the roller.
Work all the way up your mid to upper back. Do not do this on your lower back.
You can use a Rumble Roller, so a roller with “nobs” instead of a flat roller, if you want to dig in more.


Great Article and very helpful