The Get Rid Of Knee Pain Workout

The Get Rid Of Knee Pain Workout

WARM UP
Stretch and Roll Out:
Feet
Shins
Calves
IT Bands
Hips/Glutes
Groin
Quads
Hamstrings

  ACTIVATION
Complete 2 rounds of the circuit below. Hold each pose for 30-45 seconds.

CIRCUIT:
Warrior III
Bull Dog
Side Planks
Glute Bridge with Squeeze Hold

WORKOUT
Complete 4-6 rounds of the circuit below. Rest as needed between exercises, but try to move quickly. Rest up to 1 minute between rounds.

CIRCUIT:
10-15 reps per side Anterior Reach Lunge
10-15 reps per side Step Downs
15-20 reps Bent-Knee Reverse Hypers

FINISHER
Perform 4-6 rounds of a Wall Sit. Hold the Wall Sit for 30 seconds – 1 minute.

EXERCISE:
30 seconds – 1 minute Wall Sit
30 seconds – 1 minute Rest

COOL DOWN
Stretch and Roll Out:
Feet
Shins
Calves
IT Bands
Hips/Glutes
Groin
Quads
Hamstrings

  NOTES:
If you have access to weights, you can use them for the Anterior Reach Lunge or just do a few more reps. Also, you can use a step in a staircase if you don’t have a box or bench for Step Downs.

EXERCISE DESCRIPTIONS: For all of the moves included in this post, see our Dealing with Knee Pain post.

Strengthen Your Foundation Workout

Strengthen Your Foundation Workout

WARM UP
Stretch and Roll Out:
Foot
Calves/Shins
Hamstrings
Quads
Groin
Hips/Glutes
Back/Lats

ACTIVATION:

Complete 2 rounds of the following circuit. Hold each move for 30 seconds.

CIRCUIT:
30 seconds Warrior III
30 seconds Scapular Wall Hold
30 seconds Glute Bridge Hold
30 seconds each side Side Plank Holds

WORKOUT

After completing the Activation circuit, complete 4-6 rounds of each superset. Rest up to 1 minute between rounds of each superset and up to 2 minutes between supersets. Then rest up to 2 minutes before doing your 5 minutes of Conditioning.

SUPERSET #1:
8-12 reps per side Single Leg Deadlifts
15-20 reps Suspension Trainer Glute Cherry Bombs

SUPERSET #2:
8-12 reps per side Suspension Trainer Side Balance Lunges
15-20 reps Straight Leg Glute Bridge

CONDITIONING:

Set a timer for 5 minutes. Go through the ladder, mixing up the drills and walking/jogging back to the start before going through another drill. Check out this post for Agility Ladder Drills to try.

COOL DOWN
Stretch and Roll Out:
Foot
Calves/Shins
Hamstrings
Quads
Groin
Hips/Glutes
Back/Lats

NOTES:

Make sure to really roll out and stretch your feet and lower legs. This workout can really help you prevent and alleviate foot and ankle injuries.

Use the activation exercises to get your glutes firing while also building stability in your feet and ankles. Then use the workout to strengthen your feet and lower legs as well as your hamstrings and glutes. The moves will also improve your balance.

The Conditioning at the end will improve your mind-body connection. Make sure to do the agility ladder drills quickly but correctly. Speed is only beneficial if they are done well!

EXERCISE DESCRIPTIONS:

Warrior III – To do the Warrior III pose, balance on one foot with your knee slightly bent. Hinge over at your hips, lifting your back leg toward the wall behind you as you lean your chest over. Pretend you are driving your foot straight back into the wall behind you. As you hold the pose, keep your back flat and your core tight. Reach your hands overhead or back behind you. Hold in this position. Do not let your back round or your other foot touch down. You want a nice straight line from the bottom of your lifted heel to the top of your head. Make sure you do not lock the standing leg out as you hold. Also make sure your hips don’t rotate open up as you hold. Squeeze your glutes to keep your hips level. Beginners may need need to use the wall behind them to help them balance. Stand with a wall behind you and when you hinge over have the lifted foot lightly touch the wall behind you to help you balance.

warrior-iii-pose
Scapular Wall Hold – To do the Scapular Wall Hold, stand with your back to the wall just a few inches away. Bend your arms to 90 degrees and drive your elbows back and your chest out. Lean back and place your elbows on the wall with your chest pressed out and your shoulder blades drawn down and back. Do not shrug your shoulders as you drive your elbows back and pinch your shoulder blades down and together. You want to open your chest up toward the ceiling as you lean on your elbows against the wall. Do not let your upper arms or back touch the wall. Relax your head back instead of tucking your chin. Pinch your shoulder blades down and back while keeping your core tight as you lean into the wall. Squeeze your glutes and don’t arch your low back. Really press your chest out so that you feel this move low between your shoulder blades. You don’t have to be at a huge incline or have your feet very far from the wall to feel this move. You may want to work your feet away from the wall as you get stronger, but even very advanced lifters should feel this between their shoulder blades while standing almost upright if they are consciously contracting.

bat-wing
Glute Bridge Hold – To do the Basic Glute Bridge Hold, bend your knees and put your feet flat on the ground just close enough that you can graze your heels with your fingertips when you stretch your arms down by your side. Your feet should be about hip-width apart. You can change up how far your heels are from your butt. If they are further out, you may engage more hamstring. While keeping your heels in closer to your butt will isolate more glute. Then bend your elbows to 90 degrees so that only your upper arms are on the ground. Drive up through your heels and upper back and arm to lift your glutes up off the ground. Drive your hips up as high as possible, squeezing the glutes hard. Keep your belly button drawn in so you don’t hyperextend your back. Do not push backward off your heels. Make sure you are driving straight up almost as if driving your knees forward over your toes. Also, make sure that your knees aren’t caving in or falling open. Squeeze your glutes and hold at the top. Concentrate on feeling your glutes work. Don’t just go through the motions. Actually think about the muscles that should be working!

glute-bridge-activation
Side Plank Holds – You can do the Side Plank from your forearm or hand. Doing the Side Plank from your hand is harder and requires more core and shoulder stability. Stacking your feet on top of each other instead of having one foot in front of the other also makes the move harder. Beginners will want to start with a Side Plank from their forearm and knees or knee (you can bend your bottom knee and have your top leg out straight instead of stacking both knees on top of each other). To do the Basic Side Plank from your forearm, set up on your side and prop yourself up on your forearm with your elbow right below your shoulder. Your legs should be out straight. You can either stack your feet or place your top foot on the ground in front of your bottom foot. Then, driving through your forearm and the sides of your feet, lift your bottom hip up off the ground as high as possible while keeping your body in a nice straight line. Squeeze your belly button in toward your spine and keep your glutes tight. Do not let your chest rotate forward toward the ground or your top hand touch the ground. Keep your top hand on your hip or reach it up toward the ceiling.

side-plank
Single Leg Deadlifts – 
To do the kettlebell Single Leg Deadlift, hold a kettlebell in each hand down by your sides. Stand on your right leg with your knee slightly bent and your left toe lightly touching the ground. Then lift your left leg back toward the wall behind you as you hinge over, keeping your back flat. As you hinge over, drop the kettlebells down and back. Do not reach them toward the ground and let your back round. Only lower them as far as you can without rounding or “squatting.” Your standing knee should be soft but isn’t going to bend extra as you hinge over. Make sure that as you hinge over you sit back in your heel and then drive through your heel to come back up to standing. You want to feel your hamstring and glute work.

kettlebell-single-leg-deadlift
Suspension Trainer Glute Cherry Bombs – To do the Glute Cherry Bomb, place your heels in the suspension trainer straps and lie on your back on the ground. With your legs out straight and your feet close together, bridge up, squeezing your glutes and driving through your heels. Keep your core engaged so you don’t hyperextend your low back. Then curl your heels in toward your butt while maintaining the nice high bridge. Keep your glute engaged. Straighten your legs back out then and, keeping the nice straight bridge, move both feet out laterally, opening your legs up. Keep your hips up high as you spread your legs. Feel the outside of your butt work to open your legs up. Then bring your feet back together and repeat, curling your heels in toward your butt. This is an advanced movement. Beginners may not want to include the curl or may only want to do a single leg curl instead of the double leg curl.

cherry-bomb-bridge-and-curl
Suspension Trainer Side Balance Lunges – To do the Side Balance Lunge, place one foot on its side in a suspension trainer strap and face to the side. Your leg should be out straight to the side in the strap. Then bend the standing leg and push your butt back as you sink down into a lunge. Let the leg with the foot in the strap slide out to the side as you sit back and down. Keep your chest up. You may hinge forward a bit as you sink but do not let your back round. Then, driving through the standing heel, come back to standing, pulling the leg in the suspension trainer back in toward your standing leg. You will feel your adductors work to pull the leg back in. Do not bend the leg in the suspension trainer. Also make sure to squeeze your glutes as you come back up to standing. Complete all reps on one side before switching. Beginners may want to hold the other strap in their hands to help them balance. Make sure that you don’t put the strap for your foot up too high. The height of the strap will be very dependent on your hip mobility.

balance-side-lunge
Straight Leg Glute Bridge – To do the Straight Leg Glute Bridge, place your heels in the CoreX foot straps. Lie back on the ground with your legs out straight in front of you. You can either bend your elbows to 90 degrees or leave your arms on the ground down by your sides. Squeezing your glutes and driving down through your heels, lift your hips up as high as you can while keeping your legs straight. Keep your abs engaged so that you don’t hyperextend your low back as you lift. Hold at the top for a second and lower back down.

suspension trainer straight leg glute bridge

The Desk Job Rehab Workout

The Desk Job Rehab Workout

WARM UP
Stretch and Roll Out:
Feet
Shins
Calves
IT Bands
Hips/Glutes
Groin
Upper Back and Traps

WORKOUT

Set a timer for 30 seconds-1 minute. Perform each exercise for 30 seconds to 1 minute then switch quickly to the next move. Rest 1 minute between rounds of the circuit. Perform 4-6 rounds.

CIRCUIT:
30 sec-1min each side Warrior III
30 sec-1min each side Side Plank with Rotational Reach
30 sec-1min each side Crescent Pose
30 sec-1min Sit Thru to Thoracic Bridge
30 sec-1min Scapular Wall Hold
30 sec-1min each side Plank With Reach Out and Back
1 minute Rest

COOL DOWN
Stretch and Roll Out:
Feet
Shins
Calves
IT Bands
Hips/Glutes
Groin
Upper Back and Traps

NOTES:
Start with shorter work intervals and lengthen the amount of time you work to challenge yourself more as you master the moves. Make sure to maintain proper form and do the hardest variation you can of each movement. With unilateral moves (one-sided moves), do one side then the other before moving on to the next exercise. All Plank movements can be regressed to isometric holds as needed. For more Plank Variations, check out this post.

EXERCISE DESCRIPTIONS:
Warrior III – Balance on one foot with the knee slightly bent. Hinge over lifting your back leg toward the wall behind you. Pretend you are driving the foot straight back into the wall behind you. Lean your torso over, keeping your back flat and your core tight. Reach your hands overhead in front of you. Hold in this position. Do not let your back round or your other foot touch down. Keep your arms in line with your body. You want a nice straight line from the bottom of your lifted heel to the end of your finger tips. Make sure you do not lock the standing leg out as you hold. Also make sure your hips don’t open up as you hold. Squeeze your glutes to keep your hips level. Beginners may need to reach back toward their foot instead of out in front of them. Using a wall can also help beginners. Stand with a wall behind you and when you hinge over have the lifted foot lightly touch the wall behind you to help you balance.
warrior-iii-pose
Side Plank with Rotational Reach – Set up in a Side Plank from your forearms and toes (advanced) or forearms and knees (beginner). Reach your top hand under your armpit as if reaching for the wall behind you. Rotate your chest toward the ground as you keep your hips up. Then rotate back open, reaching your hand up toward the ceiling. Do not let your butt go way up in the air as you rotate or your hips drop toward the ground. Repeat, reaching back under and through then up toward the ceiling.
side-plank-with-reach-under
Crescent Pose – Step one foot forward into a wide stance and bend the front knee while keeping the back leg out straight. Your front heel should stay down while your back heel will be up. Make sure you are really sitting back into your front heel. Lift your hands up and reach them back and overhead as you stay low in the lunge. Keep your front heel down as you sit back into the lunge. If your front heel is coming up, you may want to step your front foot forward a bit more. As you hold the lunge, your back heel will stay up and the back leg will stay straight. Make sure though to drive back through your back heel instead of coming up onto your toe. Feel a nice stretch down the front of the hip and quad of the back leg. Hold then switch to the other side.
crescent-lunge
Sit Thru to Thoracic Bridge – Set up on your hands and knees with your hands under your shoulders and your knees under your hips. Flex your feet and lift up onto your hands and toes. Then lift your right hand and bring your left leg through and place your left foot flat on the ground. Rotate your hips up toward the ceiling, squeezing your glutes to lift them up as high as you can. While your lift your hips, reach your right hand down toward the ground, rotating your chest toward the floor. Feel your glutes working to keep BOTH hips up, while you reach your hand down. We have a tendency when we rotate to drop that hip down. Make sure both stay up. You should feel a nice rotation and stretch through your spine. You are twisting almost like someone wringing out a towel. Then drop your hips and step your foot back through while placing your hand back down on the ground. Rotate to the other side, bridging your hips up as high as you can. For a video of this move, click here.
thoracic-bridge
Scapular Wall Hold – Stand about six inches from a wall. With your back to the wall and your elbows bent in by your side, drive your chest out and lean back against the wall. Only your elbows should touch as you lean back. Do not shrug your shoulders and keep your body in a nice straight line as if holding a plank. Keep your head in line with your spine and do not tuck your chin. Walk your feet back toward the wall to make the move easier or walk them away to make the move harder. Make sure to drive the chest out and draw your shoulder blades down and together as you hold.
bat-wing
Plank With Reach Out and Back – Set up in a Front Plank from your hands and toes with your hands under your shoulders and your feet about hip-width to shoulder-width apart. For this move, you will want your feet wider to create a more stable base. Beginners can do this move from their knees. Then from the Plank position, reach one hand back and across toward the opposite ankle, pushing your butt back and up toward the ceiling as you reach. Then reach back forward and out toward the wall in front of you, dropping your hips back into a nice plank position. Do not drop your hips too low and feel your low back engage. Keep your core tight to protect your low back as you come back into that nice plank position. Reach back and across with the same hand until all reps are complete on that side.
plank-with-reach

The Desk Job Pain Reducer Workout

The Desk Job Pain Reducer Workout

WARM UP
Roll Out:
Hips/Low Back
Chest
Back
Traps
Forearms

WORKOUT

Complete 1 rounds of each of the circuits below. (If you have time or feel really tight, do two rounds of the second circuit.)

CIRCUIT #1:
8-12 reps each side Wrist, Forearm and Bicep Stretch
5-10 reps each side Standing Chest Stretch
5-10 reps each side 3-Way Neck Stretch
5-10 reps each side Standing Quad Stretch and Reach
5-10 reps each side Standing Hamstring Stretch and Reach

CIRCUIT #2:
30 seconds – 1 minute Crescent Hold
30 seconds – 1 minute Scapular Hold
30 seconds – 1 minute Warrior III Hold

NOTES:

There is no cool down for this workout. It is basically just meant to stretch out all the muscles that are tight from you sitting hunched over a computer desk all day.

You can even do this workout at work, if you have the space and are dressed in clothes that allow you to move a little.

Also, if you want to save time, you can do the Kneeling Bridge instead of the quad stretch and the chest stretch.

EXERCISE DESCRIPTIONS:

Wrist, Forearm and Bicep Stretch –  Stretch one arm straight out in front of you. Point your finger tips down toward the ground. You can do one stretch with your palm facing away and one with your palm facing toward you. Take the other hand and press down on the fingertips, pushing them back toward your body As you press down, you should straighten your arm more so you feel a stretch down your forearm and up into your bicep.

wrist, forearm and bicep stretch
Standing Chest Stretch – Using a door or wall, place one hand back on the wall or doorway and turn away from the hand on the wall or door. You should feel a nice stretch on that side of your chest.

chest-stretch
3-Way Neck Stretch – Reach one hand behind your back and then grab that wrist with the other hand. Pull the arm behind your back toward the opposite side. Then lean your head to the side you are pulling to. Do not tense your shoulders and bring them up toward you ears. Relax into the stretch. Then change the direction of your gaze. Look up and hold for a second or two. Then look straight ahead. And then look down. Move your chin as you look and not just your eyes. Changing the direction of where you look, will change exactly which muscles in your necks and upper back that you stretch.

neck-stretch
Standing Quad Stretch and Reach – Standing on the right foot, grab the left ankle with the left hand. Pull the left heel in to your butt while keeping the leg close to the standing leg and the knee pointing toward the ground. As you stretch the quad, reach the right hand up and back toward the ceiling. You should feel a nice stretch not only down your quad but also across your entire body. This will even open up your chest and lat after sitting all day at a computer. Hold for 1-2 seconds and then step forward and do the stretch on the other side.

quad-stretch-for-runners
Standing Hamstring Stretch and Reach – Standing, cross your left leg over your right leg. Bring the left foot over and across until the big toe is even with the big toe of the right foot. You want your feet even so that your front leg (the left leg) is pressing the back leg (right leg) straight during the stretch. Clasp your hands together and reach up overhead. Get a nice big stretch. Then bend forward, reaching the hands down to the ground. Hold for 1-2 seconds. Then relax and step forward to repeat on the other side. If your hips/glutes are tight, you can also reach toward the instep of the back foot to stretch your IT Band.

standing-hamstring-stretch
Crescent Hold – Step one foot forward into a lunge position. Bend the front knee and keep the back leg out straight behind you, driving your back heel down toward the ground. Your front heel will be down while your back heel will be up. Lift your hands up off the ground and reach them back and overhead as you stay in a low lunge. Keep your front heel down as you sit back into the lunge. As you hold the lunge, your back heel will stay up and the back leg will stay straight. Feel a nice stretch down the hip and quad of the back leg. Hold then switch to the other side.

crescent-lunge
Scapular Hold – Stand with your back to the wall. Step a couple of inches away and bend your arms to 90 degrees. Keep your elbows in by your sides and drive them back toward the wall. Lean onto your elbows on the wall. Do not let your upper arms or back touch the wall. Relax your head back. Pinch your shoulder blades down and back while keeping your core tight as you lean into the wall. You should feel this move low between your shoulder blades. To advance the move, move your feet a bit further from the wall.

bat-wing
Warrior III Hold – Balance on one leg with the knee slightly bent. Hinge over lifting your back leg toward the wall behind you. Lean your torso over, keeping your back flat and your core tight. Reach your hands overhead in front of you. Hold in this position. Do not let your back round or your other foot touch down. Keep your arms in line with your body. You want a nice straight line from the bottom of your lifted heel to the end of your finger tips. Make sure you do not lock the standing leg out as you hold. Beginners may need to reach back toward their foot instead of out in front of them. Using a wall can also help beginners. Stand with a wall behind you and when you hinge over have the lifted foot lightly touch the wall to help you balance.

warrior-iii-pose

Less Low Back Pain Workout

Less Low Back Pain Workout

WARM UP
Stretch and Roll Out:
Calves
Hamstrings
Quads
IT Bands
Adductors
Lats
Hips/Glutes

WORKOUT

Complete 1 rounds of the first circuit. Then complete 2-3 rounds of the second circuit before moving on to 3-5 rounds of the third circuit. Only rest between rounds of the third circuit. Rest up to 1 minute between rounds.

CIRCUIT #1:
10-15 reps per side World’s Greatest Stretch with Hamstring Stretch
10-15 slow deep breaths each side Pigeon Pose
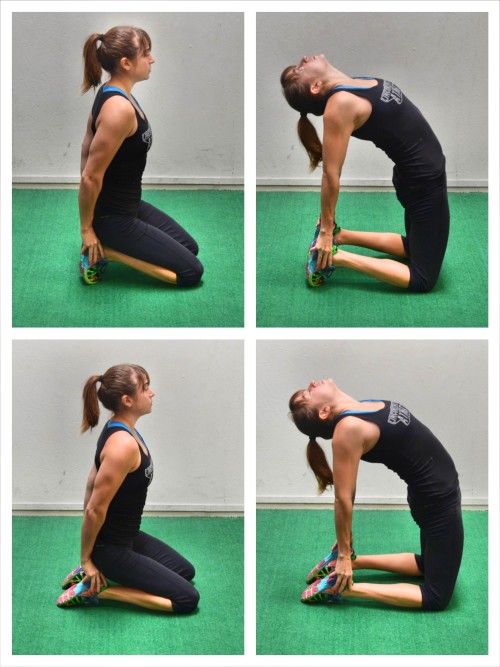
10-15 reps Kneeling Bridge
10-15 reps per side Frog Stretch with Rotation
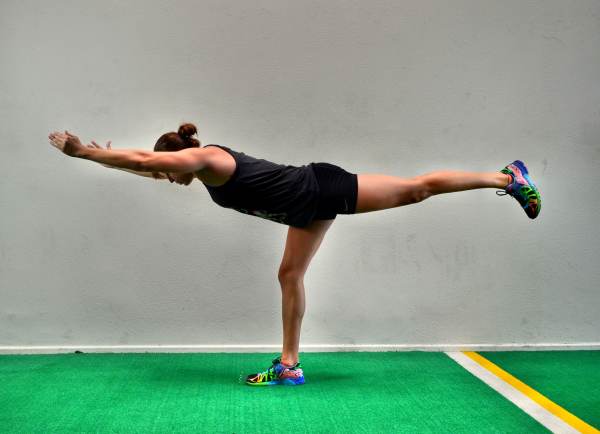
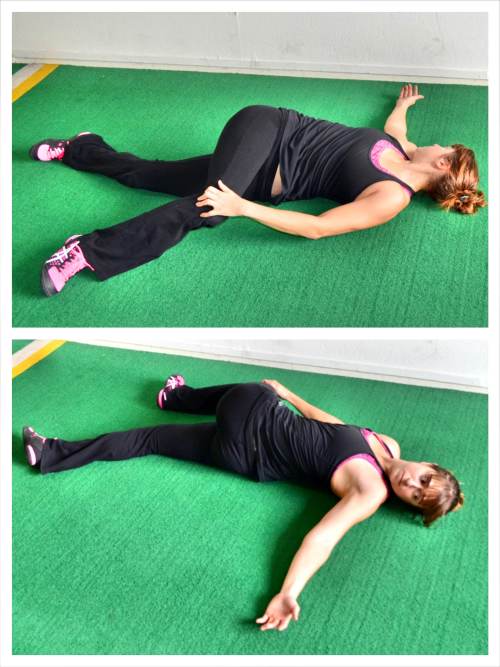
10-15 reps per side Star Stretch
10-15 reps per side Standing Hamstring Stretch

CIRCUIT #2:
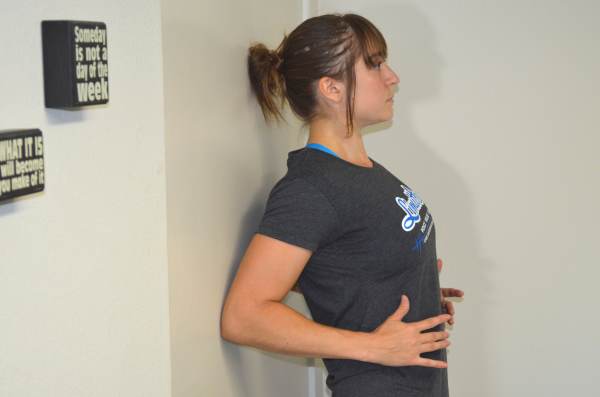
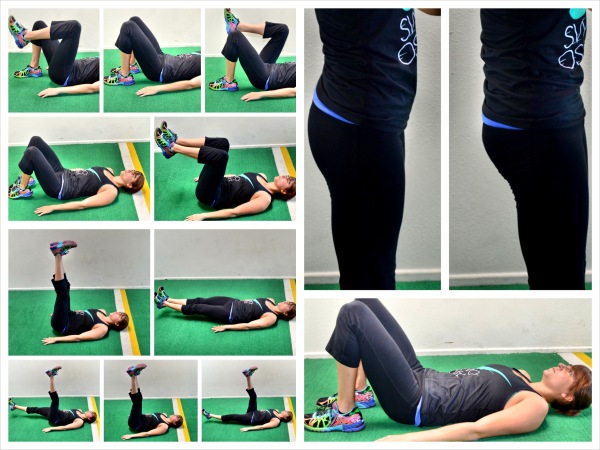
10-15 reps deep breaths or marches Pelvic Tilt
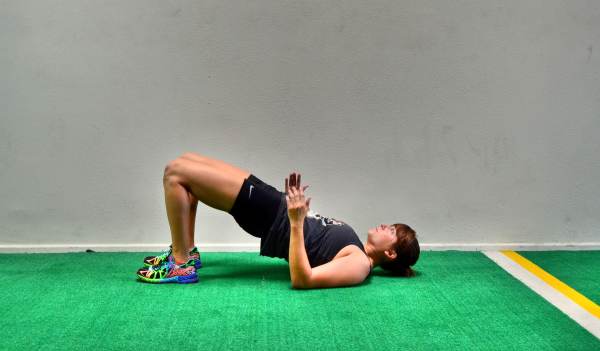
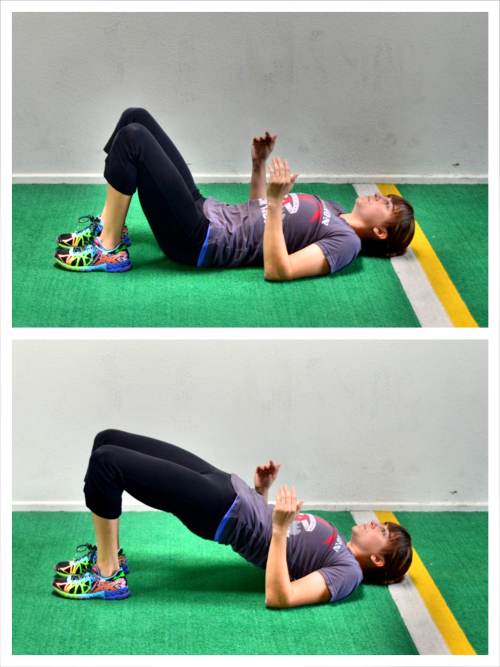
15-20 reps Glute Bridges
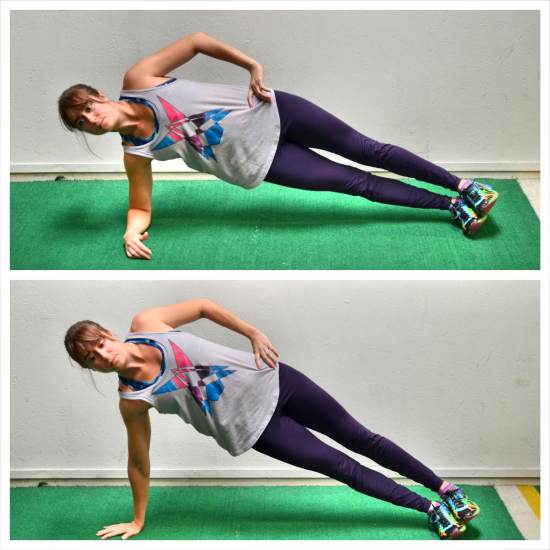
10-20 reps per side Plank with Reach Back and Out

CIRCUIT #3:
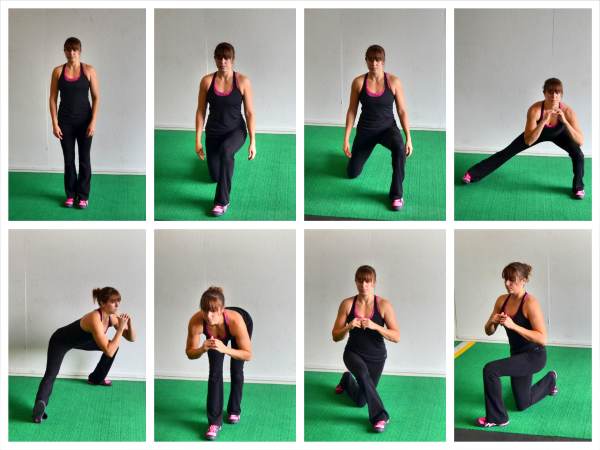
1 rep each side Lunge Matrix
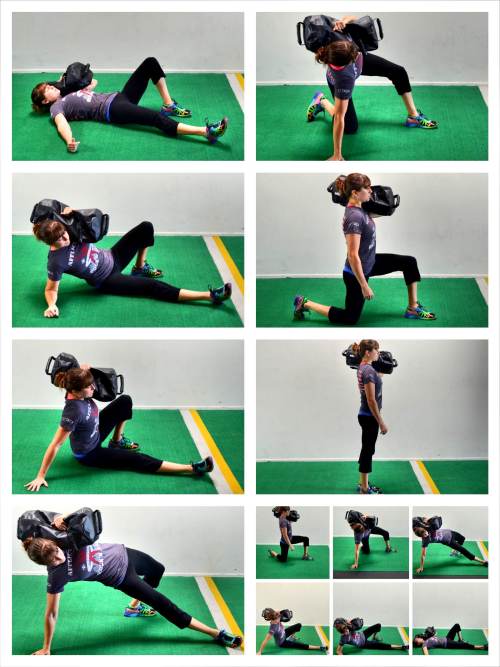
3-5 reps each side Sandbag Get Up
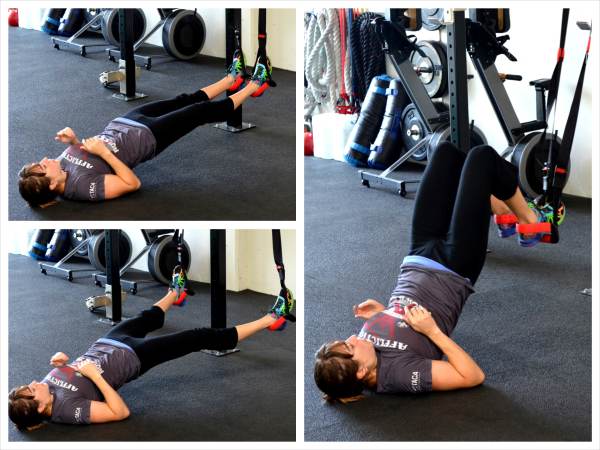
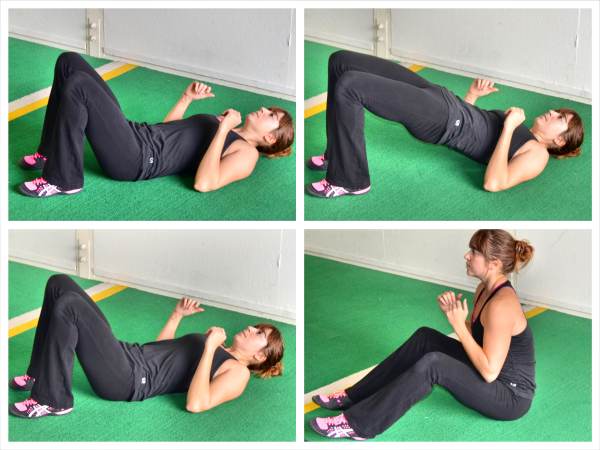
10-20 reps Glute Bridge To Sit Up

COOL DOWN
Stretch and Roll Out:
Calves
Hamstrings
Quads
IT Bands
Adductors
Lats
Hips/Glutes

NOTES:

While this workout is a good start to getting rid of your low back pain because it will stretch out your tight hips and back as well as strengthen your glutes and abs, it alone will not get rid of your pain. You need to stretch, roll out and activate the correct muscles a few times a week to get real results.

EXERCISE DESCRIPTIONS:

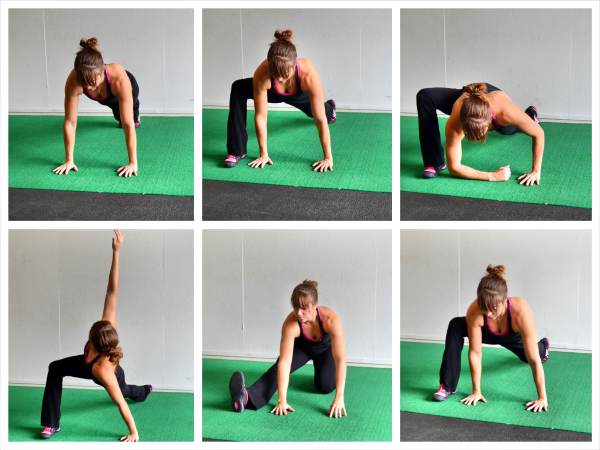
World’s Greatest Stretch with Hamstring Stretch – Start in a high plank position with your hands under your shoulders and feet together. Your body should start in a nice straight line. Step your right foot outside your right hand. Drop the right elbow down into the instep of your right foot. Then rotate open facing your right leg, stretching your right arm up toward the ceiling. Bring the right hand back down to the ground. Sit back on your left heel and straighten your right leg. Feel a stretch down your hamstring. Then bend the right leg and move back into the plank position with the foot outside the hand. Again drop the elbow and repeat the move on your right side. Complete all reps and then switch and do the stretch on the other side.

worlds-greatest-stretch
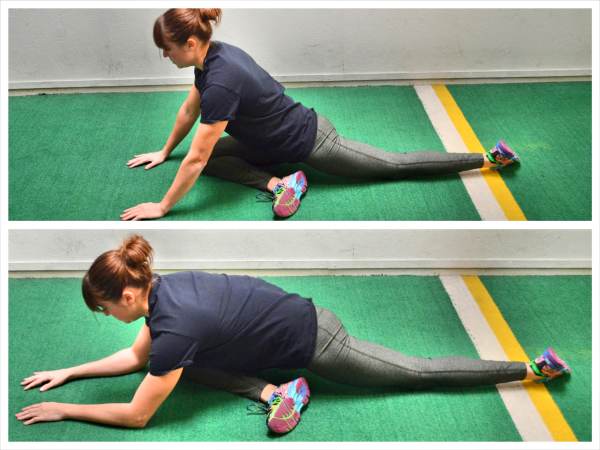
Pigeon Pose –  Sit on the ground and bring one foot in front. If you bring your right leg forward, your knee should be pointing about to “2” on a clock. The more you bring your foot out so that your knee is bent to 90, the harder you will make the move. Straighten the back leg back behind you as much as possible. Rotate the leg in, turning the toe in so that your hips are square front. Then relax over your front leg. Hold and feel a stretch in your glute and outside your front hip.

pigeon-pose
Kneeling Bridge – Start by kneeling on both legs with your feet flexed. Sit back and place your hands on your heels. Then arch up off your heels and press your chest out, keeping your hands on your heels. Relax your head back and arch as much as you can, getting a nice stretch down your chest, core, hips and quads. Hold for 1-2 seconds and relax back down. Repeat. If you are less flexible, do this stretch with a couch, chair or table behind you. Kneel down and place your hands back behind you on the couch or table. Press your chest out and arch as much as possible away from the piece behind you while leaning your head back. Then relax back down and repeat.

camel
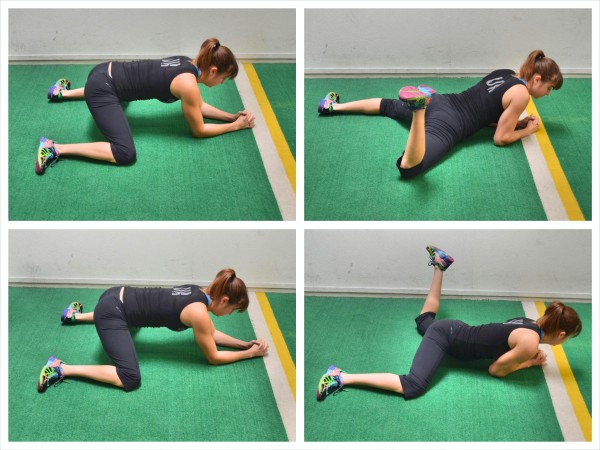
Frog Stretch with Rotation –  Kneel on the ground and spread your knees as wide as possible. Lower yourself down to your forearms. Keep your feet in line with your lower leg and knees. Do not let your feet come together behind your butt. Sit your butt back between your knees as much as possible. Then come forward out of the stretch for a second before pressing your butt back as far as you can. As you come back forward, lower your body down to the ground and rotate your lower leg up and forward. Sit back again and then pivot the other hip. Keep alternating sides until all reps are complete.

frog-stretch
Star Stretch – Lie on your back with a foam roller or ball to your right side if you have one. Otherwise you will just press your knee toward the ground. Bend your left knee to about 90 degrees and pull it across your body. Place your knee on the roller or ball. Place your right hand on top of your knee to hold your knee onto the ball. Reach your left hand across your body and touch the floor on the right side with your palm. Then open that arm back up to the left side, trying to touch the back of the hand down to the ground. Try to open up the chest as much as possible without letting the knee move from the roller or ball. Hold for a second or two and then bring the hand back across and repeat. Complete all reps on that side before switching. 

star-stretch

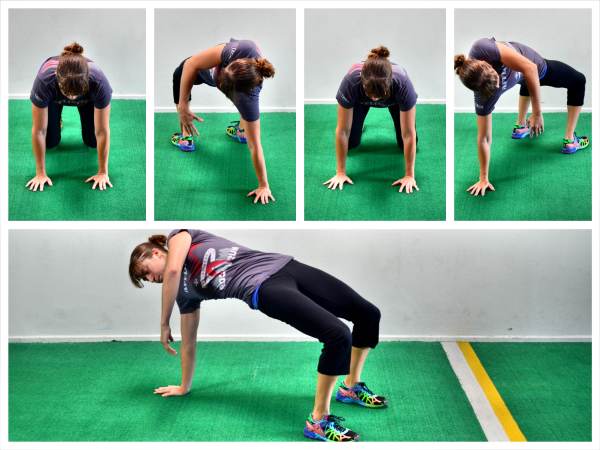
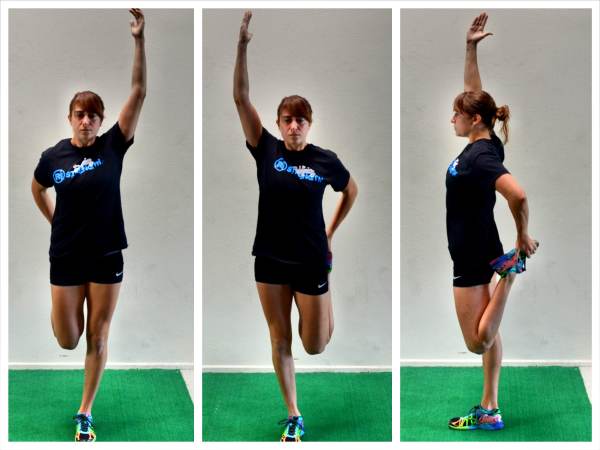
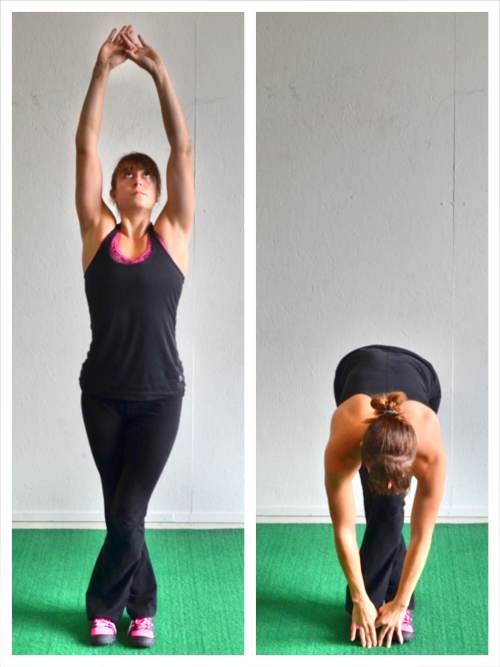
Standing Hamstring Stretch – Standing, cross your left leg over your right leg. Bring the left foot over and across until the big toe is even with the big toe of the right foot. You want your feet even so that your front leg (the left leg) is pressing the back leg (right leg) straight during the stretch. Clasp your hands together and reach up overhead. Get a nice big stretch. Then bend forward, reaching the hands down to the ground. Hold for 1-2 seconds. Then relax and step forward to repeat on the other side. If your hips/glutes are tight, you can also reach toward the instep of the back foot to stretch your IT Band.

standing-hamstring-stretch
Pelvic Tilt – Lie on your back with your knees bent and your feet flat on the ground. You should almost be able to reach your hands down by your sides and touch your heels with your finger tips. Feel the space between your low back and the ground as you lie there. Then draw your belly button in toward your spine and press that space away. You should feel your low back against the ground. Beginners may need to hold there. More advanced exercisers will add in a march or even draw both knees in. To do the march, they will bring one knee at a time in toward their chest and then return their foot right back down to the ground. Their low back will never leave the ground as they march. If they can keep their core engaged while marching for 10-15 reps per side, they may then pull both knees in at one time and then lower their feet back down. Their knees will stay bent the entire time and their back will stay pressed against the ground. Complete 10-15 reps then move to the next exercise. Make sure you really focus on keeping your core tight and your back against the ground no matter which variation you do.

exercise-for-low-back-pain
Glute Bridges – Lie on your back with your feet about hip-width apart. You should basically be able to touch your heels with your finger tips. Then bend your elbows to 90 degrees. Drive your elbows, shoulders and heels into the ground as you drive your hips up. Make sure your knees do not fall apart. Actively squeeze your butt as you drive your hips up. If you only feel your hamstrings working, make sure that you aren’t driving off your heels backward. You shouldn’t feel like you are driving back into your shoulders. You want to actual feel like you are driving your knees forward over your toes even though you are driving through your heels. Drive your hips straight up. Hold for 2-5 seconds at the top.

glute-bridge
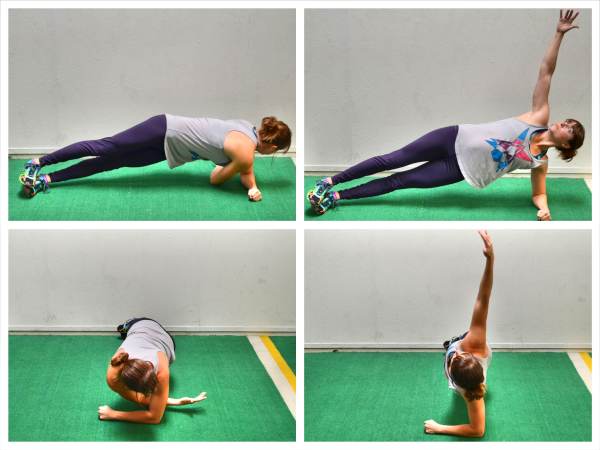
Plank with Reach Back and Out – This move is done from the hands and either your knees (beginner) or toes (advanced). To do this move from your knee, set up in the top of a push up with your hands under your shoulders and your body in a nice straight line down to your knees. Then sit back on your heels into a “child’s pose” position, reaching one hand back between your legs. Move forward back to the top of the push up as you reach the hand from between your legs out toward the wall beyond your head. You may even extend your hips more toward the ground. Just make sure to keep your abs engaged so that you don’t feel the extension out in your low back. Complete all reps on that side before switching to the other arm.

plank-with-reach

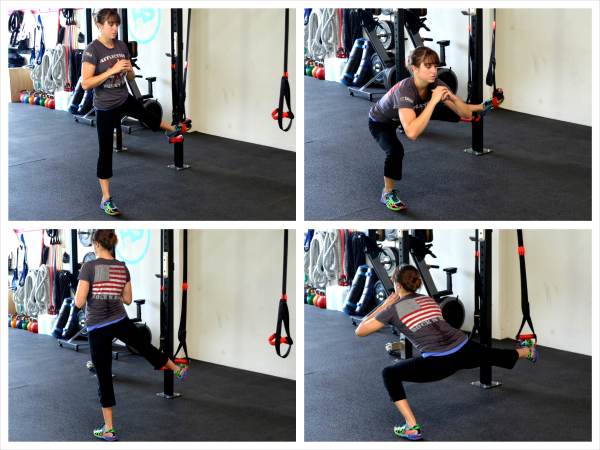
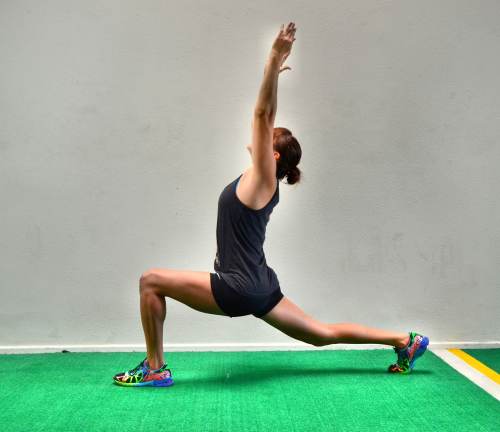
Lunge Matrix – The easiest way to remember all the lunges is to think about lunging around a clock. Start facing “12″ on the clock. Doing all the lunges first moving the left foot…

  • Front Lunge: Step the left foot forward and sink down into a front lunge. Bend both the front and back knees. Make sure you do not lean forward as you lunge forward. Also make sure you drive off your front heel to push back to standing.
  • Angled Front Lunge: After returning to standing after the front lunge, you will again lunge forward, but this time out at an angle. Lunge forward toward “11″ on the clock with your left foot. Bend both your back and front knees as you lunge forward, keeping both toes pointing straight ahead. Then drive off your left heel to come back to standing.
  • Side Lunge: Again lunging with the left foot, step the left foot out toward “9″ on the clock. As you lunge out to the side, you are going to bend the left knee and sit your butt back. Keep your right leg straight. Both toes should be pointing straight ahead. Keep your leftt heel down as you sink into the lunge. Push your butt back and keep your chest up. Then drive back up to standing.
  • Backward Rotational Lunge: Next you will lunge back toward “7″ on the clock with your left foot. Your left foot, when you step back, will be perpendicular to your right foot, which is pointing toward “12.” Push your butt back and sink into a lunge, bending the left knee while keeping the right leg straight. Do not let the left heel come up. Keep your chest up and sit your butt backward. Driving off your left heel, push back to standing. Make sure that your right toe doesn’t rotate but continues to point toward “12.” Also make sure your right leg does not bend.
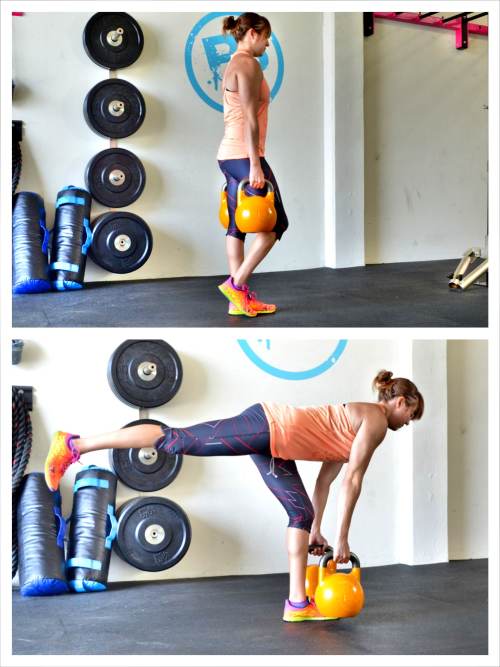
  • Backward Hinge: Again moving the left foot, step your left foot back so that the toe is even with the heel of your right foot. Both toes will point toward “12.” After taking the little step back, you are going to hinge over at the hips, pushing your butt back toward the wall behind you. You will feel a stretch down your hamstrings. Then stand back up and step forward.
  • Curtsy Lunge: Take your left foot and step your left foot back behind your right leg. You will reach your left foot back to about “5″ on the clock. Make sure you step far enough back (do not keep your left foot too close to your right) that you can bend both knees and sink down into a deep lunge. Keep your right heel down on the ground and your chest up. Then come back to standing. Make sure that you feel this lunge in the outside of your right butt cheek when you lunge back with the left leg.
  • Forward Cross Lunge: Lunge forward and across toward about “2″ on the clock with your left foot. Pivot your left foot so that your feet are perpendicular. Sink down into a lunge, bending both knees. Make sure your left heel stays down as you lunge. Then drive off your left heel to come back to standing.
  • All seven lunges listed above completes the lunge sequence on one side.
  • One rep will be all seven lunges.

lunge-matrix-lunges

Sandbag Get Up – Start by lying on your back on the ground with your legs out straight. Place the sandbag over your right shoulder and hold it in place. Bend your right knee and place your foot flat on the ground. Straighten your left arm out to the side (not straight out at shoulder height, but not right by your body). Then roll up on to your left forearm. Prop yourself up nice and tall on your left forearm. Press through your right foot on the ground. Do not let your right knee cave in and keep your left leg out straight on the ground. Once up on your forearm, press up onto your left hand with your left arm going straight. Sit up nice and tall. Do not shrug your shoulders or round forward. Then from the seated position you are going to bridge up, lifting your hips up as high as you can. You will press down through your left hand as well as your left heel and right foot. Keep your right foot flat on the ground and your left leg out straight. Do not let your right heel come up. From the bridge position, slide your left leg back and under you so that you are in a kneeling position with your hand on the ground. Make sure you swing your leg back enough so that you are in a strong supported kneeling position that will allow you to lift your left hand off the ground. Staying nice and tall, lift your left hand and come to a kneeling position. Do not lean forward of slouch forward as you lift your hand up off the ground. Then stomp your right foot into the ground and come up to standing, bringing your left foot forward to be even with your right foot. Once standing, you will reverse the steps until you are again lying on your back. You will first go back to kneeling, stepping your left foot back. You will then place your left hand down on the ground out to the side and just a little back from your left knee. You will then bridge up and swing your left leg through so it is out straight in front of you. As you bridge, keep your right heel firmly planted on the ground. From there, you will return to a seated position supported by your left hand. Then you will relax down to your forearm and finally roll on to your back. Do not slouch as you move back down. Keep a nice tall posture throughout the entire move. Repeat 3-5 reps on this right side before switching. Beginners may just want to start by balancing something on their knuckles.
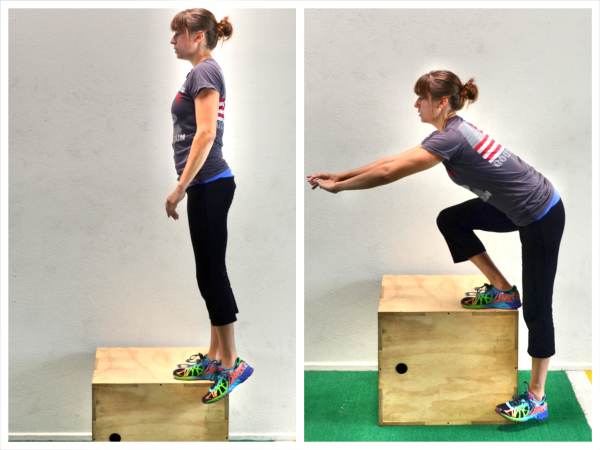
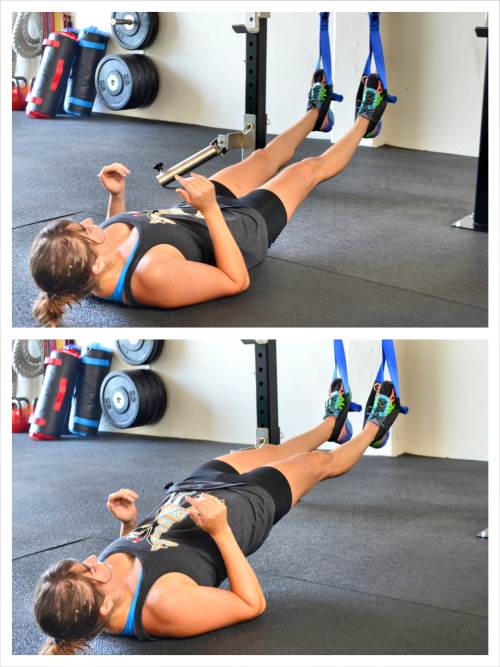
sandbag-get-up
Glute Brid
ge To Sit Up 
– Lie on your back with your knees bent and feet flat on the ground about hip-width apart. Bridge up, lifting your hips as high as possible while driving through your heels. Lower your hips back down and let your feet move a little away from your butt. Then sit up, keeping your torso up nice and tall and your feet on the ground. Once you sit all the way up, lie back down, bring your feet back in and then bridge back up.

glute-bridge-to-sit-up