It can be hard to stay on top of your workouts when you travel, especially if you don’t have access to a gym.
But if you have just three lightweight, easily storable pieces of equipment, you can get in a great workout without leaving your hotel room and stay in shape while traveling.
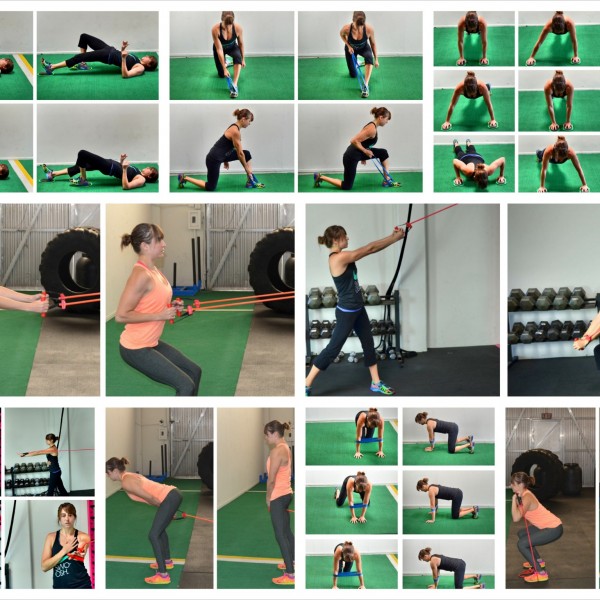
That is why the Total ValGym is amazing. It has 3 easily portable pieces of equipment to help you get in a quick full-body workout no matter where you are. In the Total ValGym there are Valslides, Resistance Bands and a Mini Band and these three pieces are all you need!
With these three pieces you can get in a full-body workout using the 30 exercises below. And if you are short on time, just try one of the 15-Minute Travel Workouts we’ve put together!
30 Exercises To Do When You Travel
Stay in shape while you travel with these 30 moves you can do in your hotel room with the Total ValGym.
While we love suspension trainers and other easily portable tools, the Total ValGym is one of our favorites because it is not only light-weight, but also more affordable while still allowing you to get in a challenging hotel room workout!
10 Valslide Exercises
When you travel, you often don’t have access to weights to make exercises more challenging. That is why Valslides are so great. They are a lightweight tool that you can easily throw into your suitcase and use to make bodyweight exercises more challenging when no weights are available.
Try these 10 moves to work your body from head to toe with the Valslides. See the video below for demonstrations of each move!
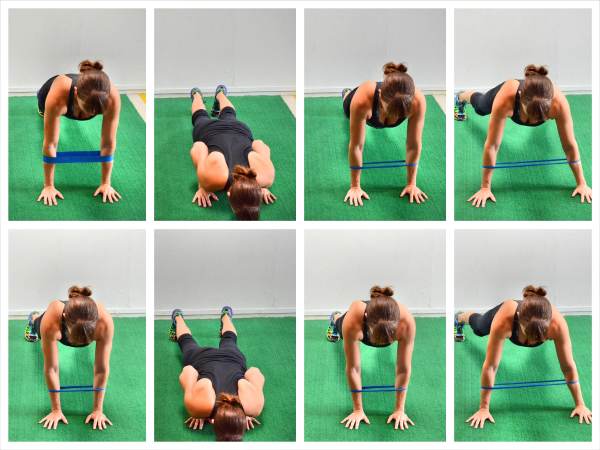
1. Fly To Push Up Variations – Depending on your fitness level, pick a variation of the Fly to Push Up that challenges you yet allows you to maintain perfect form.
To do the Beginner Fly to Push Up, set up in a push up position with one hand on a Valslide and the other hand on the ground. You can do this from your knees to make it easier or from your toes to make it harder. Then slide the hand on the slider out to the side and perform a push up. As you push up, slide the hand on the slider back in toward your hand on the ground. Repeat, completing all reps on one side before switching.
If the single slider Fly to Push Up is too much, this move can be done by just stepping the hand out to the side on the ground or even on an incline. To advance the Fly to Push Up, you will use two sliders. Again this variation can be done from your knees (easier) or toes (harder). Start at the top of a push up and then slide one hand out to the side and perform a push up. Push up and slide the hand back into the starting position. Even though this is a wider push up, don’t let your elbows flare way out by your ears. Slide the other hand out on the slider and perform a push up. Keep alternating sides until all reps are complete.
You can advance the movement further by sliding both hands out to the side as you lower into the push up and then pull them back in as you come back up out of the push up. You will perform the fly as you perform the push up instead of sliding out, doing a push up and sliding back in. With all the different variations, do not let your butt go up in the air or your hips sag toward the ground as you do the push up. Also make sure not to shrug or let your elbows flare up by your ears. You want to create more of an arrow position (->) with your arms and upper body than a “T” as you do the push up.
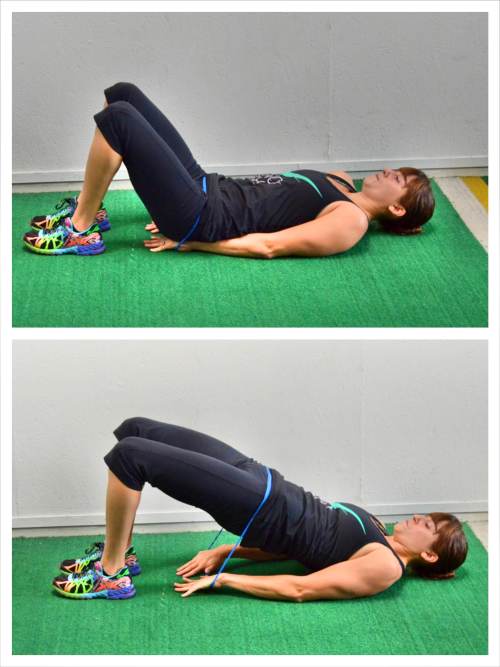
2. Glute Bridge and Curl Variations – The Glute Bridge and Curl can be done with a variety of equipment, including the Valslides. This move works the glutes and the hamstrings. Beginners may want to start with a single leg variation while more advanced exercisers may want to curl both legs at the same time.
To do the Single Leg Bridge and Curl, place a slider under each foot and set up in a glute bridge with your heels in close to your butt. Then slide out one leg at a time. Driving through your heel, drag the foot back in coming back into a bridge. As you curl each leg back in, feel your hamstring work to pull the Valslide back in. If the single towel or slider move is easy, do the Two Leg Bridge and Curl.
To do the Two Leg Bridge and Curl, start in the glute bridge position with a foot on each slider. Keeping your hips up off the ground and your glutes engaged, slide your feet out away from your butt. Straighten your legs out in front of you, keeping your hips up and your abs engaged. Then curl your heels back in, bringing the hips up again into a glute bridge. Do not let the hips sag toward the ground as you slide out or come back in. Make sure your abs stay tight to protect your low back with both variations. You want to feel your glutes and hamstrings working not your low back.
3. Posterior Plank to L-Sit – This is a great core exercise; however, it is a tougher move that may need to be regressed for beginners.
To do the Posterior Plank to L-Sit, sit on the ground and place the Valslides under your heels with your legs extended out straight in front of you. Place your hands on the ground behind your butt. Then driving through your hands and heels, bridge your hips up toward the ceiling. Press your chest out and squeeze your glutes as you bridge up. You may also want to relax your head back. Then lower your hips back down an inch off the ground and slide your butt back between your hands, keeping your legs out straight. Slide your legs back out in front and repeat, bridging up. Lower back down and pull your butt back between your hands again to do an L-Sit.
Beginners may want to do the move without the sliders or instead perform a bent knee bridge to an L-Sit.
4. Mountain Climbers – With Valslides you can advance the basic Mountain Climbers to get in a great core and cardio workout.
To do the Slider Mountain Climber, set up in a high plank position with your feet on the sliders. Your hands should be under your shoulders and your body should be in a nice straight line from your head to your heels. Make sure to brace your core so that you don’t feel this in your low back.
Then, maintaining the nice plank position, bring your right knee in toward your chest, sliding your foot in. Your left leg should still be out straight. Then slide the foot back out as you bring your left knee in toward your chest. “Run” your knees in as quickly as possible until all reps are complete. The faster you go, the harder the move will be.
Do not let your butt go up in the air or your hips sag as you run your knees in.
Beginners may want to start without the sliders.
5. Plank Wipers – This is a great advanced plank variation to work your entire core as well as your obliques.
To do Plank Wipers, set up in a plank from your forearms and toes with your toes on the Valslide. From this plank position, slide one foot out to the side and up toward your shoulders. Keeping the leg straight, slide it out and up as high as you can. Then slide it back in to the other foot. Then slide the other leg up and out. Keep alternating legs until all reps are complete. Keep your body in a nice straight line as you slide each leg out. Do not let your hips sag to the ground or you butt go up in the air as you do the Plank Wipers. The further up and out you slide, the harder the move will be.
Beginners may want to try this move without the sliders to make it easier. Instead, step your feet out to the side, alternating sides until all reps are complete.
6. Lunges (Side Lunge and Reverse Lunge) – With the Valslides, you can make a variety of lunges more challenging without adding weights. Two great Slider Lunges are the Reverse Lunge and the Side Lunge.
To do the Valslide Reverse Lunge, start standing with your feet together and a slider under one foot. Slide that foot back into as deep a lunge as you can handle, bending your front knee to 90 degrees while dropping your back knee down to the ground. Make sure to really sit back on that front heel so that you aren’t going forward. Keep your chest up nice and tall as you lunge back. Then, driving through your front heel, come back to standing, sliding your back foot forward. Stand up nice and tall at the top and squeeze your glutes. Repeat, lunging back on the same side until all reps are complete.
To do the Valslide Side Lunge, place a slider under one foot. Slide that foot out to the side, sitting back into the lunge and bending your standing leg. You may lean forward as you sit your butt back, but do not let your back round. Sit back into the lunge then, to stand back up, drive through the heel of your standing leg and pull the foot on the slider back in. Stand up nice and tall at the top and squeeze your glutes. Do not allow yourself to go forward. Make sure to really sit back and then drive through your heel to come back up to standing as you use your inner thigh to pull the leg on the slider back in. Keep your chest up and back flat as you lunge. Complete all reps on one side before switching the slider to the other foot. Be careful the first time you lunge out if you haven’t done the move before or you may not be able to slide back in.
7. Plank Taps – This is a great upper body move that also helps you build core and shoulder stability.
To do Plank Taps on the Valslides, place a slider under each hand and set up in a high plank position from your hands and toes (advanced) or hands and knees (beginner). If you set your feet or knees wider apart, this will make the move easier by giving you a wider base of support. Then slide one hand out and away from the other hand. You can slide your hand straight out forward, out at an angle, to the side or even back toward your feet. Slowly slide it out in different directions. Keep your body in a nice straight line as you slide the hand out. Do not let your hips sag or your butt go up in the air. Also, try to keep your hips from wiggling as you do the taps.
You can widen your feet to help keep your hips still. You can also regress the move by doing the movement without the Valslides.
Complete a few taps in different directions on one side before switching to the other hand.
8. Knee Tucks – This is a great core exercise to work everything down your front from your shoulders to your knees.
To do Knee Tucks on the Valslides, place a slider under each foot and set up in a high plank position from your hands and toes. Your body should be in a nice straight line from your head to your heels with your hands under your shoulders. Then, keeping your core tight, tuck your knees in toward your chest, sliding your feet in on the sliders. Do not let your butt go way up in the air as you tuck your knees in. Then slide your feet back out so that you are in the high plank position where you started. Repeat, tucking your knees in.
Beginners may want to do Mountain Climbers instead.
9. Crawling – Crawling is a great way to work your core and get your heart rate up. This straight leg Valslide variation is more challenging so beginners may want to start with a basic crawl. Check out this article on crawling for basic form.
To do the Crawl on Valslides, set up in a high plank position with a slider under each foot. Keeping your feet close together and your body in a nice straight line from your head to your heels, step one hand forward and then the other, letting your feet slide behind you. Do not let your hips wiggle from side to side a lot as you crawl. Keep your body in a nice straight line as you step your hands forward and drag your body behind you. Speed up the crawl as you become more comfortable with the move.
You may also do a Reverse Crawl on the sliders, stepping your hands back to slide your body backward.
10. Body Saw – The Body Saw is another advanced plank variation that requires not only core strength but also tricep and lat strength. The Valslides make this plank a super challenging core exercise.
To do the Body Saw, set up in a plank position on your forearms with your feet on the Valslides. With your body in a nice straight line from your head to your heels, slide your feet back and lengthen through your arms. As you slide back you should extend your body down to your elbows, shifting your shoulders back behind your elbows. Do not let your hips sag as you slide back. Then pull your feet back in to the plank position. When you come back into the plank position, do not let your butt go up in the air. Then slide back out on the Valslides, lengthening your body out as much as you can. Then pull straight back in to the plank position. Do not let your hips sag toward the ground or your butt go up in the air. You should also not feel this at all in your low back.
To regress the movement, beginners will want to do it without the Valslides. Walk your feet back, lengthening your body as much as you can and then walk your feet back in. Do not let your hips sag or your butt go up in the air as you walk in or out.
10 Resistance Band Moves
Resistance bands are a great way to add resistance when you don’t have any weights. Plus, unlike weights, they maintain tension throughout the entire range of motion, making your body have to work hard throughout the entire movement.
Below are 10 moves to work your entire body with Resistance Bands.
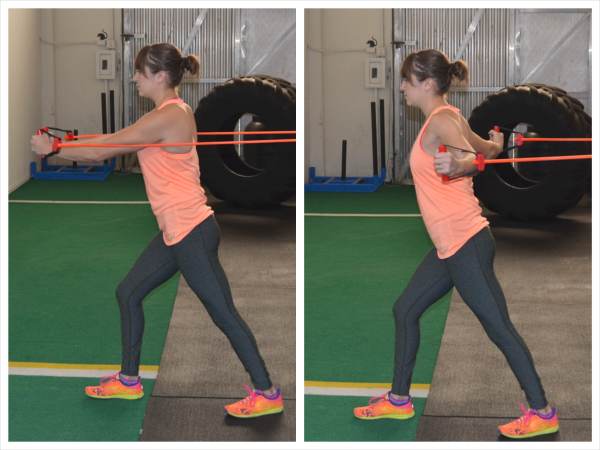
1. Band Rows – Often you don’t have many options to work your back when you don’t have any equipment. And while there are some great bodyweight back exercises you can do (5 Bodyweight Back Exercises Using No Equipment), it is great to have a tool to help you really challenge the big muscles of your back.
With Resistance Bands, you can make sure your travel and home workouts really improve your back strength to help improve your posture!
To do the Two-Arm Resistance Band Row, anchor the band around a piece of stable furniture or in a doorway so that it is just below chest height.
Facing the anchor point, grab a handle in each hand and then step away from the anchor point and sink into a little squat. Sit the butt back and keep the chest up nice and tall with the arms extended out in front of you.
Then row the band back to your chest or just below. Pinch your shoulder blades down and back as you row the band back. Stay in the squat as you row back and make sure to keep your chest up nice and tall and your back flat.
Do not round forward as you row or shrug your shoulders. You want to drive your elbows down and back so that the big muscles of your back activate instead of irritating your upper traps by making them do work they can’t handle.
Row the handles all the way to your body and then straighten your arms back out. Stay in control of the band the entire time.
Sink lower in the squat to work your legs more or move back further from the anchor point to increase the tension. You can also slow down the tempo of the movement to make it harder. More time under tension can produce better results!
Beginners may want to start with a lighter resistance or stay closer to the anchor point; however, you still want there to be tension even with your arms extended.
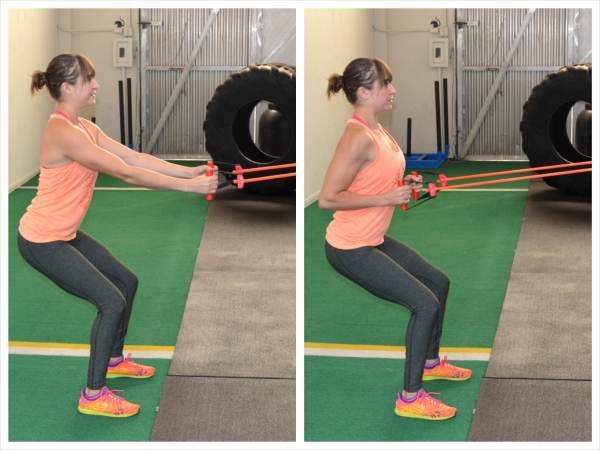
2. Squat to Press – This is a great full body move that really works your legs, core and shoulders. You may want to start with a lighter resistance band even though your legs may be able to handle more.
To do the Squat to Press, step on the resistance band and place your feet about hip-width to shoulder-width apart. The wider your stance, the harder the move will be because it will shorten the resistance band and add more tension.
Grab a handle in each hand and bring your hands up to your shoulders. You can do two different grips – you can have your palms facing forward or have your palms facing in toward each other.
Then squat down, sitting your butt back. Go as low as you can while keeping your chest up. Sit back into your heels and then drive back up to standing.
At the top, stand nice and tall and squeeze your butt. Brace your core as you press the bands up overhead. Make sure your core is engaged so you don’t feel this in your low back.
After pressing overhead and fully extending your arms, bring your hands back down to your shoulders and squat again.
To make this move easier or harder change the resistance or your stance. Beginners may even find they can only stand with one foot on the band.
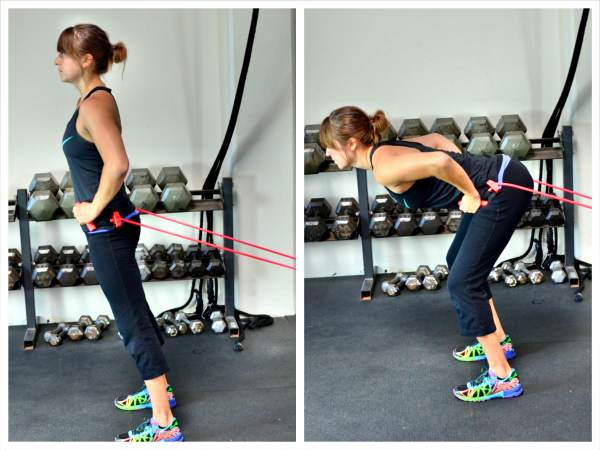
3. Band Pull Through – Band Pull Throughs are a hip hinge glute exercise that mimic the kettlebell swing. If you want to learn or improve your swing, or even simply strengthen your backside, you need to include the Pull Through in your travel or home workouts.
To do Resistance Band Pull Throughs, anchor the band around furniture or in a doorway. Step over the band and reach down between your legs to grab the handles.
Walk away from the anchor point with your back to it, holding the handles between your legs.
Then hinge over, keeping your knees soft. Push your butt back toward the anchor point as you lean forward and reach your hands with the bands back between your legs.
Then squeeze your glutes and push your hips forward to come back up to standing. Keep your arms relaxed and straight down, holding the handles between your legs.
Stand up nice and tall, fully extending your hips and squeezing your glutes.
Then hinge back over, pushing your butt back toward the anchor point.
Keep your core tight so that you don’t feel this move in your low back. Also, do not pull the bands with your arms. Your glutes should do all the work. And make sure to keep your back flat. Do not round over as you hinge over and stand up tall at the top of the move.
To make the move harder, use a heavier band or walk further from the anchor point. Also, to make the move more challenging you can either slow it down or make it more explosive. You can even make the movement to standing more explosive and then hinge back over slower to really challenge the glutes.
4. Chest Flyes – If you want to really focus on developing a stronger chest so you can do more push ups, Chest Flyes are a great exercise.
To do Chest Flyes with a band, hook the band around a piece of furniture or in a doorway. Grab a handle in each hand and face away from the anchor point. Walk away from the anchor point so there is tension in the band and set up in a staggered stance.
Then spread your arms out wide. Keep your elbows soft. Then, bring your arms forward and your hands together as if hugging a tree.
You do not want to really bend at the elbows so much as pull your arms together. Once you’ve brought your palms close together, open your arms back, staying in control of the movement so that the band doesn’t jerk you back.
Repeat, pulling your arms back together. Try not to lean forward or bend a ton at the elbows as you do the flyes.
Beginners may want to start with a lighter band or stay closer to the anchor point.
5. Stability Press – The stability press is an anti-rotational movement to work your core, especially your obliques, shoulders and glute medius. It is also a great move to help you prevent and alleviate injuries to your shoulders, back, hips and knees.
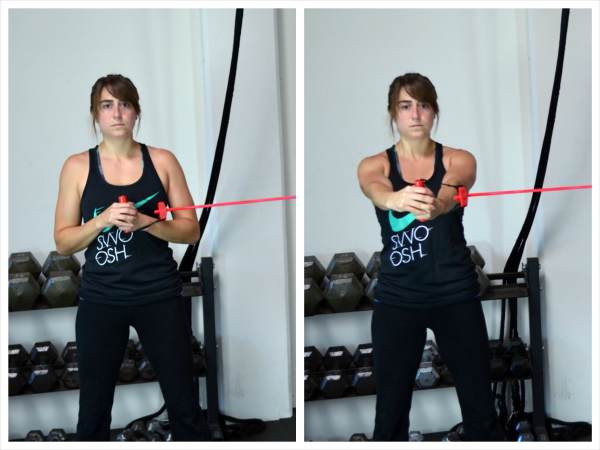
To do the Stability Press, anchor a band in a door or around a pole. Grab one handle in both hands and step away from the anchor point so that there is tension in the band. Face toward the handle so your body is sideways to the anchor point. Stand with your feet no more than shoulder-width apart. The closer your feet are together, the harder the move will be.
You will also want enough tension in the band that you feel your body wanting to rotate back toward the anchor point, but not so much tension that you can’t stabilize and press straight out.
Bring your hands into the center of your chest and slowly push the band straight out from the center of your chest until your arms are straight out. Do not let your arms rotate open and go back toward the anchor. You want to press straight out. Also make sure not to shrug your shoulders. Maintain a nice tall posture with your shoulder blades drawn down and back.
Then slowly bring your arms back in and repeat. Move slowly to really have to fight the band. If you move too quickly, you won’t get as much out of the move. Complete all reps on one side before turning and facing the other way to work the other side.
This move looks easy, but when you try it, you realize how much your entire body fights rotating back toward the band hook. Use a heavier band or step further away from the anchor point to make the move harder.
6. Woodchoppers – Unlike the Stability Press, Woodchoppers are a great rotational exercise to work your entire core.
There are two types of woodchoppers you should try – The Low-To-High and the High-To-Low.
Low-To-High Woodchopper – Place a band around a low anchor point. Grab the handle of the band in both hands and walk away from the anchor point so that there is tension in the band. Stand with your feet about shoulder-width apart and your side to the anchor point. Then pivot your feet and bend your knees to reach the handle down outside the knee closest to the anchor point (make sure there is still tension in the band). Your arms should be straight and your chest should be up as you lunge down. Do not round your back to reach lower. Bend your knees and bring the hands outside your knee. Then bring your arms up and across your body as you stand up and pivot toward the opposite side. You should end up reaching out at about shoulder height with your arms straight. Do not reach too high up as you reach across. Then control the band back down and across as you pivot and bend your knees. Move in a slow and controlled fashion back down into a lunge with your hands outside your knee. Do not let the band pull you. Complete all reps on one side before switching.
High-To-Low Chop – The High-To-Low Chop is just the opposite. You will anchor the band up high and reverse your position. You will start with your arms reach up and outside your shoulder closest to the anchor point. Make sure there is tension on the band. Then pivot and bend your knees to bring the band down and across your body to outside your opposite knee. Once you’ve brought the band outside your knee, you will then pivot back to standing, bringing the band across your body and up outside your shoulder. Move slowly and make sure there is tension on the band the entire way. Do not round your back to reach lower as you bring the band across. Keep your chest up. Just reach down outside the knee as you pivot your feet.
With both moves, you need to keep tension on the band at all times and stay in control of the movement. Do not let the band pull you back.
And you want to make sure to pivot your feet. When you pivot, you keep your knee in a safe position. Plus the pivot puts your back leg in triple extension, which is an important position to generate more force and power.
7. Single Arm Chest Press – The Single-Arm Chest Press is another great anti-rotational move that also works each side individually to correct imbalances.
To do the Single Arm Chest Press, anchor a resistance band behind you at about chest height. Grab a handle in one hand and step away so that there is tension in the band when your hand is in at your chest. You can stand in a staggered stance or with both feet even. Standing with your feet together will make the move more challenging.
Then without letting your body rotate, press your arm straight out from your chest. Move slowly and do not let your shoulder shrug. You want to press straight out from your chest.
Then bring your hand back in to your chest without letting your body rotate. You want your body to move as if you were pressing both hands instead of rotating with the hand that is pressing. Move slowly and control the band. Do not let the band pull your hand back in.
Complete all reps on one side before switching. You can place the hand that isn’t working across your chest, by your side or on your hip.
To advance the move, walk further away from the anchor point and slow down the tempo. You can also use a heavier resistance or make a heavier resistance out of a lighter band by holding both handles in one hand with the band doubled over.
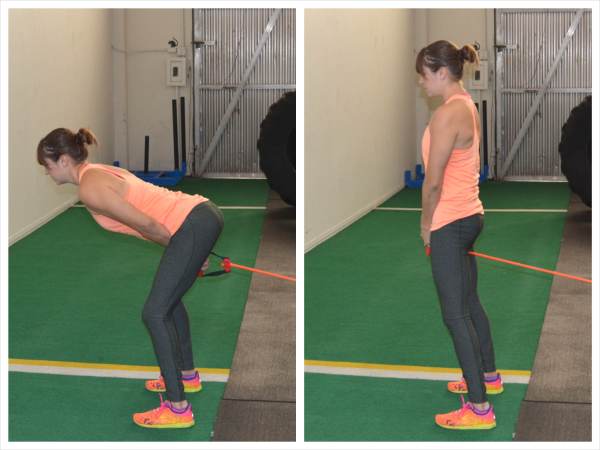
8. Hip Hinge – Another great hip hinge exercise to improve your glute strength and kettlebell swing, the Resistance Band Hip Hinge should be included in your glute workouts.
To do the Resistance Band Hip Hinge, anchor the band low behind you and hold a handle in each hand. Place your hands on your hips and walk away from the anchor point so that the tension on the band tries to pull you back. You should stand with your hips between hip-width and shoulder-width apart.
Hinge over with soft knees and sit your butt back. As you hinge over, you will lean forward to counterbalance, but do not let your back round. Make sure to sit your butt back toward the anchor point as you hinge over.
Then squeeze your glutes to come back up to standing. At the top of the movement, stand tall and consciously squeeze your glutes to fully extend your hips. Then hinge back over and repeat.
This should be a quick powerful movement. Stay controlled as you hinge over, but come back to standing explosively and feel the glutes engage. You should even feel a little stretch in your hamstrings as you hinge over and sit your butt back.
Do not squat when you perform this movement. It is a hip hinge with soft knees. You are moving at the hips to sit your butt back, not bending your knees to get closer to the ground.
Move away from the anchor point to make this move more challenging.
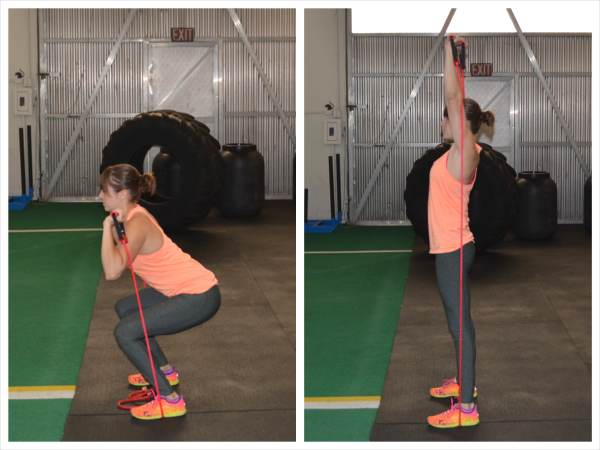
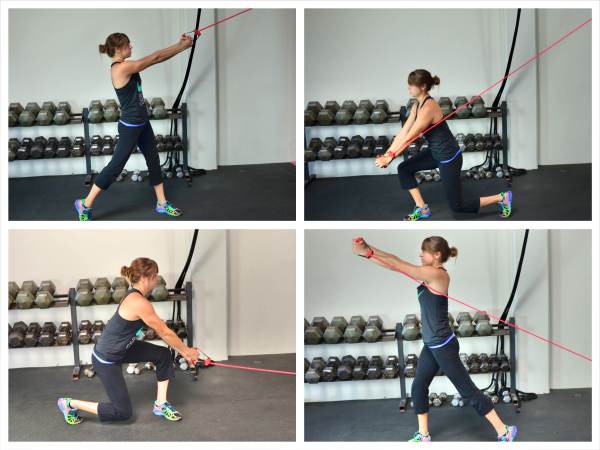
9. Lunge Pulldown – The Lunge Pulldown can help you improve your lat strength to strengthen your pull ups when you don’t have access to a pull up bar.
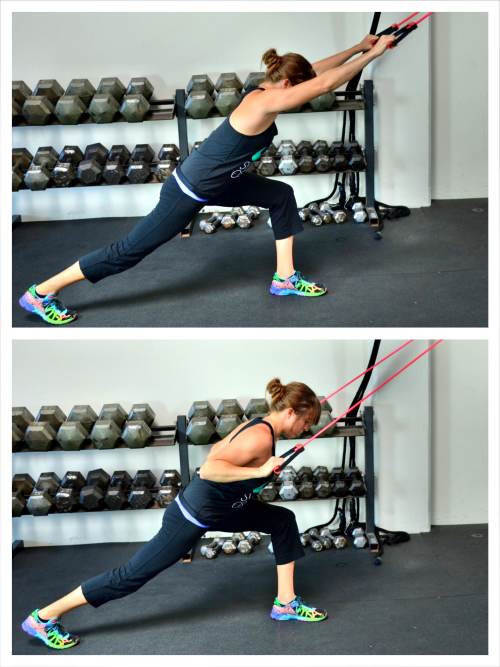
To do the Lunge Pulldown, anchor the band up high and, holding a handle in each hand. Walk back away from the anchor point and set up in a lunge stance.
Lunge back while facing the anchor point and lean your chest over your front knee. Your back leg can be straight, but you want to make sure to lean forward so that you work your lats and are performing a movement that mimics a vertical pull.
Reach your hands up overhead. There should be tension in the band with your arms extended. If there isn’t, move back. Then pull the band down toward your shoulders, driving your elbows down and back. The movement should mimic you pulling yourself up to a bar for a pull up.
As you pull down, pinch your shoulder blades down and together. Focus on working your back muscles. You want to feel the sides of your back pulling the band down. Don’t just go through the motions. You want to consciously activate the big muscles of your back.
The slowly extend your arms back out and repeat. Each time you pull down, drive your elbows down and back.
Keep your core engaged the entire time and your back flat. Do not start to straighten up and turn this into a row instead of a pulldown.
You may also feel this move in your legs because you are holding a low lunge. You can do pulldowns with a few different grips. You can have your palms facing the ground (pull up grip), palms facing you (chin up grip) or palms facing each other (neutral grip).
Change the tempo or move back further from the anchor point to make the move more challenging.
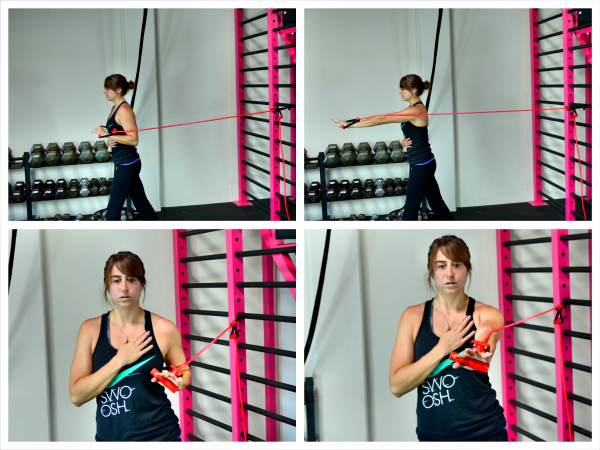
10. Scapular Band Flyes – Scapular Band Flyes will help activate the big muscles of your back and are an extremely important exercise for anyone with neck, upper back and/or shoulder pain to do.
There are three variations of Scapular Band Flyes you can use.
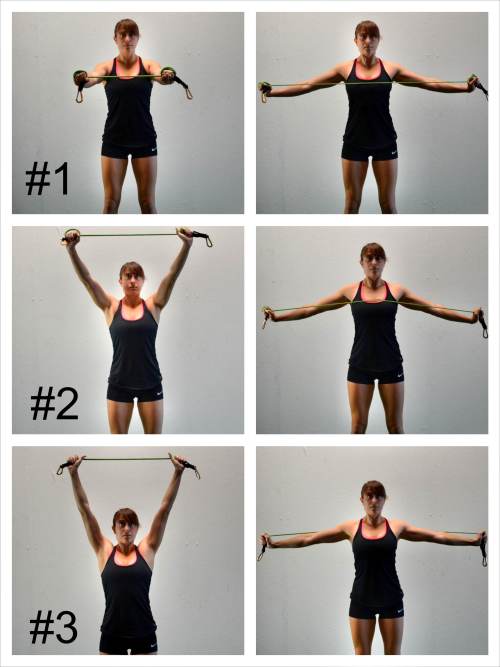
#1. To do the straight on Scapular Band Fly, hold the resistance band with your hands about shoulder-width apart and press your chest out so you are standing nice and tall. Relax your shoulders and draw your shoulder blades down and together. Your arms should be straight out in front of you at about shoulder height or right below. Keeping your arms straight, pull out on the band to open your arms out to the sides. Draw your shoulder blades together as you open and bring the band in to your chest. Do not let your shoulders shrug up as you pull the band or you will just irritate your upper traps and neck. Once you open the band to your chest with your arms straight, bring your arms back together in front of you. Do not bring them all the way together just back to the starting position so there is no slack in the band. Repeat the fly. Do not let the band pull you. Move slowly with it under control. If you have to bend your arms to do the fly or if your shoulders shrug up, you may want to choose a lighter resistance. If you struggle to keep your upper traps from doing all the work with this move, start with the Overhead Angled Fly.
#2. To do the Overhead Angled Scapular Band Fly, you will hold the band overhead in front of you and pull your arms out and down as you draw your shoulder blades down and together. Your arms should stay straight the entire time as you bring the band down to your chest then back up overhead and slightly in front of you.
#3. The third Band Fly is a behind the head overhead move in which you pull the band down behind your head. Hold the band with your hands about shoulder-width apart. Press the band up overhead. Then pull your arms down and out to the sides to bring the band down toward the back of your shoulders. Keep your chest pressed out and draw your shoulder blades down and back as you pull the band down. Keep your arms straight as you pull down. Bring the band all the way to the back of your shoulders with your arms out at about shoulder height. Once the band reaches your shoulders, slowly bring it back overhead.
To regress these flyes, use a lighter resistance band. Make sure to hold the band no wider than shoulder-width apart or you won’t get as much out of the movement. Beginners may even want to do the movements without a band and just focus on drawing their shoulder blades together.
10 Mini Band Moves
Mini Bands are one of our favorite tools whether you are traveling or working out at the gym because they are a great way to activate your glutes.
But Mini Bands are more versatile than you realize. They can also be a great way to work your upper body when you travel or workout at home.
Try these 10 moves to not only work your glutes from every angle but also challenge your upper body!
1. Half-Kneeling Single-Arm Row – This is a great unilateral back exercise that not only corrects imbalances but also works your core.
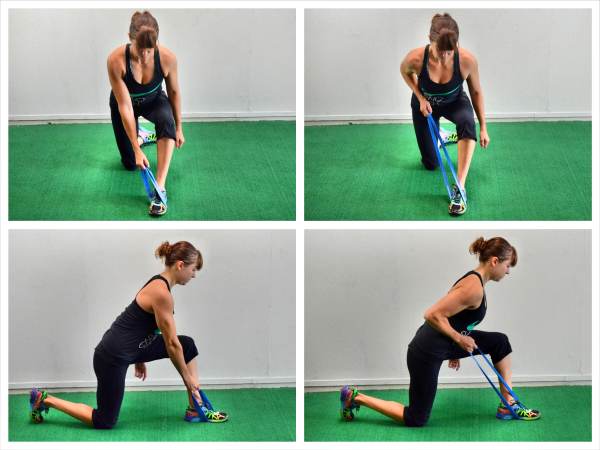
To do the Half-Kneeling Single-Arm Row, set up in a half-kneeling position on the ground with one end of the mini band around your front foot and the other side in the opposite hand from the leg that is forward.
Lean forward over your front leg, keeping your back flat. Make sure your head and neck stay in line with your spine. Extend your arm with the mini band down toward your opposite foot.
Then row the mini band up to your side, driving your elbow back and down. Keep your core tight as you row and do not rotate with the band or shrug your shoulders.
Make sure to drive your elbow down and back as you row so that you feel the row in between your shoulder blades and down the side of your back. Then slowly extend your arm back out.
Keep your back flat and abs engaged the entire time. Complete all reps on one side before switching sides. When you switch arms, also switch to half-kneeling on the other side.
Also make sure you really concentrate on feeling this move in your back. You do not want to shrug your shoulders and feel it in your upper traps.
To make the move harder, use a heavier resistance or slow down the tempo of the move. You can even hold for a few counts at the top of the move to make it more challenging.
2. Lateral Push Up Walk – If you are looking for ways to advance the basic push up and make it even more challenging for your upper body and core, then you need to try the Lateral Push Up Walk.
To do the Lateral Push Up Walks, place the band around both arms. The closer to your elbows the band is, the easier the move will be.
Then set up in a plank position with your hands about shoulder-width apart. You want a nice straight line with your body from your head to your heels. Beginners may want to do this from their knees or even on an incline.
Keeping tension on the band, perform a push up, dropping your chest as close to the ground as possible. Push back up to the top and then step one hand out to the side. Step the other hand laterally toward it so your hands are again about shoulder-width apart.
Perform another push up then step again to the side.
Depending on how much space you have, you can either move a few steps one way before coming back or you can step to one side and do a push up and then step back to the starting position and perform another.
Make sure to maintain good push up form and keep your core engaged. Do not let your hips drop or your butt go up in the air. You want to make sure you don’t feel this move in your low back.
You can also do push ups from your knees and then either step to the side on your knees or lift up onto your toes to step.
Beginners may also want to place their hands up on an incline or remove the push up and just perform a lateral walk. They may even want to do the movement without a band. The most important thing is to do the move correctly and feel the correct muscles working.
3. Cross-Body Tricep Pushdown – While compound movements give you more bang for your buck especially when you are short on time, isolation exercises like the tricep pushdown can help you focus on and work specific problem areas. This movement focuses on the tricep to help tone your arms and improve your push ups.
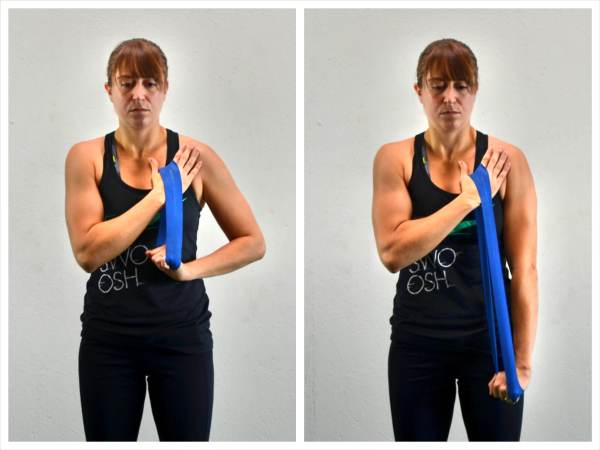
To do the Cross Chest Tricep Pushdown, hold the mini band in one hand and place it around the other wrist.
Take the hand with the mini band around the wrist, and place that hand across your chest and on the opposite pec or shoulder.
Stand up nice and tall and brace your core.
Then holding the band in the other hand, push down on the band and extend your arm down to the ground. You want to extend and then bend at the elbow to feel your tricep working to press the band down. Move slowly and complete all reps on one side before crossing your other arm over your chest and working the other tricep.
To make the move easier, use a lighter resistance mini band. To make it harder, use a stronger mini band or slow down the tempo.
4. Pulldown – The Pulldown is another great exercise to strengthen your back and help improve your pull ups and your posture.
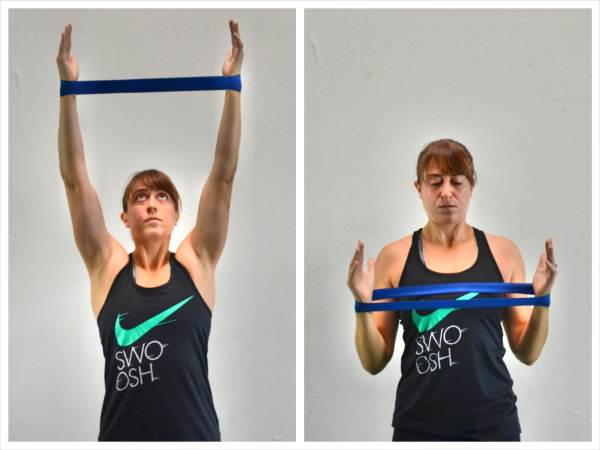
To do the Pulldown, you can either hold the band in each hand or place it around the back of your hands, wrists or even your forearms. Do not hold it in your hands if you can’t keep tension on the band the entire time. To make the move easier, place the band on your arms closer to your elbows.
Then with the band around each arm, extend your hands up toward the ceiling. Stand tall, pressing your chest out and squeezing your glutes.
Draw your shoulder blades down and back.
Then, keeping tension on the band and your arms about shoulder-width apart, pull the band down toward your chest.
Feel the sides of your back working to pull the band down to your chest with your chest pressed out and open toward the ceiling.
Hold for a second at your chest and then extend your arms back up toward the ceiling.
You can either do this move for repetitions or you can hold the band down at your chest for an isometric move.
No matter which you do, make sure to consciously engage your back and draw your shoulder blades down and back.
Make sure you keep tension on the band the entire time. Also make sure you do not arch your low back as you perform the move. Keep your abs braced so you don’t feel it in your low back.
5. Lateral Crawl – Crawling is a complete core exercise and also a great way to get your blood pumping. On the Valslides, we listed a forward/backward crawl as a great option, but because moving in every direction is important, you will also want to do the Mini Band Lateral Crawl.
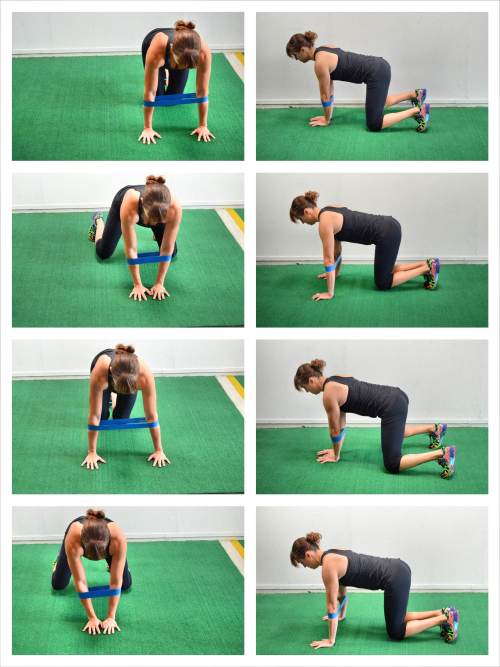
To do Lateral Crawls, place the mini band around your arms. The higher up your arms the mini band is, the easier the move will be.
Set up on your hands and knees with your hands under your shoulders and your knees close together under your hips. Beginners may want to stay here. More advanced exercisers will want to flex their feet and lift up onto their hands and toes.
Keeping your knees close to the ground, move to the right by stepping your right leg out to the side and your left hand in toward your right hand. Then step your right hand out and your left leg in toward your right.
Once you’ve crawled as far to the right as you want, step out with the left leg and bring the right hand in to the left. Then step out with left hand and step the right foot in toward the left.
Make sure that as you step laterally with your hands and feet, you keep your knees under your hips and your hands under your shoulders. You want your knees to stay about an inch off the ground as you crawl. You also want to keep your knees under your hips to keep the quads really working. While a straight-legged crawl is an option, it does change how the movement works your body.
Go slowly to start and then speed up the movement as you become comfortable. You can also place the mini band around your knees to challenge your glutes a bit more. Just make sure that if you put the band around your knees, you do not let your knees cave in as you crawl even as you bring your legs together.
6. Squat – Often when people squat, their knees cave in and their glutes don’t fire. Using a mini band when you squat, can help correct these problems and really strengthen your glutes, especially your glute medius.
There are two variations of the Mini Band Squat you ca do – The Basic Squat and the Squat with Step Out.

Basic Mini Band Squat – Place the mini band around your legs at your knees. Stand tall with your feet about hip-width to shoulder-width apart. Then, keeping your chest up, sit your butt down and back. Squat to parallel, or lower, and then, driving through your heels, come back up to standing. Make sure to press out on the band as you squat and come back up so that your knees don’t cave in.
Repeat the squat, sinking as low as you can while keeping your chest up and heels firmly planted on the ground.
Step Out Squat – Place the band around your knees or ankles. The lower it is around your legs, the harder the move will be. Then step out to one side and sink down into a squat. Come back up to standing and step the foot back in. Step back out and repeat the squat.
Or step out to one side, squat and step the opposite foot in. Step the same foot out again and squat and step the back foot in. This way you will “walk” as you squat. Make sure to keep your chest up as you squat and nice alignment in your lower body. Do not let your knees cave in as you squat.
7. Thrusters – Thrusters are a great advanced glute bridge variation. They are made more challenging by adding the mini band for resistance.
To do the Thruster, place the mini band around your hips and lie on your back on the ground. Place your feet flat on the ground. The closer your heels are to your glutes, the more the move will isolate your butt. The farther from your glutes your heels are, the more your hamstrings will be involved. Make sure that no matter how close or far your heels are from your butt, your heels stay down as you bridge up.
Extend your arms down by your sides and grab the back of the band behind your butt in both hands. Press the band down into the ground and then bridge your hips up toward the ceiling, pressing against the band.
Bridge your hips up as high as you can, hold for a second and then lower down.
Do not hyperextend your low back just to bridge up higher. Also, make sure to drive straight up as you bridge and not push yourself backward.
Slow down the tempo of the move to make it harder or use a heavier resistance. You can also make the Thruster more challenging by doing a single leg variation.
Also, make sure to keep the mini band against the ground as you bridge up. If you can’t get your hips as high using the band as you can with a basic glute bridge, regress the movement. Try a single leg bridge first without the band.
8. Standing Lateral Raises – To work your glutes from every angle and to move your body in every plane of motion, you will also want to include Lateral Raises in your workout routine.
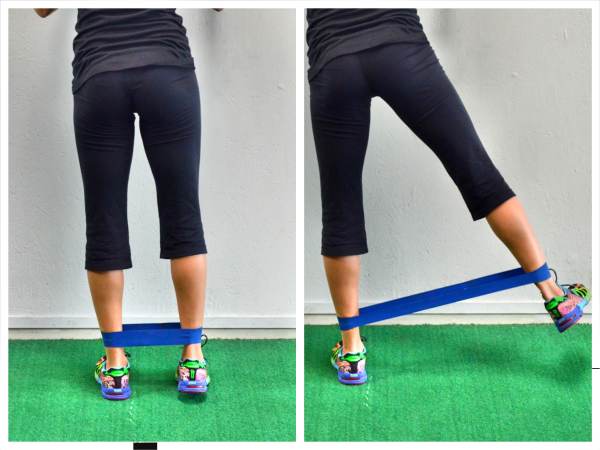
To do the Standing Lateral Raises, place the band around your ankles. Face a wall, chair or anything you can use to slightly balance with. Stand with a soft knee while you lift the other off the ground and out to the side. Keep the leg straight (but don’t lock out the knee) and lift to the side. Try not to let the toe rotate open so that the move stays focused on your abductors.
Keep the foot you are lifting parallel to the foot on the ground. Squeeze your butt as you lift. Do not lean to the side just to lift the leg higher. Keep the core tight and stand up nice and tall. Hold for a second at the top and then lower and repeat.
Complete all reps on that side. You may also feel this in the standing glute as well because that leg is working to resist the band and keep you stabile.
You may find you lean a little to stabilize on the standing leg on the first one and that is fine. The point is just not to actively lean away to raise the leg up higher or to rock as you lift.
If you wish to work your external rotators more, you can then turn your toe open as you lift. Just be aware that it is a different movement and working the muscles in a different way.
Beginners may need to use a lighter band or even no band at all to start. They may also find that a Lying Lateral Raise is easier to control.
9. Lying External Rotation – Rotation is an important movement to include in your workouts even if it is as simple as working on rotating at your hip joint. Lying External Rotation strengthens your glutes and external rotators to help prevent injuries to your hips and knees when they are required to rotate in every day life.
To do the Lying External Rotation, place the band around your ankle and lie on your side on the ground. The higher up your leg you place the band, the easier the move will be. You can support your head in your hand while lying on your side or relax all the way down on your arm.
Stack your feet on top of each other and then turn your toe up toward the ceiling and lift your top leg up as high as you can.
Keep the leg straight as you lift and do not lean forward or backward. Keep your core engaged as you lift.
Lift up and hold for a second or two before lowering back down. As you lower back down, rotate the toe down toward your foot on the ground.
Keep your legs straight as you lift.
Rotating the toe up and down works your external rotators. You can also do a Lying Lateral Raise to work your abductors if you keep your feet parallel instead of turning the toe up and out as you lift.
Beginners may want to first do this movement without a band to feel the difference in the movement as they rotate the foot open and closed.
10. Bicycles – Bicycles are a great crunch exercise to work your abs, especially your lower abs and obliques.
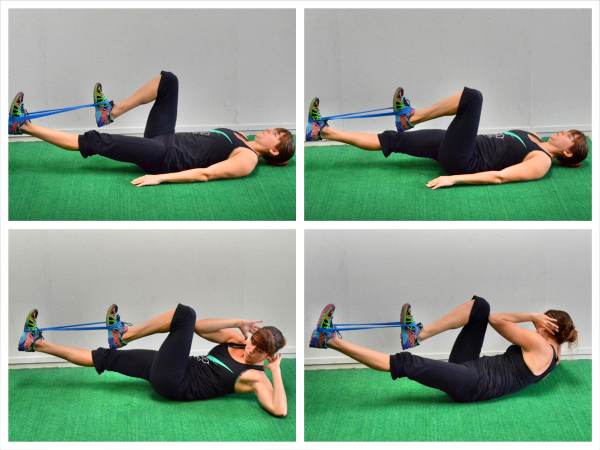
Beginner may want to start with just a lower body Bicycle. To do the lower body movement, place the band around your feet and lie on your back with your legs out straight in front of you.
Keeping your low back pressed into the ground, raise your legs up off the ground. The closer to the ground you keep your legs as you extend them out, the harder the move will be. If you feel the move in your low back, that means your abs aren’t strong enough to have your legs that low and you should have them up higher off the ground.
Then, keeping one leg extended, pull one knee in toward your chest. Make sure your low back stays firmly pressed against the ground.
Pull the knee in as far as you can and then extend the leg back out and pull the other knee in. Keep alternating legs and feel your abs and quads work. You may also really want to focus on squeezing the glute of the extended leg to help protect your low back.
To advance this movement, add in the upper body movement.
For the Bicycle with Rotation, place your hands behind your head. As you pull one knee in, rotate your chest toward that knee as if trying to bring the opposite elbow to your knee. As you rotate, drop the elbow on the side you are rotating toward to the ground and really try to get your shoulder blades up off the ground.
Then extend the leg and pull in the other knee. Rotate your upper body toward that other knee. Keep alternating knees, rotating toward the knee each time.
Make sure to keep your abs engaged the entire time. If you feel this in your low back, regress the movement and only do the leg portion or keep your legs up higher off the ground.
Try This 15-Minute Travel Workout
Often when we travel, we don’t have much time to workout. But just remember, something is better than nothing. Even if you only have 15 minutes, you can get in a great workout.
Try this quick workout below using some of the 30 moves from above!
15-Minute Total ValGym Workout
Set a timer for 15 minutes. Complete as many rounds as possible in that time. Rest as little as possible while doing the most challenging variations of each exercise as possible. Also, do not go to failure on any move so that you can keep moving. While you want to work hard, you don’t want to push so far that you have to rest since this workout is most beneficial if you move the entire 15 minutes.
CIRCUIT:
8-12 reps per side Slider Reverse Lunge
8-12 reps per side Mini Band Half-Kneeling Single-Arm Row
8-12 reps per side Resistance Band Single Arm Chest Press
8-15 reps Posterior Plank to L-Sit
Select the rep range best for you. Do not just do 8 reps because it is the lowest or 12-15 reps because that is the most listed. Do the rep range that makes the move challenging yet allows you to keep moving.
If you have more time, set a timer for 20 or even 30 minutes.
Make sure to spend a minute or two stretching and rolling out before and after the workout even if it means setting a timer for 10 minutes for the circuit. For some great stretches and foam rolling moves, check out the articles below. (For foam rolling, all you need is a tennis or lacrosse ball you can easily store in your suitcase!)
Stretching and Foam Rolling Moves:
- Desk Exercises – These are stretches and moves you can do anywhere, including at your desk or in your hotel room.
- 5 Bridge Variations – These 5 bridging exercises are all you need for a full body warm up in minutes.
- Upper Body Foam Rolling Moves – Roll out your entire upper body with these 5 moves.
- Lower Body Foam Rolling Moves – Roll out your entire lower body with these 10 moves.
To get the Total ValGym, click here.
[call_to_action_small title=”Want More Travel Exercises?” excerpt=”Looking for more Travel Exercises and Workouts. Then check out our Full-Body Mini Band Training Video Course and E-Book! It has over 30 Mini Band Moves to work your entire body as well as some great full-body workouts.” buttonText=”Get The Course Now” buttonUrl=”https://www.udemy.com/mini-band-exercises/?couponCode=ValGymPost” buttonNewWindow=”true” /]


Trackbacks/Pingbacks