To work your back, you need to include Pulling Exercises in your workout routine.
However, not all Pulling Exercises are exactly the same because there are a lot of different muscles that make up your back that are worked to different degrees by different movements.
The two most basic types of Pulling Exercises you need to include in your workout routine though are the Vertical Pull and the Horizontal Pull.
Both work the muscles of your back differently and activate and target different muscles.
The most common bodyweight Vertical Pull is the Pull Up/Chin Up while the most common bodyweight Horizontal Pull is the Inverted Row.
Both moves need to be included in your workout routine and activate different muscles of your back to different degrees.
And while the Inverted Row is often used to help beginners work up to the Pull Up, you need to be aware that these two moves are very different and that the Inverted Row is still a very important movement for even the advanced lifter to include. (The Inverted Row alone also won’t get you to that first full Pull Up because it is a different movement.)
Below we will discuss the differences between the Pull Up and the Inverted Row and even some fun variations of each move you should be including in your workout routine.
The Pull Up vs. The Inverted Row
If you want to focus on the main difference between the two moves, the Pull Up is a Vertical Pull while the Inverted Row is a Horizontal Pull. Both work your back, biceps and core (as well as a few other muscles depending on the exact variations you use of each).
Both are important moves to include in your workout routine as Pulling Exercises to help even out all the Pushing Moves (bench, push ups) that you do. Including Pulling Exercises will help you prevent shoulder, neck and even upper back pain.
Pulling Exercises also improve your posture and can help prevent pain and injury from sitting hunched over a computer screen all day!
But while both movements work essentially the same muscles, they work the muscles to different degrees and from different angles.
Let’s first look at basic form for both Pull Ups and Inverted Rows.
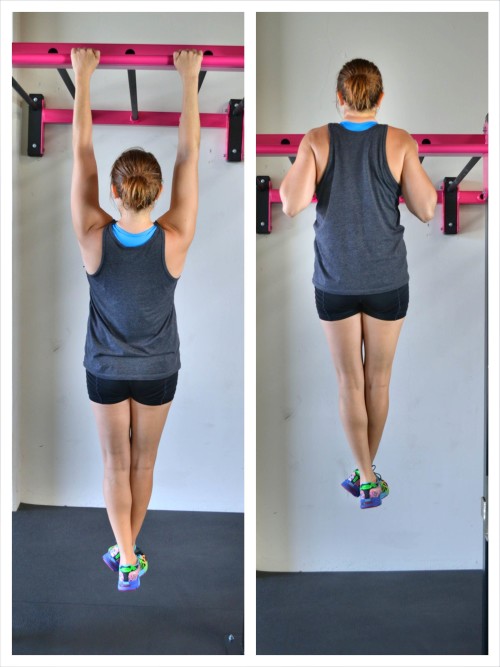
Basic Pull Up Form:

To do a Basic Pull Up, stand with a pull up bar overhead and in front of you. Grab the bar with your palms facing away and about shoulder-width apart.
Hang from the bar with your body hanging straight down. Press your chest out and even lean back ever so slightly.
Then pull your chin up above the bar, leading with your chest. Once you get your chin above the bar, lower back down, fully extending your arms.
Try not to swing a ton or kick.
Repeat, pulling yourself back up to the bar, leading with your chest.
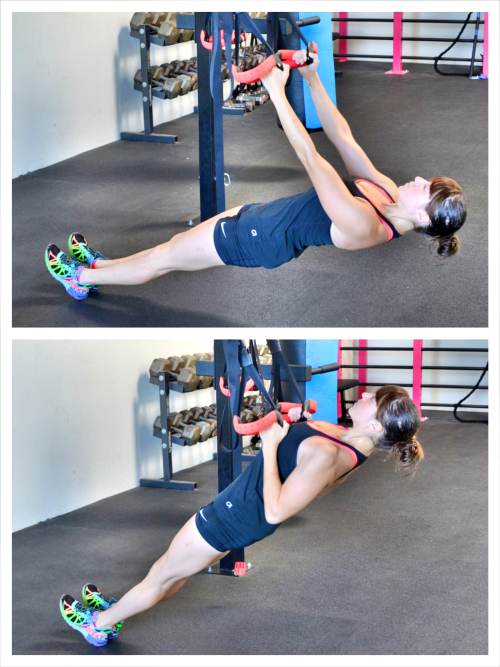
Basic Inverted Row Form:
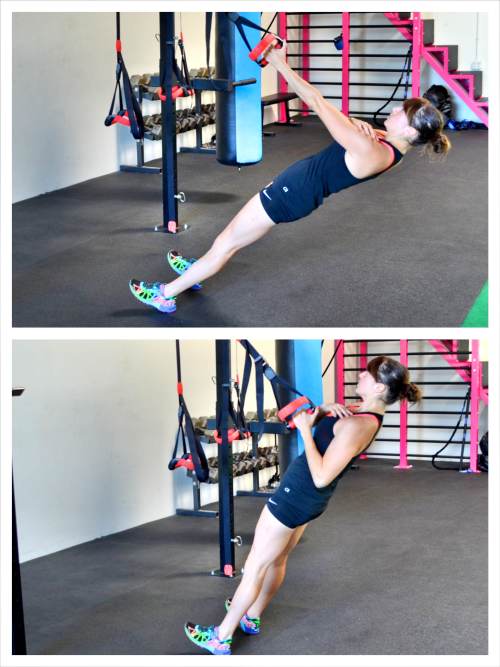
To do the Basic Inverted Row, you can either use a Suspension Trainer or a Bar. Using a Suspension Trainer, hold a handle in each hand with your palms facing in. Walk your feet forward so that your body is at an incline. The closer to parallel to the ground you get, the harder the move will be.
Hang from the straps with your body in a nice straight line and your chest pressed out. Engage your core and glutes and keep your legs straight. You want a nice straight line from your head to your heels. Do not let your low back arch or your hips sag toward the ground.
Then drive your elbows down and back to row your chest up to the handles. Keep your body in a nice straight line as you row up and do not bounce off the bottom. Keep your wrists straight as you row up. Also, do not shrug your shoulders.
Then lower back down. Do not lose tension at the bottom. Make sure to keep the chest pressed out and your body in a nice straight line. Do not swing to row back up.
Make sure to feel your back and arms working to row and not just your arms. Focus on feeling your back pull.
Working Your Back Properly With The Pull Up and The Inverted Row:
Looking at the form above, you can tell that one is a Vertical Pull and one is a Horizontal Pull. However, you can also see that both are compound movements that build back, bicep and core strength.
Both moves improve your posture and even your Pull Ups.
And both require the big muscles of your back to be activated in order for your back to work correctly. All too often people say, “I only feel this in my arms” or even “I feel this in my neck” when talking about Pull Ups or even Inverted Rows. This is because they aren’t pulling from their backs.
If your upper traps are overactive, you will not get as much out of either movement because your weak, small upper traps will try to do work they can’t handle.
This could lead to injury. So for both moves it is very important that you concentrate on the big muscles working and even spend some time activating them first. (Here are some great foam rolling, stretching and activation moves to do before your back workout so you get the most out of Pull Ups and Inverted Rows.)
It is also important that you are able to perform scapular retraction for both moves (and Inverted Rows can even help you get the muscles involved in scapular retraction stronger so your Pull Ups improve).
For both moves you need scapular retraction (which stabilizes your shoulder joint) so that the big muscles of your back work properly and you don’t risk shoulder or neck pain and can even lift more.
For scapular retraction you need to make sure your mid and lower traps as well as your rhomboids are strong and activated (again these muscles are really worked by Inverted Rows which is why Inverted Rows are a great way to improve your Pull Ups!).
Differences Between The Pull Up and The Inverted Row:
While both moves focus on your back, core, and arms (both moves also work your glutes and legs a bit), they target different muscles to different degrees, which makes them great complementary moves and also makes the Inverted Row a great way to build your Pull Up.
The Pull Up is a Vertical Pull and the Inverted Row is a Horizontal Pull, which means they work the muscles of your upper body from different angles so that you are strong when you pull from multiple directions in every day life.
And while both work your lats, rhomboids, mid and lower traps, posterior delts (shoulders), biceps, forearms and core, the Pull Up is much more lat focused while the Inverted Row is much more rhomboid and mid and lower trap focused.
The Pull Up and the Chin Up, a variation of the Pull Up, also work your shoulders and chest during the movement while the Inverted Row is fully a back exercise.
Because these two moves are different types of pulls and work the muscles of your back to different degrees both need to be included in your workout routine.
Building Your Pull Ups With The Inverted Row:
The reason the Inverted Row is a great way to build your Pull Ups is because it strengthens all of the muscles involved in scapular retraction while also being a compound movement that forces your body to engage numerous muscles at once as you perform the pull.
Scapular retraction is important because it stabilizes the shoulder and allows you to recruit the big muscles of your back to perform a pull correctly. This means you can pull more weight because the correct muscles are working.
Strong muscles that can perform scapular retraction properly also mean you can do a Pull Up.
If you’ve ever struggled to Pull Up from a dead hang, it probably means you aren’t able to perform scapular retraction and get your lats engaged to pull. If you can’t perform scapular retraction, you can’t recruit the muscles of your back properly and therefore are left with the muscles of your arms, shoulders, and maybe even a little your chest, to pull you up.
And that isn’t going to work.
That is why the Inverted Row is a great way to progress toward the Pull Up and even strengthen your Pull Ups.
The Inverted Row will strengthen the big muscles of your back so that they are strong and working when you go to do the challenging Pull Up movement. The Inverted Row also requires your core to be engaged and strong to help assist you with the row (Pull Ups require more core strength than you think!).
However, while the Inverted Row is a great way to build your strength for Pull Ups, it alone won’t get you there. The Inverted Row is still a Horizontal Pull while the Pull Up is still a Vertical Pull and the muscles are engaged to different degrees and worked in different directions.
While you need to use Inverted Rows to build your back strength and work toward more Pull Ups, you also need to use Pull Ups, or other Vertical Pulls, to build your Pull Ups.
Below are a few Variations of both the Inverted Row and the Pull Up to help you improve your Pull Ups and your posture to prevent and alleviate neck, shoulder and upper back pain.
With both moves, you can use a variety of grips and even modify the moves so that, no matter your fitness level, you can strengthen your back and core!
Pull Up Variations:
Below are a few Pull Up Variations to help you build your Pull Ups and strengthen your back.
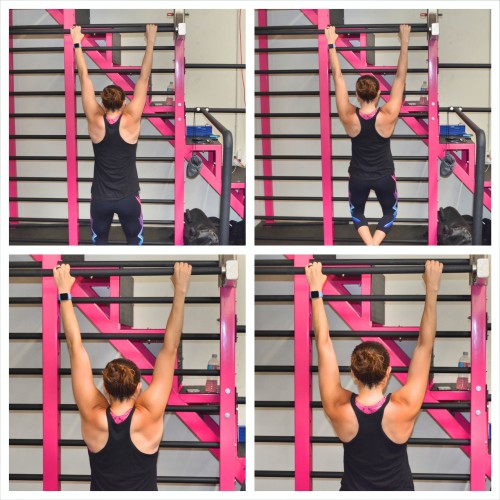
Scapular Retraction Mini Pull Ups – As I’ve mentioned numerous times in this post, scapular retraction is key. While you can use the Inverted Row to strengthen the muscles involved with scapular retraction, you still need to develop the mind-body connection to do it during a Pull Up.
That is why the Scapular Retraction Mini Pull Up is a great move to include in your workout routine. This move will help you improve your scapular retraction so that you can perform it during the Pull Up.
To do this move, hang from a bar with your palms facing away from you. Your hands should be about shoulder-width apart although you can do it with them wider apart or closer together.
From this hanging position, press your chest out and pull your shoulder blades down and together.
Don’t bend your elbows and start to pull up. Just press your chest out and retract your shoulder blades bringing them down and together.
You should feel your shoulders go down as your chest lifts up.
Then relax out and repeat. Remember, you are not bending your elbows to make this movement bigger.
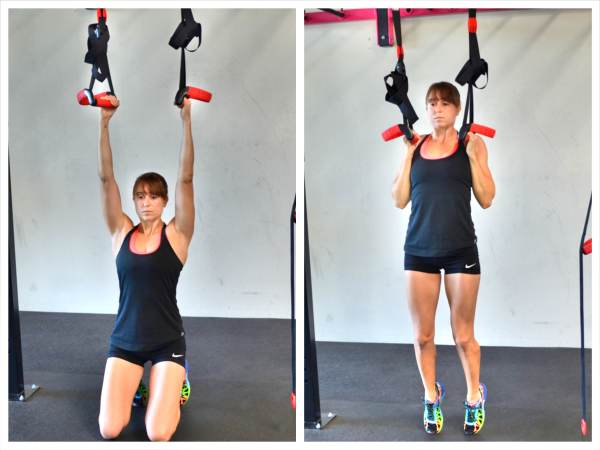
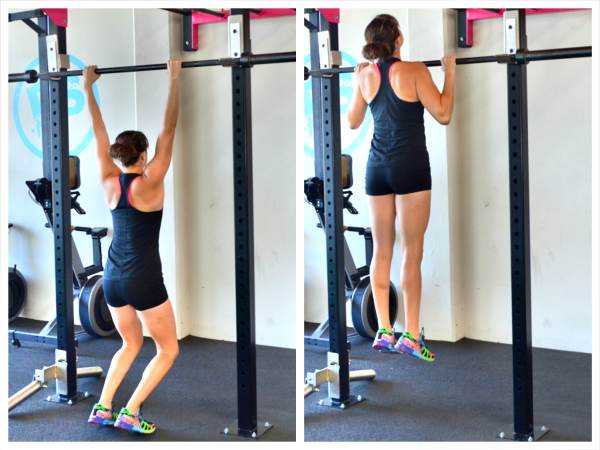
Foot-Assisted Pull Up – If you want to be able to do a full Pull Up, you need to start taking on your own weight while doing a Vertical Pull. That is why this is a great Assisted Pull Up Variation.
The Foot-Assisted Pull Up will force your body to work in the same way it would with a full Pull Up while taking a little of the weight off your back and biceps.
To do the Foot-Assisted Pull Up, hang from a bar or Suspension Trainer (find something low enough that you can place your feet on the ground to assist you).
Hanging straight down from the bar or trainer, place your feet flat on the ground in front of you or set up with your feet behind you so you can push up with your toes. If you put your feet behind you, you may have to move forward just a bit to make sure you perform a vertical pull. Either foot position works, just make sure you set up so you can pull straight up without arching your back or letting your hips come up and forward. You don’t want a huge arch in your body or to turn this into a row.
From this hanging position with your arms out straight, press your chest up and out to retract your shoulder blades. And then, leading with your chest, pull yourself up.
Use your feet only as much as you need to pull up. Your goal is to use your arms as much as possible. Pull your chin all the way above your hands and try to get your chest to your hands.
Then lower back down, fully extending your arms at the bottom.
Do not round forward as you pull. Really lead with you chest. And then relax all the way back down. Do not cheat and not fully extend your arms at the bottom.
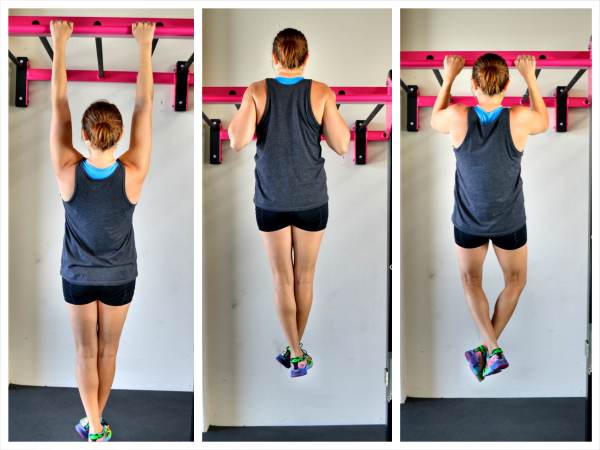
Jumping Pull Up – The Jumping Pull Up is another great way to modify the Pull Up and especially work on your lock out at the top. The more you jump when you perform this move, the easier the move will be.
To do the Jumping Pull Up, set up under a bar or use a Suspension Trainer that is high enough off the ground that you can hang from it, but low enough that you can use your legs to help get your chin up over the bar. You want to be able to complete a full range of motion through the Pull Up.
Start hanging from the bar with your feet on the ground and your arms straight. Press your chest out and retract your shoulder blades then jump, and at the same time, pull yourself up with your arms to get your chin up over the bar. Only jump as much as you need to get your chin up over the bar.
Try even jumping with only one leg to make the move harder.
Lower yourself back down slowly, fully extending your arms at the bottom before you jump up again.
You can make this move harder by slowing down the lower down like with the Eccentric Pull Up Variations below.
Eccentric Focused Pull Up – To be able to do the full Pull Up, you’ve got to be able to handle your full weight. And the best way to start taking on your full weight during the Pull Up (all while spending more time under tension to develop strength) is the Eccentric Pull Up.
The Eccentric Pull Up is a Pull Up that focuses on the lower down and it is a necessary variation to include to improve your Pull Ups whether you want that first one or that 15th. Whether you use the Foot-Assisted Pull Up, Jumping Pull Up or the full Pull Up to get to the top, you want to focus on lowering down as slowly as possible.
You want to take at least a 3-5 count to lower down.
If you still need assistance to slow down the lower down, you can do this as a Foot-Assisted Variation; however, the goal is to try to take on your full weight if possible.
When doing this variation, you may need to keep the reps low so you can keep the move slow. Keeping the move slow is more important than pushing past failure and doing a billion reps.
To do the Eccentric Pull Up, get to the top of the Pull Up (doing whatever variation is needed). Once at the top of the Pull Up, lower yourself down as slowly as possible. Think about keeping your chest pressed out.
The slower you can lower down, the more you will get out of this move.
Lower down until your arms are straight and then reset at the top and repeat.
Pull Up Holds – Pull Up Holds are another great way to strengthen your back and improve your Pull Ups. Depending on which part of your Pull Up is the weakest, or even how you want to work your back that day, you can choose from 3 Basic Pull Up Holds.
- Dead Hang – This move isn’t simply hanging from the bar. It should help you work on scapular retraction and activating your lats right from the bottom of the pull up. This is basically a Scapular Retraction Mini Pull Up held at the top. To do the Dead Hang, hang from the bar with your arms straight. You should feel like your shoulders are a bit raised as you hang from the bar. Then press your chest up and out as you draw your shoulder blades together. Feel your shoulders sink down and your neck elongates as you retract your shoulder blades and press your chest out. You should feel your back work as you hang there with tension.
- Mid-Pull Up Hold – The Mid-Pull Up Hold can really be done at any spot along the entire Pull Up movement and can help you get over your stick point (the point you usually struggle to get over when doing Pull Ups). Set up where ever you tend to fail, or right above that spot, and hold. Make sure you don’t shrug or tuck your head as you hold. Really try to lead with your chest and feel the muscles of your back working. Holding with your elbows bent to 90 is a great Mid-Pull Up Hold to do and very challenging as well.
- Pull Up and Hold – The Pull Up and Hold is a great way to work on your lock out at the top aka getting your chin up over the bar. To do the Pull Up and Hold, start hanging from the bar. Then press your chest out and pull yourself up to the top of the Pull Up. If you can’t pull yourself up, you can also use a chair or jump to set up at the top. Hold with your chin over the bar or even the bar at your chest. Keep your core tight and do not tuck your knees in toward your chest. Make your back and core really work with this move. Do not let your shoulders start to shrug as you hold or round forward. If you start to lose the hold, lower yourself down as slowly as you can and then perform a dead hang for a few extra seconds. If you struggle to hold at the top, you can also do a foot-assisted variation to lessen some of the weight on your upper body.
Inverted Row Variations:
Below are some Inverted Row Variations to change up the move and even work your core more.
Make sure with all of them that you feel your back working to pull. If you don’t, lessen the incline. Only get closer to parallel to the ground or attempt the Feet-Raised Inverted Row if you can do the movement correctly and feel your back working.
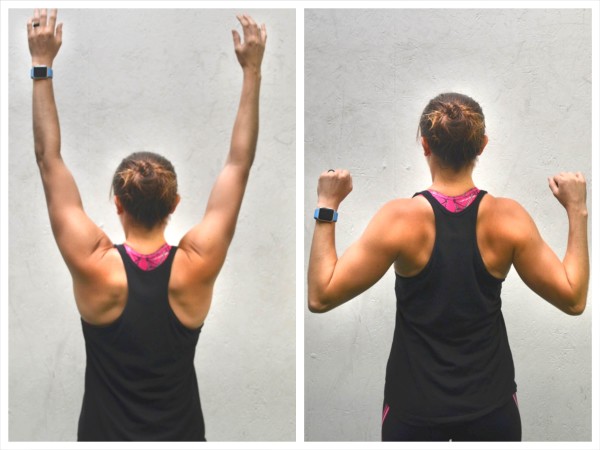
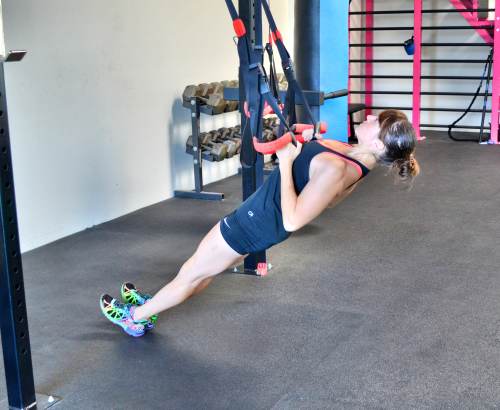
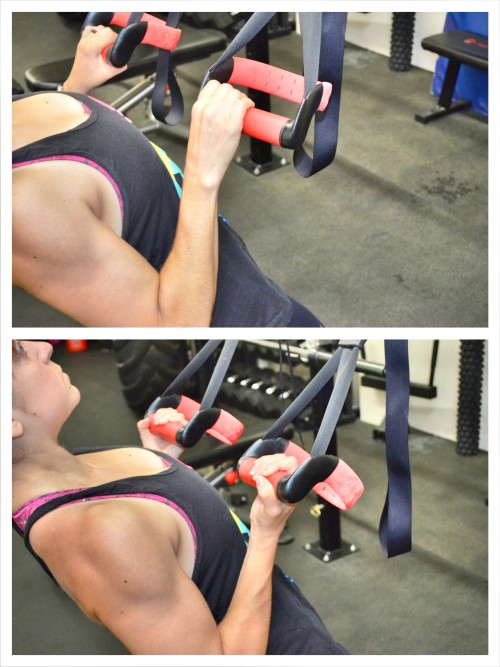
Inverted Row Hold – The Inverted Row Hold is a great isometric move to build stability and strength in your back, core and biceps. It is also a great way to really focus on feeling your back work during Pulling Exercises. (If you have neck, shoulder or upper back pain, this is a must-do move. You can also do a variation of this hold called the Scapular Wall Hold.)
To do the Inverted Row Hold, you can hang from a Suspension Trainer or Bar just like with the Basic Inverted Row. Walk your feet forward so you are leaning back. Remember the closer to parallel to the ground you get, the harder the move will be. Squeeze your core and glutes and press your chest out so there is tension between your shoulder blades. Make sure your shoulders are relaxed and not shrugged up by your ears. Also, make sure your body is in a nice straight line.
Then row up, keeping your body in that nice straight line. Row until your chest comes up to the handles and hold there. Do not let your hips sag or your body arch as you hold. Do not start to turn your hands in and rotate your wrists so that your hands and wrists aren’t in line with your forearms.
Make sure that as you hold you feel low between your shoulder blades working. You should not feel your neck straining.
Overhand Grip – You can also change up the Inverted Row by the type of grip you use. The Overhand Grip will be more challenging than the neutral grip used with the Basic Inverted Row. It will also be more challenging than the Underhand Grip.
To do the Overhand Grip, you will set up to do an Inverted Row with your palms facing away from your face. The row will otherwise be the same; however since this is a more challenging move, make sure you do not compensate by letting your shoulders shrug, hips sag or back arch.
Do not let your elbows flare way up by your ears while using this grip. That will cause your shoulders to shrug and your upper traps to take over.
Also make sure that as you row, you don’t bounce off the bottom.
Underhand Grip – If you struggle to keep your neck from straining and you have trouble feeling your back working to row, you may want to start with the Underhand Grip Inverted Row.
To do the Underhand Grip Inverted Row, hold the bar or Suspension Trainer with your palms facing your head. Place your body as close to parallel to the ground as you can and keep your body in a nice straight line.
Then row up, driving your elbows down and back as if sort of driving them down toward your hips. Row your chest up to the handles or bar and then lower back down.
At the bottom, keep your body in a nice straight line.
Feet-Elevated Inverted Row – If the Inverted Row with your body basically parallel to the ground is easy, try raising your feet up to make the move harder.
To do the Inverted Row with Feet Elevated, place a box or bench in front of you. Then place your feet on top while holding a bar or Suspension Trainer in both hands. Put your body in a nice straight line from your heels up on the box to your head.
Hang down with your arms straight and then row up, moving your body as one unit. Lower back down and repeat.
Make sure to keep your body in a nice straight line and move as one unit. Do not let your hips sag or bounce off the bottom. Also do not do the “worm” just to row up.
If you can’t move as one unit and feel your back working to pull you up, you need to regress the move and put your feet on the ground.
Single Arm Anti-Rotational Inverted Row – This Inverted Row variation is a great way to isolate each arm and each side of your back to correct imbalances, which can help prevent injury. It also is an anti-rotational movement and will challenge and work your core.
To do the Single Arm Anti-Rotational Inverted Row, a Suspension Trainer works best. Place one hand across your chest and grab a strap of the trainer in the other hand. Set up in a nice straight line, squeezing your quads, glutes and core and pressing your chest out.
Then row up. Do not let your body rotate as you row up. You want to row as if you are pulling with both arms. That means your body shouldn’t close toward the strap or your shoulder shouldn’t open toward the ground.
Row your chest all the way up. Do not shrug your shoulder as you row. Drive the elbow down and back as you row and pull your hand in toward the bottom of your pec.
Then lower back down. Do not let your back round or your body open up toward the ground as you lower. Repeat rowing back up. Do not bounce off the bottom.
While the Inverted Row and Pull Up are both back exercises, they target the muscles of your back from different angles and activate those muscles to different degrees. Both should be a part of your workout routine to help strengthen your back, improve your posture and prevent and alleviate neck, shoulder and upper back pain.
Do you include both? Which is your favorite?
And for more Back Exercises and ways to improve your Pull Ups, click here.


Awesome explanation! Thank you very much!
Thanks!
great stuff here,
Thanks!
Just what I was looking for. Thank you.
Glad to help out 🙂
I love reading your articles and you are so nice to have so many question I had for you in the past. I want to thank you for that!:)
Thanks Tim! ALways here to help!
one of the best instructional videos i have seen yet on the 2 exercises
Thanks!