If you don’t have access to a ton of space or equipment, but you want to add some variety and a little extra challenge to your bodyweight workouts, a pair of sliders is a great tool to have on hand!
They are easy to use at home and take with you when you travel so that you can advance basic bodyweight moves. (And if you have hardwood floors, towels can even work instead!)
They can also reduce impact on moves like burpees while still giving you a killer cardio workout!
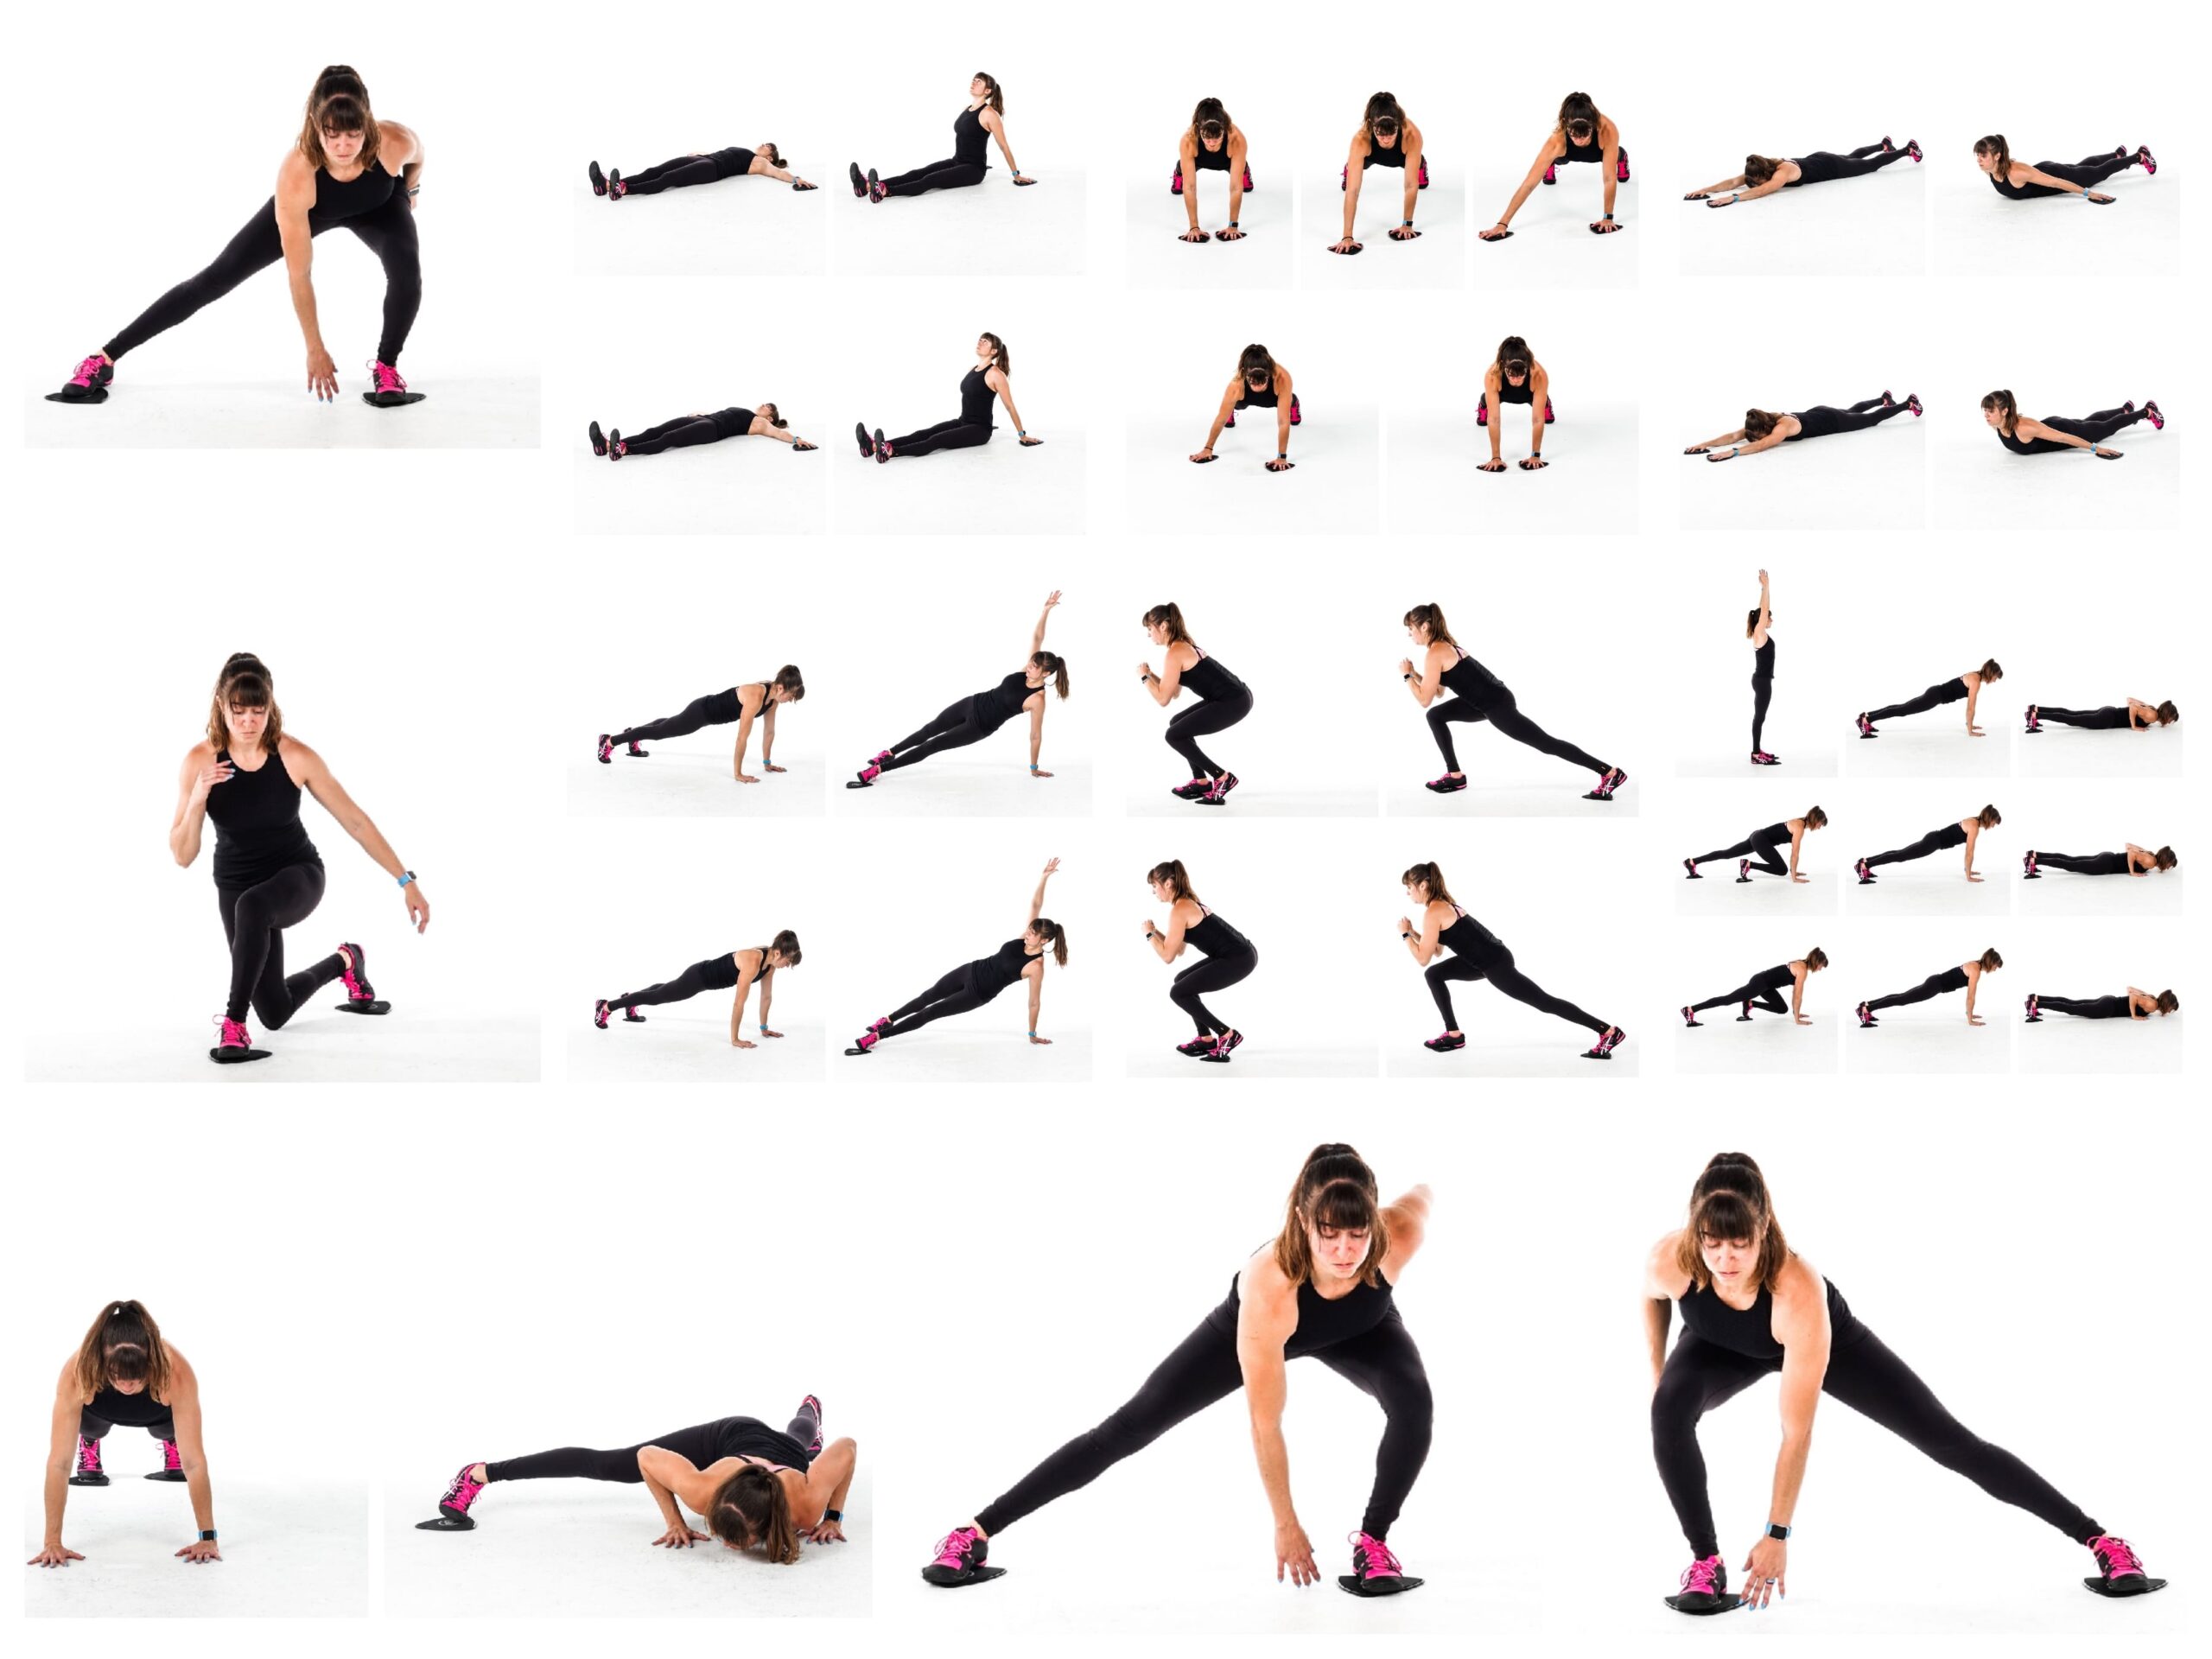
Below are 12 fun slider exercises you can use to get in a great full body cardio and strength workout!
And if you need a set of sliders, and also an amazing BOOTY BAND, check out this RS TriSlide and Booty Band Bundle!
12 Slider Exercises For A Full-Body Workout
Slider Mountain Climber Burpee:
Want a core-intensive but low impact burpee variation to use in your cardio workouts?
Then the Slider Mountain Climber Burpee is a great variation to include!
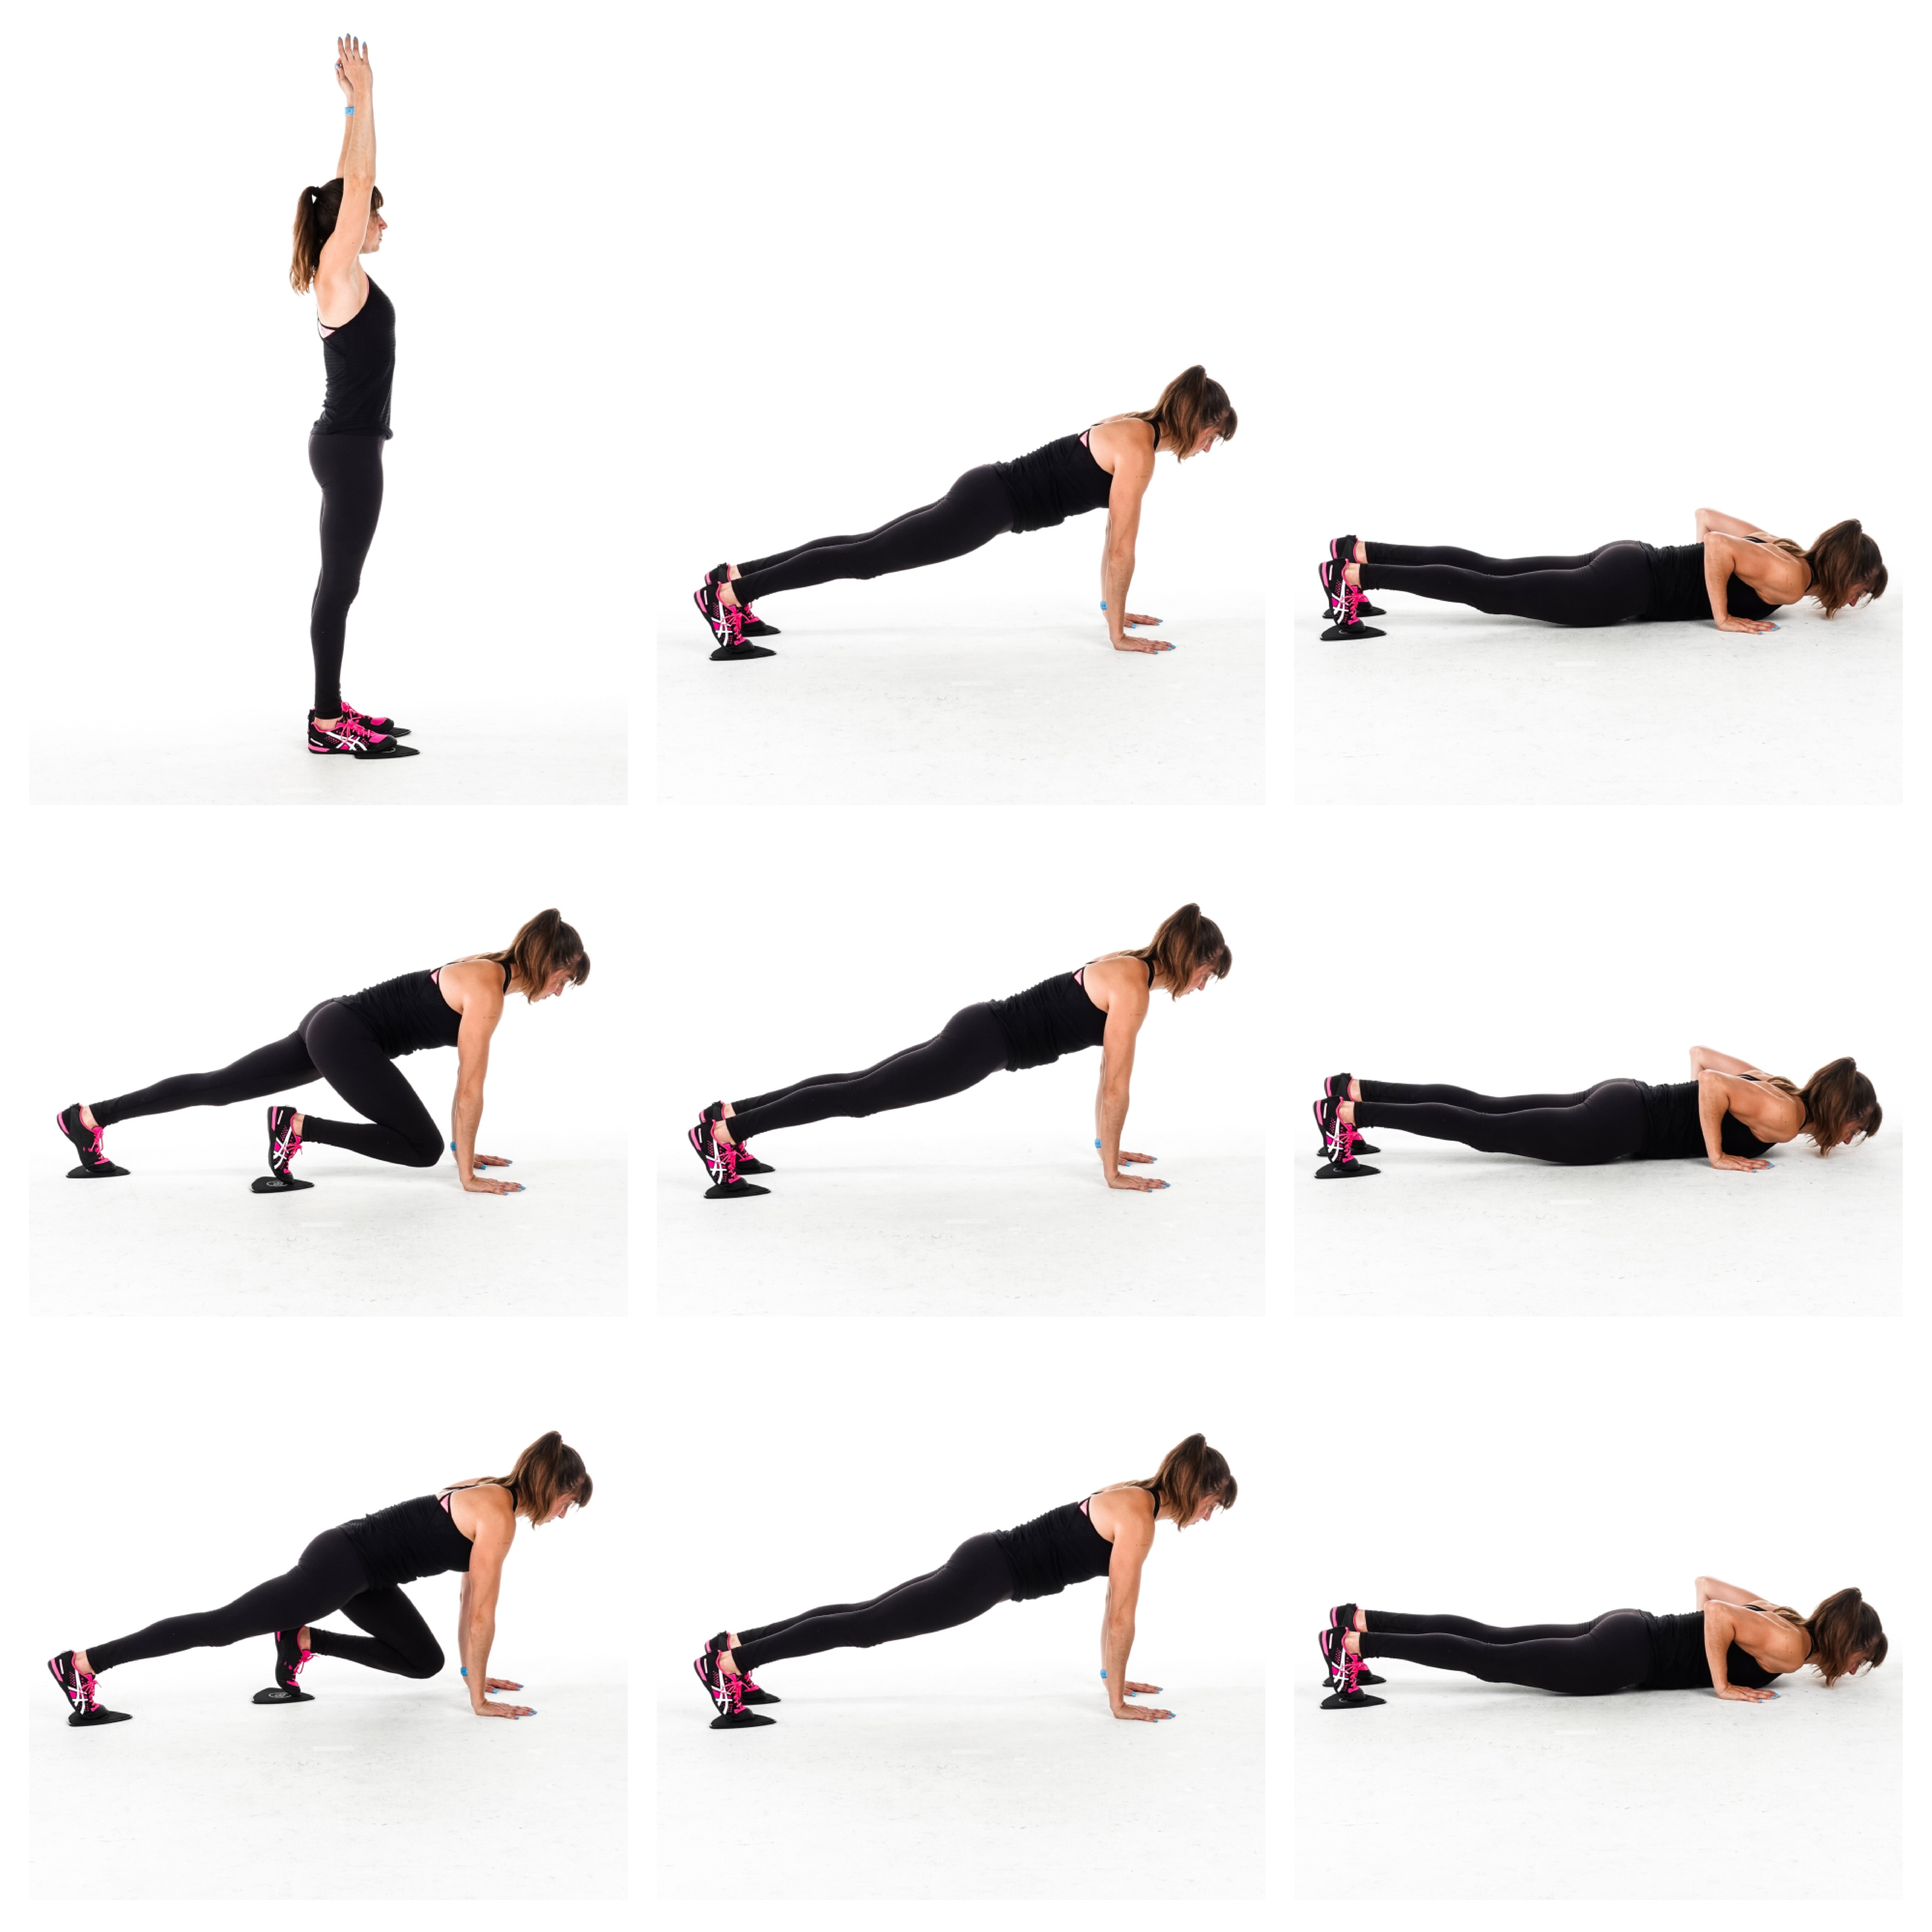
To do the Slider Mountain Climber Burpee, start standing tall with a slider under each foot. Make sure the ball of your foot is about in the middle of the slider for the most control.
Then bend your knees to sink down and place your hands on the ground as you slide your legs back into that high plank position.
With your legs out straight behind you and your hands about outside your chest, perform a push up, dropping your chest to the ground. Do not let your elbows flare way up. Create an arrow shape with your body.
Press back up and then at the top of the push up, tuck one knee in toward your chest. Do not let your hips sag or butt go up in the air. Also, make sure your hands stay outside your chest or below your shoulders.
Straighten your leg back out and perform another push up and then another knee tuck on the other side.
Perform one final push up then slide both feet back in and stand up. Raise your arms up overhead then bend back over and place your hands on the ground to slide your feet back into the high plank position.
To modify this move, you can remove the push ups completely or even eliminate just one or two. You can also go down to your knees for the push ups and come back up to your feet for the mountain climber knee tucks.
Adjust as you need so you can maintain good form and move quickly to get your blood pumping!
Skater Lunges:
Want to work your legs, especially your glutes and inner thighs, with a low impact movement?
Then try these Skater Lunges!
They are a great cardio lunge variation that is a low impact option instead of doing skater hops. Plus they work your inner thighs more!
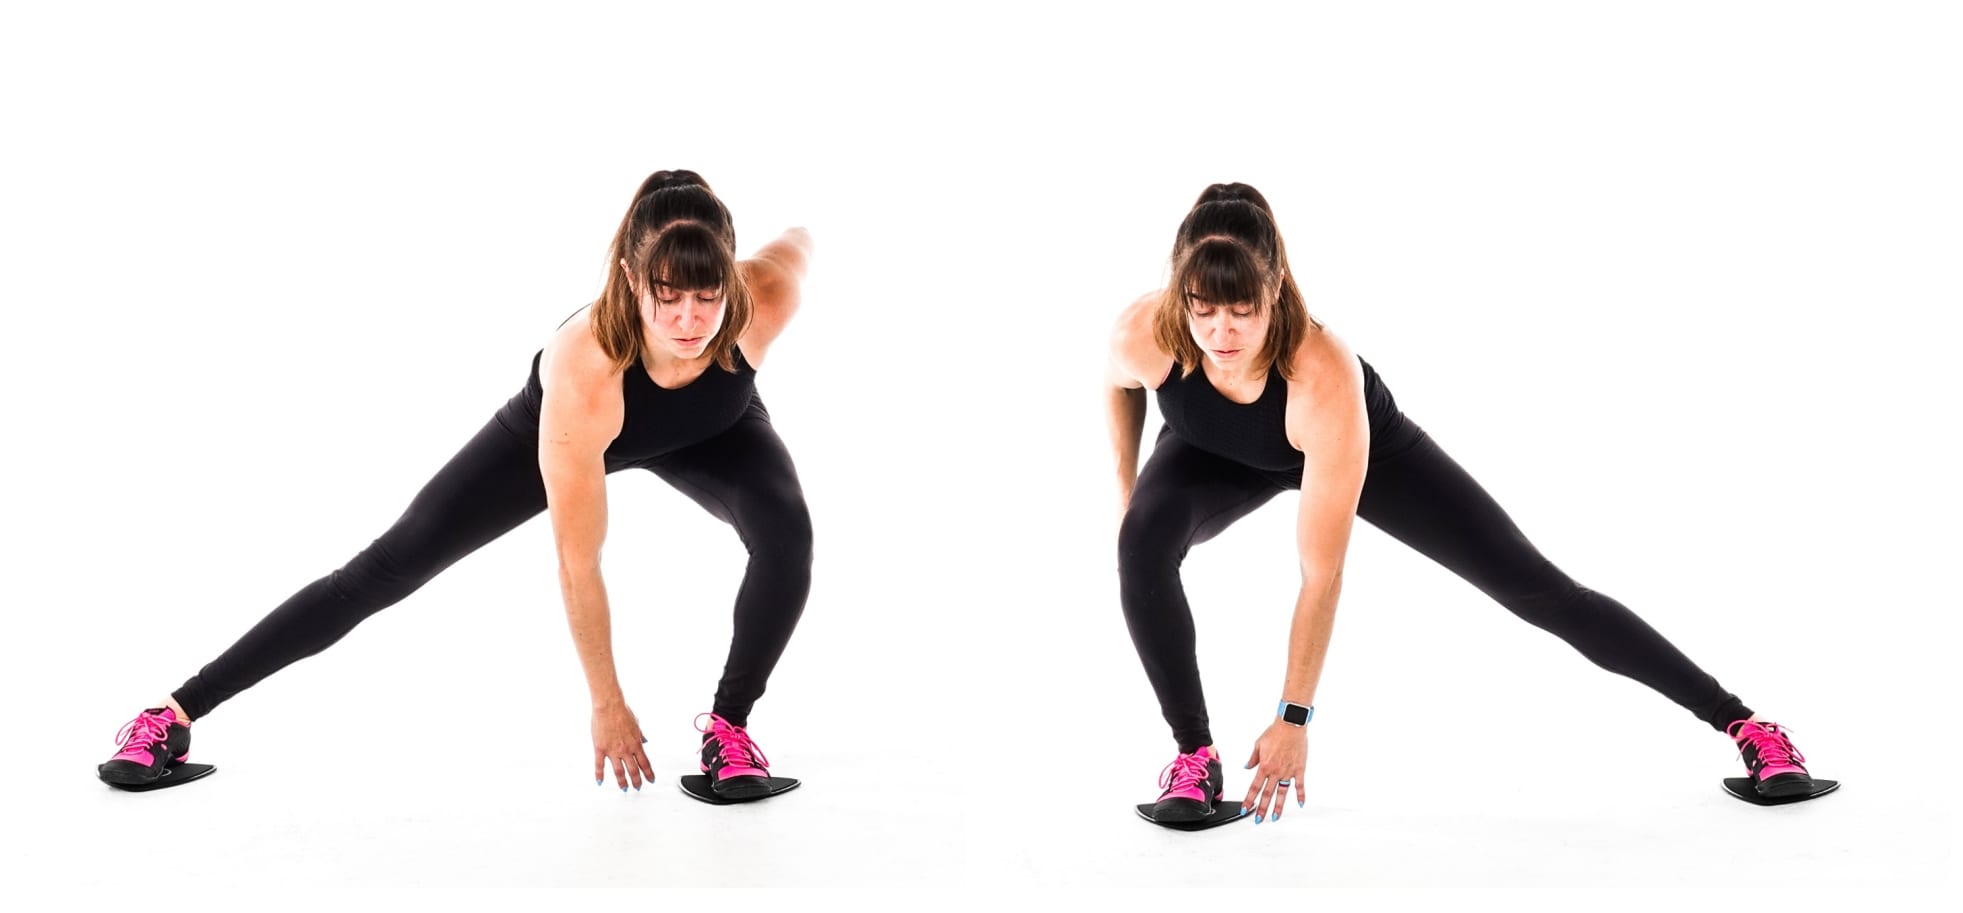
To do Skater Lunges, stand tall with your feet together and a slider under each foot. Make sure your foot is centered on the slider, with the ball of your foot firmly on the slider for control.
Slide one foot out to the side with that leg staying straight as you hinge to sit your butt back and bend that standing knee to sink into a side lunge.
You can reach the opposite hand down toward the heel of your standing leg (the leg you bend to sink into the lunge). Make sure your weight is more centered on this leg so you don’t end up sliding out into the splits.
Then use your inner thigh to help pull the slider back in and drive back up to standing using the glute of the standing leg.
Move quickly to pop up and then slide out and sink into a lunge on the other side. Again reach the other hand down and back toward your heel to help you hinge properly and really sit back.
You don’t need to reach down and back but it can help if you struggle to hinge correctly and load your glutes.
Move quickly popping back up before sliding into a lunge on that starting side.
Move as quickly as you can while staying in control!

Low Reverse Lunge Slides:
Want a killer leg move? One that will really burn?
With Low Reverse Lunge Slides, you’ll keep your legs under constant tension so you’ll feel those quads and glutes burn!
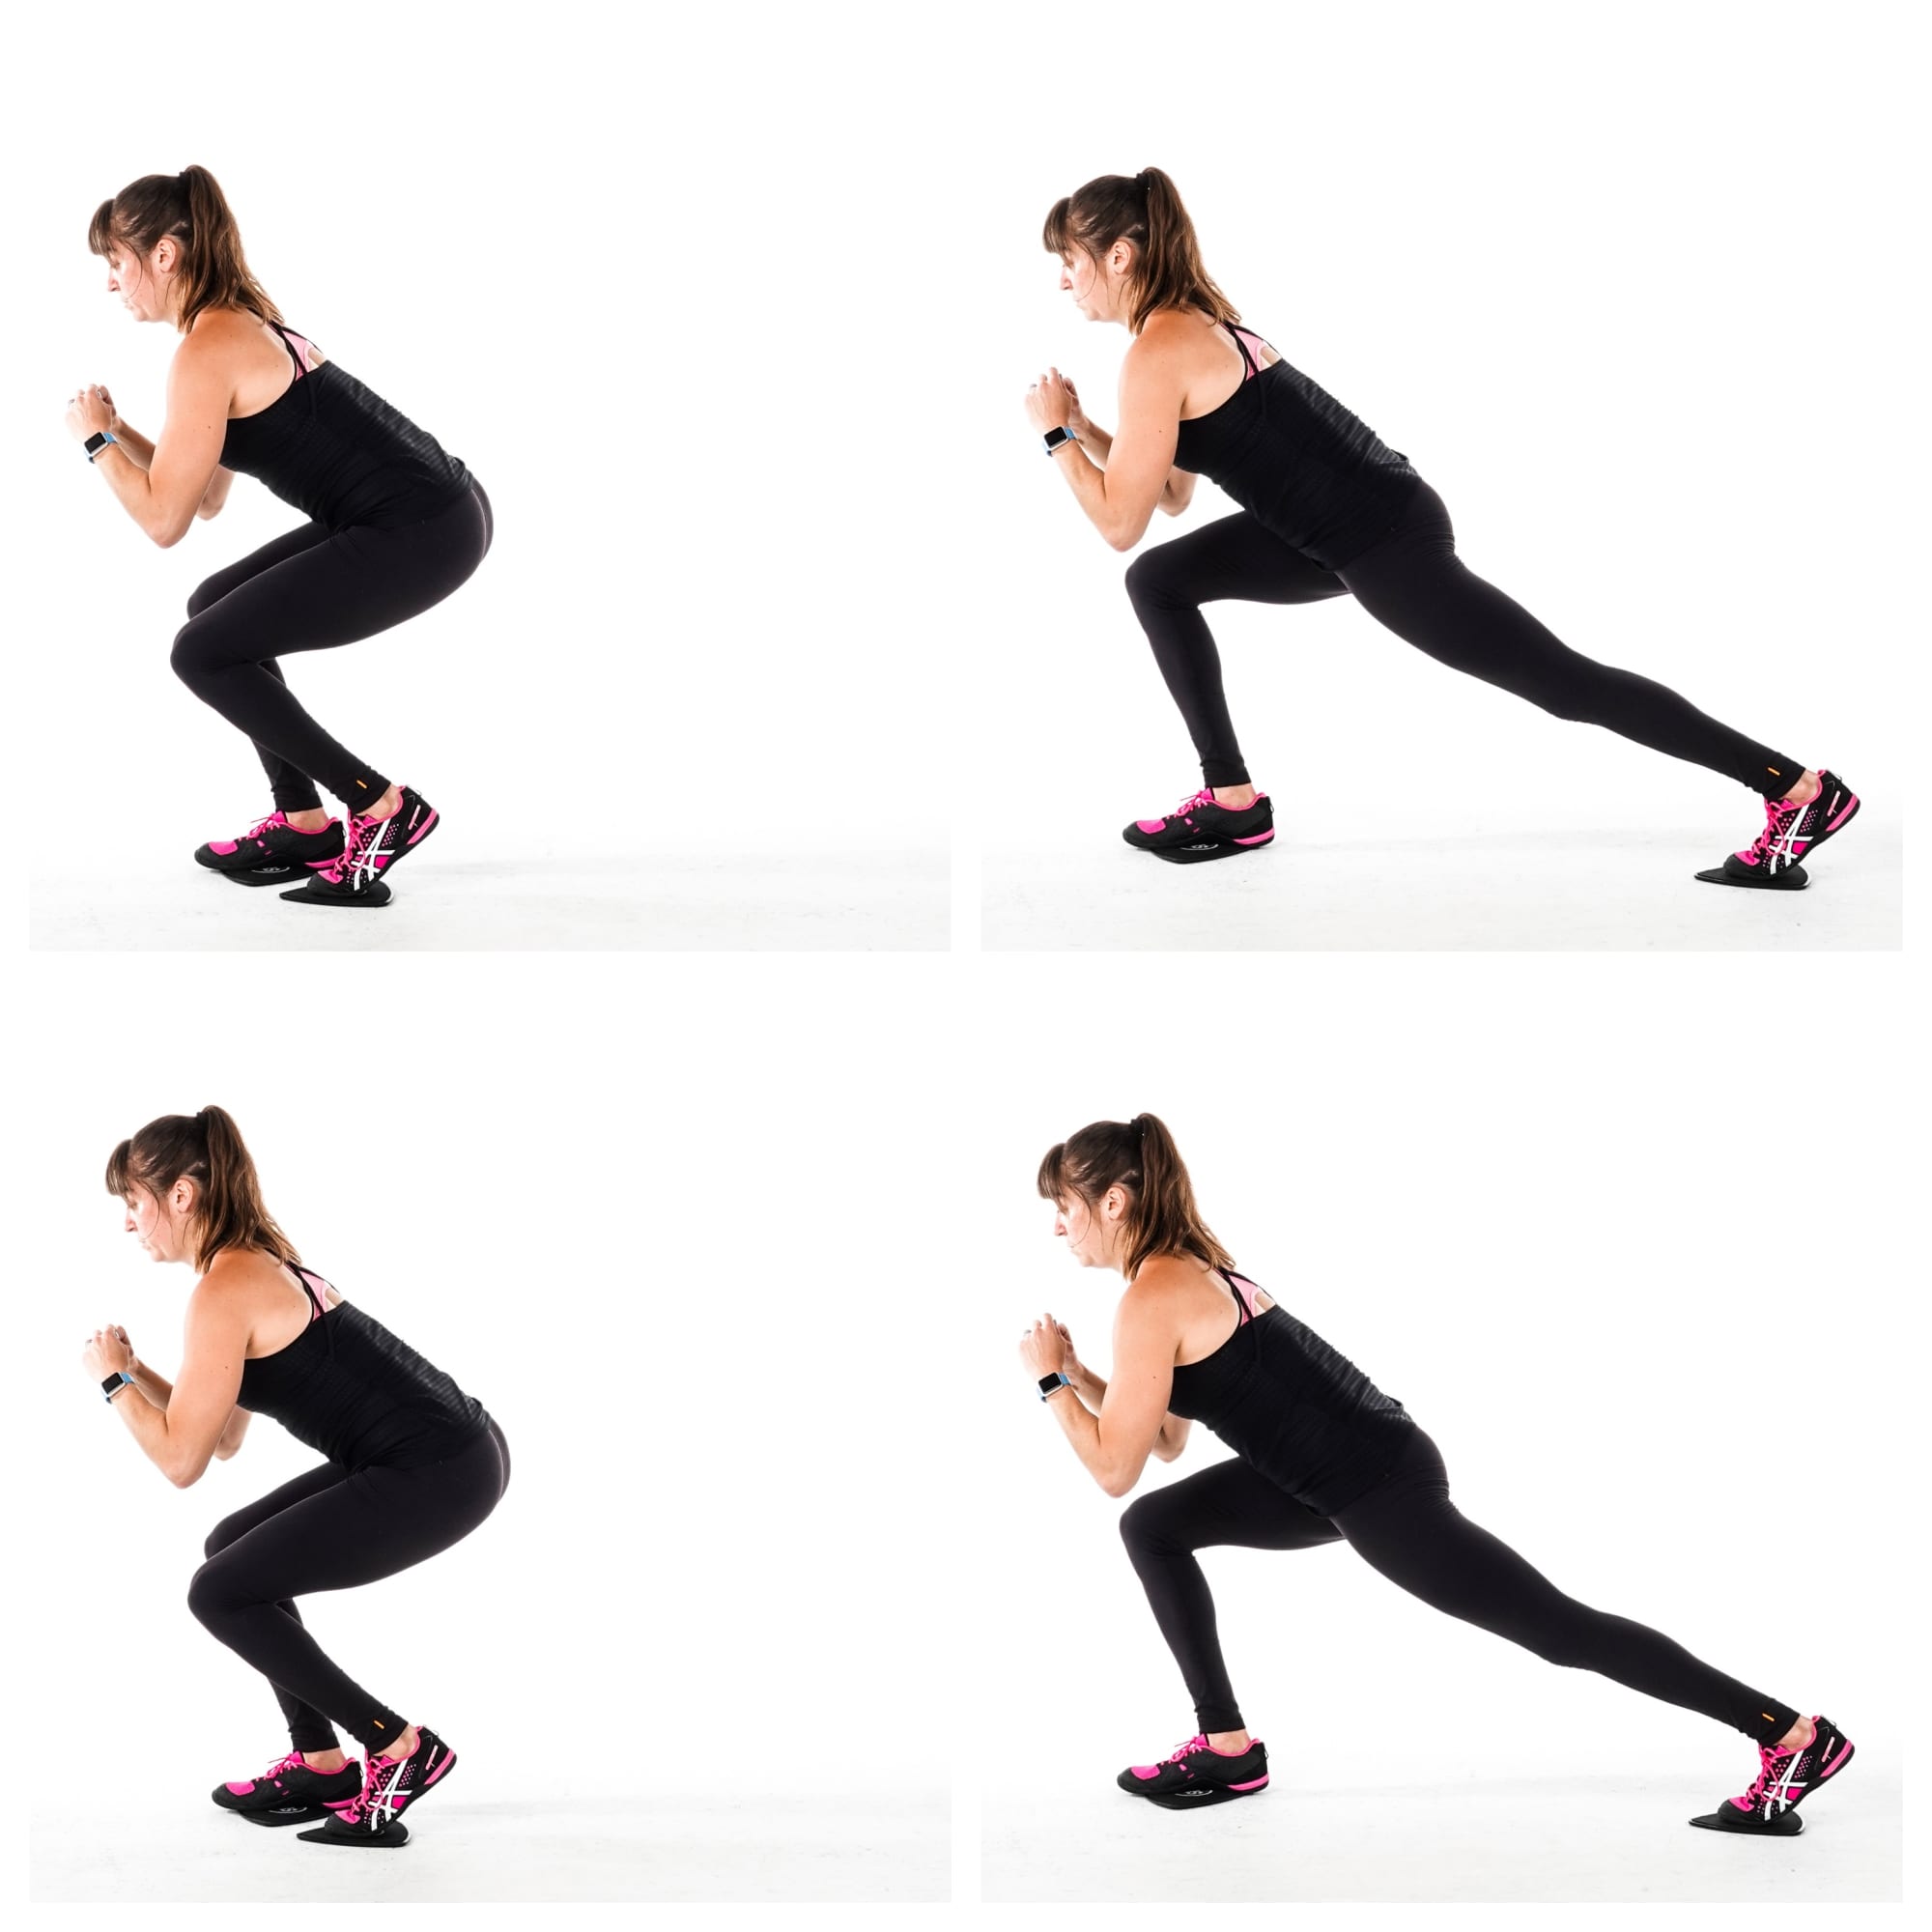
To do Low Reverse Lunge Slides, you can place a slider under each foot or simply under the moving leg as you will complete all reps on one side before switching.
Stand tall with your feet together then sink into a little squat and slide your foot back a few inches so you are in a staggered stance holding just above parallel in that squat.
The more mobile you are, the closer to parallel you will sink.
Keeping the foot in front, which would be the foot on the ground if you’re using one slider, firmly planted, slide your other leg back. Do not stand up out of the squat as you slide back.
Simply extend that leg back into a nice reverse lunge position, keeping your front leg bent.
Then slide that leg back forward into the staggered squat stance without standing up.
Move at a controlled pace and slowly extend the leg back out before sliding back in.
Do not stand up until all reps are complete. Beginners may not sink as low or slide back as far in the lunge.
Slider Side to Curtsy Lunge:
This hybrid lunge exercise is a great way to work your entire leg and even improve your hip mobility and stability. You will really target your glutes and your inner thighs too with this Side to Curtsy Lunge variation!
This lunge combo is a great way to challenge your legs without adding weights!
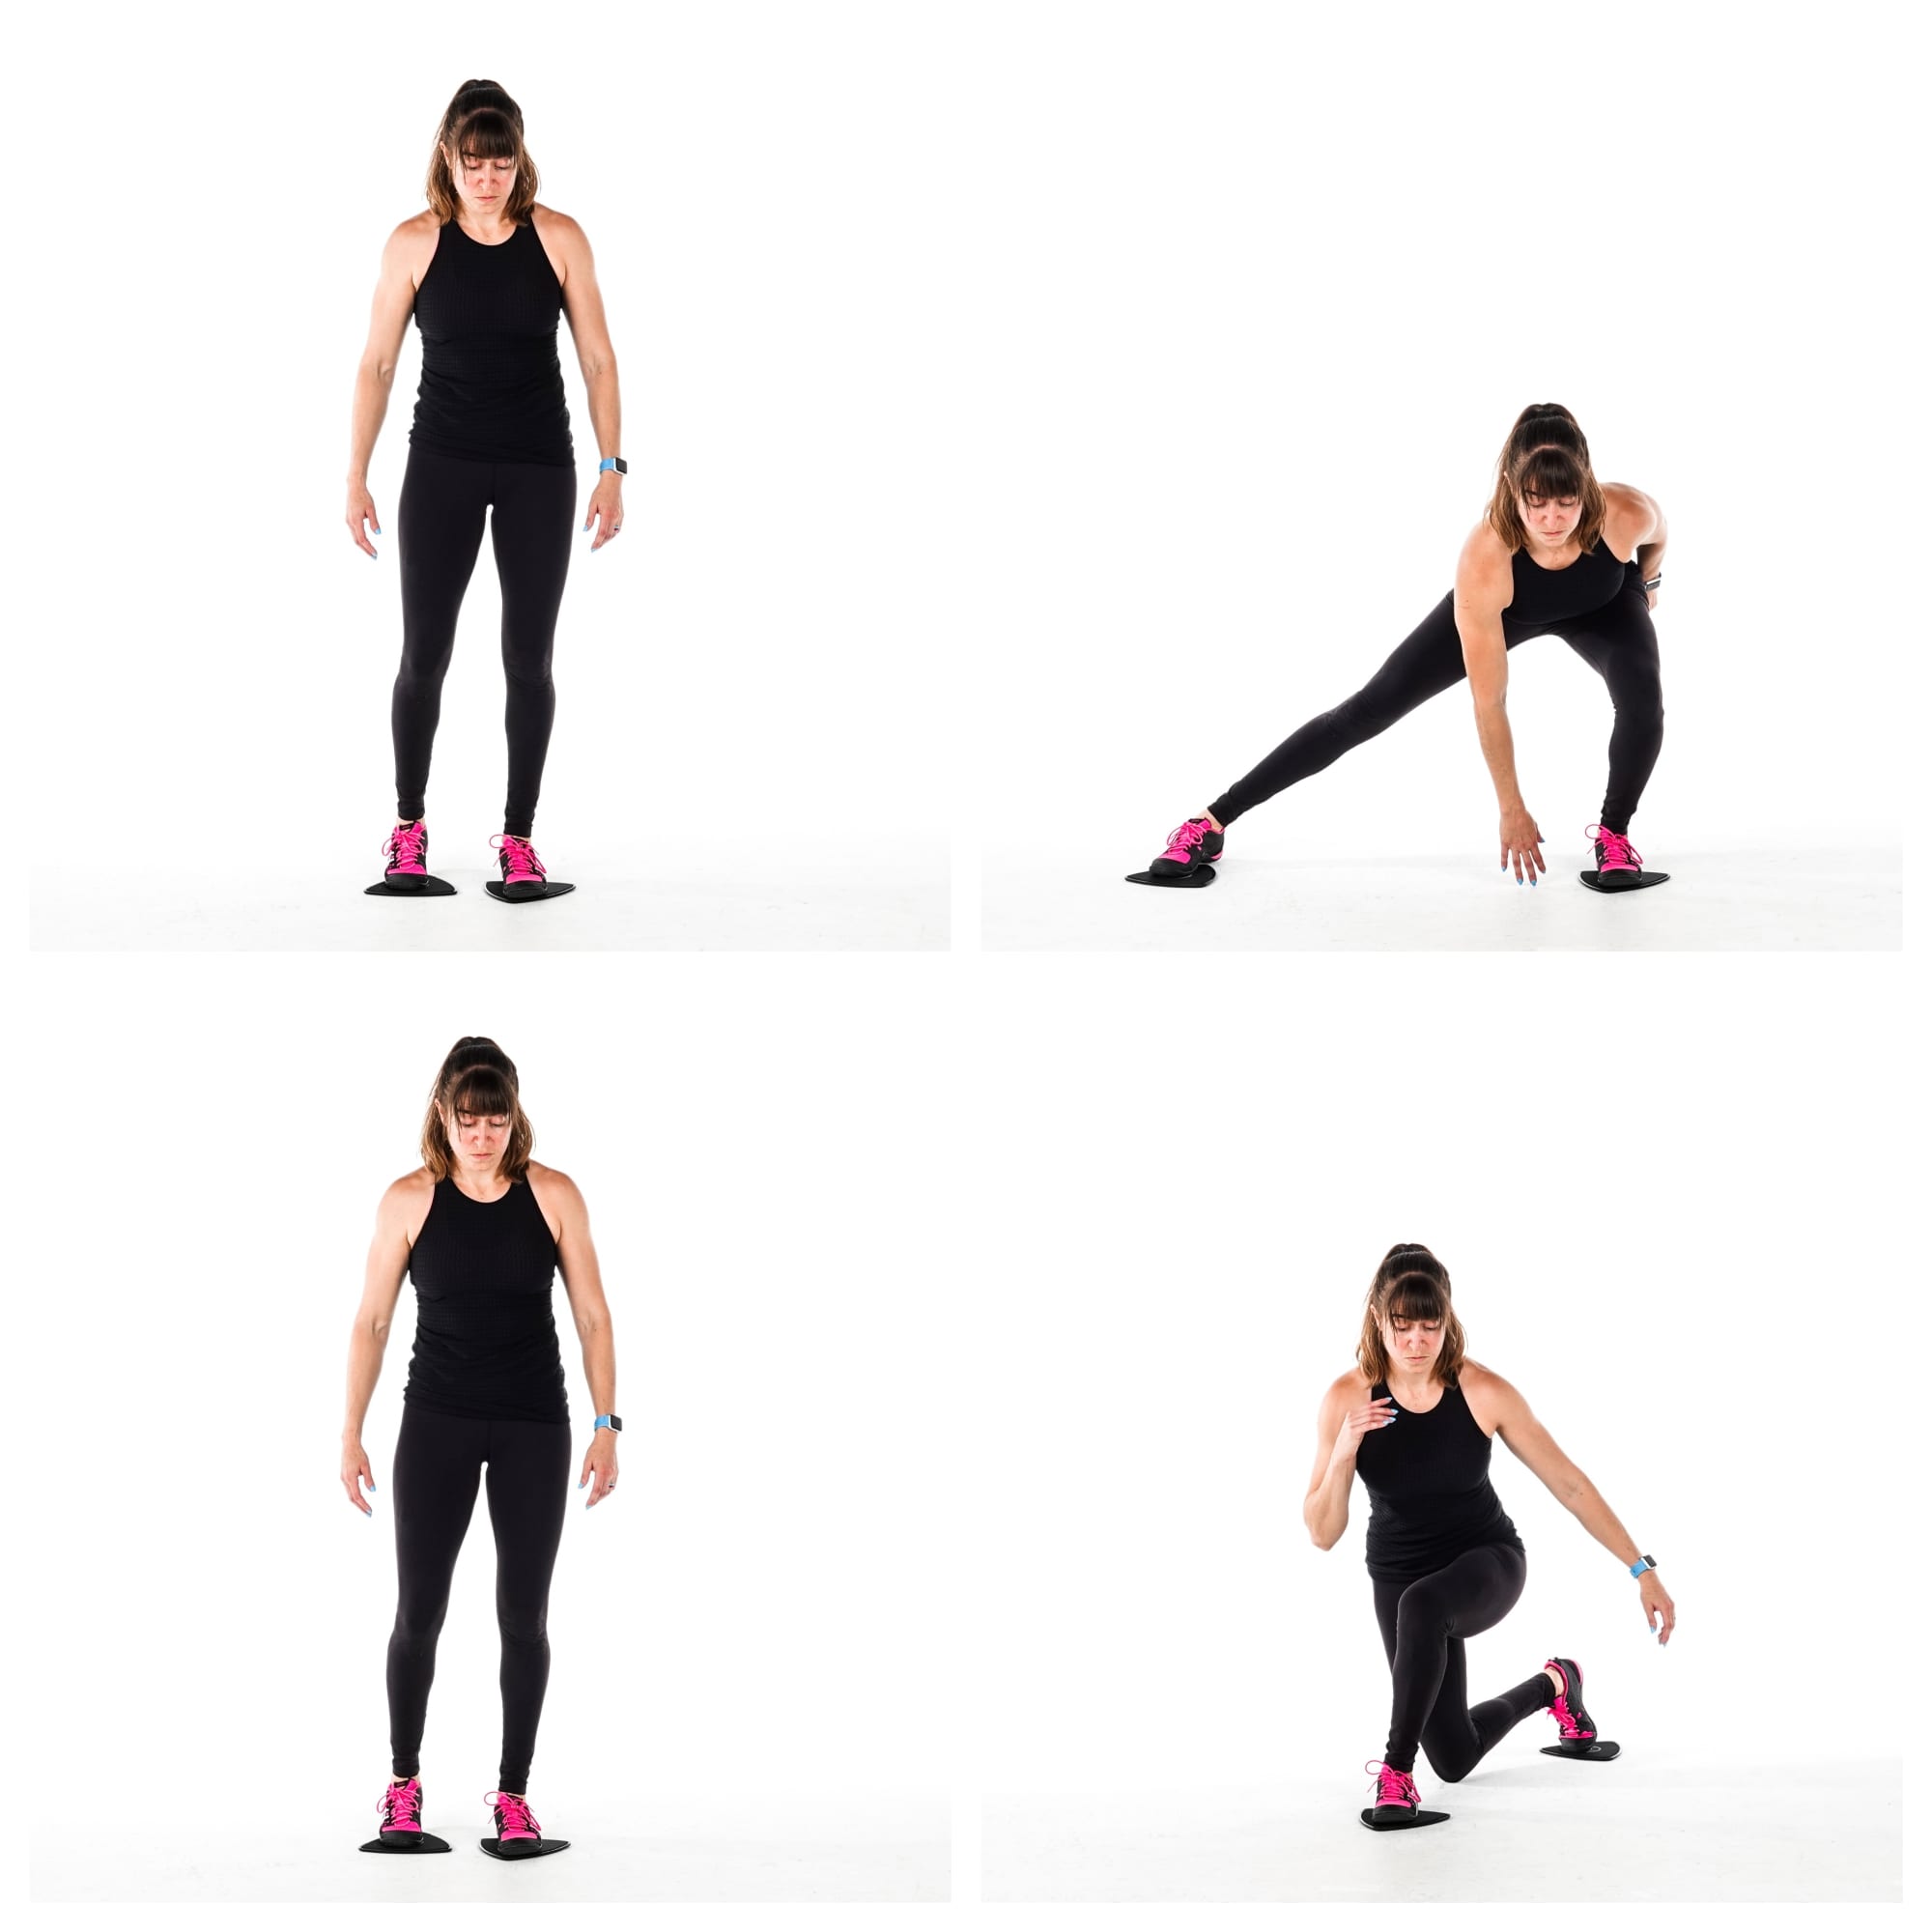
To do the Slider Side to Curtsy Lunge, start standing tall with a slider under each foot. You can also use just one slider under one foot if you plan to complete all reps on one side and want a more stable base.
Then slide one foot out with a straight leg as you bend that other leg to sink down into a side lunge. Hinge at your hips and sit your butt back but do not round your chest toward the ground.
Make sure to sit back in that standing heel. Then drive back up to standing, pulling the slider back in using your inner thigh.
As you stand up, slide that foot back in and quickly move it back behind you to sink into a curtsy lunge.
Slide the same foot that went out into the side lunge back and across behind your standing leg as you bend that front knee to about 90 degrees.
Sink into a lunge, loading that front glute. Do not rotate open but keep your chest square forward.
Drive through your standing leg and pull the slider back up to stand up tall before repeating the side lunge.
Push Up Wiper:
This killer upper body and core move will target your chest, shoulders, triceps and obliques.
It is a super challenging movement, especially if you perform the wiper at the bottom of the push up. To modify, you can do the push up from your knees then perform the wiper at the top of the push up.
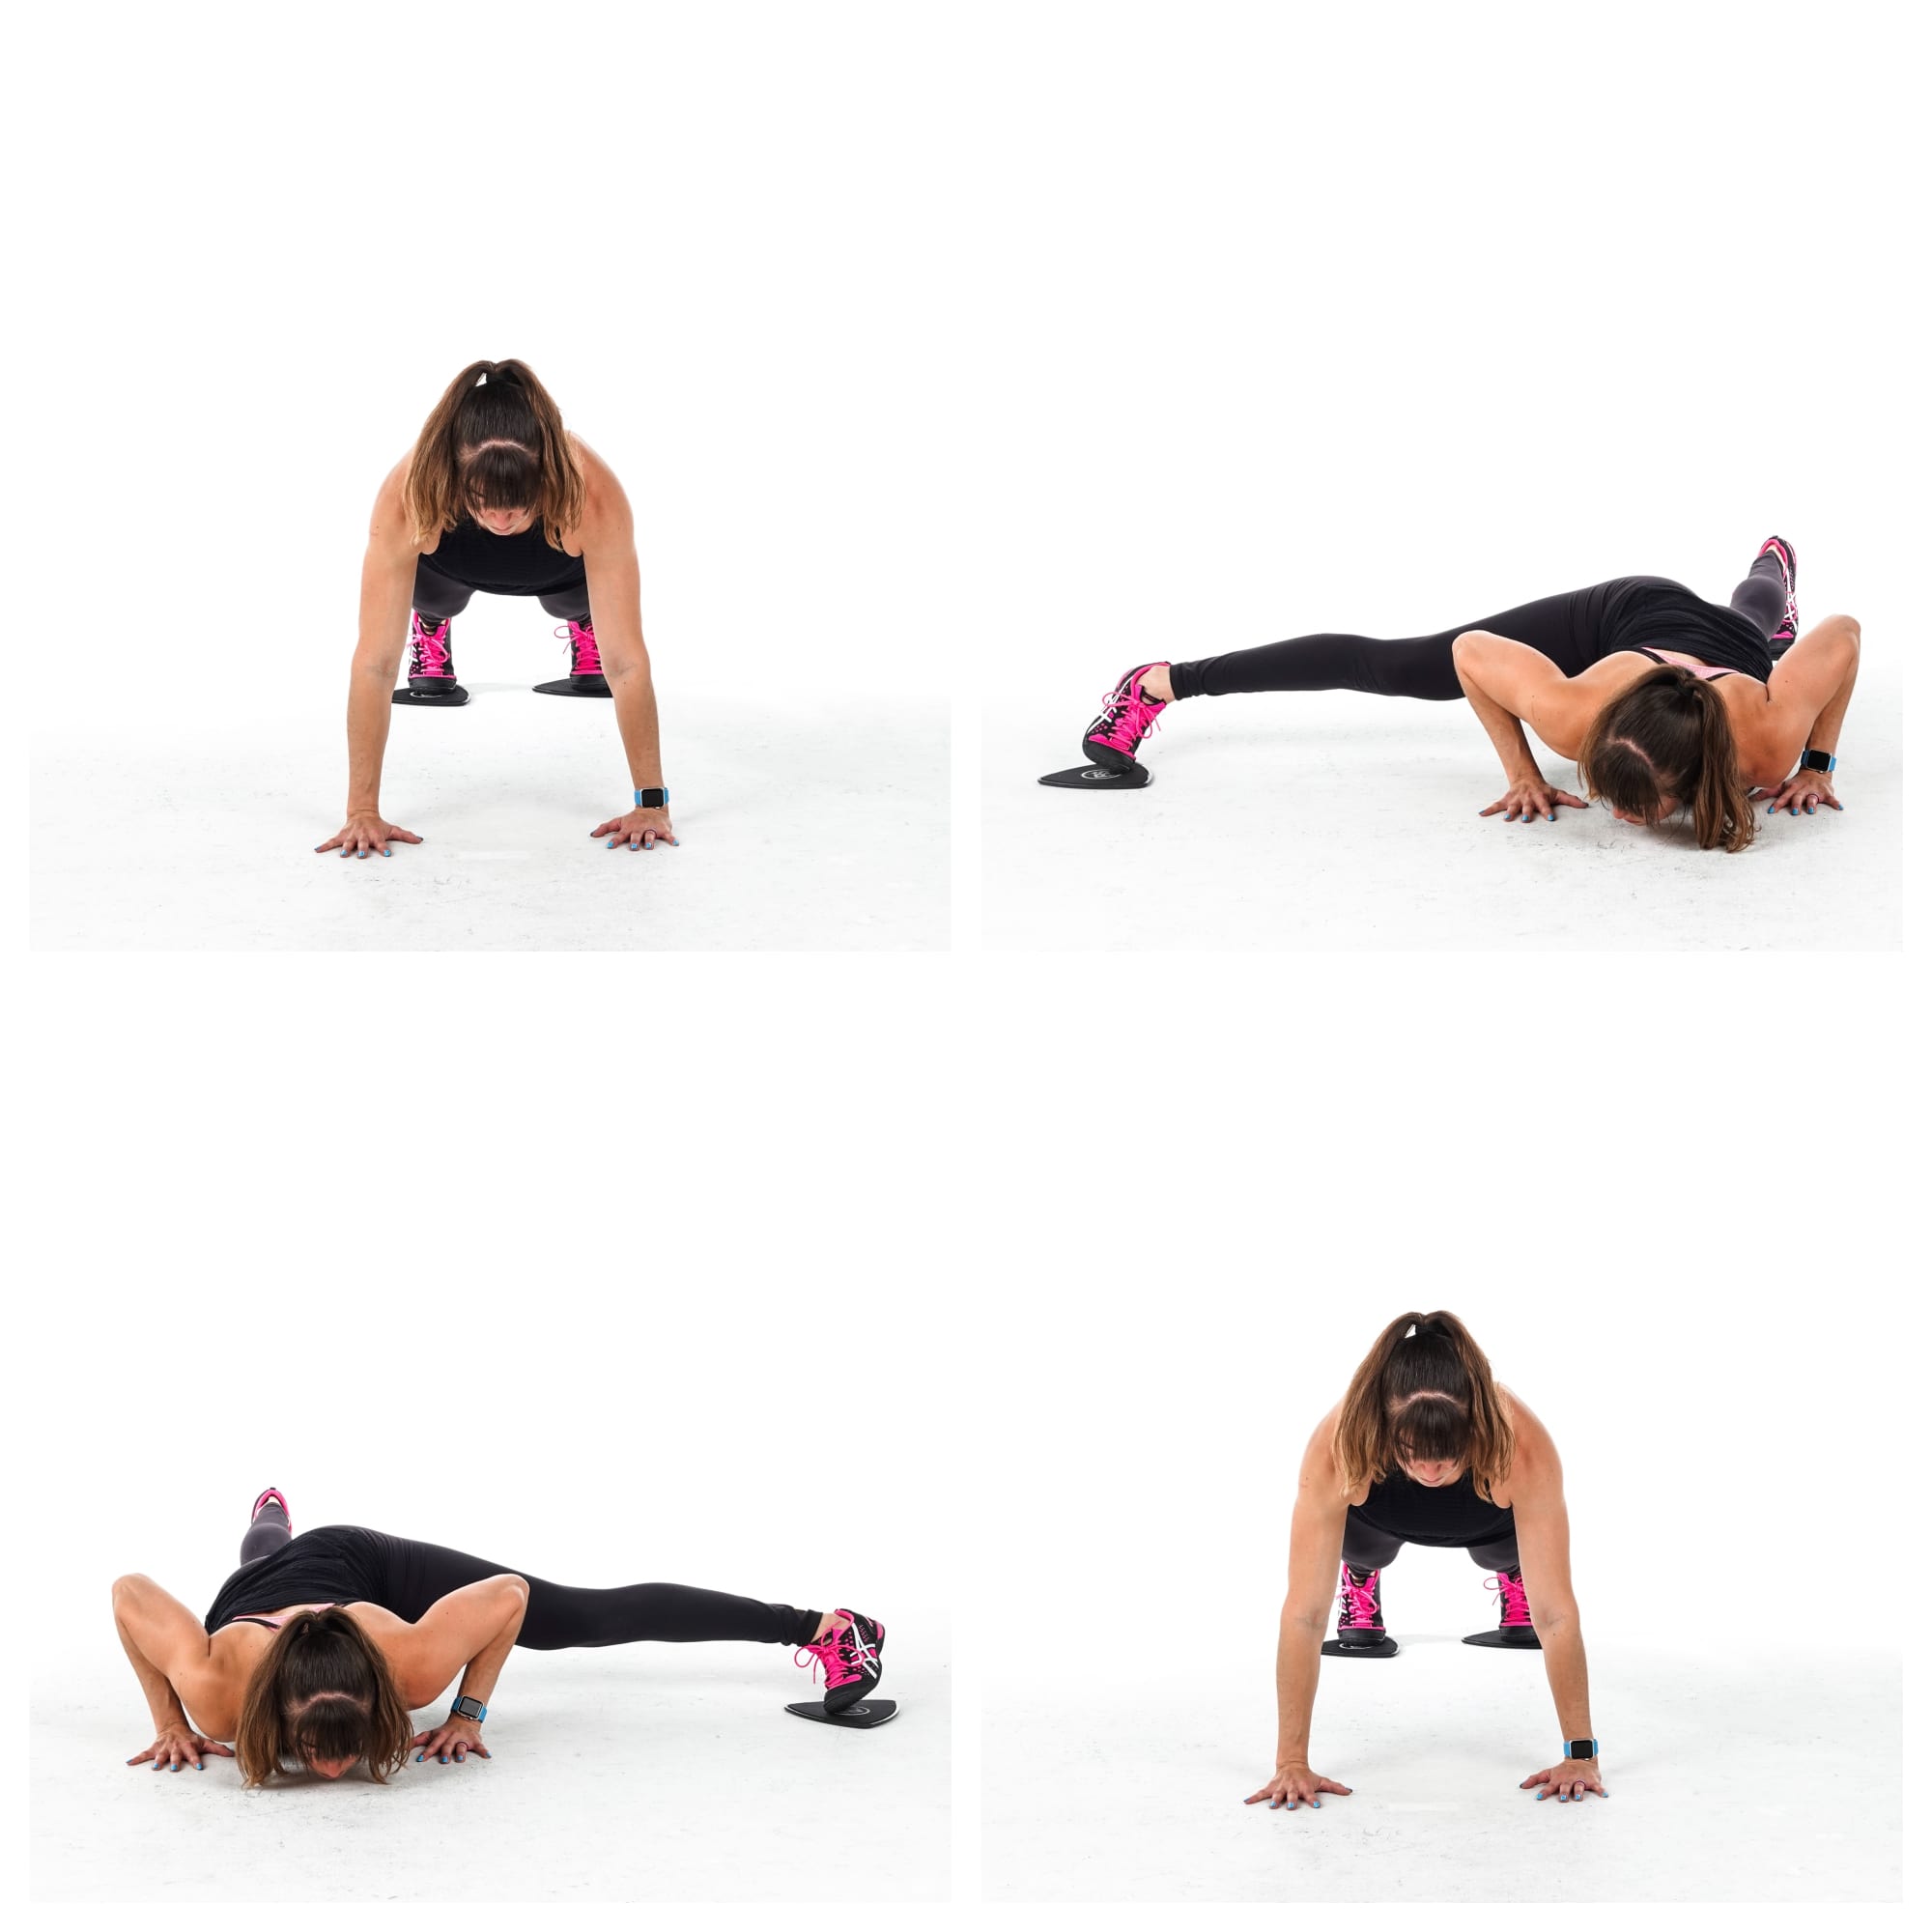
To do the Push Up Wiper, place a foot on each slider so the ball of your foot is about in the middle of the slider for the best control. Set up in the high plank position with your hands outside your chest.
Your body should be in a nice straight line down to your feet with your feet close together.
Perform a push up, dropping your chest to a few inches off the ground. Make sure your body moves as one unit as you lower. Do not let your hips sag or butt go up in the air.
Your upper arms should create an arrow shape with your body. They shouldn’t flare way out and up by your shoulders nor do they have to be against your body unless you want to make the push up harder and more tricep intensive.
As you lower you will slide one leg up and out to the side. You can also wait until at the bottom of the push up to perform the wiper, sweeping one leg out to the side and up toward your shoulder.
Slide it out as far as your mobility and control allow. You can rotate your hips slightly as you slide the leg up.
Sweep the leg back down and press back up. To make it slightly easier, slide the leg back before you press back up. To make it slightly harder and a bit more of a coordination challenge, sweep the leg back as you press up.
After coming back to the high plank position, do another push up and perform a wiper with the other leg.
To make the move a bit easier, do the wiper at the top of the push up and even perform the push up from your knees. You can also remove a push up and do a wiper to each side between push ups.
Slider Plank Circles:
This is a great move to improve your anti-rotational core strength and shoulder stability.
It is one of my favorite moves to include if people want to work on improving their push ups while preventing shoulder, neck and lower back aches and pains.
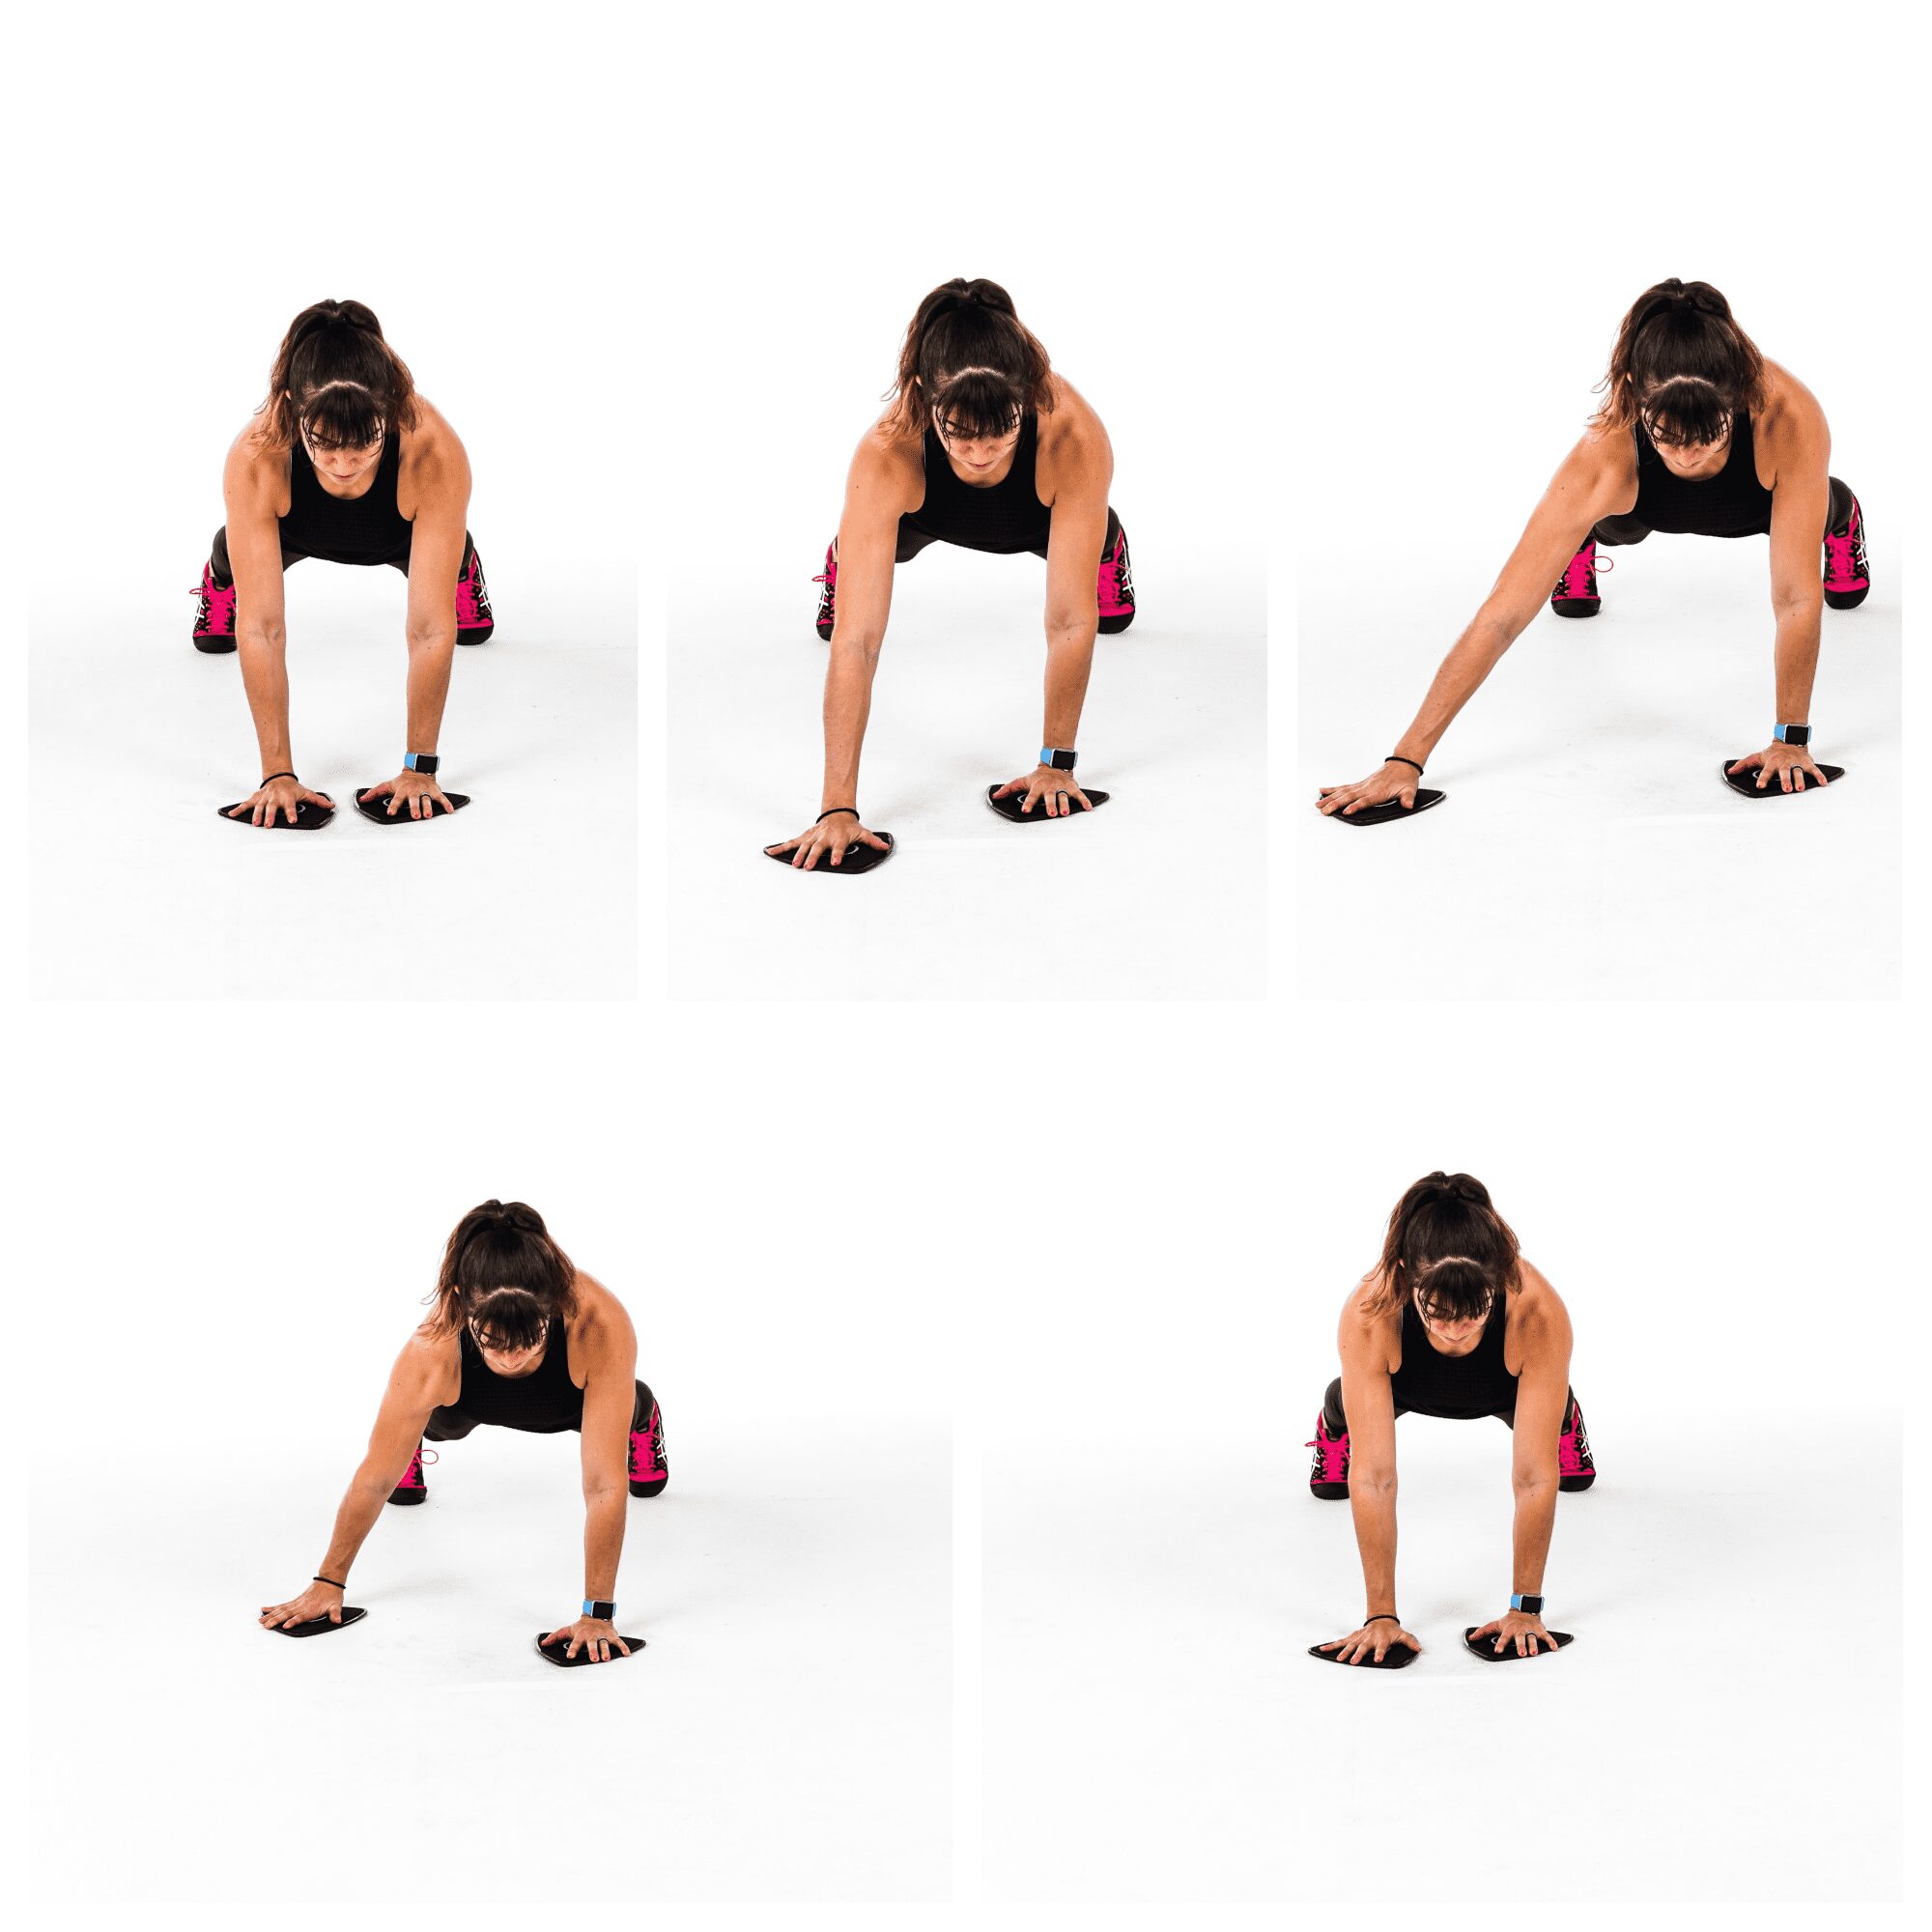
To do Slider Plank Circles, place a slider under each and with your hands under your chest and below your shoulders. You can place them slightly closer together so that you’ll create more of a tripod position with your feet to help you fight rotation.
Set up at the top of a push up, or in the high plank position, with your feet about shoulder-width apart.
Then slide one hand out in front of you, up and out to the side and then down and back around under your chest. You want to draw a circle up, around, down and back under.
Do not let your hips rotate as you circle. Squeeze your butt, flex your quads and drive back through your heels to help create tension through your entire body.
Keep your shoulders down and back so you aren’t shrugging. Then circle your other hand up around down and back under.
Alternate slow circles as you maintain that nice plank. Make sure to feel around your rib cage working as you pull the slider down, around and back under.
Do not let your shoulders shrug and feel your back engage to support your shoulders as you hold.
To modify, you can do this from your knees or even do taps instead of using the sliders. You can also stay on one side with the slider only under your moving hand. By not alternating it can be easier to fight your body’s desire to rotate.
Slider Sit Thru:
This move is a great way to improve your shoulder stability while also really challenging it so be careful if you’re returning from shoulder injury.
It is also a great move to work your entire core, especially your obliques.
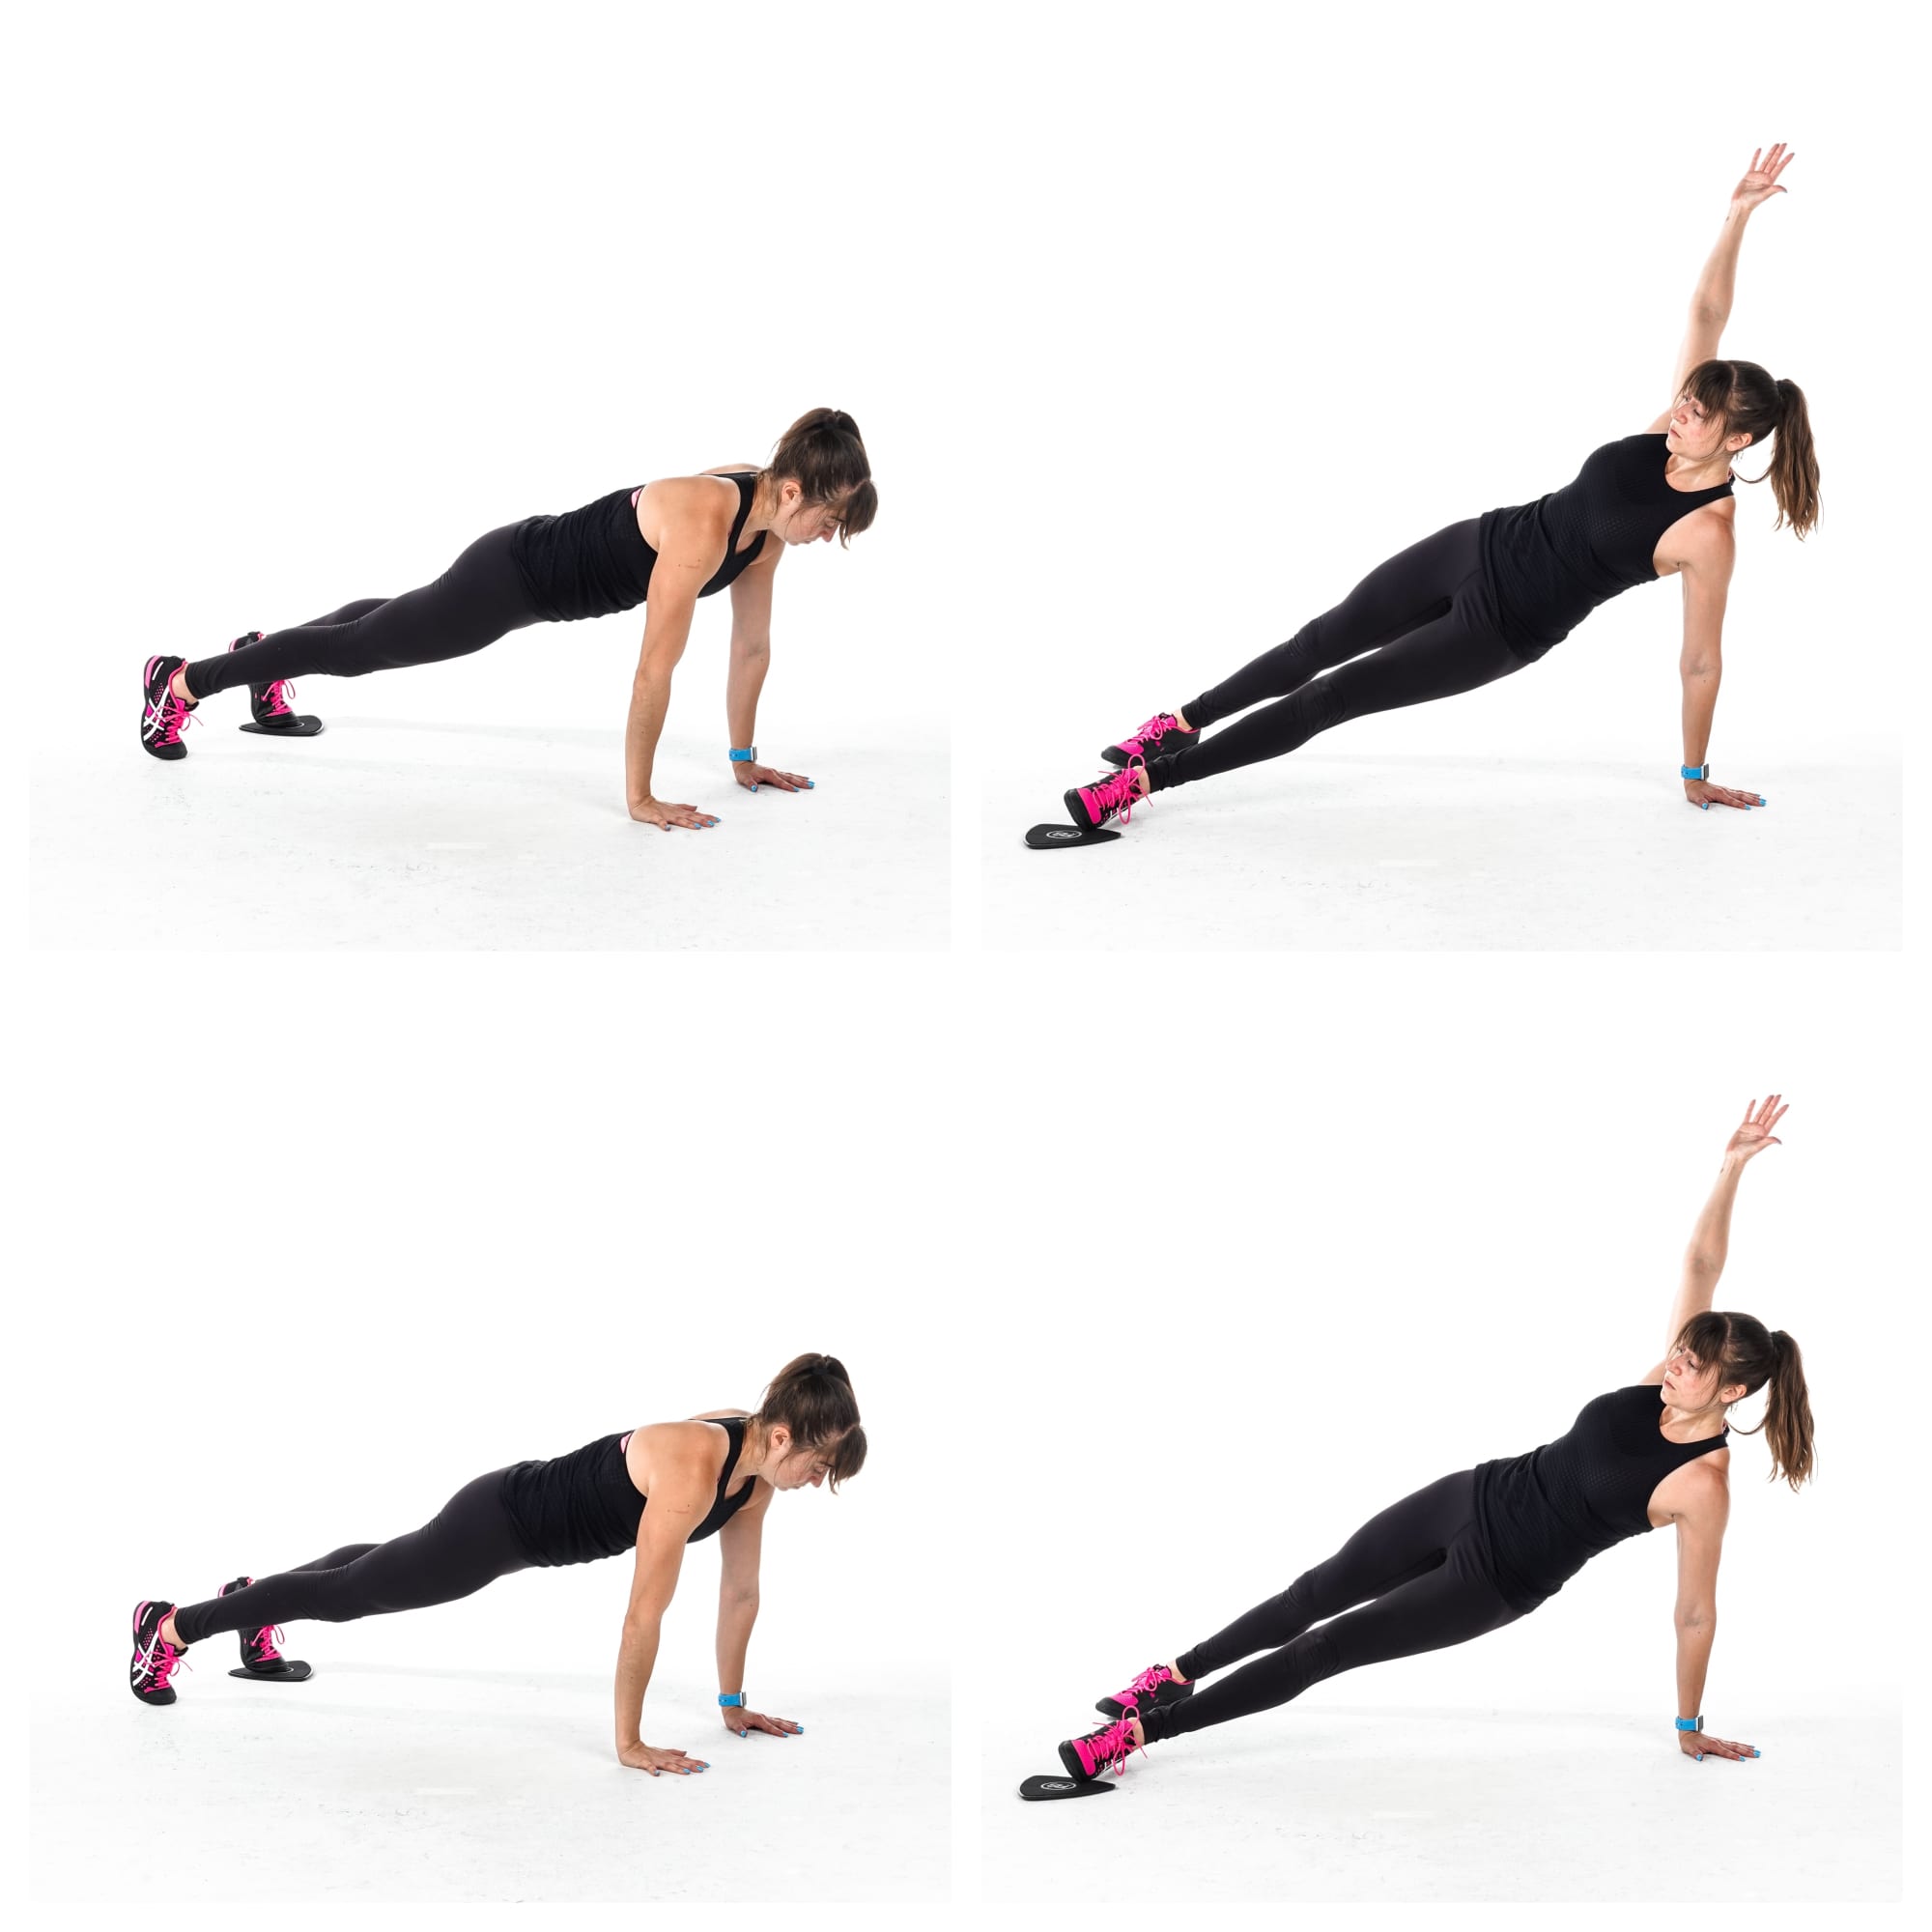
To do the Slider Sit Thru, place a slider under one foot with the ball of your foot in the middle of the slider. Because your foot will rotate onto the side, you may want to put your foot slightly toward the side of the slider you’ll be sliding toward.
Set up in the high plank position with your hands about under your shoulders and your legs out straight behind you about hip-width to shoulder-width apart.
Then slightly tuck the foot on the slider forward as you kick it under and across your body. As you rotate, lift the hand on the side you are kicking toward to open your body up toward the ceiling.
Extend the leg all the way across and through as you rotate open, reaching your hand up. Make sure your hand on the ground is positioned under your shoulder.
The leg of the foot on the ground may bend slightly as you rotate and pivot slightly onto the inside of your foot.
Slide the leg through then pull it back to the starting position as you rotate your body back to face the ground and put your hand back down.
Then repeat, kicking that same leg back across as you rotate open. Move quickly to get your blood pumping, but no so quickly you aren’t fully in control. Just don’t really pause in that plank position more than to fully return to it.
To modify this move, you may take out the slider or even keep both hands down the entire time, performing a smaller reach across with the foot on the slider.
Alternating Slider Tabletop Curls:
If you sit all day hunched over a computer, this is a must-do move.
It will open up your chest and hips while activating your entire backside. It will work your hamstrings, glutes, back and arms as well as your abs even!
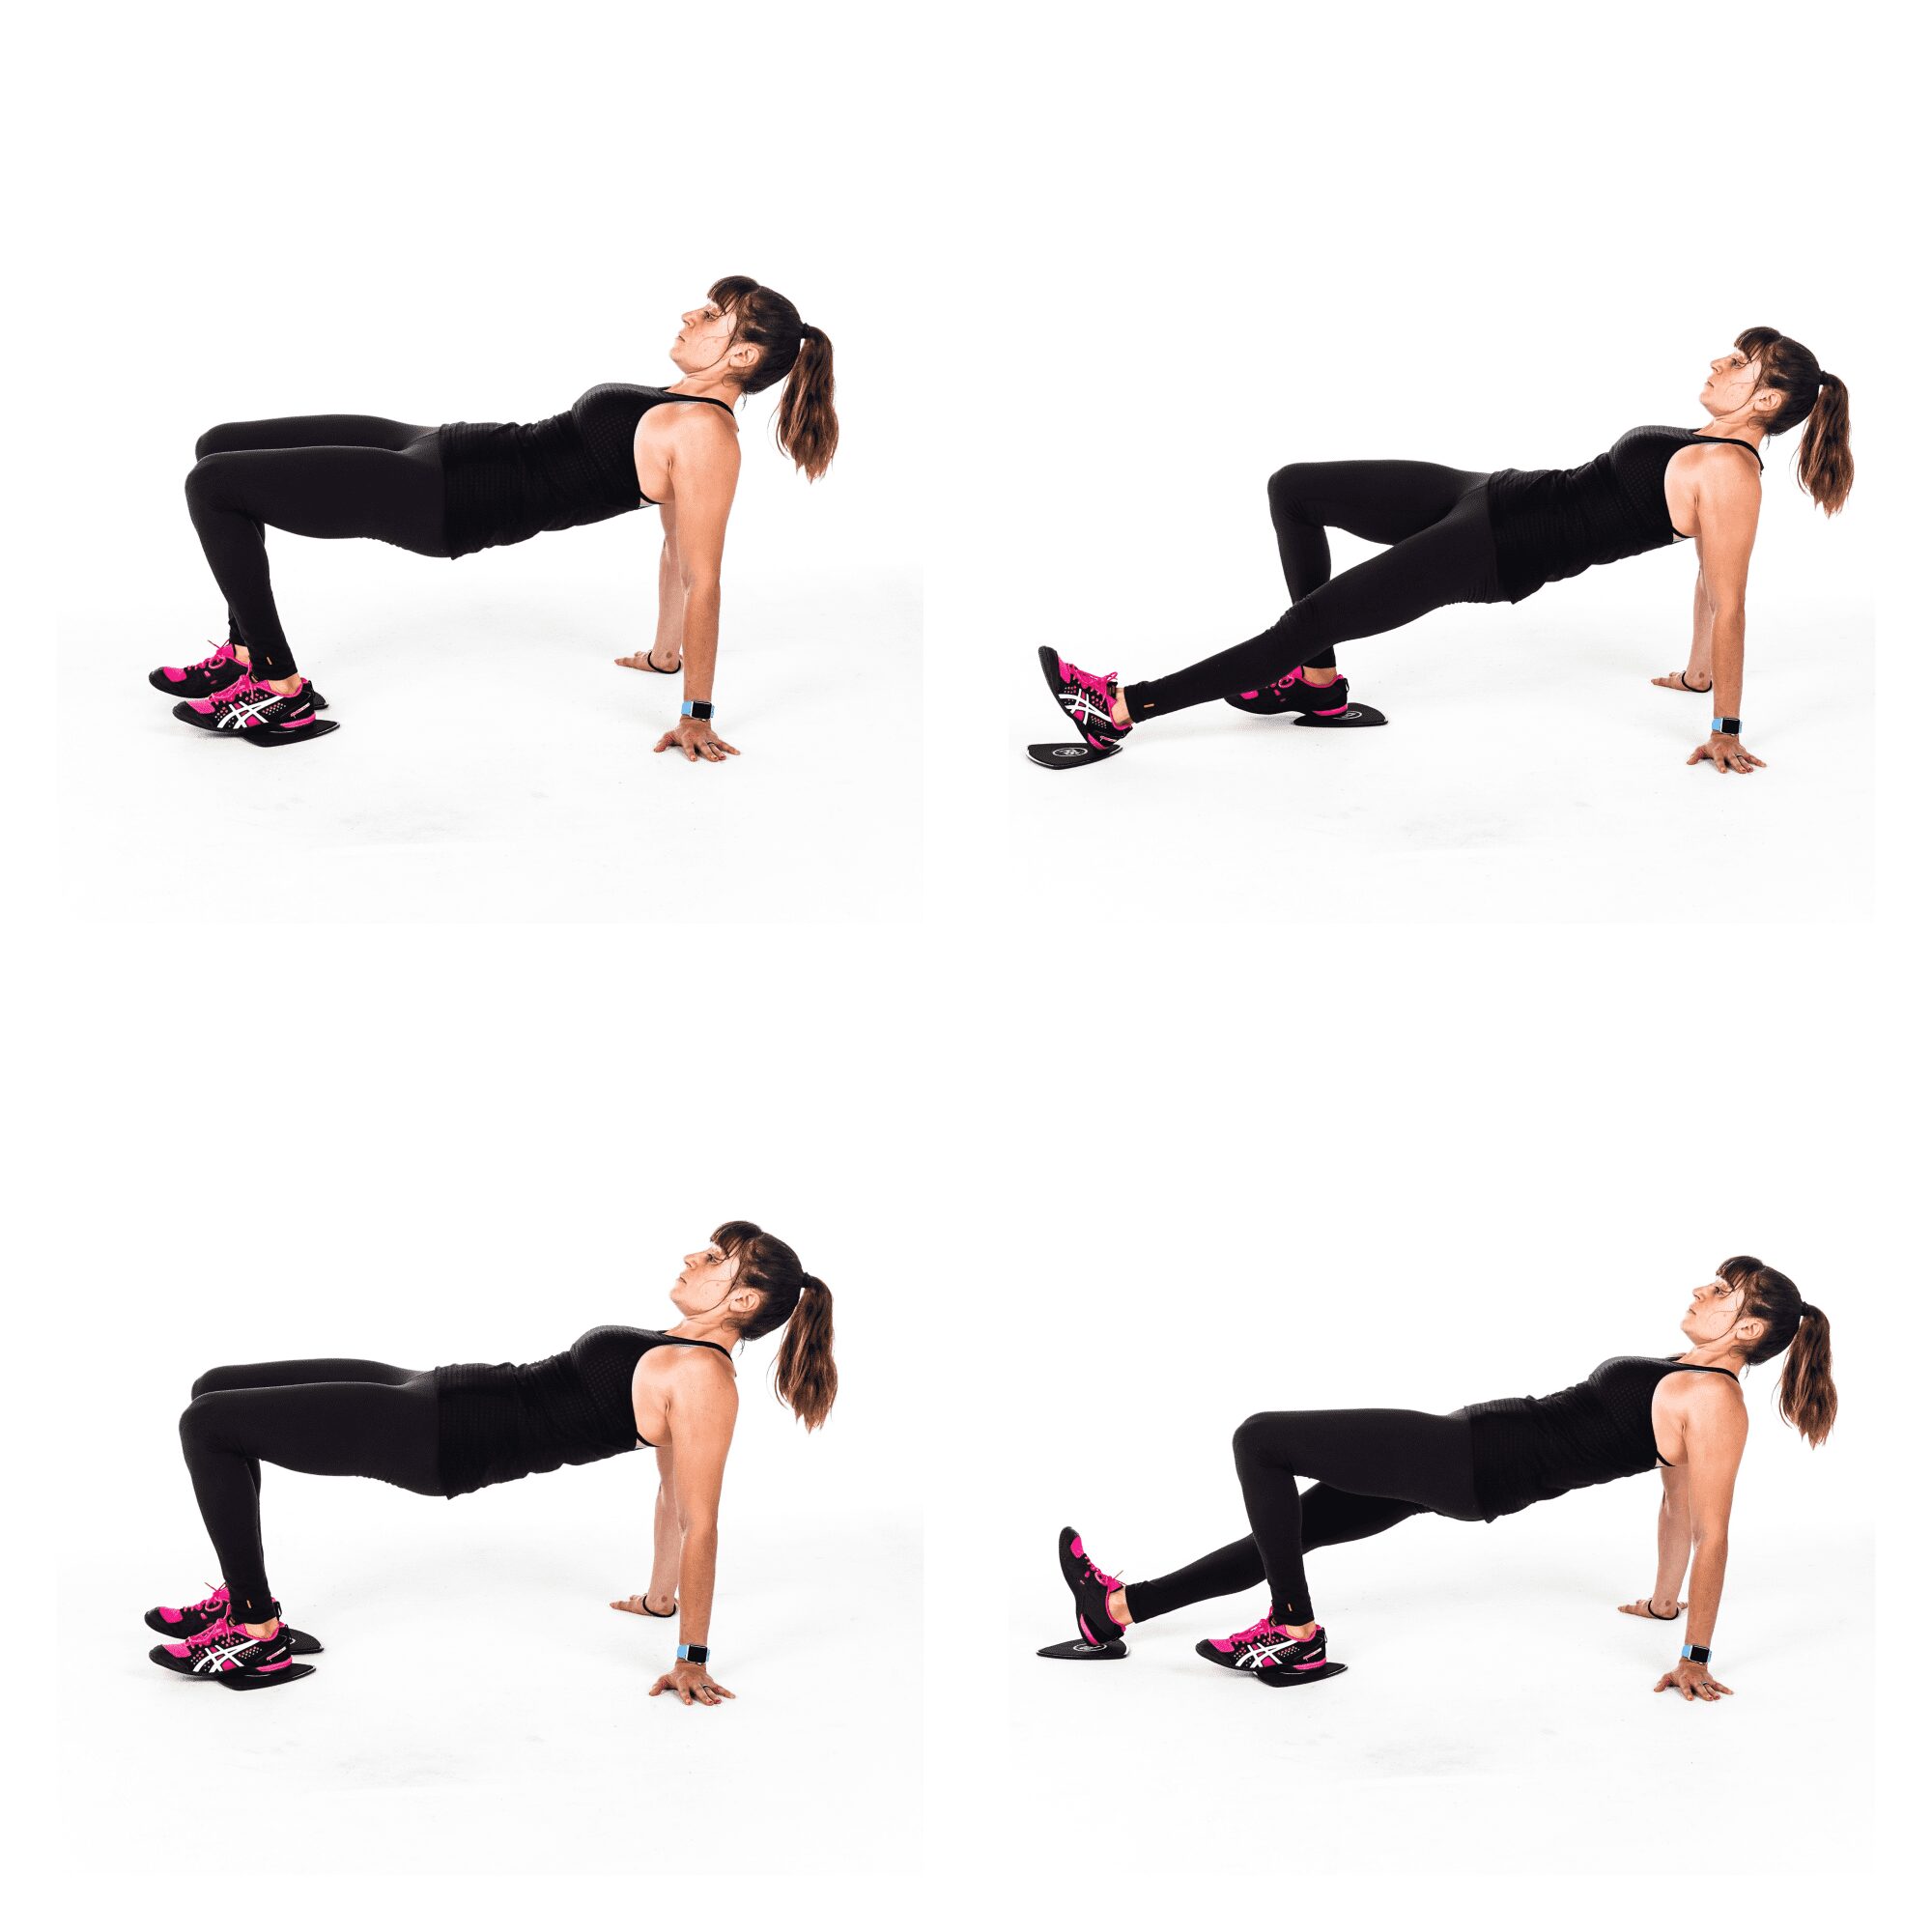
To do Alternating Slider Tabletop Curls, place a slider under each foot and sit on the ground with your heels on the sliders and hands behind you on the ground. Turn your hands out or back as you place your hands on the ground behind your butt.
Bend your knees and bring your heels back close to you so you can bridge up into a tabletop bridge. Squeeze your glutes as you lift your butt up and press your chest out.
You can perform a posterior pelvic tilt to help engage your abs as you hold this tabletop position and even slightly tuck your chin to look out beyond your knees.
The slowly extend one leg out before using your hamstring to pull your heel on the slider back in. Then extend the other leg out, pulling the heel back in again with your hamstring.
As you pull the slider back in, really even think about driving the slider down into the ground to help work your hamstring more.
Do not let your hips drop toward the ground as you extend. You want to keep your abs and butt engaged the entire time as you slowly alternate sides.
Slider Prone Snow Angels:
Because we spend so much time hunched over, it is key we include moves to work our back and even improve our scapular mobility and spinal extension.
One great move to include as activation to help you do just that is the Slider Prone Snow Angels. It is one of my favorite moves to include during warm up or even as “active rest” during a core or upper body series!
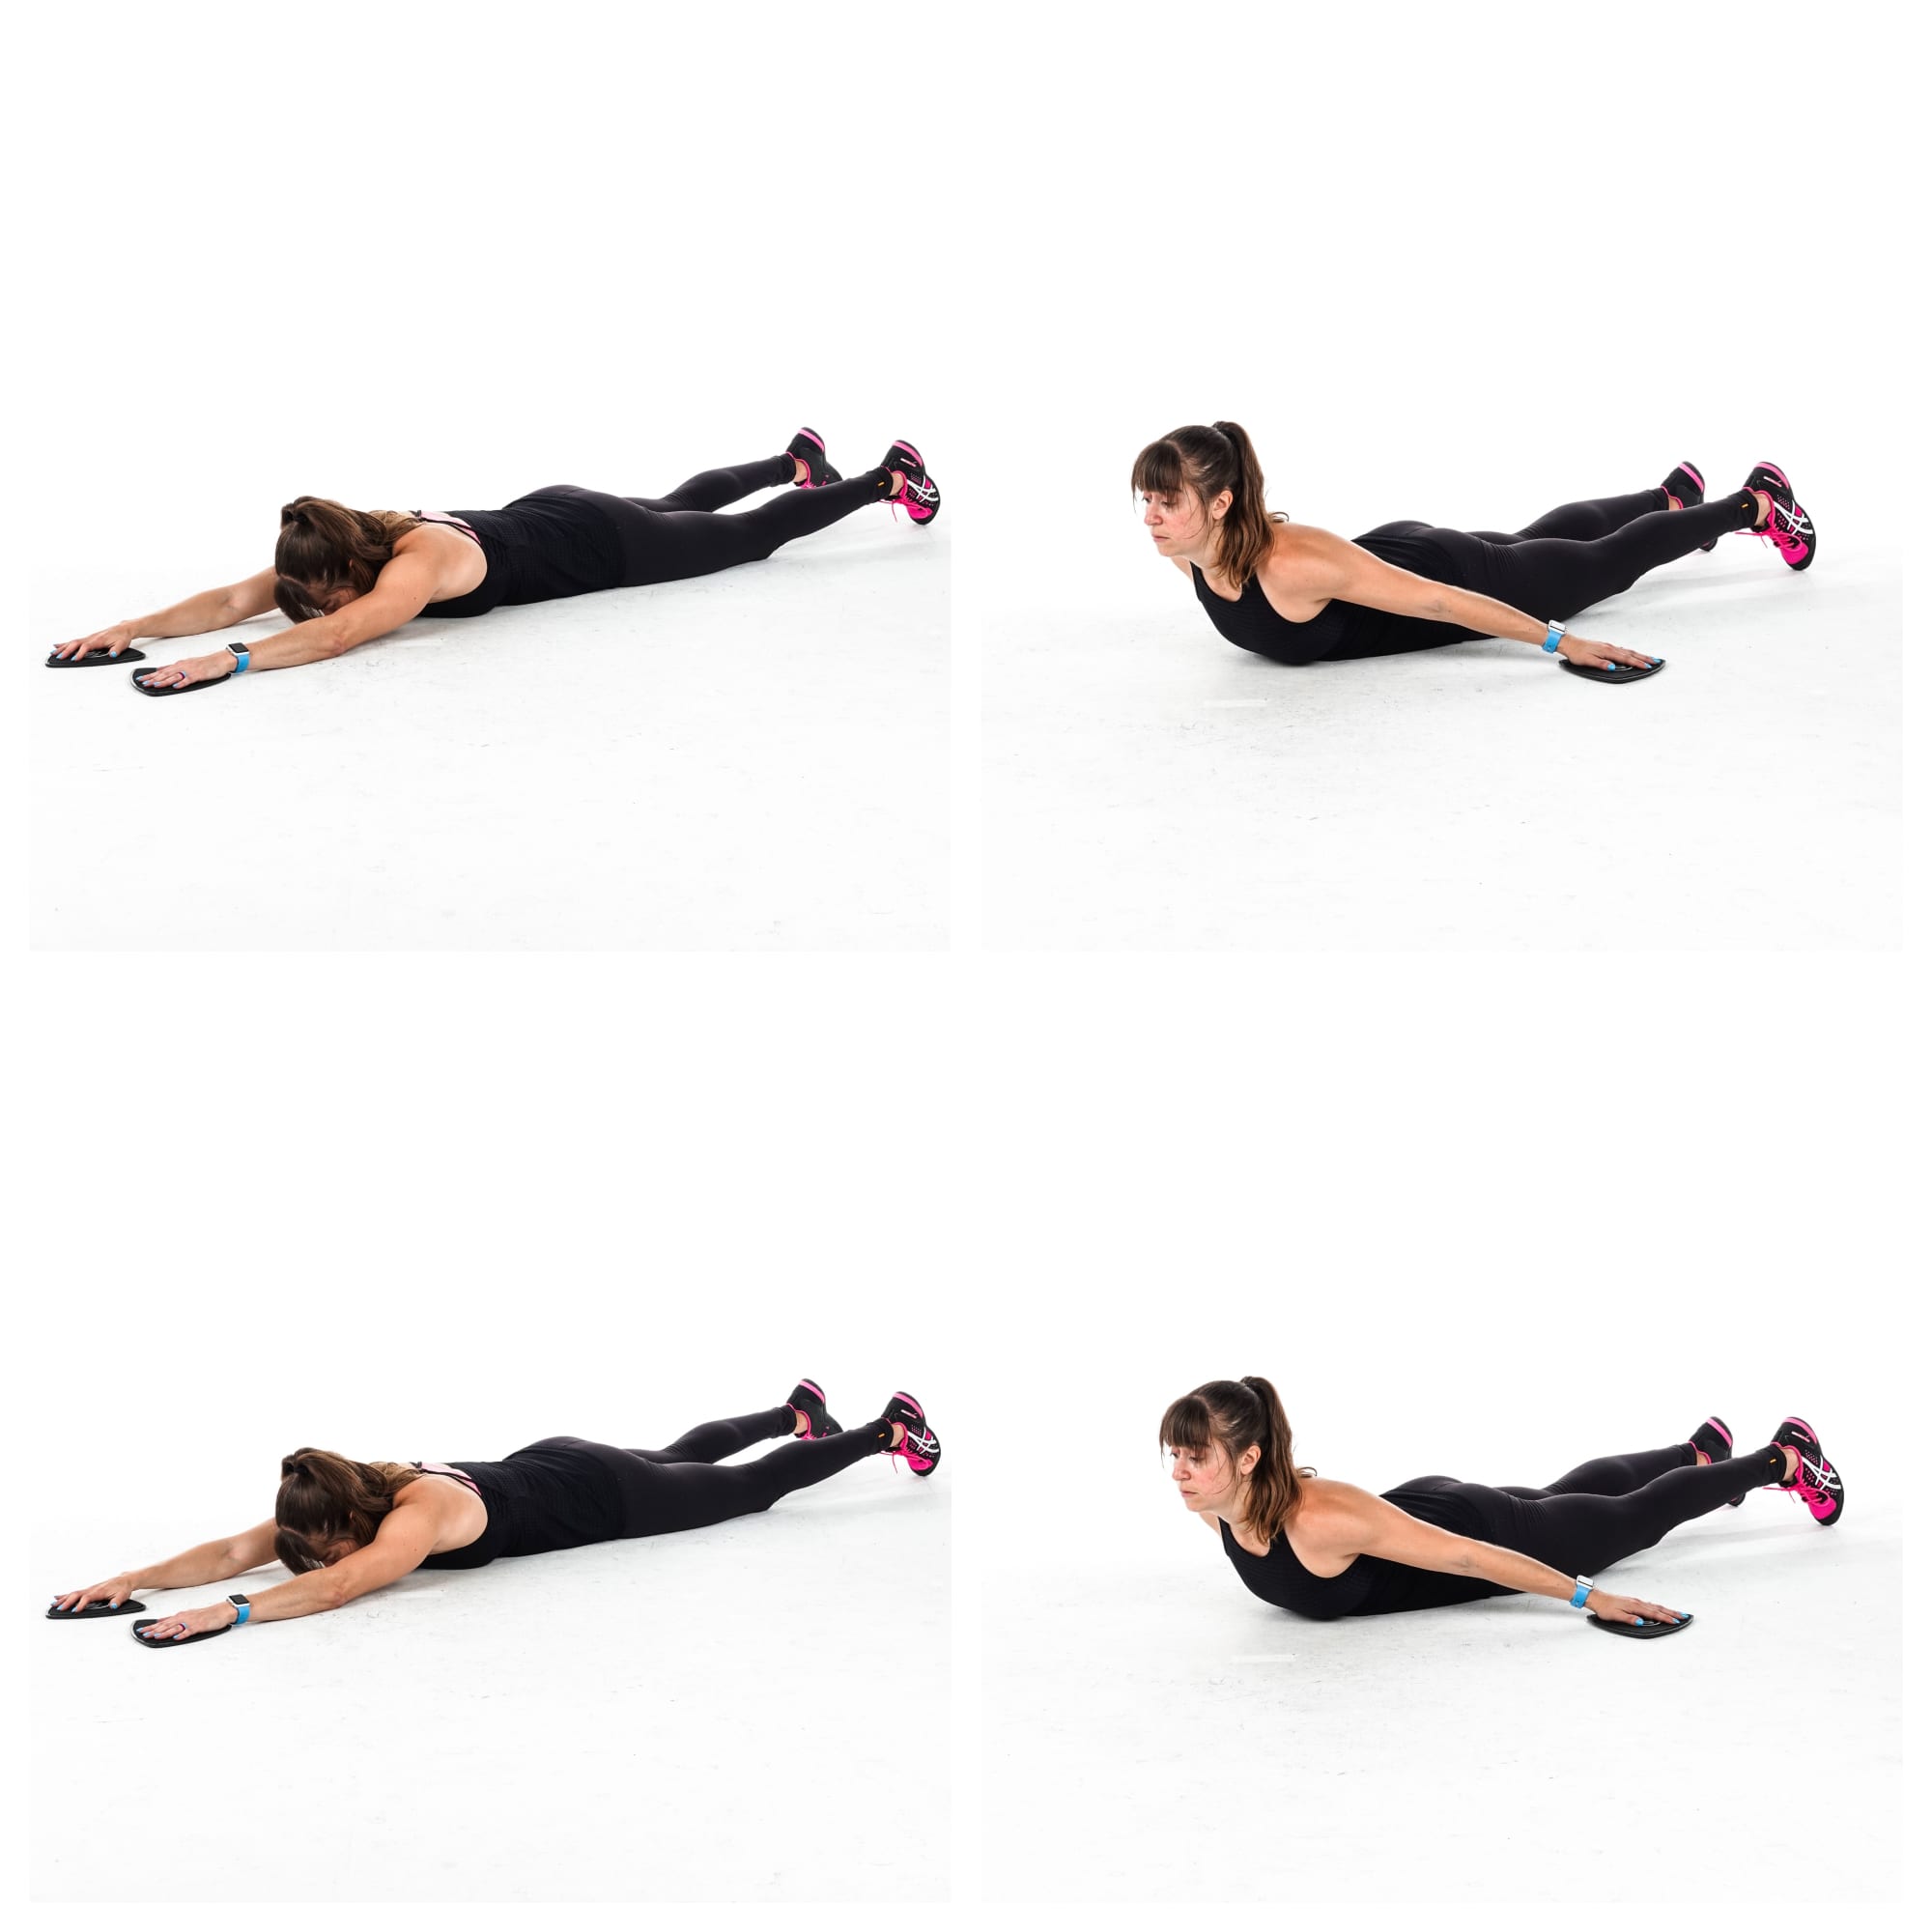
To do Slider Prone Snow Angels, place a hand on each slider and lie face down on the ground with your body in a nice straight line and your hands reaching overhead on the ground.
Keeping your arms straight, sweep your arms out and down toward your sides, lifting your chest up off the ground as you sweep you arms all the way down and back toward your hips.
Squeeze your butt and lift your chest up as much as possible, lifting it higher as your arms sweep all the way down.
Then lower back down as you sweep your arms back overhead.
Lift and lower as you slide your arms down and out to the sides and back overhead.
Move slowly and even pause for a second at the top to hold and feel your entire upper back and even the backs of your shoulders working.
Make sure you don’t just feel your lower back arching or your neck straining.
Slider Body Saw:
This is a VERY challenging core move that will work your triceps, lats, pec minor, abs and quads. You will feel your entire core shaking and working to protect your lower back.
Because of the extended plank position, your abs have to work hard to protect your lower back. If you aren’t yet ready for this move, you will feel your lower back taking over and working, which means you need to regress.
If this is the case, walk back instead of sliding back or limit range of motion to start. You don’t want your lower back compensating or you won’t get the full benefit!
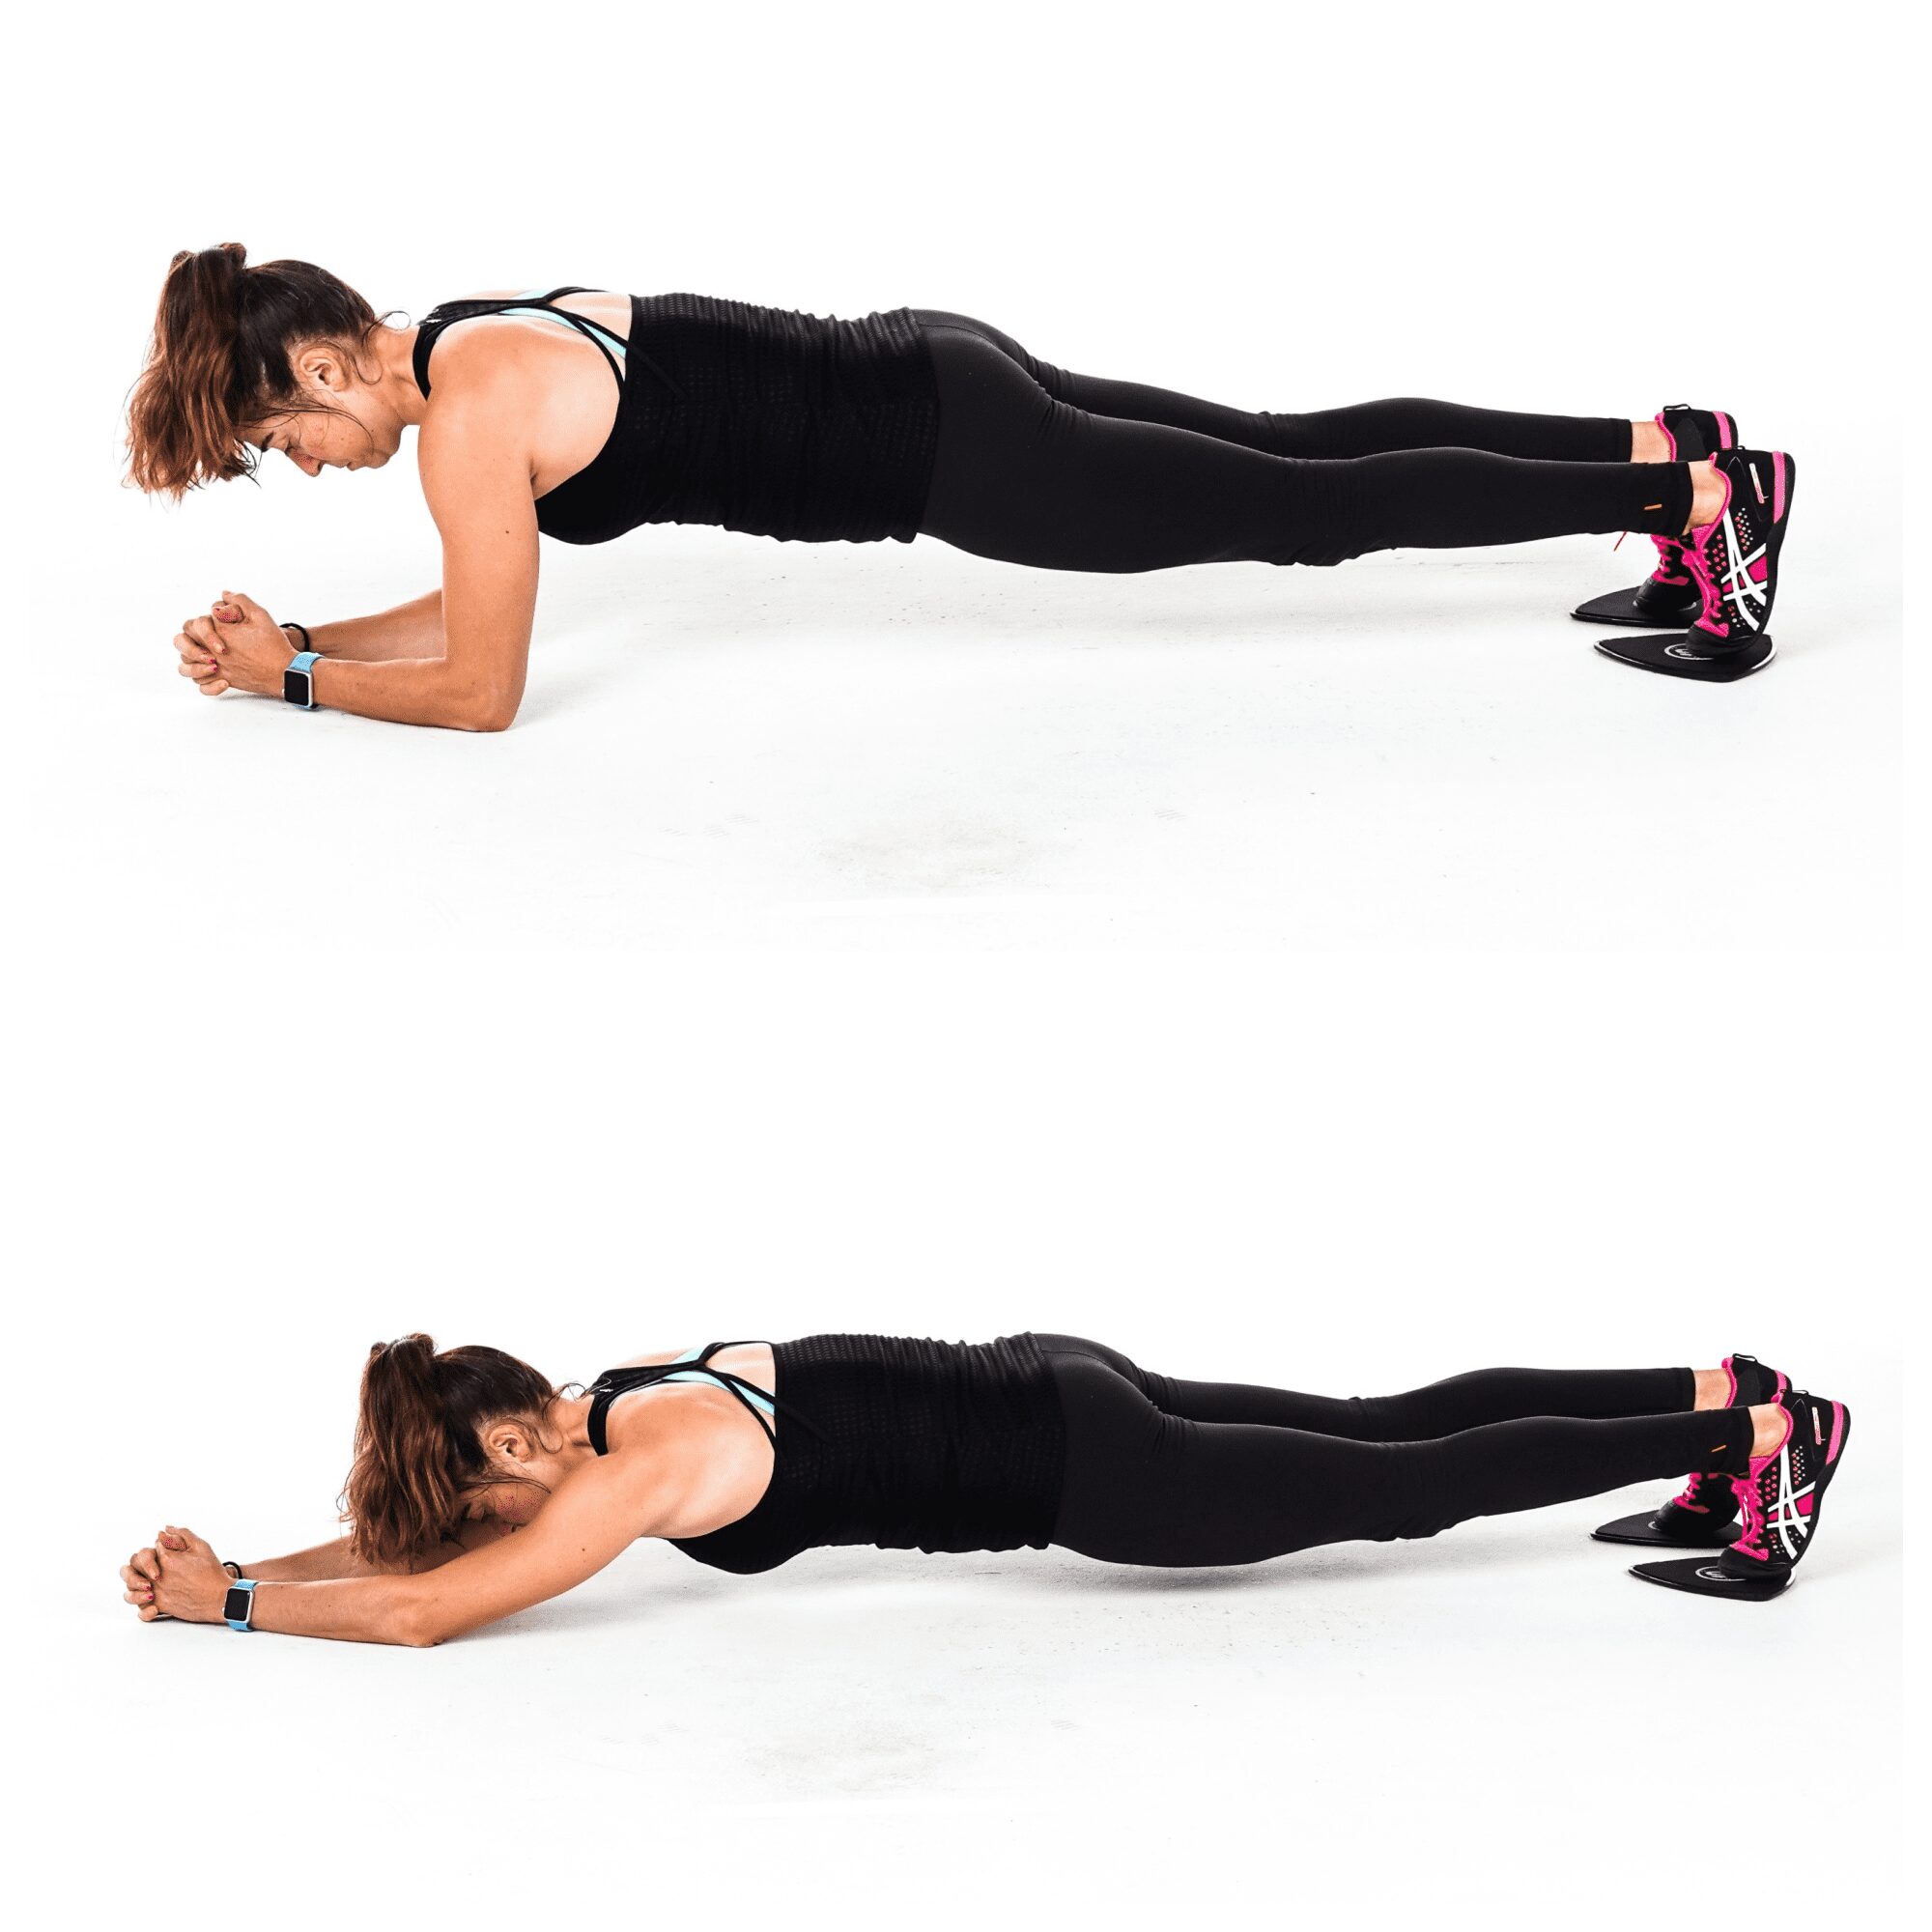
To do the Slider Body Saw, set up in a plank position on your forearms with your feet on the sliders. Elbows should be under your shoulders and your feet should be together or no wider than hip-width apart.
With your body in a nice straight line from your head to your heels, slide your feet back and lengthen through your arms. As you slide back you should extend your body down to your elbows, shifting your shoulders back behind your elbows. Do not let your hips sag as you slide back. You are extending your triceps as you slide back.
Then, using your lats and core, pull your feet back in to the plank position. When you come back into the plank position, do not let your butt go up in the air. Make sure your hips don’t sag either.
Then slide back out, lengthening your body out as much as you can. Again do not let your low back take over. Make sure that you also aren’t simply sliding forward and then back to the start but are actually sliding back and lengthening through your arms.
Ab Extension:
Work your lats, abs and even your glutes with this great move! You’ll feel all around your rib cage working and even your arms too!
Like the body saw though, be careful that your lower back doesn’t take over. And if you have shoulder issues, watch how far you extend out to start!
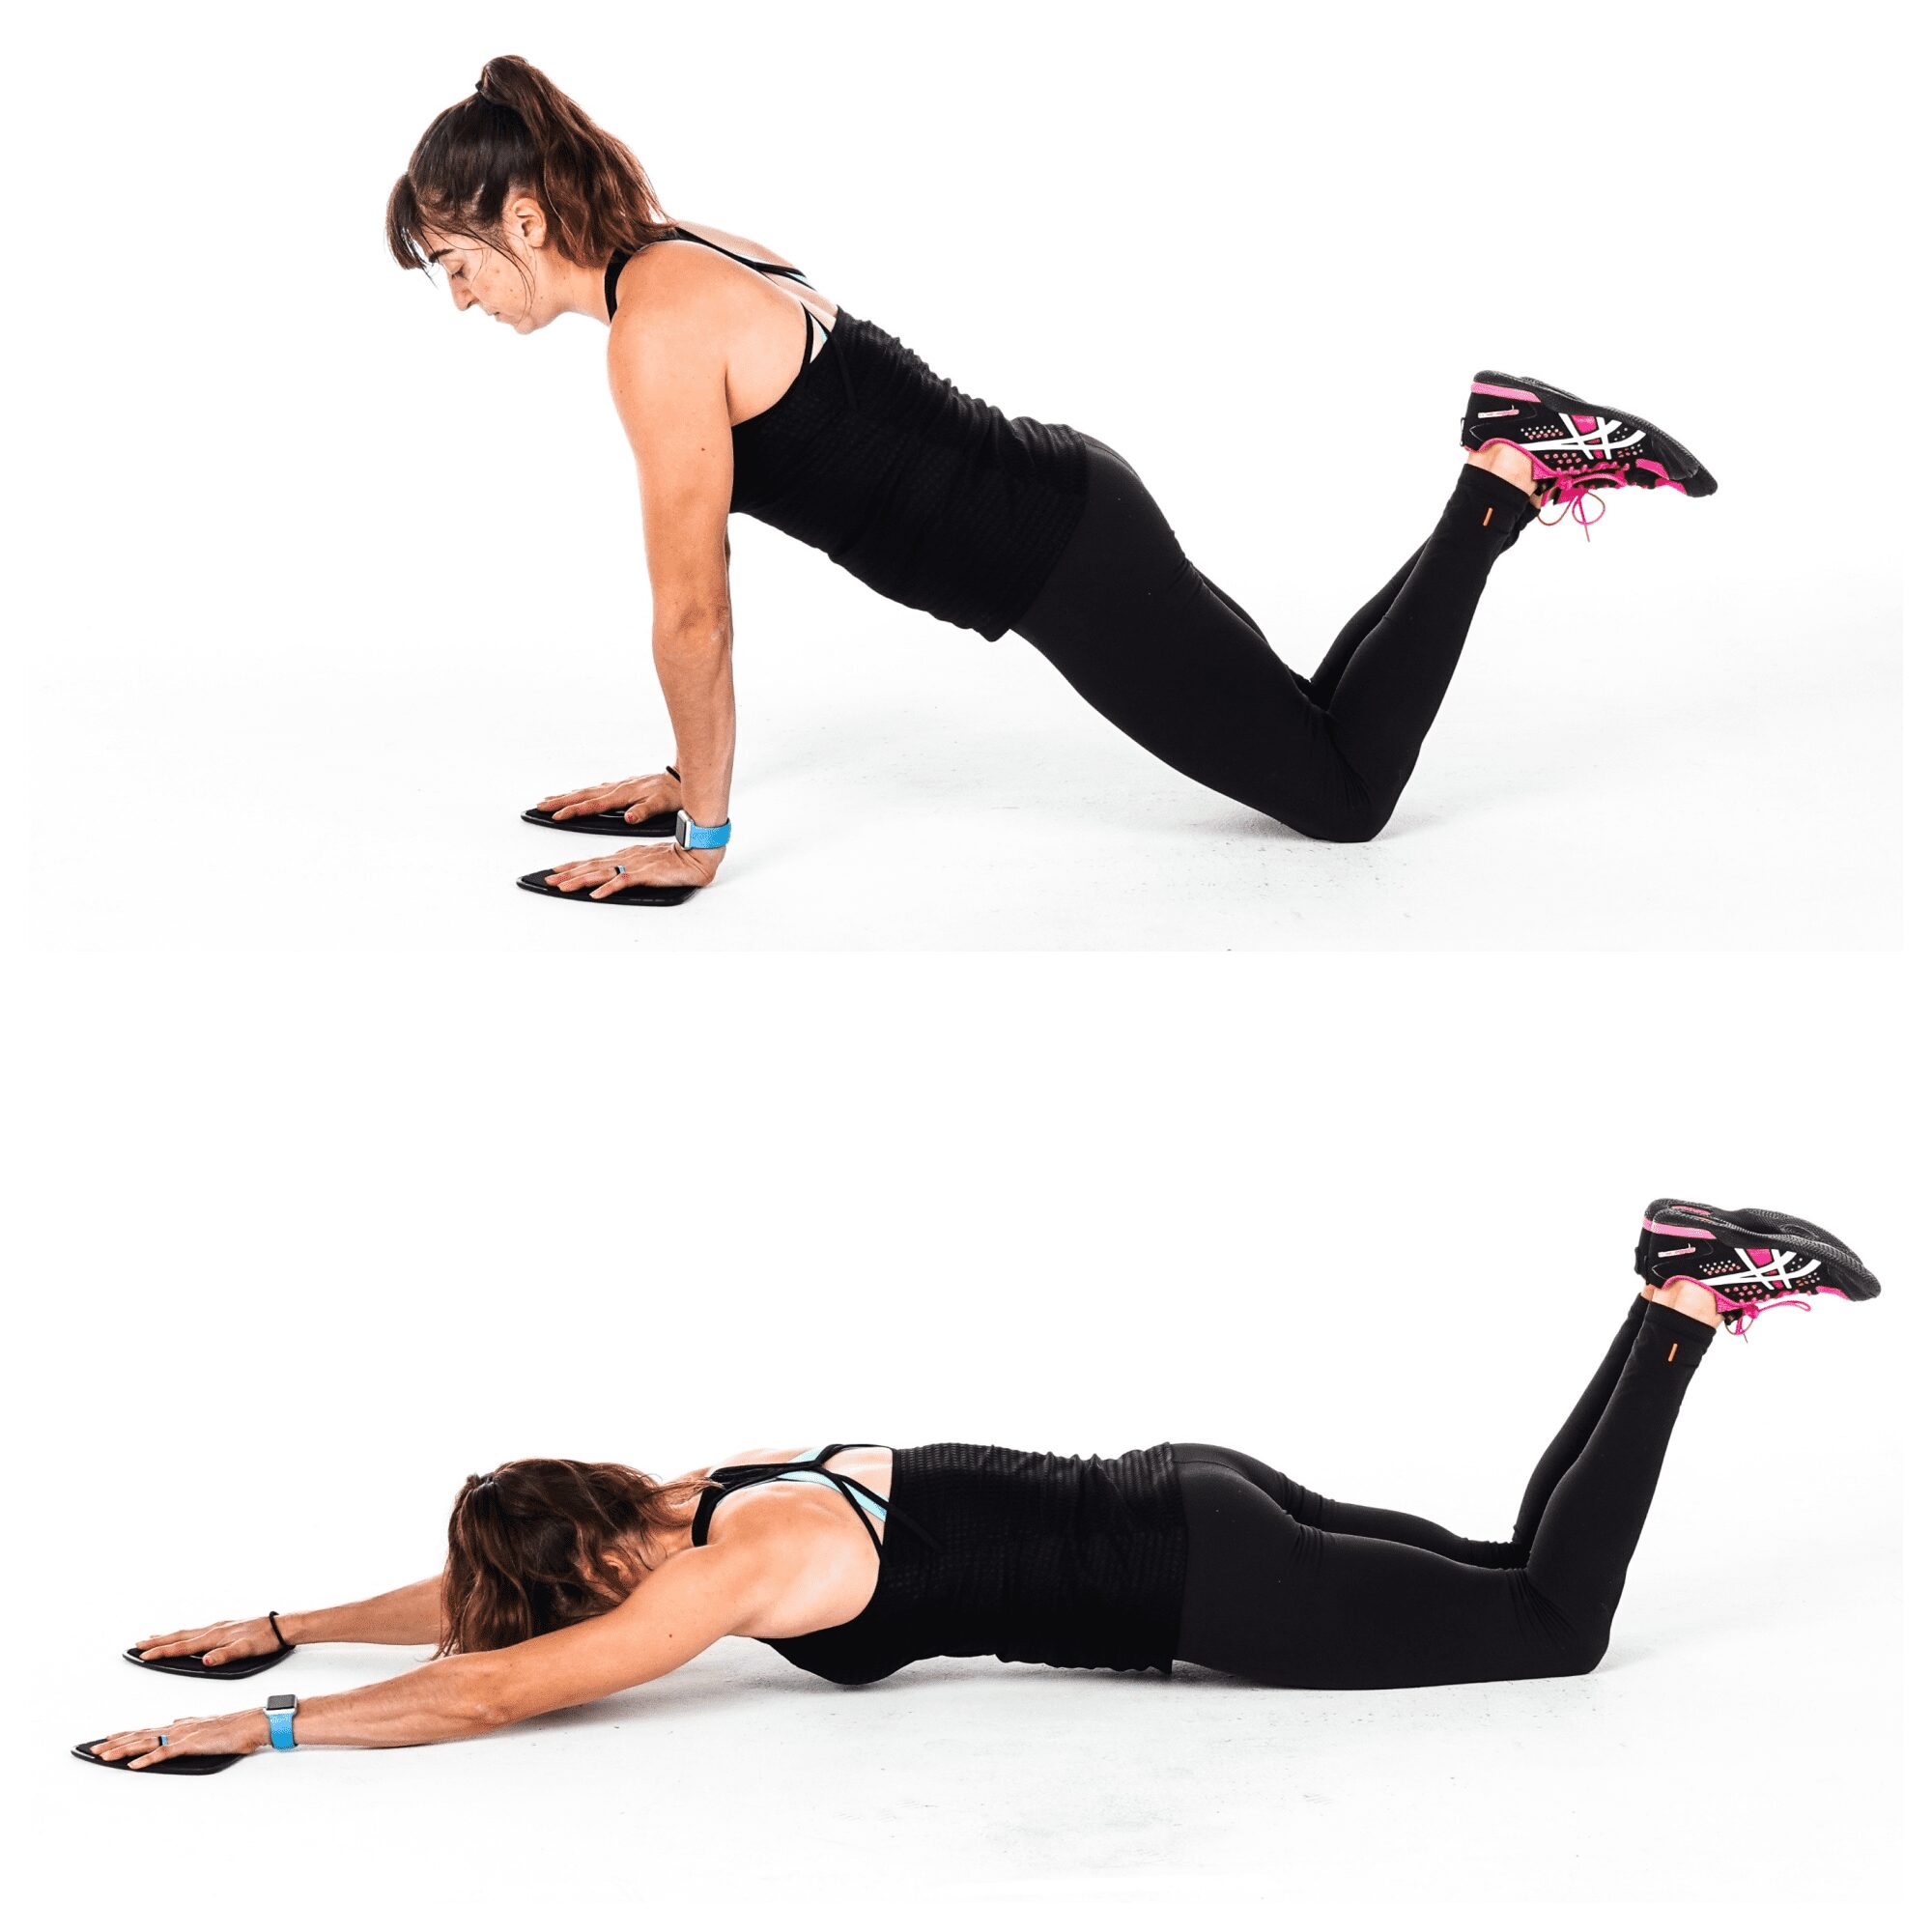
To do Slider Ab Extensions, place a slider under each hand and set up as if you’re doing a push up from your knees.
You want to have your hands under your shoulders and your body in a nice straight line from your head to your knees. Brace your abs and squeeze your glutes.
Slide both hands out as far as you can, lowering your body toward the ground. Extend out, if you can, until you’re hovering just above the ground.
Then pull the sliders back under your shoulders without bending your arms as your body moves back into the plank position. By sliding your hands back under, pulling with your back to bring your hands back in, your body will move back into the plank position.
Do not sit your butt back or let your lower back engage as you extend out or pull your hands back in. You want to brace your abs and keep your body in a nice straight line the entire time.
Once back in that knee plank position, repeat the slide back out. Do not let your hips sag, lower back arch or butt go up in the air. Also, make sure you don’t sit your butt back to help pull your arms back in. You only “rise up” because your hands come back under your shoulders.
Beginners may not slide out as far or they may extend one hand, then the other, then pull one in at a time.
T Sit Up:
Work your abs, hips, arms and upper back with this sit up variation that will also work to improve your posture!
It’s a great way to advance the basic sit up and target different areas than you may normally work!
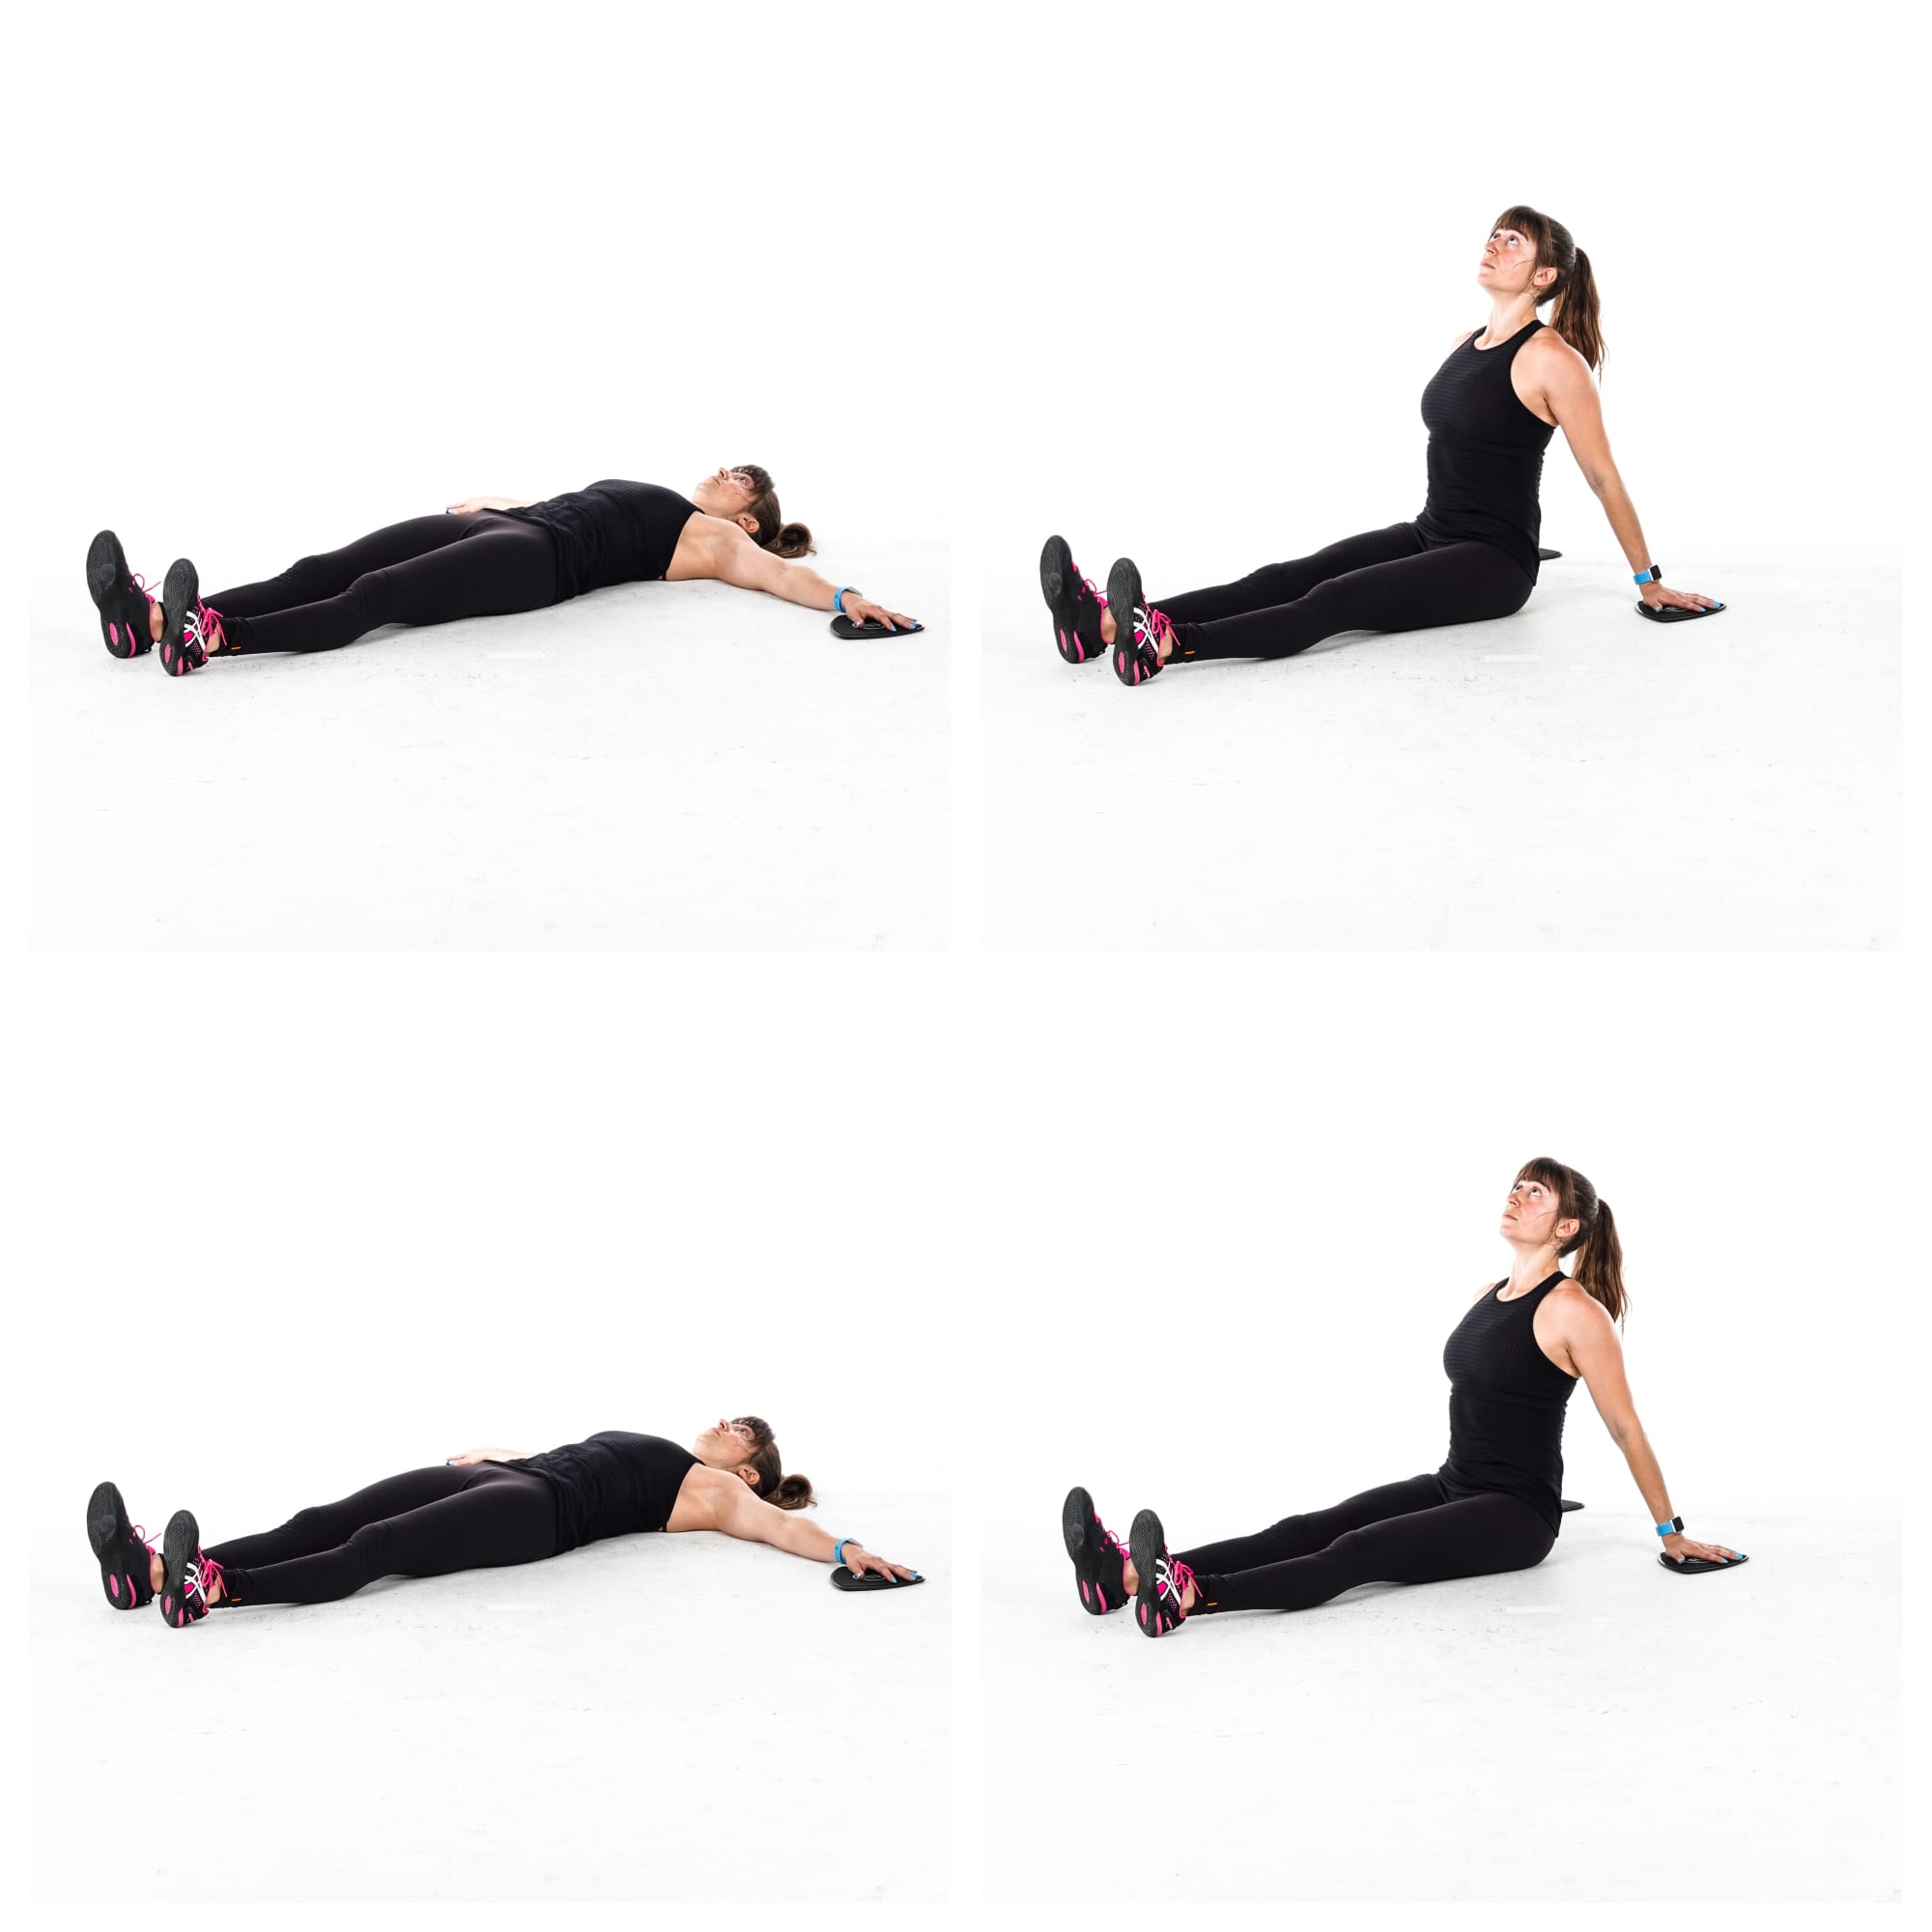
To do the T Sit Up, place a slider under each hand and lie on your back with your arms out straight from your body at about shoulder height. Your legs should be out straight in front of you although you can slightly bend your knees if it helps you to drive your heels into the ground and keep your legs from lifting up as you sit up.
Then sit up, pressing your lower back into the ground as your round up. By slightly rounding your spine as you sit up, you can better use your abs over just depending on your hip flexors.
As you sit up, pull the sliders in toward your butt, keeping your arms straight.
Sit up tall at the top, making sure your shoulders aren’t shrugged. You want to have pulled your hands in toward your butt and have pinched your shoulder blades together to help bring your hands in.
Then slowly round your back to lower yourself back down. You can even think about lowering one vertebrae at a time if that helps to start.
As you lower down, extend your arms back out straight at shoulder height. Do not bend your arms as you sit up or lower down.
Repeat, sitting back up.
Creating A Workout:
To create a workout using these moves, you can choose to use all 12 or even just select 4-6 for a great circuit workout. Intervals are a great option with these moves although they can also be done for reps based on your goals.
For a great interval workout design using these, select 4-6 moves based on what you want to work that day and set a timer for 30 seconds on, 15 seconds off. Move from one exercise to the next, resting only the 15 seconds between moves. Complete 4-6 rounds through the circuit of moves. Beginners may rest an extra 30 seconds between rounds if needed.
Need a great travel workout kit so you can get in a challenging workout wherever you go? Check out my TriSlides and Booty Band Bundle!


Great Ideas! Thank you! ❤️Them!
Thanks!
Cori! I’ve been exercising all of my life and I’m 58 and always looking for something different to make myself stronger and have a challenge of doing something new. I came across your YouTube videos on sliding and got some old plastic plates and gave it a try. I can say it is exactly what I needed. Wow what a challenge! You are amazing and make it look easy but it’s not. You have such incredible strength! Thanks, Barb
Thank you Barbara! I’m so glad you’re having fun using your “sliders!” It’s a great way to progress those basic bodyweight movements in a fun way!
Awesome workout for being stuck in the house under isolation ?? Thanks so much I’m nackered after that! ?
Glad they helped!
What no Zombie Crawl (feet on sliders and walking with your hands)? Another great one,
That definitely requires more space and is included in my crawling post 😉
I shall give them a go and see how I go.
Have fun Susan!
Are 9” oval sliders better than 7” round sliders?
I love my trislides but I feel like all of them can work and even like different shapes for different moves personally.