The Push Up is a must-do move even though most of us need to make sure we do extra pulling exercises because we sit hunched over a computer for 9 hours a day.
So while you definitely need to include rows and pull ups and all sorts of pulling exercises in your workouts, you can still include Push Ups.
Push Ups are an important bodyweight exercise to include because they work not only your chest, shoulders and triceps but also your entire core. As I’ve mentioned before, Push Ups are basically just a moving Plank.
They can help train the muscles of your core to work together correctly. They can help you develop and improve your mind-body connection so that your core engages and works properly during compound exercises.
However, doing the same basic Push Up over and over again gets boring. Plus there are so many different variations out there that can work not only your upper body, but also your core, in different ways to focus on different muscle groups.
That is why it is important to include different Push Up variations in your workout routine. Check out these 31 Push Up Variations below for some great upper body and core exercises!
These 31 Push Up Exercises are intermediate and advanced variations. Beginners may be able to do some from their knees or off an incline, but should first focus on progressing the basic Push Up movement.
Many of these variations are even a great way to improve your Push Ups and build toward a One-Arm Push Up.
1. Archer Push Up (0:12) – The Archer Push Up is a great way to modify the full One-Arm Push Up if you aren’t yet strong enough, but want to build toward one. It is a very challenging Push Up Variation not only for your upper body, but also for your core. This variation requires you to use a towel, slider or paper plate.
To do the Archer Push Up, place a slider under one hand and set up in a high plank position from your hands and feet. If you set up with your feet a bit wider apart, it will make the move a bit easier on your core. Make sure your body is in a nice straight line from your head to your heels and your abs are braced.
Then, keeping your arm on the slider straight, slide the slider out to the side as you lower your body down to the bottom of the Push Up. As you lower down, bend the elbow of the other arm while keeping your arm in by your side. Make sure your body moves as one unit to lower down and that you maintain a nice straight line from your head to your heels.
Keeping your core tight, press back up as you pull the slider back in. Do not bend your arm as you slide the slider back in. Make sure your body moves as one unit.
Bring the slider back in under your shoulders and repeat the Push Up. Do not bend the arm on the slider and make sure to keep the other arm in close by your side.
You will find you slightly shift your weight toward the arm on the ground as you lower down and press back up.
2. Single-Arm Assisted Push Up (0:26) – This is another great advanced Push Up variation to help you build toward the full One-Arm Push Up. This Push Up really isolates each side and allows you to slowly shift into the full One-Arm Push Up by lifting one finger at a time.
To do the Single-Arm Assisted Push Up, set up in a high plank position with your feet about hip-width apart. Then stretch one arm out to the side, even with your other hand. You can keep your palm flat on the ground or lift up onto your fingertips. To advance the move, lift a finger or two up off the ground.
Keeping one arm straight out and your other arm in by your side, lower your chest down toward the ground. Make sure your body moves as one unit and your core stays braced. Do not let your hips sag or your butt go up in the air.
Then drive back up to the top of the Push Up, straightening your arm in by your side all the way back up. The arm straight out should really not change position and should be there only to assist. You want to shift your weight toward the arm in by your side. The more you can shift your weight, the harder the move will be and the closer to a One-Arm Push Up it will be.
Drive straight back up, keeping your body in a nice straight line and then lower back down.
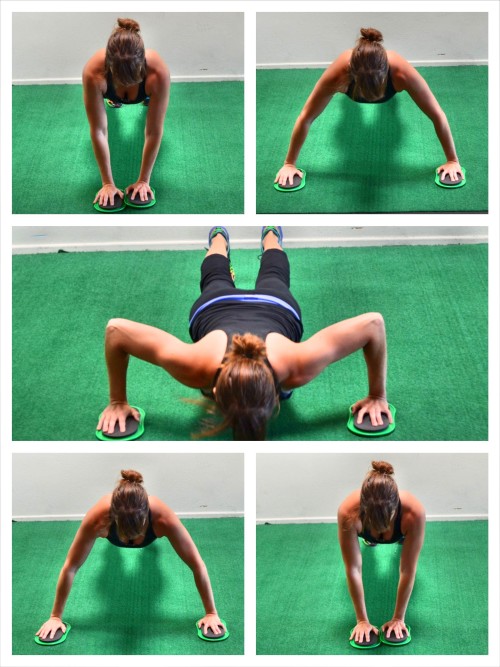
3. Slider Fly Push Up (0:40) – The Slider Fly Push Up is a great way to make the basic Push Up even more challenging for your chest. Intermediate exercises can do this from their knees or even complete a partial fly, sliding just one hand out at a time. Advanced exercisers can fly both hands out at the same time, as shown in the video, to do the full Slider Fly Push Up.

To do the Slider Fly Push Up, place a slider under each hand with your hands close together under your chest and your body in a nice straight line from your head to your heels. Place your feet only a few inches apart.
Keeping your body in a nice straight line, slide both hands out wide and lower your chest down toward the ground. You are performing a Push Up as you fly your hands out. Do not let your elbows flare way up toward your shoulders as you fly and perform the push up.
To come back up to the top of the Push Up, pull your hands back in, sliding your hands back together under your chest. Feel your chest and shoulders working to pull your hands back in and together as you come to the top of the Push Up.
Make sure your body moves as one unit and your core is engaged so that your hips don’t sag and your butt doesn’t go up in the air. Do not tuck your chin or let your body worm to lower down or come back up.
Repeat the move, sliding both hands out as you lower back down.
To modify the Slider Fly Push Up, check out these other Slider Push Up variations.
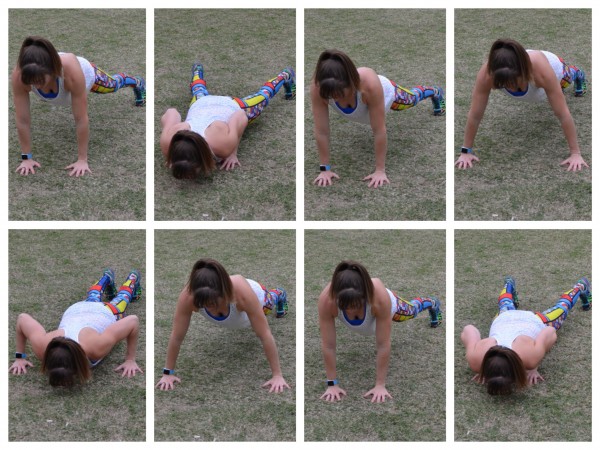
4. Jumping Spider Push Up (0:50) – If you want to work on your upper body explosive power while also working your core, especially your obliques, you need to include the Jumping Spider Push Up. This is a very advanced movement as it requires lots of core strength to jump from Push Up to Push Up. It also requires a lot of upper body strength to press up off the ground. Do not let your body “worm” as you perform the jumping Push Ups. Take out the plyo movement to regress.
To do the Jumping Spider Push Up, start in a high plank position with your hands outside your chest and your body in a nice straight line. Then stagger one hand back slightly and bring your knee up and in toward the outside of your elbow, placing your foot on the ground.
Drop down to the bottom of a Push Up, but do not let your elbows flare way up by your ears. Do not let your hips sag or your butt go up in the air.
Then quickly press back up, and as you do, explode up off the ground to land with your other hand staggered back and your other knee in by your elbow. Do not land with your arms locked out. As you land, sink right back into the bottom of a push up.
Explode back up off the ground and land back on the first side.
To regress the Jumping Spider Push Up, you can perform a Spiderman Push Up (number 7).
5. Plyo Push Up (1:03) – If you want a great move to work on core strength and upper body power, you need to include the Plyo Push Up. This move shouldn’t be done for high reps, but for only a few very explosive, powerful repetitions. It is a great explosive Push Up variation to start with before progressing to the Clapping Push Up or Jumping Spider Push Up.
To do the Plyo Push Up, set up in a high plank position with your hands outside your chest and your body in a nice straight line down from your head to your heels. Your arms should be straight and your feet should be close together.
Lower your chest down to the ground, keeping your body in a nice straight line as you lower to the bottom of the Push Up. Do not let your elbows flare way up by your ears. You want your arms to create an arrow shape with your body.
Once you’ve lowered your chest to the ground, quickly push back up from the bottom of the push up, exploding up off the ground at the top. Lift your hands up off the ground. You may slightly bend your elbows as you lift.
As you land, bend your elbows and quickly sink right back to the bottom of the Push Up before exploding back up off the ground.
Keep your body in a nice straight line as you explode up and land. Do not push your butt up in the air just to try to get higher up off the ground. Force your core to really work and keep your body in a nice straight line as you move.
Intermediate exercisers may start with an Incline Plyo Push Ups, Knee Plyo Push Ups or quick Push Ups without leaving the ground. The point is to be explosive while keeping your core tight.
6. Clapping Push Up (1:12) – This is a great way to force yourself to be even more explosive with the Push Up than you were with the Plyo Push Up. You’ve got to make sure to explode up high enough that you can perform a ‘clap’ when you leave the ground.
To do the Clapping Push Up, set up like you would for the Plyo Push Up, but when you explode up off the ground, quickly bring your hands together and perform a clap. As you land, make sure to bend your elbows and lower back down to the bottom of the Push Up.
Do not let your body worm or your butt go up in the air just so that you can get up higher.
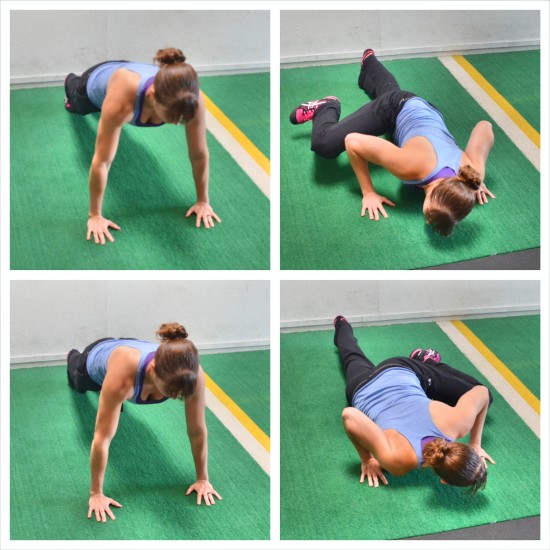
7. Spiderman Push Up (1:20) – This is a great way to modify the Jumping Spider Push Up and to work your chest, shoulders, triceps, abs, and especially, your obliques.
To do the Spiderman Push Up, set up in a high plank position with your hands outside your chest and your body in a nice straight line down to your heels.
Keeping your body in a nice straight line, perform a Push Up and, as you lower to the bottom of the Push Up, bring one knee in toward the outside of the elbow on that side. Do not let your butt go way up in the air as you bring the knee in even though you may very slightly rotate open toward that side.
As you press back up out of the Push Up, drive your leg back out straight to put the foot back down.
Then perform another Push Up, this time bringing the other knee in as you lower down to the bottom. Push back up and put the foot back, straightening the leg back out. Make sure to keep your core tight as you bring the knee in. Your body should move as one unit as you push back up to the top.
Intermediate exercisers can modify by performing the knee drive at the top of the Push Up.
8. Wide Grip Push Up (1:33) – The Wide Grip Push Up is one of the few variations in this list that can really be regressed for the beginner if it is done off an incline. No matter your fitness level though, this is a great Push Up variation to really target your chest. It is a great way to build strength as well for the Slider Fly Push Up.
To do the Wide Grip Push Up, set up in the high plank position with your hands out wider at chest height. A great way to figure out a width to start with is to make your hands into fists and place your knuckles together. Lean forward and lay your arms on the ground with your knuckles together. Your elbows will be pointing out and, right at the end of each elbow, you will place your hands. Make sure your hands are at chest height and not way up by your head.
Then in the high plank position with your feet close together and your body in a nice straight line from your head to your heels, lower your chest down to the ground. Do not let your hips sag or your butt go up in the air. Make sure your entire body moves as one unit.
Lower all the way down then press back up with your body moving as one unit. Full straighten your arms out at the top and repeat, lowering back down. Try to keep your entire palm firmly on the ground as you press and lower.
Beginners can do the Wide Grip Push Up from their knees or off an incline.
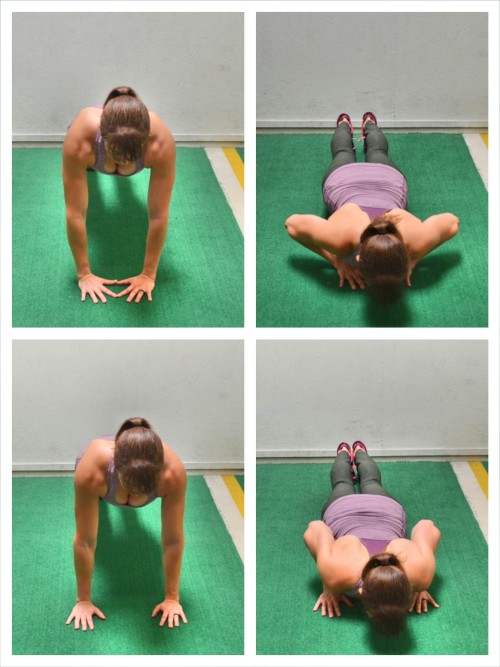
9. Diamond Push Up (1:42) – Diamond Push Ups are a great way to really target your triceps with a compound exercise that will still really work your core. Don’t waste time on tricep extension and kickbacks. Instead try Diamond Push Ups. Like with the Wide Grip Push Up, beginners or even intermediate exercisers can modify by doing these off an incline or from their knees. (Diamond shown top, basic Close Grip shown bottom)
To do the full Diamond Push Up, place your first fingers and thumbs together to create a diamond with your hands. Then place your hands on the ground under your chest with your body in a nice straight line from your head to your heels. Do not shrug your shoulders. Your elbows can flare out a bit from your body, but the more they stay in, the harder the move will be and the more you will isolate your triceps. Do not let your elbows flare way up by your ears though!
With your hands in the diamond and your body in a nice straight line, lower your chest down to touch your hands. Then press back up. Make sure to engage your entire core and keep your head in line with your spine as you lower and press back up. Do not let your butt go up in the air or your hips sag as you move. Also, make sure everything moves together.
Feel your triceps working as you fully extend your arms and then lower back down and repeat.
10. Elevator Push Up (1:56) – This is a great Push Up variation to really build upper body and core strength. Your core will have to work hard to keep your body in a nice straight line as you pause at different points throughout the Push Up movement. This is also a great move to build your Push Ups if there is a point you find you stick at when close to hitting your back.
To do Elevator Push Ups, set up in a high plank position with your hands right outside your chest and your feet close together. Engage your abs and set your body in a nice straight line from your head to your heels.
You can then move through the Push Up movement, lowering your chest all the way down to hover just off the ground. At any point in the movement, pause and hold. You can hold at the bottom with your chest just off the ground and your body in a nice straight line. You can hold at the middle with your elbows bent to 90 degrees (and your body in a nice straight line). Or you can even pause and hold at the top.
You can pause at any point in the Push Up. Just don’t let your hips sag, your butt go up in the air, your shoulders shrug or your head tuck. Your body should stay in a nice straight line and you need to engage your core, including your back, abs, glutes and quads.
Mix up where you hold and even have a partner tell you where to pause to challenge you!
11. Push Up Holds (2:11) – Build great core stability with Push Up Holds. There is nothing like an Isometric move to work your core and build great stability and strength. These Push Up Holds can help you target and strengthen different points in the Push Up by having you hold right where you get stuck.
If you are struggling to build your Push Ups, holds can help!
To do Push Up Holds, there are three main holds you can focus on – High Push Up Hold, Mid Push Up Hold and Bottom Push Up Hold.
- High Push Up Hold – Use this hold to improve your lockout and strengthen your core and shoulders. To do the High Push Up Hold, set up at the top of a push up with your feet together and your hands under your shoulders but outside your chest. Your body should be in a nice straight line from your head to your heels (with your legs straight). Engage your abs, glutes, quads and back. Do not shrug your shoulders. Make sure your legs are engaged and you are driving back through your heels not coming forward onto your toes. Do not tuck your chin. To regress this move, hold from your hands and knees.
- Mid Push Up Hold – This is a great move to work your core, chest, shoulders and triceps. This move will be harder on your core than the high hold because you have to keep it even as your chest, shoulders and triceps ares struggling to work. Set up at the top of a Push Up with your feet together and your hands under your shoulders and just outside your chest. With your body in a nice straight line from your head to your heels, bend your elbows to about 90 degrees and lower and hold. Do not let your hips sink or your butt go up toward the ceiling as you hold at that mid-point. Do not tuck your chin or let your elbows flare way out. You want your arms and body to create an arrow shape. Hold as close to 90 degrees as you can. Regress the hold by doing it from your knees.
- Bottom Push Up Hold – This is the hardest of all three holds because you’ve got to keep everything engaged while holding an inch off the ground. This hold is great if you struggle to keep your core engaged as you press back up from the bottom of a Push Up. This is actually a great hold for any beginner looking to achieve their first full Push Up from their toes. To do the Bottom Push Up Hold, set up at the top of a Push Up and then, keeping your body in a nice straight line and everything engaged, lower down until your chest is an inch off the ground. Make sure to engage your glutes and quads to keep your body in a nice straight line. Do not tuck your chin, let your hips sag toward the ground or your butt go up in the air. Do not let your elbows flare way out as you hold. You can also do this from your knees or off an incline even. Really focus on engaging your entire core as you hold.
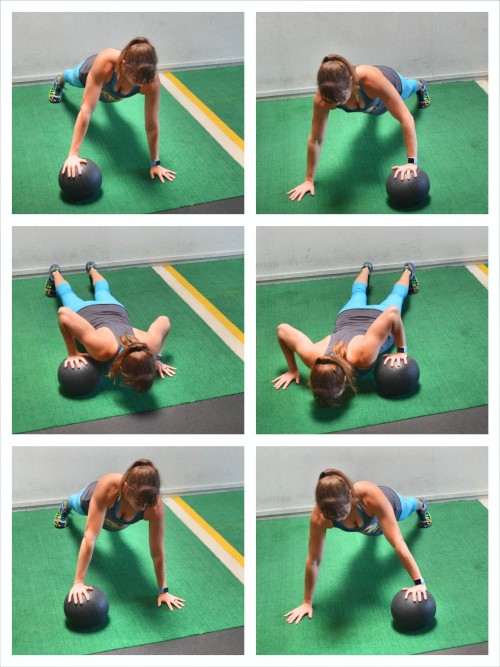
12. Push Up Shuffle (2:24) – This is another great plyometric Push Up variation that will really work your shoulders, chest and core. If you haven’t mastered the basic plyo or the clapping, you may want to start by doing this move from your knees as you not only need to explode up high enough but also move laterally as you jump.
To do the Push Up Shuffle, place a med ball (or stack of books or kettlebell) on the ground between your hands. Then set up in a Push Up position from your hands and toes with your hands at about shoulder height and one hand on the ball. Your body should be in a nice straight line.
With one hand on the ball, perform a push up, dropping your chest so that it may touch the ball. Quickly press back and, as you do, jump your body over the ball, placing the other hand on top of the ball as you place the other hand on the ground.
As you land, bend your elbows and sink into another Push Up. Lower your chest to graze the ball and then explode back up and shuffle back over the ball.
Intermediate exercisers can try the knee Push Up Shuffle or regress the movement by performing a step over the ball instead of jumping for a plyo shuffle.
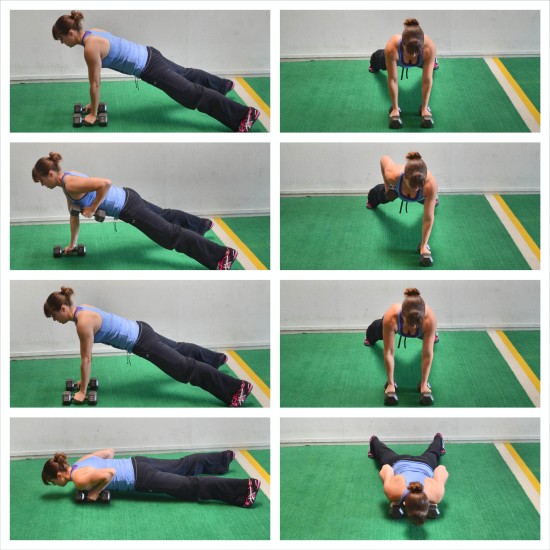
13. Renegade Row Push Up (2:37) – Because we sit so often during the day, any pulling movements we can add into workouts are beneficial. And when you add in the Renegade Row to a Push Up, you not only get to work your back, but you also force your core, shoulders and glutes to work harder.
To do the Renegade Row Push Up, you can use dumbbells or kettlebells. Place them on the ground a few inches apart with them under your shoulders. Grip the weights and set up at the top of a plank with your arms straight and legs out straight behind you. The closer together your feet/knees are, the harder the move will be on your core because you won’t have as wide a base to keep you balanced and help you fight rotation during the row.
From this plank position, perform a Push Up, dropping your chest to the weights. With your body moving as one unit, lower down and then press back up. At the top of the Push Up, keeping your core braced and body still, row one dumbbell up to your side. Drive your elbow down and back toward the ceiling to row the weight up.
Lower the weight back down and then perform another Push Up before rowing the other dumbbell up. Make sure not to shrug your shoulders as you row or tuck your chin. You want to feel your back working. As you row, fight the urge to rotate open. Keep your body in a nice straight line from your head to your heals. Really focus on squeezing your glutes.
Intermediate exercisers may need to do a row on each side after each Push Up to eliminate some of the Push Ups. They may also want to do this form their knees to prevent their butt from going up in the air or their hips from wiggling. Advanced exercisers will want to do only one row after each Push Up and use heavy weights.
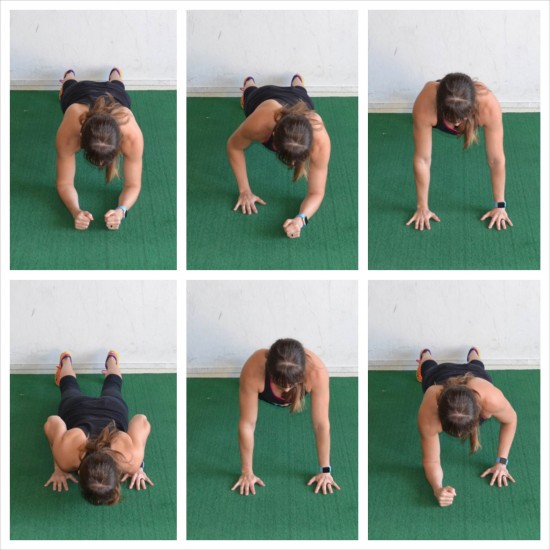
14. Dive Bomber Push Up (2:50) – This is a great Push Up to really work your chest, shoulders and triceps. It requires a lot of strength and a good amount of mobility to really be able to dive under and perform the movement. It is a great way to really open up your chest and shoulders while working your upper body and core.
To do the Dive Bomber Push Up, set up on your hands and toes. Your hands should be just outside your chest and your feet should be about hip-width apart. Bringing your feet closer together will make the move harder because you will have a less stable base. Lift up to start at the top of a Push Up with your body in a nice straight line from your head to your heels.
Without moving your hands back, push back into a downward dog position. Push your butt back and up toward the ceiling as you drive your heels down and try to extend through your spine. Bend your knees slightly if needed, but really press your chest back and try to get your back flat.
Start to slowly move back forward, dropping your chest and head toward the ground. You want to move forward as if you are trying to sneak under a fence. Drop your chest and head as close to the ground as you can as you bring your chest forward and through between your hands.
As your chest passes between your hands and your hips drop close to the ground, begin to arch up. You will open your chest up toward the ceiling as you straighten your arms and drop your hips to almost touch the ground. You will be in an upward facing dog position. Make sure that you don’t shrug your shoulders as you arch open.
Then move right back into a downward dog position.
Regress this move by doing this from your knees. You can also advance the movement, but moving back into downward dog the same way you moved forward aka you can sneak back under the fence instead of simply pressing back.
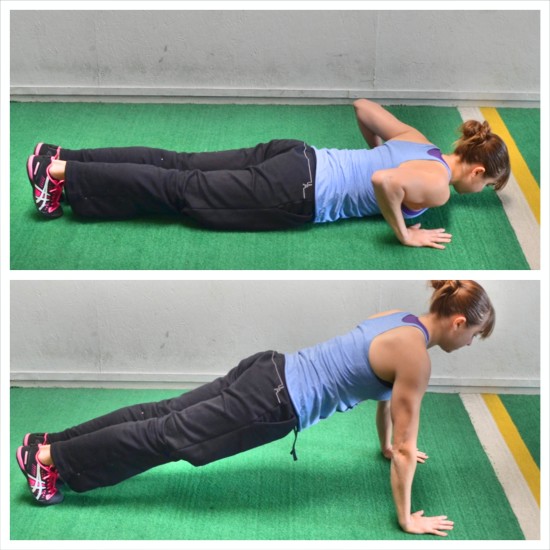
15. Close Grip Push Up (3:08) – This is another great tricep-focused Push Up, but slightly easier than the Diamond variation.
To do Close Grip Push Up, place your hands no wider than right outside your chest as you set up in the high plank position with your feet together and your body in a nice straight line. The closer your hands are together (aka the closer to a Diamond Push Up you get), the harder the move will be and the more your triceps will be forced to work.
Keeping your body in a nice straight line and your arms in by your sides, lower your chest down to the ground. Your body should move as one unit to lower down without your butt going up in the air or your hips sagging. Make sure your elbows and arms stay in by your side as you lower. Do not let them flare out or you will not force your triceps to work as hard.
Lower your chest as close to the ground as possible then press back up. Make sure your body moves as one unit and your arms don’t flare out. Then lower back down and repeat.
Often with Narrow-Grip Push Ups, our elbows will want to flare out or our hips will drop because our triceps are weak and we end up relaxing our cores. If you can’t press back up with your core staying engaged and your body in a nice straight line, you may need to regress the movement to an Incline Narrow-Grip Push Up or a Knee Narrow-Grip Push Up.
16. Knuckle Push Up (3:20) – Our wrists, hands and forearms can all be strengthened by performing Push Ups with a variety of hand positions. By doing Push Ups from your Knuckles, you can build your wrist strength; however, you must already have a certain amount of strength to do this movement in the first place!
To build up wrist strength and mobility before attempting this Push Up, try Planks with different grips.
To do the Knuckle Push Up, make fists with your hands and either wrap your thumbs slightly outside your fingers or just let keep them on the sides, but do not tuck them under your fingers. Then set up in a high plank position from your knuckles and toes with your knuckles outside of your chest, but under your shoulders and your feet close together. Your body should be in a nice straight line.
Perform a Push Up, lowering your chest as close to the ground as you can before pressing back up. Keep your body in a nice straight line and make sure to engage your abs, glutes and quads. Do not shrug your shoulders. Also make sure your wrists stay in line. Do not rock out on your hands or your could hurt your wrists.
Press back up and repeat the Push Up.
17. Fingertip Push Up (3:31) – Another great Push Up to strengthen your hands, wrists and even forearms. Our hands, wrists and forearms are so often trapped in flexion throughout the day typing, it is nice to give them some exercise and extension as well!
This is a more challenging Push Up variation in that it does require some hand strength.
To do the Fingertip Push Up, set up like you would for a basic Push Up and then lift up onto your fingertips. Keeping your body in a nice straight line, lower your chest down to the ground then press back up. Make sure your body moves as one unit and that your elbows don’t flare way up by your ears.
If you can touch your chest to the ground, go all the way down as it will mimic a deficit Push Up since you are on your fingertips instead of flat on your palm. It will make your chest, shoulders and triceps work through a bigger range of motion and grow stronger through the increased range of motion!
18. Bird Dog Push Up (3:41) – If you want to really challenge your core and work those abs and glutes, you need to include the Bird Dog Push Up. This is a great move to really improve your core stability as you work your upper body!
To do the Bird Dog Push Up, set up in the high plank position from your hands and toes with your hands under your shoulders and your feet about hip-width apart. Widen your feet out to make the move a bit easier and give you a more stabile base. Brace your core and make sure your body is in a nice straight line from your head to your heels.
With your body moving as one unit, perform a Push Up, dropping your chest to the ground. Do not let your elbows flare way up by your shoulders and make sure to keep your core engaged and drive back through your heels so that your body stays in a nice straight line.
Press back up and, at the top of the push up, lift your opposite leg and arm up, reaching your arm out straight toward the wall in front of you as you lift your foot back toward the wall behind you. Keep your core engaged and squeeze your glutes to lift your leg as you raise your arm. Do not let your body rotate open or your hips sag toward the ground. Do not let your butt go up toward the ceiling as you lift. Pause to hold for a second at the top. You get more out of this move if you hold for a second at the top instead of rushing.
You do not need to lift super high. It is more about lifting toward opposite walls and engaging your core and glutes to stay balanced. Repeat the Push Up and again make sure your body moves as one unit. Do not tuck your chin or let your hips sag.
When you press back up, perform a Bird Dog on the other side, lifting the opposite arm and leg up. Keep performing a Push Up then a Bird Dog, alternating sides.
Intermediate exercisers can do the move from their knees.
19. Push Up With Leg Kick (3:58) – This is a great Push Up to work your obliques and legs while challenging your upper body. The Leg Kick does require more mobility so make sure to stretch your hips beforehand.
To do the Push Up with Leg Kick, set up in a high plank position with your hands outside your chest and your feet close together. Your body should be in a nice straight line with your abs braced and glutes and quads engaged.
Then lower down to the bottom of a Push Up, keeping your body in a nice straight line. At the bottom, kick one leg out to the side toward your elbow. Your hips may rotate slightly as you kick, but your butt shouldn’t go up in the air. Kick your leg up as close to your elbow as you can and then lower it back down and place your foot back on the ground.
Once your foot is back down, press back up to the top of the Push Up. Lower down again and kick the other leg out to the side toward your elbow. Keep your leg as straight as you can as you kick it out. And make sure your body stays in a nice straight line.
Place your foot back and press back up before repeating on the first side.
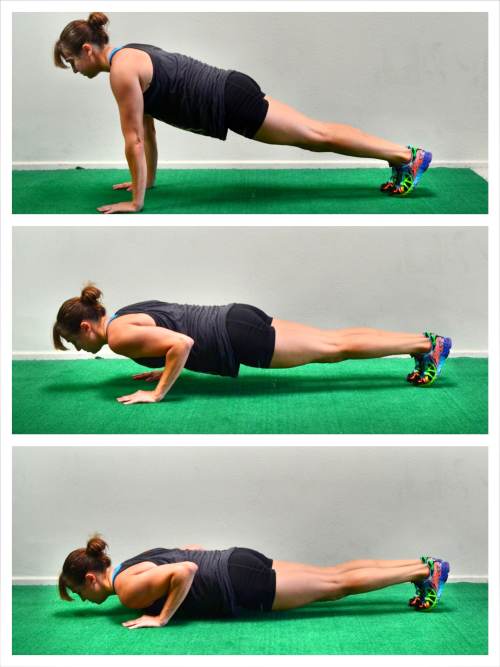
20. Slow Eccentric Push Up (4:13) – This is a great move to build your upper body strength and can even be used by beginners to improve their Push Ups. By slowing down the Eccentric portion of any move, you can tear down more muscle tissue, which can lead to increased strength gains.
To do the Slow Eccentric Push Up, start in the high plank position with your hands outside your chest and your feet close together. Draw your belly button in toward your spine and squeeze your glutes. Flex your quads and your feet and drive back through your heels.
Then slowly lower your body down toward the ground, going as slowly as you can. You can also set a count for the Eccentric, such as a 3 or 5 count. Move slowly and make sure your body moves as one unit. Touch your chest to the ground and then lift quickly right back up to the starting position.
Again slowly lower back down before pressing quickly back up. Try to touch your chest to the ground before pushing back up.
If your body doesn’t move together, if you do the “worm” as you press up or down, regress to your knees or an Incline Push Up.
You can also do an Eccentric-Only Push Up to help build your Push Ups if you can’t yet do a full one. This allows you to take on your own bodyweight in a full Push Up position for at least part of the movement, which will help you learn to handle your full weight for the full Push Up from your feet.
With this movement, you will slowly lower down, but instead of pushing back up, you will simply reset at the top of the Push Up. That means you can drop to your knees and then just set back up at the top of the Push Up without performing a Push Up to get back up.
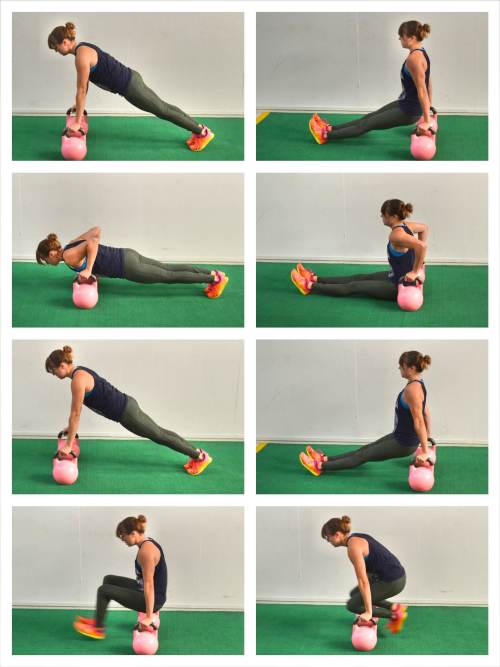
21. Push Up To Dip (4:28) – This is a great compound Push Up variation that combines Dips and Push Ups for an upper body and core killer. This move will really target your triceps, shoulders and core.
To do the Push Up to Dip, set up two kettlebells next to each other or use Push Up Stands. The weights or stands should be close enough together that you can only really slide your feet through. You want them close enough that you have to perform a closer grip Push Up.
Place your hands on the kettlebell handles with your palms facing each other (kettlebell handles will be parallel to each other). Then set up in a high plank position so that your hands are at chest height just outside your chest. Make sure your body is in a nice straight line from your head to your knees or toes.
Then perform two Push Ups with your hands on the kettlebell handles. Drop your chest down to the handles. Go a little lower if mobility allows. Keep your elbows from flaring way up by your ears. The more you keep your arms in by your sides, the more your triceps will work.
Then swing your legs through without touching your feet down. Swing them out in front of you so that they are straight, but so that your butt is back by the kettlebells. Then perform two Dips, dropping your butt down to the ground as you bend your elbows.
The more you “swing” through and don’t touch your feet down and the less you walk back and forth through the kettlebells, the more challenging the move will be for your core. Also, the straighter your legs are for the Dips, the harder the move will be. To make the Dips easier, bend your knees and walk your feet back toward your butt.
After doing two Dips, walk or swing your feet back through and set back up to do two more Push Ups and repeat the series.
22. Climber Push Up (4:46) – This is a great Push Up variation to build anti-rotational strength while targeting your shoulders and really working your core.
To do the Climber Push Up, start in a plank position from your forearms. Set your feet wider apart to create a more stable base. Make sure your body is in a nice straight line from your head to your heels and that your shoulders are stacked over your elbows.
Brace your abs and, keeping your body in a nice straight line, climb one hand at a time up to a high plank position from your hands. To climb up to your hands, place your hands right below your shoulders, but outside your chest. Try not to wiggle your hips as you climb and don’t let your butt go up in the air or your hips sag toward the ground.
At the top perform a Push Up. Keep your body in a nice straight line as you drop your chest between your hands and down toward the ground. Press all the way back up and then climb back down.
To climb back down, make sure to place your elbows right below your shoulders. Then repeat, climbing back up. Make sure to alternate or switch which hand leads the climb at some point.
Keep your body in a nice straight line and your core engaged the entire time to keep your hips as still as possible. Keep your feet wider for more stability or bring them closer together if you can keep your hips still.
Intermediate exercisers may need to do this from their knees or may need to lower down to their knees after climbing to perform the Push Up.
23. Single Leg Push Up (5:01) – Create a little instability to get your glutes and abs working a bit more with this Single Leg Push Up. By raising your leg, you force your core to work harder to stay balanced. You can also really force the glute of the raised leg to work to hold the leg up!
To do the Single Leg Push Up, set up in a high plank position with your hands outside your chest and your feet close together. Use your glute to then lift one leg up off the ground and hold it up. Do not let your butt go up in the air as you hold the leg up. Keep your core engaged and your body in a nice straight line.
Keeping your leg up, lower down to the bottom of a Push Up. Keep the leg up the entire time and your body in a nice straight line.
Press back up and repeat. Do not touch your foot down until all reps are complete on that side.
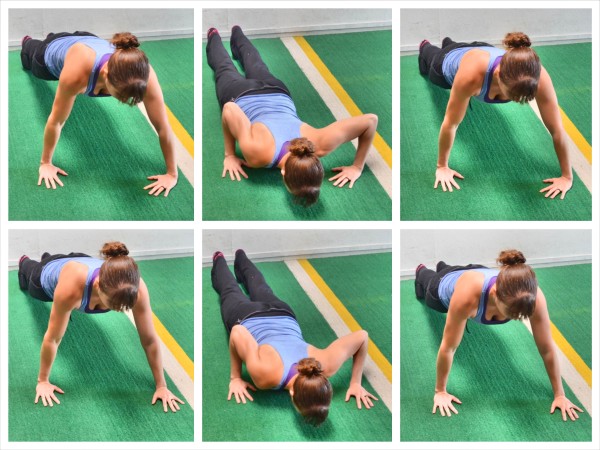
24. Staggered Push Up (5:12) – This is a great Push Up variation to target your shoulders and triceps and sort of isolate each side and make them work in different ways but at the same time.
To do the Staggered Push Up, stagger one hand up higher, at about shoulder height, while one is back outside your chest. Allow one elbow to flare out as you keep the other arm in by your side. Rotate the fingertips of the hand up by your shoulder to point in toward your body. The fingertips of the hand outside your chest should be pointing straight ahead.
Set up with your arms straight, feet close together and your body in a nice straight line. Make sure you aren’t shrugging your shoulders as you set up.
Keeping your legs engaged and core tight, lower your body down toward the ground as one unit. As you lower down, your arm with the fingertips turned in may flare out as you keep the other arm in by your side. Try to touch your chest to the ground without your hips sagging or your butt going up in the air. Do not tuck your chin as you lower down. Keep your hands flat on the ground as you lower and lift, do not rock toward the outside of your hands.
Press back up to the top, moving your body as one unit. Complete all reps on one side then stagger your hands the other way with the other hand high and the other hand low.
If turning the top hand in toward your body creates too much strain on your shoulder and engages your upper trap, you can keep both hands pointing straight ahead with one outside your chest and the other staggered up right at the top of your shoulder (shown in bottom three photos).
25. Mountain Climber Push Up (5:25) – Get your blood pumping and work your core with the Mountain Climber Push Ups. Whether you do all the Push Ups and do one between each knee drive or your simplify things and do two knee drives between each Push Up, your core and upper body are going to get a great workout.
To do Mountain Climber Push Ups, set up at the top of a Push Up with your hands outside your chest and your body in a nice straight line down to your heels.
Then perform a Push Up, dropping your chest to the ground before pressing back up and fully extending your arms. Make sure your body moves as one unit and that your butt doesn’t go up in the air or your hips don’t sag toward the ground.
At the top of the Push Up, then drive one knee in toward your chest. As you pull the knee in, don’t let your butt go up in the air.
Extend the leg back out and place the foot back down. Perform another Push Up then tuck the other knee in.
26. Bottom Up Push Up (5:35) – If you struggle to keep your core engaged as you press up from the bottom of a Push Up, this is a great way to build your core strength. If you are also working to improve the max number of Push Ups you can do and your range of motion, this is a great variation to help you out!
To do the Bottom Up Push Up, start lying on the ground with your feet together and hands on the ground outside your chest. Flex your feet and drive back through your heels as you engage your abs, quads and glutes so that your body is nice straight line.
From this engaged position with your body on the ground, press up to the top of a Push Up. Your body should move as one unit as you press up. Make sure you’ve engaged your core before even starting the press up. If it doesn’t move as one unit, regress the move to your knees or do it off an incline.
Your body should be in a nice straight line from your head to your heels as you fully straighten your arms. Do not tuck your chin or let your elbows flare way up by your shoulders. You arms should create an arrow shape with your body.
Once you’ve locked your arms out at the top, lower back down to the ground and reset, completely touching your body down toward the ground. Make sure you release all tension at the bottom so you are pushing up from a dead stop each time. You can even lift your hands at the bottom before re-engaging your core to make sure you have no momentum to use.
Again before pressing back up, engage your core and legs and set your body in a nice straight line as you drive back through your heels.
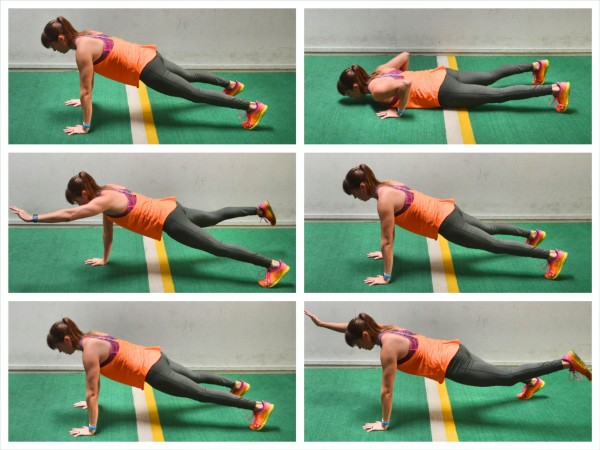
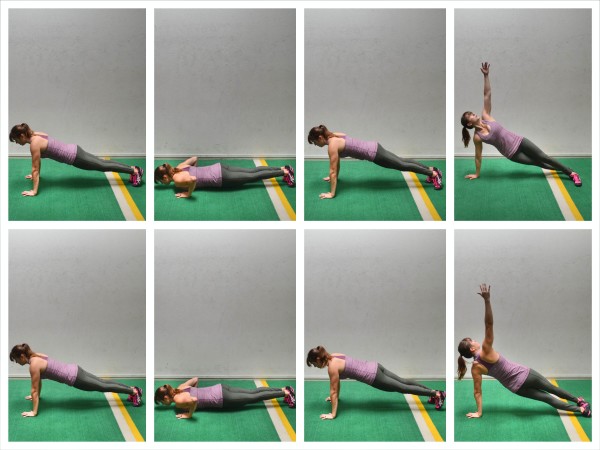
27. T Push Up (5:50) – The T Push Up is a great move to strengthen your shoulders while really working your core, especially your obliques. This move works your obliques and even your glutes more because you rotate into a Side Plank after each Push Up, aka a perform a “T.”
To do the T Push Up, start at the top of a Push Up with your hands outside your chest and your feet close together. Brace your abs and engage your glutes and quads as you drive back through your heels to make sure your body is in a nice straight line.
Then perform a basic Push Up, dropping your chest to the ground between your hands. Keep your body in a nice straight line and do not let your hips sag or your butt go up in the air. Also, make sure your elbows do not flare up by your shoulders and that you do not tuck your chin or jut your head forward.
Press back up to the top of the Push Up, moving as one unit, then lift one hand up off the ground toward the ceiling as you rotate open into a side arm balance or side plank. Pivot your feet to rock onto the sides of your feet as you reach your top hand up toward the ceiling and rotate your body open. Do not let your shoulder shrug as you do this.
Pause for a second, as you rotate open and keep your bottom hip up. Then rotate the hand back down and the feet back forward. Perform another Push Up and then a side arm balance/side plank on the other side. Keep alternating side arm balances after each Push Up.
Intermediate exercisers can do this movement from their knees and lift up onto their toes after the Push Up for the side plank.
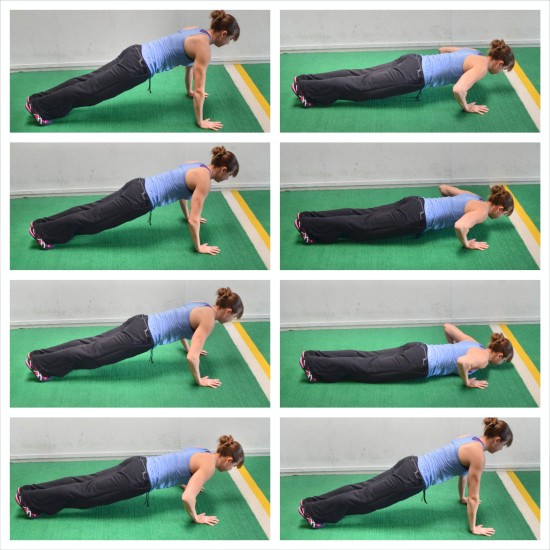
28. Push Up Walk (6:03) – This is a great challenge crawl variation that will work your chest, shoulders and triceps while also challenging your core. This move is super challenging for the triceps and chest as you cycle back and forth between a wider grip Push Up and a close grip Push Up. It is also challenging for your shoulders as you must stay in the plank position and move laterally between Push Ups.
To do the Push Up Walk, start in a plank position with your hands in close to your body and your feet about shoulder-width apart. Perform a Push Up, dropping your chest down toward the ground as your body moves as one unit. Keep your arms in by your sides as you perform the Push Up.
Press back up to the top and then step to one side with your hand and foot (your “front” hand and “back” foot will move together). This should bring your hands out wider as your feet come together. Perform another Push Up then step your hands back in and your feet back out wide (this time you will move the back hand and front foot).
Perform another Push Up. Keep moving toward one side, performing a Push Up each time you step. Then go back the other way.
Intermediate exercisers may do the Push Ups from their knees.
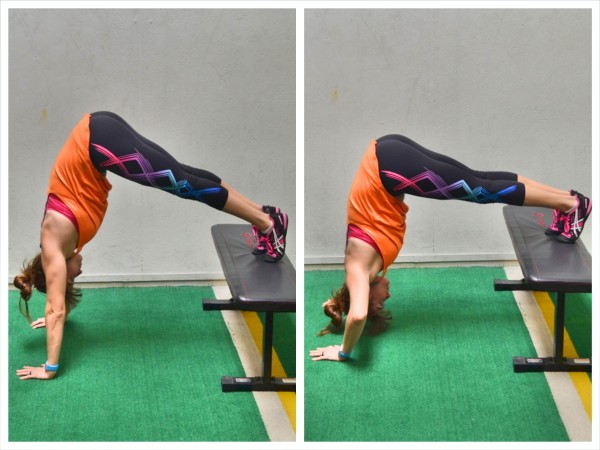
29. Pike Push Up (6:16) – If you want to progress toward the full Handstand Push Up, this is a great intermediate Push Up variation to help you get there.
To do the Pike Push Up, place your feet up on a box or bench. The higher the box or bench, the harder the move will be because the more toward a full Handstand you will be.
With your feet up on the box, push your butt up in the air and walk your hands back a bit toward the bench. Your legs may be bent or straight.
As you press your butt up toward the ceiling, create a nice straight line with your arms and spine. You want a nice straight line from the heels of your palms up to your tailbone. And your biceps should be right by your ears as you hold. Press off the bench a little to try to get your butt to be almost over your head.
Then in this piked position, bend your arms and drop your head straight down toward the ground between your hands. Lower down and then press back up, fully extending your arms. Make sure you are performing a vertical push and not turning this into more of a horizontal movement or a Decline Push Up. If you are pressing back instead of up, try adjusting your feet or regressing the movement. You want to mimic a handstand, vertical press as much as you can.
Repeat, dropping your head straight down between your hands.
To regress the movement, do the Pike Push Up from the ground. To make it harder, try a handstand variation off the wall.
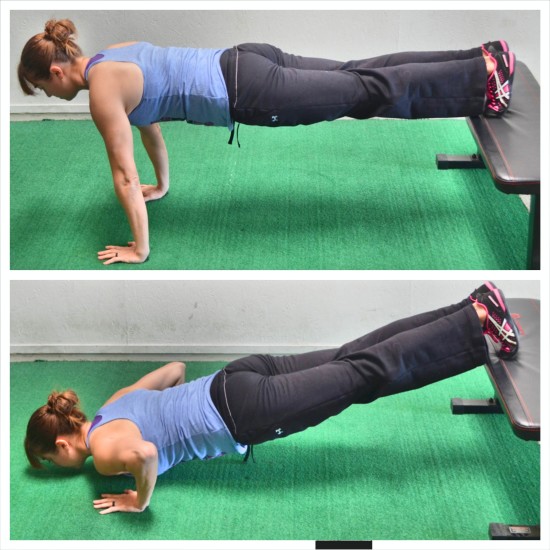
30. Decline Push Up (6:24) – This is a great way to make the basic Push Up more challenging without adding weights.
To do the Decline Push Up, place your feet up on a box or bench. The higher the box, the harder this move will be. Set up in a high plank position with your feet on the box and your hands under your shoulders and outside your chest. Engage your core and drive back through your heels to set your body in a nice straight line from your head to your heels.
Then, keeping your body in that nice straight line, drop your chest down to the ground between your hands. Do not let your hips sag or your butt go up in the air as you lower down.
Get your chest close to the ground as you can then push back up and lock out your arms at the top. Again, make sure your body moves as one unit. If you can’t lower within an inch or two of the ground, regress back to the basic Push Up or use a lower box.
Repeat lowering back down while keeping your feet up on the box and your core engaged. Do not let your hips sag or your butt go up in the air.
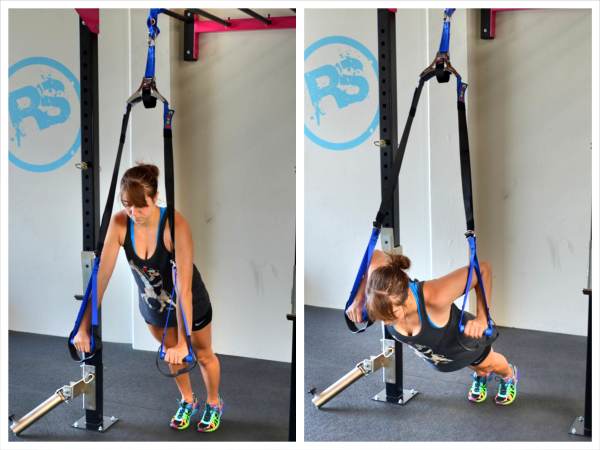
31. Suspension Trainer Incline Push Up/Decline Push Up (6:35) – The Suspension Trainer is a great tool to make your core work even harder during Push Ups.
Doing Suspension Trainer Incline Push Ups will require your core to work hard to stabilize while also really working your shoulders and chest. While Decline Push Ups from the Suspension Trainer will help engage your core even more than basic Decline Push Ups.
- To do the Incline Suspension Trainer Push Up, hold a suspension trainer strap in each hand and walk your feet back so your body is at an incline. You can hold the straps so your palms are facing each other or so that your thumbs are facing each other. The closer to parallel to the ground you get, the harder the move will be. Start at the top of the Push Up with your hands in line with your shoulders and your feet together. Make sure you aren’t shrugging your shoulders. Keeping your body in a nice straight line, lower your chest down between your hands so that your chest goes to about the handle. Keep your elbows from flaring up by your shoulders. You want your arms to create an arrow shape with your body not a “T.” Make sure that as you perform the Push Up, you are driving back through your heels. Then press back up. Keep your core tight as you lower down and press back up. Do not let your low back arch or your butt go up in the air. Make sure your hands stay right outside your chest and that you don’t let them spread out wider. Do not let your shoulders shrug. To make it harder, walk your feet back and lower the straps toward the ground a bit.
- To do the Decline Suspension Trainer Push Up, place your feet in the straps and walk your hands out so that you are in a plank position with your hands under your shoulders and your body in a nice straight line. The higher the straps are, the harder the move will be. Squeeze your glutes and quads and draw your belly button in toward your spine so that your body is in a nice straight line. Keep your feet together and lower your chest down toward the ground to perform a Push Up. Do not let your elbows flare out toward your shoulders or your hips sag or butt go up in the air. Then press back up, making sure your body moves together as one unit. To make the move harder, make the suspension straps shorter or walk out further form the anchor point. If you walk your hands out further forward the suspension trainer straps will try to pull you backward when you do the Push Up, making your core and upper body have to work harder to prevent you from sliding back.


espectacular !
Thanks!
Those 31 Push Up Variations are excellent. I enjoy watching you doing them accurately on Youtube. My desire is to master every aspect of those Push Ups.
You have done a wonder job. I am motivated to do those Push Ups.
Congratulation.
Thank you! They are definitely a fun and functional upper body and core move!