Do you sit at a computer for 9 hours a day and your wrists and elbows can get achy and sore? Or maybe you’ve noticed that doing moves such as push ups or handstands cause wrist or elbow pain?
That is because most of us spend lots of time with our wrists and elbows in flexion (actually basically our entire upper body is in flexion hunched over a computer screen), which can cause the muscles of our forearms and even our upper arms and upper back to get sore and tight.
This tightness in our forearms and our upper back can cause wrist and elbow pain and lead to injuries when we workout. When we go to the gym and do moves like push ups and handstands, we ask our wrists to be in extension, which they may be too tight to comfortably do.
Plus the tightness caused by sitting in flexion can also cause the extensors in our forearms and the muscles of our upper backs to be weak, which can also lead to injury when we lift because we may not be engaging the correct muscles and may be instead overusing weak muscles that can’t handle the load.
Below are 10 Tips to help you prevent and alleviate wrist and elbow pain at your desk and loosen up your upper body after sitting in flexion hunched over a computer. Any time you need a little break from typing, try one of these moves!
Alleviate Wrist And Elbow Pain At Your Desk
Forearm Foam Rolling – A tight forearm can cause both elbow and wrist pain. You may find trigger points in both your flexors and your extensors so make sure to roll out both the outside and the underside of your forearm.
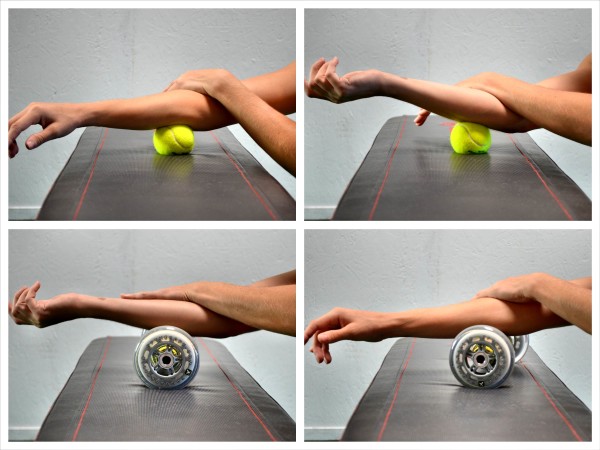
To loosen up your forearms to prevent and alleviate wrist and elbow pain and help restore a full range of motion, try this foam rolling move you can do at your desk with a ball or roller. Make sure to hit both sides of your forearm and get right under your elbows.
To roll out your forearm, place a small ball or roller up on your desk. Place your forearm over the ball with it right below your elbow. Press down on your forearm with your other hand to press it into the ball.
Make small circles on the ball, holding on any tight spots. If you find a tight spot, you can also tense and relax your forearm by either making a fist or by pointing your fingers down toward the ground.
By flexing and relaxing the muscles, you help the ball dig in and release the tight spot.
Once you’ve worked on one spot, move the ball down your forearm. You can use it to roll out both sides of your forearm. Make sure to get the outside and inside of your forearm as there can be trigger points in both spots causing your wrist and elbow pain.
Don’t waste time on any areas that aren’t tight or sore. Seek out and spend time on any areas of pain.
Apply as much pressure as you can handle and use as small and hard a ball or roller as you can.
Tricep Foam Rolling – Tricep tightness can also cause and perpetuate elbow pain. Rolling out your tricep can help keep your elbow joint functioning correctly.
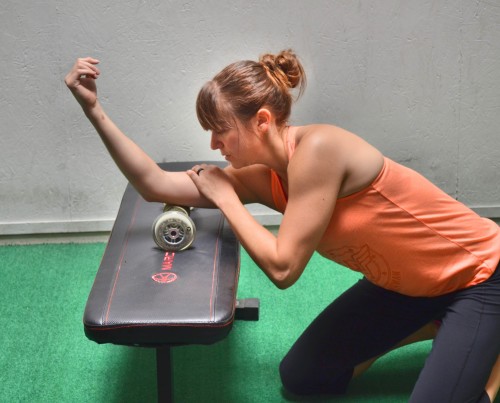
To roll out your triceps, place a roller or ball up on your desk so that you have leverage to press down into the roller.
Then place the backside of your upper arm on the roller or ball with the roller or ball right above your elbow. Rock your upper arm side to side on the roller. Hold on any tight spots.
Then roll the roller higher up your tricep toward your shoulder. Rock side to side on the roller each time you move it up higher. Work up the length of your tricep, hitting toward the inside and outside of your arm as you go.
You can also use a ball on the desk or either the ball or roller against a wall. Still rock side to side and work your way from the top of your elbow up to your shoulder.
Upper Back Foam Rolling – If your upper traps or even your lats are super tight, your upper body may not be functioning properly, which may place more strain on your elbow because you aren’t getting properly mobility from your shoulder or upper back.
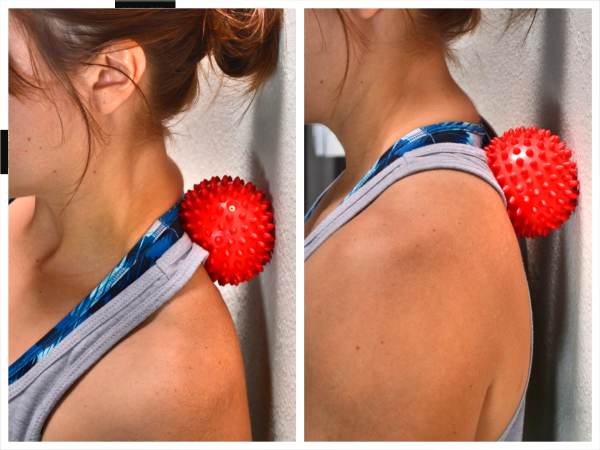
To roll out your upper back and even the top of your lats, you can use a ball against the wall of your office.
Using a ball, stand with your back to a wall and place the ball to the side of the base of your neck between the top of your shoulder blade and your spine. Press the ball into the wall and roll it down along your shoulder blade.
Hold on any tight spots. You may even want to pull your arm across your chest as you dig out under the shoulder blade. You can also lift and lower your arm. By flexing and relaxing the muscle, you can help the muscle release the knot.
You can also use the ball against the wall to dig out right at the top of your armpit and into your rotator cuff muscles. By working down the side of your back under your armpit, you will also dig out the top of your lats.
If you want to apply more pressure with the ball, you can use a harder ball or use the ball against the ground instead of the wall. Make sure to hold on any tight spots.
Seated Wrist Flexion Stretch – After rolling out, you need to stretch to help restore muscles to their proper length-tension relationships so that they work properly and you can move better and without pain.
If you sit working on a computer all day and then include lots of push ups or even handstand work in your workouts, you need to include this stretch in your routine.
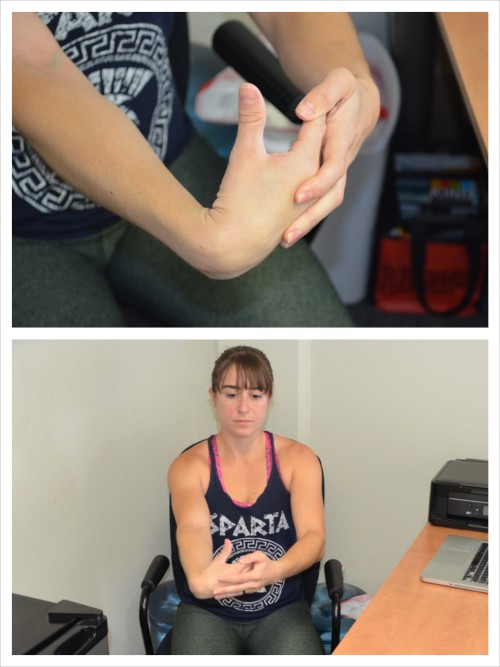
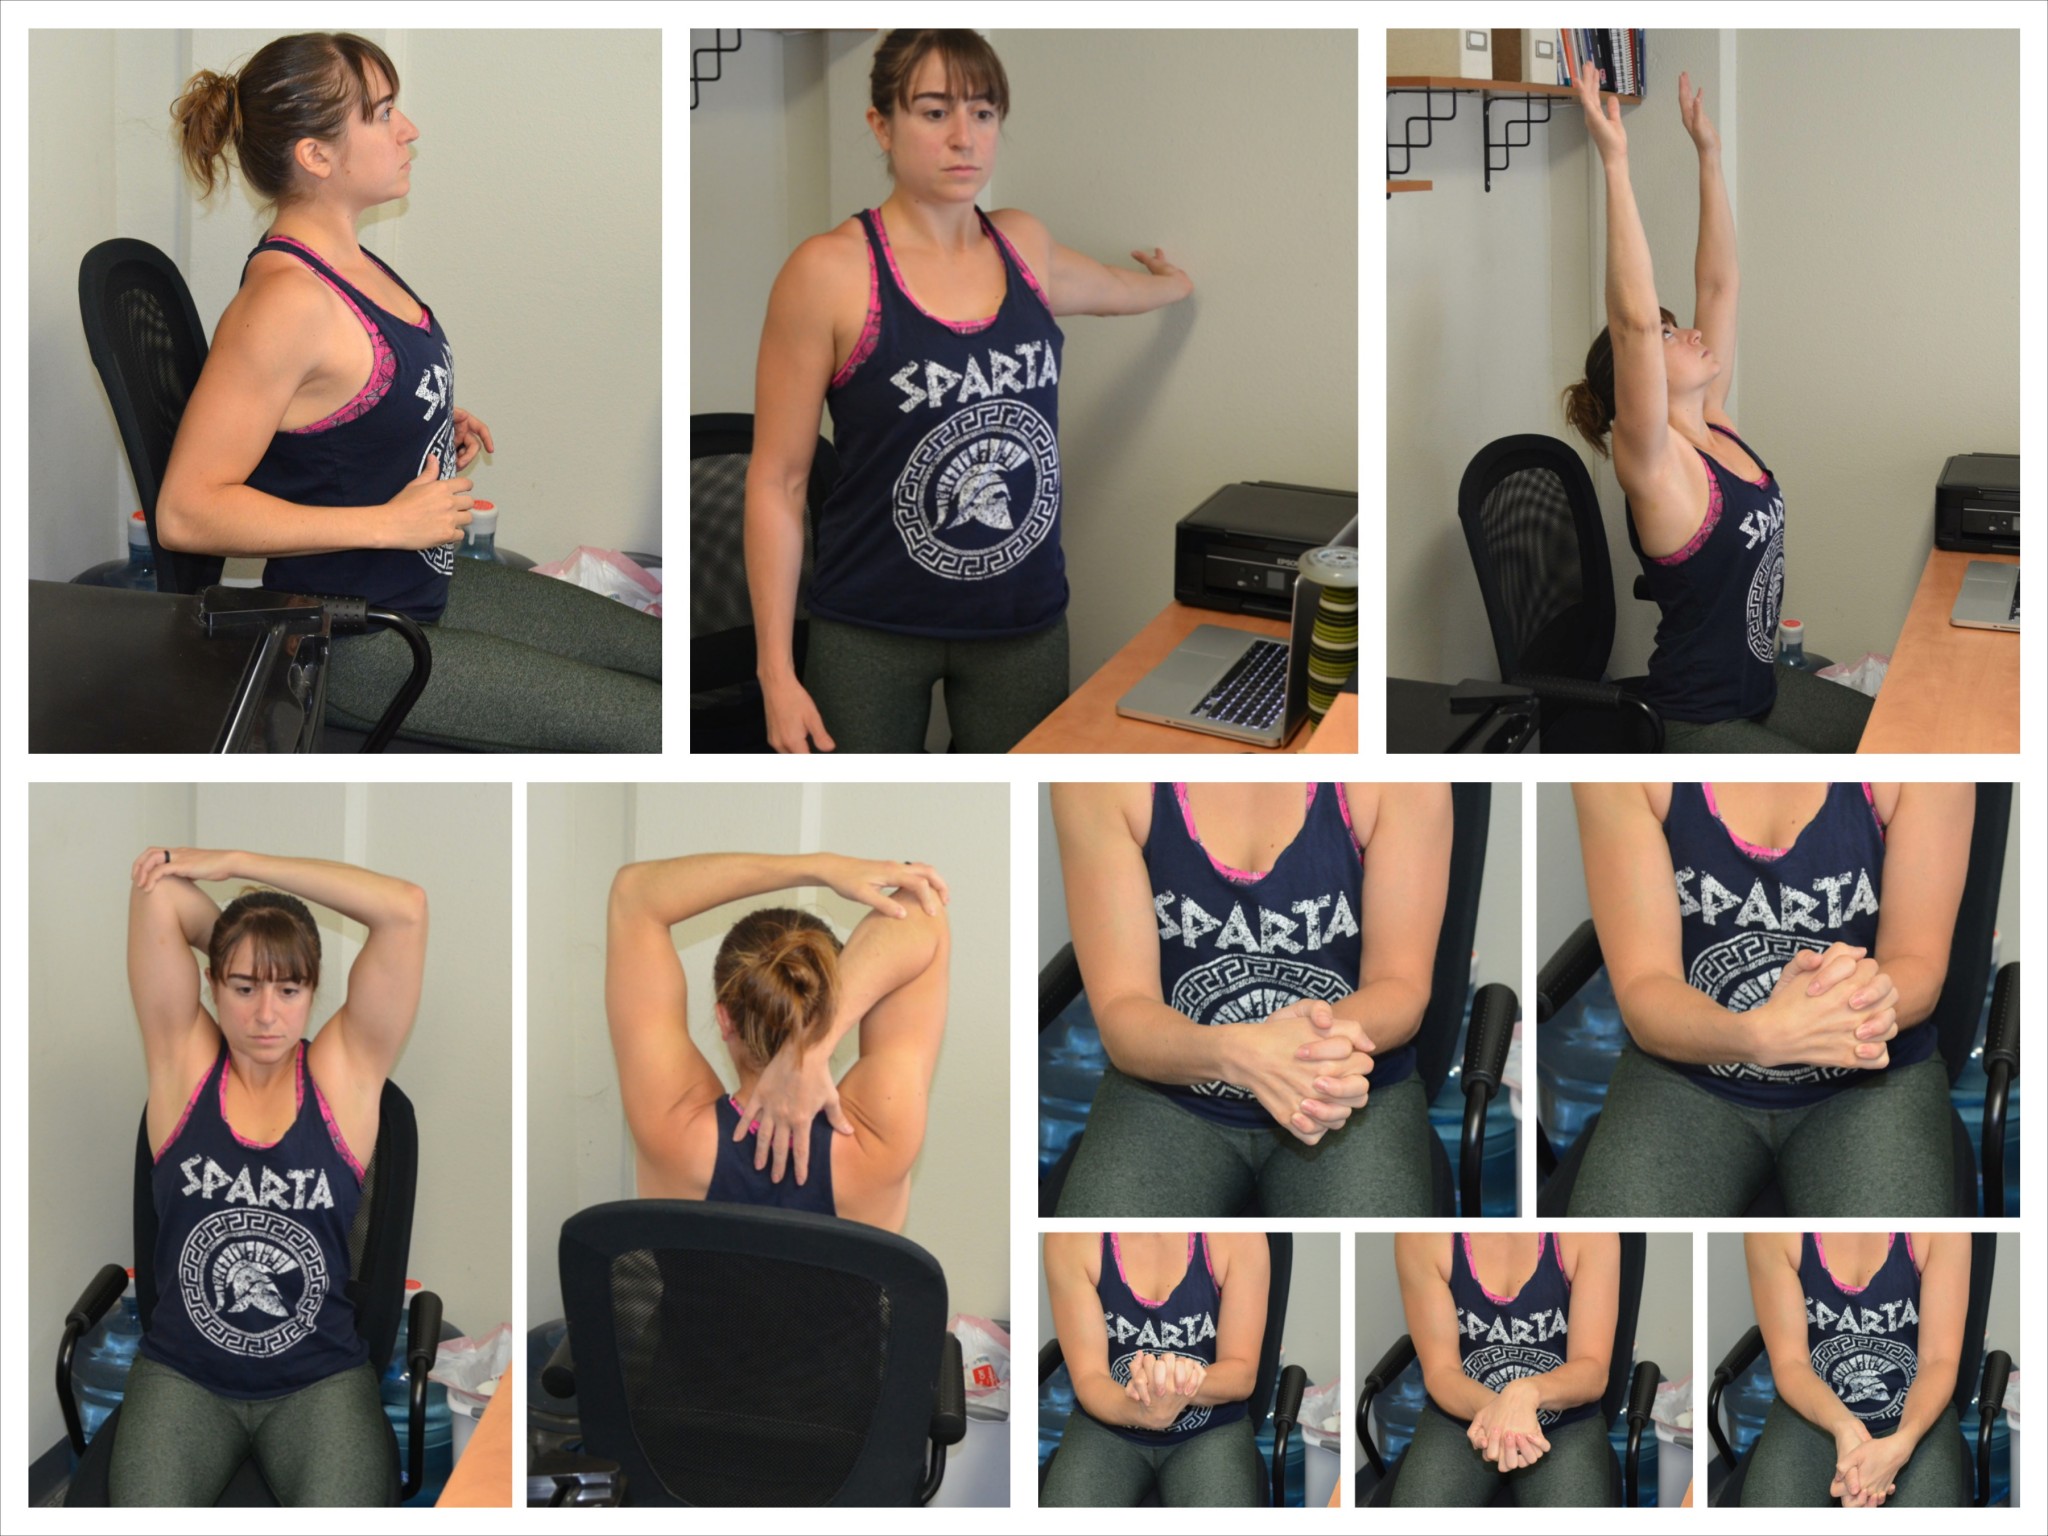
To do the Seated Wrist Flexion Stretch, you can sit or stand at your desk. Stretch one arm out in front of you with your palm facing you. If your right arm is stretched out, turn your fingertips in so they are pointing to the left.
Then take your left hand and press on the back of your right hand, pressing your fingertips back toward you.
Do not simply bend your fingers back. As you press feel a nice stretch down the outside of your forearm. Make sure to keep your arm straight as you press your fingertips back.
Also, do not shrug your shoulder as you stretch. Hold for a few deep breaths then switch to the other side.
Wrist Release Stretch – If you are suffering from wrist and elbow pain (especially elbow pain from Tennis Elbow), you will want to do the Wrist Release Stretch.
The Wrist Release Stretch is a great stretch to do after sitting for hours typing because it will open up your wrists and alleviate the trigger point below your elbow that can lead to elbow pain.
It will also work on your wrist extension so your wrists hurt less when you do exercises on your hands like Push Ups or Downward Dog.
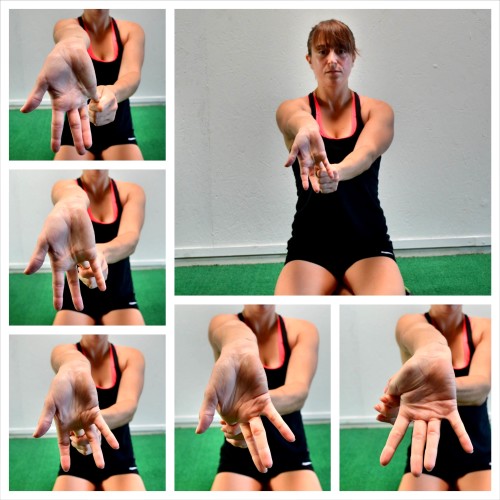
To do the Wrist Release, stretch your arm out in front of you with the palm facing away and the fingertips pointing down toward the ground.
With your other hand, press one finger at a time down and back while keeping your arm out straight in front of you. Do not let your hand or fingers tighten as you do this. Keep your hand relaxed and don’t let your fingers crunch up. Also make sure to keep your shoulders relaxed.
Hold the stretch on each finger for a second or two. Work your way from thumb to pinky, holding on each finger. Go back and repeat the stretch on any fingers that feel tighter or cause tightness up your forearm to your elbow.
You can do this stretch standing or seated. Make sure to sit or stand up tall as you stretch.
Wrist Circles – Wrist Circles are a great way to relax your wrists after having them in flexion while typing and using the mouse at the computer.
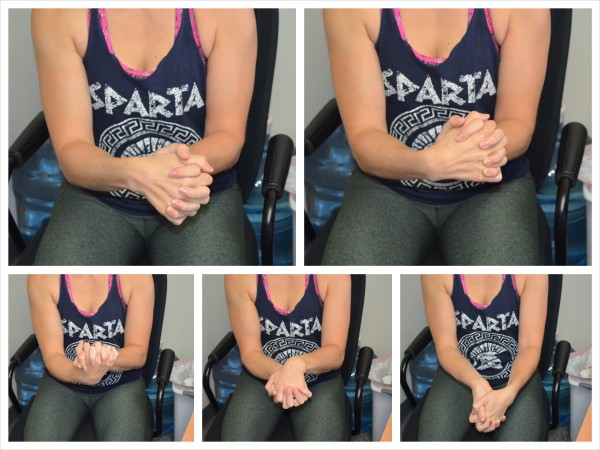
To do Wrist Circles, clasp your hands together and intertwine your fingers together. Place your palms together.
With your hands together, begin to circle your wrists. Make 5-10 circles one way then go back the other way.
You can also create a figure 8, moving your wrists with your hands together.
Let your your forearms and wrists relax as you circle. Keep your hands together, but don’t force your palms to stay perfectly together as you circle.
Seated Overhead Tricep Stretch – The Seated Tricep Stretch will help stretch out not only your tricep but also your lat to alleviate elbow pain and even shoulder pain. It can also be a great way to remind yourself to sit up nice and tall from time to time.
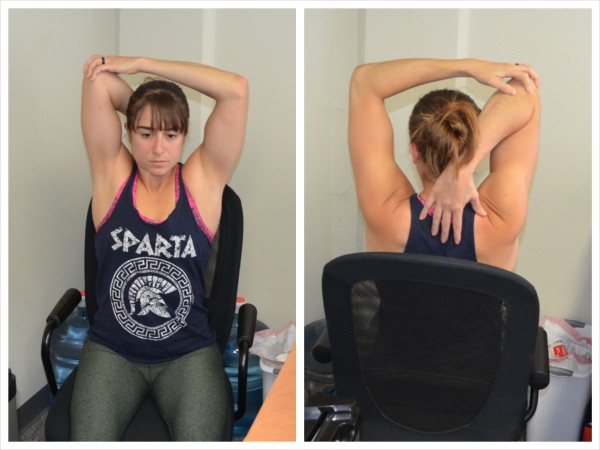
To do the Seated Overhead Tricep Stretch, sit up nice and tall in your chair. Keep your abs engaged so you don’t simply arch your low back.
Then reach your right arm up overhead and reach down your back behind your head. Take your left hand and press down on your right elbow to help you stretch further and reach further down your back.
Don’t round forward as you hold or let your low back arch. Feel a stretch down your right arm and even down the side of your back right under your armpit.
Breathe and hold then switch to the other side.
If you can’t do this stretch without arching your low back, you can also do a Thoracic Extension and Lat Stretch at your desk. You can stand or sit to do this stretch.
Place both elbows up on your desk about shoulder-width apart. You can clasp your hands together. Then push your butt back and lean forward, dropping your chest through your arms as you extend your upper back. Feel a nice stretch down your lats and triceps.
Hold and breathe. Make sure that with this stretch you are extend your upper and mid-back not just your low back.
Chest and Bicep Stretch – Stretch out your chest and biceps to help restore proper mobility to your upper body so that you don’t try to compensate and cause injury. Stretching out your chest will also help improve your posture.
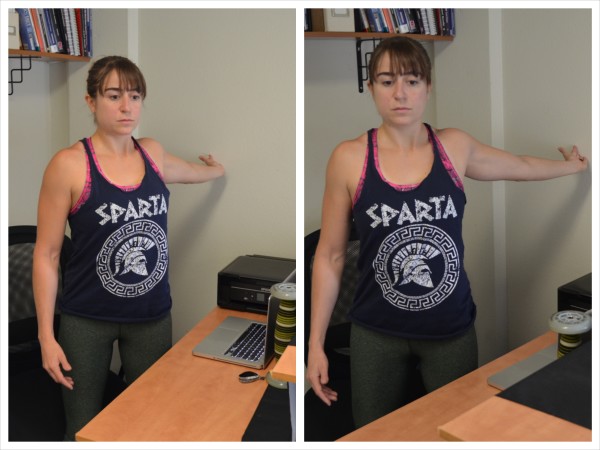
To do the Chest and Bicep Stretch, you can stay seated as long as there is a wall close by you can use. Standing or sitting, reach your arm back and place your hand on the wall with your palm against the wall.
Making sure your shoulder stays relaxed and your arm stays straight, begin to rotate away from the wall. Do not round forward as you rotate.
As you turn away from the wall, feel a nice stretch through your chest, shoulder and even your bicep. Breathe and hold.
To open your chest up even more, rotate the thumb of the hand on the wall back and open so that your pinky is against the wall and your palm is facing the ceiling. Make sure to keep your chest up nice and tall as you stretch.
Make sure not to shrug your shoulders as you hold the stretch.
You can also do a variation of this stretch in a doorway.
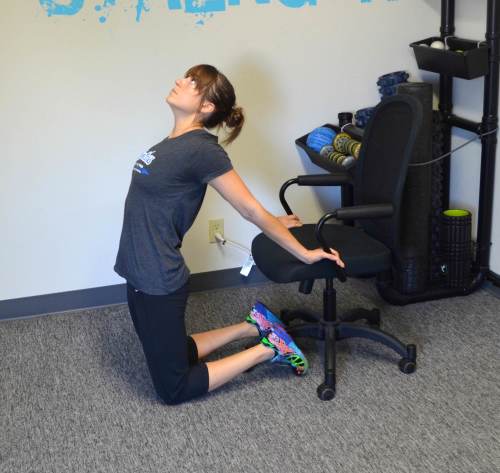
Seated Thoracic Extension – Because we sit hunched over a computer all day, our Thoracic Spine is constantly in flexion which can cause imbalances and improper movement patterns that lead to elbow and wrist pain.
The Seated Thoracic Extension Stretch is a great way to open up your chest and back to not only improve your posture but help you prevent upper body pain and injury.
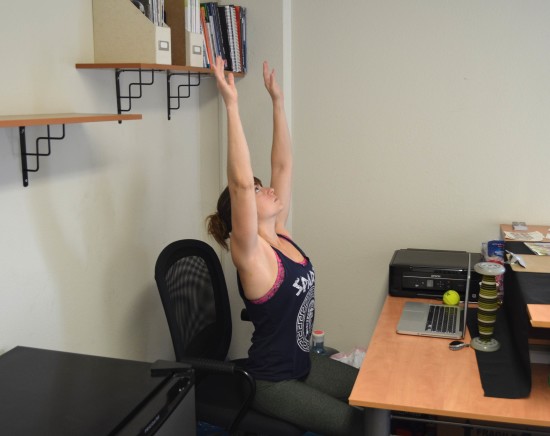
To do the Seated Thoracic Extension Stretch, sit up nice and tall. If your chair back is low, you can use the back to extend over. If you have a chair with a high back, you will need to move forward in your chair so you can extend backward.
Reach your arms up overhead and then begin to reach them back overhead behind you. As you reach back, extend your upper back backward. Do not simply arch your low back to reach overhead behind you.
Keep your abs engaged and think about trying to open your chest up toward the ceiling as you extend your upper back to reach overhead behind you.
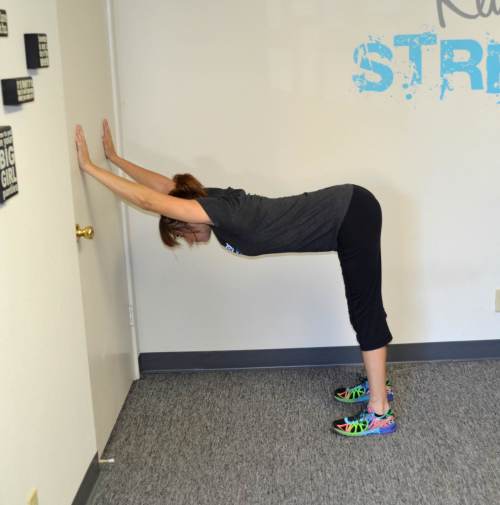
Hold for a second or two and then relax out of the stretch and repeat. You can also work on your Thoracic Extension by doing a Half Wall Hang against the wall.
Rubber Band Extension – Because we use a mouse at the computer and type most of the day, our fingers and wrists are constantly in flexion, which can cause our flexors to become overworked and overactive.
And on top of all that typing and mouse use, we are also in flexion when we carry bags, hold weights, hold our tooth brush or even hold our fork. Basically throughout the day we do activities that keep working our flexors.
Therefore, we need to make sure to open up our fingers and wrists and get our extensors strong and working. The Rubber Band Extension is a great way to open up our wrists and fingers and get our extensors working to prevent wrist and elbow pain.
Plus you can do it right at your desk as you work.
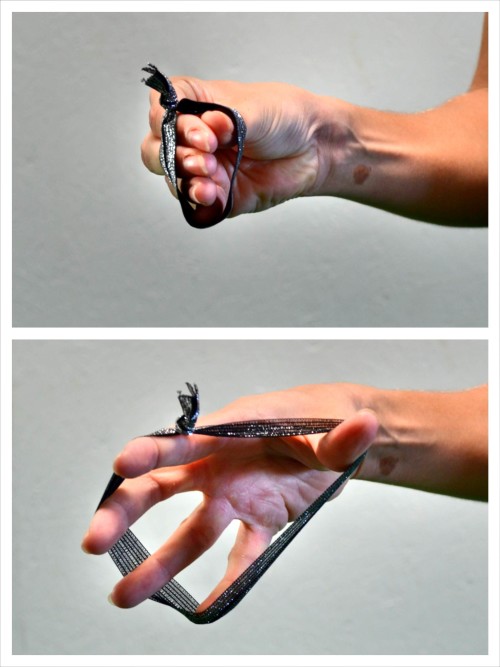
To do the Rubber Band Extension, place a rubber band around the outside of your fingers and thumb. (If you find the bands slips, you can wrap it around each finger once to keep it in place if the band is big enough.)
Bring your fingers together and then spread them as wide apart as you can against the rubber band. Move at a controlled tempo and perform 10-20 reps before switching hands.
You can do this exercise a couple of times a day, but start slow. Also, if you can find a thicker rubber band, it will add more resistance.
Hair ties can also work, especially if you wrap them around each finger or they are flat.
BONUS:
Chair Scapular Hold – The Scapular Wall Hold is one of our favorite moves and a must-do move for anyone with a desk job because it activates the big muscles of your back while stretching your chest and shoulders to help you prevent neck, shoulder, upper back and elbow pain.
The Chair Scapular Hold is a variation of the Scapular Wall Hold that you can do right at your desk. While the standing Scapular Wall Hold is the best option because it also makes you stand up and take your hips out of flexion, the Chair Scapular Hold is a great way to at least stretch out your upper body without even having to get up from your chair.
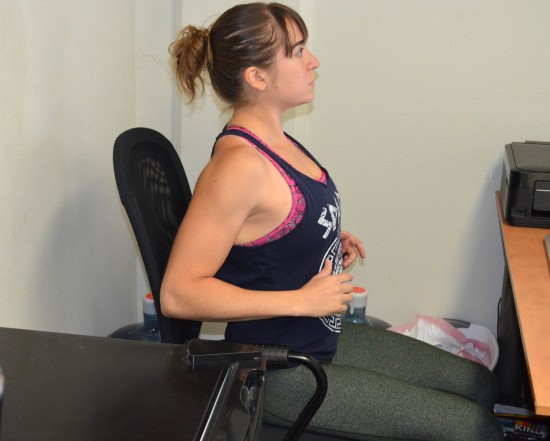
To do the Chair Scapular Hold, sit up nice and tall toward the front of your chair. Drive your elbows down and back by your side, driving them into your chair back.
Keeping your chest pressed out and your shoulders down, lean slightly back on your elbows against the chair. Feel your shoulder blades pinching down and together as your back works while your chest stretches.
Make sure to keep your neck long and a nice tall posture. You should feel your back working even if you don’t lean back. Focus on driving the elbows back as you draw your shoulder blades down and together. Hold here, opening your chest up toward the ceiling.
For more exercises you can do at your desk to stretch out the rest of your body, check out these 10 Isometric Moves And Stretches To Do At Your Desk.


Thank you!:)
🙂 No problem Tim!