I’m constantly asking clients during sessions, “Where do you feel this?” “What do you feel working?”
I ask these questions for a couple of different reasons.
One, I want them to focus on the correct muscles activating and working to make sure they are getting the most out of the move.
And two, I want them to build their mind-body connection so they can actually get stronger and more efficient with the movements.
Because, amazingly, just because someone has good form doesn’t mean they are actually activating the correct muscles and forcing them to work.
You would be amazed and surprised by how many people lack a real mind-body connection – a real awareness of what muscles should be working and activating.
Heck, many people can’t even get the correct muscles working and isolated during movements.
Yet they are all out there working out, adding a little more weight or doing a few more reps.
And then they wonder why they aren’t getting stronger. Why their pull ups aren’t getting better. Why they constantly have aches and pains in areas that shouldn’t really be getting as worked as they are.
It’s all because they haven’t established a proper mind-body connection – it’s because they’ve skipped the Activation Step.

Building The Mind-Body Connection to Avoid Pain and Get Stronger
Building your mind-body connection sounds like some new age, stupid visualization practice or something.
Most of us just want to get into the gym and get, what we see as, the most bang for our buck. We want circuits and workouts that, to some extent, destroy us.
And wanting to work hard isn’t a bad thing.
However, working hard doesn’t get us the results we truly want if we aren’t also working smart.
If we aren’t working the correct muscles and improving our movement patterns.
That is why we need to also include exercises to help us build our mind-body connection so that we are conscious and able to recruit the correct muscles in the correct order when we lift.
A better mind-body connection leads to better form and us being able to lift more, run faster and work harder with less risk for injury.
It means we are using the correct muscles in the proper order to lift and move.
And the best way to start establishing a better mind-body connection is through Activation Exercises.
Have you been working on your Pull Ups, but still can’t do a full one? Have you gotten stronger and yet no closer to being able to pull yourself up?
GUESS WHAT!?!
The missing piece is probably ACTIVATION EXERCISES.
The same thing may be the case if you’ve hit a lifting plateau. Or can’t seem to increase your running speed.
Or keep suffering from the same aches and pains.
So stop wasting time and start including a few Activation Exercises in your workout routines and start getting results from all your hard work!
Activation Exercises
What are Activation Exercises?
Activation Exercises are moves designed to get the big muscles of your body activated and working properly.
Most of us sit at a desk all day and move around in ways that cause areas of our body to get tight. This tightness and the poor movement patterns and posture that we use throughout the day in turn causes imbalances, weak and underactive big muscles and tight, overactive small muscles.
Because these small muscles become overactive and the big muscles become overactive, we tend to try to use these weak, small muscles to do work they aren’t really able to handle, which puts us at risk for injury.
So if you’ve ever felt your upper traps and neck really starting to feel worked during a Pull Up or Row, it’s probably because the big muscles of your back are underactive while your upper traps are overactive from poor posture and an inability to activate the big muscles.
Activation Exercises help to develop the mind-body connection and get the big muscles activated so that the small muscles don’t try to take on a load they can’t handle – so that your upper traps aren’t trying to take over on Pull Ups when the big muscles of your back should be working.
Activation Exercises focus on activating the big muscles and restoring proper balance and posture.
They aren’t moves done with a lot of weight. They are moves that are done with a focus on FEELING the correct muscles working.
You should even go extra light with these moves until you feel the correct muscles working.
If you just go through the motions and don’t focus on the correct muscles working, the activation moves won’t work.
But if you take time to use the moves correctly, they make it easier for you to get the big muscles working because they are more isolated, focused movements than many of the moves you’ll do in your workouts.
Below are some Activation Moves that may help you move forward toward your goals as well as alleviate and prevent specific aches and pains.
And if you sit at a desk all day you definitely need to include some Activation Exercises in your routine, even if you don’t have aches and pains yet or necessarily want to be able to do Pull Ups or Deadlift more.
Desk Job Activation Exercises
When you sit at a desk all day, your whole body is basically in flexion. You are rounded forward and hunched over your computer with your hips also in flexion because you’re sitting in a chair.
Your head is probably forward and your hands, wrists and even elbows are in flexion while you type at your computer.
This forward, flexed posture causes muscle imbalances and inactivity of the big muscles of your back and your glutes especially.
It can also lead to overactive flexors, upper traps, tight chest, and tight hips to just name a few.
All of this can contribute to injury and can prevent you from getting the most out of your workouts.
So in order to restore proper posture and eliminate these imbalances so that you prevent injury and can move better during everyday life as well as your workouts, you need to do Activation Exercises.
By doing these moves, and thinking about the correct muscles working, you can also build your mind-body connection and learn how to recruit these muscles correct during exercise and prevent poor posture when doing other movements.
Plus they will make you more aware of your posture when sitting at your computer all day!
Below are 5 Activation Moves For Anyone With A Desk Job.
When doing these moves, don’t just go through the motions. Feel the correct muscles activating and working!
1. Rubber Band Wrist Extension – If you have wrist, elbow or even shoulder aches and pains, it may be caused by the fact that your wrists, hands and even your elbows are in flexion all day while using your computer or driving.
The pain that’s caused by sitting in flexion all day may only be made worse by all of the gripping that you do during your workouts. And if you find that crawling or push ups are hard on your wrists, that could be due to the fact that your flexors are overactive and you lack proper wrist extension.
That is why it is important to do the opposite of all that gripping and flexion. That is why it is important to activate the extensors in your forearms.
An easy exercise you can do right at your desk to activate your extensors is the Rubber Band Wrist Extension exercise.
To do the Rubber Band Wrist Extension Exercise, place a rubber band or even hair tie around the outside of your fingers and thumb. (If you find the bands slips, you can wrap it around each finger once to keep it in place.)
Bring your fingers together and then spread them as wide apart as you can against the rubber band. Open your hand up wide, spreading your fingers wide apart then bring them back together. As you open and close your fingers, do not let the band pull you.
If you can find a thicker rubber band, it will add more resistance. Do 10-20 reps and use this at least a few times a week at least.
For more great moves, including foam rolling and stretching moves, to alleviate your wrist and elbow pain right at your desk, check out these 10 Tips to Alleviate Wrist and Elbow Pain at Your Desk.
2. Camel – Because most of us are busy, we want exercises and workouts that are efficient and give us a lot of bang for our buck in a very short amount of time. That is why Activation Exercises like the Camel are so great – they stretch out the tight muscles while activating the big muscles that should be working.
The Camel will stretch out your chest, shoulders, hips, quads and even your biceps while activating your glutes. This exercise is basically the opposite of what you do seated at your desk all day, which makes it a very important move to include in your daily routine.
To do the Camel, kneel on the ground with your knees about hip-width apart and your feet flexed. If you point your toes instead, this will make the move harder and require more flexibility (bottom two photos). Also, flexing your feet will stretch the bottom of your feet more while pointing your toes will get your shins more.
With either your feet flexed or pointed, sit back on your heels and place your hands on your heels.
Then arch your hips up and away, as you press your chest out and lift your glutes up off your heels. Keep your hands on your heels as you arch away and squeeze your glutes to fully extend your hips. Do not hyperextend your low back. Engage your glutes to stretch out your hips.
Relax your head back and arch as much as you can, getting a nice stretch down your chest, core, hips and quads. Do not let your shoulders shrug and really focus on opening your chest up.
Hold for 1-2 seconds and relax back down. Repeat, arching back up. You can also make this a static stretch by simply holding the pose for 15-20 seconds.
If you are less flexible and can’t place your hands on your heels, you can do this stretch with a couch, chair or table behind you. Kneel down with the coach or table behind you. Place your hands back behind you on the couch or table. If you are at your desk, you can use your desk or chair. Keeping your arms straight behind you, press your chest out and arch away from the piece behind. Relax your head back and really squeeze your glutes to arch away.
3. Scapular Wall Hold – Whether you want better posture, to prevent shoulder, neck or upper back pain and injury, have a stronger, sexier back or even do more Pull Ups, you need to do the Scapular Wall Hold after sitting hunched over a computer screen or driving in your car all day.
This move is the exact opposite of the upper body flexion we usually find ourselves in. It will activate your lower traps and rhomboids so that your upper traps, shoulders and neck muscles don’t try to take over and do work they can’t handle. The Scapular Wall Hold will also stretch out your chest and shoulders.
Plus it is a move you can easily do in your office every time you get up from your desk!
To do the Scapular Wall Hold, stand with your back to the wall and your elbows bent in by your side. You can walk your feet out further from the wall to make the move harder, but really focus on feeling it between your shoulder blades no matter how far you walk out.
Drive your elbows back into the wall and press your chest out and open toward the ceiling. Only your elbows should touch as you lean back and press your chest out. Draw your shoulder blades down and back and make sure to drive your chest out and open toward the ceiling. Think about driving your elbows back into the wall but also down toward your hips.
Do not shrug your shoulders and keep your body in a nice straight line as if holding a plank. Keep your head in line with your spine and do not tuck your chin. Walk your feet back toward the wall to make the move easier or walk them away to make the move harder.
Make sure to drive the chest out and draw your shoulder blades down and together as you hold.
If you don’t feel the muscles low between your shoulders and even down the sides of your back working and instead feel your neck, walk your feet closer to the wall. You don’t need to be at a huge angle to feel this move working. If you do it correctly, you can even feel it working when standing basically straight against the wall.
4. Sit Thru to Thoracic Bridge – Our desk jobs can cause pain and injury up and down our body because it causes our entire body to be in flexion. That is why all of these Activation Exercises work on extension. The Sit Thru to Thoracic Bridge is another great move to open up your hips and chest while loosening up your spine.
The rotation of this move really helps to open up your entire spine and even your SI joint after sitting at a desk or in a car all day.
To do the Sit Thru to Thoracic Bridge, start on your hands and knees with your hands under your shoulders and your knees under your hips. Flex your feet and lift up onto your hands and the balls of your feet.
Then lift your right hand up and bring your left leg under your body and through and place your left foot flat on the ground. Rotate your hips up toward the ceiling, squeezing your glutes to lift them up as high as you can. Really try to open your hips up toward the ceiling and squeeze your glutes to fully extend your hips.
With your hips lifted, reach your right hand down toward the ground, rotating your chest toward the floor. Really reach your hand toward the ground as the rest of your body opens toward the ceiling to feel a nice stretch as you rotate. Feel your glutes working to keep BOTH hips up, while you reach your hand down. Don’t let your hips drop as you rotate.
You should feel a nice rotation and stretch through your spine. You are twisting almost like someone wringing out a towel. Make sure though that you aren’t hyperextending your low back to bridge up but are instead squeezing your glutes.
Then drop your hips and step your foot back through while placing your hand back down on the ground. Rotate to the other side, bridging your hips up as high as you can.
5. Glute Bridge – This basic Glute Bridge is a must-do move. When we sit our hips become tight, which leads to our glutes becoming inactive. This can not only cause low back and hip pain but also cause problems all the way up and down our bodies.
And when our glutes are inactive, we miss out on working one of the largest muscles in our body when we workout!
By doing the Glute Bridge, not only do we stretch our hips, but we activate our glutes to prevent injury and help ourselves deadlift and squat more! (Plus who wouldn’t want perky, sexy butt cheeks as well!)
You can do the Basic Glute Bridge as a hold or for reps. To do the Basic Glute Bridge for reps, bend your knees and place your feet flat on the ground just close enough that you can graze your heels with your fingertips when you stretch your arms down by your side. Your feet should be about hip-width apart.
If your hips are tighter, you may need to place your feet further from your glutes. Play around with the exact positioning just make sure that when you bridge up, you feel your glutes working and not your low back or hamstrings taking over.
Bend your elbows to 90 degrees so that only your upper arms are on the ground.
Then bridge up, squeezing your glutes as you drive through your heels and upper back to lift your butt up off the ground. Drive your hips up as high as possible, squeezing the glutes hard. Keep your belly button drawn in so you don’t hyperextend your back. Focus on engaging your glutes and consciously squeeze your glutes at the top.
Do not push backward off your heels. Make sure you are driving straight up and that your knees aren’t caving in or falling open.
Squeeze your glutes for second or two at the top and lower all the way back down to the ground before repeating.
Improve Your Pull Ups Activation Exercises
The most often forgotten piece of the puzzle when it comes to improving your Pull Ups is ACTIVATION EXERCISES.
If you can’t get the correct muscles activated and working, if you don’t have the mind-body connection to recruit the correct muscles at the right times, you won’t be able to do a Pull Up even if your back is strong.
When you do Back Exercises and Pull Up work, you’ve got to be very conscious of where you should feel the moves and what you actually feel working.
Because most of us sit all day or drive in a car or basically do things that promote poor posture, imbalances and compensation, often we can’t get the correct muscles activated and working when we work our back.
That is why it is important to include Activation Exercises, especially in your Pull Up routine.
By activating the big muscles of your back, you will help yourself perform more Pull Ups with less risk for neck, shoulder or even elbow pain.
Below are 5 Pull Up Activation Exercises to Improve Your Pull Ups.
(Learn more about my pull up challenge)
1. Mini Band or Towel Pull Down – Even if you don’t have a Pull Up bar, you can still work on activating the muscles involved in strengthening your Pull Ups.
With the Mini Band or Towel Pull Down, you can not only activate the big muscles of your back, but also work on scapular retraction. Scapular retraction is when you draw your shoulder blades down and together and is KEY to you being able to go from just hanging to pulling yourself up!
To do the Mini Band Pull Down, place a Mini Band around the back of your hands, wrists or even your forearms. To make the move easier, place the band closer to your elbows.
Then with the band around your arms, extend your arms up toward the ceiling. Stand tall, pressing your chest out and bracing your abs. Press out on the band so that there is tension.
Keeping tension on the band, pull the band down toward your chest. As you pull the band down, draw your shoulder blades down and together. Feel the sides of your back working to pull the band down to your chest. Make sure to keep your chest pressed out and open toward the ceiling.
Hold for a second at your chest and then extend your arms back up toward the ceiling.
Make sure to consciously engage your back and draw your shoulder blades down and back as you pull the band down. Keep tension on the band the entire time. Also make sure you do not arch your low back as you perform the move. Keep your abs braced so you don’t feel it in your low back.
If you don’t have a Mini Band, you can use a towel instead. Hold the towel in both hands. Pull out on the towel to create tension and then do the Pull Down like you would with the band.
2. Scapular Push Ups – Scapular Push Ups are another great way to work on scapular retraction and get the big muscles of your back activated and working. It is also another great move you can do to improve your Pull Ups without a bar.
Because we sit all day at a desk hunched over a computer, the big muscles of our back become inactive and we often have trouble getting them engaged and working when we do Pull Ups. We lack the mind-body connection between the big muscles of our back and our brain because those muscles are inhibited by tight, overactive muscles from our poor desk posture.
This inability to isolate and control the muscles of our back because of this poor mind-body connection can make moves like the Scapular Push Up very challenging to do. People often struggle to simply retract their shoulder blades without moving their entire body.
In order to do this move properly, you may need to start on your hands and knees with your knees under your hips and only progress to your feet once you’ve developed the mind-body connection to pinch the shoulder blades together without also moving your core.
You won’t get anything out of this move if you bend your elbows or wiggle your core instead of just pinching your shoulder blades together.
When this move is done correctly, you will feel not only your back working but also your core working, especially the muscles around your ribs.
To do the Scapular Push Up, set up in a high plank position with your hands under your shoulders and your feet together. Your body should be in a nice straight line from head to your heels.
Without bending your elbows or dropping your hips, pinch your shoulder blades together and press your chest out. Do not tuck your chin or jut your head forward. Also do not let your core wiggle or your elbows bend to try to increase your range of motion.
You are not doing a push up. This is a very small range of motion where you are simply focused on pinching your shoulder blades together.
Just pinch your shoulder blades together and then relax or even round your back up out of it (rounding your back at the top is another variation but can be very useful for correcting certain push up problems).
Keep your core tight as you pinch your shoulder blades together. As you get stronger and build the mind-body connection you will find your range of motion increases.
If you struggle to pinch your shoulder blades together without wiggling your core or bending your elbows, go down to your knees as if doing a push up from your knees. If you still struggle, bring your knees under your hips.
Do not get caught up on doing this from your toes. Just focus on pinching the shoulder blades together.
3. Back of Hand Band Rows – Pull Ups can take a toll on our wrists, elbows and even our shoulders. We sit with our upper body in flexion most of the day, which already causes imbalances and overuse as well as underactive muscles. And then when we go do Pull Ups, we again put our arms through flexion, which isn’t bad, but can perpetuate the tightness and overuse that we already have.
That is why the Back of Hand Band Row is such an important move to include in your workout routine. Not only will it activate your back so that you don’t injury your shoulders or neck, but it will also work on activating your forearm extensors to help prevent wrist and elbow pain from constant flexion and gripping.
To do the Back of Hand Band Row, anchor a resistance band in front of you and either loop it or make sure it has a handle you can put your hand through. Place the band or handle around the back of your hand and point your fingers up toward the ceiling. Step away from the anchor point so that there is tension in the band with your arm extended in front of you.
Stand up nice and tall and press your chest out as you face the mini band. Your feet should be about hip-width apart. Make sure you aren’t shrugging your shoulders as you hold your arm out in front of you with the band around your hand.
Then drive the elbow down and back as you row the back of your hand and the band into right below your chest. Row low so that you don’t shrug your shoulder. Also, don’t rotate as you row.
Feel your back pull the band back. Don’t just use your arms. Also, make sure that your upper traps don’t try to take over.
Really press the chest out and drive the elbow down and back. Straighten the arm back out and repeat.
Focus on feeling your back pull the band and not just your arm. By focusing on what muscles should be working, you will improve your mind-body connection.
Also, make sure to keep your fingertips pointing up toward the ceiling to engage the extensors in your forearm.
4. Mini Pull Ups – One of the best ways to get better at Pull Ups is by doing Pull Ups. So any time you can do activation moves hanging from the bar, take advantage and do them!
Mini Pull Ups are one of those activation moves off the bar that are essential to improving your Pull Ups. They are a great scapular retraction and activation exercise, especially if you are really struggling with that initial pull up from hanging.
They take what you’ve worked on with the Scapular Push Ups and the Mini Band Pull Downs and now force you to do that movement while hanging from the bar, which is basically the initiation of the Pull Up.
Mini Pull Ups will also teach you to lead with your chest when you pull up so that you recruit the big muscles of your back.
Beginners may need to do this with their feet on the ground to take a little load off their upper body. If you do assist with your feet though, try to force your body to do as much work as possible. Don’t turn this into a leg exercise.
To do the Mini Pull Ups and work on engaging your lats to pull up, hang from the bar with your palms facing away from you (you can also do this with palms facing toward you for a Mini Chin Up). Your hands should be about shoulder-width apart although you can do it with them wider apart or closer together as well. I recommend using whatever grip you use when you do your Pull Ups.
Hanging from the bar, press your chest out and pull your shoulder blades down and together. Feel your back engage as you draw your shoulder blades together.
Don’t bend your elbows and turn this into a pull up. Just press your chest out and retract your shoulder blades bringing them down and together. Feel your back engage and pull you up toward the bar even though your arms aren’t moving.
You should feel your shoulders go down as your chest lifts up.
Then relax out and repeat. Remember, you are not bending your elbows to make this movement bigger.
5. Inverted Row – While the Inverted Row is a great strength training move for your back, it is also a great way to learn how to engage the muscle of your back while keeping your core braced.
The Inverted Row can be a great way to build up your strength and work toward more Pull Ups. However, the Inverted Row only helps if you actually focus on getting your back to engage and first build your mind-body connection with the move.
Often people want to do the hardest variation they are shown. If I say, “Walk your feet forward so that you are closer to parallel to the ground to make the move harder” many people will walk way too far forward.
They want to work hard so they try to challenge themselves by doing a hard variation.
Which is good if the correct muscles are working.
But because most of us sit at a desk, most of us have a hard time getting the big muscles of our back to work. That means when many people walk too far forward, they end up engaging muscles that shouldn’t be working and compensating with poor movement patterns.
They can do the movement, they just aren’t getting benefit from the movement.
That is why when you use the Inverted Row, you need to focus on activation first then strengthening. Start with the move being easy and work your way to more challenging variations. But don’t progress unless you FEEL your back doing the work. Don’t progress if you have to arch or shrug or compensate.
Doing a hard variation isn’t important. Working the correct muscles is important.
To do the Basic Inverted Row, you can either use a Suspension Trainer or a Bar. Using a Suspension Trainer, hold a handle in each hand with your palms facing in. You can have your palms facing toward your feet or even facing toward your head. Rotating them to face your head can make it a bit easier to engage your back.
Then walk your feet forward so that your body is at an incline. The closer to parallel to the ground you get, the harder the move will be. But remember, it is most important to feel your back working and move with good form. Start more vertical and work your way down as long as your back is activating and working.
Hang from the straps with your arms out straight and your body in a nice straight line. Press your chest out and engage your back before you even row. Brace your core and engage your glutes and keep your legs straight. You want a nice straight line from your head to your heels. Do not let your low back arch or your hips sag toward the ground.
Then drive your elbows down and back to row your chest up to the handles. Keep your body in a nice straight line as you row up and do not bounce off the bottom. Keep your wrists straight as you row. And do not shrug your shoulders.
You want to feel your back pulling you up. Focus and think about your back working. Don’t just go through the motions.
Then lower back down. Do not lose tension at the bottom. Make sure to keep the chest pressed out and your body in a nice straight line. You want to keep the back engaged the entire time. Do not swing to row back up.
Make sure to feel your back and arms working to row and not just your arms. Again, focus on feeling your back pull. Then progress the move as long as your back continues to work.
Increase Your Glute Strength Activation Exercises (Deadlift More, Squat More, Sprint Faster…Develop Strong, Sexy Glutes…)
Honestly, everyone should be including Glute Activation Exercises.
Whether you have dreams of lifting more, running faster, having a sexy a$$ or simply avoiding pain, EVERYONE needs to do Glute Activation Moves.
(It’s honestly why I created, and still use personally weekly, my Booty Burner Program)
Because most of us sit too much during the day. Whether it is at a desk, in the car or even getting exercise by cycling, we sit with our hips in flexion far too long during the day.
And this hip flexion causes not only tight hips and a low back that wants to do work it shouldn’t, but also underactive glutes.
If your glutes are underactive, you risk low back and hip pain. You could even suffer from knee and ankle pain, especially if you’ve had previous injuries.
Plus you can’t lift as much or run as fast.
And probably all of those workouts you are doing to tone and shape up your glutes aren’t really working if your glutes aren’t activated!
So basically, no matter your goals, you probably should be including these 5 Glute Activation Exercises in your workout routine (as well as the Basic Glute Bridge under 5 Activation Moves For Anyone With A Desk Job).
1. 3-Way Hip Circles – It is very important that we stretch out our hips as we activate our glutes. We also really need to focus on our glutes working during these Activation Exercises to build our mind-body connection so that our glutes engage when we do heavier lifts and we don’t compensate and destroy our low backs.
That is why the 3-Way Hip Circles are an important Glute Activation Exercise. Not only do they target all three gluteal muscles, but they also open up your hips and even activate your core to help protect your low back.
When you do the 3-Way Hip Circles, it is very important that you keep your abs braced and focus on your glutes working to raise your leg. You want to extend from your hip, especially when you kick back.
If you instead arch your back or use your hamstrings to do the moves, or even simply bend your arms and lean away with the Fire Hydrant portion, you won’t actually activate your glutes even if you are performing the movements.
To get your glutes to work, you’ve got to concentrate on them during the movements and not just go through the motions.
To do the 3-Way Hip Circles, start on your hands and knees with your knees under your hips and your hands about under your shoulders. Flex your feet and brace your abs.
Keeping your arms straight, kick one leg back, driving the heel up toward the ceiling. Keep the knee bent as you drive the heel back and up. Squeeze your glute to kick the leg back. Do not hyperextend your low back or rotate your hips open to try to drive higher. Also, make sure your hamstring isn’t taking over. Extend your hip and squeeze your glute to kick back.
Hold there for a second. Make sure to keep your arms straight and concentrate on squeezing your glutes.
Then, without lowering the leg down, bring the leg up to the side into the Fire Hydrant position. Keep your foot flexed and knee bent to 90 degrees. Do not bend your arms or lean away as you raise the leg out to the side. Also, do not let your knee or foot get higher than the other. When you raise your leg up to the side, you want your lower leg to be even and as close to parallel to the ground as possible. Feel the outside of your hip work to lift.
Hold there for a second and feel your glute working to hold the leg up.
Without touching the knee down, drive the knee forward toward your elbow. Feel your abs engage as you hold. Really feel your abs work to pull the knee in. Do not tuck your chin as you pull the knee in. Also, do not simply go through the motions and tuck your knee in. Use your abs to pull it in and keep them engaged as you hold.
Hold there for a second then repeat on the same side starting with the kick back.
2. Mini Band Walks – To get the glutes really activated and working, it is great to have them spend a little time under tension. Rushing through the moves to get them done won’t do near as much for you as spending a little uncomfortable time under tension.
That is why the Mini Band is such a great tool for glute activation. It will make those butt cheeks burn by adding a little resistance and putting them under tension as you move.
And Mini Band Walks are a great way to get your glute medius and minimus working and firing, which are two muscles very involved in stabilizing our hips. Plus activating the glute medius generally helps us activate the upper fibers of the glute maximus when we lift.
However, it is very easy once we add resistance to start letting other muscles take over, especially as we fatigue. When you do these Walks, make sure that your glutes are working and that the muscles at the front of your hips aren’t taking over.
There are two Mini Band Walks that you should include in your workout routine – the Mini Band Side Shuffle and the Mini Band Monster Walks.
- Mini Band Side Shuffle – To do the Mini Band Side Shuffle, place the band around both ankles. If you place the band up higher toward your knee or even right above your knee, the move will be easier. If you place it around your ankles, or even your feet, the move will be more difficult. Choose a place that allows you to take large steps and feel your glute working and not other muscles taking over. Step your feet about hip-width apart to start so that there is tension on the band. Bend your knees slightly and push your butt back (you can also choose to do a straight leg variation). Your toes should both be pointing straight forward and your feet should be parallel. Make sure that as you side shuffle, you lead with your heel and don’t open your front toe out. Then step laterally with one foot, stepping as wide apart as you can. Step the other foot back in, but not so close that there isn’t still tension. You always want tension on the band. Step again with the same foot. Do not drag the back foot when you step back in. Also, try not to rock as you shuffle. Do not rush this move, but instead take big precise steps and feel your glutes working. If your knees cave in or you start to feel other muscles taking over, move the band up your legs or choose a lighter resistance. Doing this move with your knees caving in will perpetuate bad movement patterns and won’t activate your glutes.
- Mini Band Monster Walk -To do the Mini Band Monster Walk, place the band around both ankles. Like with the Side Shuffle, the higher up your leg you put the band, the easier the move will be, which means it will be easier to isolate your glutes if you are struggling to feel them work. Choose a place that allows you to take large steps and feel your glute working and not other muscles taking over. Then step your feet out about shoulder-width apart so there is lots of tension in the band. Keeping tension in the band, step forward and out to the side with one foot. Then step forward and out to the other side with the other foot. You want to take big “monster” steps, keeping your feet as wide apart as you can while moving forward. Then walk backward in the same manner. Step back and out with each foot, keeping tension on the band. Do not wiggle your hips open as you walk back or swing your leg around to help you walk forward. Step forward and backward to walk. You can also do either a low monster walk (more of a squat) or a straight leg variation. Try not to waddle or rotate your hips though as you walk. If you can’t control the move and you don’t feel your glutes working, use a lighter band or place it higher up on your legs. Also, make sure your knees don’t cave in as you walk!
3. Frog Bridges – If you really struggle to feel your glutes working when you lift and are having a hard time developing a mind-body connection, you may want to try the Frog Bridge. This move will open up your hips and activate your glutes.
It is often easier for people to isolate and feel the Frog Bridge only in their glutes unlike some of the other bridges where they may feel their hamstrings or low back take over. The Frog Bridge is great for activation because of the open position of your knees during the bridge and the fact that you can really drive down through your upper back and elbows to keep yourself from pushing backward.
It is a great Activation Move to get all three gluteal muscles working and help you get your glutes activated before you go lift so that your low back and hamstrings don’t try to do work they can’t handle and end up injured.
To do the Frog Bridge, place the bottom of your feet together and bend your knees as if doing the butterfly stretch. The closer you bring your feet in toward your crotch, the more mobility you need to do the move. Find a comfortable placement and allow your knees to fall open.
Lie on your back on the ground with the outside of your feet down. Straighten your arms down by your sides then bend your elbows to 90 degrees so that only your upper arms are against the ground.
Driving through your upper arms and the outsides of your feet, bridge up while keeping your knees open. Squeeze your glutes as you lift and pause at the top.
Then lower back down. Keep your core engaged and really drive down through your upper arms so that you don’t push yourself backward. Do not let your knees close. Keep them relaxed and open.
Concentrate on your glutes working to lift. Make sure to pause and engage your glutes at the top.
If you feel your hips too much, don’t bring your heels in as close to your body.
4. Side Plank Clam – Part of being able to get your glutes activated and working is also dependent on you being able to engage your core to protect your low back so that you can focus on your glutes.
That is why moves like the Side Plank Clam are a must-do move. This move not only strengthens your glute medius, but also your entire core. It works everything from your shoulders to your knees.
And boy does it burn!
It is not only a great move to get your glutes activated before you workout but also a great move to build your hip stability so that you are at less risk for injury.
To do the Side Plank Clam, lie on your side propped up on your forearm with your elbow underneath your shoulder. Bend your knees so that your feet and lower legs are behind you. You can place your top hand on your hip or reach it up toward the ceiling, but don’t touch it down to the ground.
With your legs stacked, lift your hip up off the ground, driving through your knee and forearm. As you lift your hips up, lift your top leg up and toward the ceiling, keeping the knee bent. Open up as high as you can then lower the leg back down.
As you lower the leg back down, lower your hip back down to the ground.
Repeat, lifting up and, as you do, raise your top leg up toward the ceiling.
Complete all reps on one side before switching. Make sure you are lifting straight up and not rotating toward the ground or open toward the ceiling. Also keep your elbow under your shoulder and do not get too spread out.
When you lift the top leg, don’t rotate open as you do. Really focus on lifting with your glute.
You can also do a Side Plank with Leg Raise as a fun variation, especially as your core strength increases.
5. Band Hip Rotations – In everyday life we move in every direction, which means that to prevent injury we must be mobile and strong in every plane of motion. That is why it is important that you strengthen your glutes from every direction.
And with Band Hip Rotations, you will strengthen your glutes with a rotational movement to help build stability and strength in every plane of motion. This move will also teach you how to engage your glutes and use them to power rotation moves so that your low back and hip flexors don’t do work they can’t handle.
This is a very challenging movement and you will have a tendency to want to use your arms to pull the band instead of powering it with your glutes. You must also keep your abs braced so you don’t engage and use your low back.
Go light with this move to start and really concentrate on rotating with your glutes.
To do Band Hip Rotations, anchor the band and hold one end in both hands. Stand with your side to the anchor point and your feet about hip-width to shoulder-width apart. Your front toe should be turned slightly open while your back toe should point straight ahead.
Then squat down very slightly, pushing your butt back as you reach your arms back toward the anchor point. Make sure there is tension in the band even as you reach back. Brace your abs and keep your chest up nice and tall. Do not shrug your shoulders.
Keeping your arms fairly straight (aka do not actively bend them, but they may have a slight bend to start), bring the band across your body and up outside your far shoulder. Feel the glute of the leg closest to the anchor point engage and power the rotation. Do not turn it into an arm movement or simply rotate at the waist.
Your back glute should power the rotation. Feel it squeeze as you rotate. Concentrate on using it to power the move. Do not get to focused on bringing the band to a certain point. If you rotate and you don’t bring it up to the shoulder that is ok as long as the glute powers the rotation across.
Bring the band back across your body to the starting position in a controlled fashion. Do not pivot your feet as you perform the move. You want to rotate at the hip because the glute is powering the movement. You do not want your feet to move.
Complete all reps on one side before switching. Focus on squeezing your glutes and bracing your abs. Do not shrug your shoulders or round over.
If you struggle to feel your glute working, you may want to start with a Stability Press, described below in the Alleviate Hip and Low Back Pain section.
Alleviate Hip and Low Back Pain Activation Exercises
Many of us suffer from low back and hip pain caused by tight hips and weak abs and glutes from sitting in flexion at a desk all day. And this pain isn’t necessarily made better when we lift and cycle and run because we never really get the correct muscles activated and working. We just continue to overuse small muscles that can’t really handle the load.
That is why it is important to not only include most of the Activation Moves For Anyone With A Desk Job in your workout routine, but also to include the moves below to strengthen your entire core.
A strong core means less risk for hip and back pain, but a strong core isn’t simply achieved by doing a ton of crunches.
A strong core is one that can brace and support you when you lift heavy things. It means having everything from your shoulders to your knees be strong and work together properly.
It also means building the mind-body connection so that you can recruit your core instead of allowing your low back to take over and cause injury.
With the moves below, you can train your core to truly activate and engage correctly so that it will work when you lift instead of your low back taking over.
5 Activation Exercises For Hip And Low Back Pain
1. Pelvic Tilt – Ever do Leg Lowers, where you lower both legs straight down toward the ground and then raise them back up, in an exercise class only to find your low back doing most of the work?
That means your abs aren’t engaging correctly and aren’t yet ready for that advanced exercise.
And while placing your hands behind your low back may help at the time, it doesn’t solve the problem or truly make your abs any stronger.
To build up to that Leg Lower exercise and truly strengthen your core, you’ve got to start with a more basic variation of the Pelvic Tilt.
By starting with a basic variation, you can improve your mind-body connection and learn how to brace your abs properly. And then as your abs get stronger and you can more quickly recruit the correct muscles, you can work on more advanced Pelvic Tilt variations.
With the Pelvic Tilt, you will learn how to engage your abs by tilting your pelvic. It is almost like you are slightly rounding your low back and tucking your hips up toward your ribs as you draw your belly button in toward your spine to brace your core.
Learn all the Pelvic Tilt variations and work up to those Leg Lowers so that they truly work your abs with this Pelvic Tilt Progression.
2. Bird Dog – The Bird Dog is a great way to build up your core stability and strength (it also really works the glutes). Plus it improves your coordination and balance, which means you’ll also improve your mind-body connection.
Make sure to move slowly when you do this move. Once it feels super easy, you can progress to the Advanced Variation; however, you want to make sure you’ve first mastered the Basic Bird Dog.
And even once you are strong enough to do the harder variation, you will want to return to this basic Activation Exercise from time to time.
While this basic move may seem easy, if you focus on bracing your abs and engaging your glutes to lift your leg, it will really help to get your core activated and working no matter how strong you are.
To do the Basic Bird Dog, start on your hands and knees with your hands under your shoulders and your knees under your hips. Do not let your hands get way out in front or your knees shift backward to make the move easier.
Flex your feet and then kick your right leg back behind you as you raise your left arm out toward the wall in front of you. Keep your hips and chest square to the ground as you lift your arm and your leg. Do not rotate open as you lift.
Kick your leg straight out behind you as if kicking it into the wall while you reach the other arm out straight toward the wall in front of your head. Don’t worry about lifting your leg or arm up super high. Just brace your abs and use your glutes to lift. Do not let your low back engage or hyperextend just to lift up higher. You want to extend your hip to lift your leg.
Really try to drive your arm and leg toward opposite walls as you keep your core engaged and squeeze your glutes. Again, make sure to keep your chest and hips square to the ground as you reach out.
Hold for a second at the top and then lower your arm and leg back down, but instead of touching them down to the ground, bend them and bring them together under your body. Try to touch your elbow to your knee before extending back out.
Move slowly so you can stay balanced. Don’t rush through just to get them done. Move slowly to make it more challenging. Also, make sure to feel your abs as you tuck. Do not simply just bring your elbow back toward your knee.
Complete all reps on one side before switching to the other side.
For the Advanced Bird Dog, click here (This post also has other great crunchless core moves you can use to build your core strength and improve your mind-body connection). Do not progress to the Advanced Bird Dog unless you’ve completely mastered the Basic Bird Dog. And even then, make sure to return to the basic variation every once in awhile!
3. Bench 2-Way Leg Swings – Strengthening your glutes is key to protecting your low back and hips. Your glutes are a stronger muscle group that should be doing the work that your low back and hip flexors sometimes try to take on but can’t handle.
By activating your glutes, you will prevent your low back from taking over while also building hip stability to prevent injury.
And with the Bench 2-Way Leg Swings, you’ll activate your glutes in two planes of motion to improve your hip stability, which is important if you want to help yourself prevent pain and injury when moving in every direction during every day life.
Plus by using the bench you can go easily from a straight leg lateral raise to a straight leg swing back. This will help open up your hips as you activate your glutes.
Just make sure that you don’t allow your hamstrings or low back to take over. If they do and you don’t concentrate on activating your glutes, you won’t benefit from this move.
To do the Bench 2-Way Leg Swings, place one knee and both hands on a bench with your knee under your hips and your hands under your shoulders. Stand with the other leg straight and your foot on the ground.
Then, keeping your arms straight, brace your core and lift the leg off the bench straight up to the side. Keep the leg straight as you lift and don’t lean away. Squeeze your glute to lift the leg out to the side.
Lower back down and then lift the same leg straight back behind your. Again, squeeze your glute to lift your leg straight out behind you. Keep your core engaged and extend your hip to swing the leg back. Do not hyperextend your low back to get the leg up higher.
Lower back down and repeat the side lift. Do not bend your arms or really rock away to get the leg up higher. You want to move from the hip and use your glute.
Repeat the straight leg swing back after lifting to the side. Complete all reps on one side before switching.
Make sure to feel your glutes working to lift both ways.
4. Stability Press – While rotational exercises are important to include in your workout routine to strengthen your body in every plane of motion, anti-rotational moves are also very important to include.
Anti-rotational moves help us build stability and help us prevent injury when when are pushed or pulled by other forces acting on us unlike rotational exercises that help us build strength so that we can rotate and move objects.
That is why it is important to include both. You need to have a strong core to be able to resist being pushed and pulled while also being able to pull and push other things.
And the Stability Press is a great anti-rotational move to include. It will strengthen your entire core with a focus on your obliques and glute medius. (While it is a great way to learn to engage your glutes for the Band Hip Rotations, both should be included in your workout routine for optimal hip and low back health as well as glute strength.)
While it may look like an easy, simple movement, it is far from it. Do not rush through it just because you want to get it done because it is challenging and uncomfortable. Moving slowly is key to getting the most out of it.
To do the Stability Press, anchor a band and grab one handle or end in both hands. Face with your side to the anchor point and step away from the anchor point so that there is tension in the band. Stand with your feet no more than shoulder-width apart. The closer your feet are together, the harder the move will be. Choose a stance though that challenges you while allowing you to maintain good form and not lean away. As you become stronger, bring your feet closer together and then even try a heavier band.
Bring your hands into the center of your chest and squeeze your glutes while you brace your abs. Then slowly push the band straight out from the center of your chest until your arms are straight out. You want to make sure there is enough tension in the band and that you are far enough from the anchor point that it is a struggle to press the arms straight out. You want the band to try to pull you back toward the anchor point so that you have to work to stabilize and press straight.
Do not let your arms rotate open and go back toward the anchor. You want to press straight out from the center of your chest without shrugging your shoulders. Maintain a nice tall posture with your shoulder blades drawn down and back and your core engaged.
Then slowly bring your arms back in and repeat. Move slowly to really have to fight the band. If you move too quickly, you won’t get as much out of the move and you’ll probably get sloppy and let yourself rotate toward the anchor point or even shift open and push away. If you allow your stance to rotate open or if you lean away, it will make the movement easier and won’t force that inside side (the side closest to the anchor point) to really work to stabilize.
Complete all reps on one side before turning and facing the other way to work the other side.
This move looks easy, but when you try it, you realize how much your entire body fights rotating back toward the anchor point. Use a heavier band, play around with your stance or step further away from the anchor point to make the move harder.
5. The Warriors – Yoga poses and Isometrics can be a great way to improve your mobility and flexibility while also getting the correct muscles activated and working. Which is great because mobility and flexibility work are very important components of a proper pain prevention program.
To alleviate low back and hip pain, you want to improve your hip mobility while also improving the flexibility of all the muscles that connect or affect your lumbo-pelvic-hip-complex (aka stretching your back, hips, hamstrings, quads, adductors, glutes…). And while you need to increase your mobility and flexibility, you also need to get the correct muscles activated and working (aka your core and your glutes).
That is what makes Warrior I, II and III such great moves to include as Activation Exercises to prevent low back and hip pain – they do all of the above!
- Warrior I –To do Warrior I, step one foot forward with the toe pointing straight ahead as you step the other leg back with the toe point out. You want to set up in a nice wide stance so that you can sink down into a lunge with your front knee over your ankle. Make sure the back toe is turned out so that your feet are about perpendicular with your front foot lined up with about the instep of your back foot when it is turned out. Then bend your front knee and sink down into a lunge. Keep your back leg straight and the front heel firmly planted. Make sure your front knee is open and not caving in. Rotate your hips to face forward as you reach your hands up overhead. Squeeze the glute of the back leg to make sure that you are extending through your hip while keeping that back leg straight. Also, do not rock to the inside of your back foot. Keep that foot fully planted. As you hold the lunge, try to get your front knee bent as close to 90 degrees as possible and your quad parallel to the ground, but do not let that front knee cave in. Squeeze that front glute to keep your front knee open. Beginners may not be able to sink as deep in the lunge. You may find you need to step your front foot forward a bit more to sit comfortably in the lunge and keep the front heel down or you may even need to step that front foot back if your knee is behind your ankle while in the lunge. The lower you sink in the lunge, the harder the move will be. Breathe and relax into the lunge. Make sure you keep both feet flat on the ground and your back knee straight. As you reach up and back, do not hyperextend your low back. Make sure to squeeze your glutes and stretch through your hips.
- Warrior II – To do the Warrior II, set up like you would for Warrior I in a nice wide stance with your front foot pointing forward while your back toe is turned out. Sink down into a lunge, bending your front knee while keeping the back leg straight. Try to get your front knee bent to 90 degrees and your quad parallel to the ground. Beginners may not be able to sink as low. Make sure that when you sink into a deep lunge your knee is about over your ankle and you aren’t in too wide or two narrow a stance. Also, engage your glute and do not let your front knee cave in. Squeeze your back glute as well to keep your back leg straight and make sure that you don’t rock in on your back foot but instead keep it flat on the ground. By squeezing both glutes, you will also help open up your hips. Unlike with Warrior I, you will not rotate your hips forward. With Warrior II, you will try to open them up as you reach forward over your front leg with one arm and backward over your back leg with your other arm. Reach your arms out at about shoulder height and keep a nice tall posture. Keep your chest open and do not lean or round forward. Keep your weight centered in the lunge as you reach. Breathe and relax deeper into the lunge and don’t rotate your hips forward.
- Warrior III – To do Warrior III, start standing tall with your feet together. Then move to balancing on one foot and hinge over at the hips, leaning your torso forward as you push your butt back and lift your back leg straight toward the wall behind you. As you lift your leg and hinge over, make sure to keep your hips square to the ground. Do not rotate open. Also, pretend you are driving the foot of the lifted leg straight back into the wall behind you as you reach your head toward the wall in front of you. Maintain a nice straight line from your head to your raised heel, making sure to keep your back flat and your core tight as you hold this hinged over position. As you hold, reach your hands overhead in front of you, out to your sides or back toward your heels. Breathe and relax into the stretch and try to straighten your standing leg as much as you can while keeping your hips square to the ground and your body in a nice straight line. Feel your foot working to grip the ground and your leg stretching while your glutes and core work to keep you balanced. Do not let your back round or your other foot touch down as you hold. Only straighten your standing leg as much as you can while still maintaining balance and a straight line with your body. Beginners may need to reach back toward their foot instead of out in front of them or they may want to use a wall behind them to help them balance. To use a wall for slight assistance, stand with a wall behind you and when you hinge over have the lifted foot lightly touch the wall behind you to help you balance.
For more great Isometrics, like the Warrior Pose, to improve your mobility and flexibility while also getting the correct muscles activated and working, check out these Leg Isometrics.
And for more tips to alleviate your low back and hip pain, including foam rolling and stretching moves, which are also an essential part of any pain and injury prevention program, check out our complete post on How to Prevent and Alleviate Hip and Low Back Pain.
Alleviate Neck, Shoulder and Upper Back Pain Activation Exercises
Many of us sit in some sort of slumped position all day. Whether we sit hunched at the computer, in a car, traveling in an airplane or even over a bike when we workout, many of us have poor posture and spend most of the day with our upper bodies in flexion.
This perpetual flexion can lead to imbalances, poor movement patterns and neck, shoulder and upper back pain. It can cause your chest and upper traps to become tight and lead to your upper traps and shoulders trying to take over and work when the big muscles of your back should be working.
That is why you have to do Activation Exercises to get your mid and lower traps, potentially your rhomboids and even your lats engaged and working.
Some important moves to include as well as the ones below are the Scapular Wall Hold, Camel and Wrist Extension Stretch in the Desk Activation Exercises section. Many of the Activation Exercises under the Improve Your Pull Ups section would be good as well.
(And if you need work work on your shoulder and scapular mobility and stability, these foam rolling and stretching moves as well will help!)
Below are 5 more Activation Exercises To Alleviate Neck, Shoulder and Upper Back Pain and help open you up after sitting in constant flexion!
1. Downward Dog – Downward Dog is a great way to activate your shoulders, upper back and core while also improving your thoracic extension and stretching your lats and even your triceps.
Improving your thoracic extension after sitting all day is a very important part of being able to get the big muscles of your upper back activated and working. Because we sit hunched all day, our thoracic spine is in flexion.
Because of this posture, we often lose the ability to really extend our spine. And this lack of extension can cause us to overuse smaller muscles when we go to perform exercises and movements, such as overhead pressing and rowing, which can lead to injury.
So to be able to get the big muscles working correctly, it is important that we include an Activation Exercise in our routine that also works on thoracic extension.
To do Downward Dog, start in the high plank position with your hands under your shoulders and your feet about hip-width to shoulder-width apart.
Then, without walking your hands back toward your feet, push your butt up toward the ceiling as you press your chest back toward your legs. Keep your straight arms as you press your chest back and try to get your biceps by your ears.
You want to focus on getting your back flat and a nice straight line from the heels of your hands up to your tailbone. You want your arms to be in line with your torso (aka your biceps by the ears). As you press through your hands, make sure that you don’t rock to the outside of your hands. Feel your fingers gripping the ground as you work to extend your spine.
Push your butt back and up as you hold the downward dog position and try to drive your heels down toward the ground. Breathe and try to relax deeper into the stretch.
While you may need to adjust your exact hand positioning, do not walk your hands in closer to your feet just to get your heels down. You want to make sure you are really focused on driving your chest back and improving your thoracic extension.
2. Straight-Arm Shoulder Extensions – Every Activation Move to prevent and alleviate upper back, neck and shoulder pain should help improve your posture. It should force you to stand up nice and tall and press your chest out while also making sure to keep your shoulders down and back.
And it should work the backs of your shoulders as well as the muscles between your shoulder blades.
When you do all these Activation Moves, you should make sure that you aren’t shrugging or feeling the muscles of your neck or your upper traps taking over.
With the Straight-Arm Shoulder Extension, you can work not only your mid and lower traps but also your rotator cuff muscles to strengthen them to prevent pain and injury.
However, with this move like all Activation Exercises to alleviate upper back, neck and shoulder pain, you must focus on the correct muscles working because your body will want to compensate and sometimes use incorrect muscles because of the poor movement patterns and imbalances you’ve built up from spending most of the day in flexion.
This is where you need to focus on your mind-body connection and making sure the correct muscles are working. Go light as you learn to engage the correct muscles. You do not need to use a lot of resistance for this move to work.
To do the Straight-Arm Shoulder Extension, anchor a resistance band and hold one end in each hand.
Set up facing the anchor point but far enough away that there is tension in the band when your arms are down straight and your hands are in front of you. Stand up nice and tall with your feet about hip-width apart. Make sure you aren’t shrugging your shoulders and that your chest is pressed out. Feel the muscles between your shoulder blades already engaging before you even extend your arms back.
Keeping your arms straight and chest pressed out, pull back on the band, extending your shoulders as you pull your hands behind you. Feel your back and the backs of your shoulders extending your shoulder to pull the band back. You may even feel the back of your arm a little, but you shouldn’t feel your neck or upper traps at all.
Do not shrug as you pull back or jerk the band back and lean forward in an attempt to perform a bigger range of motion.
This won’t be a huge movement. Just focus on your back pulling the band back as your arms stay straight. Pinch your shoulder blades together as you pull back.
Hold for a second or two then relax your arms back forward and repeat.
Make sure you maintain a nice tall posture as you pull the band back. You must focus and think about your back working as you do the movement. Do not just go through the motions!
3. 3-Way Scapular Band Flyes – Another great move to work your back is the Scapular Band Fly. However, like many Back Fly exercises, it is very easy for us to compensate and recruit the incorrect muscles to perform the movement because we sit hunched over and with our shoulders shrugged and heading jutting forward for most of the day.
That is why it is very important that you start with a light resistance and really focus on the correct muscles working. It is also why the 3-Way Scapular Band Flyes are a great exercise to include.
They work on activating the big muscles of your upper back and can be very effective with a very light resistance so that you can improve your mind-body connection. And you can either do all three variations if you feel the correct muscles working or simply start with the one you feel in the right spot before slowly integrating the others as your mind-body connection improves.
Because these Scapular Band Flyes are done 3 different ways, they also help you learn how to recruit the big muscles of your back from numerous different angles to help you when you do Rows or even Pull Ups.
Below are all 3 Scapular Band Flyes – The Straight Scapular Band Fly, the Overhead Scapular Band Fly and the Behind-The-Head Scapular Band Fly.
- #1 Straight Scapular Band Fly – To do the Straight Scapular Band Fly, hold the resistance band with your hands about shoulder-width apart. The closer together they are the harder the move will be and the farther apart they are the easier the move will be. Make sure that whatever distance you pick, you can open your arms straight out to the side and feel the correct muscles working. Press your chest out so you are standing nice and tall. Relax your neck and shoulders and engage your back muscles. Do not shrug. Raise your arms up straight in front of you at about shoulder height or right below, holding the band. Keeping your arms straight, pull your arms open and out to the sides, pulling the band open toward your chest. Pinch your shoulder blades down and together as you open and bring the band in to your chest. Do not let your shoulders shrug up as you pull the band. Focus on feeling your back work to pull your arms open. You want to pinch your shoulder blades together as you pull. Hold with your arms open for a second or two and feel your back working. After holding to feel your back working, bring your arms back together so your arms are about shoulder-width apart again and there is no slack in the band. Repeat the fly. Really focus on your back working and not your upper traps or neck. Do not round forward as you do this move or rush through it.
- #2 Overhead Scapular Band Fly – To do the Overhead Scapular Band Fly, you will hold the band with your hands about shoulder-width apart like you did for the Straight Scapular Band Fly. Then raise your arms out overhead and slightly in front of you. Keeping your arms straight, pull the band down to your chest by opening your arms straight out to the sides and down. Draw your shoulder blades down and together as you bring the band down. Your arms should stay straight the entire time as you bring the band down to your chest. Really press your chest out and make sure you to keep your shoulders and neck relaxed. Feel your shoulder blades retract down and back and the big muscles of your back working. Move slow and even pause at the bottom to assess and feel the correct muscles working.
- #3 Behind-The-Head Scapular Band Fly – The Behind-The-Head Scapular Band Fly is an overhead move in which you pull the band down behind your head. This is a more challenging variation so don’t attempt this one if you can’t feel the other two working the correct muscles. To do this variation, hold the band with your hands about shoulder-width apart and start with your arms up straight overhead. Then pull your arms straight out and down to bring the band down toward the back of your shoulders. Keep your chest pressed out and draw your shoulder blades down and back as you pull the band down. Try not to really jut your head forward as you pull it down behind your head. Pull it behind your head and bring your arms straight out to the side at about shoulder height. Once the band reaches your shoulders, slowly bring it back overhead. Really feel your back working. If you feel your neck or upper traps taking over, regress to the Band Fly you feel the most and then return to this one with a lighter resistance and focus on the correct muscles working.
4. Plank Scapular Push Ups – Another great Scapular Push Up variation can be done from the Forearm Plank Position. This is a great move to really work your core while also improving your scapular retraction. If you struggle to stop yourself from bending your elbows as you do the Scapular Push Up, this may be a better variation for you to start with as you aren’t able to move your arms.
And just like with the basic Scapular Push Up, it is very important that when you do this move, you isolate your back and don’t also wiggle your core. If you do this move correctly, you will not only improve your mind-body connection and activate the bigger muscles of your back, but you will also build core strength and stability.
To do the Plank Scapular Push Up, set up in a plank position on your forearms and toes (advanced) or knees (beginner). Your elbows should be stacked under your shoulders and your body should be in a nice straight line from your head to your heels or knees. Brace your abs and squeeze your glutes.
Then, holding this plank position, pinch your shoulder blades together. Then release. As you pinch, do not drop your hips or push your butt up toward the ceiling. Your body will move a very small amount, but only because you are pinching your shoulder blades together.
Do not try to make this a bigger movement by wiggling your core or jutting your head forward.
Pinch your shoulder blades together and then release. You can even round your back up out of it if you want (as stated above with the Scapular Push Ups, this can also have benefit).
Make sure to keep your core engaged the entire time. You may feel this all the way around your ribs as you perform the small movement.
If you really struggle to isolate your back, you may even want to start on your hands and knees with your knees under your hips.
5. YTWLs – YTWLs are four great movements to build shoulder strength and stability. They get the correct muscles activated and working to support your shoulder so you prevent injury.
If you’ve ever had any rotator cuff problems, you’ve probably done YTWLs in some way, shape or form before.
Because you are working stabilizing muscles, you should not go super heavy ever with these moves. Bodyweight is great to start with.
YTWLs are actually four different movements. They can be done lying on the ground, lying on a bench or even with a Suspension Trainer. For Ys and Ts using the Suspension Trainer, check out these 10 Suspension Trainer Exercises.
Below is how to do YTWLs lying on a bench. The first picture shows Ys (top), Ts (middle) and Ws (bottom).
- Ys – To do Ys, lie face down on a bench. Reach your arms up overhead with your hands relaxed down on the ground. Turn your hands so your thumbs are pointing up toward the ceiling. Your arms should be straight out and make the shape of a “Y” with your body. Squeeze your glutes and then lift your arms up, raising your thumbs up toward the ceiling. Raise your arms straight up as high as you can and feel your upper back and the backs of your shoulders working to lift. Do not strain your neck or arch your low back just to lift your arms up higher. Squeeze the muscles of your upper back to lift your arms up. Hold for a second then relax back down and repeat. Do not bend or turn your arms as you lift and lower. Create a “Y” with your arms as you lift and lower. Press your chest down into the bench as you lift. Complete all reps of the “Y”s before moving on.
- Ts – The “T” is basically a back fly where you are lying down on the bench. To do this move you will want to pinch your shoulder blades together much like you do with the Scapular Band Flyes. To do Ts, reach your arms out to both sides at about shoulder height with your arms relaxed down toward the ground and your thumbs pointing up toward the ceiling. Your arms should make a “T” with your body especially as you raise them up toward the ceiling. Squeeze your glutes then lift your arms up to the side toward the ceiling, pinching your shoulder blades together as you lift. Keep your arms straight as you lift as if performing a back fly. Pinch your shoulder blades together as you lift and press your chest out. Do not shrug your shoulders or tense your neck. If you struggle to get the muscles between your shoulder blades to work, you can always bend your elbows very slightly or even try this standing. Pinch your shoulder blades together and drive your thumbs up toward the ceiling then lower your arms back down and repeat. Hold for a second or two at the top to feel the correct muscles engaging and working.
- Ws – To do Ws, bend your elbows to about 90 degrees and have your arms hang down from the bench so that your palms are facing in toward each other and your thumbs are pointing up toward the ceiling. Then lift your arms up toward the ceiling, bringing your upper arm back and up so that it looks like you are creating a “W” with your arms and body. The backs of your hands will face up toward the ceiling as you pinch your shoulder blades together to lift your arms out to the sides. Try to lift your entire arm evenly and not just drive your elbows back as you lift. Keep your neck relaxed and feel your upper back and the backs of your shoulders working. Hold for a second or two at the top and then lower back down. Do not unbend your elbow each time just lower and raise right back up.
- Ls – The “L” will change slightly depending on what equipment you are using. If you have a bench there will be more movement than if you are doing this lying face down on the ground (shown below). To do Ls lying on a bench, start with your arms hanging down toward the ground. Squeeze your glutes then drive your elbows back and up toward the ceiling so that you are bending your elbows to 90 degrees. Keeping your elbows bent then rotate the backs of your palms up toward the ceiling. Do not bring your hands in toward each other or let your lower arm flare way out as you lift the backs of your hands. You are simply rotating at the elbow and shoulder. Do not tense your neck or shrug your shoulders. Feel the back of your shoulder working. Then relax your palms back down to parallel to the ground and rotate to drop your hands all the way down toward the ground, extending your arms. Repeat, bending your elbows then rotating the backs of your hands back up toward the ceiling.
None of these moves, in the YTWL, involve a big range of motion. Do not rush through the movements.
For any injury prevention program, it is important that you include Foam Rolling and Stretching Exercises as well as Activation Moves. All three components combined are necessary to correct the problem. Click here for more tips and exercises to help you alleviate neck, shoulder and upper back pain.
Alleviate Foot, Ankle and KneePain Activation Exercises
Your feet and ankles are your foundation. If there are problems there, you will most likely have problems higher up your kinetic chain with your knees, hips, back and even potentially your shoulders. Especially your glute functioning can be impacted (Learn more about the Ankle-Butt Connection!)
Therefore it is very important that you work on your feet, ankles and knees to get muscles activated and working correctly.
Many of the Activation Moves you need to include to prevent and alleviate foot, ankle and knee pain will also help prevent and alleviate hip and low back pain, as well as other lower body injuries, because these moves focus on improving your balance and activating your core.
To prevent and alleviate foot, ankle and knee pain, you need to activate the stabilizers in your feet and lower legs as well as your quad muscles and glutes. By activating these muscles, you will help build stability in your legs and help improve your movement patterns.
Check out these 5 Activation Exercises to Prevent and Alleviate Foot, Ankle and Knee Pain to activate and build stability in your legs.
1. Leg Swings – Leg Swings are a great way to start working on your balance while activating all the stabilizers in your legs. This move will also improve your mind-body connection, build core stability and even open up your hips a bit.
Because you are working to stay balanced while also moving, this is a very challenging move. Beginners may need to start with a more basic balancing pose or simply start by standing on one foot and balancing.
By adding in the movement, you force everything to work extra hard to engage and remain stabile.
There are three Leg Swings (forward/backward, side-to-side and rotational) that are great to open up your hips while also forcing your body to work hard to balance. As you do these movements, focus on your foot’s connection to the ground and feeling all the muscles engaged to hold you steady. You will even want to engage the glute of the standing leg and brace your abs to help keep you from falling over.
To do the 3-Way Leg Swings, start standing on one foot. Feel your foot gripping the ground and engage the glute of the standing leg to help you balance. Brace your abs and stand up nice and tall.
Keeping both legs fairly straight, but not locked out, begin to swing the other leg forward and backward. Swing from the hip, don’t just bend your knee and kick your lower leg. The bigger your swings are, the more your standing leg will have to work to balance.
Do not hold on to anything as you do this move. If you need to at the beginning, just perform smaller swings and tap your foot down as needed to reset and stabilize.
Complete all reps of the forward/backward swing then, still balancing on the same leg, switch to lateral swings. For the lateral swings, swing the leg up to the right and then to the left in front of your standing leg. You may even feel the outside of that glute working to raise the leg up as you swing it. The bigger your swing, the more you will open up your hip and force your standing leg to work hard to balance.
After performing the lateral swings, bend the knee of the leg you’ve been swinging to 90 degrees and perform rotational swing.
To do rotational swings, bring the bent knee in front of you and then open it out to the side. Bring the knee back forward, keeping the leg bent the entire time. Really focus on opening from the hip with this move. You should really feel the glute of the standing leg working as you rotate. The more your rotate, the harder the move will be, but also the more you will open your hips and get your glutes activated.
Once you complete all three swings, switch to the other side and do all three swings.
If you do this move correctly, you will feel your foot, calf and even your shin muscles working to balance. You will also feel your glute and core engaging as you swing your leg to open your hip.
Again start with a more basic balancing pose if you can’t maintain balance or perform smaller swings. The whole point of this move is to improve your mind-body connection and get things activated so you can balance.
If you hold on to a wall just so you can swing higher, you won’t get as much out of this move.
2. Chair Pose with Glute Stretch – When you suffer from foot, ankle and knee pain, often not only do you need to regain stability in your lower leg, but you also need to get your quads activated and working to stabilize.
This Chair Pose with Glute Stretch will do all that while also stretching out your glutes and engaging your core.
And because we generally aren’t completely balanced, especially after suffering from injury, it is important to include unilateral moves in our workout routines. Unilateral moves are exercises where each side works independently. This allows you to strengthen your weaker side because your stronger side won’t take over and pick up the slack.
In the Chair Pose with Glute Stretch, each leg is forced to work independently so that you can’t compensate and allow your stronger side to take over.
To do the Chair Pose with Glute Stretch, start standing up nice and tall. Then slightly bend your knees and shift your weight to balance on one foot. Take the leg you aren’t balancing on and cross that ankle over the other leg right above your knee.
Sink down lower into the squat, but do not allow yourself to round forward. Open the knee of the leg your crossed over as you hold the squat.
Make sure to sit your butt back and not just slouch pushing your knee forward.
You can also press down on the knee of the leg you crossed over to help open up the hip. Or you can bring your hands to prayer pose or even reach them up overhead. Just make sure to keep your chest up and sit your butt back as you open up your hip.
Feel your foot gripping the ground as you breathe and hold.
Make sure to sit your butt back as you squat and keep the knee of the leg crossed over open.
Beginners may need to do a Tree Pose or simply Chair Pose instead. They can also start with the Wall Sit below.
3. Wall Sit – The Wall Sit is a great isometric exercise to activate and strengthen your quads and help build stability in the muscles that help stabilize your knee.
Unlike the Warrior Poses, this isometric will not necessarily stretch you out, will force your quads to engage and stabilize. This will help them also become stronger and stabilize the knee joint to prevent knee pain.
It is also a good idea to include other Isometrics like Warrior I and II and even Triangle to open up your hips as you build stability in your legs because the Wall Sit will put you in flexion just like you were sitting in a chair.
To do the Wall Sit, stand with your back to a wall and your feet about hip-width apart. You can change up your exact foot position to hit slightly different aspects of your quads.
Then sink down into a squat, pressing your back into the wall behind you as you try to get your quads as close to parallel to the ground as possible.
When you sink into the squat, keep your ankles aligned under your knees and drive back into the wall through your entire foot. Do not rock forward onto your toes. Also, do not sink past parallel. Hold there and drive your back into the wall.
If you start to feel this in your low back, make sure to brace your abs. Also, do not hunch or lean forward as you hold. Stay up nice and tall.
To make this move easier, don’t sink as low in the squat or move your feet out just a bit from the wall. Do not let your ankles get too far out in front of your knees though.
4. Glute Bridge with Squeeze – The Glute Bridge is basically a must-do move no matter what. Injury or no injury, many of us have inactive glutes from simply sitting too much.
Inactive glutes can not only perpetuate pain and injury, but lead to new aches and pains. That is why it is important to get your glutes activated and working. And if you’ve suffered a foot, ankle or knee injury, it is even more likely that your glutes have shut off because of that injury.
That is why it is important that when you’ve suffered from a lower body injury, you make sure to include glute activation exercises in your routine, especially Glute Bridges.
Glute Bridges will not only activate your glutes, but they will also open up your hips.
And when you do the Glute Bridge with Squeeze, you also engage and strengthen your adductors as well to help build knee stability.
Also, by squeezing an object between your knees during the Glute Bridge, you can help keep your ankles, knees and hips in perfect alignment. By training the proper alignment during an activation exercise, you can get everything working correctly before you do the more challenging lifts.
To do the Glute Bridge with Squeeze, bend your knees and place your feet flat on the ground about hip-width apart. Start with your feet just beyond your fingertips when you stretch your arms down by your sides. If your hips are tight, you may need to move your feet further away so that you don’t feel your back or hamstrings taking over. You need to feel your inner thighs and glutes working.
Place a book, yoga block or even a pillow between your knees. It should be a light object that will keep your knees in line with your hips and ankles when you squeeze it. Also make sure that it is wide enough that your ankles, knees and hips are in alignment. You may need to bring your feet slightly closer together if you only have a skinny book to make this happen.
Then bend your elbows to 90 degrees so that only your upper arms are on the ground. Brace your abs. Then drive through your heels and upper back and arms to bridge up, lifting your glutes up off the ground.
Squeeze the block and drive your hips up as high as possible, squeezing your glutes to lift. Feel your glutes and even your inner thighs working to help you bridge and hold the block.
Keep your belly button drawn in so you don’t hyperextend your back at the top but instead extend through your hips. Really squeeze your glutes and hold the block. Do not worry about exactly how high you bridge up. Just focus on consciously squeezing your glutes at the top and extending your hips.
Do not push yourself backward off your heels. You want to also drive up using your upper back. Make sure you are driving straight up and that your knees, ankles and hips are all in line. The block should keep your knees from really caving in or falling open.
Squeeze your glutes for a second or two at the top and then lower all the way back down to the ground before repeating. Do not lose the block as you bridge and lower.
5. Bull Dog Hold – Activate the entire front side of your core with the Bull Dog Hold – everything from your shoulders to your knees. This is a great move to activate your quads and even strengthen and stretch your feet.
However, because you will be on the ball of your foot, this move may be more challenging if you have foot pain and injury and you will have to be careful that it doesn’t aggravate it.
To do the Bull Dog Hold, set up on your hands and knees with your hands under your shoulders and your knees under your hips. Flex your feet and tuck your toes under.
Then lift up onto your hands and the balls of your feet and hold with your knees an inch off the ground. You want to keep your knees as close to the ground as possible.
Also, make sure to keep your head and back in a nice straight line. Do not tuck your chin or arch your back. And do not shrug your shoulders.
Keep your abs engaged and hold. Do not let your butt go up in the air as you fatigue.
To prevent and alleviate foot, ankle and knee pain, you will also want to include The Warriors and even all of the Glute Activation Exercises in your pain prevention program.
For more tips and exercises to help prevent and alleviate foot and ankle pain, check out these tips to take care of your feet and ankles.
For more exercises and tips to prevent knee pain, check out this Knee Pain Prevention Post.
By using these Activation Exercises in this post, you can prevent and alleviate injury while also getting stronger to lift more and run faster!
P.S. Please make sure to consult a doctor or see a Physical Therapist if you are suffering from pain so they can assess your specific situation.
Also, all Activation Exercises are even more effective when done with a proper foam rolling and stretching routine!
For the full 3-Part RStoration Process, get my 21-Day RStoration Program!


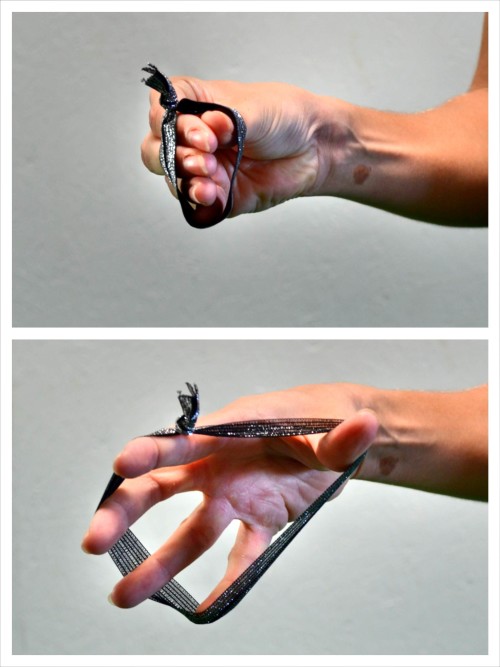
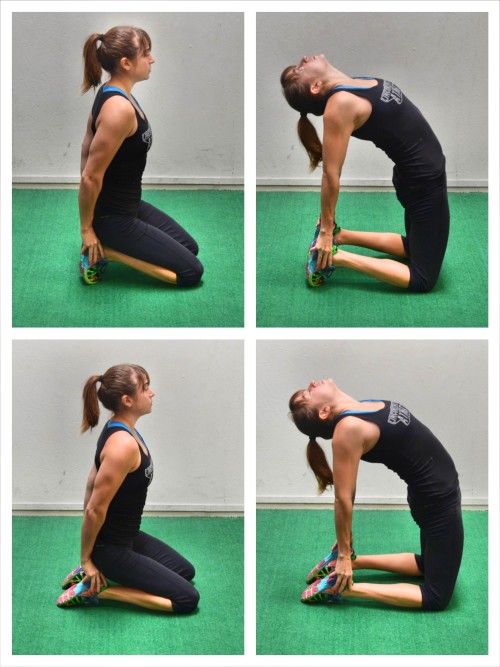
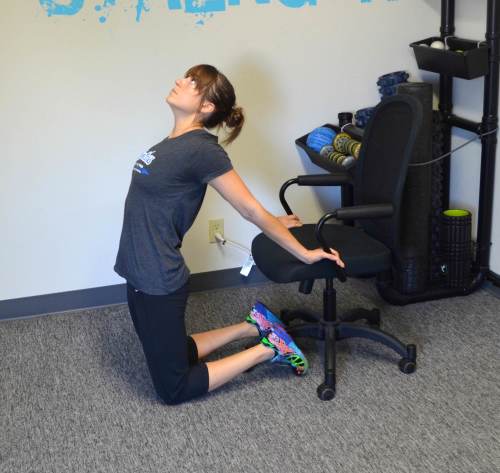
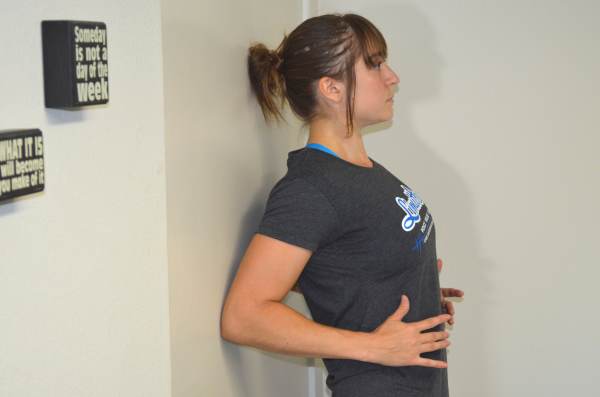
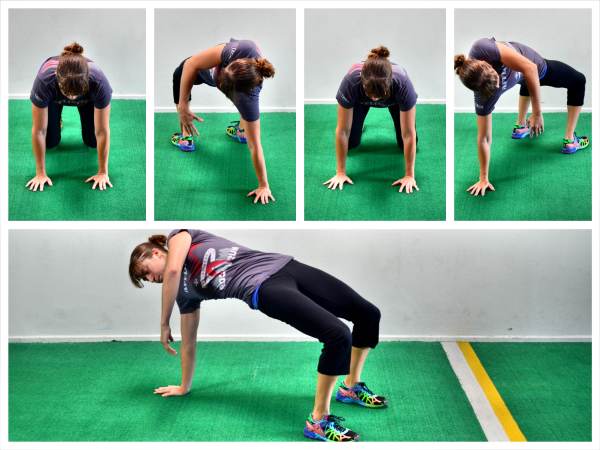
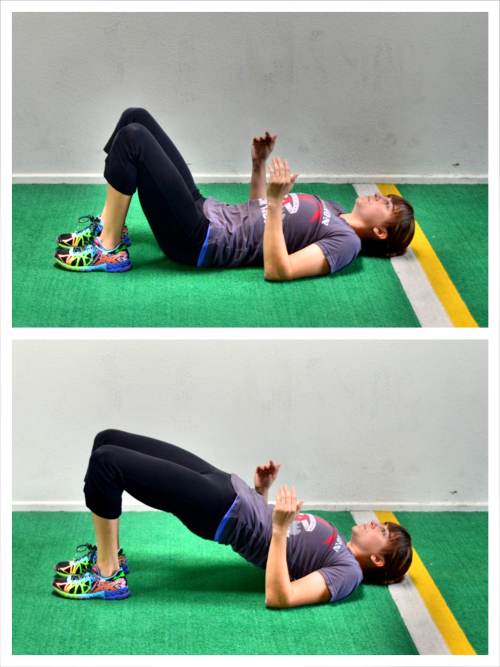
 (Learn more about my pull up challenge)
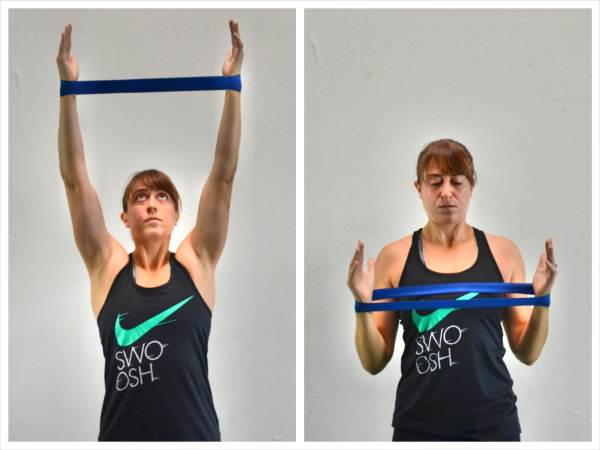
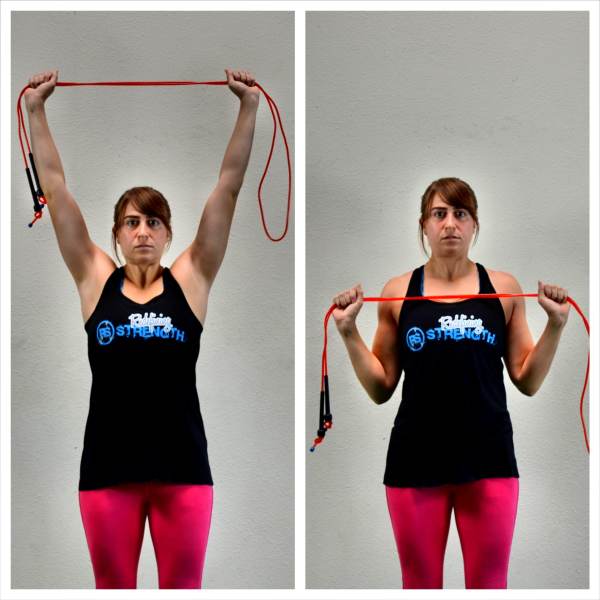
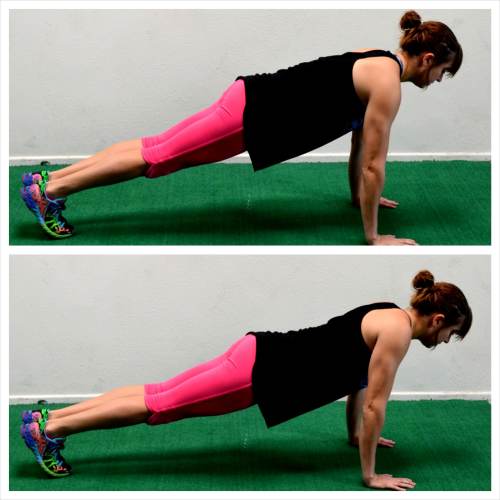
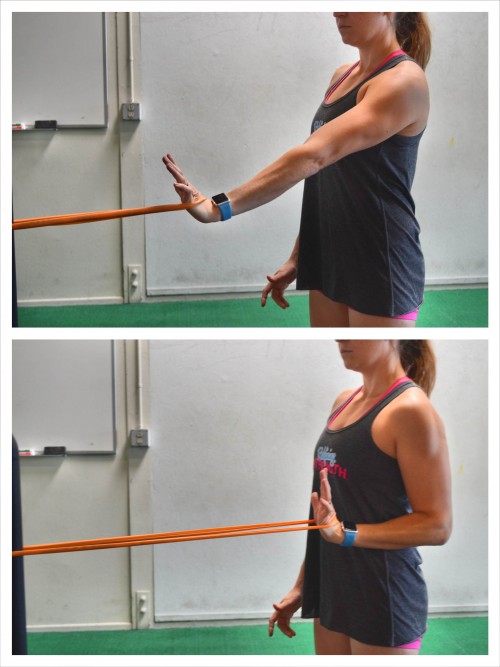
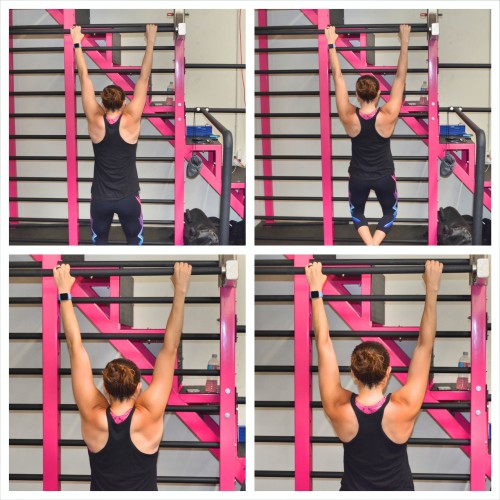
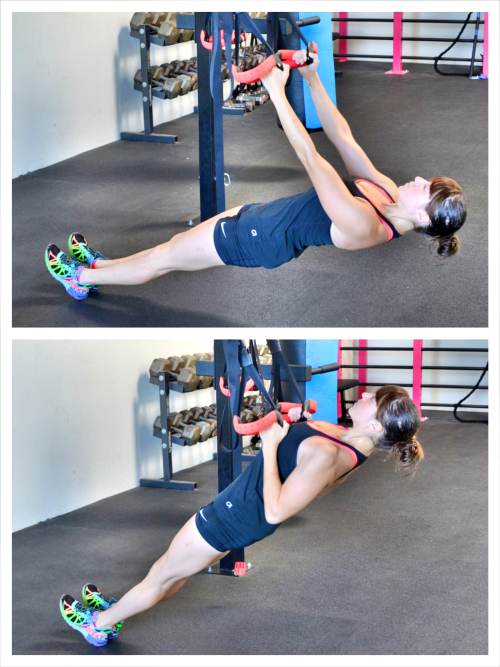
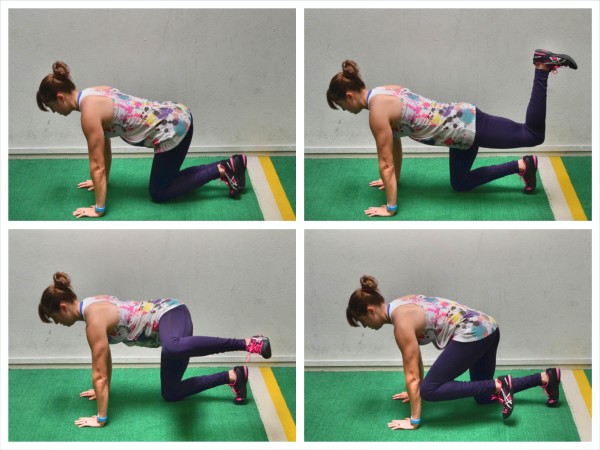
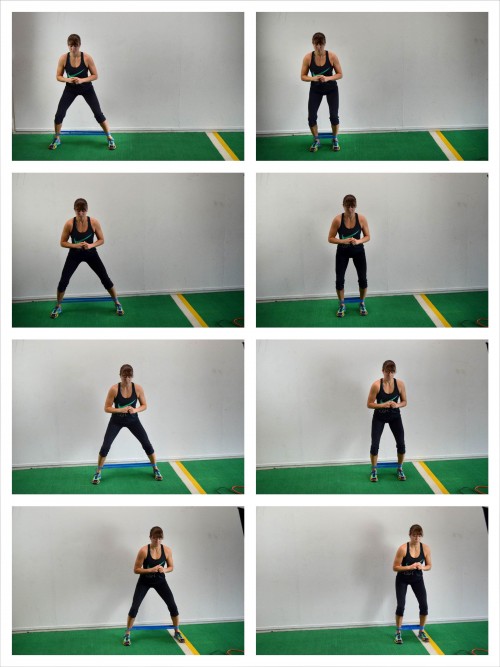

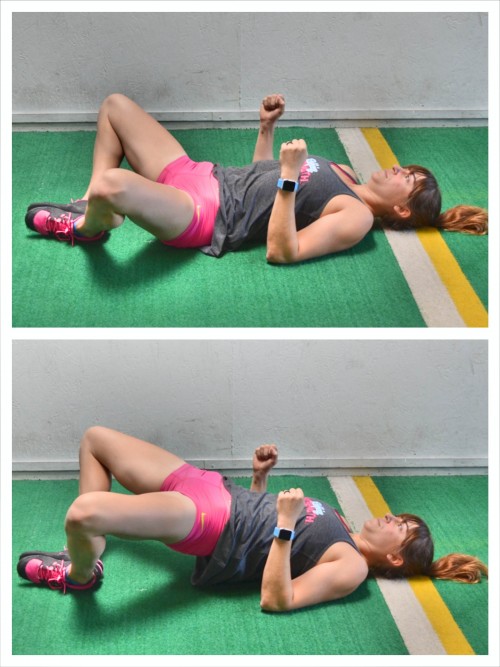
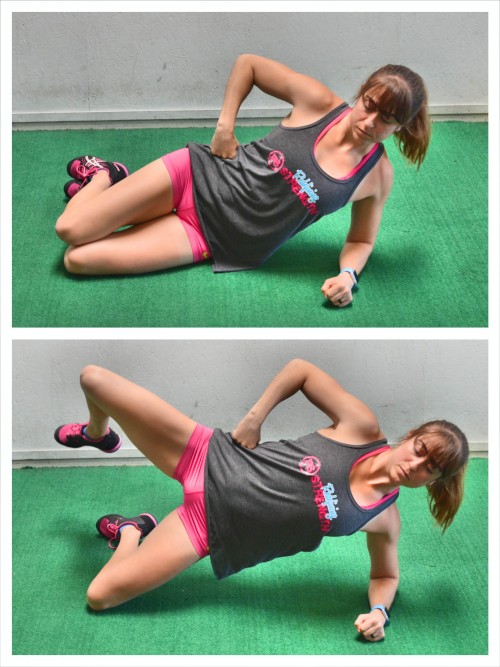
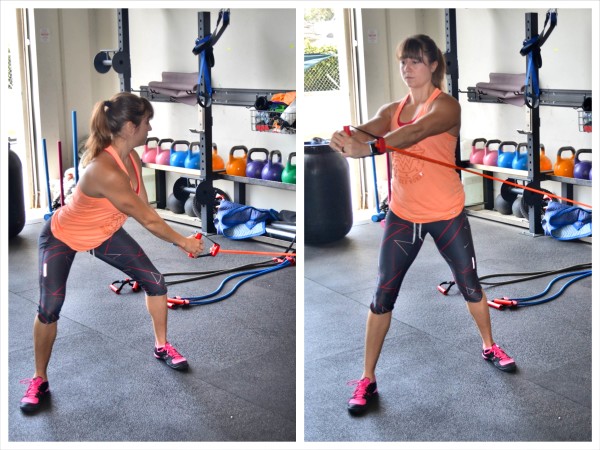
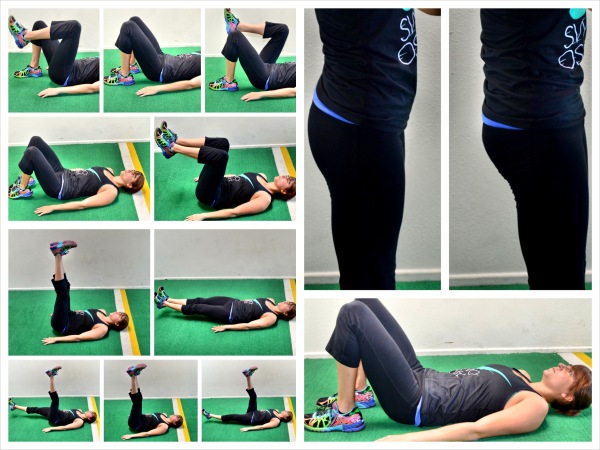
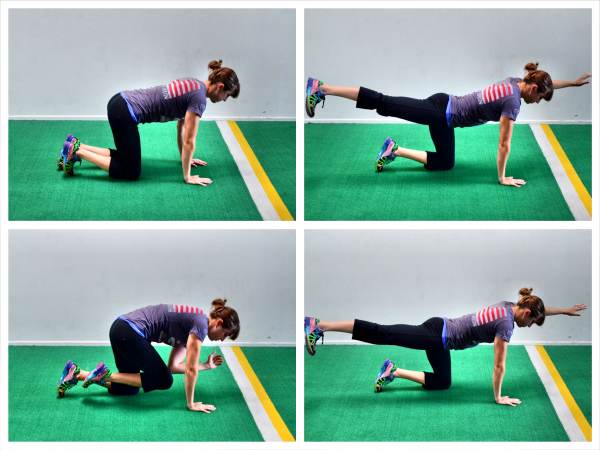
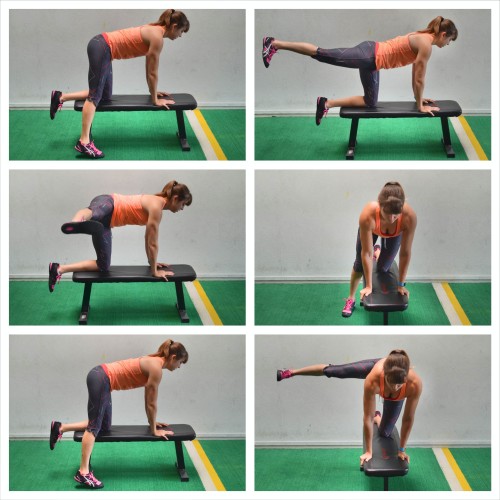
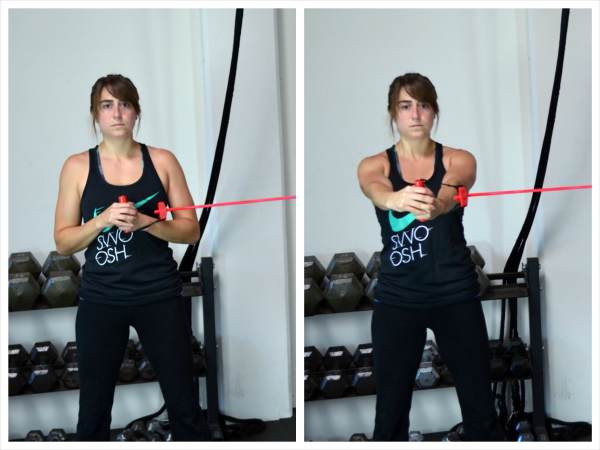
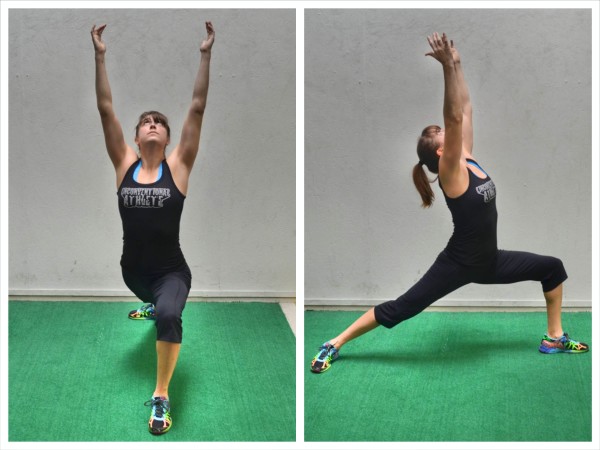
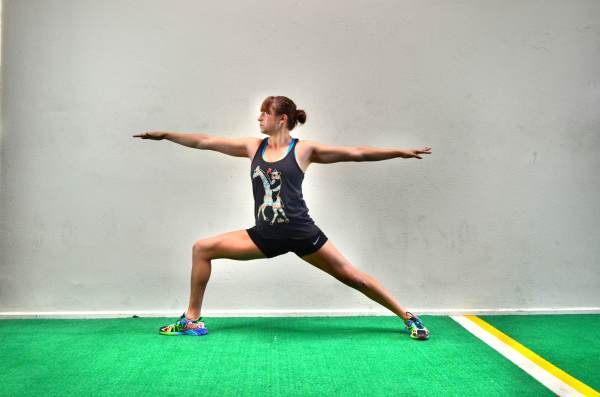
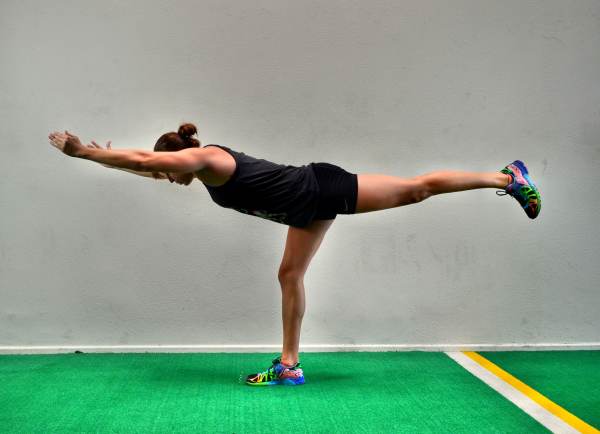

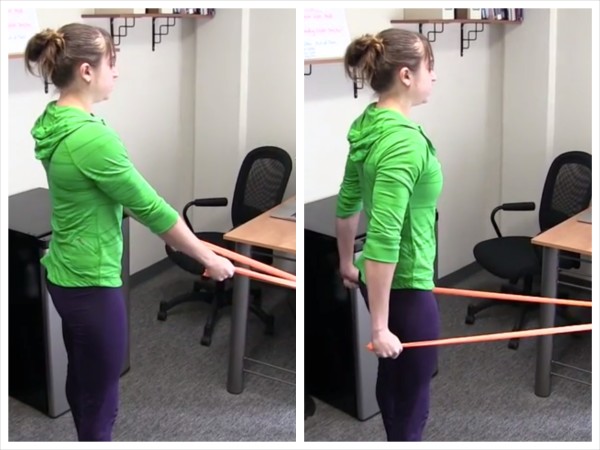
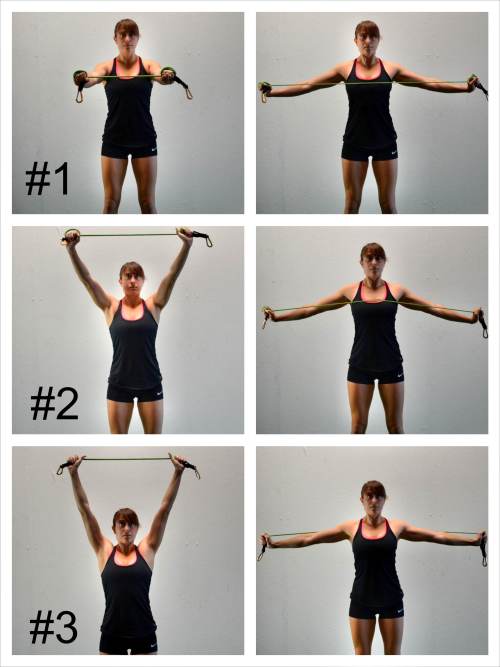
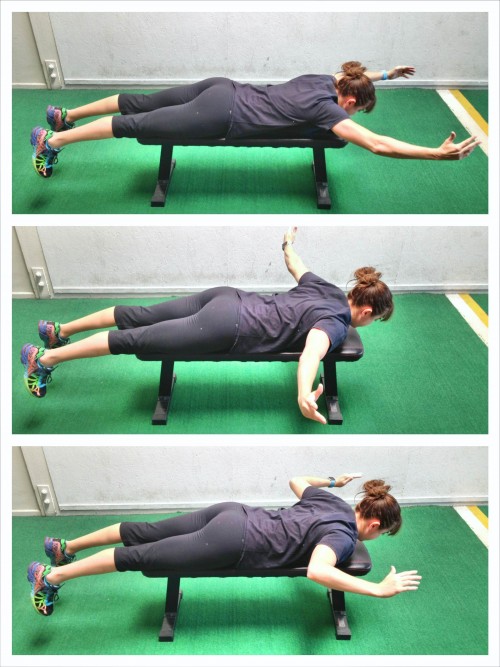
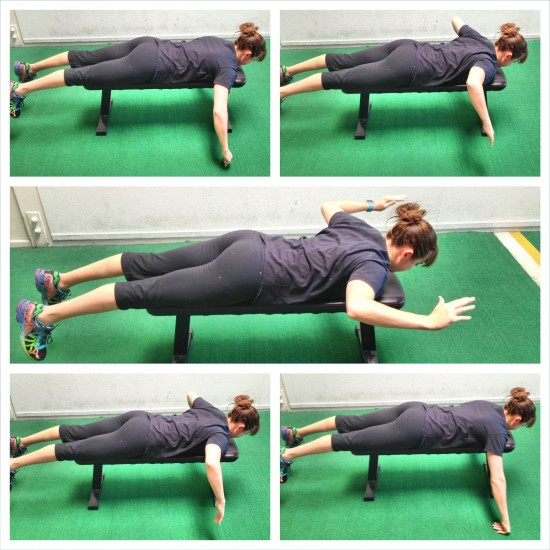
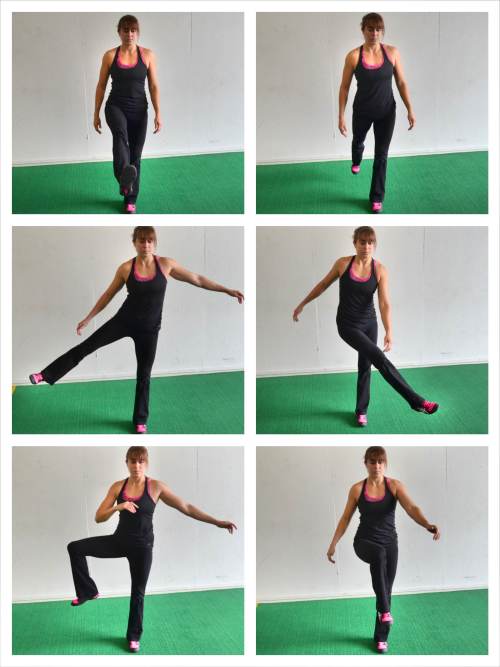
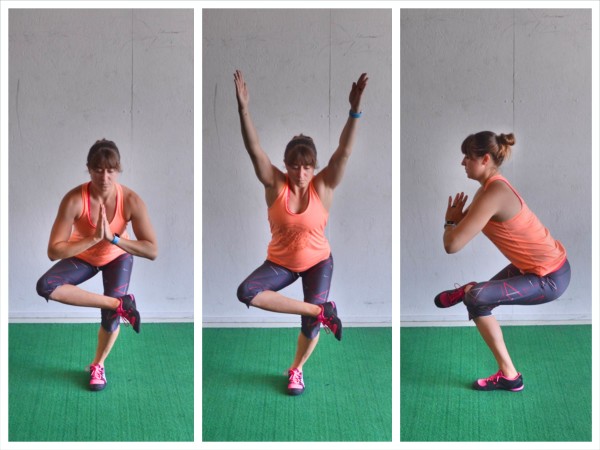
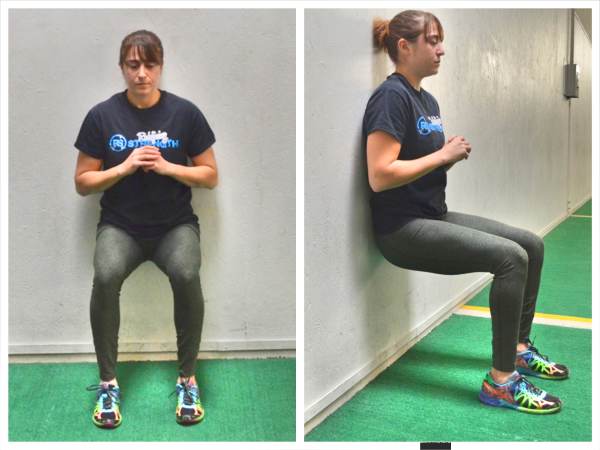
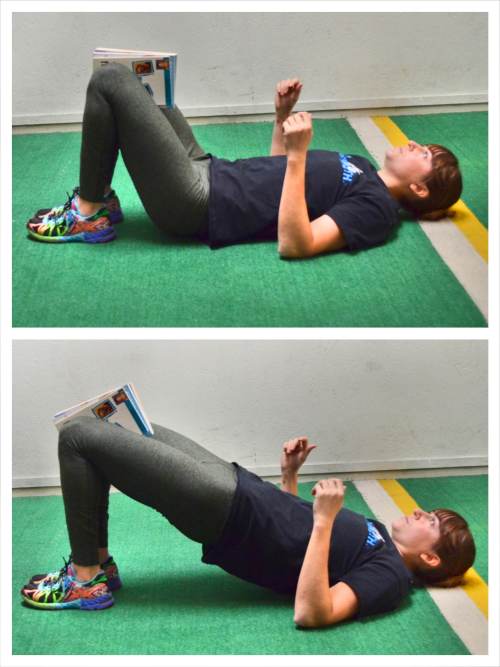
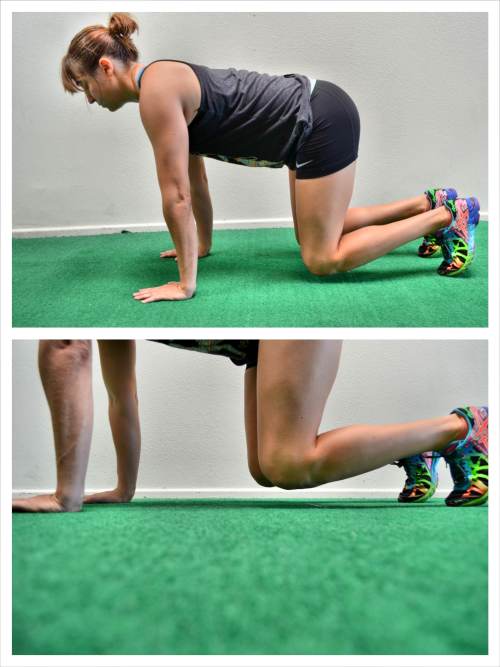


Wow Great, great article.
After about 10 years of actively trying to fix my broken body throughout the years i have found many of these exercises after trial and errors. So seeing so many exercises of which i know that they work together makes me super excited and hopeful to try the ones in this article i am not doing or have not done yet.Again great article and i hope it will help many people and spare them years of trial and error with the oveload of info that is online.
Thank you! May I ask what you are trying to fix? I could then maybe pass on some other helpful links! – Cori
Sure always interested in links from legit sources :)! I have problems with my nervous system, central sensitisation was just diagnosed, i also seem to lose control over my muscles slowely. Almost cant move my toes since i never actively used them so other muscles that i do use are less affected. My muscles will randomly cramp up, stiffen up and or feel injured during training while the tissue often does not have any damage. So a lot of activation problems that over many years of weightlifting and being a martial artist that trains 5-6 days a week (you wouldnt say huh, probably sound more like a 65 year old :D) have caused many faulty movement patterns where i use the wrong muscles for tasks and cant activate others that i should be using. The thing that is so annoying is that when i do activation exercises, or try to learn good motor patterns something always goes wrong in the progression and ends up messing up everything. To illustrate for example … i find out my glutes are not firing, so i start bridges, i up the reps slowely and my knee starts hurting so i have to quit the progression and find another exercise clambshells, so i do these and after a couple of times my hipflexor starts stiffening up.etc etc. Have to say that i made huge progress in the last years and went from spending 4-6 hours a day laying on the floor to rest my lowerback and upperback pain, to a lot of pain free days.
I have full time availability to fix these issues and i spend hours every day on them in an autistic way trying out new stuff and getting to know my body better to see what works and what not.
Ok to much text haha, every link would be appreciated.
My bad after writing that wall of text i realized i didnt even answer your question, currently trying to fix:
Scapular winging, my 4th rib does something weird (move)that irritates the muscle thats over it, left shoulder elevates, right side glute does not activate well especially in the end range of hip extention. Right side Psoas seems to be very weak and stiffens up a lot, giving lower back pain and possibly inhibiting my glute even more. Grips are very weak and if i tense up too much lower arm will hurt for days. Pec minor is tight, calves stiffen up immensely after for example 3×20 calve raises i almost cant walk for a week. Activation of right side internal obliques is getting better but need to find a progressive exercise that doesnt stiffen up my psoas like leg raises. Lats wont activate well. I left out some minor stuff and a lot of extra info on these problems, but these are the main points.
May I ask if you do some foam rolling as well? Didn’t see you mentioned this…And when you progress, you say something seems to go wrong. How slowly do you build? How much time for recovery are you allotting? Aaron if you want to email me too at [email protected] maybe we can chat too 🙂
Thanks, send an email.
Hello Aaron,
Finally found hope reading through your discussion with cori, I exactly have the same problems as you, been suffering for the last three and a half years, tried every conventional medicine, therapy to no avail. The exercises Cori described here are also something i came to realize that helps in pain recovery time to time through lot of trial and error ( until ofcourse some other muscle group starts trouble me), I had been practicing karate for 16 years and then weight lifting for 4 years ( similar pattern to yours)
I have developed exactly similar issues like you. Pain one day on my shoulder or neck ,the other day on my hip or right glute and even on the tail bone area.
I suppose my question to you now is , have you made any recovery yet ? is there any recommendation from Cori ? i am just basically interested in following up with your discussions on these comments thread.
Hope you get to see this.
We actually emailed after to chat a bit. The key is finding out what the imbalance is you need to correct aka what needs to be mobilized and activated. If you want to chat about your specific situation, don’t hesitate to email me either. Because even though you may have the same pain, it can be occurring for a vastly different reason. – Cori
I loved this article!
I am seriously suffering from an upper tricep that is constantly in pain. I am not sure what muscle is not working that is causing it. I have a feeling it could be my Supraspinatus that is not strong enough. I also know that the head of my bicep tendon tends to get overused.
Any suggestions would be welcome.
How is your shoulder and scapular mobility? Are you doing moves to activate your back? Are you foam rolling your chest, triceps and arms? How is even your wrist mobility?
Hi dear
Amazing article and totally focussed on core issues that are masked.
I am doing mostly on my lower leg, tight upper torso, and i love squat and bird dog ex. However my knee hurts the most when i lower more than 30 degrees. that is my limit. My dorsiflexion is very limited and I have poor psoas and hamstring muscles so lower limb flexion strength is 2+/5.
I Lose balance in side strides workout also.
Any suggestions please!!
Regards
You should check out my RStoration program. Sounds like you need some mobility and stability work!
Hi Cori,
Great set of exercises !! After seeing so many specialists of all kind for my low back-sciatica-hernial-SI joints-QL issue (to not name them all) for the last decade, I realized that my chicken or egg problem is mainly a training-sitting one. Cycling and running hard trainings (while sitting many hours in front of a computer for work) and no targeted muscular and neuromuscular maintenance for my upper part of the back are probably the main causes of my pain (diffused and alternating pain in the QL, piriformis, tensor of fascia latae, medius gluteus). You propose very challenging exercises and clear explanation. Thanks so much!
Really cool stuff thank you! What exercises do you have to activate the traps and rhomboids? I feel mine actually NEVER work. Also, due to quite some lower back pain, I unfortunately have to avoid doing heavy shrugs, hangs. Thanks!
Glad the article and moves help! I think often we ignore our daily postures and don’t consider how they can alter our movement and recruitment patterns during our training!
The trap is really divided into three parts that have slightly different functions so one move doesn’t necessarily address all functions. And if you have lower back pain it sounds like some ab and glute activation would be good too!
Hi Cori. Fantastic to find this article with so much great advice and exercises! I have struggled for years and years with inhibited glutes (mainly right side) and a inhibited upper back. As you rightly say, mainly due to too much sitting at work and at home affecting my posture. These problems have plagued my surfing, climbing, running and biking with many injuries over the years.
I have made some good progress the last couple of years with a few of the exercises you have shown and different stuff like eccentric glute contractions to wake it up and regular yoga to help my upper body and core. However, when it comes to trying to do things like pull ups, I find it really hard to activate the correct muscles in the back and obviously those muscles are very weak so I cant keep the right form very long.
One question: with something like the Scapular Wall hold that I can do at work. How many reps and sets would you recommend to start working with?
Thanks!
So with that hold, I would even recommend doing it every hour for even just 30 seconds when you get up to go the bathroom or move around. Reverse that hunch when you can, right!? Also, as you do your pull up work, do foot assisted or such so you can control the load and focus on what you feel working 🙂
You have really great exercises! Just not sure where to start. I’ve been diagnosed with fibromyalgia/myofascial pain. I know my glutes and low back are a problem. I am thinking about your restoration program. Any help would be appreciated. ?
Hi Nancy Jane. I’m so sorry I didn’t see this! Are you foam rolling currently at all? I use my RStoration and/or my Booty Burner to start with my clients with fibromyalgia. If you need anything, feel free to email me at [email protected]!
I have been diagnosed with myofascial pain syndrome going on 5 years. It started on the left and then shifted to my right side . From top right neck to bottom of right foot. I believe it all started from shifting my squat pattern to work away from pain in the top part of left hip on the posterior side. I have active trigger points in mid back, QL, glutes, hamstring and calf. My left scapula wings and my right shoulder is internally rotated. I’ve been told my joints are hyper mobile, especially at my elbows. I wear medical grade orthotics as I have overflexible arches. Whew! Where to start?
Are you going to physio to relax the overactive muscles but especially to do the activation to create stability while addressing imbalances?
Fantastic and trasforming
Glad it helps!