If you want to be able to do push ups from your toes, the knee push up isn’t the best way to get there.
Yes, push ups from your knees will strengthen your upper body, BUT if you want to be able to do push ups from your toes, YOU NEED TO DO PUSH UPS FROM YOUR TOES.
So how do you do push ups from your toes if you can’t actually do push ups from your toes?
You use AN INCLINE!
Putting your hands up on a bench, bar or any sort of incline, allows you to make the full push up easier because you don’t have to press up all of your weight.
Using an incline allows you to use only as much weight as you can handle as you learn perfect FULL push up form – not modified knee push up form.
Because let’s face it, the full push up is basically a moving plank, a moving plank from your TOES.

If you can’t hold a plank from your toes, if you can’t learn to engage your glutes and quads to keep your body in a nice straight line all the way down to your heels, then you aren’t going to be able to do a full push up.
And you can’t really learn any of that from doing push ups on your knees.
Incline push up from your toes allow your body to work in the same way that it would when you do full push ups from the ground.
Incline push ups force you to engage your glutes and quads to maintain a nice straight line all the way down your body.
Incline push ups force your core to work in the same way it would in a full push up from the ground.
So by doing an incline push up instead of a knee push up, you are training your body to work in the way that it will need to when you do a full push up from the ground.
You are training your body to move efficiently and engage the big muscle groups.
Plus the incline push up is for EVERYONE.
While very beginners often can’t do a push up from their knees with proper form, they can do an incline push up with perfect form.
Incline push ups can start against the wall. A newbie can start with their hands on a wall for an easy variation that still allows their body to work in the way it would from the ground.
And as they advance, the exerciser can keep the exact same form while slowly lowering the incline. They can bring their hands down to a bar or shelf. Then maybe a table, chair or bench. Then maybe just a few books.
And then finally the ground.
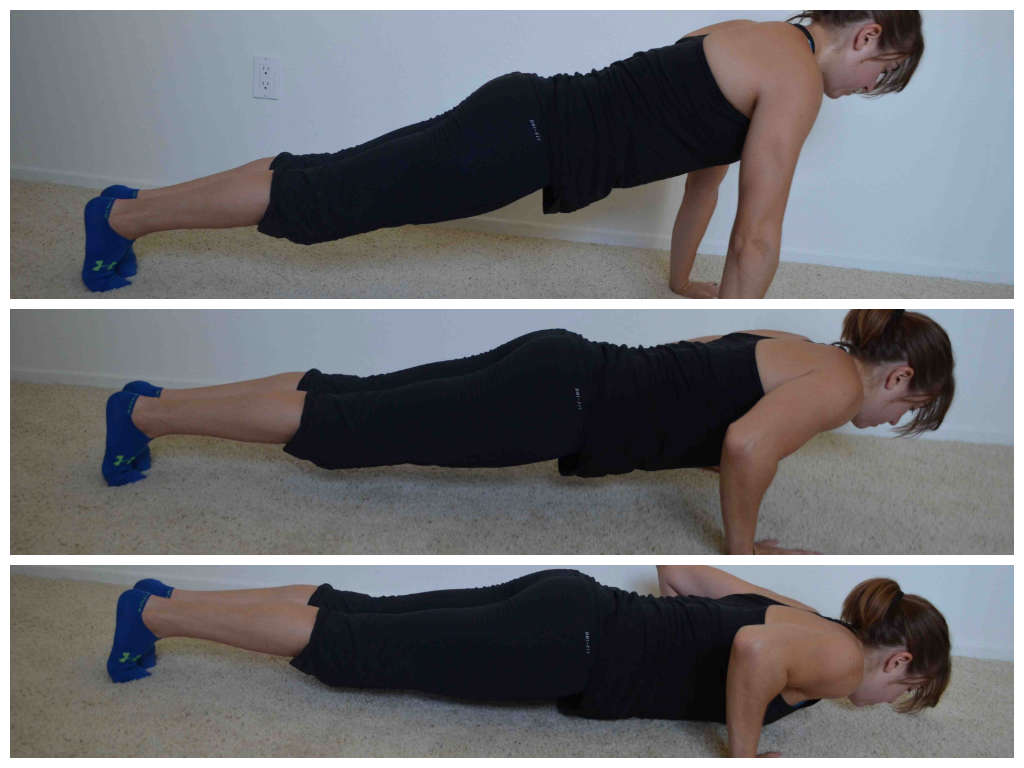
Here is a how to do the Incline Push Up:
1. Place your hands up on a wall, bench, shelf or bar at an appropriate height that allows you to drop your chest all the way down while maintaining perfect form.
2. Your feet should be together and your hands should be right outside your chest. It is best to set up at the bottom of the push up so that you know your chest will hit the incline right at nipple height. This ensures that your upper body will be in perfect alignment with your arms and form an arrow shape (->).
3. Do not push forward onto your toes. Drive your heels back toward the ground, but don’t think they need to stay on the ground. Driving back through your heels will help you keep everything engaged. If you press forward onto your toes, you are going to make your push ups weaker.
4. Draw your abs in and squeeze your glutes and quads.
5. Press your chest up from the bar, extending your arms out all the way and locking out at the top.
6. As you press up, make sure your body moves as one unit. Your head should be in line with your spine and your hips shouldn’t sag toward the ground and your butt shouldn’t go up in the air.
7. Make sure your shoulders don’t shrug as you push up and your back doesn’t round at the top of the push up. Do not tuck your chin toward your chest.
8. Then with your body moving as one unit, lower your chest back down to the bar. Do not shrug your shoulders or let your hips sag or rise up. Your core should be tightly engaged with your butt and quads squeezed and your belly button drawn in toward your spine.
9. Even at the bottom of the push up, do not relax. Keep everything engaged so you can press right back up.
10. As the incline becomes easier, make it lower and lower. If your form starts to falter, do fewer reps from the lower incline OR regress the incline. Doing a combination of both may be the best option even!
Remember, the push up is a moving full plank from the toes and the plank is all about core strength.
And core strength doesn’t simply mean stronger abs. It means a strong relationship between the upper and lower hemispheres of the body.
So if you want everything to have to work together, you need everything to be working, which is why the knee push up simply isn’t as good as the incline push up.
An essential supplemental exercise to strengthen your core for the push up (since I think the core is all too often forgotten in favor of upper body supplemental exercises), is the pelvic tilt.
Originally an exercise used for women post-pregnancy, the pelvic tilt is an essential exercise for anyone that needs to learn how to truly engage their core.
To do the Pelvic Tilt:
1. Lie on your back with your knees bent and your feet flat on the ground. You should almost be able to reach your hands down by your sides and touch your heels with your finger tips.
2. Feel the space between your low back and the ground as you lie there.
3. Then draw your belly button in toward your spine and press that space away. You should feel your low back against the ground.
4. Beginners may need to hold there. More advanced exercisers will add in a march or even draw both knees in at one time and then lower the feet back down for reps.
5. To do the march, bring one knee at a time in toward your chest and then return your foot right back down to the ground.
6. Your low back will never leave the ground as you march.
7. If you can keep your core engaged while marching for 10-15 reps per side,you may then pull both knees in at one time and then lower your feet back down for reps.
8. Your knees will stay bent the entire time and your back will stay pressed against the ground. Complete 10-15 reps. Make sure you really focus on keeping your core tight and your back against the ground no matter which variation you do.
9. To advance the move further, straighten both legs and lift one at a time. Once you’ve mastered that, you may even do a straight leg lift with both legs together.
10. Make sure that your low back never leaves the ground. If you feel it start to arch off, pause and reset or regress the move. Do not try to do a harder variation if you haven’t mastered keeping your low back firmly on the ground in an easier variation.
While you definitely want to strengthen your upper body to be able to do more and better push ups, you also need to perfect your form AND develop great core strength and full body communication.
Your body must work together to do a full push up, which means you need great core strength to connect the two halves of your body.
And an incline push ups is the BEST modified push up variation to help you develop the strength you need!
[call_to_action_bar buttontext=”Subscribe Here” buttonurl=”http://eepurl.com/LC0cf” title=”Want Help Improving Your Push Ups?” excerpt=”FOR THE WEEK OF MARCH 10th-16th ONLY: Let me give you some personalized tips to help you improve your push up! Subscribe to Redefining Strength and follow the directions in the email to submit your push up video for review. Once you submit the video, I will send you some personalized tips and exercises to improve your form and strengthen your push ups.” /]
***If you’ve already subscribed and would like me to review your form, please see this week’s newsletter for details!


What nonsense. That’s like saying that doing dips and decline bench presses won’t help your flat bench press or standing press. THEY’RE ALL EXERCISES. THEY WILL INVOLVE ARMS AND CHEST MUSCLES WHICH IS A PATHWAY INTO STRAIGHT PUSHUPS.
Hi Tony…Thanks for reading! 🙂 You are definitely entitled to your opinion, but I’d love to explain my reasoning even if you choose not to agree. I’ve helped 100s of women now go from modified push ups to full push ups and I’ve found the most effective way to do this is Incline Push Ups. And not because of upper body strength, but because of CORE STRENGTH. Knee push ups don’t force you to engage your quads, adductors and entire core in the same way that full push ups do. So even when many women have the upper body strength to do a full push up, they can’t keep their core engaged properly even after 100s of knee push ups. However, incline push ups do engage the core in the same way and allow you to slowly take on more of your own bodyweight as you learn to keep your core engaged and recruit the correct muscles to help you perform a perfect push up. Incline Push Ups force you to recruit the muscles of your core in the same way you would with full push ups therefore helping people learn to keep everything engaged properly as they lower and press. But that has just worked for me and my clients. I do not believe that all exercises are equal and that all get the same results. But that is just me. Always like to learn and grow so maybe this gave you at least some insight into my opinion 🙂 Again thanks for reading and commenting!
Thanks for this! I’ve been doing incline push ups and started on the wall like suggested here and have gotten to the arm of the couch and went online to see how to progress further without hurting my knee caps because I still have a large amount of weight to drop, and this makes a lot of sense. I will just decrease the incline for more of a challenge until I can get to the floor. Huge relief! With previously having knee surgery and knee problems I was really dreading going to my knees but really wanted to push myself! (Ha no pun intended) So thanks!
Hi Natasha! Awesome! The incline will be key! Sorry just saw this as it went to spam for some reason! Hope your push up work is going well!
Very helpful. Just what I needed since I have bad knees!
Glad it helps!
Ok..couldn’t do a standard push up..bad back ..so started with knee push ups..added few every day till got to 1000 recently .
Just done 200 standard ‘perfect push ups ..first attempt..so..transitioned fine for me??
Glad it worked for you. But people are unique and I’ve seen far too many clients get stuck for years. Who knows…maybe using an incline you could have gotten there faster 😉
Hi Cori,
Sorry a few years late to the party here.
I was actually doing a little research into “knee push ups” and came across your article.
Firstly, the article in itself was great.
However, your reply to Tony in the comments section smashed it out of the park for me.
Well done you.
I totally agree about core engagement when doing push ups (any variety).
I’m someone who typically does push ups at a far slower pace than anyone I know.
My aim is to engage the core, quads, glutes, plus all the “standard” target muscles, while increasing time-under-tension.
A great read Cori, loved it, plus your explanation in the comments section – awesome.
Thanks
Partha
Thanks!