Why You Should Include Unilateral Exercises In Your Training
“I don’t want to do that. I feel unbalanced and awkward and I can’t lift as heavy.”
I had a new client tell me this when I explained that he’d be doing Single Leg Deadlifts.
My response?
“That’s exactly why you SHOULD be doing them.”
His statement though shed some light though on why so many peopled DON’T use unilateral exercises in their training.
Yea…Many of them are awkward to start. They challenge our balance. They challenge our mind-body connection and coordination. And we CAN’T often lift as heavy with them to start.
But these moves we try and avoid, are some of the best ones if we want to truly get functionally stronger and prevent injury.
And I think part of what helps us start including moves we aren’t comfortable with is the understanding of WHY they are important.
So…here’s why unilateral moves are important to do! (And at the bottom of the post I share some of my favorite unilateral moves!)
Why You Should Include Unilateral Exercises In Your Training
To quickly summarize and list the benefits before I explain them in more detail…
- Correct/reduce imbalances that could lead to injury.
- Build core stability.
- Improve your balance.
- Build functional strength.
- Improve your proprioception and mind-body connection.
Ever only feel one side really get sore from your workouts?
Maybe you always feel your dominant side taking over during bilateral moves (aka moves like the squat and such where both sides are working together)?
Or maybe you’ve had injuries on one side that just keep flaring up? And you can’t seem to get that side to feel like it is working the right way.
Whether you’ve experienced one, or even all of these, you need to use Unilateral Moves in your training.
Unilateral moves force each side to work independently, which is why it can help correct imbalances. When you work each side independently, your stronger, dominant side can’t compensate and take over.
With bilateral moves, we can compensate. We can rely on our dominant side. We can recruit muscles that really aren’t meant to handle the load. This creates imbalances and compensations which can lead to injury.
Injuries can cause muscles on one side of your body to shut off, which can lead to further compensations, imbalances and injuries. And not properly strengthening your weaker side, or underactive muscles, can lead to aches and pains on both the same side of your body or even the OPPOSITE side.
With unilateral moves, you prevent your dominant side from taking over and you can correct those imbalances that can lead to overuse and injury.
You force each side to work equally and you can really focus on even doing EXTRA on that weaker side to help correct the deficit! You can “close the gap” between both sides by focusing on your weak areas and forcing that weaker side to do what your stronger side can.
I often tell clients to do the reps on their weaker side first so they know what they can do and they do the same on that stronger side. You may fear this will “hold your stronger side back,” but instead it makes sure you don’t perpetuate the imbalance. Heck, in this case, if you’re going to do more reps on one side, you should do more on your weaker side.
You can also correct the imbalance by using the same weight and reps you can on that dominant side on that weaker side even if you have to “pause” at a point in the reps. (Keep that pause short and your body won’t necessarily process it as rest!)
So you can use these unilateral moves to strengthen that weak side and stop perpetuating the imbalances.
But on top of that you can improve your balance, core stability and mind-body connection throughout your body by using these moves.
Standing on one foot, or loading down one side or rowing with one arm adds in an element of instability, which challenges your core. And when you stand on one foot, you definitely work all of those stabilizers muscles that will improve your balance.
Unilateral moves can build functional strength for those times we are off balance or reaching and not necessarily centered or lifting with both sides. You can work on your rotational strength, so your ability to rotate and control the rotation (aka not hurt your back) as well as your ANTI-rotational strength aka your ability to RESIST forces acting on you that could otherwise cause you to turn or twist in a weird way!
So whether you want to prevent injury, look better or get stronger so you can lift more or run faster, you need to include unilateral moves.
Yes, RUNNERS unilateral strength training is key for you especially if you want to strengthen your gait to run faster and more efficiently AND prevent injuries!
If you’re now sold on unilateral training, try these moves!
10 Of My Favorite Unilateral Moves
Single Leg Deadlift – A must-do move whether you want to correct imbalances, strengthen your core, improve your balance or just simple get a strong backside is the Single Leg Deadlift.
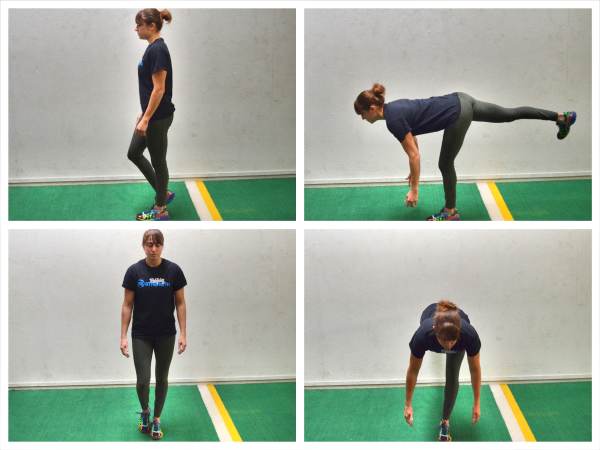
To do the Bodyweight Single Leg Deadlift, stand up nice and tall, balancing on your right leg with your knee slightly bent and your left toe lightly touching the ground. Your arms should be hanging down by your sides.
Then lift your left leg back toward the wall behind you as you hinge over, keeping your back flat. As you hinge over, extend your arms down toward the ground. Make sure to sit your butt back as you hinge over and not simply lean forward.
Do not reach your arms toward the ground and let your back round. It doesn’t matter if you touch the ground, just extend your arms down toward it as far as you can without rounding or “squatting.” Your standing knee should be soft but isn’t going to bend extra as you hinge over.
Hinge over as far as you can with good form and then drive through that standing heel to come back up to standing. Feel your glutes work to bring you up nice and tall. Squeeze your glutes at the top and repeat, hinging back over on the same leg.
Single Arm Anti-Rotational Row – Improve your posture, pull ups and anti-rotational core strength as you strengthen your back without your stronger side taking over!
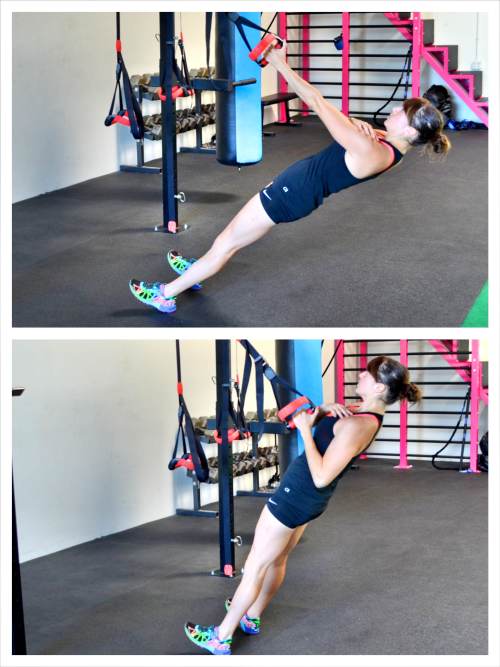
To do the Anti-Rotational Single-Arm Inverted Row, grab one handle of a suspension trainer in one hand and place the other hand across your chest. You can also reach the free arm up as if holding a strap if that will help remind you to keep your shoulders square. Set up with your body in a nice straight line, squeezing your quads, glutes and core and pressing your chest out. Make sure to relax your shoulder down and back and not shrug up.
Walk your feet forward to an appropriate incline. The closer to parallel you are to the ground, the harder the move will be. Make sure that you choose an incline that allows you to row with proper form and feel your back working. You do not want your shoulder to shrug.
Square up your body and then row up. Do not let the side not holding the strap rotate toward the strap as you row up or the shoulder of the arm not holding a strap to drop open. You want to row up as if you are pulling with both arms. That means your body shouldn’t close toward the strap or your shoulder shouldn’t open toward the ground.
Drive your elbow down and back as you row up and row your chest all the way up to the handle. Do not shrug your shoulder as you row. Then lower back down. Do not let your back round or your body open up toward the ground as you lower. Repeat rowing back up, making sure that you don’t bounce off the bottom or rotate as you repeat.
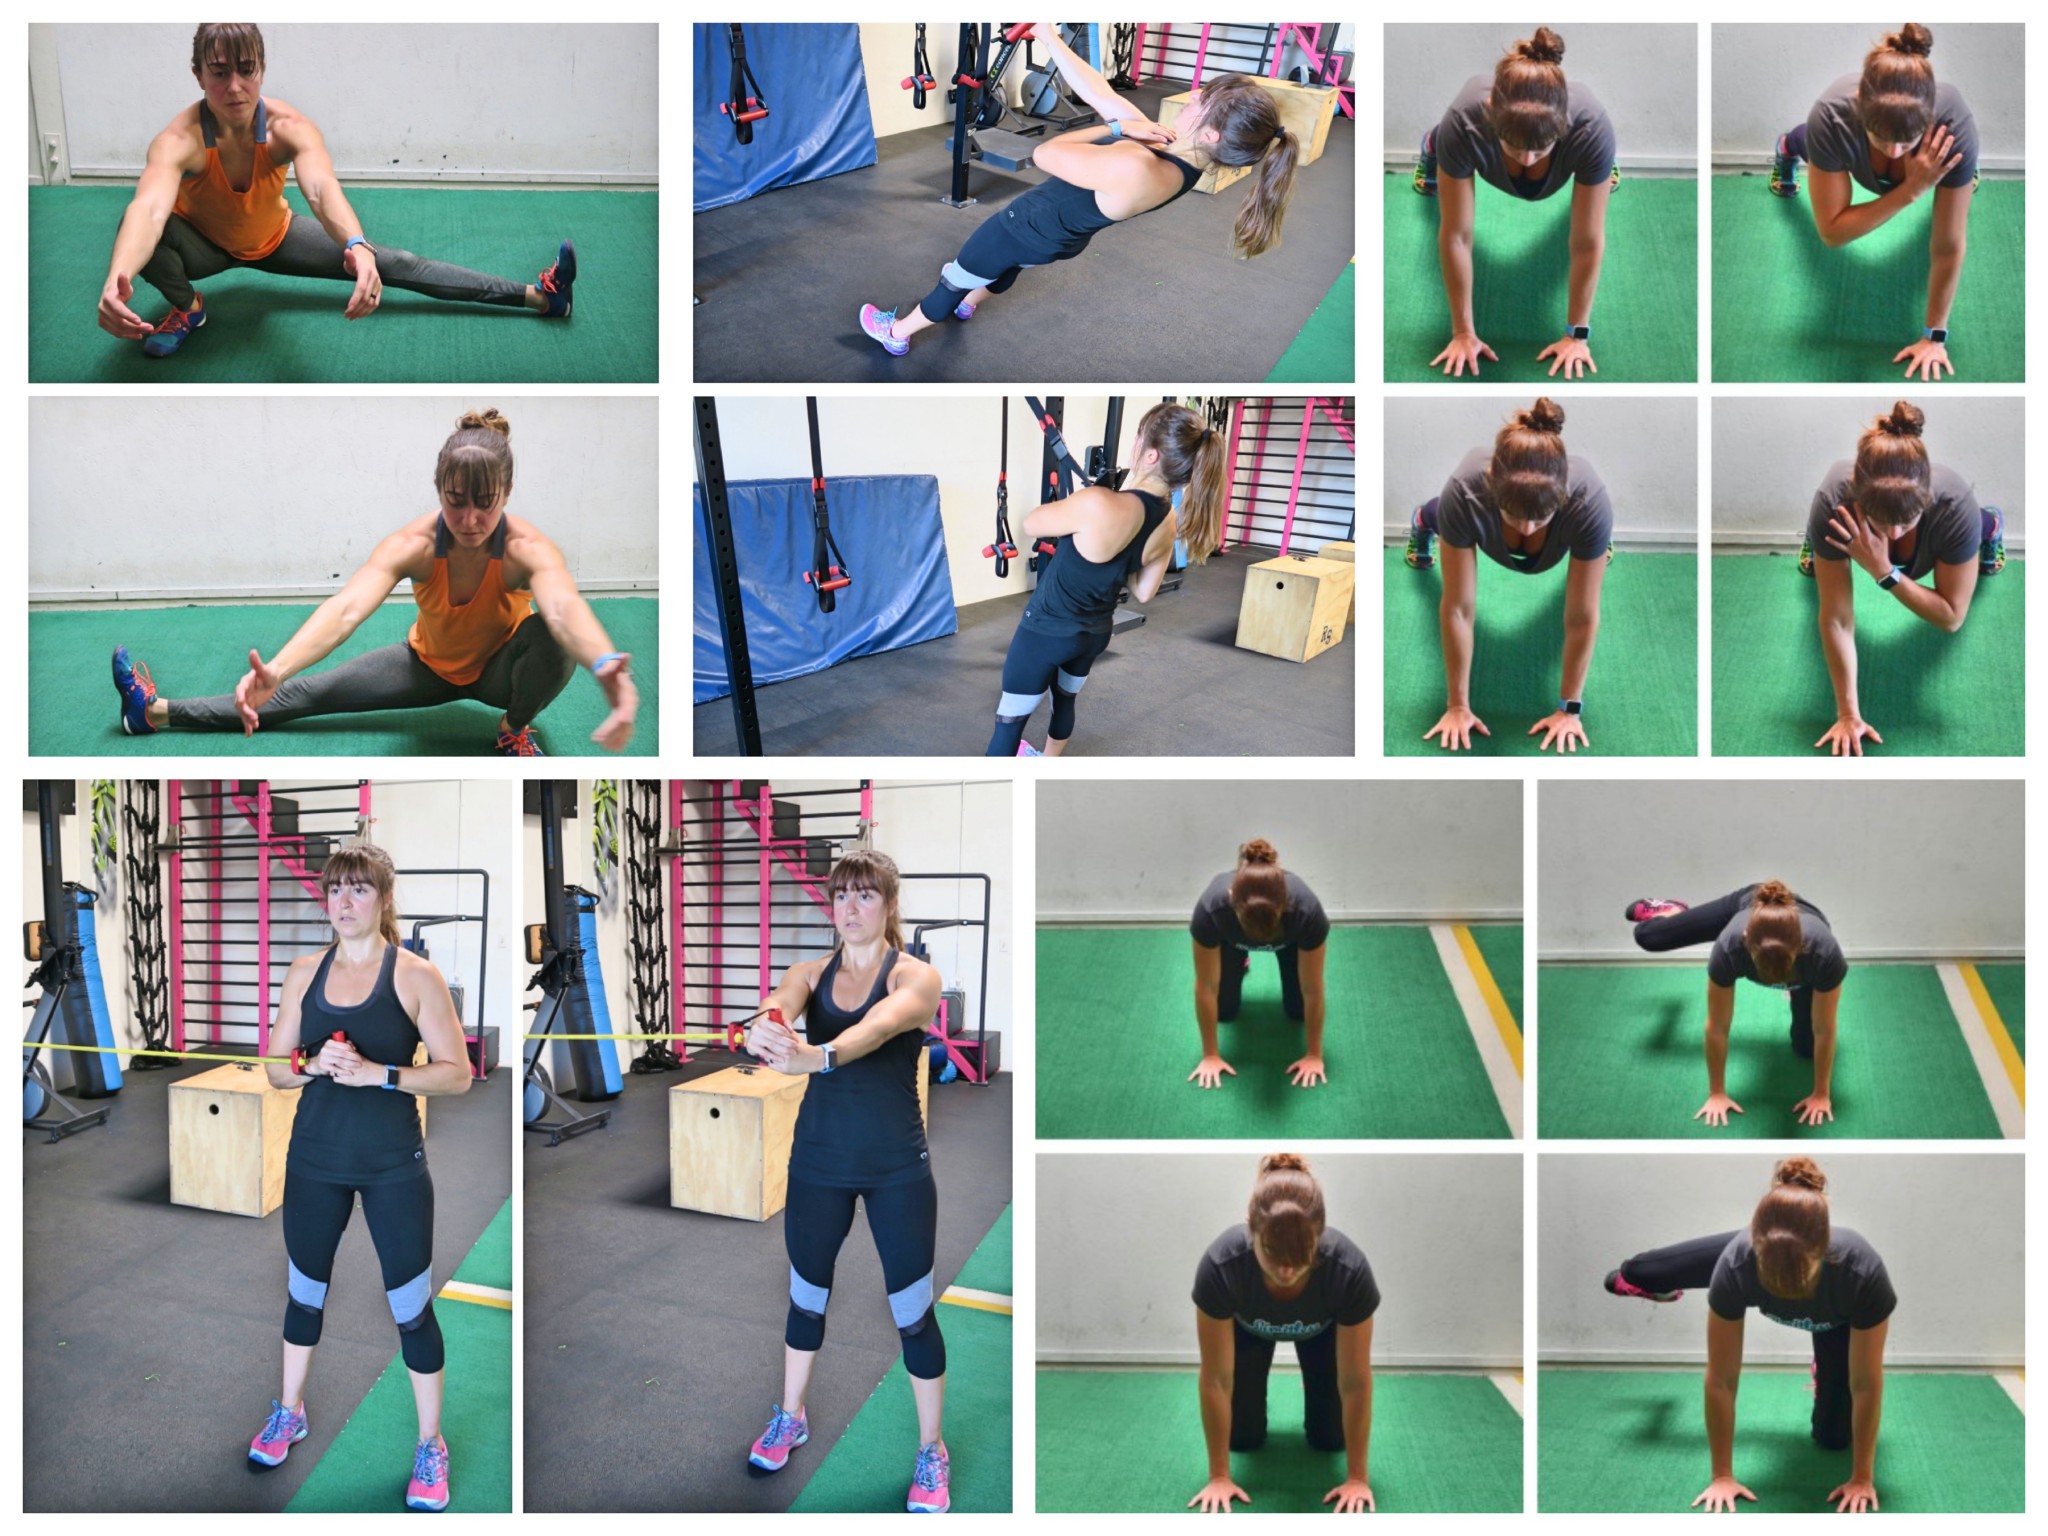
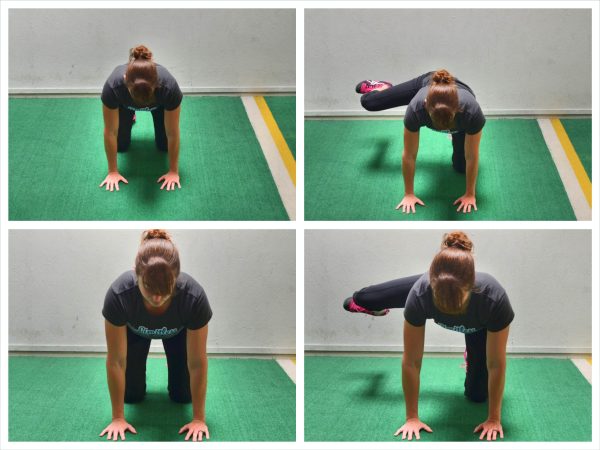
Single Arm Plank Rotation With Knee – Talk about a move to build functional core strength and shoulder stability! This unilateral move will challenge your core stability for sure!
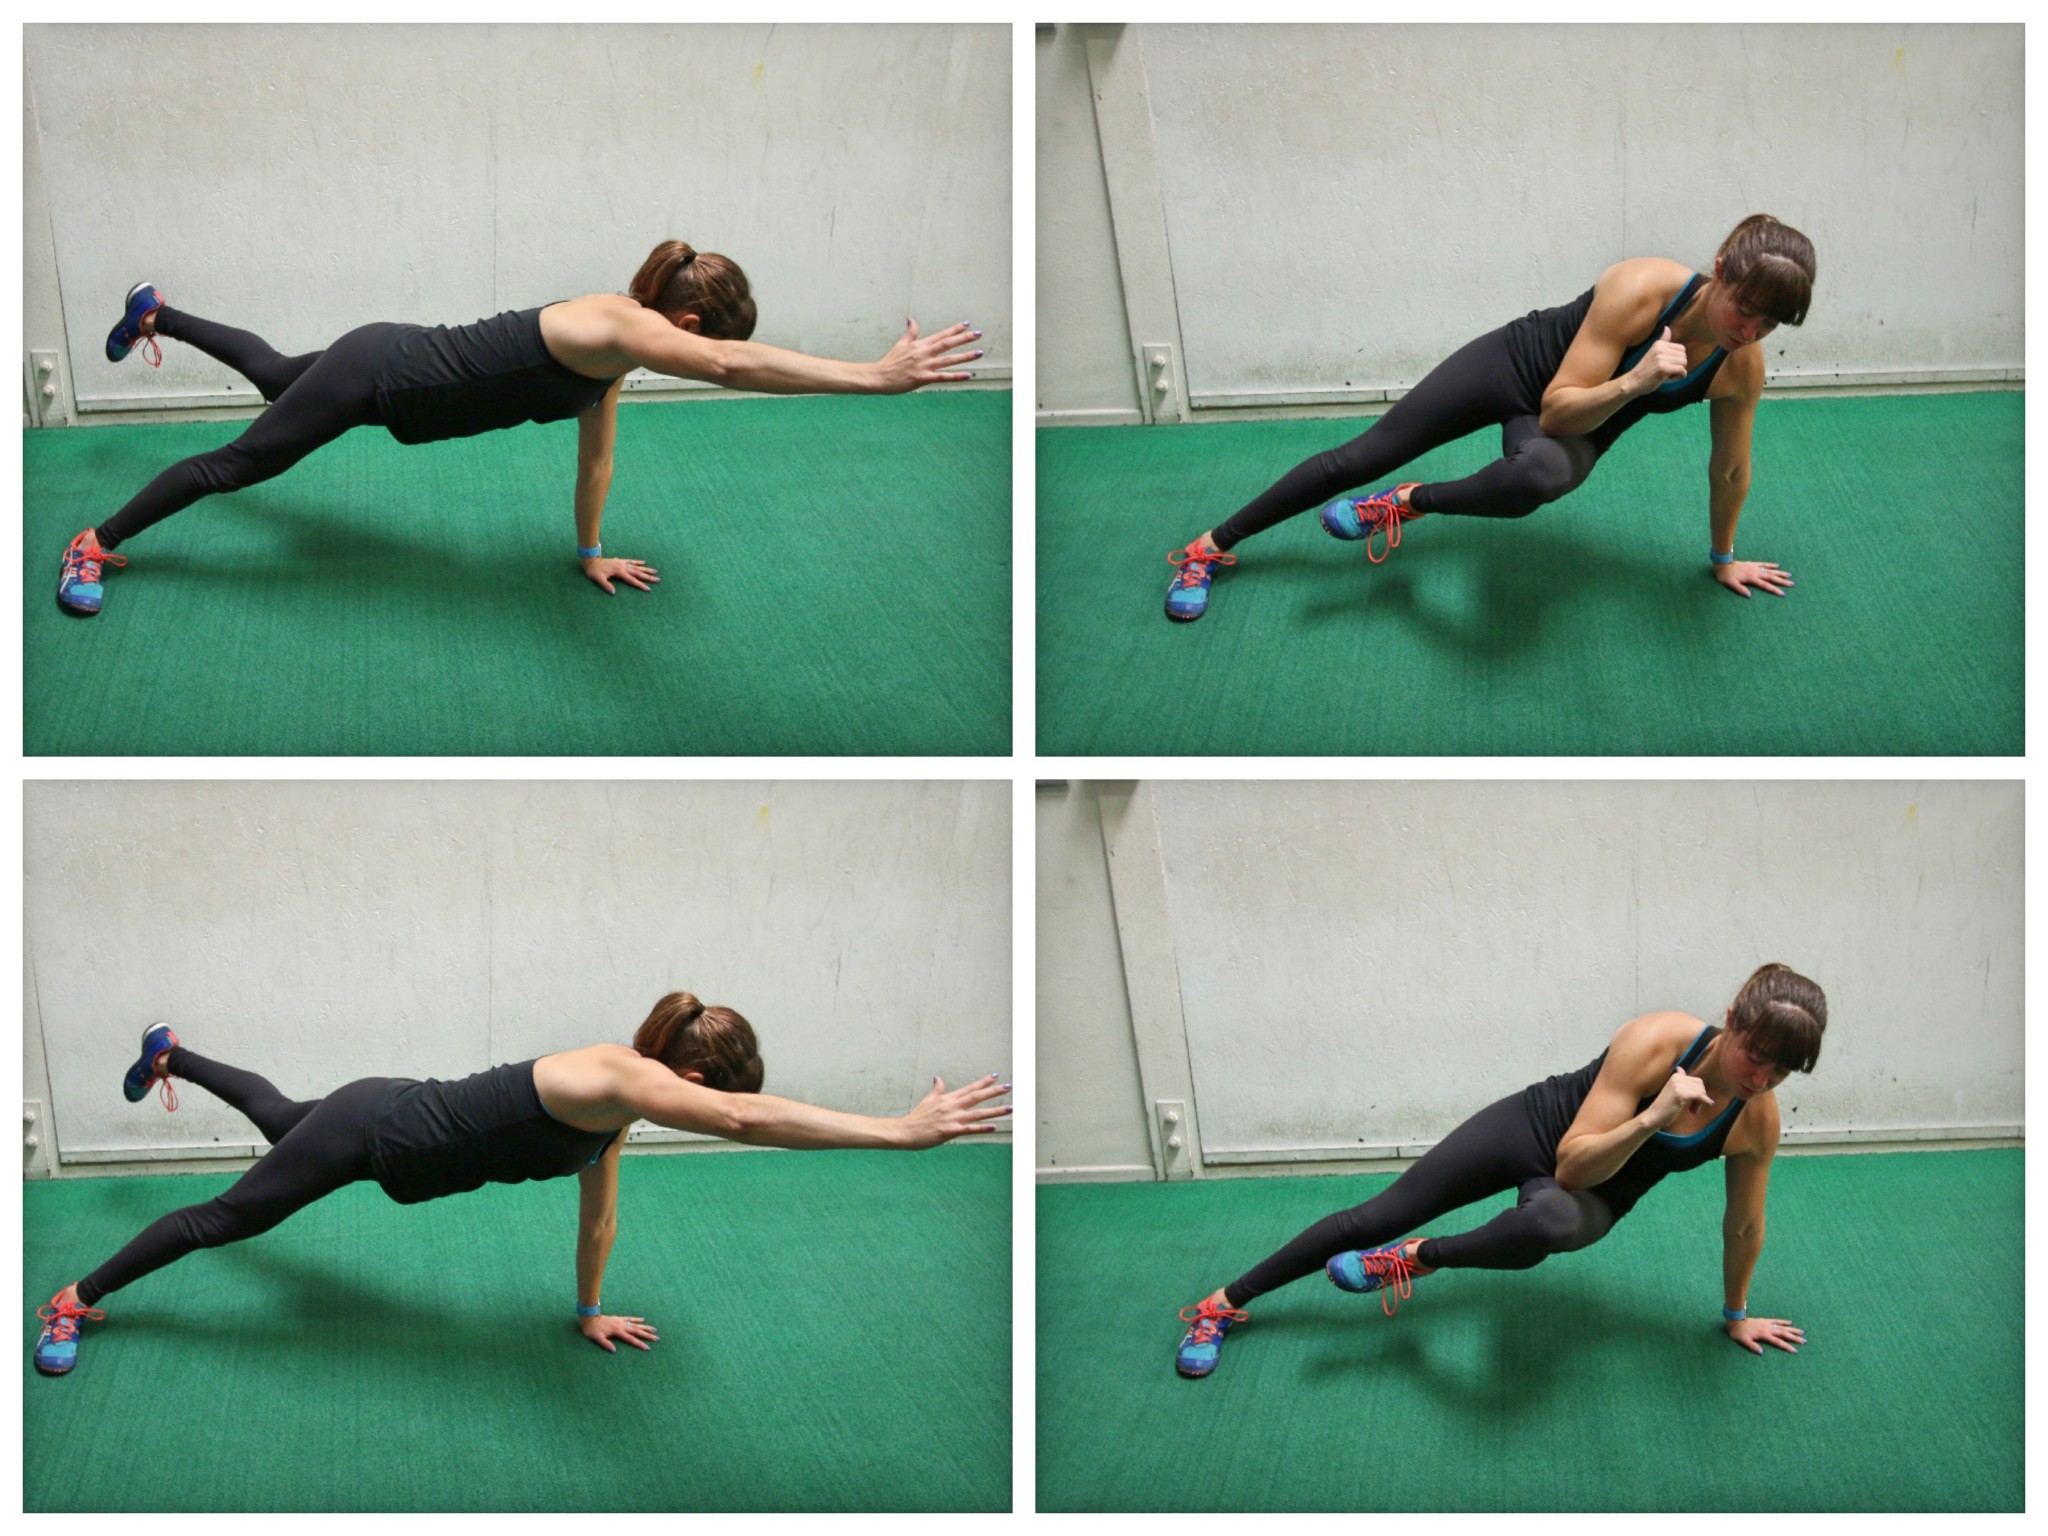
To do the Single Arm Plank Rotation With Knee, set up in a side plank position from your hand with your bottom leg in back of your top leg.
Then lift that back leg as if kicking it back and up toward the ceiling slightly. Reach your top hand out in front of you and overhead. Your chest will rotate toward the ground as you lift up into this side plank position with your opposite arm and leg raised.
Rotate your chest back open as you tuck your raised leg under and forward, driving your knee forward as you tuck your raised arm down to meet it. Try to touch your knee to your elbow as you rotate your chest back open and away from the ground.
After slowly tucking the knee to the elbow and feeling yourself pivot around that shoulder then kick the leg back out and reach back out and overhead with your hand. The muscles around your rib cage should really be working.
Move slowly to stay balanced and try to keep your hand on the ground under your shoulder. Beginners can tap the toe down behind them or even just do the knee tuck without the kick out.
Cossacks Squat – Not all unilateral moves have to mean you are COMPLETELY balanced on one side. Lunges and moves like the Cossacks Squat reduce the balance and instability while still getting each side to work on it’s own. And while they may “reduce” the balance element, they are still more unstable than equal bilateral moves. AKA they are a great way to work up even to full unilateral moves!
And the Cossacks specifically will really help you improve your mobility!
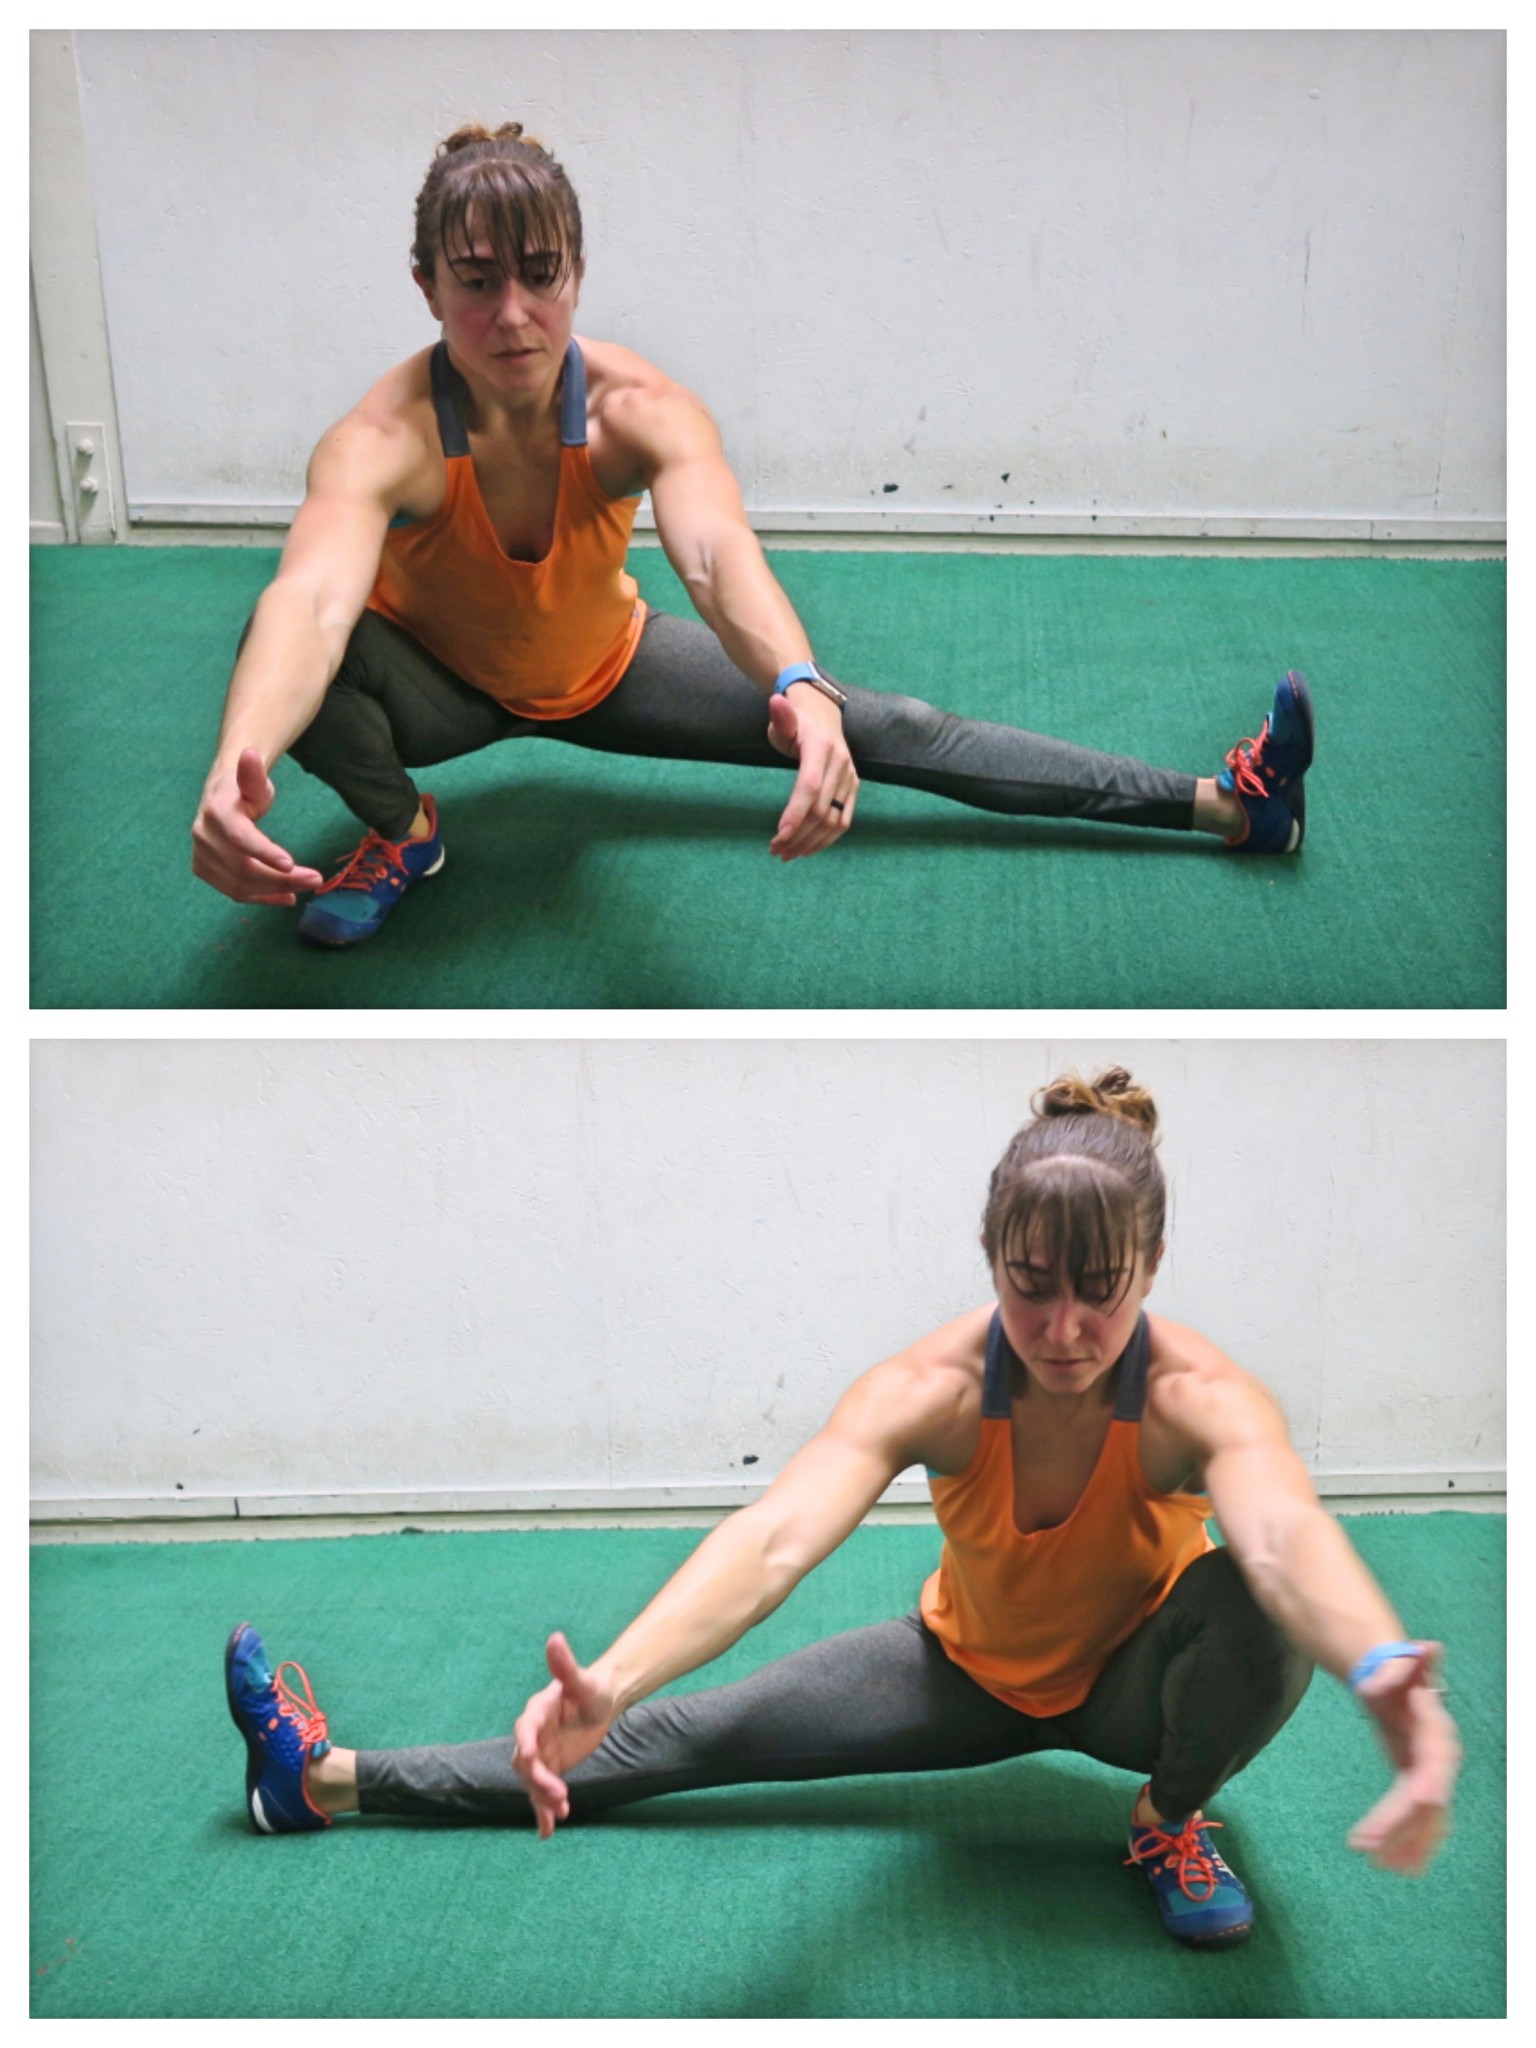
To do the Cossack Squat, stand with your feet nice and wide apart as if you are going to do a Side Lunge (feet will be wider than shoulder-width). Shift your weight to one side, bending that knee and sinking down into a side lunge as you rotate the toe of your straight leg up toward the ceiling.
Sink as low to the side as you can, dropping your butt down to the ground while keeping your heel on the ground. You will feel like you are sinking into a deep squat on one side as your other legs stays out straight with the toe up.
Then push back up out of the squat and come to standing tall with your legs straight and feet still wide apart. Then shift to a squat on the other side, sitting down as low as you can while keeping your heels down.
Beginners may not be able to sink as low in the squat. Do not try to sink lower by squatting down and letting your heel come up. Sink only as low as you can while keeping your heels down.
Advanced exercisers can hold a weight goblet style.
Step Down – The Step Down is a great way to strengthen each glute and leg individually and improve your balance. And unlike the Step Up, you can’t cheat and allow your other leg to assist in the movement. Plus, you can improve your mobility as you strengthen through a full range of motion.
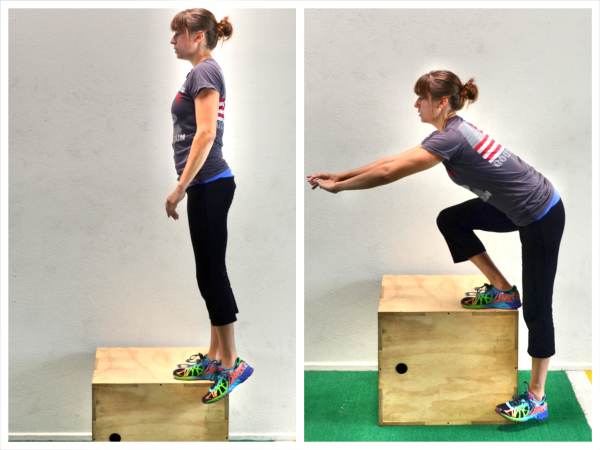
To do the Step Down, start standing on a bench or box. Stand close to the edge so that you can step off of it to the side with one foot. The higher the box you use, the bigger the range of motion you can do. You can also decrease the range of motion if you aren’t yet strong enough by using a lower box or by not sinking all the way down. You do not want to go too low and end up setting your foot down on the ground so that you can push off.
Standing near the edge of the bench with your other foot right on the side or hanging off, slowly hinge forward sitting your butt back as you drop the foot on the side down toward the ground. Keeping your back flat, push your butt back as you bend your standing knee to drop your foot toward the ground.
If you can, lightly touch the toe of the foot to the ground, but make sure you do not drop it all the way down so that you can push off of it. Sink as low as you can then drive right back up to standing. Make sure you are only driving through your standing heel and not using your left foot on the ground.
Do not rock forward as you come back up to standing. Really use your glute and drive through your heel. Stand back up nice and tall and squeeze your glute at the top.
Then repeat, sinking back down.
Go as low as you can and complete all reps on one side before switching.
Split Squat – When we think lunges, we think about stepping forward or backward…or maybe even sideways. And these are all great unilateral variations. But if you want to train the most basic lunge movement, you need to start with the Split Squat.
This is a great move to strengthen your legs and core to help you run faster and squat more. It is also a great way to build toward the Balance Lunge without as much instability. Plus, you can improve your strength through a full range of motion as you get up from a half kneeling position on the ground!
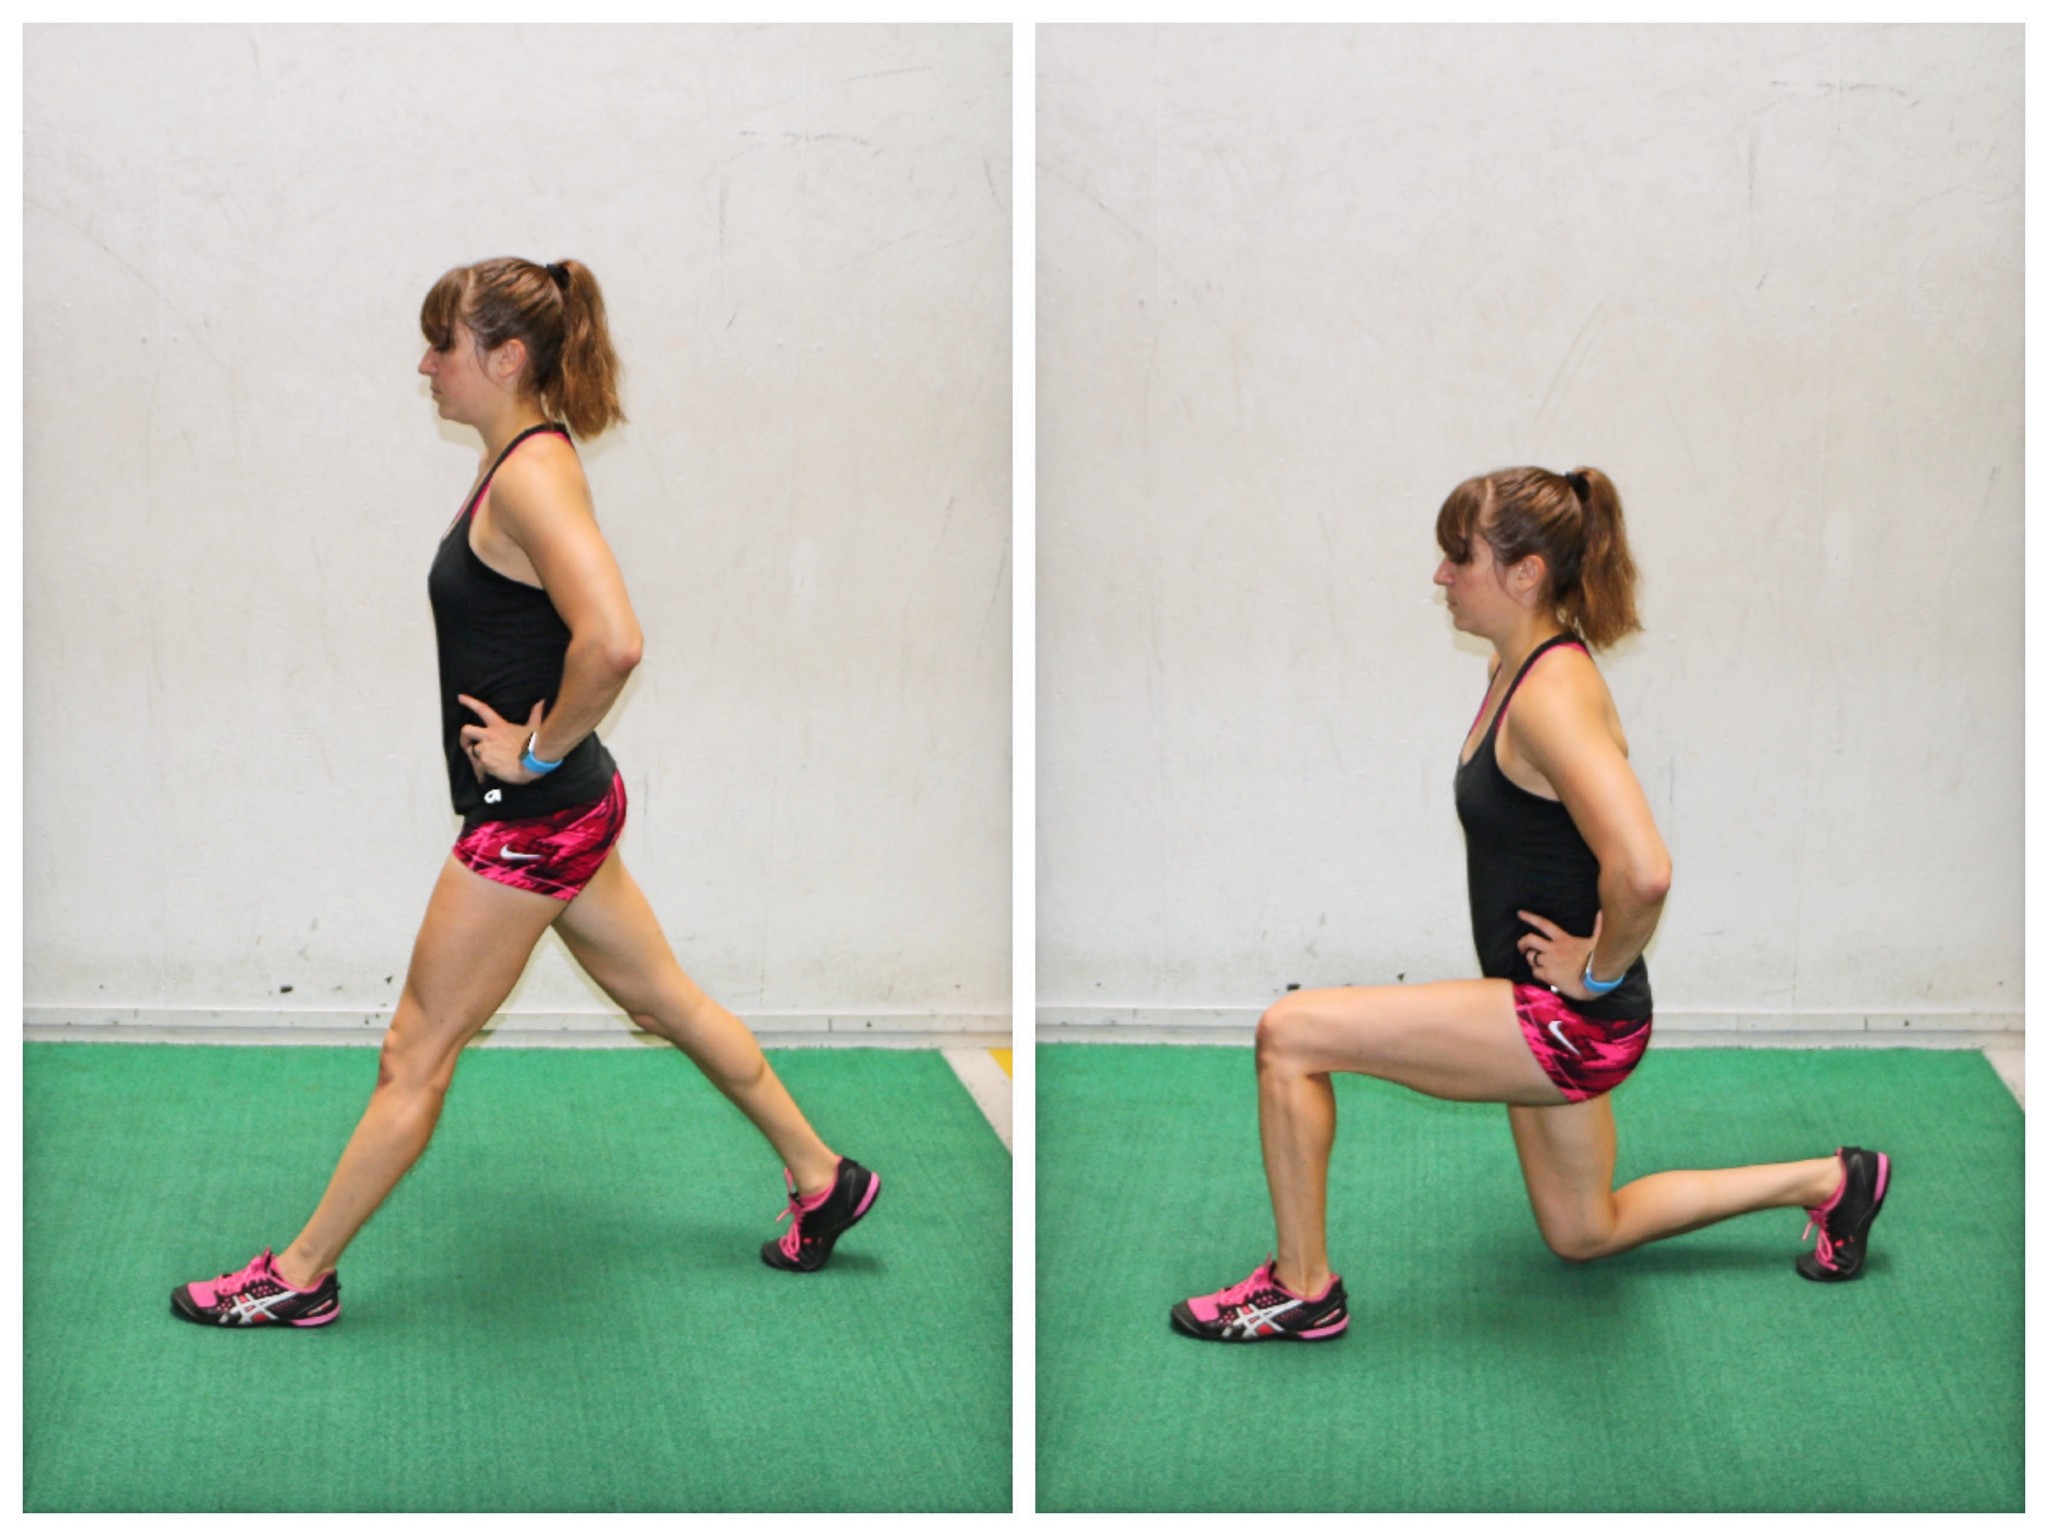
To do the Split Squat, step one foot forward into a wide lunge stance. Keeping your chest up nice and tall, stand with your front foot flat on the ground and the heel of your back foot up so that you are on the ball of your back foot.
Then drop your back knee down toward the ground. Do not go forward as you drop your back knee down. Really sit back in your front heel, while keeping your foot flat on the ground, as you bend your front knee and drop your back knee down. You can touch your knee to the ground if you have the strength and mobility. Your weight should be centered as you lower down to the bottom of the Split Squat. To make the move more challenging, touch your knee down and pause so that you have to drive up from a dead stop.
Then drive back up to standing, keeping your weight centered. Drive through your front foot and the ball of your back foot. Feel your quads and your front glute really working to bring you back up to standing. Do not lean or round forward as you lift back up. Come back up and then repeat the move on the same side. Really focus on keeping your weight centered as you lift and lower.
Plank Shoulder Taps – This is one of my favorite plank variations because it is a great anti-rotational core move that also builds shoulder stability. Having to fight your body wanting to rotate as you slowly move from hand to hand will make your core work!
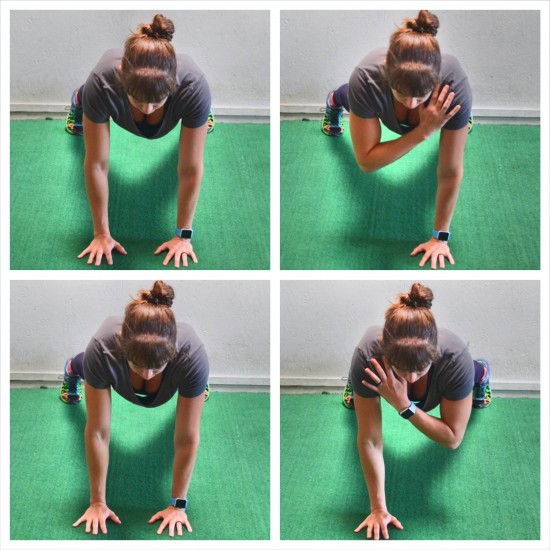
To do the Plank Shoulder Taps, set up in a high plank position from your hands and toes (advanced) or hands and knees (beginner). Place your hands under your shoulders and closer together while your feet or knees should be wider apart to provide a more stable base. Bring your feet or knees together as the move becomes easier to make it harder on your core to stabilize. By having your hands closer together and more centered under your chest, you will also provide yourself with a more stable base. It is very important that you remain stable with this move or you can stress your shoulder.
Then, bracing your abs and engaging your glutes so that your body is in a nice straight line, lift one hand up off the ground, moving it slowly to touch the opposite shoulder. Keep your hips square to the ground and do not rotate as you lift your hand to touch your shoulder.
Do not let your butt go up in the air or your hips sag toward the ground. Touch your opposite shoulder then slowly place your hand back down on the ground. You want to move at a very controlled pace. Lift the other hand and tap your other shoulder. Do not rotate as you lift. Try to keep your body still and simply lift the hand to touch the opposite shoulder.
Fire Hydrant – Especially if you’ve had any injuries, you need to include unilateral isolation/activation moves to help correct those imbalances and get the underactive muscles working. That is why Fire Hydrants are key. They will help activate the glutes to build hip stability so you can run faster and lift more. This move is key to get the glute medius working so that you can also prevent hip, low back and even knee pain.
To do Fire Hydrants, start on your hands and knees with your hands under your shoulders and your knees under your hips. Flex your feet. Keeping your arms straight and your feet flexed, raise your right leg out to the side with the knee bent to 90 degrees.
As you raise your leg out to the side, you want to keep your ankle in line with your knee and not let your foot get above your knee or your knee go up above your foot. You want to try to raise your lower leg parallel to the ground when you lift your leg out to the side.
You should feel the outside of your hip and glute working to lift the leg to the side. Don’t simply lean away to get your leg up higher. Keep your core tight and lift from the hip using your glute. Hold at the top then lower back down.
Make sure to hold for 1-2 seconds. Do not rush through the lift or simply swing the leg up. Make sure you do not bend your arms to get your leg up higher. Squeeze your butt and make sure you feel it activate.
Range of motion isn’t important as long as you feel your glute working. You may even feel this in the leg you are kneeling on because your glute is working to stabilize. Complete all reps on one side before switching.
Glute Bridge with Rocks – Unilateral moves are a great way to correct imbalances, but they can also be a great way to progress exercises instead of adding weight. HOWEVER, sometimes those unilateral moves are TOO challenging so we can’t do them correctly and end up compensating still.
That is why having moves that isolate each side WITHOUT putting the full strain on one side at a time can be key…just like with lunges and such. The Glute Bridge with Rocks is another great move that, while still bilateral, allows you to get in some unilateral activation. It is the perfect way to regress the Single Leg Glute Bridge, but also just a great variation on its own!
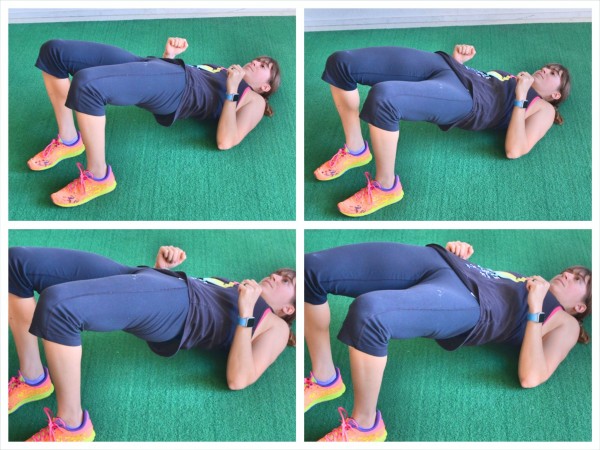
To do the Glute Bridge With Rock, set up like you are going to do the Basic Glute Bridge. Lie on your back with your knees bent and feet flat on the ground. Your feet should be about hip-width apart and your knees should be in line with your feet and hips.
Bend your arms to 90 degrees and then drive through your arms, upper back and heels to bridge up. Squeeze your glutes and brace your abs to bridge up.
Then slightly release the contraction in one glute and rock to bridge one hip up slightly higher. Really focus on contracting that glute.
Release that side and rock your other hip slightly up to contract that glute harder. Keep your abs braced as you rock slightly and alternate contracting each glute a little bit extra at the top of the bridge.
Do not let your low back take over as you hold at the top and work to contract each glute a little bit extra. Also, do not let your hips sag down toward the ground.
Stability Press – The Stability Press is a great anti-rotational core move that really works your obliques and glutes. It is a great move to help prevent low back and hip pain, especially if you find you have pain only on one side!
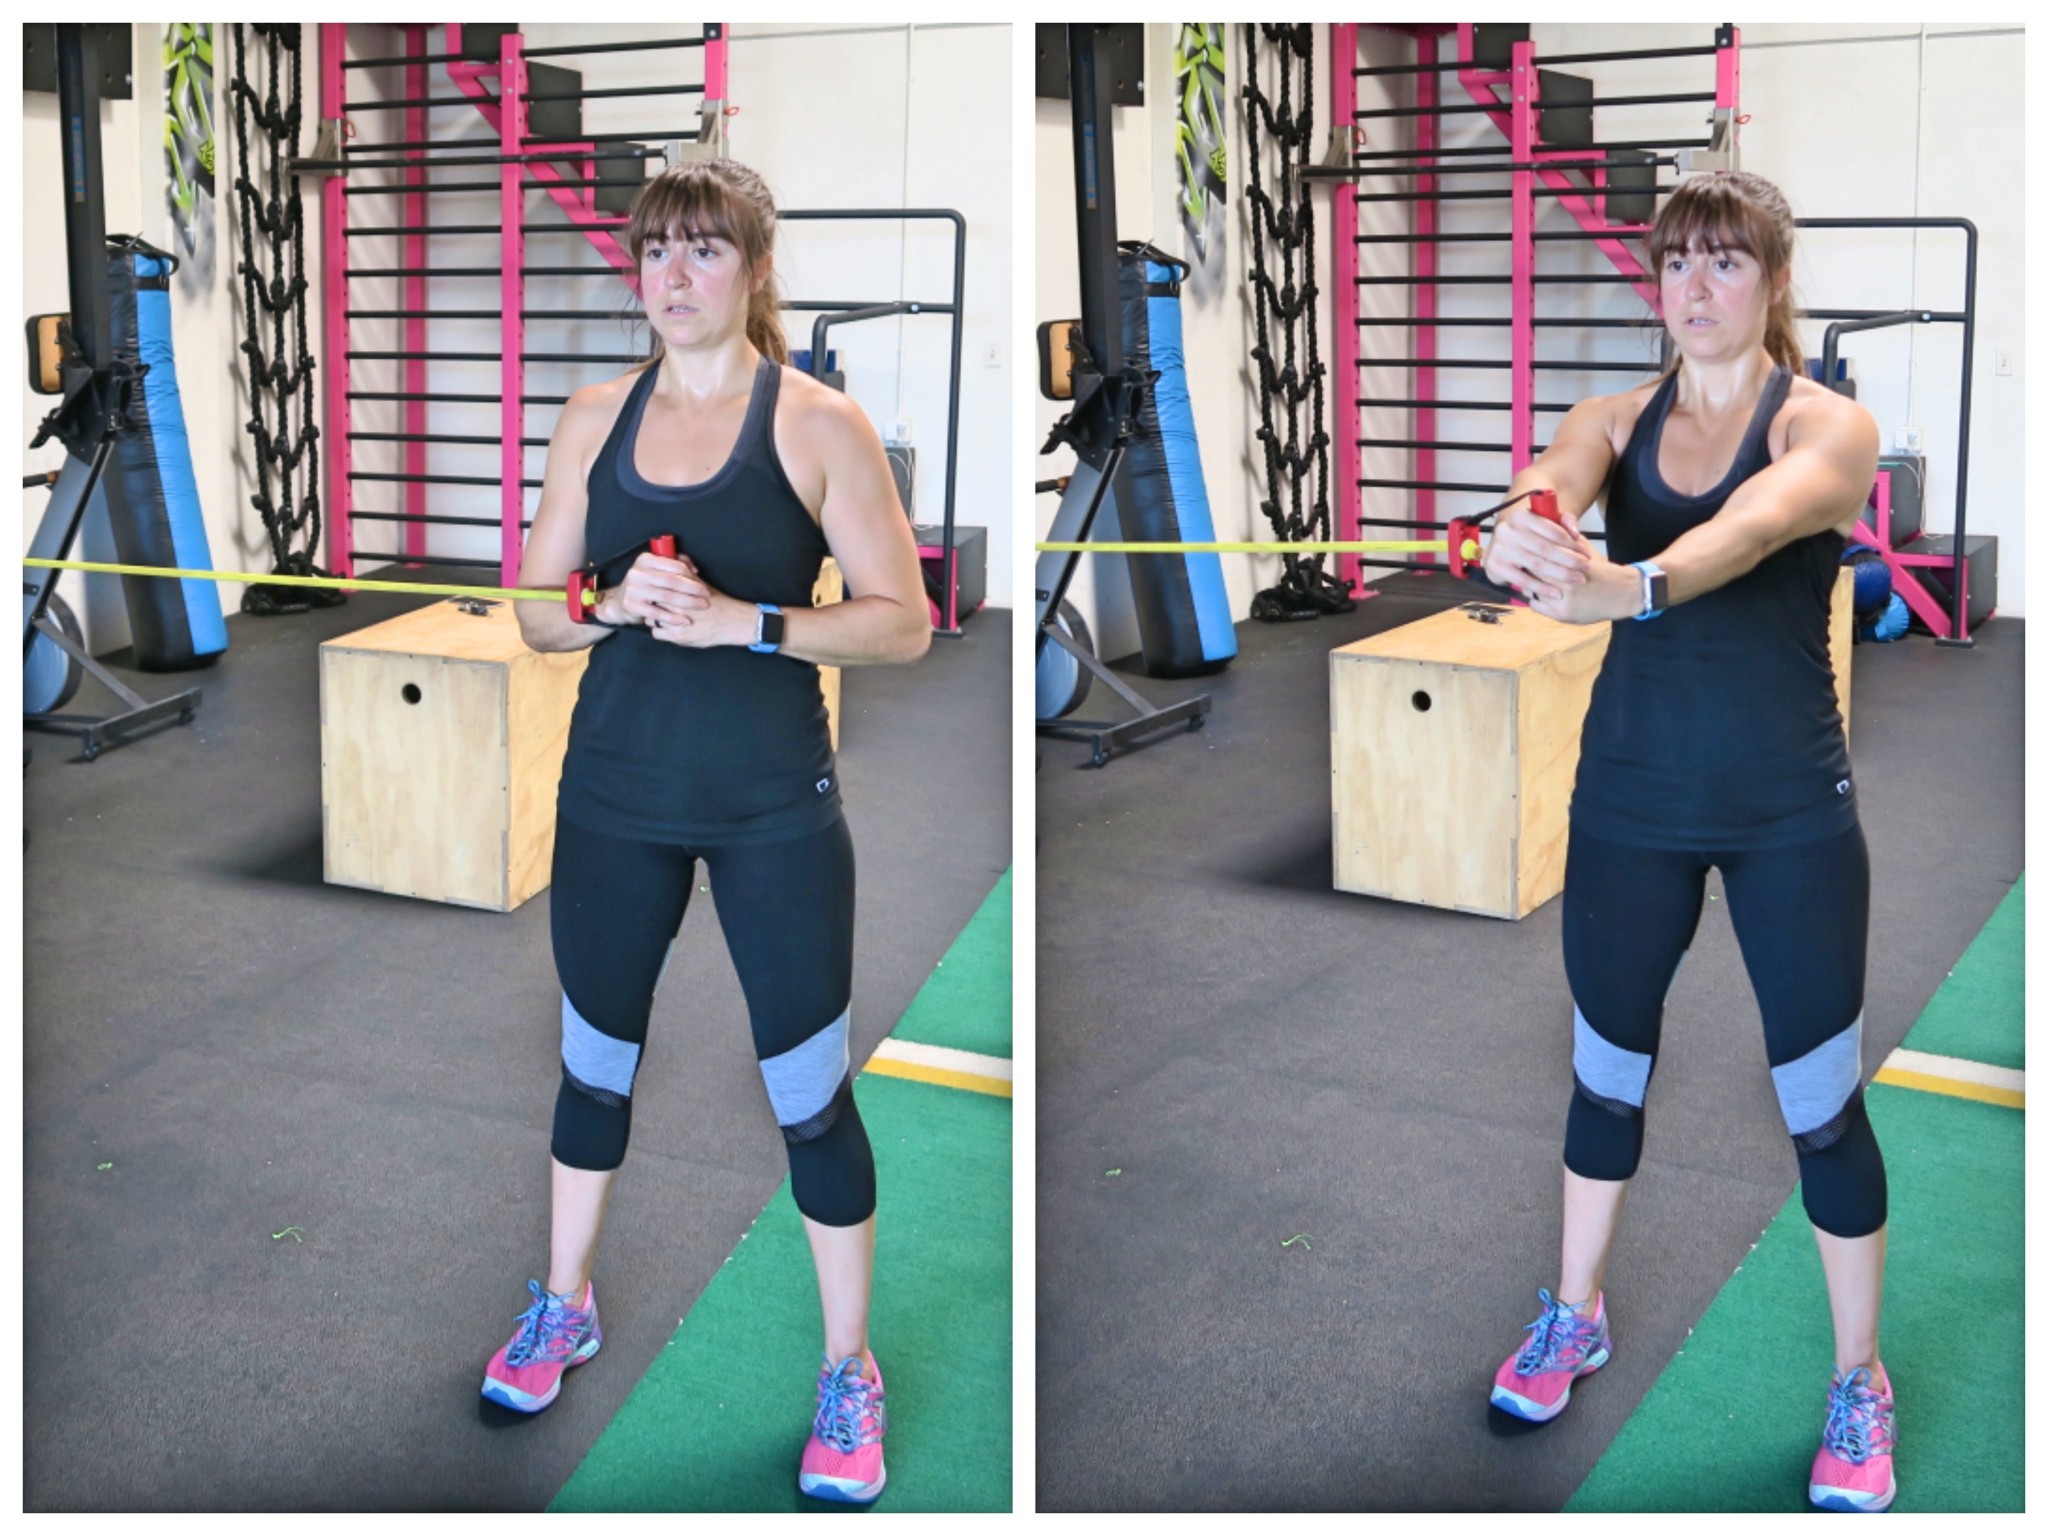
To do the Stability Press, you can use a resistance band or cable. Hold a handle in both hands and turn to the side so you are sideways to the anchor point and step away from the anchor point so that there is tension in the band. You want to make sure there is tension or the move won’t be challenging. Stand with your feet no more than shoulder-width apart. The closer your feet are together, the harder the move will be. Choose a stance though that challenges you while allowing you to maintain good form and not lean away.
Bring your hands into the center of your chest and squeeze your glutes while you brace your abs. Standing up nice and tall with your chest pressed out, slowly push the band straight out from the center of your chest until your arms are straight out.
It should be a struggle to press the arms straight out because the band is trying to rotate you back toward the anchor point. Your core should have to work to stabilize and press straight out from your chest. Do not let your arms rotate open and go back toward the anchor. Maintain a nice tall posture with your shoulder blades drawn down and back and your core engaged. Make sure you also don’t lean away.
Then slowly bring your arms back in and repeat. Move slowly to really have to fight the band. If you move too quickly, you won’t get as much out of the move and you’ll probably get sloppy and let yourself rotate toward the anchor point or even shift open and push away. If you allow your stance to rotate open or if you lean away, it will make the movement easier and won’t force that inside side (the side closest to the anchor point) to really work to stabilize.
Start training unilaterally with the moves above or even some more fun variations in the video below!

