If you sit all day, much of your lower body is constantly in flexion, which means that you need to roll out before your workouts to prevent injury.
If you like to run as your workout, then it is extra important that you roll out.
Runners especially need to do these moves to prevent hip, knee and ankle pain as well as shin splints, hamstring strains, plantar fasciitis among other common lower body ailments all too many runners have to deal with.
You don’t need to spend hours doing these moves to benefit from them. Spend just 5 minutes before and after you workout (or any time you feel tight!) rolling out to help you remain injury and pain-free!
However, do not rush through and just roll quickly up and down. It is better to pick just a few tight spots and spend more time on them than to roll quickly through all the muscle groups. Just rolling over the knots won’t help. You actually need to hold on any tight areas to help them release.
10 Lower Body Foam Rolling Moves
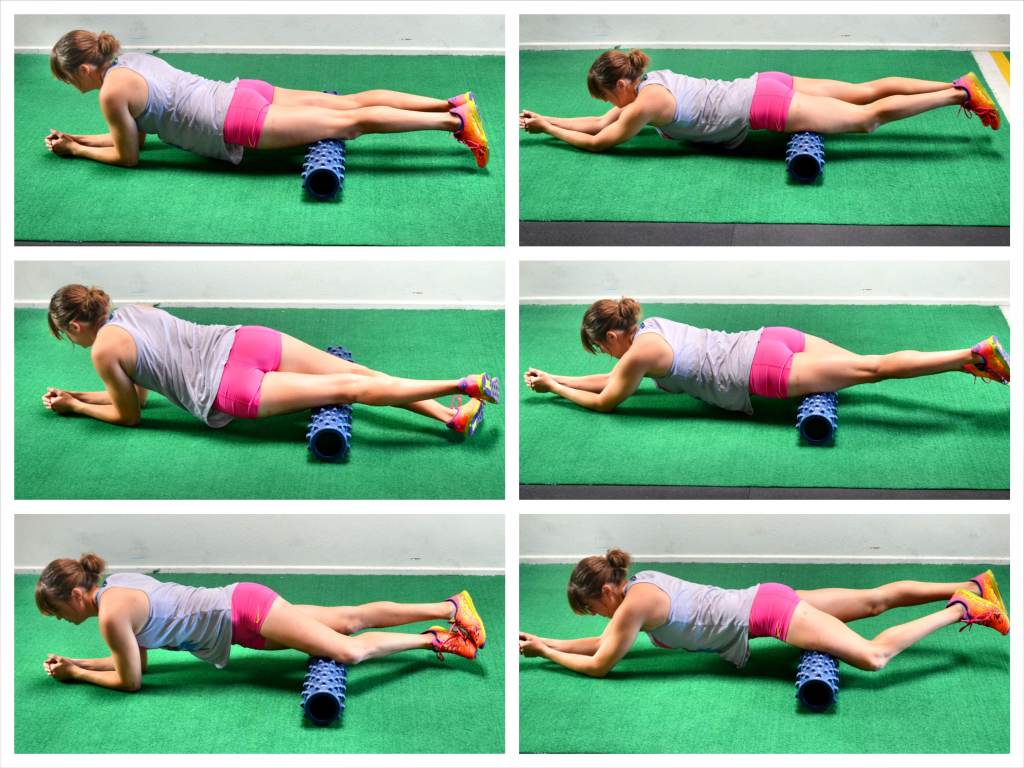
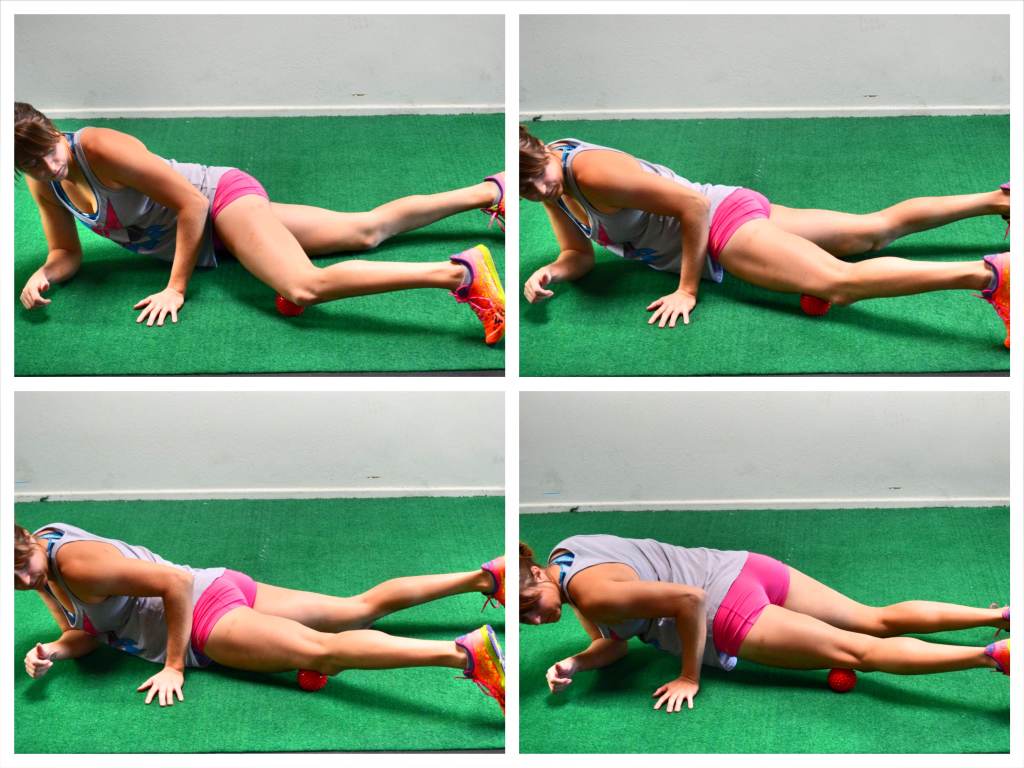
1. Quad – If you have knee or hip pain (or if you are a runner or cyclist even if you don’t have pain), you need to roll out your quads.

To roll out your Quads, take the foam roller and lay over it as if you are about to do a plank.
Start with the roller right above your knees. Rock side to side and then move it up a little higher on the front of your legs.
As you rock and move the roller higher, make sure to pause and hold on any extra tight spots until the pain lessens a bit.
Work your way all the way up to your hips.
If you find any tight spots, while you hold on them, flex and relax your quad to help the tight spots loosen.
To apply more pressure, place only one leg down on the roller and rock side to side, holding on any extra tight spots.
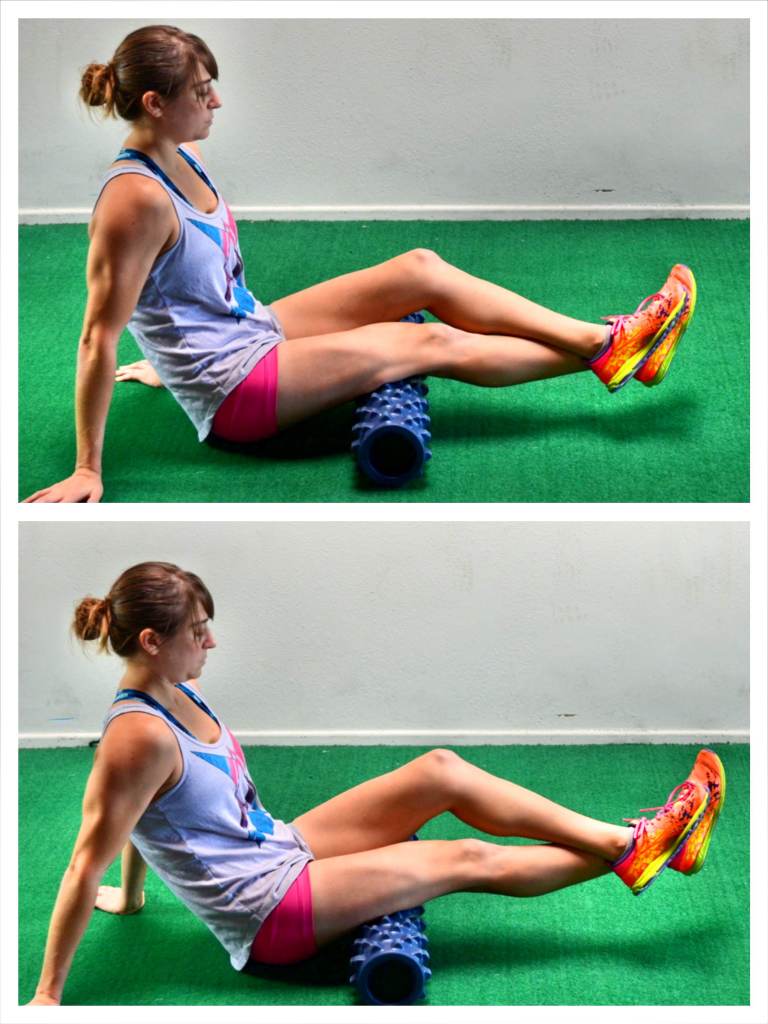
2. Hamstring – While our hamstrings can feel tight because they are actually stretched too far because our hips are tight, you can’t ignore them when rolling out. Tight hamstrings can lead to inactive glutes and knee and hip problems (as well as even back problems). Plus, hamstring strains and pulls are all too common running injuries that we can help prevent with foam rolling.
To roll our your Hamstrings, place your legs on top of the roller right above the back of your knees. Rock side to side and then move the roller up closer to your butt.
Hold on any tight spots as you work your way up the back of your legs. If you flex and relax your hamstring as you hold, it can help to loosen up any tight spots.
To add more pressure, cross one leg over the other. To reduce the pressure, roll out both legs at once.
Because the pressure you can apply even when isolating one leg on the ground is limited, you may want to elevate the roller and sit on a box with the roller under your leg to apply more pressure. A ball or smaller roller like the Trigger Point Quad Roller, are other great ways to apply more pressure to your hamstrings while sitting on a box.
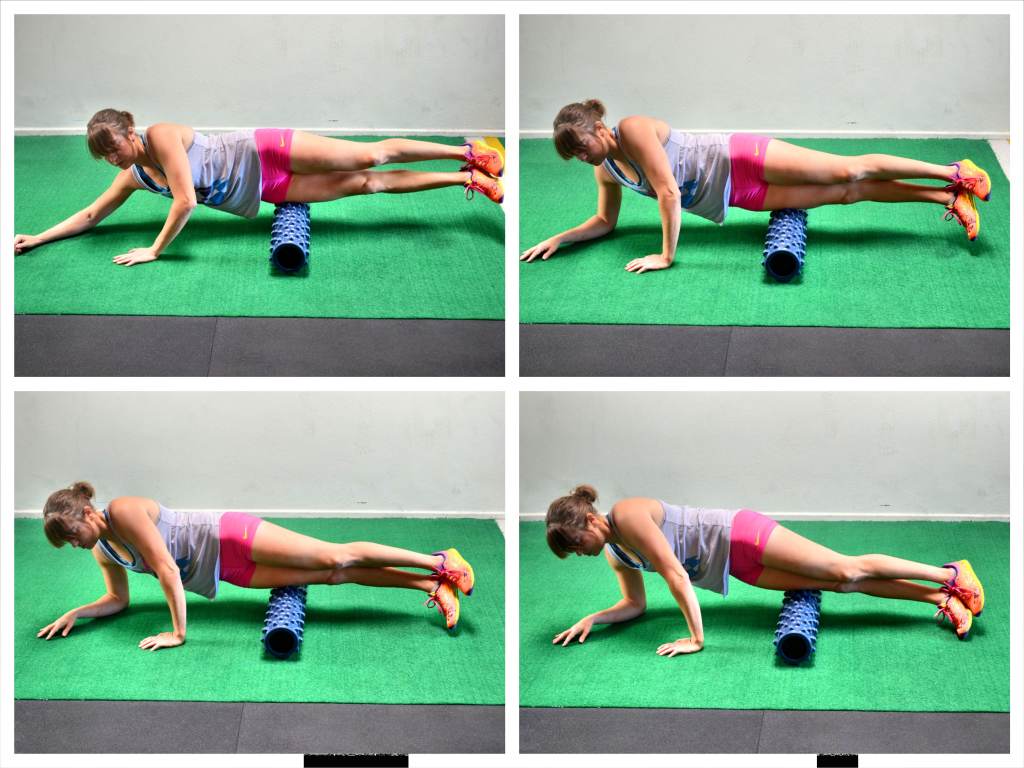
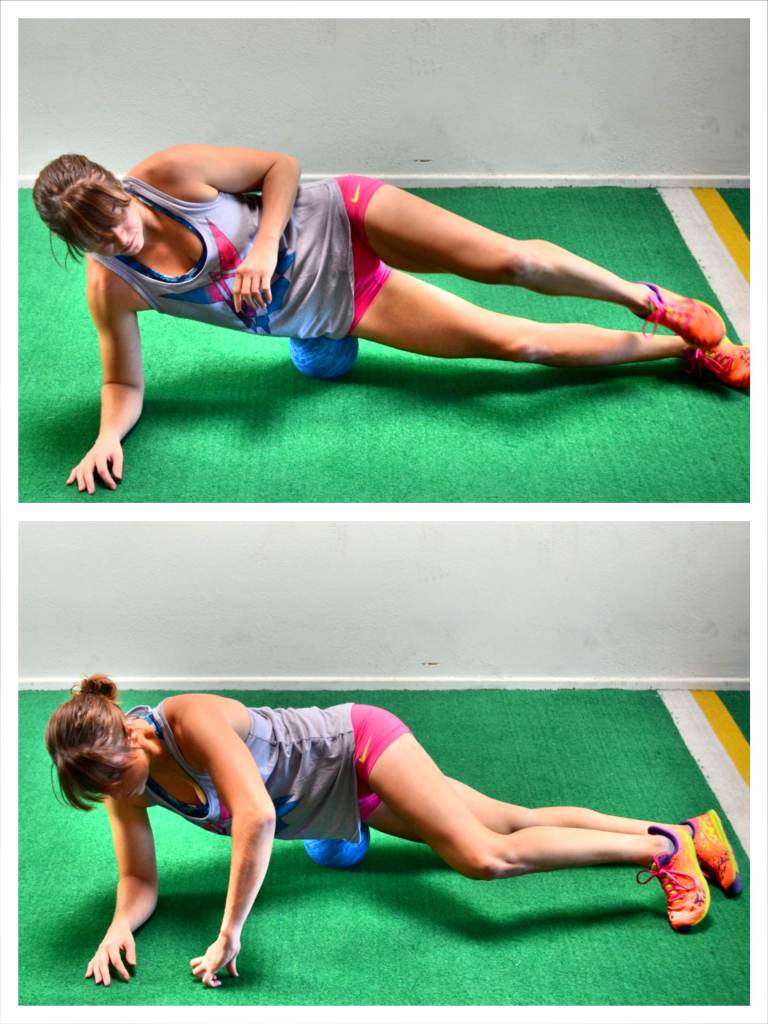
3. IT Band – The IT Band can cause a variety of injuries including problems at your hips and knees. Runners especially need to take care and roll out and stretch their IT Bands to prevent injury as they increase their mileage.
To roll out your IT Band, place the foam roller under the side of one leg and lie on your side propped up on your hand or forearm. Stack your legs one on top of the other.
Rock forward and backward as you move the roller up the side of the leg toward your hip. Hold on any tight spots until the pain lessens. Don’t just roll up and down quickly.
To put less pressure on sensitive parts of your IT Bands, place the top leg on the ground in front of you and push off the ground with your foot instead of leaving your legs stacked.
Make sure to take your time and hold on any tight spots.
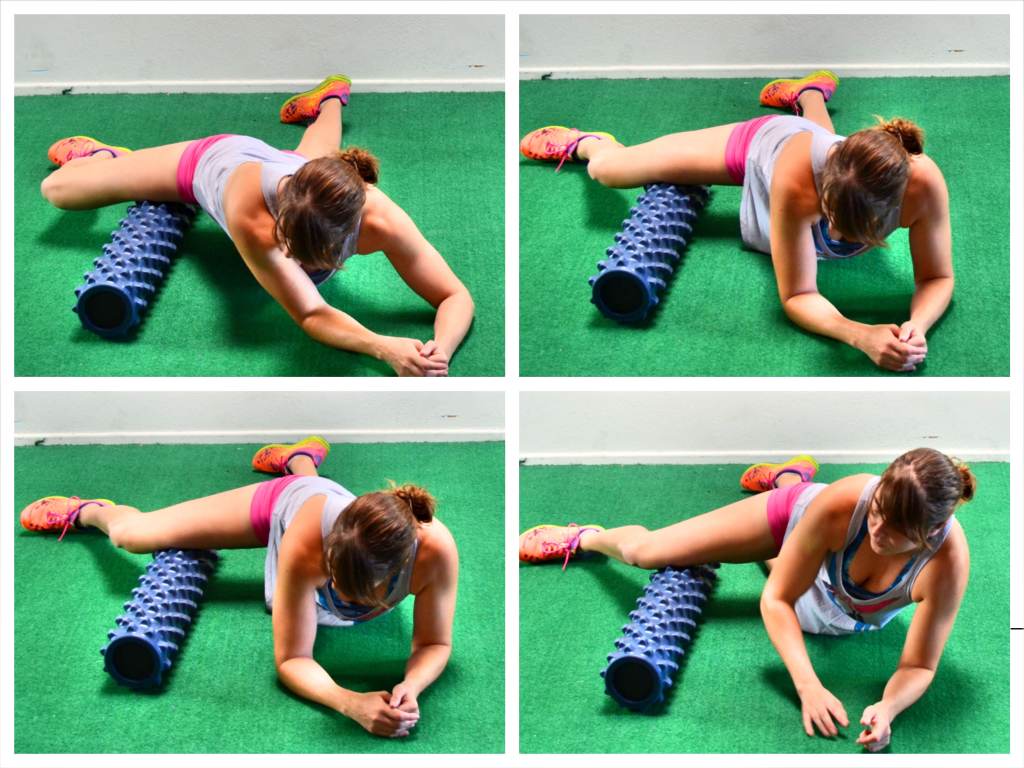
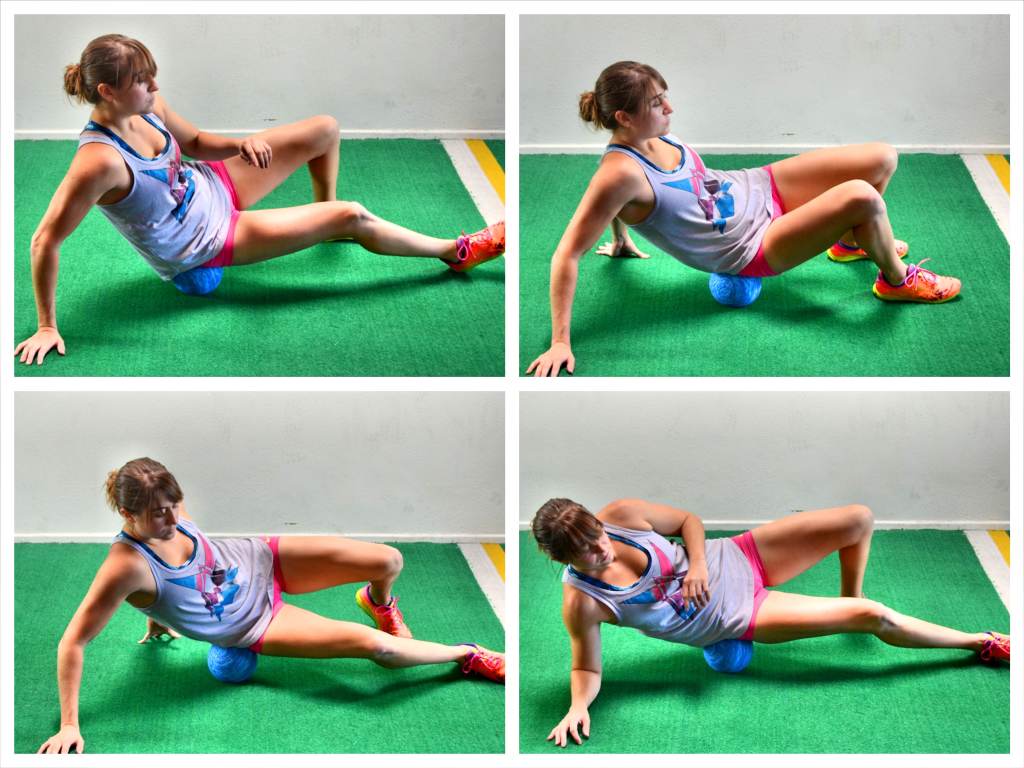
4. Adductor – If you have knee, hip or even ankle pain or if your knees cave in when you run, walk or squat, your glutes probably aren’t activated and your adductors are probably tight.
While glute strengthening is very important to correct this problem, so is rolling out the adductors. You’ve got to loosen tight muscles so that you can then activate the weak muscles. If you don’t do both, you risk injury because the correct muscles aren’t working.
To roll out your adductors, lie face down on the ground. Bend one knee out to the side at about 90 degrees and place the roller under the inside of your knee.
Resting on your forearms, rock your leg forward over the roller toward your quad and then back toward your hamstring. Hold on any tight spots.
Then move the roller up your inner thigh toward your crotch. Rock forward and backward again and remember to spend more time on any tight areas.
5. TFL and Hips – While you can use a roller to target your TFL and Hip Flexors, a ball really works best. The smaller and harder the ball, the more you will be able to dig in.
It is very important to roll out your hips because they are constantly in flexion if you sit at a desk all day. And tight hips can lead to low back, hip and knee pain as well as an anterior pelvic tilt that could cause hamstring issues.
A blue foam posture ball is a great place to start if you don’t know how much pressure you can handle.
To roll out your Hips, place a ball on the side of your hip just to the front of the fleshy part of your butt. Roll the ball around and hold on any tight spots.
If you find a tight spot, hold on that spot and lift and lower your leg up and down. By lifting and lower the leg, you are flexing and relaxing the muscle, which will help loosen everything up as you hold.
As you seek out tight spots in your hip, bring the ball around front and right to the side under your hip bone into your TFL (right in front of your IT Band).
Again hold on any tight spots and even flex and relax your leg to help dig in.
Move the ball under your hip bone and again hold on any tight spots.
You can work your way back out to the side of your hip as well if you found any sore or tight spots.
You may even want to use the blue ball above your hip into your abdominal region to help release your psoas (a hip flexor muscle).
6. Glutes – There are muscles in our butt that can become tight from sitting all day, such as the piriformis. By rolling out our glutes, we can alleviate, or at least lessen the pain of, common problems associated with having a tight piriformis such as sciatica and piriformis syndrome.
Rolling out our glutes helps keep everything in our lumbo pelvic hip complex in the right length-tension relationships so that the correct muscles are working and activated and we don’t get injured!
Just like with rolling out your hips, a ball generally works best. And the smaller and harder the ball you use, the more you can dig in to any tight spots. If you don’t have a ball though, you can use a roller.
Start by placing ball under one side of your glute. Roll it around under your glute, searching for any tight spots.
When you find a tight spot hold there and bend your knee in toward your chest and then straighten the leg back out. You can also lift and lower the leg when the ball is on the tender area. I recommend doing 5-10 of each and then moving on to the next spot.
By bending your knee or lifting and lowering your leg, you are flexing and relaxing the muscle to help loosen the tight spot.
Search all around your glute even bringing the ball forward toward the outside of your hip.
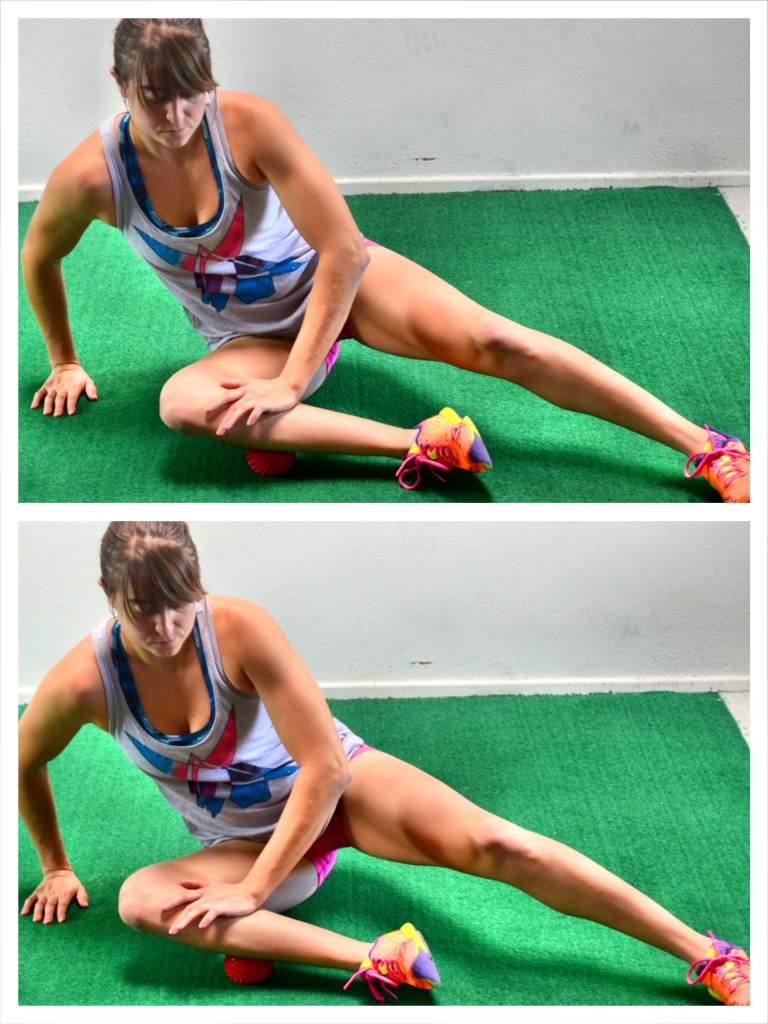
7. Peroneals – While we often focus on our upper leg when we have knee pain, our lower leg may actually be causing the problems. If you have knee or ankle pain, you may want to focus on the outside of your shins – your peroneals.
To roll out your Peroneals, a ball or small roller works best although you can use a larger foam roller.
Take a ball and place it on the ground with the side of your lower leg on top. Press down on your lower leg with your hand to apply more pressure so that the ball digs in.
Then move your leg so that you roll the ball down the length of the side of your lower leg.
Hold on any tight spots and even make small circles on the ball with your lower leg to dig into any tender areas. You can also circle the ankle while holding on any tight spots.
To hit slightly different angles along the side of your shins, rock forward a bit (toward your shin) or backward (toward you calf).
Work your way up to just below your knee and then down to a few inches above the anklebone.
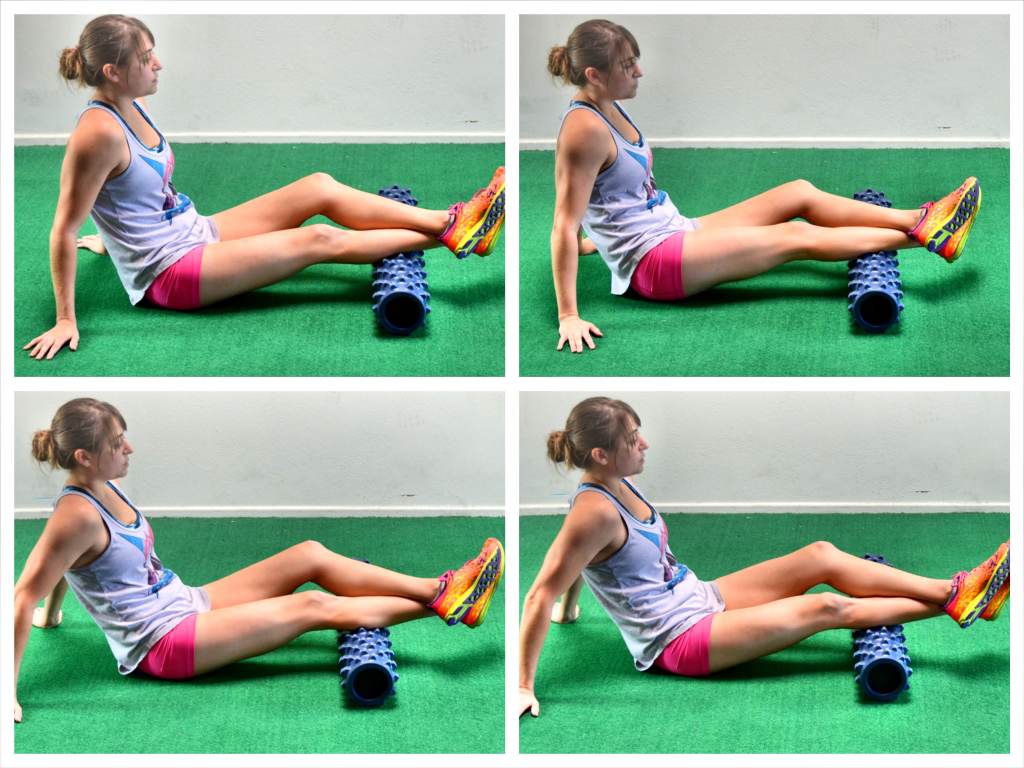
8. Calves – If you wear dress shoes, especially high heels, or run or cycle a lot, you NEED to roll out your calves. Tight calves can contribute to and worsen plantar fasciitis as well as achilles issues.
To roll out your Calves, place one calf over the foam roller near your heel. (You can also place a ball on top of a block and place your calf over that.
Cross the other foot on top of the leg on the foam roller or ball to help apply more pressure.
Rock right to left or side-to-side a couple of times and then roll the foam roller up higher on your calf toward you knee. Keep rocking side to side as you work your way up your calf.
Hold on any tight spots. If you find a super tight spot, make 10 circles with your foot and then tense and relax your calf (flexing and dropping your foot) 5 times before you move to the next spot. This will help you dig in further to any knots and help the muscle relax itself.
Don’t spend any time on areas that aren’t tight. Repeat all the way up both calves.
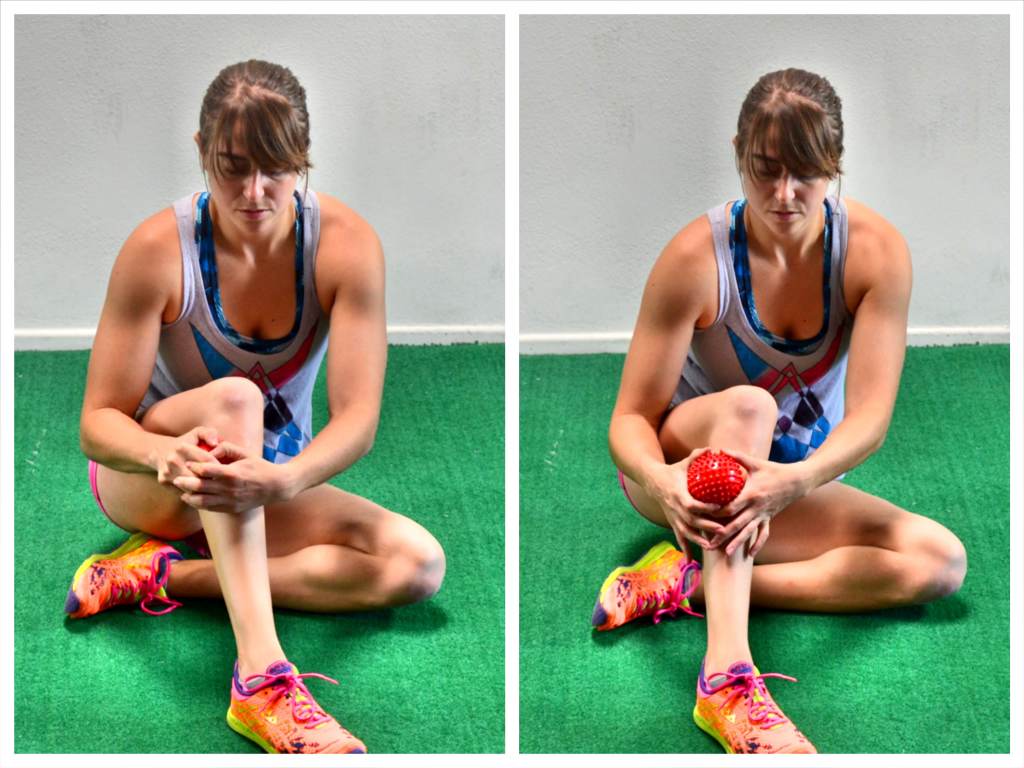
9. Shin – Knee pain? Ankle pain? Shin splints? Then you need to roll out the muscles in the front of your lower leg!
The harder and smaller the ball you use, the more you will be able to dig in.
To roll out your shin, sit on your butt with one knee bent in front of you and the foot flat on the ground. Take a ball and with both hands dig it in to the muscle on the outside/front of your lower leg under your knee.
Do not dig it into the bone.
Make small circles in the same spot and then move the tennis ball down your shin. Make extra circles and even just simply hold the ball on any tight spots.
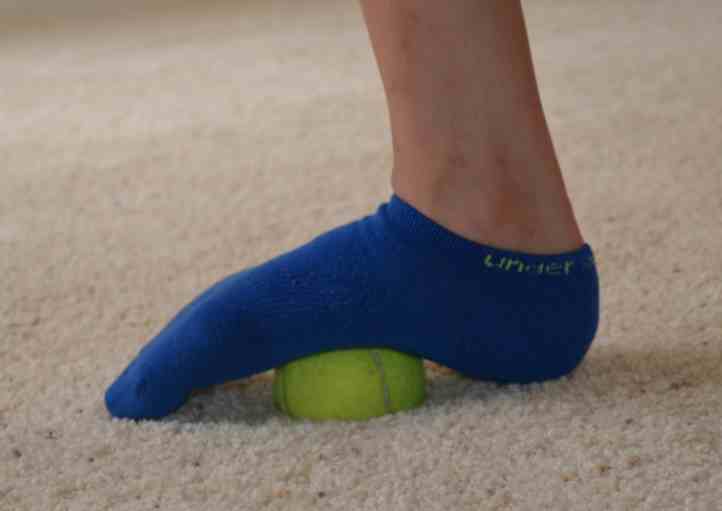
10. Foot – If you have Plantar Fasciitis, this foam rolling move is a must. Even if you just wear shoes all day, you should roll out the bottom of your feet because any tightness there can cause problems further up your body. Remember, everything is connected!
To roll out your foot, place a ball on the ground and step on top of it. Roll it along the length of the bottom of your foot. Hold on any tight spots.
The smaller and harder the ball you use and the more you apply pressure, the more you can dig into any tight spots.
BONUS:
“Knee” – Often the muscles right around the top of our knee can feel tight and rolling out the bottom of our adductors, quads and IT Bands with the roller just doesn’t quite do it. That is where a firm ball is great.
Lie on the ground as if you are rolling out your adductors and place a ball right on the inside of your thigh above your knee. Make small circles on the ball, holding on any tight spots.
Then work your way around to the front of your leg and then even to the outside of your knee.
Hold on any tight spots as you work across the front of your leg.
The harder the ball you use, the more you will be able to dig in.
These 10 Lower Body Foam Rolling Moves don’t all have to be used every day. Make sure to spend more time on areas of tenderness and tightness. If an area doesn’t have any tight spots, move on and don’t waste your time there.
If you are suffering from specific aches and pains, don’t just go straight to the spot of pain and roll out. Make sure to go on a “search and destroy mission” all around the area. While you may be feeling pain in your knee, the problem may be a tight hip or even a tight lower leg.


This is a great page! Thank you so much!
Thanks!
Can I ask what kind of foam roller you are using?
Yes sorry it is the Rumble Roller – https://goo.gl/2wx7Cq