Knee Pain can be a complicated issue to resolve because there are so many culprits that could be responsible. Since the knee is in between both the feet and ankles and the hip, dysfunction in either place could refer and lead to pain in the knee.
Dysfunction in the hip or in your feet and ankles could lead to muscular imbalances that then cause improper tracking and function of the knee joint. And if the knee then starts to move incorrectly, further problems could then occur up and down your body.
For instance, muscular imbalances could lead to knee valgus aka when your knees cave in. If your knees cave in, not only can your knees start to hurt but so can your feet, ankles, hips and low back. And pain in your lower body could then even lead to dysfunction in your upper body.
Therefore it is important to address all of the issues that could be leading to your knee pain above and below the joint so that Knee Pain doesn’t become pain everywhere.
To correct the muscular imbalances and address all the issues leading to your knee pain, you need to follow our 4 Steps to Prevent and Alleviate Aches and Pains – Foam Rolling, Stretching, Activation and Strengthening.
All 4 Steps must be included to help you prevent and alleviate your Knee Pain for good. Including only one step may help a little, but it won’t truly resolve the problem.
So correct your imbalances and start alleviating your knee pain today with the 4 Steps below.
Prevent and Alleviate Knee Pain
Below are the 4 Steps you need to follow to alleviate your knee pain. For each step, there are exercises listed that you need to include in your workout routine. And after all 4 Steps is a workout to show you how to implement the moves.
Foam Rolling Moves:
Any good pain prevention program needs to start with foam rolling. Foam rolling releases knots and relaxes tight muscles so you can stretch them and improve your mobility and return muscles to their proper length-tension relationships.
Below are some must-do foam rolling moves if you have, or have ever had, knee pain. Remember that even though you have knee pain, the cause of the problem may be above or below the point of pain, which means you shouldn’t only roll out right around the knee but also up toward your hips and down toward your ankles.
If you aren’t sure what is causing the pain, try out all of these moves below. Focus on the ones that target your trigger points. Do not spend much time with the ones that don’t target your areas of tightness.
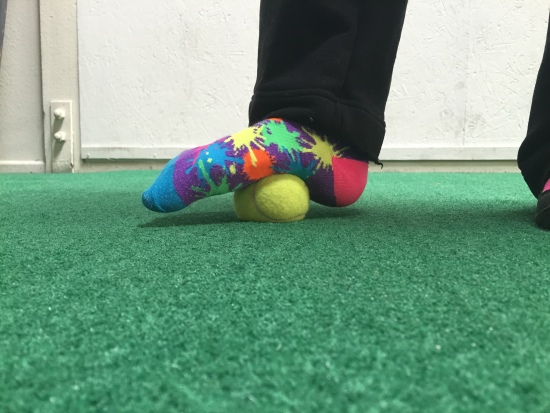
Feet:
Your feet are your base. If there are problems there, like you pronate (rock in) or supinate (rock out), that could cause improper movement patterns that lead to knee pain. That is why you need to take care of the muscles of your feet.

To roll out your feet using a tennis ball, place the ball on the ground and step on top of it. Roll it along the length of the bottom of your foot. Hold on any tight spots.
The harder and smaller the ball you use, the more pressure you will be able to apply.
You can also use a frozen water bottle to roll out your foot and ice at the same time. To do this, place a water bottle full of water in the freezer until it freezes. Then place the bottle on the ground with your foot on top of it. Roll it under your foot to dig out any knots while also icing to reduce inflammation. This is best done after a workout. Before a workout simply use the ball.
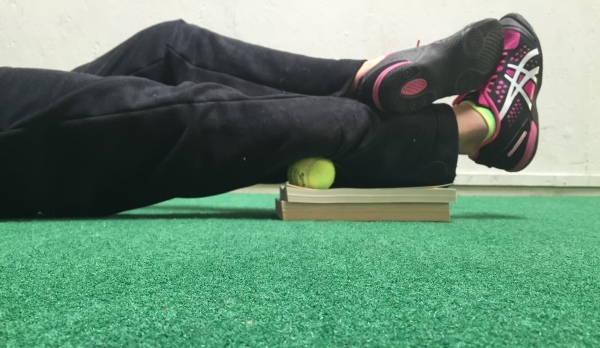
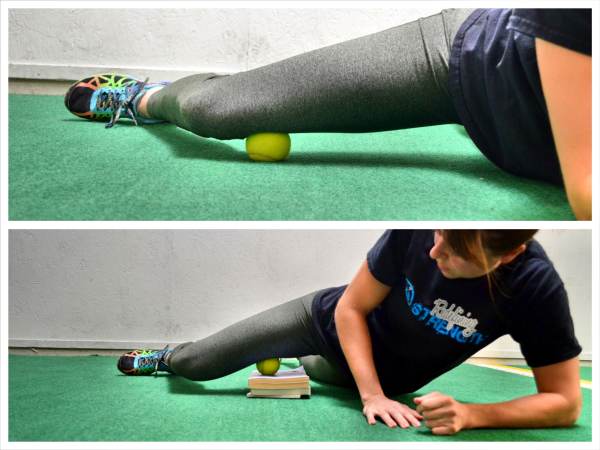
Calves:
If your calves are tight, your foot can pronate when walking or running or even squatting to compensate for the lack of calf flexibility. This can cause more rotation of the lower leg and lead to the patella being slightly misaligned, which can lead to knee pain such as Runner’s Knee.
To roll out your calf, place a ball on some books or a yoga block and then put one calf on top of the ball with the ball at the bottom of your calf muscle.
Cross the other leg on top of your leg on the ball to help apply more pressure if needed.
Rock very slightly from side-to-side a couple of times and then move the ball to another spot on your calf, working over the entire meaty part of the muscle. Keep rocking side to side as you work your way around your calf.
Hold on any tight spots.
If you find a super tight spot, make 10 circles with your foot and then flex and relax your foot 5 times before you move to the next spot. Tensing and relaxing your calf by making circles or flexing your foot, can help you dig in deeper to the knot.
Don’t spend any time on areas that aren’t tight. Repeat all the way up and around both calves.
If your calves aren’t tight, do not waste time rolling them out. If you have a foam roller or rumble roller, you can also use that instead of the ball.
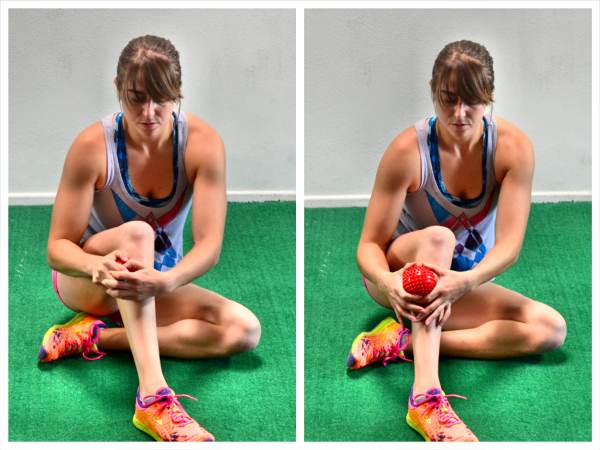
Shins:
Your calves aren’t the only area of your lower leg that you need to take care of. Tight Shins (and weak shins even) can also lead to knee pain because tight shins and even shin injuries such as Shin Splints can lead to improper movement patterns.
To roll out your shin, sit on the ground with one knee bent in front of you and the foot flat on the ground. Relax the leg and foot.
The take a tennis ball in both hands and press it into your shin right next to your shin bone. Start digging it in to the muscle on the outside/front of your lower leg under your knee. Do not dig it into the bone.
As you press the ball into the muscle as hard as you can or as hard as you can tolerate, make small circles with the ball. You can circle the ball clockwise a few times and then counterclockwise.
Then move the tennis ball down your shin and again make small circles as you press the ball into the muscle as hard as you can. The more pressure you can apply, the more you will dig in and help the knot release.
Make extra circles and even just simply hold the ball on any especially tight spots. You can also flex and relax your foot to tense and relax the muscle to help the muscle relax the knot.
Work your way down your shin to the top of your ankle.
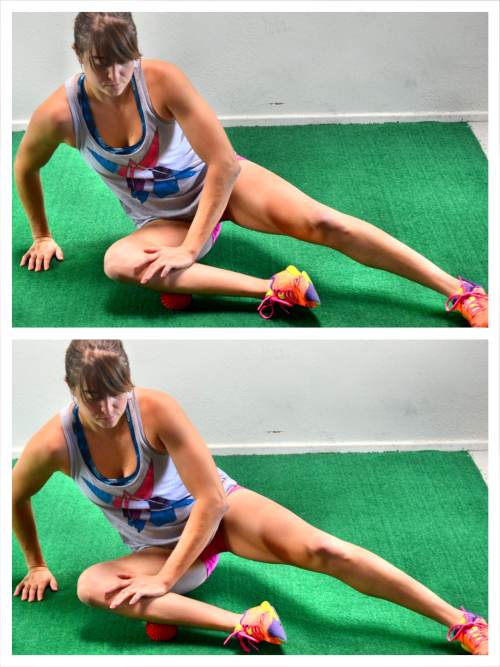
Peroneals:
Tight Peroneals can contribute (or be caused by) overpornation of the foot. So if you feet roll in toward the midline of your body, there is a good chance your Peroneals are tight. And not only can this tightness lead to further foot, ankle and lower leg pain but also to knee pain.
Remember imbalances and tight, overactive muscles lead to compensations and misalignment, which can cause pain and injury further up the body.
To loosen up your Peroneals you can roll them out with a tennis ball.
To roll out your Peroneals, place a ball on the ground in front of you and then bend your knee and place the side of your lower leg on top of the ball, starting with the ball below and outside your knee. Press down on your lower leg with your hand to apply more pressure so that the ball digs in.
Then move your leg so that you make small circles on top of the ball. Work your way down the length of the side of your lower leg, pressing your lower leg firmly down into the ball. (You may even put a book under the ball to help you apply more pressure and get a better angle.)
Hold on any tight spots and, as you hold, flex and relax your foot to help dig into any knots or trigger points. To dig in more, you can also circle the ankle while holding on any tight spots instead of flexing and relaxing the foot.
To hit slightly different angles along the side of your shins, rock forward on the ball a bit (toward your shin) or backward (toward you calf).
Work your way along the length of your lower leg from just below your knee down to a few inches above the anklebone. Do not go right up to the anklebone or roll over bone.
Quads:
Any muscle that can pull on the knee and cause misalignment or improper tracking, can cause knee pain. And one muscle group that can definitely affect the alignment of our knees are our quads.
Many of us not only have tight quads and hips because we sit all day, but we also have inactive glutes. And because our glutes are inactive we tend to overuse our quads. This overuse of our quads can cause poor movement patterns and very tight muscles.
Aka tight quads can lead to knee pain.
To roll out your quads, a foam roller is best. It allows you to cover the entire muscle quickly; however, if you don’t have a roller, you can still loosen up your quads.
You can also use a rolling pin if you have one or a tennis ball.
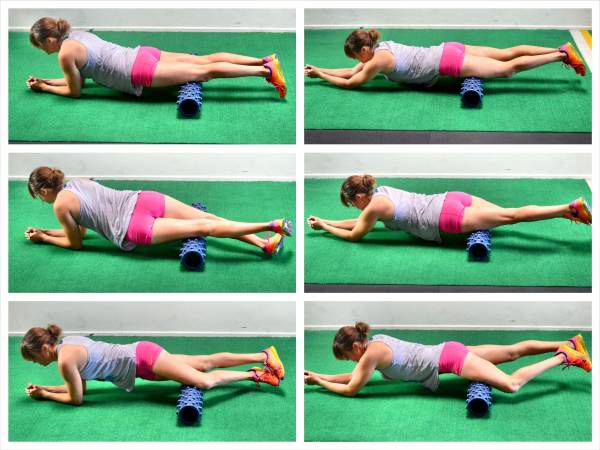
To roll out your quads with a tennis ball, place the tennis ball on the ground and lie on your belly supported on your forearms with the ball right above your knee in your quad.
Rock the leg side-to-side, rolling the ball from above and inside your knee to the outside of your quad above your knee. Hold on any tight spots. Then move the ball up higher on your quad and again move the leg and allow the ball to roll from near your inner thigh out toward your IT Band.
Hold on any tight spots.
Work your way up your quad until you reach under your hipbone.
Don’t spend time on areas of your quad that aren’t tight. Hold and focus on areas that are tight. You can even flex and relax your quad to help the knot release.
Also make sure you don’t just hit the front but also toward the inside and outside of your quads. Using the tennis ball may take more time than a roller or even a rolling pin.
To use the rolling pin or another hand-held roller, hold the roller in both hands and sit on a chair. Relax your quad and place the roller down on the muscle. Roll from the hip to the knee. Hold on any tight spots. Again make sure to work toward your inner thigh and out toward your IT Band. Don’t just roll up and down the leg quickly.
Hamstrings:
If you sit all day at a desk, your hamstrings may be tight. And if your hamstrings are tight and or overactive, your glutes may not be firing and your pelvic may not be properly aligned and stabilized. This could lead to more strain on the knee because of improper movement patterns.
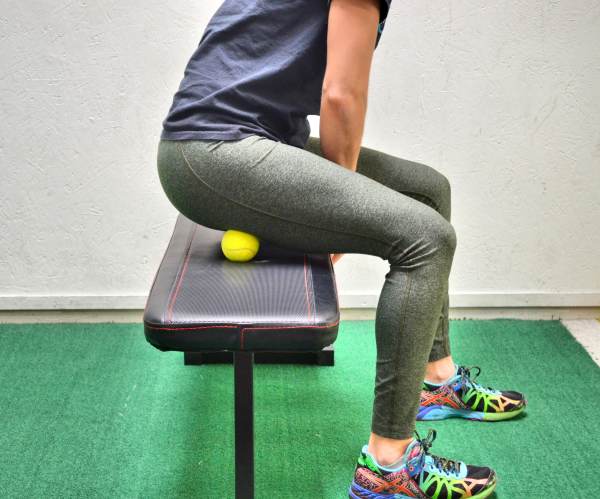
To roll out your hamstrings, a ball is actually best as long as you can sit on the ball while sitting up on something like a chair, table or box. The pressure you can apply even when isolating one leg on a roller on the ground is limited so using a ball when seated up on something allows you to dig into your hamstring more.
Take the ball and place it under the bottom of your butt/top of your hamstring while sitting on a chair or table. Rock side to side on the ball and roll it from your inner thigh out toward the outside of your leg.
Hold on any tight spot and perform small rocks side to side to help you dig into the knot further.
Work your way down your hamstring toward your knee. Flex and relax your hamstring as you hold on any tight spots.
If you have a roller, you can also use a roller while seated on a box or chair. The point is to be elevated so you can truly dig into the muscle.
IT Bands:
IT Band Syndrome is one of the most common overuse injuries that runner’s suffer from. It is another problem that can be caused by overpronation. And it can cause knee pain as well as hip pain through friction and rubbing.
While the IT Band isn’t a muscle, and part of rolling out your “IT Band” is also about rolling out muscles that are tight along your outer leg, rolling of your IT Band can help make it a bit more supple and lessen the rubbing.
To roll out your IT Band a roller is best, but if you don’t have access to a roller you can use a ball; however, the ball is going to dig into specific areas more.
To roll out using a ball, lie on your side with your top leg bent and the foot flat on the ground in front of you. Start the ball outside the hip under the leg on the ground or right above of the knee.
Hold the ball there and very slightly rock on the ball. Then move it up or down the outside of your leg.
Hold on any tight spots and lightly rock as you move the ball down toward your knee or up toward your hip. You can work down the outside of your quad and even move the ball down the outside of your leg toward your hamstring.
Make sure to go over the tight spots a couple of times. Do not spend time on areas that aren’t tight.
Again, if you have a roller, it is easier to cover the entire expanse of your leg quickly. It also won’t dig in as much as the ball.
Adductors:
If your Adductors are tight, there is a chance, especially if your glute medius is also weak, that your knees could cave in aka you could suffer from knee valgus. If your knees cave in, your movements patterns are probably not going to be correct, which means your knee valgus could lead to knee pain.
But knee valgus isn’t the only problem that can occur with tight Adductors. Different Adductor trigger points, that can be released with foam rolling, can also refer pain to the knee.
Therefore it is super important that you roll out your Adductors and target the different trigger points causing your pain.
To roll out your Adductors, a roller or a bigger foam ball works best; however, you can use a tennis ball or a rolling pin if you have either on hand.
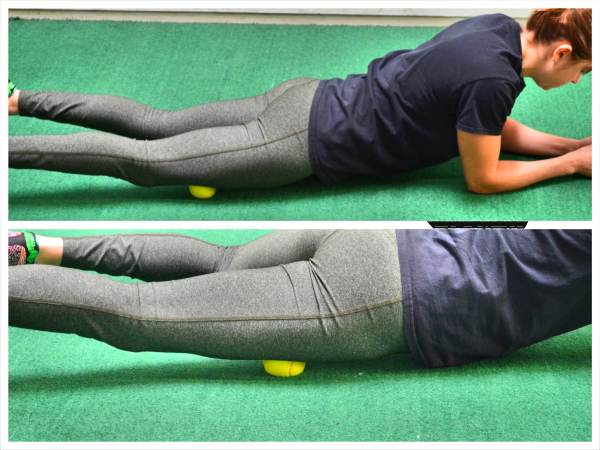
Using a tennis ball, lie face down on the ground. Bend one knee out to the side at about 90 degrees and place the ball under the inside of your knee.
Resting on your forearms, rock your leg forward over the ball toward your quad and then back toward your hamstring. Hold on any tight spots.
Then move the ball up your inner thigh toward your crotch. Rock forward and backward again and remember to hold and spend more time on any tight areas.
As you move up your adductor, you may find it helpful to place the ball up on a book or two to help you dig in depending on your flexibility.
As you move up toward your hip, you will also want to work around the front of your leg to make sure you hit all of the potential Adductor trigger points.
Remember to spend more time on the areas that feel tight. Hold on those spots.
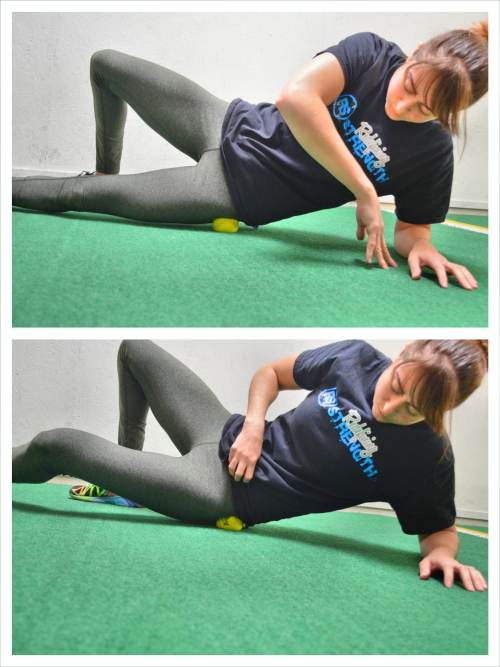
Hips:
Most of us sit in flexion for 9 hours a day. This can cause our hips to become tight, shortened and immobile. And when we lose mobility in our hips, we compensate with improper movement patterns to make up for the lack of range of motion. We then don’t recruit the correct muscles to perform the movement.
And all of this, stemming from tight hips from sitting all day, can lead to knee pain.
To roll out your Hips, lie on the ground on your side and place a ball on the side of your hip just to the front of the fleshy part of your butt. Roll the ball back a little along the top of your butt and even right back behind your hip bone.
If you find a tight spot, hold on that spot and lift and lower your leg up and down. By lifting and lower the leg, you are flexing and relaxing the muscle, which will help loosen everything up as you hold.
As you seek out tight spots in your hip, bring the ball around front and right to the side under your hip bone into your TFL (right in front of your IT Band). You can even roll a bit more along the top of your quad, holding on any tight spots.
Move the ball back under your hip bone and again hold on any tight spots. Work your way back out to the side of your hip and around toward your glutes.
Go back over any especially tight spots.
You may even want to use the ball above your hip into your abdominal region to help release your psoas (a hip flexor muscle). If you do this, you may need to use a bigger ball or place the tennis ball up on a couple of books to help you dig in.
Glutes/Piriformis:
Our glutes can not only be inactive but can also be tight and have trigger points that can refer pain or lead to compensation and poor gait mechanics. And imbalances and compensation are what lead to knee pain.
A few muscles of our butt that are commonly known to cause problems are the Glute Medius, Glute Minimus and Piriformis.
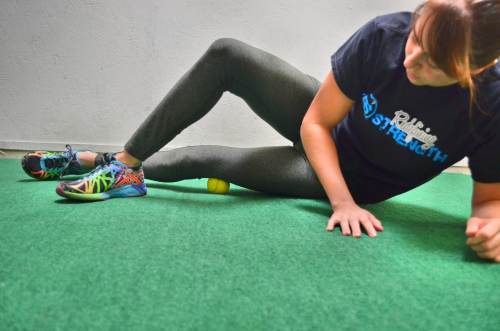
To roll out your Glutes and Piriformis, a tennis ball or even a harder ball like a lacrosse ball work best.
Lie on your side on the ground propped up on your arm. Place the ball under one side of your glute. Roll it around under your glute, searching for any tight spots.
You can work all around the fleshy part of your butt – from the outside of your hip to your tailbone, from under your SI Joint to the top of your hamstring.
When you find a tight spot hold there and bend your knee in toward your chest and then straighten the leg back out. You can also lift and lower the leg when the ball is on the tender area to help the muscle release. Try 5-10 of each movement and then move on to the next spot.
Search all around your glute and focus on the areas of tightness.
Stretching Moves:
Once you’ve relaxed the muscles, you then need to work to improve not only your flexibility but also your mobility. While you want to stretch the muscles, you want to make sure you are stretching to return full mobility to all of the joints involved.
For instance, you want to make sure to stretch your Adductors and Hip muscles so that your hip has a full range of motion. Because without a full range of motion, you are going to compensate.
You also want to make sure that your stretching addresses imbalances on both sides of your body. Imbalances between right and left sides and even an imbalance of flexibility of muscles around the same joint can contribute to knee aches and pains.
Below are some great stretches to try, including dynamic, static and isometric moves.
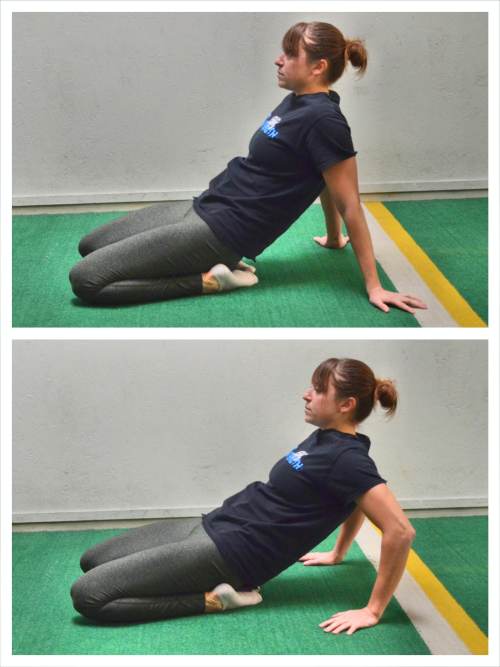
Peroneal and Quad Stretch:
This stretch can be a harder one if your knees are super achy so you may simply need to do a Seated Peroneal Stretch and then a quad stretch; however, if you are doing this move to keep the pain at bay, it is a great way to stretch your lower legs and quads (especially right around your knees) at the same time.
To do the Peroneal and Quad Stretch, start kneeling on the ground with your toes turned in toward each other. Then lean back and relax your butt down onto your feet with your hands behind you on the ground to help support your weight and keep you balanced.
Only sit back as far as you can and relax into the stretch. The more you sit back, the more you’ll feel the stretch. You can even rock back and allow your knees to come up. You can then work to relax them back onto the ground in that rocked back position.
After doing this stretch, you can even then come back to kneeling and flex your feet, tucking your toes under, to stretch out the bottom of your feet and toes.
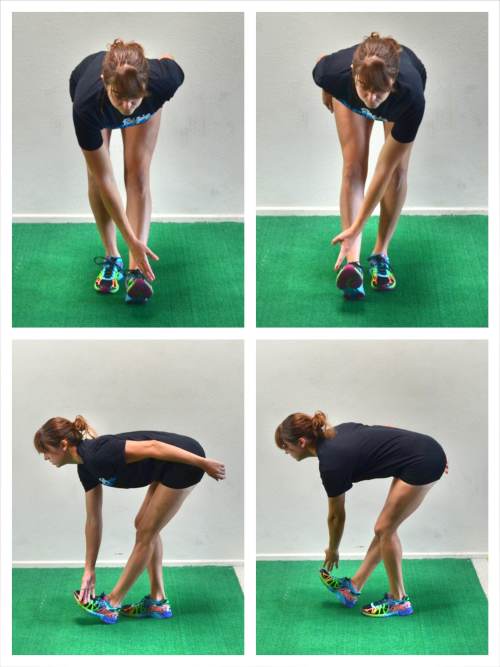
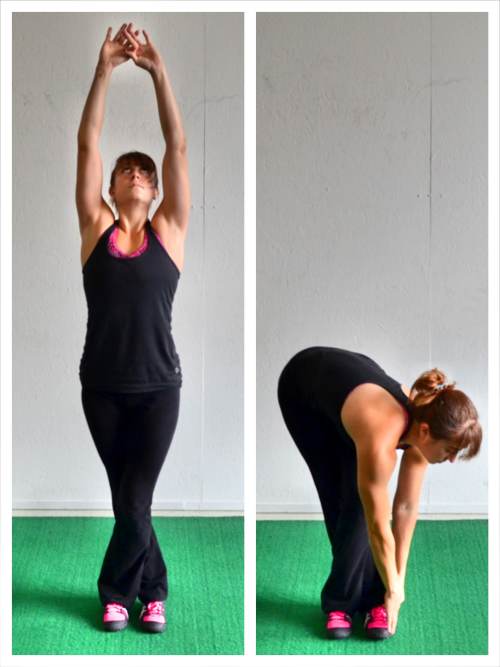
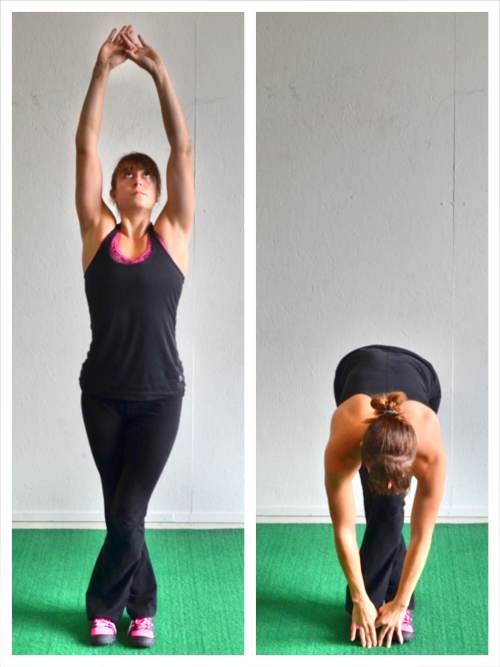
The Standing Calf and Hamstring Stretch:
This is a great stretch to loosen up your calves and hamstrings, especially their connections right around your knees. This is even an easy stretch to do at work, especially if you slide those high heels off for a second or two to get some relief.
To do the Standing Calf and Hamstring Stretch, stand tall with your feet together. Then step one foot a few inches forward and rock back on your heel with that leg straight.
Keeping that front leg straight, lean forward as you sit your butt back and reach your opposite hand down and outside your front foot. Hold for a second then step the foot back and switch to the other side.
Make sure you keep that front leg straight and sit your butt back as you reach the hand toward the outside of the foot. Only reach as low as you can without bending that front knee.
Keep alternating sides until all reps are complete.
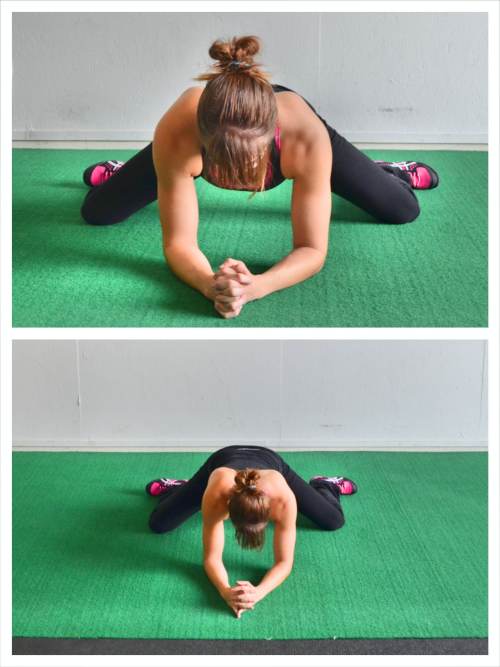
Frog Stretch:
One of the best stretches for your Adductors is the Frog Stretch. This can be both a dynamic and a static stretch. You can even add in a rotation to hit around the front of your quads to your hips. However, you probably won’t want to do this stretch at work.
To do the Frog Stretch, kneel on the ground and spread your knees as wide as possible while also supporting yourself on your forearms.
Turn your toes out as you open your knees as wide as possible. Do not let your heels come together behind your butt. You want your feet wide apart.
Then sit your butt back toward your heels as much as possible while keeping your knees wide. You may not be able to sit back much, but just push back as far as you can.
Breathe as you sit back and feel the stretch.
Then come forward out of the stretch for a second before pressing your butt back as far as you can.
If you want to add in the Rotation, as you come back forward, lower your hips forward onto the ground and rotate one of your lower legs up and forward, bringing your foot forward toward the same shoulder. Then sit back again and repeat the frog stretch before relaxing forward and rotating the other hip. Keep alternating sides until all reps are complete.
You can also make the Frog Stretch a static stretch by simply sitting your butt back toward your heels and holding instead of rocking slowly in and out of the stretch.
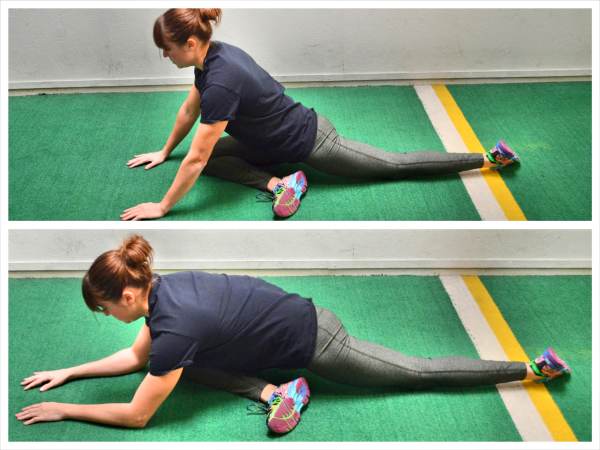
Pigeon Pose:
The Pigeon Pose is a great stretch for your hips and glutes as well as your groin and even your abductors. It works on both external rotation and internal rotation. And because it opens your hips, it helps alleviate strain on your knees.
To do the Pigeon Pose, sit on the ground and bring your right foot forward. Angle your right knee toward about “2” on a clock to start. The closer to 90 degrees you bring your front knee, the harder the stretch will be so start with the “2” o’ clock position until ready to progress.
If you feel this a lot in the outside of your front knee, make sure you are flexing that right foot.
Then extend your left leg out behind you as much as you can. Turn that back leg slightly inward so you aren’t sitting right on top of your knee cap.
Then relax over your front leg. Turn your hips to face the ground. Do not move the front leg closer to 90 degrees if your hips aren’t both square to the ground or you will put more pressure on your back.
You can either hold here or make “circles” on the ground with your arms. If you choose to add in the circles, walk your hands toward the outside of your front hip and then back toward your feet. Feel a nice stretch in your hips as you circle.
Then switch to a Pigeon Pose on the other side and either hold or walk circles with your arms.
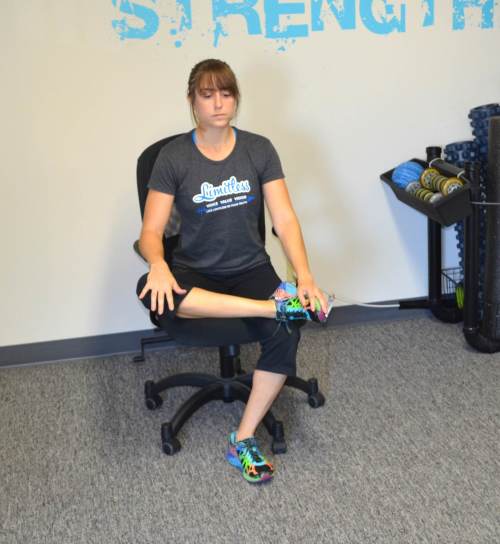
A great variation of the Pigeon Pose from the ground is the Seated Pigeon Pose. As long as you aren’t wearing a skirt, this is a great stretch you can do right at your desk.
To do the Seated Pigeon Pose stretch, sit up nice and tall in your chair and bend one knee to place the ankle on top of your other leg just above the knee.
Sitting tall, press down on your knee to open up your hip.
Flex the foot of the leg crossed over if you feel too much pressure on the outside of your knee.
Breathe and relax as you press down on the leg to feel a nice stretch in the outside of your hip and glute. Pay attention to how the stretch feels on each side. Make sure to stay seated up nice and tall.
Make note of any imbalance. If you notice one side is tighter, make note. Imbalances can lead to injury more so than even if both sides are just super tight. You will then want to focus on releasing the tighter side and figuring out what may be causing the imbalance so it doesn’t lead to knee pain.
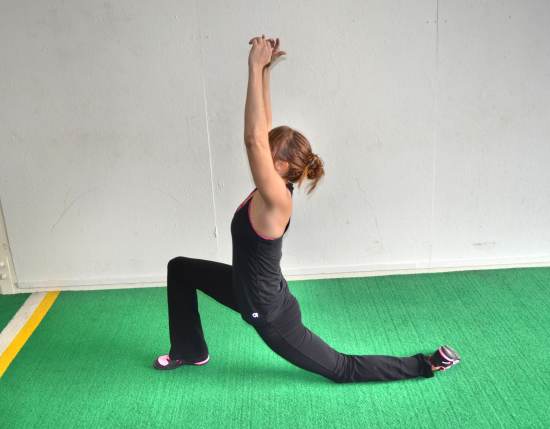
Half-Kneeling Hip Stretch and Variations:
One of the most important areas for us to stretch often if we have a desk job is our hips. And one of the best stretches we can do for our hips is the Half-Kneeling Hip Stretch. Below are a few different variations of the stretch depending on your flexibility and even exactly what areas of your hips you want to target.
To do the Basic Half-Kneeling Hip Stretch, start half kneeling on the ground. Then press your hips forward as you reach your hands up overhead so that you feel a nice stretch down the hip and even into the quad of the back leg.
Squeeze the glute of your back leg so that you are actually fully extending your back hip and not simply arching your back.
Breathe as you hold and reach your hands backward overhead or turn this into a dynamic stretch by releasing and then repeating the stretch.
You can also reach your arms to the side over your front leg if you want to hit your hip from a different angle.
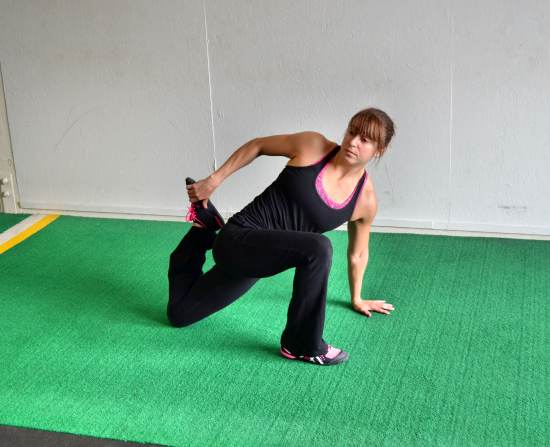
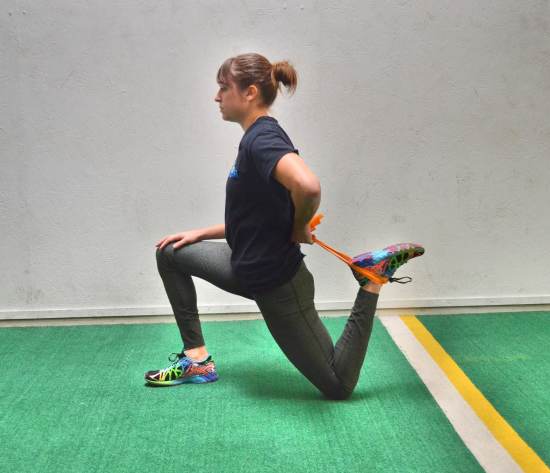
Beginners may need to stay with this variation or grab a towel or stretch strap to do this next variation. The second variation of the Half-Kneeling Hip Stretch will stretch your quad more as well; however, it requires more flexibility to be able to grab your back foot and pull it into your butt.
To do the Half-Kneeling Hip and Quad Stretch, set up half-kneeling with your right leg back. It is best to do this with a wall or bench in front of you to help you balance.
Then reach back and grab your right foot/ankle with your right hand and pull it in toward your butt. In the half-kneeling position with your heel pulled in and the wall to balance you, rock forward and backward, pressing the hip forward to increase the stretch down your quad. Then relax back out of it and repeat. Complete all reps then switch sides.
Make sure to squeeze your glute as you press your hips forward to stretch your right hip and quad. Do not simply hyperextend your low back as you rock forward.
If you would like to stretch your spine as well as the outside of your hip and glute as you stretch your quad and hip, then you should try the Rotational Half-Kneeling Hip and Quad Stretch.
To do this variation, set up in a half kneeling position with your right leg forward. Then place your left hand on the ground and lean forward.
Reach back with your right hand and grab your left foot. Pull your foot in toward your butt as you drive your hip forward. Feel a stretch down your hip and quad.
As you press your hip forward, rotate your chest open toward your front leg. You may also feel a stretch through your spine and down the outside of that front leg. Hold here and breathe as you relax deeper into the stretch.
Beginners may need a towel or stretch strap to help them do this stretch as it requires more flexibility to reach around and grab the leg with the rotation.
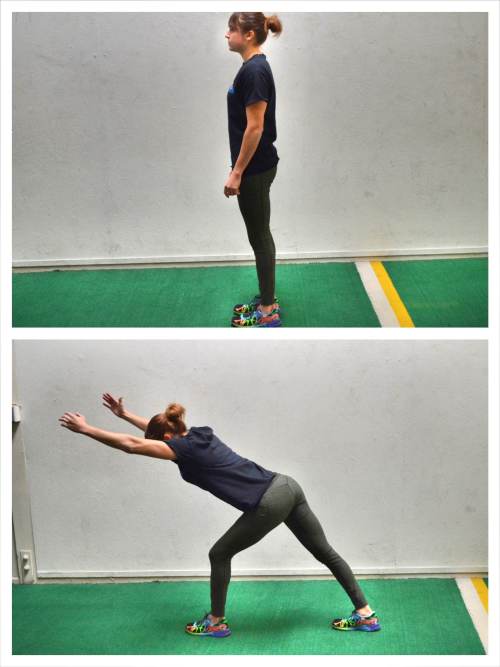
And if you are stuck at work and can’t kneel down, try this standing Hip and TFL stretch – the Step and Reach Hip Stretch.
To do the Step and Reach Hip Stretch, start standing with your feet together. Step one foot forward as if you are going to lunge, however, only slightly bend the front knee while keeping the back leg straight. You can come up onto the ball of your back foot as you step forward.
Then reach the same arm as the leg that is back overhead. Reach toward the ceiling behind you. Press your hip forward as you reach and feel a nice stretch down that back hip. Hold there.
You can also reach up overhead and toward the front leg to hit your hips from a slightly different angle. Make sure to squeeze your glutes and drive your hips forward so that you feel this in your hips and not your low back.
To use a towel with any of these moves, simply wrap it around your feet and grab it with one hand to pull your heel in toward your butt.
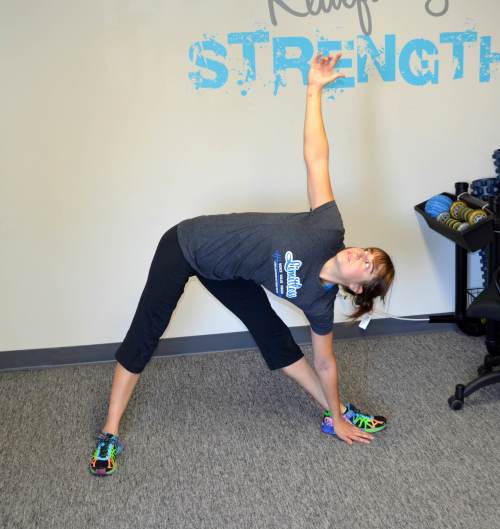
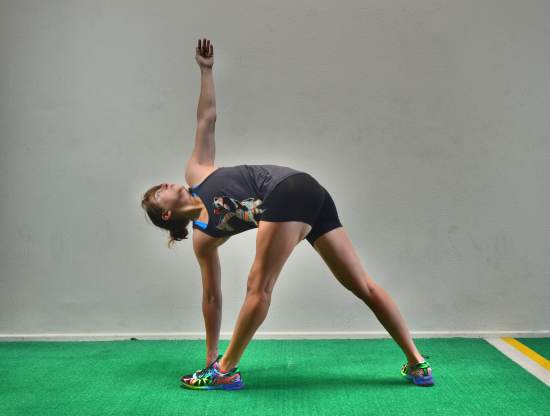
Extended Triangle Pose:
The Extended Triangle Pose is a great isometric move that not only stretches, but also strengthens your legs, feet and ankles to alleviate knee pain. This pose stretches your calves, hamstrings and inner thighs while also opening up your hips. And if you sit at a desk all day, it has the added benefit of also opening up your chest, shoulders and spine!
To do the Extended Triangle Pose, step up as if you were going to do the Warrior II pose. Step one foot forward into a nice wide stance (with your feet about 4 feet apart). Your front foot should be pointing straight ahead and your back foot should be turned out. Your feet should be almost perpendicular. Also make sure that your front foot is about at the instep of your back foot if you look back from your front heel to your back foot.
Then, pushing your butt back and hinging at the hips, reach the same hand as the leg that is forward down to the ground. Make sure to keep your legs straight as you hinge. If your legs start to bend, do not reach lower.
Place your hand on the ground inside your foot or on a block or your shin or ankle if you can’t reach the ground while keeping your legs straight.
Reach your opposite hand up toward the ceiling, opening your chest up toward the ceiling. If you can’t really open your chest up toward the ceiling, you may want to place your hand up higher.
Hold that pose and relax and breathe. Then switch and repeat on the other side.
You can also do a variation of this pose called the Twisting Triangle Pose to really get the outside of your hip and even your IT Band. For this variation, you will simple reach the opposite hand from the front leg down to the ground and rotate open toward your front leg. You may also find you need to bring your feet in a bit closer together for this variation.
Standing IT Band Stretch:
To help loosen up your outer hip and your hamstrings, the Standing IT Band Stretch is a great option. It can also loosen up tight calves/ And as long as you aren’t wearing high heels, you can do this one at work.
To do the Standing IT Band Stretch, start standing with your feet together. Then cross your left leg over your right leg. Bring the left foot over and back across until the big toe is even with the big toe of the right foot. You want your feet even so that your front leg (the left leg) is pressing the back leg (right leg) straight during the stretch.
Then reach your arms up overhead for a nice big stretch. Get a nice big stretch. Then hang over, reaching your arms down toward the instep of the back foot (right foot). Push your hips out to the right as you reach toward your right foot. Feel a stretch down the outside of that right hip and side. You should even feel it down your right hamstring and calf.
Hold for a breath. Then reach back up overhead and cross your legs the other way.
This time reach down toward your left instep, pushing your hips out to the left. Keep alternating sides with a reach up overhead in between every time.
If you want to focus on your hamstrings, you can reach straight down toward your feet instead of reaching toward the instep of the back foot.
Activation Exercises:
Once you’ve got everything stretched out and ready to work, you’ve got to get the correct muscles activated. Often with knee pain that means strengthen our glutes as well as the stabilizing muscles around our knees.
The Activation Exercises below will help you get the correct muscles working to improve your movement patterns, correct imbalances and help you prevent knee pain.
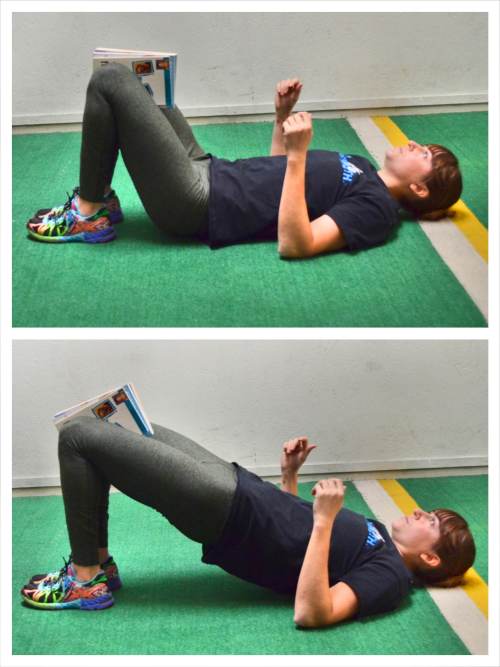
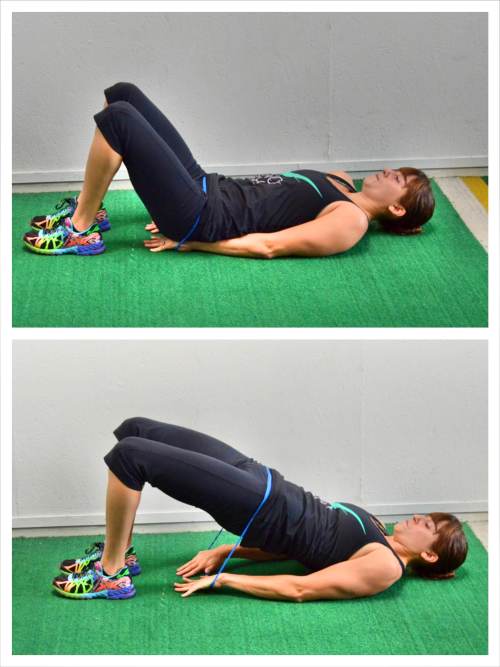
Glute Bridge With Squeeze:
The Glute Bridge is one of the best glute activation exercises because it also works on hip extension. It can also be used to make sure that your adductors are engaging properly to help stabilize your knee if you add in a block or book to hold between your legs.
By squeezing an object between your knees during the Glute Bridge, you can help keep your ankles, knees and hips in perfect alignment. By training the proper alignment during an activation exercise, you can get everything working correctly before you do the more challenging lifts.
To do the Glute Bridge with Squeeze, bend your knees and put your feet flat on the ground just close enough that you can graze your heels with your fingertips when you stretch your arms down by your side. Your feet should be about hip-width apart. Place a book, yoga block or even a pillow between your knees. It should be a light object that will keep your knees in line with your hips and ankles when you squeeze it.
Then bend your elbows to 90 degrees so that only your upper arms are on the ground and bridge up. Drive up through your heels and upper back to lift your glutes off the ground.
Squeeze the block and drive your hips up as high as possible. Feel your glutes and even your inner thighs working to help you bridge and hold the block.
Keep your belly button drawn in so you don’t hyperextend your back. Do not worry about exactly how high you bridge up. Just focus on consciously squeezing your glutes at the top and extending your hips.
Do not push backward off your heels. Make sure you are driving straight up and that your knees, ankles and hips are all in line. The block should keep your knees from really caving in or falling open.
Squeeze your glutes for second or two at the top and lower all the way back down to the ground before repeating.
Do not rush through the move. To make the move harder, hold longer at the top or even slow down the lower back down to the ground. A slower tempo means more time under tension and more work for your glutes.
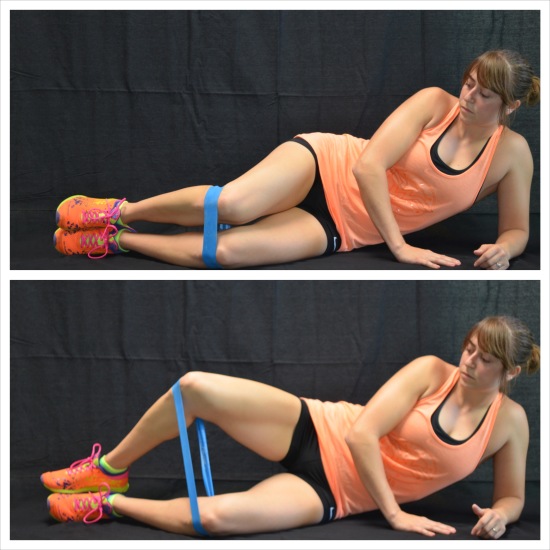
Mini Band Moves:
The Mini Band is one of the best tools for glute activation. It works your butt from just about every angle and it is easily portable so anyone can use it just about anywhere. Plus, they are only about $3 to buy.
For Mini Band Exercises to get your glutes firing before you work, check out these 10 Mini Band Moves. When you get your glutes activated with these moves, you improve your mind-body connection and also wake up your glutes so they fire properly during other lifts in your workout.
These activation moves make sure that your glutes work and that your low back and/or hamstrings or even your quads don’t take over and try to do work they can’t handle. Just make sure that you actually think about and concentrate on your glutes working during these activation moves. Don’t just go through the motions. It is very important that you concentrate on the correct muscles working!
Planks:
When people think of Planks they really think of abs. But Planks are a core exercise that work everything from your shoulders to your knees and improve your stability and strength.
Planks are a great activation exercise to include in your workouts if you’ve suffered from knee pain because they can help strengthen your quads, adductors, glutes and even abductors depending on exactly what variations you do.
For a guide to Plank Form and some great plank variations, check out this Perfect Plank Form Post. And a great plank variation to get your glutes activated and stretch out your hips while getting your core working is the Plank with Reach Back and Out.
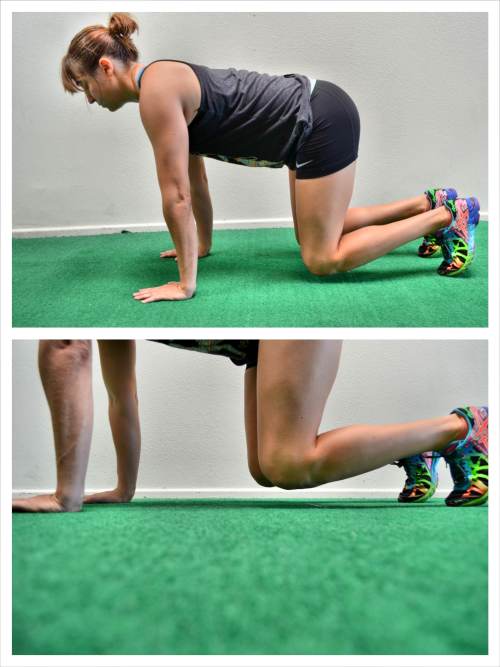
Bull Dog:
The Bull Dog Hold is a great isometric move to get your quads working to help stabilize your knee. This move also really works your core and shoulders and can stretch your feet.
To do the Bull Dog Hold, set up on your hands and knees with your hands under your shoulders and your knees under your hips. Tuck your toes under and flex your feet.
Lift up onto your hands and the balls of your feet and hold. When you lift up onto your feet from your knees, make sure to lift up so that your knees only about an inch off the ground as you hold.
Also, make sure to keep your head and back in a nice straight line. Do not tuck your chin or let your low back arch. Keep your abs engaged.
Hold and do not let your butt go up in the air as you fatigue.
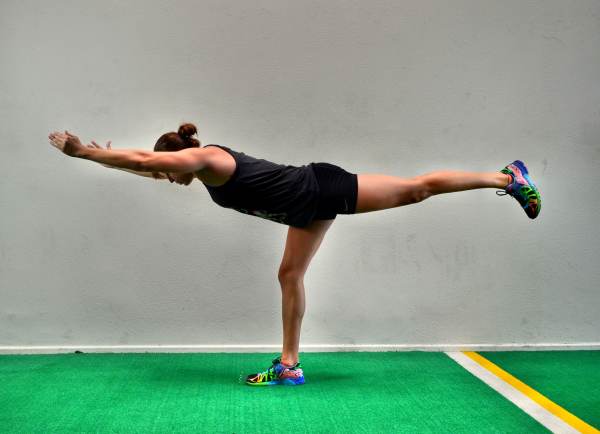
Warrior III:
The Warrior III is another great isometric move to improve your balance and strengthen your feet, ankles, legs and glutes. It can also help stretch your calves and hamstrings and improve the stability of your legs.
To do the Warrior III, start standing tall with your feet together. Then shift your weight so you are balancing on one foot with the knee slightly bent.
Hinge over at the hips, leaning your torso forward as you push your butt back and lift your back leg toward the wall behind you. Pretend you are driving the foot of the lifted leg straight back into the wall behind you.
Keeping your back flat and your core tight as you hold this hinged over position. You can then reach your hands overhead in front of you, out to your sides or back toward your heels.
Hold in this position. Do not let your back round or your other foot touch down.You want a nice straight line from the bottom of your lifted heel to the tip of your head. Try to straighten your standing leg as much as possible as you hold to work on your flexibility and stability.
Make sure you do not lock the standing leg out though as you hold. Also make sure your hips don’t rotate open. Squeeze the glute of the lifted leg to keep your hips level.
Beginners may need to reach back toward their foot instead of out in front of them. Using a wall can also help beginners. Stand with a wall behind you and when you hinge over have the lifted foot lightly touch the wall behind you to help you balance.
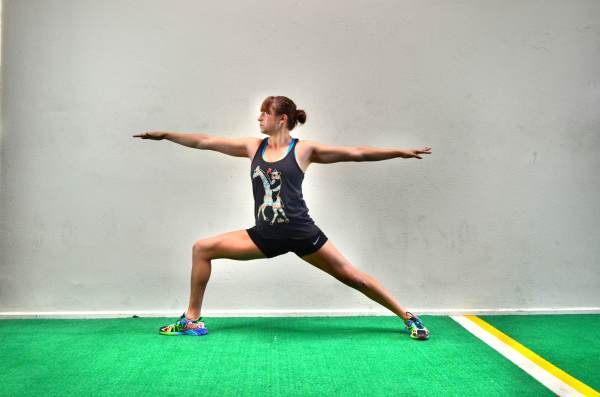
Warrior II:
This Warrior II Pose is a great way to strengthen your glutes, legs and ankles while also opening up your hips and adductors.
To do the Warrior II, step forward into a nice wide lunge stance with your feet about 4 feet apart to start. Keeping the front foot pointing straight ahead, turn the back toe out so your feet are about perpendicular. The back of your front heel should be in line with the instep of your back foot.
Then sink down into a lunge, bending your front knee while keeping the back leg straight and the front heel firmly planted. Try to get your front knee bent to 90 degrees and your quad parallel to the ground. You may find you need to step your front foot forward a bit more to sit comfortably in the lunge and keep the front heel down.
The lower you sink in the lunge, the harder the move will be.
Do not let your front knee cave in or your back leg bend. Squeeze your glutes and keep your front knee in line with your hip and your ankle. Squeezing your glutes will also help open up your hips.
Also make sure that while you hold the low lunge, your back foot stays flat on the ground. Do not rock in on your back foot as you hold. Also make sure the heel of the front foot stays down.
While in the low lunge, open your arms out at shoulder height. Reach one forward over the front leg and the other back over the back leg. Keep the chest open and do not lean forward. Keep your weight centered in the lunge.
Hold and breathe relaxing into the pose. Then switch to the other side.
Strengthening Exercises:
Once you’ve gotten everything activated and ready to work properly, you can then move onto your workout. Even when working out, you want to select moves that are not only more knee-friendly, but that also help you improve your movement patterns and strengthen the correct muscles.
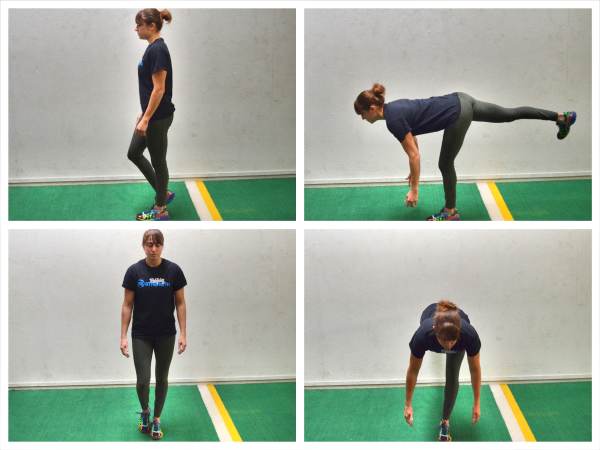
Single Leg Deadlift Variations:
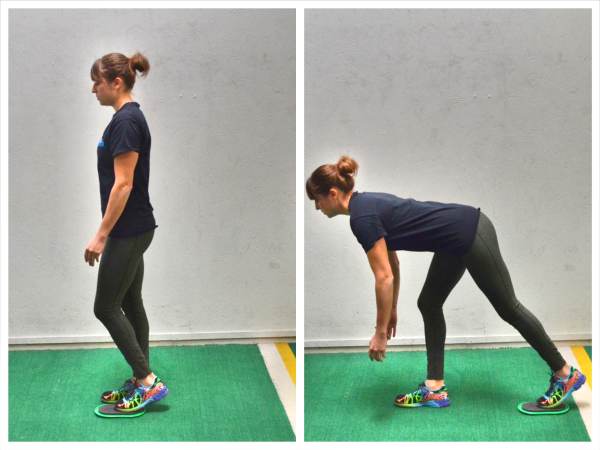
The Single Leg Deadlift is a great posterior chain movement to strengthen your glutes and hamstrings while also improving your balance. It is also a great move for anyone with knee pain because it doesn’t require any knee flexion.
To do the Bodyweight Single Leg Deadlift, stand up nice and tall, balancing on your right leg with your knee slightly bent and your left toe lightly touching the ground. Your arms should be hanging down by your sides.
Then lift your left leg back toward the wall behind you as you hinge over, keeping your back flat. As you hinge over, extend your arms down toward the ground.
Make sure to sit your butt back as you hinge over and not simply lean forward. Your weight should shift slightly toward the heel of your standing leg although you do not want to complete rock backward or you will lose your balance.
Do not reach your arms toward the ground and let your back round. It doesn’t matter if you touch the ground, just extend your arms down toward it as far as you can without rounding or “squatting.” Your standing knee should be soft but isn’t going to bend extra as you hinge over.
Hinge over as far as you can with good form and then drive through that standing heel to come back up to standing. Feel your glutes work to bring you up nice and tall. Squeeze your glutes at the top and repeat, hinging back over on the same leg.
Only tap your other foot down at the top if you need to. Also, do not use the other foot to help you come back up to standing. Slow down the tempo of the movement to make it harder. You can also add weight to the movement to make it harder.
If you really struggle with balance or simply want to add in a little variety to your workouts, you can also try the Slider Single Leg Deadlift. This move still works your glutes and hamstrings as well as your calves, but doesn’t require as much stability to balance.
Sliders are another great tool for anyone that works out at home or travels a lot because they are light weight and easily portable. You can also trade them out for towels if you have hardwood floors.
To do the Single Leg Deadlift with Slider, place the ball of one foot on a slider with your arms down by your side. Stand nice and tall.
Then, hinging at the hips, slide the foot on the slider back. You want to feel a stretch down the hamstring of your standing leg as you sit back and load your glute. Lower your arms down toward the ground as you hinge over, but do not round your back to try to touch the ground.
Keep your back flat as you hinge over. Then driving through the standing foot, come back up to standing. Squeeze your glutes as you come back up.
Hinge back over and repeat. Keep your abs braced as you hinge over so you don’t feel this move in your low back. Complete all reps on one side before switching the slider to the other foot. If you want to make this move harder, hold weight.
Straight Leg Deadlift:
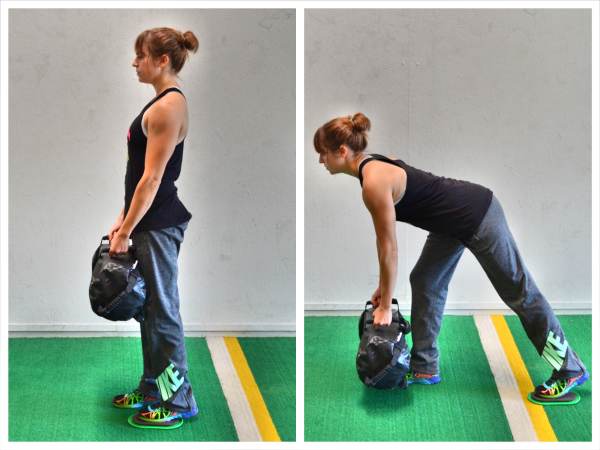
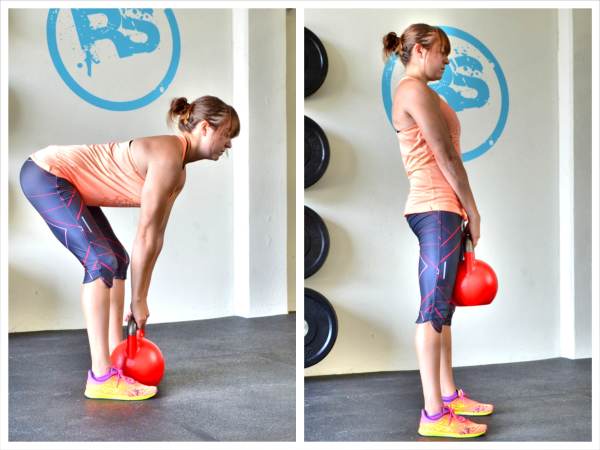
The Straight Leg Deadlift is another great deadlift variation to strengthen your glutes and hamstrings. And because your legs are straight, it is easier on the knees. However, you really do need to have some sort of weight to make this move challenging. If you don’t have weights, you could always try to use gallon jugs, your dog or a box/purse/duffle bag full of books.
To do the Straight Leg Deadlift, stand with your feet about hip-width apart. Hold the weight in both hands right in front of your legs.
With a slight bend to your knees, hinge over pushing your butt back and dropping the weight down toward the ground. Keep your back flat and your arms straight as you hinge over and lower the weight down. Do not round your back just to reach the weight all the way to the ground.
Then drive through your heels to come back up to standing. At the top, squeeze your glutes and stand up nice and tall.
Then repeat, pushing your butt back and hinging back over, keeping your back flat as you lower the weight.
This move may almost feel more like a hamstring stretch than anything else. Just make sure you really push your butt back and don’t simply lean forward as you hinge. You do not want to feel your low back taking over. If your low back starts to do all the work, you aren’t recruiting the correct muscles, which means you may just be perpetuating the imbalances that have lead to your knee pain.
Weighted Glute Bridge:
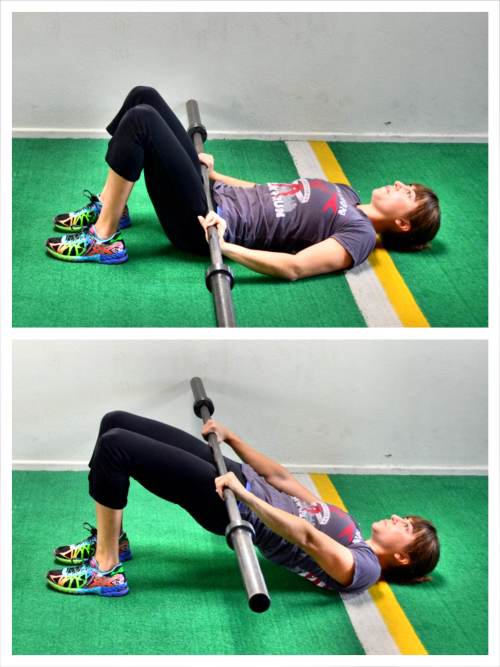
The Glute Bridge is a versatile exercise that can, and should, be used both as an activation move and a strengthening exercise. A great variation of the Glute Bridge to really strengthen your backside while opening up your hips is the Weighted Glute Bridge. While a kettlebell can be used for this move, a sandbag or barbell is best.
If you don’t have access to weights, but do have a Mini Band you can also use that to do a variation of the Weighted Glute Bridge called the Mini Band Hip Thruster.
To do the Weighted Glute Bridge using a Barbell, sit on the ground and roll or place the barbell over your hips. Then lie back and bend your knees with your heels close to your butt.
Pushing the barbell down toward your quads, drive your hips up and squeeze your glutes. Make sure you drive through your heels and upper back to lift straight up.
Squeeze your glutes as you lift to extend your hips. Do not let your knees fall open or cave in. Also, do not hyperextend your low back just to try to bridge up higher.
Hold for a second or two and then lower back down.
As you lift, you may find you want to press the barbell down and away onto your thighs to help you squeeze your glutes at the top and keep your core engaged. You may even find that performing a pelvic tilt as you lift helps you prevent the move from going into your low back.
Also, you can use a sandbag, bag of books or any other object to weight this move down.
To do the Mini Band Hip Thruster, place the mini band around your hips and lie on your back on the ground.
Place your feet flat on the ground with your knees bent. The closer your heels are to your glutes, the more the move will isolate your butt. The farther from your glutes your heels are, the more your hamstrings will be involved. If you find that your hamstrings always take over when doing posterior chain movements, you will want to make sure your butt is the prime mover with the Hip Thruster to help you prevent and alleviate knee pain.
Make sure that no matter how close or far your heels are from your butt, your heels stay down. Then extend your arms down by your sides and grab the back of the band behind your butt in both hands.
Press the band down into the ground and then bridge your hips up toward the ceiling, pressing against the band.
Bridge your hips up as high as you can, hold for a second and then lower down.
Again, do not hyperextend your low back just to bridge up higher. Make sure to drive straight up as you bridge and not push yourself backward. If you feel yourself trying to hyperextend your low back to get up higher, try the pelvic tilt as you bridge.
Slow down the tempo of the move to make it harder or use a heavier resistance. Make sure to keep the mini band against the ground as you bridge up.
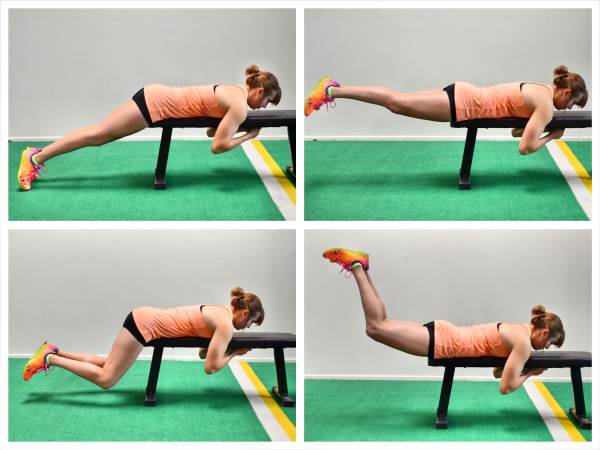
Reverse Hypers:
The Reverse Hyper is a great hip extension exercise to really get your glutes firing. You can do two different Reverse Hypers, a bent-knee and a straight-leg variation. The bent-knee variation isolates the glutes more while the straight-leg includes more hamstrings.
If you have troubles getting your glutes to fire, stick with the bent-knee so that your hamstrings don’t take over.
Also, while your low back will engage, you want to make sure that your glutes are the muscles powering the lift and not your low back.
To do the Bent-Knee Reverse Hypers (bottom), lie face down on a bench, box or table. Place your hips right on the edge of the bench and hold on to the bench or something in front of you. If your hips are too far on the bench, you are more likely to hyperextend your low back in an attempt to get your hips up higher.
Place your heels together and bend your knees to about 90 degrees. Flex your feet. You can choose to turn your toes out to hit a slightly different aspect of your glutes as well.
Then, with your knees bent, kick your heels up toward the ceiling, squeezing your glutes to lift. You can sort of drive up and out a bit to really get your glutes to work.
Make sure that you squeeze your glutes as you lift and don’t hyperextend your low back just to get up higher. Lift so that your quads are about parallel to the ground and lower back down.
Only lift higher if you don’t feel your lower back take over. You want to focus on and make sure your glutes are working to lift NOT your low back. The most important part is that you feel your glutes tighten.
Hold at the top for a second or two to feel your glutes work and then lower back down. You can also add weight to make this move harder.
To do a Straight-Leg Reverse Hyper (top), you will set up like you are going to do the Bent-Knee Variation, however, you will keep your legs straight. Still place your heels together though. And you can also choose to turn your toes out to hit a slightly different aspect of your glutes.
Then, keeping your legs straight, raise your heels up toward the ceiling. Squeeze your glutes as you lift. Lift till your legs are about parallel to the ground and lower back down. Only lift higher if you don’t feel your lower back take over. You want to focus on and make sure your glutes are working to lift NOT your low back.
If you do feel your low back, make sure you are pressing your pelvic down into the bench as you squeeze your glutes to lift.
Hold at the top and lower back down. Slow down the tempo or add weight to make the move more challenging.
Anterior Reach Lunge:
The Anterior Reach Lunge is a great exercise for anyone suffering from knee pain because it puts less strain on the while still helping you develop big, strong legs.
The movement is still a hinge like the Deadlift, which makes it easier on the knees; however, unlike Deadlifts and Reverse Hypers, the Anterior Reach Lunge isn’t only a posterior chain movement – it also works your quads to help you develop strong legs. This move will also strengthen your feet and ankles because they will have to work to stay balanced as you lunge.
To do the Anterior Reach Lunge, start standing tall with your feet together. Then take one big step forward, bending your front knee as you step forward.
Keep your back leg straight as you lunge forward and make sure that when you step forward your front heel down stays down.
Do not let your weight go forward and your front knee go over your front toe. If your weight all goes forward and your foot isn’t firmly planted, you may load your knee which could perpetuate your knee pain.
Your weight also shouldn’t go forward because as you step forward you want to hinge over and push your butt back to load that front glute. Reach your hands overhead as you hinge and lunge.
Then, pushing back off the front leg, come back up to standing. Stand nice and tall and then repeat, stepping forward and hinging over to load that front glute.
Make sure you don’t step out so far that you can’t push back up to standing in one smooth move.
You can also either alternate sides or stay on one side until all reps are complete. Add weight to make the move more challenging, but makes sure you have good form and can maintain your balance and feel your glutes working before you do.
If you hold weights, let them hang down by your sides instead of reaching overhead as you lunge and hinge. Make sure that you can still step forward and backward in a smooth motion with the weights. Otherwise they may be too heavy.
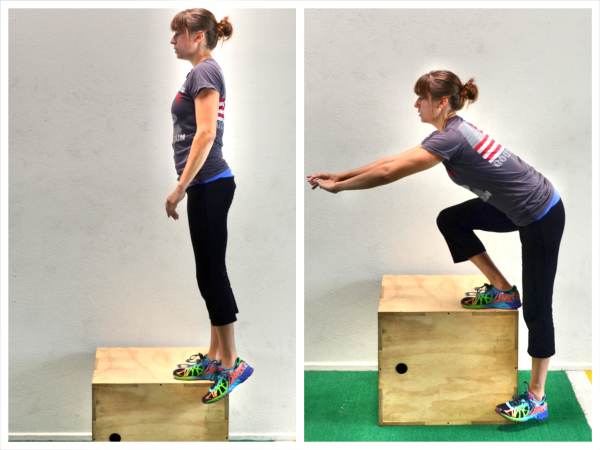
Step Downs:
Step Ups can be a knee-friendly exercise some of the time, especially if you have a lower box to use to start with. However, if you only have one box or a step and it isn’t low enough, you can still do a Step Down and not risk knee pain.
The Step Down allows you to control how low you go no matter what height the box is. And often with Step Ups people don’t step up correctly and they end up loading their knees. The Step Down is very focused on hinging and loading the glute, which will help you protect your knees.
To do the Step Down, start standing on a bench, step or box so that you can step off of it to the side with your left foot. Your right foot will be near the edge of the bench or step.
Then slowly begin to bend your right knee and lower your left foot down to the ground. As you bend your right knee, make sure to sit your butt back and hinge forward. Do not round your back as you hinge.
Lower your left foot down as close to the ground as possible. Do not put the foot fully on the ground. You do not want to be able to push off the ground with your left foot to help yourself come back up to standing.
Once you’ve lowered your left foot down as far as you can, drive through your right foot to come back up to standing. Feel your right glute working to push you back up to standing.
If you feel this in your low back, do not go as deep in the Step Down. Also, make sure you are slightly back in your standing heel. You really want to load your glutes and not your knees with this movement.
And because this move is very challenging for the balance, you may want something in front of you to help you balance or you may not want to go as low in the Step Down to start.
Complete all reps on one side before switching. To make the move harder, get a higher step or box or add weight.
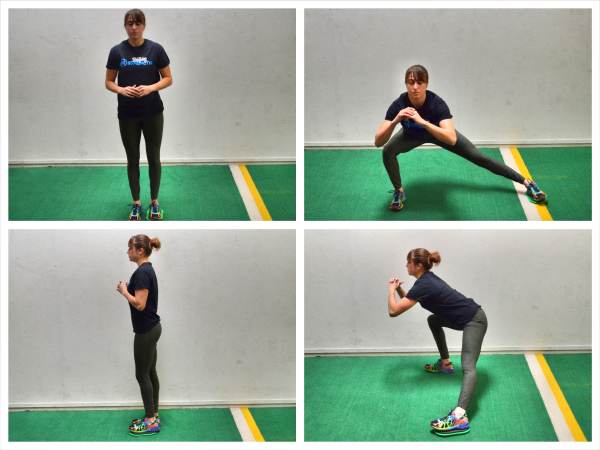
Slider Side Lunges:
To develop strong legs and protect our knees, we need to be strong in every plane of motion; however, often lateral movements cause us further knee pain.
A great, more knee-friendly, lateral movement is the Slider Side Lunge. Because you aren’t stepping out into the lunge, and you can really focus on hinging to load the glutes, this move can be a great way to strengthen your adductors and knee stabilizers in the frontal plane of motion.
If you don’t have Sliders (Valslides) remember you can always use towels! And please be careful with this move the first time you do it. The slider or towel reduces traction so do not slide out too far to start. Start with a smaller range of motion and increase it as you become comfortable with the move.
To do the Slider Side Lunge, place a towel or slider under one foot. Start standing tall with your feet together.
Then slide the foot on the towel/slider out to the side, hinging over and sitting your butt back as you bend your standing leg to sink into the lunge.
Make sure to keep your standing heel firmly planted on the ground.
Then drive through your standing heel and pull your foot on the towel/slider back in to come back up to standing. Do not allow yourself to go forward as you come back up to standing. You do not want to load your knee. Make sure to really sit back and then drive back up through your heel. Keep your back flat as you lunge even if you lean forward a bit.
Make sure you feel this in your standing glute and the adductor (inner thigh) of the leg on the slider. Complete all reps on one side before switching.
Go lower in the lunge or slow down the tempo to make this move harder. You can also add weight.
Focus on the hinge to protect your knees. Do not worry about how low you go at the beginning.
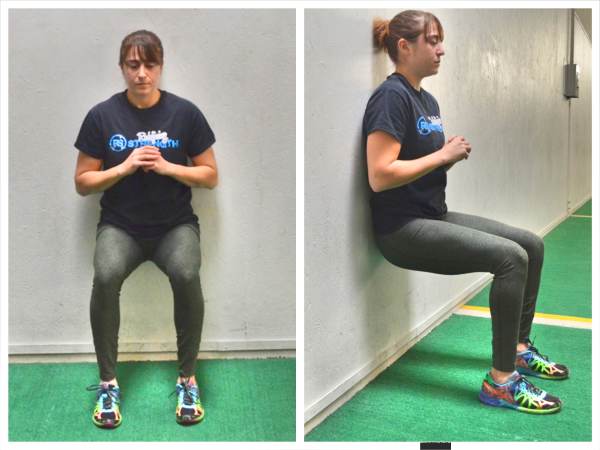
Wall Sit:
While squats usually aren’t very knee-friendly, the Wall Sit is a great squat like movement to strengthen your quads and build great leg stability.
To do the Wall Sit, stand with your back to a wall and your feet about hip-width apart. Then sink down into a squat and press your back into the wall behind you.
When you sink into the squat, try to get your quads parallel to the ground and make sure your ankles are aligned under your knees. Hold there and drive your back into the wall.
If you start to feel this in your low back, try engaging your core with a pelvic tilt. Press your low back into the wall.
To make this move easier, don’t sink as low in the squat or move your feet out just a bit from the wall. Do not let your ankles get too far out in front of your knees though.
To make this move harder, hold a weight or even try a Single Leg Wall Sit.
To prevent and alleviate your knee pain, you need to include exercises from all 4 Steps. You do not need to use all the exercises listed above every time. Only pick a few and use the ones that target your areas of tightness and weakness.
And, for a great workout to help you get stronger legs with knee pain, try this Get Stronger Legs With Knee Pain Workout.


Great article, thanks for sharing! I am struggling with knee issues right now and had to give up cycling this last year. I started running and just completed my 2nd half marathon but my knee was in excruciating pain. I’ve been seeing a physical therapist for 2 months and we have been working on strengthening stabilizer muscles and stretching using some of the exercises you posted. Great info!
Hi Michele. Thanks! Good luck with your knee rehab. If you ever need anything, feel free to email me (Cori) at [email protected].
Well explained and amazing thorough. I can see you are really dedicated to helping promote health and wellness.
Diagnosed with OA on right knee September 2015. Doctor asked me if I wanted to make an appointment for knee replacement. A great deal of pain. I have done yoga three times a week, and stopped running.
Because of reverse lunges, walking more than ever, squats (without weights) Taking suppliments and extra vitamins, and a focus and dedication to understanding this diagnosed ‘problem’, I have improved my knee function by about 95%. I have no more pain, and took my children to Disneyland for 12 hours and walked without pain.
Please continue your good work. I will continue to focus on this problem, reserving surgery as a last resort (maybe after I’m dead).
Hi Aldo. That’s awesome that you’ve been so dedicated and have been working to strengthen everything to prevent the pain. I would definitely also work on some glute activation to make sure your knee issues don’t lead to issues elsewhere! 🙂 Keep up the good work! Cori
Hi there. What would you recommend for someone is trying to correct an imbalance because of an ACL replacement in the right knee? I also have arthritis from being bowlegged, which led to a lot of problems. I started working out again in June of this year, which has been so great. I’ve built up a lot of strength in general and can do things again that should have been super easy but weren’t, like running and jumping. However, what I’ve noticed is that I was focusing so much on my right knee/leg that it now seems to be stronger than my left leg. Do you recommend doing more reps of some of the above exercises on the left leg than the right leg? Thanks! 🙂
Hi Erika…Are there specific areas you feel are stronger? Also, how have you determined it is stronger? Do you find your mobility to be even? And what muscles/movements are you noticing the difference in? Sounds like you are doing a great job of slowly building and progressing so congrats! 🙂 Cori
Great and helpful article! Thanks! 🙂
No problem! Hope it helps! 🙂
Thanks for the great article! I have tight hips and knee pain, so I think this information can really help. I do foam rolling, but not quite in depth as this.
Thank you! Also make sure to include lots of glute activation!!! This article may also interest you – https://redefiningstrength.com/unlock-your-hips-and-activate-your-glutes/
In 2017 I tore 70% of the achilles off my calf muscle (walking the Camino trail across Spain). Once they reknitted, I have had various imbalance problems (glutes & inner quad inactivation, knee pain of that leg, muscle wastage etc) ever since then. It’s been really frustrating, since I am usually very active. I have bought a couple of your programmes, Macrohacks and Booty Burner (yay). I have trolled through all the links on your website and found your explanations and solutions soooo clear, thoughtful, careful and informative. I have never come across anything so helpful – onwards and upwards!
You absolutely rock!! I love your dog clips too.
Hi Terry! I’m so sorry this went to my spam! Here to help if you need anything as you go through the programs. So email me any time if you need anything!
I have been reading your articles and find them very informative, thank you. I had a left TKR 2 years ago and still have some issues with pain and swelling and now have issues with right knee. I get a lot of hamstring pain and have been working hard at dealing with this issue by rolling, stretching, doing glute activation and strengthening. The problem I have is that my workouts are long as I do the above routine and then add another workout – upper body or a full lower body workout. Do you have any suggestions. I really like the look of the above routine and would like to try it. Would you suggest to do it as my full lower body workout ? And then add it to my upper body workout on alternating days? Thanks for all your great articles and videos I have been following for a few years.
Why are you doing two routines in one day? If I have clients do a lower body workout I alternate areas worked over the week. If you want to use the warm up with a full body workout you can too. But you don’t need to do upper and lower every day. You want to be cycling the areas that are worked 🙂