There is just something so cool and fun about handstands.
However, they are far from easy and many of us can’t even hold one against a wall let alone hold a freestanding one for a second.
But that doesn’t mean we shouldn’t include handstand work in our exercise routines.
Handstands are a great way to build upper body and core stability and strength. Beginner variations even improve your upper body mobility so that as your strength increases, you can do more and more challenging variations.
No matter your level, there is a handstand variation right for you that can help you work toward that freestanding handstand and give you a great upper body and core workout.
Check out our How to do a Handstand Progression (and our How to do a One-Handed Handstand Progression) to help you achieve that handstand or at least get in some great upper body and core work!
How to do a Handstand Progression
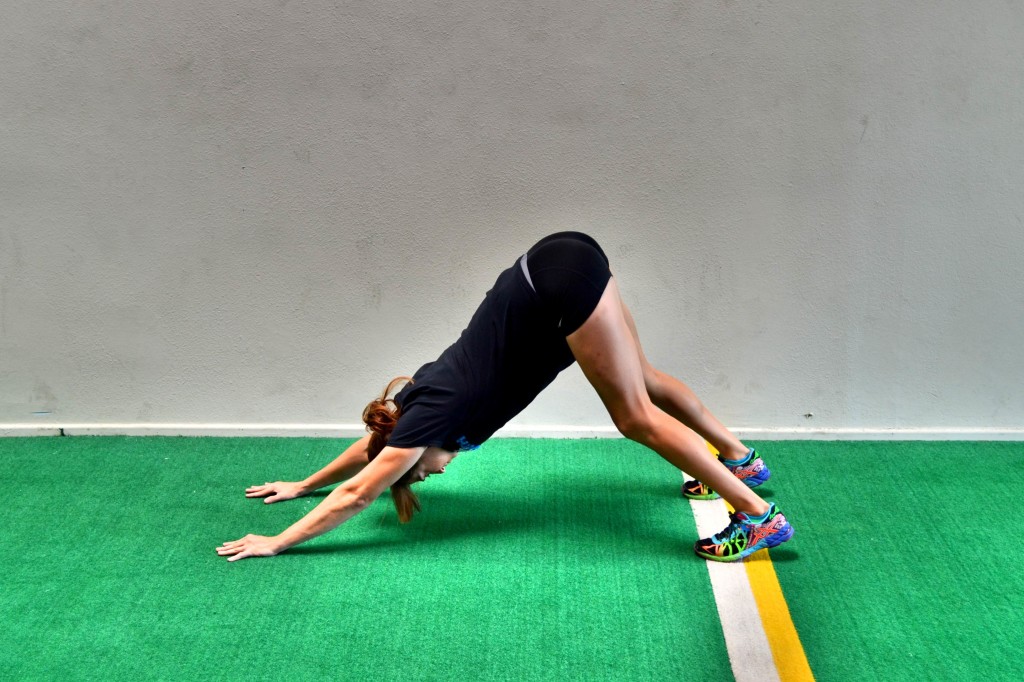
If you’ve never attempted a handstand before and you sit at a desk job all day, you will want to start with a variation of the Downward Dog.
This Downward Dog variation will improve your upper body mobility to help you remain injury free as you work toward harder handstand variations. It will also improve your upper body and core stability.
To do the Downward Dog Handstand Variation, start on your hands and knees with your hands a little bit out in front of you.

Then push your butt up in the air, and drive your heels back and down toward the ground. Do not worry about keeping your legs straight. You may even want to bend your knees to be able to get your back flatter.
As you drive your butt up, press your chest back and create a nice straight line from the heels of your palms up your spine to your tailbone. You want your biceps by your ears and your arms straight.
Drive your chest back and hold. Make sure to keep your head in line with your spine as you push your butt up.
Also, make sure you don’t walk your hands back toward your feet to get your back flatter.
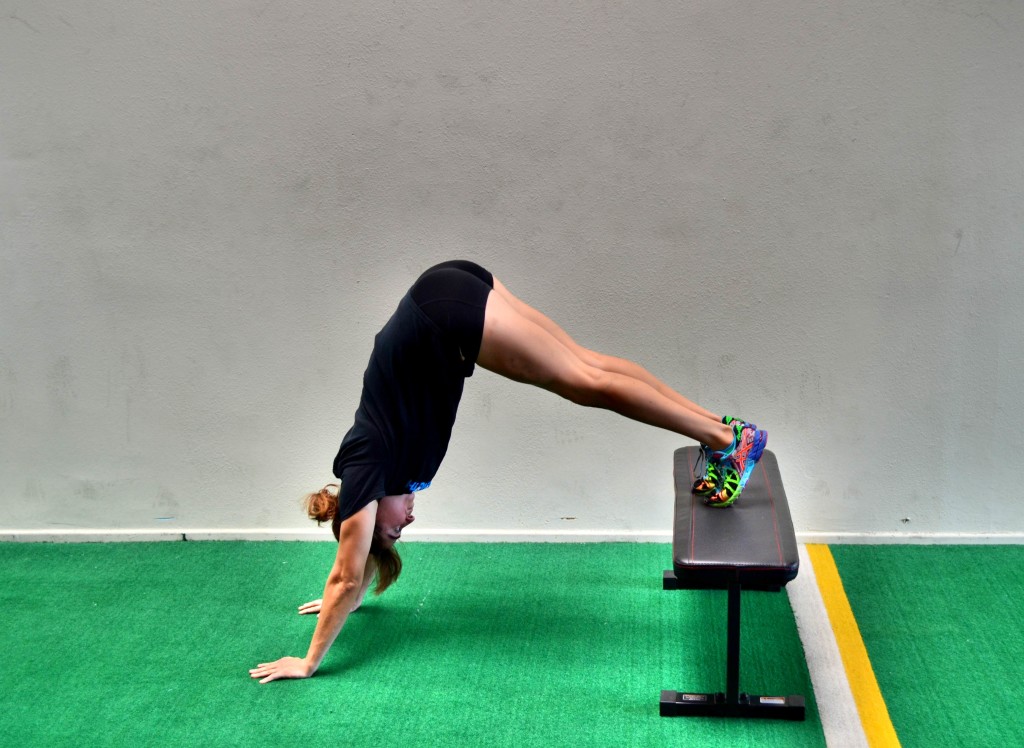
To progress the handstand from this Downward Dog Variation, place your feet up on a box or bench.
This Box Handstand Variation will still work on your mobility while making the upper body and core work harder to stabilize. You will even feel your legs and glutes working with all of these handstand variations.
To do the Modified Box Handstand, place your feet up on a box or bench. The higher the box or bench, the harder the move will be.
Walk your hands back a bit toward the bench and press your butt up in the air. Your legs may be bent or straight.
As you press your butt up toward the ceiling, create a nice straight line with your arms and spine. You want a nice straight line from the heels of your palms up to your tailbone. And your biceps should be right by your ears as you hold.
Make sure to keep your abs engaged as you hold. You do not want to feel this move in your low back.
Once you start to feel comfortable with these modified holds off of the wall, you are ready to begin walking up the wall.
With the beginning wall holds, you will face the wall as you walk up.
To start with a Beginner’s Wall Hold, walk your feet only a few feet up the wall. Then walk your hands back so that you are creating a 90 degree angle with your body. You want a nice straight line from the heels of your palms up to your tailbone.
Make sure your back is nice and flat and that your spine is in a nice straight line. Hold there and make sure to breathe.
With the wall holds, also start focusing on really feeling and gripping the ground with your hands. Being able to grip the ground will become more and more important as you progress to the freestanding handstand.
Also, make sure that you engage your abs and glutes to protect your low back as you walk up the wall further.
Once you’ve mastered this modified wall hold, walk your feet up higher on the wall.
The higher up you walk your feet and the closer to the wall you get with your hands, the harder the handstand hold will be.
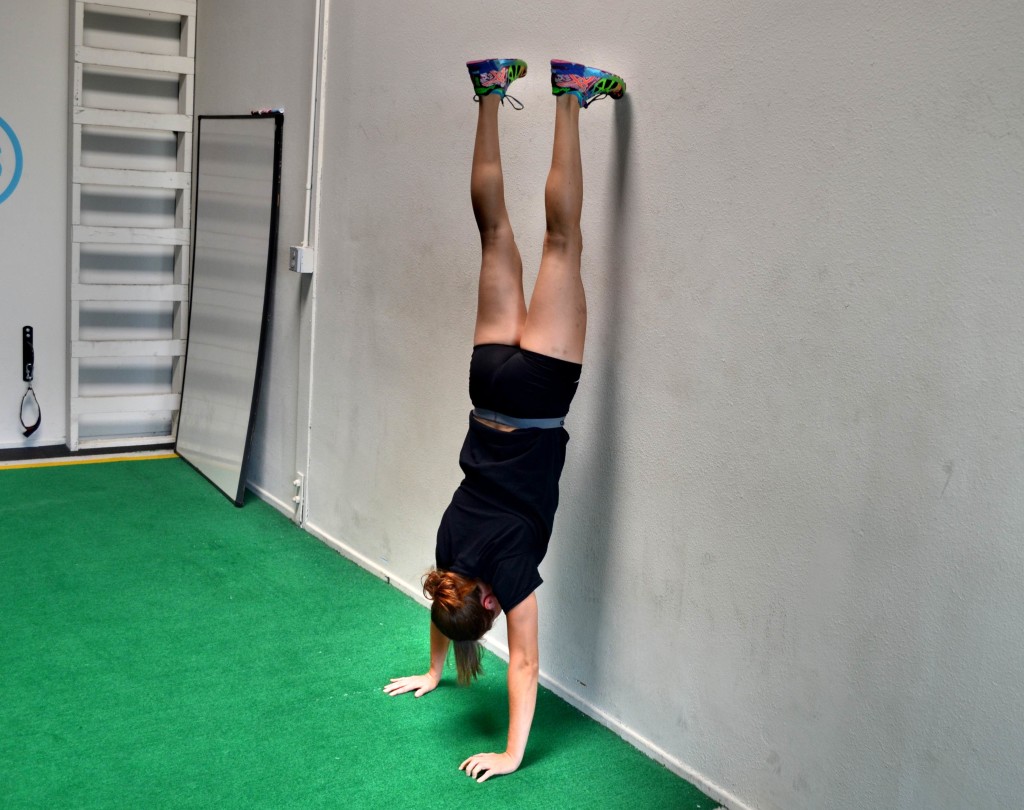
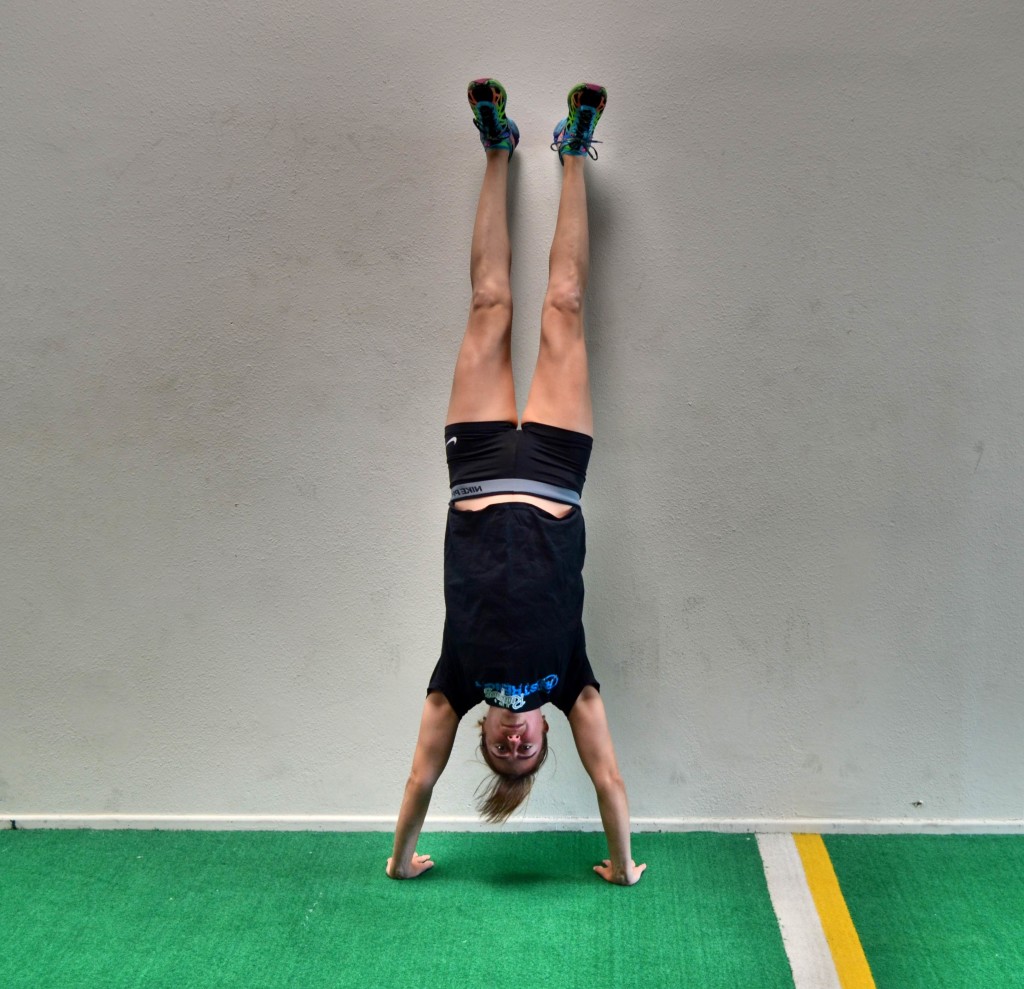
Your goal with the Handstand Wall Holds is to get all the way up parallel to the wall.
With this Advanced Handstand Wall Hold, make sure you are not letting your low back arch or your legs rest against the wall. You want to engage your abs and glutes and create a nice straight line with your body from the heels of your palms all the way up to the heels of your feet.
Your entire body will be engaged and working to maintain this nice straight line. Also focus on really gripping the ground with your hands as you hold.
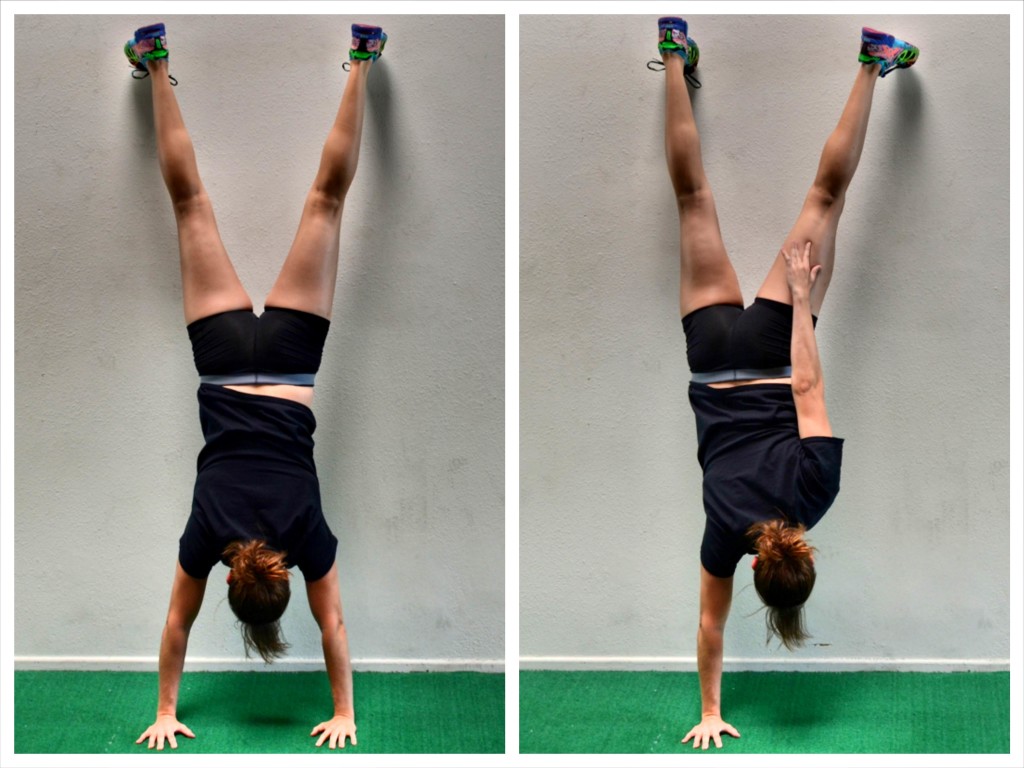
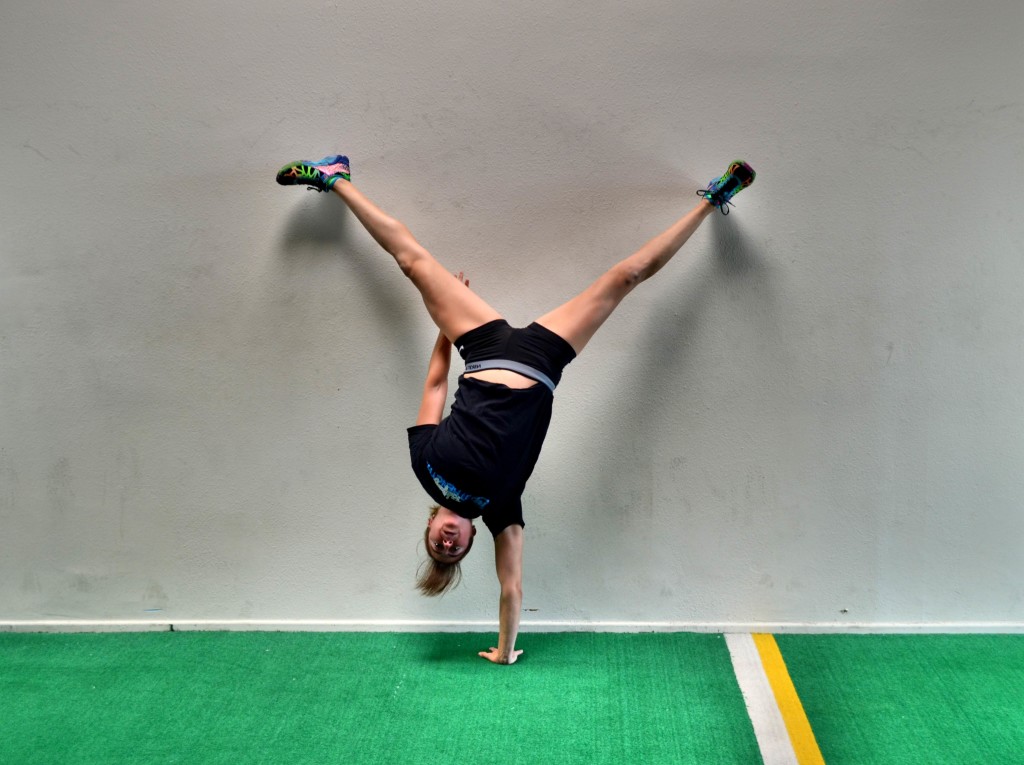
Once you can hold with your body completely parallel to the wall, you will want to try to lift one foot at a time from the wall to force your core to work harder to stabilize.
Then you will want to move on from the static holds to Handstand Hip Touches and Wall Walking.
Handstand Hip Touches are a great way to help you develop core stability and strength for freestanding handstands. They also really help you work on your hand’s connection to the ground and your lat engagement. They are a great way to have the balance and safety of the wall while creating more instability and forcing your body to get stronger for the full handstand (they also help with hand walking and the one-arm handstand!).
You will also find that when you first play around with the freestanding handstand you can’t keep your weight perfectly centered and you need to move and adjust your hands a bit by taking a “step” forward. The hip touches start to teach you how to be able to adjust and move on your hands. (The Handstand Wall Walks are a way to advance the hip touches further before fully leaving the wall.)
To do the Handstand Hip Touches, walk your feet up the wall to an appropriate height. You do not want to be more than a foot from the wall. If you are more than a foot from the wall, you probably aren’t yet ready for this variation.
You may find you want to widen your feet a bit against the wall. This will make it easier to stabilize.
Then with your body in a nice straight line all the wall from your hands to your heels, slowly lift one hand up off the ground to touch your hip. Keep your abs engaged and try not to let your hips rotate.
Then lower the hand back down and lift the other hand to touch your hip. Slowly keep alternating hip touches until time is up or you’ve completed a set number of repetitions.
If you feel your hips really wiggling from side to side, you may need to widen your feet more or regress the movement. You want to keep your abs and glutes engaged so that your body doesn’t rotate from side to side much.
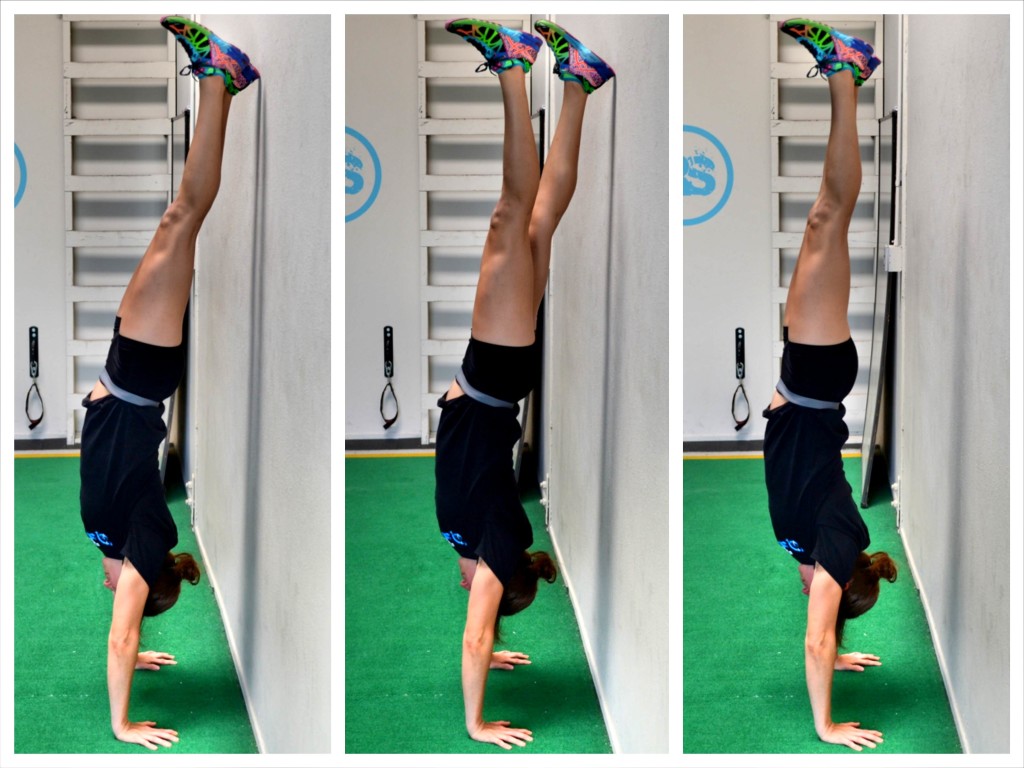
To advance the Hip Touches, you will want to start with handstand wall walking. Wall Walks can be done laterally against the wall or in-and-out from the wall.
To do Lateral Wall Walks, set up in a handstand against the wall with your hands no more than a foot from the wall.
Set up with your hands about shoulder-width apart and your feet together against the wall. Make sure your body is in a nice straight line and that your hips aren’t caving toward the wall.
Then step your hands sideways and together and your feet apart. Make sure your body stays in a nice straight line as you move.
Moving the same direction, step your hands apart and your feet back together. Keep moving in this pattern laterally against the wall. Make sure your abs are engaged and that you don’t feel this movement in your low back. Maintain a nice straight line with your body the entire time.
Another way to do Wall Walks is In and Out from the wall. While both the hip touches and the lateral wall walks require upper body and core strength, these wall walks will definitely challenge your upper body strength. They will also force you to really engage your core and grip the ground.
To do In-And-Out Wall Walks, you are going to start either off the wall or on the wall in a handstand right against the wall. You will then walk your feet down or up the wall moving your hands in and out from the wall. The entire time you move, you want to keep your body in a nice straight line.
You will basically be moving from a plank position against the wall from your hands to a completely upright handstand against the wall.
Especially as you near the bottom of the wall, you will want to let your hips sag, but you must fight to maintain a nice straight line with your body from your head to your heels.
The Wall Walks will really force your legs to engage and work as well.
As you become comfortable with the wall walks, you will want to start working on holds with little wall assistance.
If you only ever do handstand holds walking up the wall, you will get very strong and very good at handstand holds against the wall.
But if you want to be able to do a freestanding handstand, at some point, you need to start leaving behind the safety of the wall.
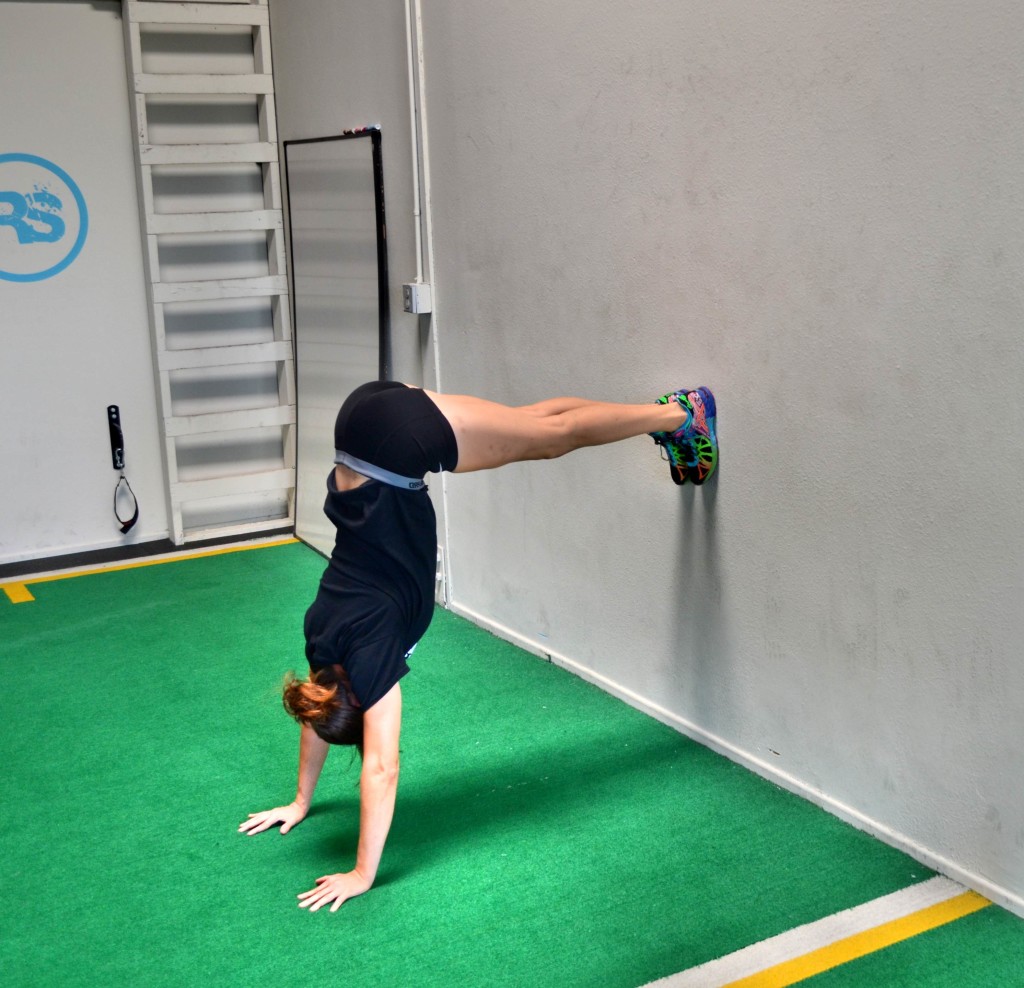
The best way to start doing this is by flipping up to the wall the other way (your back will be to the wall instead of your chest when you hold the handstand).
By facing away from the wall as you hold, you will have to learn how to “kick up” into a handstand. And you will be able to start slowly getting rid of all assistance and support.
To do the Wall Assisted Handstand Hold, stand facing the wall and place your hands on the ground no more than a foot from the wall. Make sure that you place your hands on the ground no wider than shoulder-width apart.
Too wide can actually make the hold harder.
Then kick your feet up toward the wall, pressing up into a handstand with your heels against the wall.
Engage your abs and glutes and do not let yourself sag back into the wall. Consciously think about your hands’ connection to the ground and feel yourself grip.
Hold in that position against the wall.
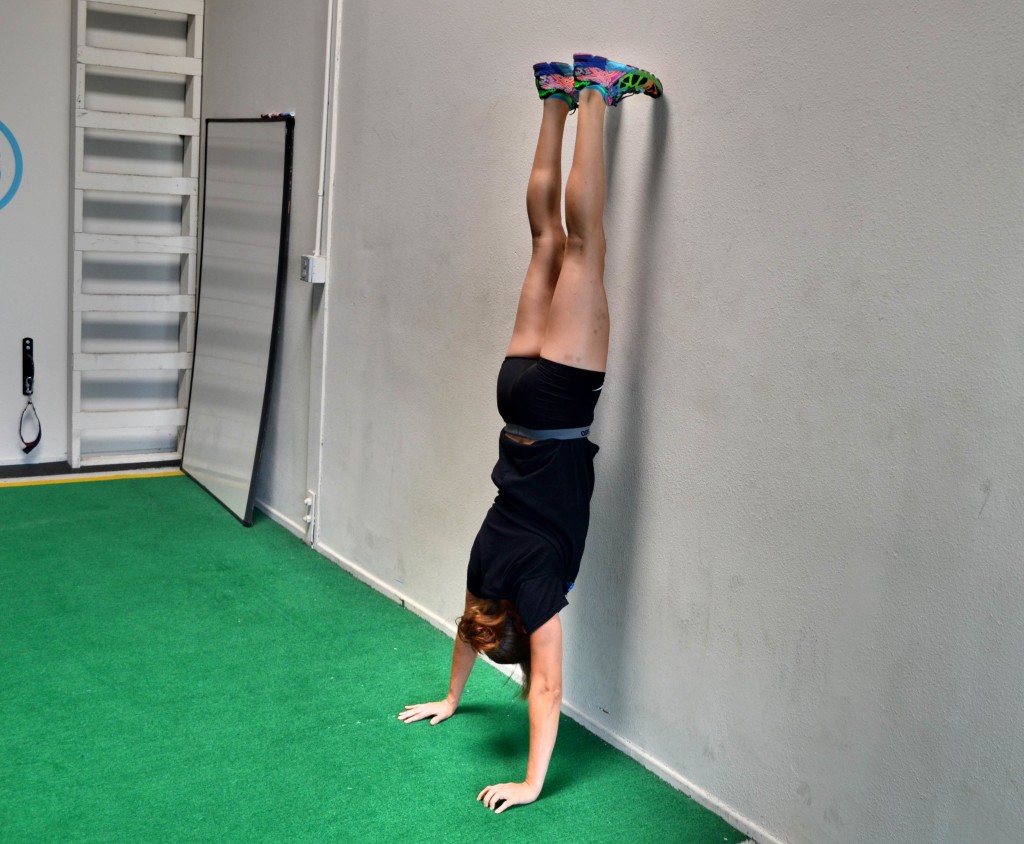
From this hold against the wall, you can progress the movement by lifting one foot off the wall.
Once you can lift one foot away, you will want to slowly lift both away.
To do the Wall Assisted to Freestanding Handstand, kick up into the handstand hold against the wall and then slowly lift one foot away. Once you feel in control and balanced, slowly lift the other foot away from the wall until you are holding with no assistance from the wall. If you feel yourself losing balance, you can bring one foot back to the wall to help you stabilize.
Once you are able to remove both feet from the wall and balance, you will want to set up further from the wall and try kicking up into a freestanding handstand.
Since the wall will still be behind you, if you kick up to far and start to go over, your feet will come to the wall so that you can push off and come back into the handstand. But other than having the safety of the wall, you will be basically working on the freestanding handstand.
To do the Freestanding Handstand with Wall Safety, set up about a foot from the wall so that it is there if you lose the handstand over, but not close enough that you will kick right back up into it.
Place your hands on the ground and kick up. Hold the handstand. If you start to go over, tap your foot on the wall behind you to stabilize and press back into the handstand.
With the wall not right behind you, you can really work on controlled kick ups and balancing while still having the safety of the wall behind you. Also make sure to really focus on gripping the ground with your hands as your hands are your base and super important in helping you hold a freestanding handstand!
From this assisted freestanding handstand, the next step is just to practice the fully Freestanding Handstand!
As you play around with the freestanding handstand, you may find you want to test out other handstand variations.
One fun variation to start working on is the Wall-Assisted One-Handed Handstand.
How to do a One-Handed Handstand
To work on the this One-Handed Handstand Variation, you will want to go back to that Wall Assisted Handstand Hold.
You will kick up to the wall behind you. From there, you will want to widen your feet to create a better base of support.
Also, many people want to set their hands wide apart. They think this creates a better base of support but it actually makes the movement onto one hand tougher.
There are also only very subtle changes to this basic hold to work toward the one-handed hold.
Whereas with the Freestanding Handstand Progression there were a ton of different variations, to work toward the one-handed handstand, there are very little changes you will make to this Wall-Assisted Handstand Hold. It is all about slowly shifting your weight.
The first thing you will want to begin doing from this hold against the wall with your feet wide is shift your weight slightly from side to side. Slowly shift your weight toward one hand and feel your obliques and lat really engage to stabilize.
Once you feel in control of this slight weight shift, try to shift the weight further off one hand and lift your palm. This is a very small movement and should be done slowly so that you feel everything “stack” to that other side.
If you move too quickly you will just throw yourself off balance.
After lifting your palm so that your fingers are supporting your weight, try to lift up onto your fingertips.
What you are trying to do is slowly shift all the weight to that one side. At each slight shift, you are giving your body a chance to adjust and stabilize.
From your fingertips, begin to lift each finger off the ground until your weight is basically all one one side with only your finger down.
Then slowly completely lift that hand off the ground and bring it up to your hip.
Do not rush the process as you are learning. If you just try to quickly lift, you probably won’t correctly engage and just end up falling.
As you become more confident in the movement, you will be able to more quickly lift your hand straight off the ground without taking as much time to shift your weight.
Then next comes the full Freestanding One-Handed Handstand!
Do you want to learn how to do a handstand? What progression are you able to do?


Thanks a lot for this nicely elaborated progression! It helped me a lot the last month to improve my handstand!
Glad it helped! If you have any questions, let us know! 🙂
My shoulders have muscle problems to put my weight on them. I do not need to lose weight. I am 106 lbs.. My shoulder has 2 bone spurs and muscle spasms in it and the other dislocates sometimes and gets muscle spasms.
I don’t see how I can do any form of the handstands. I do think you explain how to do them well.
I would recommend you actually focus more on these moves and this article than on handstands at this time – https://redefiningstrength.com/keep-shoulders-healthy-prevent-alleviate-shoulder-pain-injury/ These moves will be good to help you activate. If you suffer from dislocation, you’ll want to focus on the activation for your back in the link I provided.
This is a great article, but for me personally the difficulty lies in transitioning from the wall walk–which I can do perfectly now– to the wall assisted hand stand. I don’t know what it is but, after literally trying hundreds of times, I keep falling over. My best bet is that I’m doing something weird with my shoulders while trying to keep my balance but I’m not really sure. Do you have any tips for the transition in between the two? Thanks! 🙂
Hi Albert. So you mean the transition from facing the wall to facing away? I found that with the wall assisted starting further from the wall and then kicking up as if doing a real handstand is what makes that effective. It can also be good to start to spot the ground. And that way if you “kick over” you’ll kick your heels over into the wall and then can work on pressing the ground away and trying to lift your heels off the wall as you engage even your legs. This is what I’ve found helpful as a very non gymnast haha. Hope it helps you too!
Thanks a lot. My biggest hurdle in learning handstand on and off in the past several years is that I tend to have a banana curve, not able to hold the hollow position while inverted. I can do the hollow hold while laying down on the mat, but struggled to get into that position inverted. 🙁
But I haven’t tried all these progressions. I typically just do a wrist and shoulder warm-up, then go ahead to do face against the wall handstand. One difference is that, I use a 80cm tall chair as the wall, and lean my shoulders on the chair’s back, and do the ‘chair handstand’, in this way, my lower body will not touch anything to get support. So I can try to get into the hollow position as much as I can by tightening the muscles and try to push my lower back touch the chair’s back. However, the disadvantage is that I can’t push my shoulders off the chair’s back no matter how hard I press my fingers. 🙁
In your shoulder warm up, do you include scapular mobility work?