Isometric Exercises are moves where you hold in a position under tension. And often when we think of “core” isometric moves, we think of Planks. And while Planks are great isometric core moves, they aren’t the only great Isometric Core Exercises.
These 10 Isometric Core Exercises are a great way to build your core stability and strength so that your core works properly during heavy lifts. All of these moves also work your entire core – they work everything from your shoulders to your knees not just your abs.
Because these moves improve your core stability, they can help you not only get a stronger, more toned middle, but they can also help you prevent and alleviate injury.
All of these moves are great for everyone from the beginner to the advanced lifter just pick the variation right for you. Also, to get the most out of these moves, you have to make sure to hold with proper form.
Isometric Core Moves are the perfect chance to build your mind-body connection and focus on the correct muscles engaging and working. By building your mind-body connection, you will teach your body to recruit the correct muscles quickly when you do other lifts, helping you to not only lift more but also lift properly to prevent injury.
Because you are holding in an uncomfortable position, these moves will also help you build mental toughness and learn to become comfortable being uncomfortable, which is essential for achieving results.
If your form breaks down, rest and reset. Do not simply hold these moves to hold for longer. Make sure the correct muscles are engaging when you hold even if it means you can’t hold as long.
Check out these 10 Isometric Core Exercises to work and strengthen your entire core.
10 Isometric Core Exercises
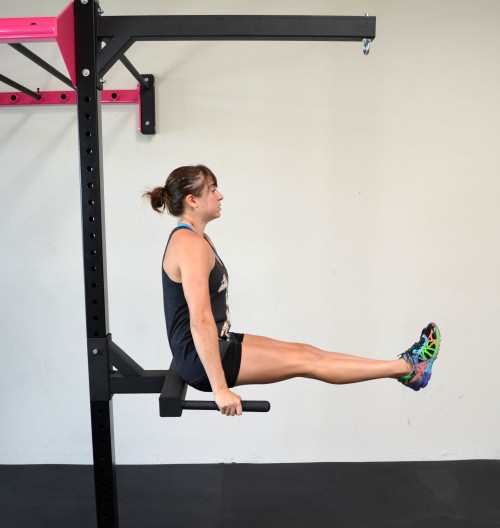
Dip Hold (Bonus! with Leg Raises or Knee Tucks) – If you want to improve your posture, lessen upper back, neck and shoulder pain while also strengthening your upper body and core, you need to do the Dip Hold.
And if you want to make the move even more challenging and core intensive, you need to add in some sort of Leg Raise or Knee Tucks.

To do the Dip Hold from parallel or dip bars, place one hand on each bar and then push up to the top of a dip with your arms locked out and your shoulders down and back. Press your chest out and draw your shoulders down so that you aren’t shrugging. You want to think about elongating your neck.
Your legs should hang down straight below you. Keep your core tight as you hold at the top.
Beginners may need to use some assistance and lightly keep one foot on the ground. If this is still too much, they can also do this move from a bench.
To advance the move, add in the Knee Tucks or Leg Raises.
To do Knee Tucks, while holding at the top of the Dip, bend your knees and tuck your knees up to your chest. Move slowly and make sure you don’t shrug your shoulders up as you lift. If bringing both knees in at the same time is too much, try lifting one knee up at a time.
To advance the move, you can do straight Leg Raises. Starting with your legs hanging straight down at the top of the dip, raise your legs out straight in front of you till your quads are about parallel to the ground. Then lower your legs back down. While you may rock back a bit as you raise, do not let your shoulders shrug.
Lift your legs and then lower back down. If you can’t lift your legs to parallel to the ground, try raising one leg out straight in front of you at a time or try the Knee Tucks.
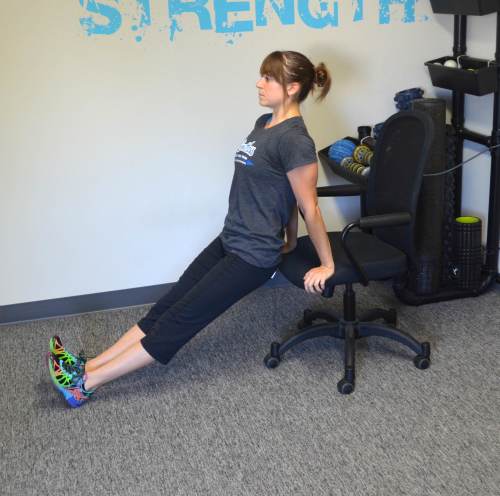
To do the Basic Dip Hold from a bench, sit on a bench and place your hands on the edge just outside your butt. Your fingertips should hang over the edge of the bench. With your legs out straight in front of you (you can bend your knees to make the move easier), lift yourself up and in front of the bench.
Straighten your arms out and keep your butt right back by the bench. Make sure to draw your shoulder blades down and back so that you aren’t shrugging. You want a nice tall posture with your chest pressed out and your neck nice and long. Hold at the top. Do not let your hips come up as you hold. You want to keep your butt down and back.
This is a great move to open up your chest while at your desk!
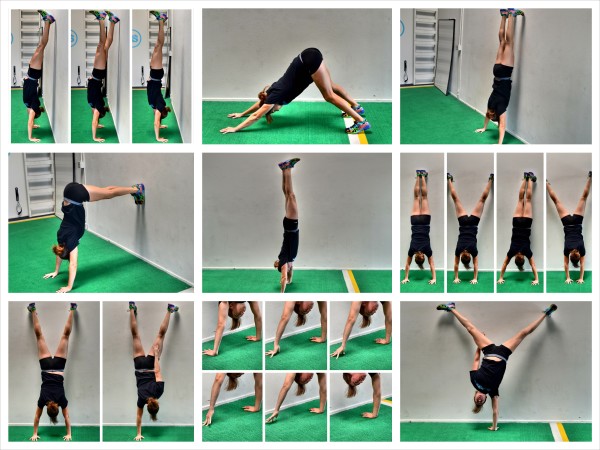
Handstands – Handstands are a great way to build core stability and improve your mind-body connection because you not only have to engage your core but you actually have to think about engaging everything to be able to hold a freestanding handstand.
Even if you can’t yet hold a freestanding handstand, there are handstand variations you can use to still work your upper body and core while helping you build toward that freestanding handstand.
Click here for the Full Handstand Progression.
Banana – The Banana is another great way to improve your mind-body connection as well as your core strength and stability. It is a very tough move and an advanced variation of the Pelvic Tilt so beginners will want to start with the Pelvic Tilt Progression and learn to keep their abs engaged before trying the Banana.
Click here for the complete Pelvic Tilt Progression.
To do the Banana and improve your mind-body connection so that you can engage your entire core (everything from your shoulders to your knees), start lying on your back with your legs out straight and your arms reaching overhead on the ground. Your legs should be together and your arms should be right by your head.
Press your low back into the ground and draw your belly button in toward your spine as you lift your legs and arms up off the ground.
Your neck and head should be in a neutral position between your arms and your legs should be together and out straight a few inches off the ground.
Hold here, squeezing your legs together as you try to get your shoulder blades up off the ground while keeping your low back against the ground and abs engaged.
Beginners may find they need to lift their legs up higher toward the ceiling or bend their knees to keep their low back against the ground and their abs engaged.
Beginners can also try an easier variation of the Pelvic Tilt if they feel their low back taking over.
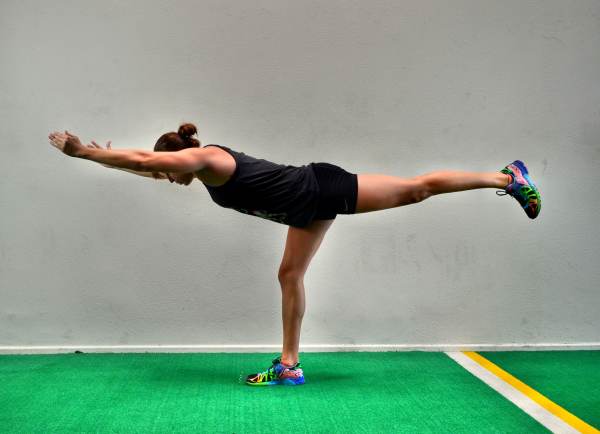
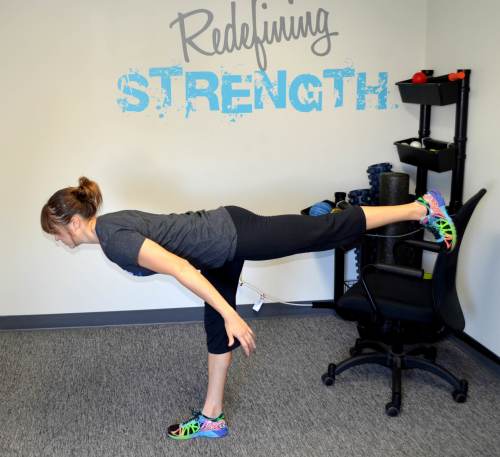
Warrior III – When we do unilateral moves, our core has to work harder to keep us balanced and in the correct positioning. The Warrior III Isometric Pose, because it is a unilateral move, not only works our core, but will also improve our balance and mobility. Plus this is a great move to strengthen the glutes!
To do the Warrior III, start standing tall and shift your weight toward one side.
Then balancing on one foot with the knee slightly bent, hinge over lifting your back leg toward the wall behind you. Sit your butt back as you hinge over.
Pretend you are driving the foot straight back into the wall behind you as you lean your torso over, keeping your back flat and your core tight.
You can then reach your hands overhead in front of you or out to the side or back toward your foot. Out in front of you will be the most challenging.
Hold in this position.
Do not let your back round or your other foot touch down. You want a nice straight line from the bottom of your lifted heel to the end of your finger tips.
Straighten the standing leg as much as your mobility allows without completely locking it out. Straightening your leg more will make the move tougher as long as you then don’t round your back. Also make sure your hips don’t open up as you hold. Squeeze your glutes to keep your hips level.
Beginners may need to reach back toward their foot instead of out in front of them or use a wall. Stand with a wall behind you and when you hinge over have the lifted foot lightly touch the wall behind you to help you balance.
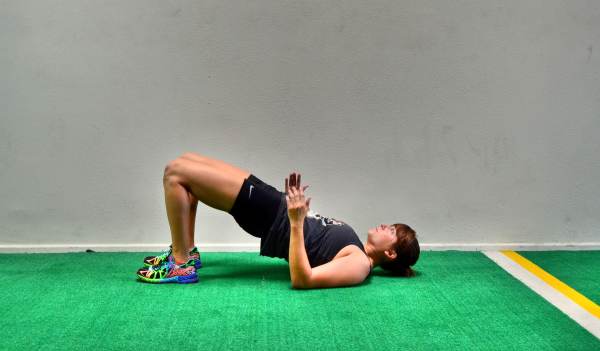
Glute Bridge Hold – An important part of your core that is often overlooked with core training is your glutes. And it is important to work your glutes because they are not only a large muscle group, but also a powerful muscle group. Working your glutes will improve your speed, how much you can lift and help you alleviate and prevent low back and hip pain.
Plus working your glutes will make them look better!
The Glute Bridge and Hold is a must-do glute move no matter your fitness level. Even advanced exercisers should include the Glute Bridge Hold in their recovery or warm up routines because it not only activates the glutes but also opens up your hips and works on the stability of your core.
To do the Glute Bridge Hold, lie on your back on the ground with your feet flat on the ground and knees bent. Bring your feet in so that you can just barely touch them with your fingertips when your arms are down by your side. You can play around with this exact positioning to make sure you feel your glutes and not your low back or hamstrings taking over. Make sure your feet are also about hip-width apart.
Then bend your elbows to 90 degrees and drive your hips up, driving through your heels, upper back and arms. Fully extend your hips and squeeze your glutes as you raise. Brace your abs so that you don’t hyperextend your low back as you lift.
Hold at the top with your abs engaged and glutes squeezed. Make sure to concentrate on engaging and contracting the correct muscles as you hold. It is very important that you don’t simply go through the motions with this hold or your glutes may not fully work!
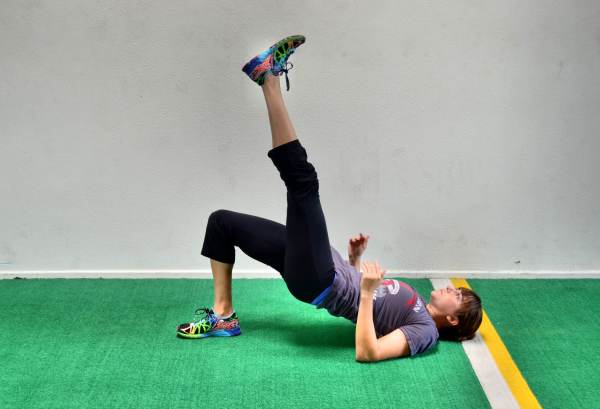
To advance the Basic Hold, you can do a Single Leg Glute Bridge Hold or even try holding on a Power Wheel or in Suspension Trainer straps.
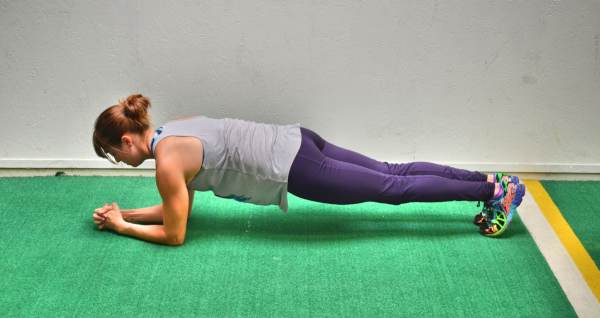
Planks – When we think of Isometrics for our core, our usual go-to is Planks. However, most people don’t do Planks correctly and don’t really get the most out of the hold. Instead of truly focusing on engaging the correct muscles, they focus on holding for longer.
With Planks, you need to focus on engaging your entire core and not just hold a straight line with no thought about the muscles that should be working. If you hold a Plank for one minute, but your low back takes over, you haven’t worked your core properly and just wasted that time.
If, however, you truly engage your abs, lats, quads, glutes and inner thighs correctly, you may only be able to hold for 20 seconds. But that 20 seconds will have been way more beneficial than that 1 minute hold.
In order to get the most out of Planks, you have to get over holding for longer and instead focus on engaging everything as hard as you can.
For a complete guide to Planks and using the Pelvic Tilt to get the most out of Planks (aka strengthen your abs a ton), check out this post on Perfect Plank Form.
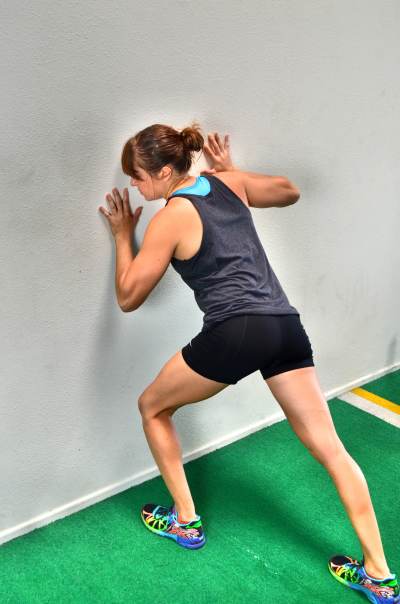
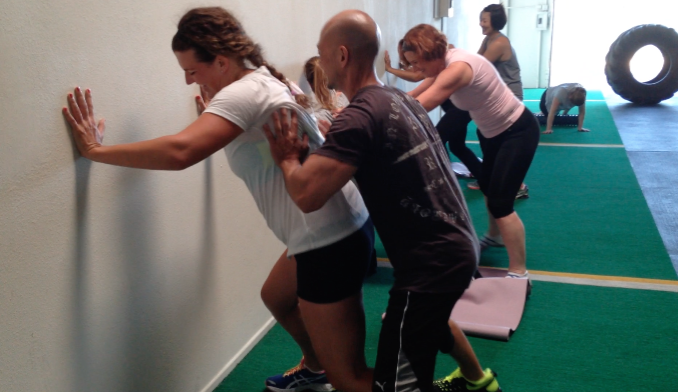
Wall Push – The Wall Push, like the Plank, is only beneficial if you focus on engaging everything as much as you can. However, with the Wall Push, it may be slightly easier to engage everything if you push as hard as you can into the wall.
If you push into the wall as hard as you can, you will feel the entire frontside of your body working – everything from your shoulders to your feet. You should even feel your glutes engage to help you drive into the wall.
To do the Wall Push and work your entire core, stand about a foot from the wall and stagger your feet. Your back foot may end up almost two feet from the wall while your front foot may be only inches from the wall.
Standing in a staggered stance, lean forward and place your hands on the wall. Lean in nice and close, like you are setting up at the bottom of a push up and then push into the wall as hard as you can. The closer you get to the wall, aka the more your arms are bent, the stronger your position will be and the harder your will be able to push and engage everything. You can, however, hold with straighter arms if you would like just make sure to push as hard as you can into the wall.
Push as hard as you can against the wall as if you are trying to move it. Keep everything engaged as you drive into the wall. You can switch and stagger your feet the other way after holding for awhile.
If you have a partner available, have them push you from every angle to force you to engage more. Do not let your partner move you as you push. They aren’t trying to push you over, but they are trying to force you to brace harder.
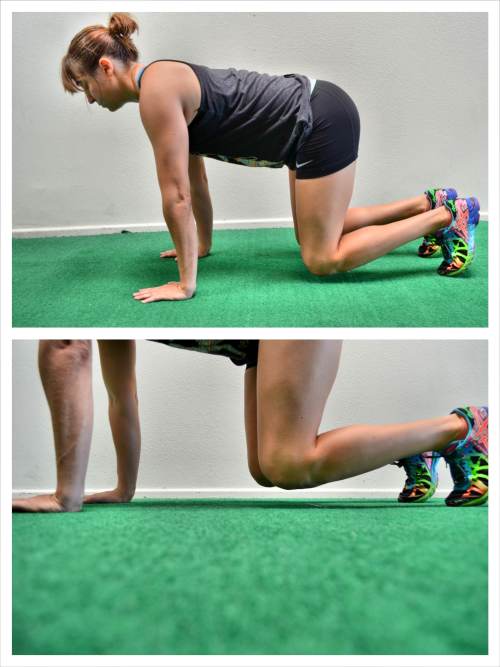
Bull Dog Hold – The Bull Dog Hold is a great Core Isometric Move to really target your shoulders and your quads.Because your knees are bent with the Bull Dog Hold, it isn’t as hard on your abs but it is much more challenging for your legs, making it a great way to add some variety to your core training program and target slightly different muscles in your core. It is also a great way to improve your crawls as well as your Push Ups and even your Planks.
If you have knee pain and are also looking for a safe way to strengthen your quads, this is a great move to include in your program.
To do the Bull Dog Hold, set up on your hands and knees with your hands under your shoulders and your knees under your hips. Then flex your feet and lift up onto the balls of your feet and your hands.
Keeping your knees under your hips and about an inch off the ground, hold in this Bull Dog position.
Do not tuck your chin or let your back arch as you hold. Keep your abs engaged and and do not let your butt go up in the air. This move will be more challenging if you keep your knees close to the ground.
Also, do not let your legs straighten out. This will take some pressure off the quads. Make sure to keep your knees under your hips as you hold.
This position is the exact position you will want to maintain during Table Top Crawls.
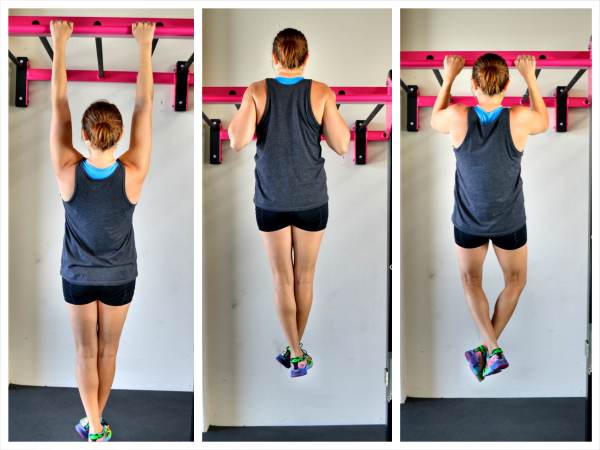
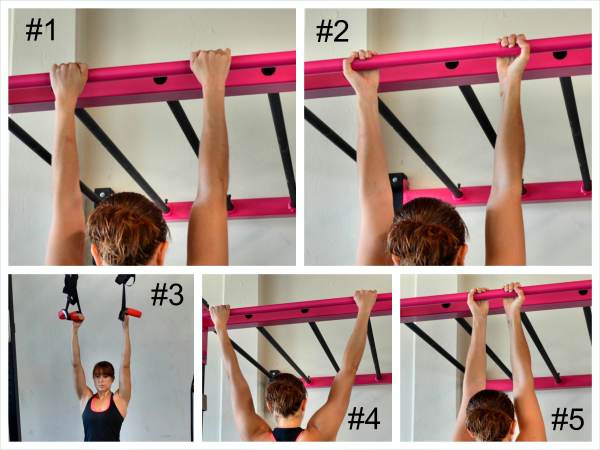
Pull Up Holds – Pull Ups are generally thought of as a back and biceps exercise, but they are also a great move to strengthen your core.
And while you can do full Pull Ups to work your upper body and core, you can also do Pull Up Holds to focus on the weak points in your Pull Ups while blasting your core.
Even beginners can use these holds although they may not be able to hold as long or may need to use some assistance.
There are three Pull Up Hold Variations you should include in your workouts:
- Dead Hang – The Dead Hang isn’t simply hanging from the bar. To do the Dead Hang correctly, you should engage your back and be active in that fully extended hanging position. It should help you work on scapular retraction and activating your lats right from the bottom of the pull up. It will also help teach you to engage your core to help with Pull Ups. To do the Dead Hang, grab the bar and hang with your arms extended. You should feel like your shoulders are a bit raised as you hang from the bar. Then press your chest up and out as you draw your shoulder blades together. You should feel like your shoulders sink down and your neck elongates as you retract your shoulder blades. Feel your back work as you hang there with tension. This move will also improve your grip strength for Pull Ups and help you learn to lead with your chest to engage the muscles of your back.
- Pull Up and Hold – The Pull Up and Hold is a tough Pull Up Hold and a great way to work on getting your chin up over the bar at the top, which is the hardest part for many people. To do the Pull Up and Hold, start hanging from the bar in a dead hang (aka with the muscles engaged). Then pull your chest up to the bar, or at least your chin over the bar, and hold. Keep your core tight and do not tuck your knees into your chest. Make your back and core really work with this move. Do not let your shoulders start to shrug as you hold. If you start to lose the hold, lower yourself down as slowly as you can and then perform a dead hang for a few extra seconds. If you can’t pull up to the top to hold, jump up or use a box to step up at the top of the movement.
- Mid-Pull Up Hold – The Mid-Pull Up Hold can really be done at any spot along the entire Pull Up movement. It is a great way to help yourself get over a sticking point (a point where you get stuck in the Pull Up and can’t pull yourself over). To do the Mid-Pull Up Hold, set up where ever you tend to fail, or right above that spot, and hold. Make sure you don’t shrug or tuck your head as you hold. Really try to lead with your chest and feel the muscles of your back working. Keep your arms bent while holding yourself at this point until you lose it. Slowly lower down and hang in the Dead Hang for a few extra seconds. If you can’t pull yourself up to the Mid-Pull Up Hold, you can jump or use your feet for assistance.
All of these holds can be done with a variety of grips, including the ones below. Mix it up to work slightly different aspects of your back and arms or even to allow you to hold for longer to work your core more.
- Pull Up Grip – Palms facing away on the bar about shoulder-width apart.
- Chin Up Grip – Palms facing toward you about shoulder-width apart.
- Neutral Grip – Palms facing each other about shoulder-width apart.
- Wide Grip Pull Up – Palms facing away with your hands wider than shoulder-width. You can go super wide, holding as far out as your arms allow.
- Close Grip Chin Up – Palms facing you with your hands closer than shoulder-width apart. You can even place your hands right next to one another.
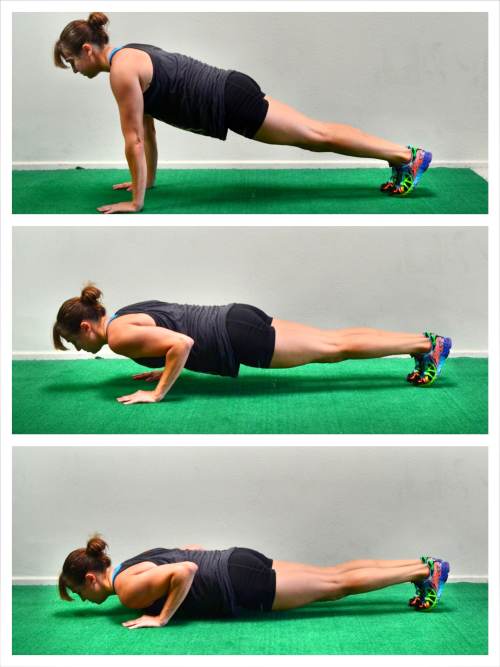
Push Up Holds – Push Ups are already moving Planks, but to make them even more like Planks, you can stop and hold at different points in the Push Up. Push Up Holds are a great way to improve not only your Push Ups but also your core and upper body strength.
There are three Push Up Variations you need to include in your workouts:
- High Push Up Hold – This is a great way to begin improving your lock out and core strength for push ups. It is also a great variation of the Basic Forearm Plank Hold to work on engaging your entire core. To do the High Push Up Hold, set up at the top of a push up with your feet together and your hands under your shoulders. Your body should be in a nice straight line from your head to your heels (with your legs straight). Tilt your pelvic under and hold in that position. Make sure your legs are engaged and you are driving back through your heels not coming forward onto your toes. Do not tuck your chin as you hold or shrug your shoulders. Keep your head in line with your spine and do not let your hips sag. Also make sure you don’t really round your upper back or let your butt go up in the air. You can also hold from your hands and knees to make the hold easier.
- Mid-Push Up Hold – The Mid-Push Up Hold is a great way to really work your core, chest and triceps while also helping you to get over any sticking points (aka any points you get stuck at and can’t push past when doing Push Ups). To do this move, set up in a push up position with your feet together and your hands under your shoulders. Press up to the top of the push up with your body in a nice straight line from your head to your heels. Keeping your body in a nice straight line, bend your elbows to about 90 degrees. Do not let your hips sink or your butt go up toward the ceiling as you hold at that mid-point. Do not tuck your chin as you hold or let your elbows flare way out. You want your arms and body to create an arrow shape (->) not a “T.” Hold as close to 90 degrees as you can. You can also do this from your knees to make it easier or even off an incline. If you find your sticking point is a bit higher or lower, you can adjust at hold at that point.
- Bottom Push Up Hold – This is the hardest of all three Push Up Holds because you are holding at the bottom of the Push Up which is often the hardest part of the Push Up. Holding at the bottom means keeping everything engaged so that you can push back up to the top in one straight line. The Bottom Push Up Hold will help you learn to keep your core engaged so you can do a full range of motion with your Push Ups while maintaining good form. To do the Bottom Push Up Hold, set up at the top of a Push Up. With your body in a nice straight line and everything engaged, lower down until your chest is an inch off the ground. Make sure to engage your glutes and quads to keep your body in a nice straight line. You also want to make sure you are driving back through your heels and even squeezing your legs together. Do not tuck your chin or let your hips sag toward the ground. Also do not let your butt go up in the air. Maintain a nice straight line from your head to your heels and hold an inch off the ground. Do not let your elbows flare way out as you hold. You can also do this from your knees or off an incline.
These 10 Isometric Core Exercises, while they won’t get you out of breath or burn your abs like crunches, are compound movements that will help you truly develop complete core strength and stability while improving your mind-body connection. They help you learn to engage the correct muscles while improving your mobility and stability.
Don’t skip these moves just because they don’t seem gnarly! These moves are essential to building your core strength, mind-body connection and even your mental toughness.


I am looking for isometric exercises to strengthen my knees. Can you help?
Hi Lucy. We can’t really strengthen our knees. You can strengthen the muscles around them but depending on the injury that may not be the best course of action. You may want to even look at some glute activation tips but definitely get checked if you are injured.
hi im having a hip arthroscopy in Jan to help with a leberal tear and hip impingment and im looking tips or excerises to help strenghten glute, hamstring, quad area before surgery? can you help? I have a list of different exercises from my physio but there are certain terms and letters i dont understand. Thanks
I would recommend you check out my Booty Burners 🙂 Foam rolling is also key prior and then slowly rebuilding. But make sure to follow your physio’s plan!
Hi – I really like (and subscribe to) your Youtube videos and saw this article when searching for isometric ab exercises for my wife. She had major surgery in March – Whipple procedure – and is regaining her strength – slowly. She is not ready to start a full exercise regime and does not have a lot of energy as she has also started on chemotherapy. Can you suggest a few isometric exercises to get her going again?
Is she planning to do physio? That is often key to have that support to rebuild that mind-body connection!