Often we don’t realize how much our core actually works when we do our basic exercises. We instead think we need to do more crunches or sit ups to specifically target our cores instead of focusing on movements that work more muscle groups at once.
And while including exercises to really target our core is important, there are more moves out there to work our core from every angle than we realize.
Many of them we may even be doing without realizing how much they are already building and improving our core strength and stability.
These moves will target and work your entire core – everything from your shoulders to your knees – in a functional way to strengthen, not only other exercises, but also how well you move in everyday life.
These 15 Unconventional Core Exercises are functional movements because they target your core while making you move or engage muscles in a way you might during everyday life and during exercises that require you to use other muscles.
15 Unconventional Core Exercises
These 15 Unconventional Core Exercises are not sit ups or crunches (although those do have a place and time).
These moves are instead exercises to target your entire core and work it in different directions and in different ways.
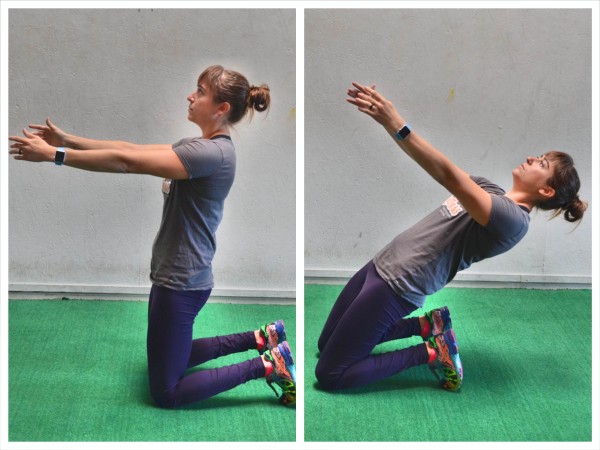
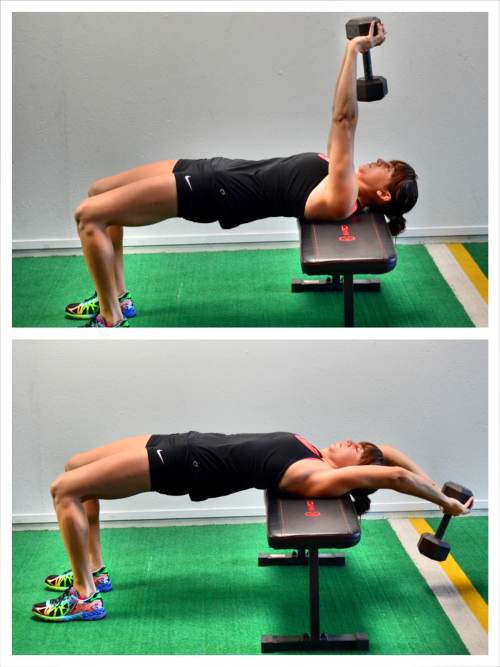
Lean Backs – This has fast become a must-do move in my book. This is a great exercise to learn to engage your core and glutes to protect your low back as you really target and work another muscle group – your quads.
When you do this move, you will really feel your quads doing the work. However, that doesn’t mean your abs and glutes aren’t working. They should be engaged. If they aren’t engaged, you’ll know because you will start to feel this move in your low back.
So even though your abs and glutes aren’t the main muscles you will really feel burning, don’t discount the fact that they are working.

To do Lean Backs, start kneeling on the ground with your knees about hip-width apart. Flex your feet and kneel nice and tall. Squeeze your glutes and brace your abs. You can then cross your hands over your chest or reach them out in front of you.
Engaging your core and driving down through the balls of your flexed feet, lean back. Do not arch your back as you lean back but simply move from your knees.
Go back as far as you can with your body in a nice straight line. Then come back forward. Squeeze your glutes and brace your abs the entire time.
Feel your quads really working to control your lean back. Do not sit back on your heels as you go back.
Come back up to kneeling nice and tall and repeat.
You can make this move more challenging by holding a weight in at your chest or even in your straight arms out in front of you.
Do not rush the Lean Back, but instead move in a slow and controlled fashion.
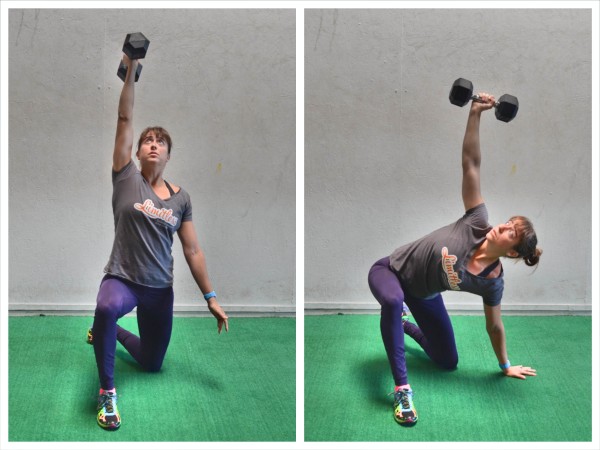
Turkish Get Up Hinge – The Turkish Get Up is a great Unconventional Core Exercise. Actually it is a great full-body functional movement in general.
It is a move that basically everyone should include in some way, shape or form in their workout routine because it will not only build core stability and strength, but also teaches core sequencing. It can help teach you to engage the proper muscles at the right times.
It is also a great move for us to do as we age so that we not only keep our mind-body connection strong, but also remain coordinated and strong enough to stand up if we happen to end up lying on the ground! (Full Turkish Get Up instructions here.)
However, you don’t even need to do the full Turkish Get Up every time to get in a great core workout. Sometimes breaking it down and using pieces of the move can be all you need.
For instance, the Turkish Get Up Hinge is a great shoulder, glute and oblique exercise and is only a very small piece of the full Get Up.
To do the Turkish Get Up Hinge, start by setting up in a half-kneeling position on your left knee. Your right knee will be bent with your right foot flat on the ground. Hold a weight in your right hand, if you are going to use one, and press your arm straight up toward the ceiling. You can then look up at the weight to help you keep your arm straight up and the weight pointed straight at the ceiling.
Then hinge over to the left, dropping your left hand down to the ground back in line with your left knee. Keep your right arm straight up toward the ceiling the entire time. Do not sit your butt back as you hinge to the side. You can let your hip pop out to the right as you hinge over to load your glute, but you should not sit your butt back on your heels.
Then using your glutes and obliques, come back up to half kneeling nice and tall. Lift your left hand up and hinge up to the right, keeping the right arm straight up toward the ceiling.
Once back up nice and tall, repeat hinging back over. Make sure to keep your chest out and maintain a nice tall posture the entire time.
Move in a slow and controlled fashion. Complete all reps on one side before switching. Make sure you come all the way back up to half kneeling nice and tall each and every time.
Here is actually a great workout breaking down each piece of the Get Up to strengthen your core – Breaking Down the Turkish Get Up.
Also, if you have pretty good hamstring and hip mobility, you may also want to try a variation of the Turkish Get Up Hinge called the Windmill. It requires more mobility to do properly, but is another great way to work your obliques and glutes not to mention the rest of your core!
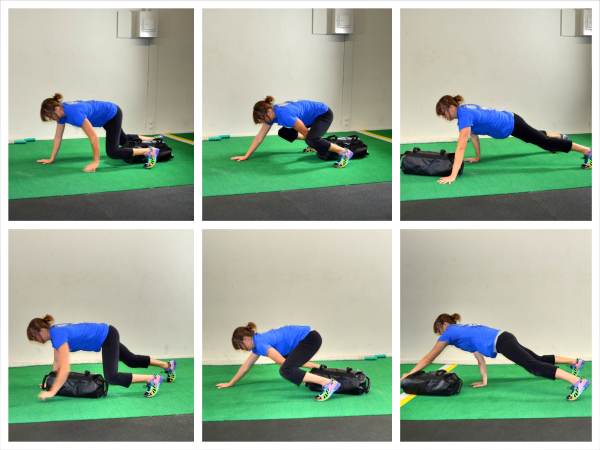
Table Top Crawl With Pull Thru – Crawling in general is a great core exercise. It can help teach you contralateral movement and it can improve your coordination. Plus you can move in every plane of motion with a variety of fun and different crawls.
It is also a great exercise to get your blood pumping.
A great crawl to work your entire core is the Table Top Crawl with Pull Thru. This crawl not only works on contralateral movement, but it also works on hip extension. Plus the pull also engages your lats and glutes so you work your backside as well as your frontside during this crawl.
It is a great move to really open up your hips after sitting all day and even improve your glute strength.
To do the Table Top Crawl With Pull Thru, chains or sandbags work best although you can easily do this with a dumbbell, sledgehammer or even some plate weights attached to a rope (heck you can even use a battle rope!).
Using a sandbag to do the Table Top Crawl With Pull Thru, place the sandbag on the ground and set up on your hands and knees with the sandbag behind your feet and your feet flexed. You should start with your hands under your shoulders and your knees under your hips. Then lift up onto your hands and the balls of your feet.
From this Table Top Crawling Position, sit your butt back toward your heels as you reach one hand back through your legs to grab the sandbag.
Then push off the balls of your feet and drive your hips forward, extending your hips as you pull the sandbag up under your body and through overhead. As you pull the sandbag through, extend your hips and squeeze your glutes to help you power the pull. You don’t want to pull the sandbag through using only your arm although you may feel your lats and shoulders working.
Your glutes and hip extension should power the pull so that you can pull the sandbag up to your head or a little beyond.
Once you’ve pulled the sandbag through, perform a Table Top Crawl forward with opposite arm and leg moving together. Crawl past the bag so it is just behind your feet and then sit your butt back again and reach through with the other hand. Pull the sandbag up and through. You can perform all pulls with one arm and then switch or switch each pull.
Once you’ve pulled the bag through, crawl past it again and repeat.
Make sure to use a heavy enough bag that you feel challenged to pull it through. If it doesn’t force you to use your glutes, the weight is too light. If you can throw the bag 10 feet out in front of you, the bag is also too light. Pick a bag that you can only pull a little past your head at most, but that you feel your glutes working to help pull under your body and through overhead.
For other fun Crawling Variations, check these out.
Renegade Row – Planks are a great core moves that most of us include in our workouts in some form. But one great Plank Variation that isn’t used as often, or at least used correctly, is the Renegade Row.
The Renegade Row is basically a Plank combined with an Alternating Arm Row. But it isn’t as simple as holding a Plank as you row one arm up and then the other.
If you really want to get the most out of the Renegade Row, you also need to make it an Anti-Rotational Exercise. What that means is that as you hold the Plank and Row one hand up at a time, you need to fight your body’s desire to rotate and force your core to engage to stabilize.
If you use the Renegade Row as an Anti-Rotational move, you will build core stability while strengthening your shoulders, lats, back, glutes, quads and abs (to name a few).
To do the Renegade Row, you can use dumbbells or kettlebells. Set two weights, whichever type you choose to use, on the ground under your shoulders. If you place your hands and the weights closer together, it will make the movement easier and help you balance and prevent rotation.
Set up in a high plank position with each hand on a weight and your feet wider apart. Placing your feet wider apart will make it easier to stabilize and give your a wider base. If your hips rotate as you row, widen your base. If it is easy to stabilize, try bringing your feet closer together. Beginners may need to do this from their knees.
In the plank position with your body in a nice straight line from your head to your heels, row one weight up toward your chest, driving your elbow down toward your hip and back up toward the ceiling. Make sure that as you row your brace your abs and squeeze your glutes.
You want to fight your body’s urge to rotate as you row one weight up at a time. Keep your hips and chest square to the ground. Row the weight all the way up to your chest just below your pec. Keep your core tight and squeeze your glutes so that you don’t rotate open. Do not let your butt go up toward the ceiling or your hips sag.
Then lower the weight back down and row the weight up on the other side. Keep alternating until all reps are complete. Keep your core braced and fight the rotation as you alternate rows. Move slowly and fight the urge to rotate. Do not rush the movement. Be in control the entire time.
Dip Hold (with Leg Raise) – As often as you can, you should do moves that are the opposite of what you do seated at a desk all day hunched over a computer screen. That is why the Dip Hold is a great exercise.
The Dip Hold is the opposite of your rounded forward, shrugged posture. It works on teaching you to draw your shoulder blades down and engage your mid and lower traps instead of overusing your upper traps. It also forces you to stick your chest out and stay up nice and tall as your arms and back work to hold you up.
Plus, if you add in a Leg Raise it can be an even more core intensive move. The Leg Raise can work your hips a bit so use caution with this move if you have low back pain or ridiculously tight hips.
To do the Dip Hold itself, you will need dip bars or parallel bars. Then place one hand on each bar and push up to the top of a dip with your arms locked out and your shoulders down and back. Press your chest out and draw your shoulders down so that you aren’t shrugging. You want to think about elongating your neck and pressing up through your hands as tall as you can. Keep your body hanging straight down.
Beginners may need to place one, or both, feet lightly on the ground to reduce the weight on their arms so they can maintain a proper posture. Do not turn it into a leg exercise though.
Hold here and brace your abs as you hold.
Beginners can also do a Dip Hold off a bench or chair, however, this will not be as great an exercise for their entire core.
To make this move more challenging, add in the Leg Raise.
To do the Dip Hold with Leg Raise, start in the Dip Hold with your legs hanging straight down and together. Really drive down through your hands and do not shrug your shoulders.
Then, without your shoulders shrugging, raise both legs together straight out in front of you till your quads are about parallel to the ground. Feel your core and quads working to lift your legs as you hold yourself at the top of the dip.
Then lower your legs back down.
You may rock back a bit as you raise and lower, do not shrug your shoulders or really try and use momentum. Control the movement.
If the Leg Raise is too challenging, you may want to try a Knee Tuck or raise only one leg up at a time.
Sit Thru Variations – The Sit Thru is a great rotational core exercise. And by adding it to other movements, you can create some killer Unconventional Core Exercises.
Three great Sit Thru Variations to work your core include the Donkey Kick Sit Thru, the Sit Thru to Thoracic Bridge and the Burpee Sit Thru.
The Donkey Kick Sit Thru is a great variation of the Sit Thru because it forces your core to work extra by adding in a little Donkey Kick up between Sit Thrus. Your shoulders and abs have to work extra to balance in between Sit Thrus as you kick your legs up. The Donkey Kick also adds an extra little cardio element to the movement.
To do the Donkey Kick Sit Thru, start on your hands and knees with your knees under your hips and your hands under your shoulders. Then flex your feet and lift up onto the balls of your feet.
From this position on your hands and feet, kick your heels up in the air. The more you quick up and out the harder the move will be.
As you come back down to land, land more on one foot so you can then more easily rotate into a Sit Thru on one side. If you land more on your right foot, rotate toward your right, lifting your right hand and kicking your left leg under and through to perform the Sit Thru. When you kick through, you should almost be able to sit on your butt.
Quickly kick the leg under and through and then totate back to the starting position, pulling your foot back under your body as you place your hand back down on the ground.
Perform another Donkey Kick and this time land on your left foot and rotate to the left, kicking your right leg under and through as you lift your left hand. Sit through then bring your leg back under and repeat.
Move quickly and challenge yourself to really kick up with the Donkey Kick.
Beginners will want to start with the Basic Sit Thru.
The Sit Thru to Thoracic Bridge is another great Sit Thru Variation that is not only rotational but also focuses on activating the glutes and opening up the hips as you release your spine. Like the Dip Hold, it is a great move to include in your routine because it is the opposite of what you do seated at a desk all day.
To do the Sit Thru to Thoracic Bridge, start on the balls of your feet and your hands with your hands under your shoulders and your knees under your hips.
Then lift your right hand and bring your left leg under your body and through to place your left foot flat on the ground about hip-width apart from your other foot.
Rotate your body open toward the ceiling and bridge your hips up, squeezing your glutes to lift them up as high as you can. Do not hyperextend your low back as you bridge just to get your hips up higher.
As you bridge up, reach your right hand down toward the ground, rotating your chest toward the floor so you feel your spine twisting. Do not let your left hip drop toward the ground as you rotate. Engage your glutes and keep both hips up as you reach your hand toward the ground and rotate your upper body. Also, do not simply flop your arm across your chest. Actively reach toward the ground.
You should feel a nice rotation and stretch through your spine as you squeeze your glutes to keep your hips up. Hold for a second or two and then drop your hips and step your foot back through while placing your hand back down on the ground.
Rotate to the other side, kicking your right leg under as you lift your left hand. Bridge your hips up as high as you can as you reach your left hand down toward the ground.
Beginners may need to start with just a Sit Thru and/or just a Thoracic Bridge.
A third great Sit Thru Variation is the Burpee Sit Thru. This is a great way to get your blood pumping as you work your core. Core exercises don’t have to be only strength moves. Sometimes adding in a cardiovascular element is good! Plus adding the Sit Thru to a Burpee adds a rotational element to change up the Basic Burpee so you can move in every plane of motion.
To do the Burpee Sit Thru, start standing tall with your about hip-width apart. Then squat down and place your hands on the ground as you jump your feet back far enough that your knees are under your hips and only an inch or so off the ground.
Unlike with the traditional Burpee, you won’t jump your feet back into a plank position. You will want to jump your feet back so you are in more of a crawling position with your knees bent and close to the ground.
From this bent-knee position, kick one leg under your body and through as you lift the opposite hand. Rotate open so you could almost sit down on the ground.
Move quickly to sit through and then bring the leg back under your body as you lower your hand back down to the ground and sit through on the other side. You will again kick the leg under your body and through as you lift your opposite hand. You want to rotate all the way through so you could actually sit if you lost your balance.
Once you’ve performed a Sit Thru to both sides, jump your feet back into your hands. Then, as you come back up to standing, jump up off the ground before repeating the movement.
Beginners may find they want to jump back into more of a plank position to make the Sit Thru easier.
Make sure though, that even if you regress it, you move quickly, rotating open and sitting all the way through on each Sit Thru.
Unilateral Farmer’s Carry (Unilateral Loading) – A great way to make any exercise even more challenging for your core is to Unilaterally Load it down. What this means is that you will hold a weight on only one side of your body.
This Unilateral Load forces your core to stabilize to prevent rotation, which makes Unilaterally-Loaded Movements, like the Renegade Rows we discussed above, Anti-Rotational Movements also.
While you can Unilaterally Load Deadlifts, Squats, Lunges, Bench Press, and even Row, one of the best Unilaterally-Loaded Exercise is the Unilateral Farmer’s Carry.
This is a great move to strengthen your core, improve your posture and even strengthen your legs and glutes.
To do the Unilateral Farmer’s Carry, you will need a dumbbell, barbell, sandbag, kettlebell…Basically any weight you can hold in one hand on one side of your body.
Grab the weight in one hand and hold it down by your side as you stand with your feet about hip-width apart. Stand nice and tall with your chest pressed out and your head help high. Make sure that you aren’t shrugging your shoulders or leaning toward or away from the side holding the weight.
You want your posture to look like you are holding weights in both hands.
Then begin to walk forward in a slow and controlled manner. Do not let the weight simply rest against your leg. Stand up nice and tall and do not round forward as you walk.
Walk for the set distance or time and then switch and hold the weight in your other hand.
You can also do a Unilateral Racked Carry or a Unilateral Overhead Walk as well to mix things up!
For more Anti-Rotational Exercises and Unilaterally-Loaded Moves, click here.
Front-Loaded Exercises and the Bottoms Up KB Front Squat – Another way to make any exercise more challenging is to Front Load the weight. This is another way besides the Unilateral Load to make a basic exercise more challenging.
By Front-Loading a movement, you force your core to work harder to keep you balanced and from rounding forward.
You can Front Load Deadlifts, Squats and Lunges to name a few.
And if you want to make a Front-Loaded Movement even more challenging, you can Front Load with an awkward or unstable weight.
Awkward and unstable weights are another way to force your core to work harder because it has to stabilize against the shifting weight.
A great Front-Loaded Exercise that also uses an unstable weight is the Bottoms Up KB Front Squat. This is an advanced move and beginners may want to start with the Basic Goblet or Front Squat.
To do the Bottoms Up KB Front Squat, you will need two kettlebells. To hold those two kettlebells bottoms up, you will hold each one by the handle. You will then swing or lift them up so your hands are at chest height and the bottoms of the kettlebells are facing up toward the ceiling. Grip the handles hard to keep the kettlebells stable and the bottoms up.
Holding the bells bottoms up with your hands in front of you at about shoulder height, set your feet between hip-width and shoulder-width. Stand nice and tall and then sit your butt back and down to squat as low as you can while keeping your chest up and the weights balanced with the bottoms up.
Move in a slow and controlled fashion and sit your butt down as low as you can with good form while keeping your heels down.
Do not round forward as you squat.
Then drive straight back up to standing, keeping the weights balanced. Stand tall at the top and squeeze your glutes before repeating.
You can vary up the Bottoms Up KB Front Squat by even making it a Unilateral Bottoms Up KB Front Squat!
Reverse Lunge with Rotation – Adding in a Rotational movement to a basic exercise like the lunge is a great way to increase your core involvement in the movement and make it even more core intensive. However, you have to be careful with Rotational Movements. Make sure to brace your abs and use your glutes to power the movement.
If you aren’t careful to control the rotation with your abs and glutes, you could overuse your low back or even rotate too far. Make sure to use a weight and stay under control so that you protect your low back.
The Reverse Lunge with Rotation is a great exercise because it forces you to move in numerous planes of motion at once while working your core, glutes and legs.
To do the Reverse Lunge with Rotation, a sandbag works well although you can use a dumbbell or kettlebell. Using a sandbag, grab a handle in each hand so that your palms are facing toward each other. Stand nice and tall with your feet together and the weight in front of your legs.
Then lunge back with one foot, bending your front knee and pushing your butt back as you hinge over at the hips. Your back leg will stay straight and you will really load the front glute. Most of your weight will be on your front leg.
As you lunge, you will lean forward a bit, hinging at the hips, and rotate the sandbag down outside the front quad. Do not round forward as you rotate with the sandbag. Keep your arms straight.
Then, driving through the front foot and glute, stand back up and stomp the back foot in forward as you bring the sandbag back around front. You want to squeeze your glutes as you come back to standing and stand up nice and tall. “Stomping” can help remind you to stand tall and squeeze your glutes at the top.
Once you come back to standing, quickly lunge back with the other leg, letting the sandbag swing outside the front knee. Then again stomp the back foot up forward to come back up to standing as you bring the weight around front.
Advanced exercisers will want to use the momentum of their lunge (and their glutes) to propel the sandbag from side to side quickly. They will want to swing it and rotate with it as they lunge.
Beginners will want to “place” the sandbag outside the leg instead swinging it to rotate it from side to side. By placing the bag instead of swinging, you will have more balance and control. Rotational exercises can be dangerous for the back if you are not under control so make sure to “place” the bag instead of swinging it to protect your low back if necessary.
You can also do Side Tap Lunges or even Squats with Rotation as well. A great variation of this Lunge with Rotation is the Med Ball Rainbow Lunge even!
Pull Overs – Pull Overs are a great core exercise that can be made even better by performing a bridge as you do them instead of simply lying on a bench as you do the movement. The Pull Over works your lats, triceps and the muscles along your ribs as well as abs and even your glutes if you do the bridge.
It is also a great exercise if you want to improve your Pull Ups. (And, on a superficial note, it does also work the area of your back that most women complain about – that back fat above the bra area!)
To do Pull Overs, a dumbbell works well although you can use a resistance band, kettlebell or even plate weight.
Using a dumbbell, place your upper back on a bench or box. Relax your head and neck on the bench and hold a dumbbell in both hands, cupping one end of it. With your upper back and head resting on the bench, bridge your hips up and squeeze your glutes. Brace your abs so you don’t hyperextend your low back.
Keeping your arms fairly straight, but not necessarily locked out, reach back over your head toward the ground behind you as you stay up in the bridged position. Reach back as far back behind you as you can and then pull with your back to bring the dumbbell back overhead and forward over your chest.
Keep your hips up the entire time.
Really feel your lats and abs stretch and work to control the reach overhead. Then feel your lats and abs work to pull the dumbbell back over your chest. You may “crunch” a bit as you pull the dumbbell back over your chest.
You will also feel this move in your triceps; however, you don’t want your triceps to take over. You want your lats to pull the weight over.
Make sure that as you reach and pull back over, you do not actively bend the elbows. Keep the arms straight, but not locked out so that you are moving at the shoulder joint.
If you can’t reach very far back overhead, you may want to use a lighter weight.
Also, make sure your upper traps don’t take over as you pull. Concentrate on feeling your lats work to pull the weight back over.
Band Hip Rotations – When working your core, you can’t forget about your glutes. When working your glutes, you can’t forget about rotational movements.
Many people struggle to get their glutes to power rotational movements which is why they often feel them in their low backs. It is also the reason why many people get injured when rotating to lift or move in every day life.
That is why moves like the Band Hip Rotations are so important to include. They teach you to engage and use your glutes to rotate while also strengthen your abs and back. They also help us prevent low back and hip pain!
As you get stronger with the Band Hip Rotations, you can progress to moves like Wood Choppers and know that your glutes and abs will be working to power the movements. Band Hip Rotations are basically a simplified variation of Wood Choppers that really allow you to focus on the glutes. Beginners to advanced lifters need to include Band Hip Rotations even if they can do the full Chopper.
To do Band Hip Rotations, anchor the band and hold one end in both hands. Move away from the anchor point so there is tension in the band even as you relax your hands back toward the anchor point. Stand with your side to the anchor point and your feet about shoulder-width apart. Your front toe should be turned slightly open while your back toe should point straight ahead.
Then squat down very slightly, pushing your butt back as you reach your arms back toward the anchor point. Brace your abs and keep your chest up nice and tall. Do not shrug your shoulders.
Keeping your arms fairly straight, but not necessarily locked out, rotate and extend your hips to bring the band across your body and up toward your far shoulder. Feel the glute of the leg closest to the anchor point engage and really power the rotation. Do not turn it into an arm movement, pulling the band with your arms, or simply rotate at the waist.
Your back glute should power the rotation and you should feel it squeeze as you rotate. Concentrate on using it to power the move and swing your arms across. Do not get to focused on bringing the band to a certain point. If you rotate and you don’t bring it up to the shoulder that is ok as long as the glute powers the rotation across. Also, feel your abs engage as you rotate the band across.
Then bring the band back across your body to the starting position in a controlled fashion. Do not pivot your feet as you perform the move. You want to rotate at the hip because the glute is powering the movement. You do not want your feet to move.
Again, use your glute to rotate the band back across your body. Really concentrate on feeling the glute work.
Complete all reps on one side before switching. Focus on squeezing your glutes and bracing your abs. Do not shrug your shoulders or round over as you rotate.
Once you really feel your glute powering the movement, you can try Wood Choppers.
Glute Bridge and Curl – If you want a move to work your hamstrings, you need to include the Glute Bridge and Curl. This is a great Glute Bridge Variation to really target the hamstrings while still working your glutes and abs.
Remember, it is important when training your core to train not only your frontside but also your backside!
You can do the Glute Bridge and Curl using a Suspension Trainer, Power Wheel, Stability Ball or Valslides.
Beginners will need to start with a Single-Leg Glute Bridge and Curl while more advanced exercisers can do the full Two-Leg Glute Bridge and Curl.
To do the Single-Leg Glute Bridge and Curl using a Valslide, slider or towel, place a slider under each foot and bring your feet in close to your butt. Then bridge up, engaging your abs and squeezing your glutes to extend your hips. Make sure to drive your elbows and upper arms down into the ground so that you don’t push yourself backward.
Keeping your hips up and glutes and abs engaged, slide out one leg fully extending it. Then drag your foot back in, pulling the slider back in with your hamstring.
As you curl your heel back in, extend the other leg out. Move in a controlled fashion and feel your hamstring work to pull the slider back in. If the Single-Leg move is easy, do the Two-Leg Bridge and Curl.
To do the Two-Leg Bridge and Curl, start in the glute bridge position with a foot on each slider like you did for the Single-Leg Variation. Make sure to engage your glutes and your abs as you drive down through your upper arms and back.
Keeping your glutes engaged, slide your feet out away from your butt. Straighten your legs out in front of you as far as you can, keeping your hips up and your abs engaged. Your glutes may touch the ground, but you shouldn’t let your hips sag. They should lower because your legs are extending.
Once you straighten your legs out fully, curl your heels back in, bringing your hips back up again into a glute bridge. Really pull your heels back in with your hamstrings by driving your heels into the sliders and dragging them back in.
Do not let the hips sag toward the ground as you slide out or come back in. Your hips will lower as you extend and bridge back up as you curl back in.
Make sure your abs stay tight to protect your low back with both variations. You want to feel your hamstrings, and even your glutes, working not your low back.
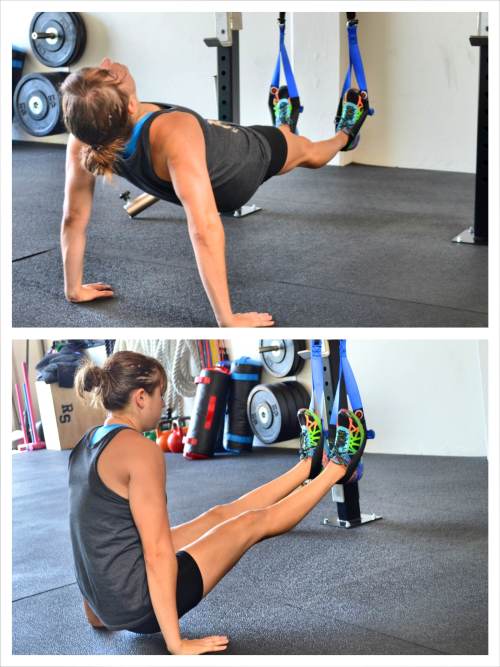
Posterior Plank to L-Sit – The Suspension Trainer is a great tool to help you work your core that you can really use anywhere. And a great core move using the Suspension Trainer that will work your frontside and your backside is the Posterior Plank to L-Sit.
This is also a great move because it not only strengthens your back, arms, abs, glutes and even your quads, but also improves your mobility and can help open up your chest and hips.
This is, however, a more advanced move and beginners may need to start with just a Posterior Plank or just an L-Sit. They may even need to start with the Posterior Plank from the ground.
To do the full Posterior Plank to L-Sit, sit on the ground with your heels in the foot straps and your hands behind your butt. You can turn your fingertips out or back toward your glutes. Then lift up off the ground so that you are holding your weight on your arms and your feet in the foot straps.
From this raised seated position, let your legs move forward in the straps as you drive your hips up to bridge up into the Posterior Plank. Press your chest up and out and squeeze your glutes to extend your hips as you lean your head back. Try to get your body in a nice straight line, driving down through your hands and heels.
Hold for a second and then lower your butt back down an inch or so off the ground as you pull your butt back in between your hands. You will pull yourself back into an L-Sit. Keep your legs straight the entire time.
Hold and then repeat the move, pressing your hips back up into the Posterior Plank before repeating the L-Sit. Keep your arms and legs straight throughout the entire movement.
Rotational Row to Press – Another great Suspension Trainer core exercise to target your back, shoulders and abs is the Rotational Row to Press. This is a great rotational move to strengthen your obliques and your back.
Plus it makes you pull and row in a different plane of motion than the traditional Inverted Row, which is great to make you functionally stronger.
To do the Rotational Row to Press, hold your hands close together with a strap in each hand. Walk your feet forward so that your body is at an appropriate incline. The closer to parallel to the ground you are, the harder the move will be. Once you’ve walked your feet forward to the right incline, press your chest out and engage your abs and glutes as you hang down with your arms straight and your body in a nice straight line.
Then, keeping your body in a nice straight line, row your hands in toward your chest, driving your elbows down and back. Feel your back row you up.
Once you’ve brought your chest up to your hands, rotate and press your hands out to the right. Press your arms out straight, keeping your shoulders down. Make sure to keep your body in a nice straight line as you rotate and press. Do not drop your hips or arch your back. Also, do not shrug your shoulders.
Then bring your hands back in to the center of your chest and rotate back forward before lowering back down. Extend your arms and hang down, but do not completely relax. Keep your chest pressed out and your abs and glutes engaged.
Repeat the movement, rowing back up, but this time press out to the left instead. Keep alternating which side you press to each time you row up.
Throughout the entire movement, keep your legs and body straight. You want a nice straight line from your head to your heels. Do not let your hips sag toward the ground or your low back arch as your row and press. Make sure you do not shrug your shoulders as you press out.
As you fatigue, do not bounce or swing to get up. If you feel your form breaking down you can always walk your feet back so that you are more vertical.
Battle Ropes Waves and Pulls – The Battle Rope is another great Unconventional Core Training Tool. It is a great way to get your blood pumping and work your entire core from every direction.
Using the Battle Ropes you can do two basic movements to work your core – Waves and Pulls. Using both these movements, you can improve your strength, endurance and aerobic conditioning.
Battle Rope Wave Exercises can not only help you develop greater power, but also help you be able to maintain that power and intensity for a longer period of time. Plus these moves will work everything from your shoulders to your knees.
Battle Rope Pulling Exercises will build your strength and endurance. Your muscles will not only get stronger, but you will be stronger for longer without fatiguing. Plus, pulling exercises are important to include in our workout routines because they can help strengthen our backs, which is important if you sit hunched over a desk all day!
Both movements are super core intensive and are must-do Unconventional Core Exercises.
Plus there are a variety of Waves and Pulls that you can choose from to target your core in different ways.
A great Battle Ropes Wave Exercise is the Single-Arm Plank Waves.
To do Single-Arm Plank Waves, set up in a Plank position at the end of the rope from your hands and toes (advanced) or hands and knees (beginner). Set your feet wider apart for a more stabile base and have your hands under your shoulders with them slightly closer together.
Then grab one handle of the rope in one hand, and keeping your body in a nice straight line with your abs and glutes engaged, begin to make waves, lifting and lowering your hand and the rope. Do not let your hips rotate or your butt go up in the air as you create the waves. Keep your core tight. Do not sag your hips as well.
Create the waves for a set number or time and then switch to the other side.
The Single-Arm Plank Waves are also a great anti-rotational core exercise!
For more Battle Ropes Wave Exercises, click here.
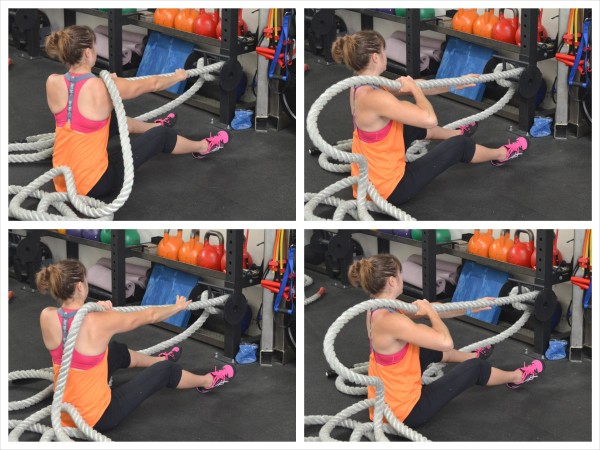
A great Battle Ropes Pulling Exercise to work your upper body and core is the Seated Shoulder Pulls.
To do Seated Shoulder Pulls, sit on the ground facing the rope wrap with your legs stretched out in front of you. You can slightly bend your knees and place your feet flat on the ground if you want extra leverage to help you pull.
Thread the rope over your shoulder and hold it in both hands as you sit up nice and tall.
Reach one hand toward the anchor point and pull the rope back over your shoulder, using the other hand to guide it. Stay up nice and tall and do not round forward or shrug your shoulders as you pull. Also, do not let your elbow flare way up by your ears.
After pulling back over your shoulder with one arm, reach the other hand forward and pull the rope over your shoulder using that arm.
Keep alternating pulls over that shoulder and then switch and pull over the other shoulder.
Make sure you don’t round forward as you pull. Brace your abs and feel your back helping to pull the rope.
For more Battle Ropes Pulling Exercises, click here.
You can easily integrate many of these Unconventional Core Moves or exercise variations into your current routine. You don’t necessarily need to have a separate Core Day, although you can if you want. You can easily add some of these in depending on the area of your body you are working.
For example, if you are doing a glute workout, try adding in the Band Hip Rotations since it is a glute focused core move. Or even the Glute Bridge and Curl.
Or on an upper body day, try the Rotational Row to Press since it will also really target your back and shoulders.
These moves are all easy to integrate because they work the big muscles of our bodies as well as our abs!
Love these moves? For some great Core Workouts using these Unconventional Core Exercises, check out our Elite Workout Library! Over 100 workouts with new ones added weekly.


Very good blog , a lot of great articles , very open trainer , Greating to you from France !
Thanks Rudy!
I appreciate your articles and pictures. I have had back pain for a long time, I think because I’ve been athletic. It usually hurts when I DON’T do any movement/exercise. Thank you.
Movement really is key! Often we think rest when we are injured but really we need to work around the pain and train our body to move better.