The Back And Bicep Blast
Build a strong back and sexy arms with this Back and Bicep Triset Blast (and KILLER bicep drop set burner!). YOUCH!
If you want a strong back that not only looks amazing, but also helps you improve your pull ups AND avoid neck and shoulder pain, this workout is perfect to include in your routine.
An added bonus of this workout is that it will also strengthen your core by using some great hybrid plank variations. Work your back, shoulders and abs all at once!
Talk about some great bang for your buck!
If you like this workout, check out my other killer upper body series in my Arm Burner cards!
Whether you want strong, sexy arms, a toned back, to improve your pull ups and push ups or even to avoid injury, the Arm Burners have you covered (and there are some killer hybrid core moves and cardio burners in there too)!
Now to the workout fun!
The Back And Bicep Blast
Complete 3 rounds of each triset, resting 45-60 seconds between rounds. Then rest 1-2 minutes between trisets. After all 3 trisets are complete, complete the Bicep Burnout!
TRISET #1:
10-15 reps per side Single Arm Plank Rotation with Knee
6-12 reps per side Alternating Arm Dumbbell Rows
10-15 reps per side Superman Waves
TRISET #2:
6-12 reps Lat Pull Downs
10-15 reps Back Flyes
10-15 reps per side Side Plank Rows
TRISET #3:
10-15 reps Mini Pull Ups
6-12 reps per side Suspension Trainer Single-Arm Rotational Rows
10-15 reps per side Bench Plank Rows
BICEP BURNER:
You’ll complete 3 rounds in this drop set series.
Complete 6 reps of each of the 3 bicep curls back to back with one weight. Then quickly switch to lighter weights for 9 reps of each. Then again drop the weights and go lighter for 12 reps of each. Make sure to pick a weight that challenges you for the reps listed!
CIRCUIT:
6-9-12 reps Full Bicep Curls
6-9-12 reps Bottom Curls
6-9-12 reps Top Curls
(Feel the burn!? Get more killer Arm Burner Workouts HERE! YAAASSS!)
EXERCISE DESCRIPTIONS:
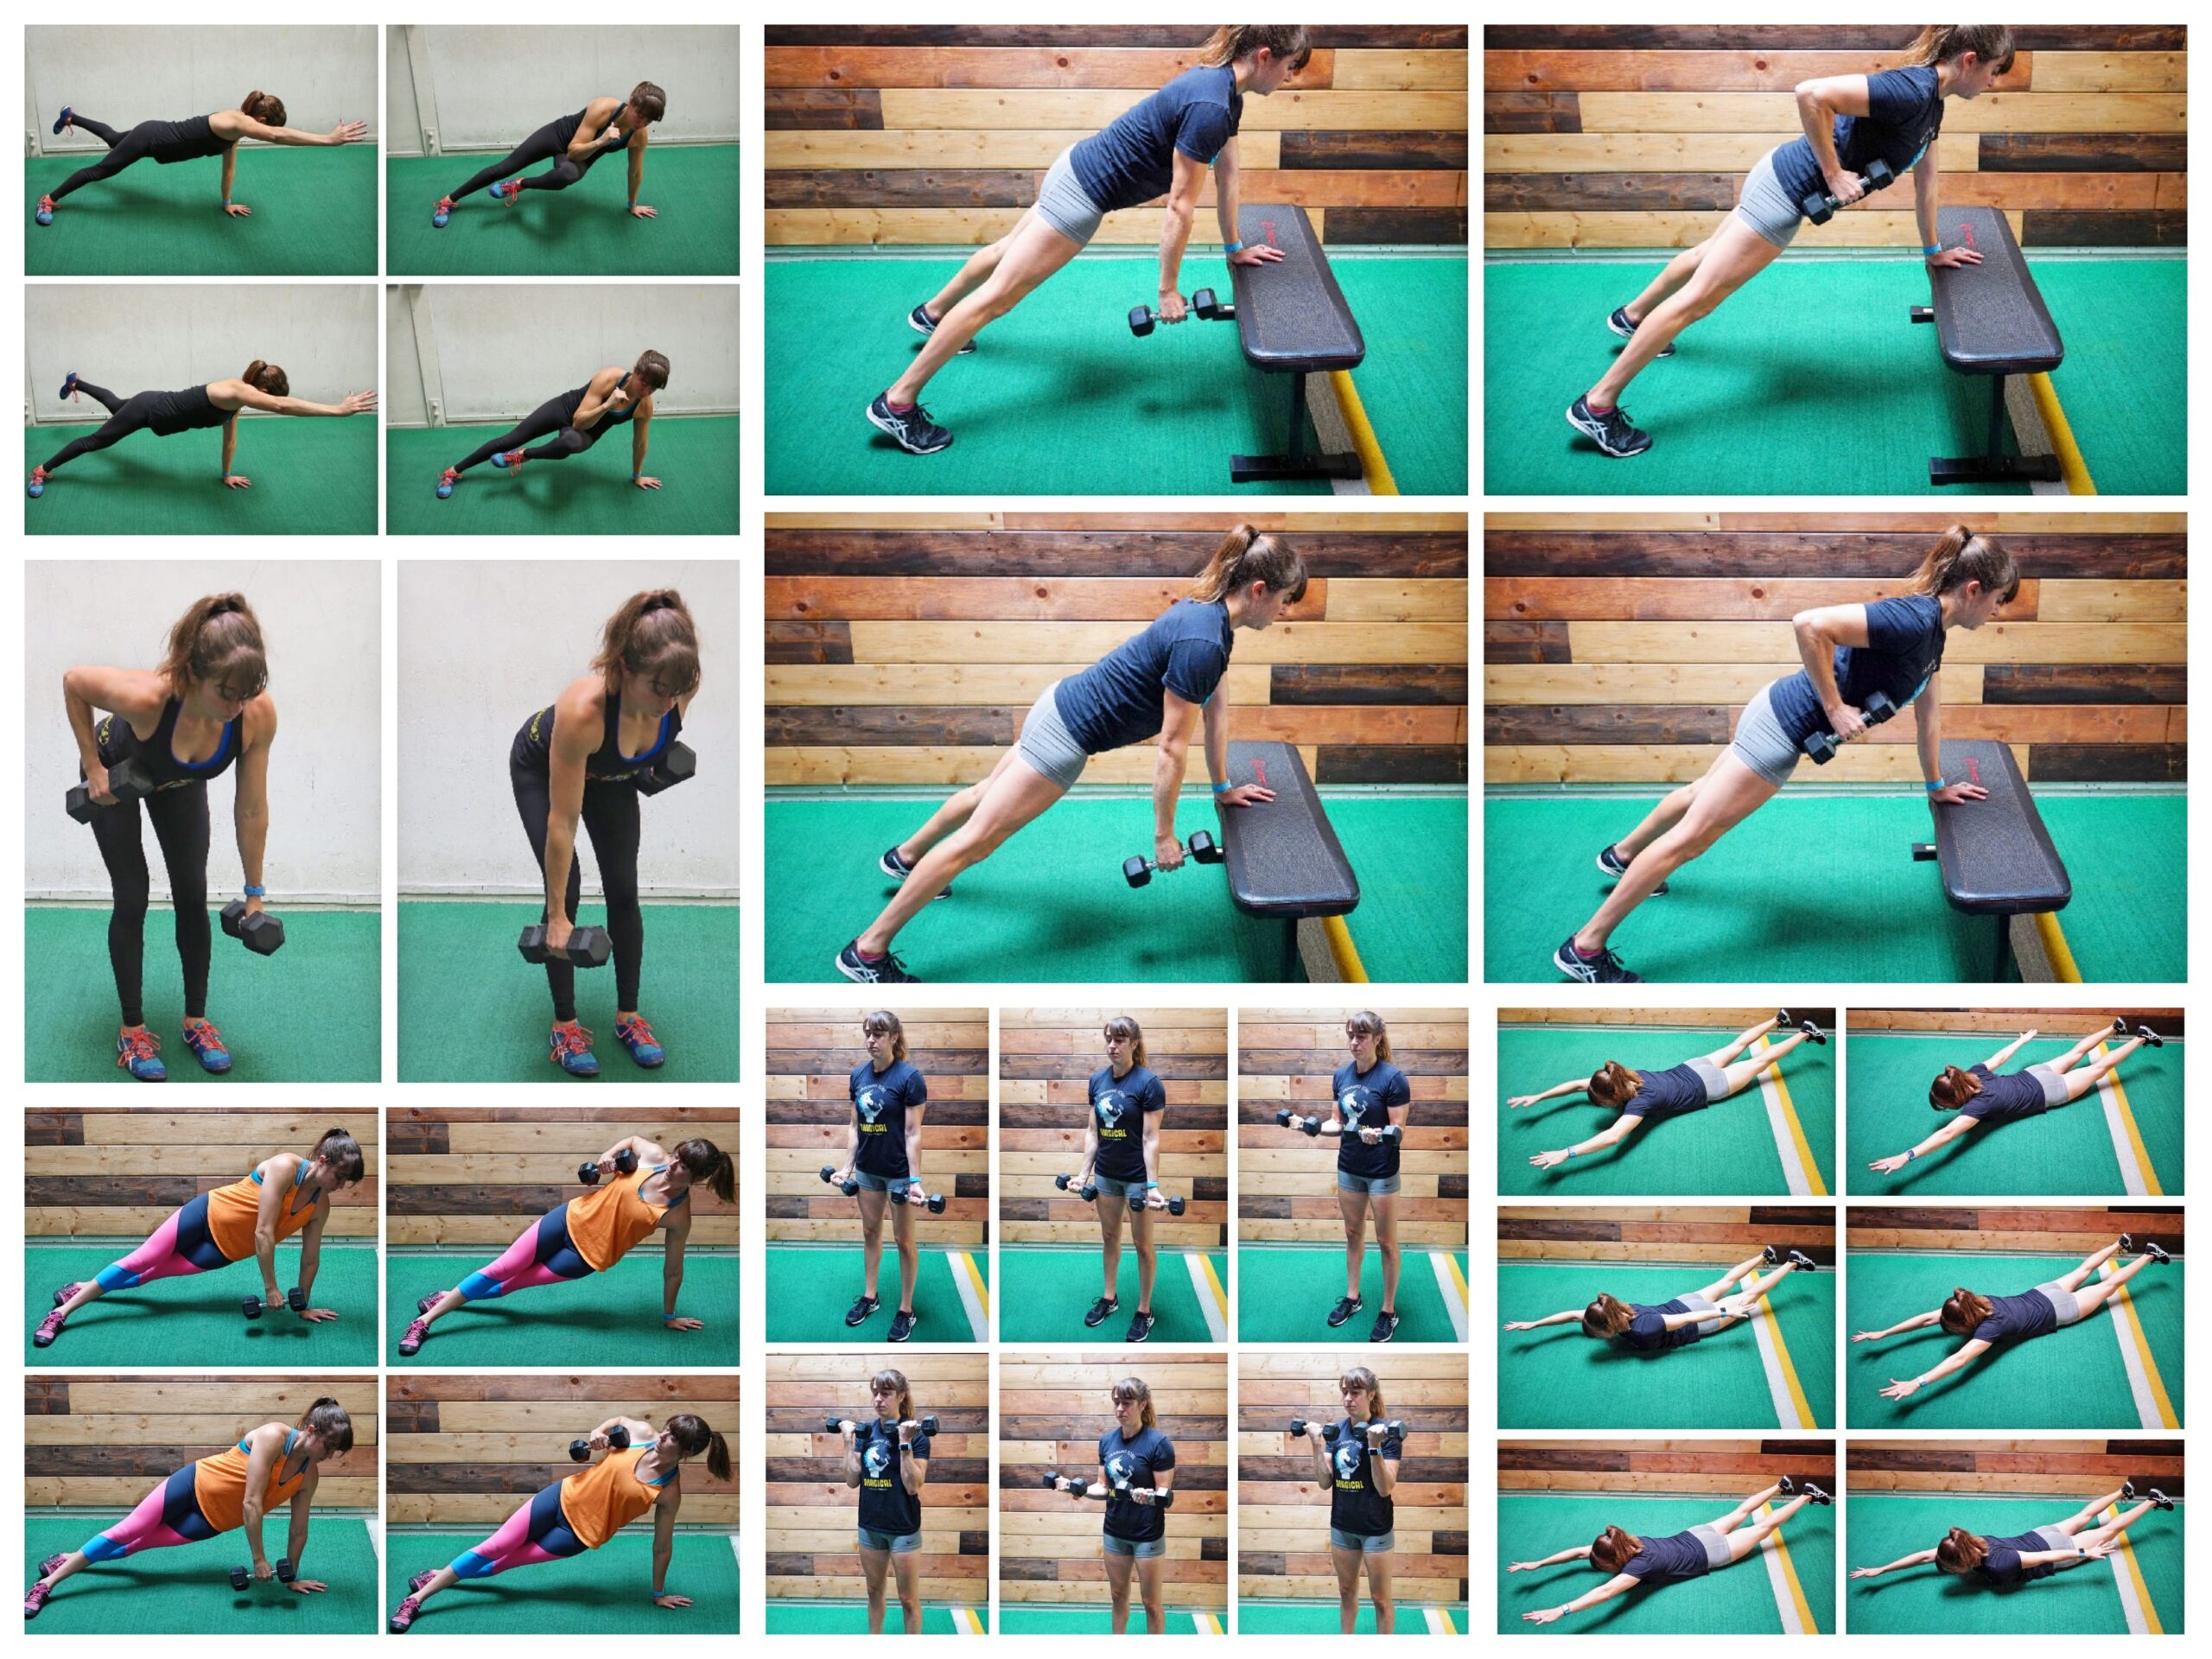
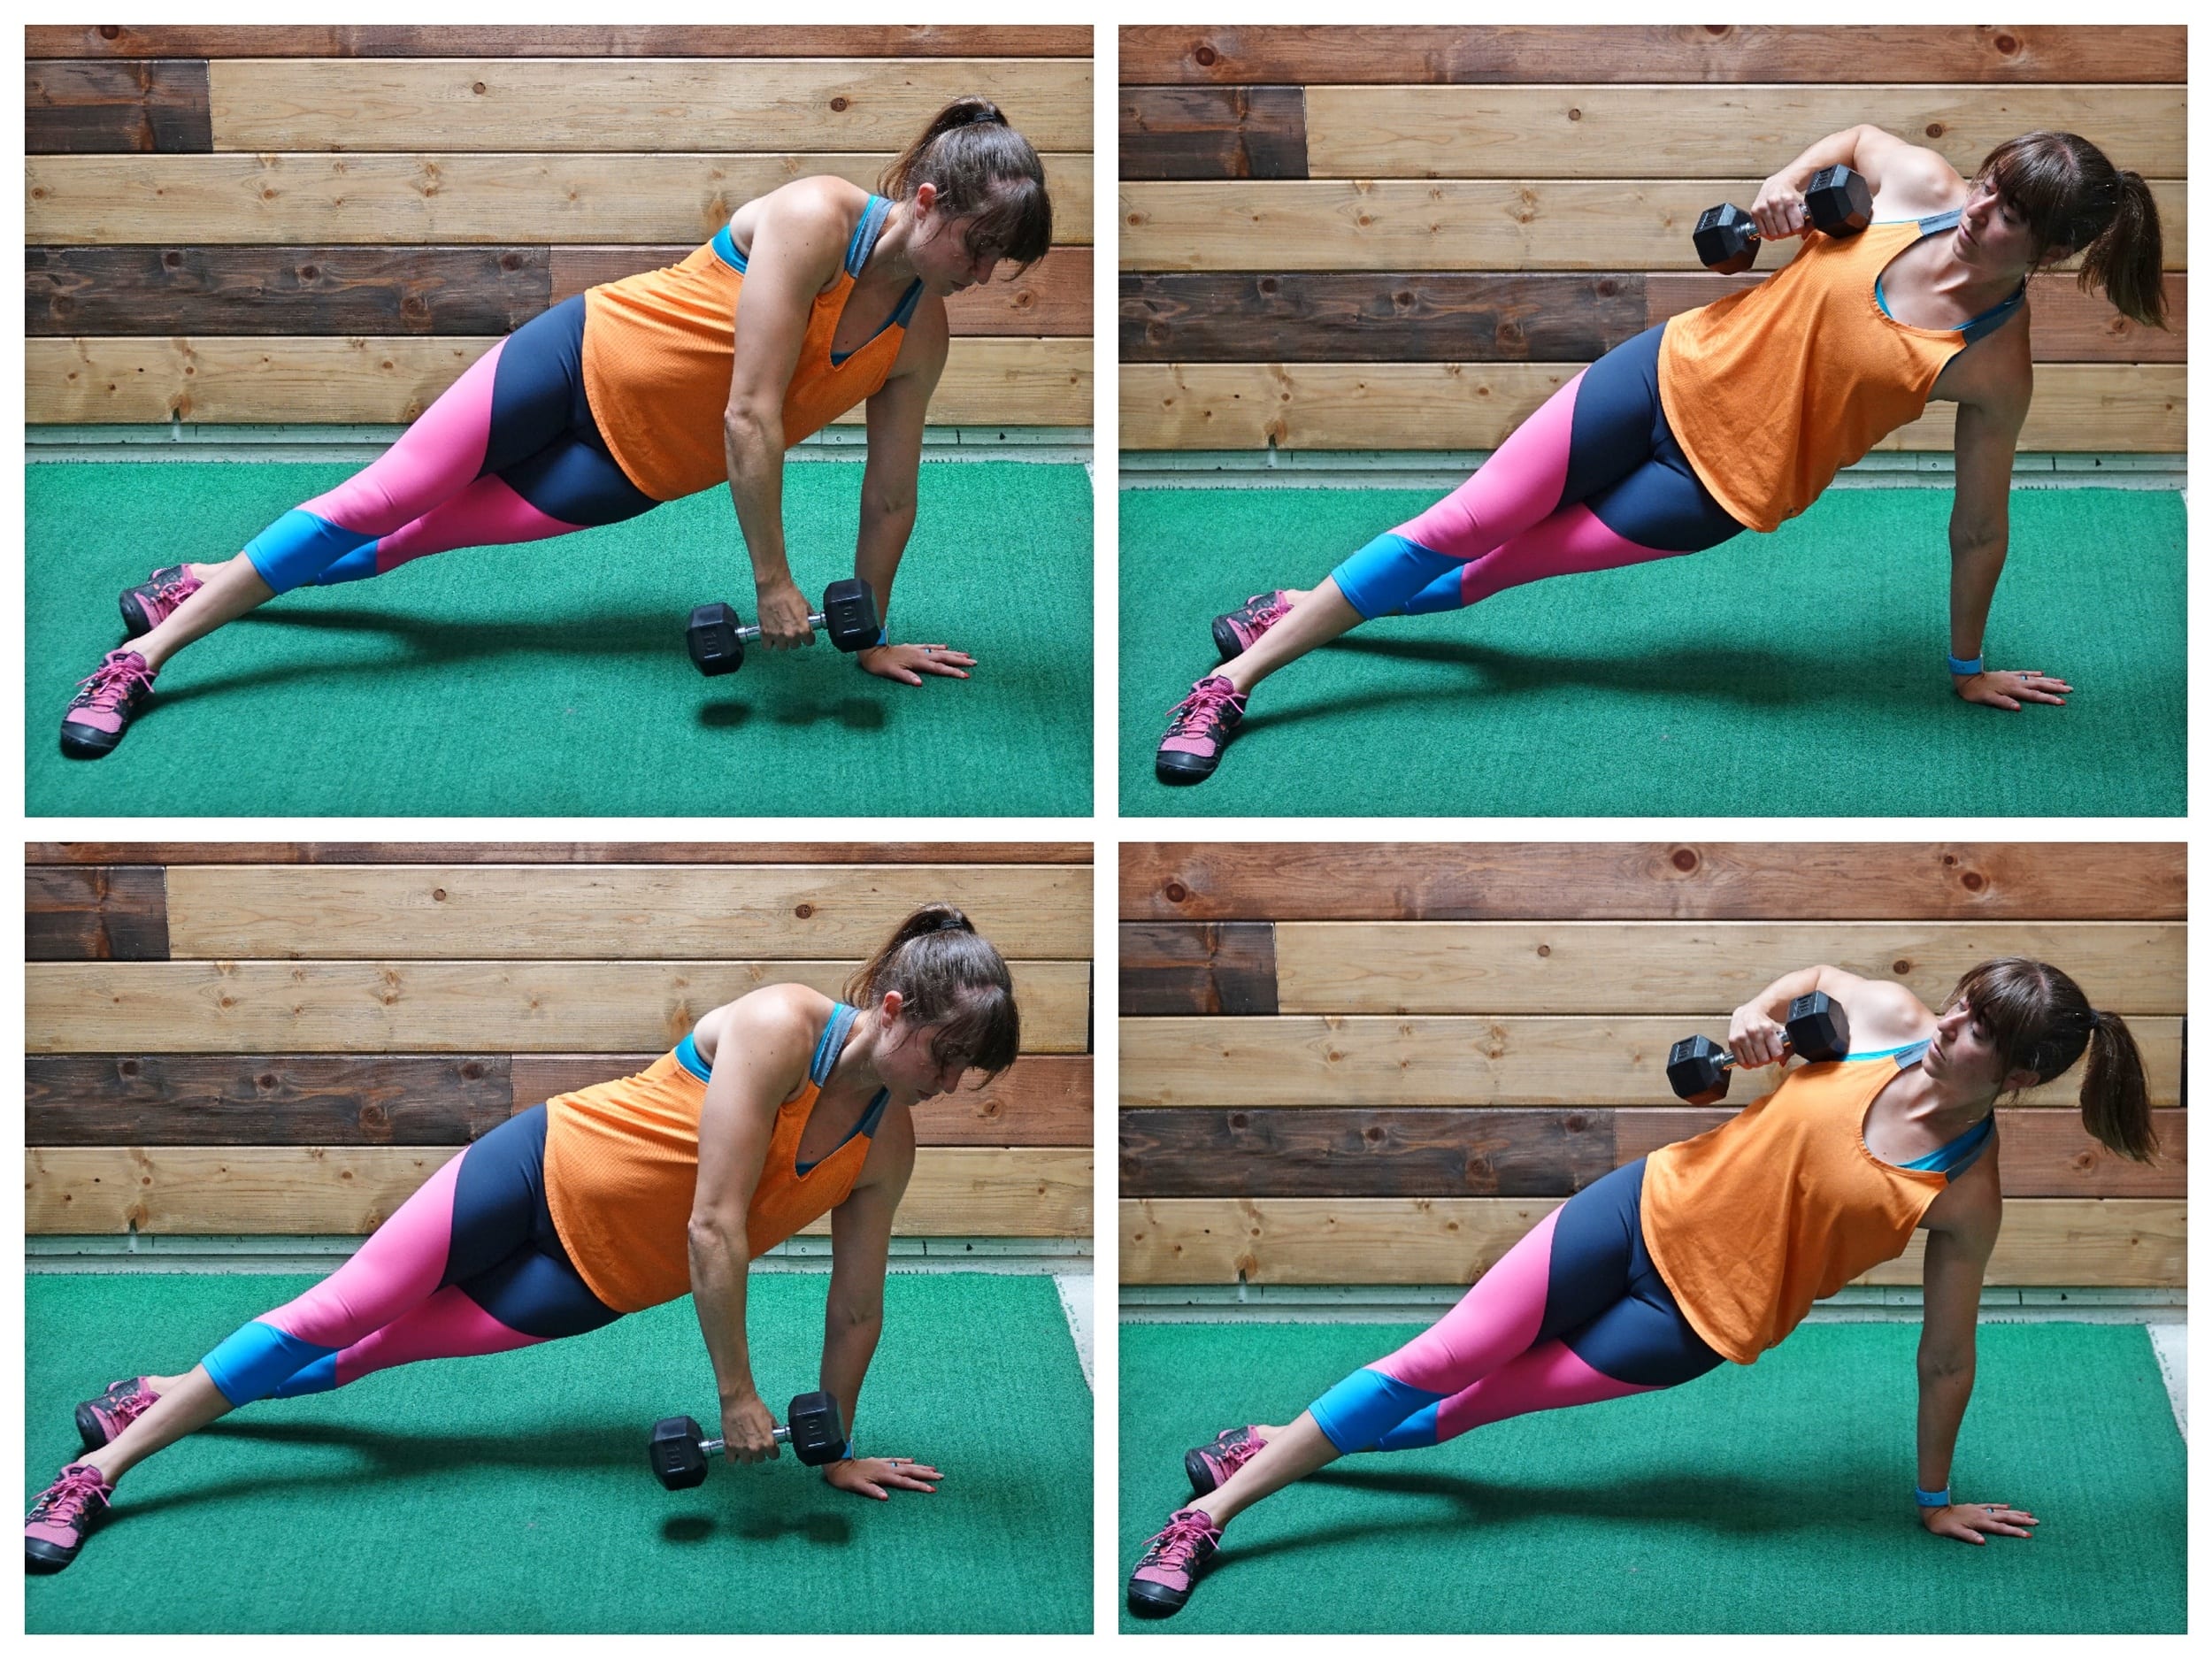
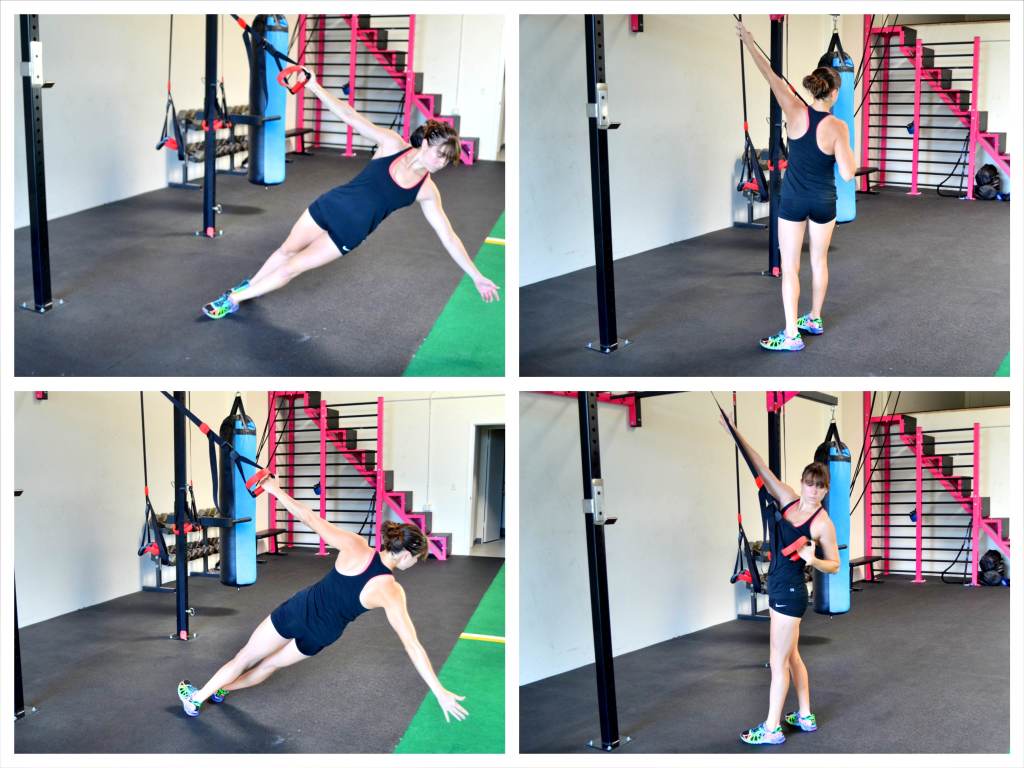
Single Arm Plank Rotation with Knee:
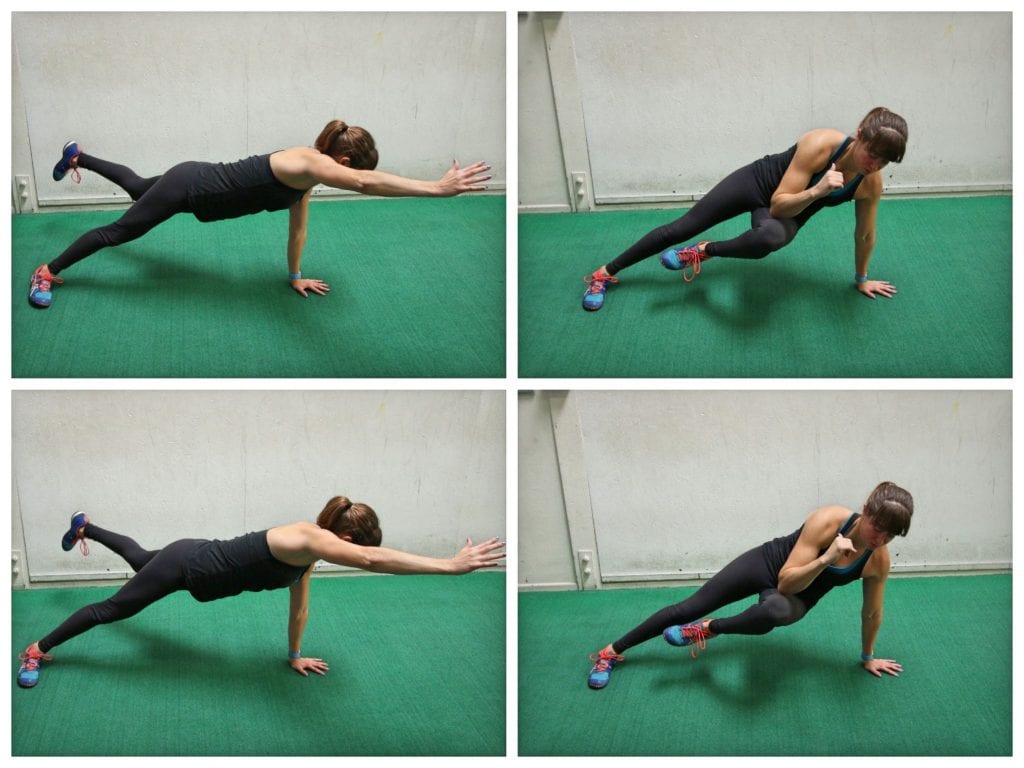
To do the Single Arm Plank Rotation With Knee, set up in a side plank position from your hand with your bottom leg in back of your top leg.
Then lift that back leg as if kicking it back and up toward the ceiling slightly. Reach your top hand out in front of you and overhead. Your chest will rotate toward the ground as you lift up into this side plank position with your opposite arm and leg raised.
Rotate your chest back open as you tuck your raised leg under and forward, driving your knee forward as you tuck your raised arm down to meet it. Try to touch your knee to your elbow as you rotate your chest back open and away from the ground.
After slowly tucking the knee to the elbow and feeling yourself pivot around that shoulder. The muscles around your rib cage should really be working. Then kick the leg back out and reach back out and overhead with your hand.
Move slowly to stay balanced and try to keep your hand on the ground under your shoulder.
Beginners can tap the toe down behind them or even just do the knee tuck without the kick out.
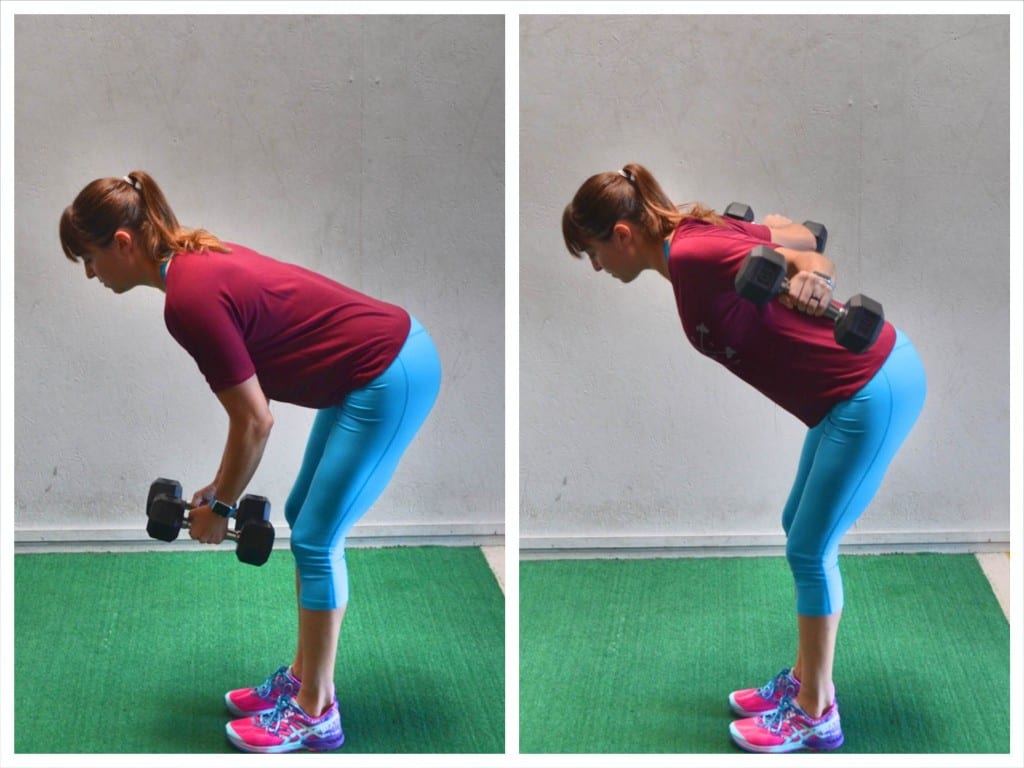
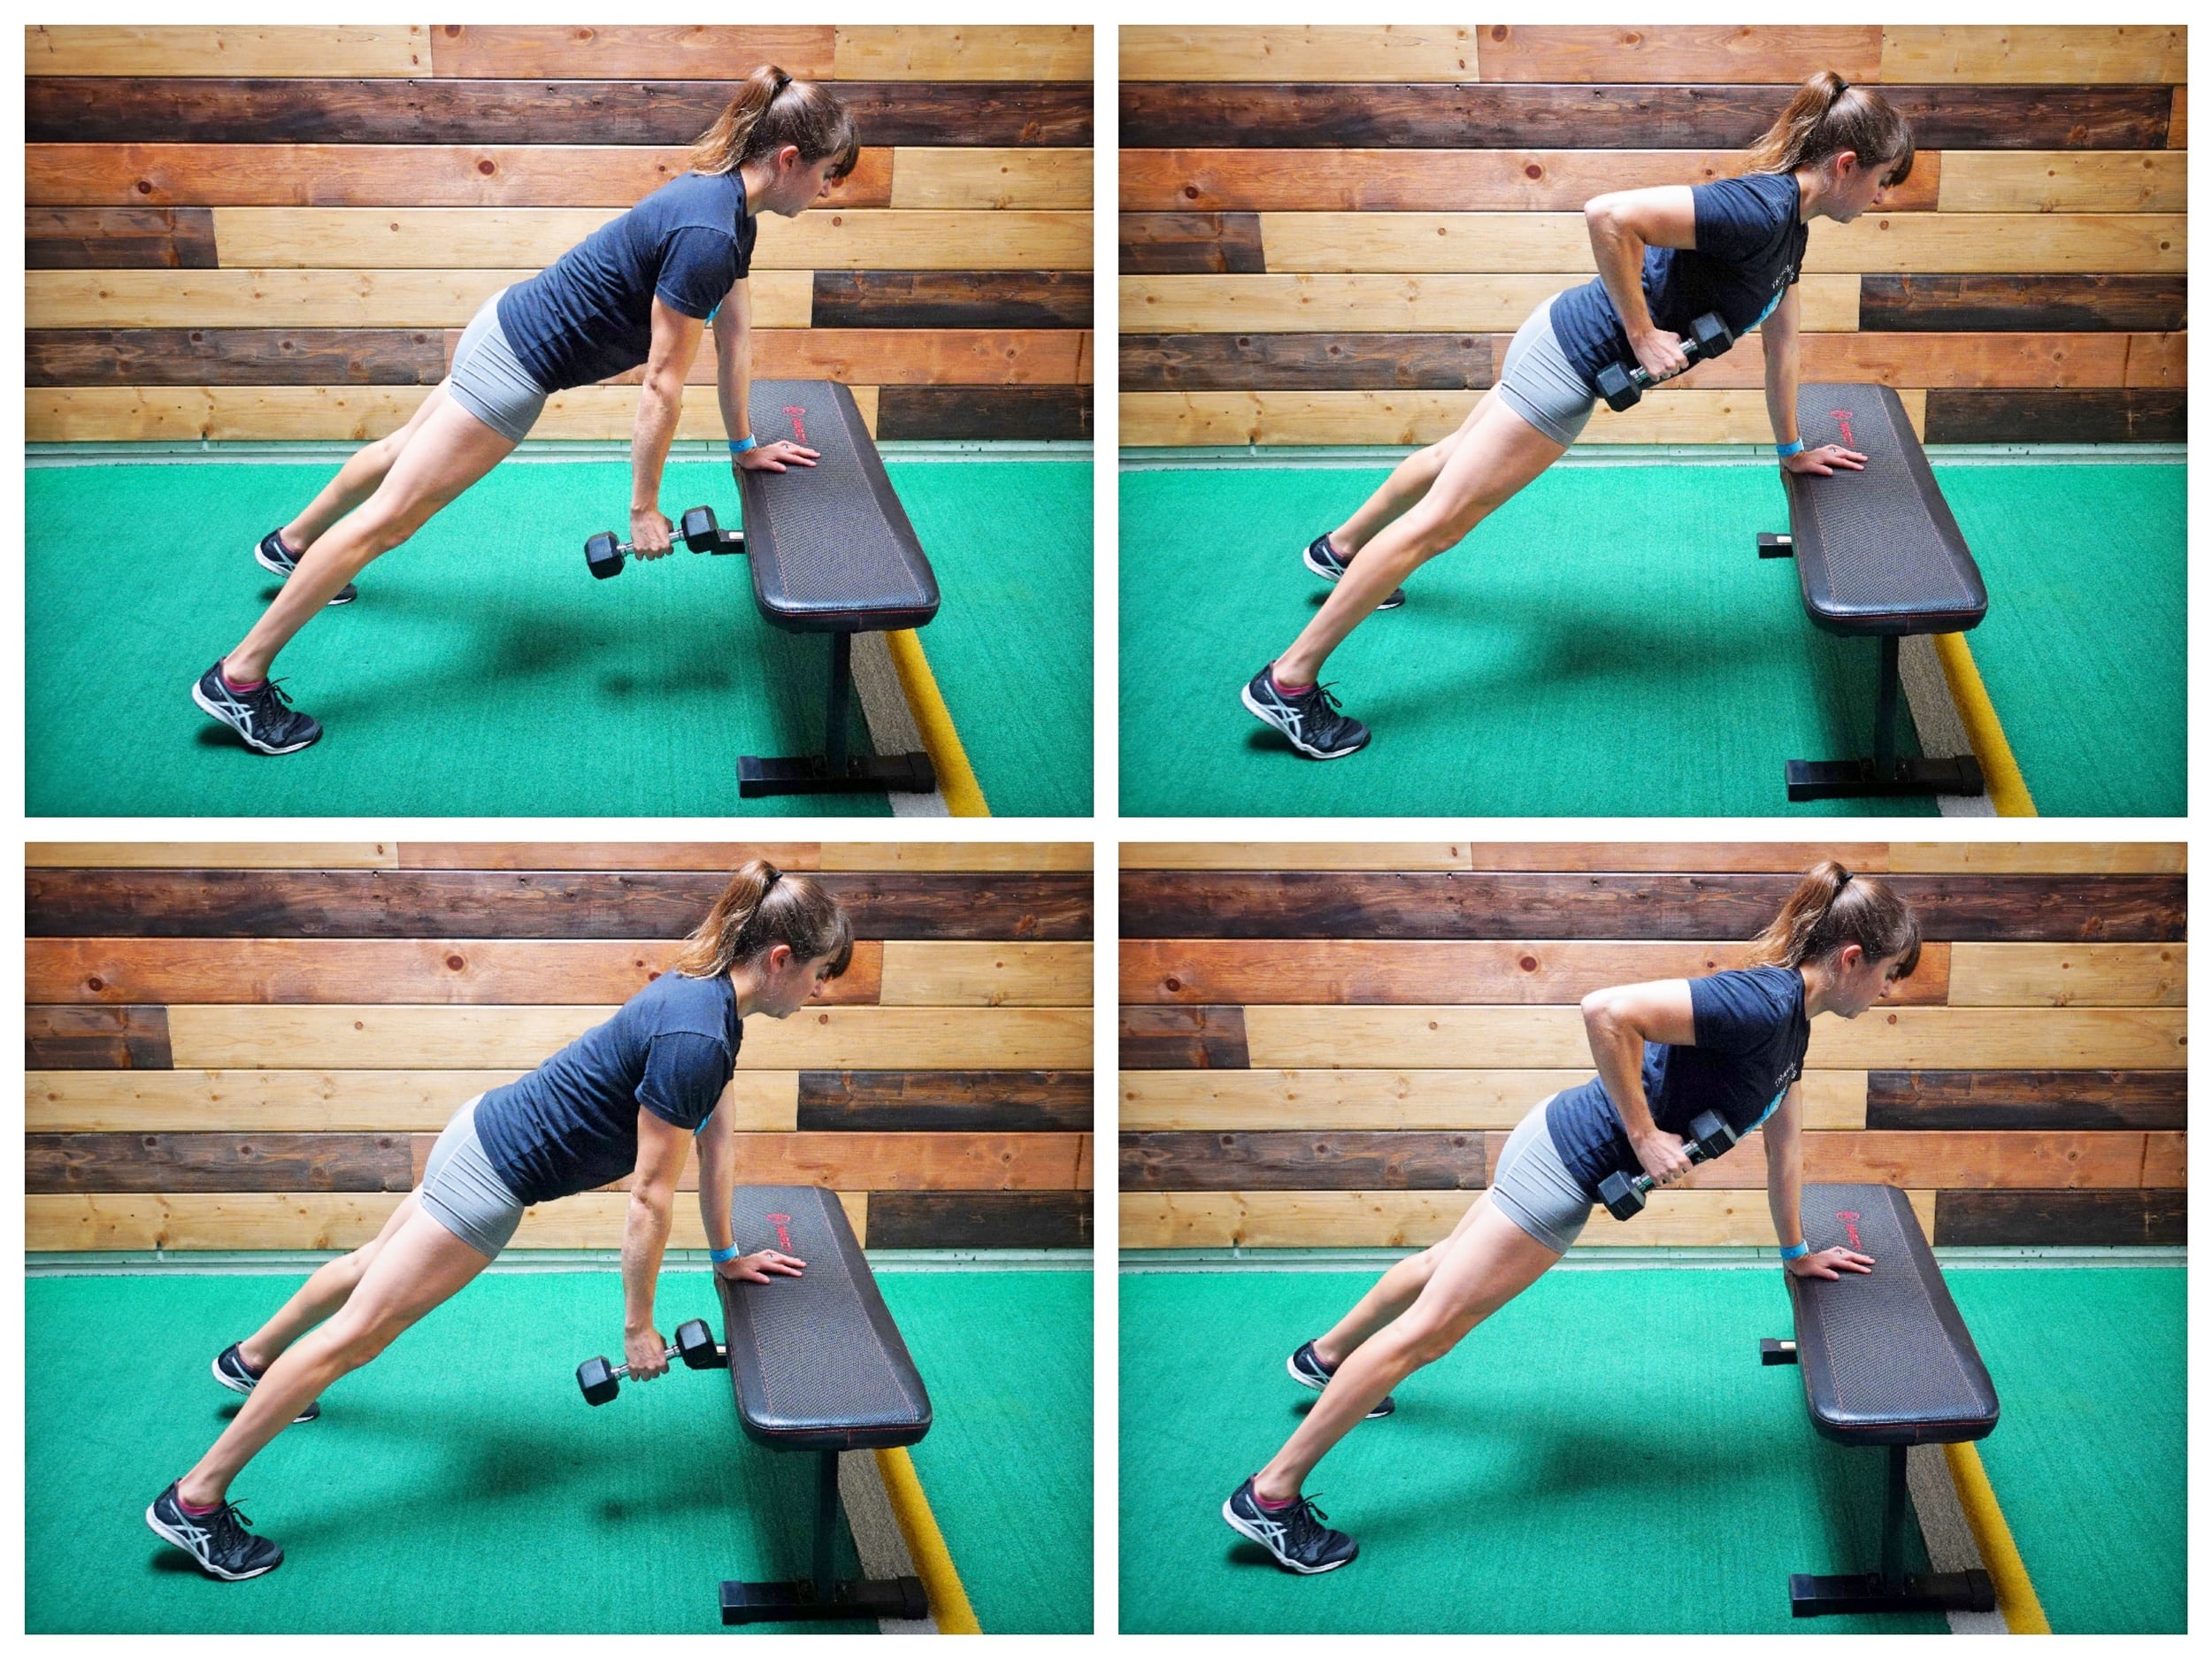
Alternating Arm Dumbbell Rows:
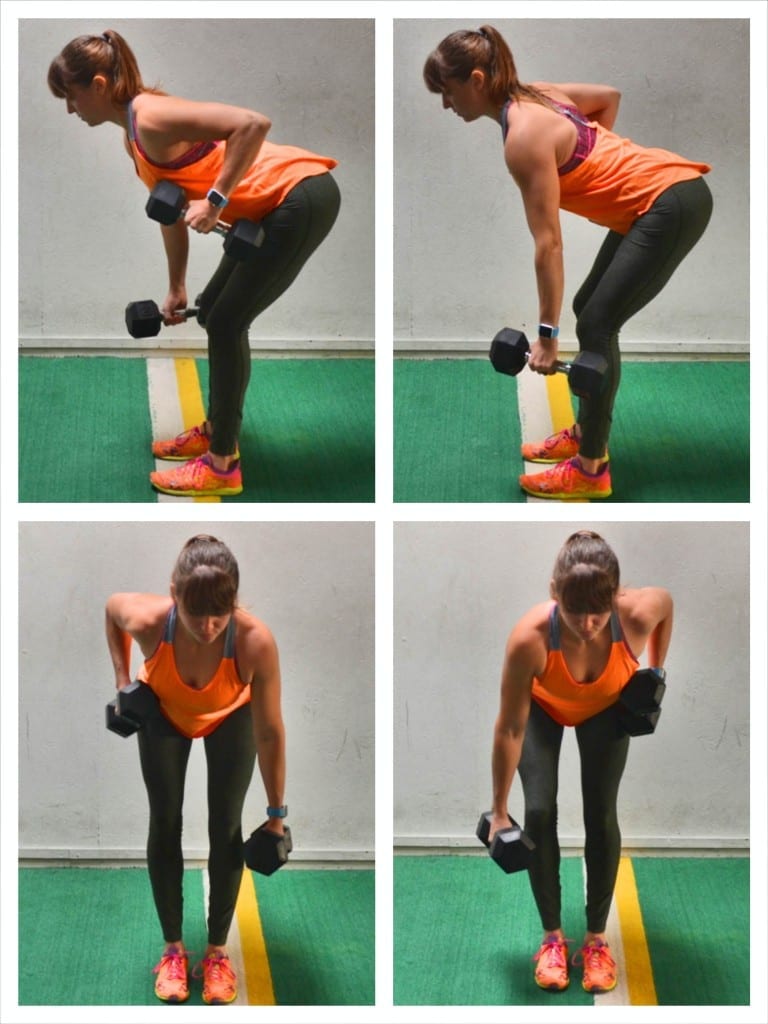
To do Alternating Arm Dumbbell Rows, hold a dumbbell in each hand with your palms facing in and hinge over, pushing your butt back while keeping your knees soft and back flat. Engage your upper back with your arms extended down toward the ground.
Then drive one elbow down and back toward your hip as you row the dumbbell up to your chest. Do not shrug your shoulder and really focus on pulling with your back. Do not turn it into a bicep curl. You should row the weight up to about nipple height.
Lower the weight back down and row up on the other side. Brace your abs and really pull with your back. Do not bounce with the weight or rotate a ton just to try to row up higher. Make sure you don’t hyperextend your lower back as you stay hinged over.
Brace your abs, press your chest out and keep your knees soft the entire time to protect that lower back and focus on working your upper back.
Also, look slightly out to keep your head about in line with your spine and not strain your neck. Move at a controlled pace as you row, alternating arms. You do not have to pause with both at the bottom but can row one up as you lower the other down.
Superman Waves:
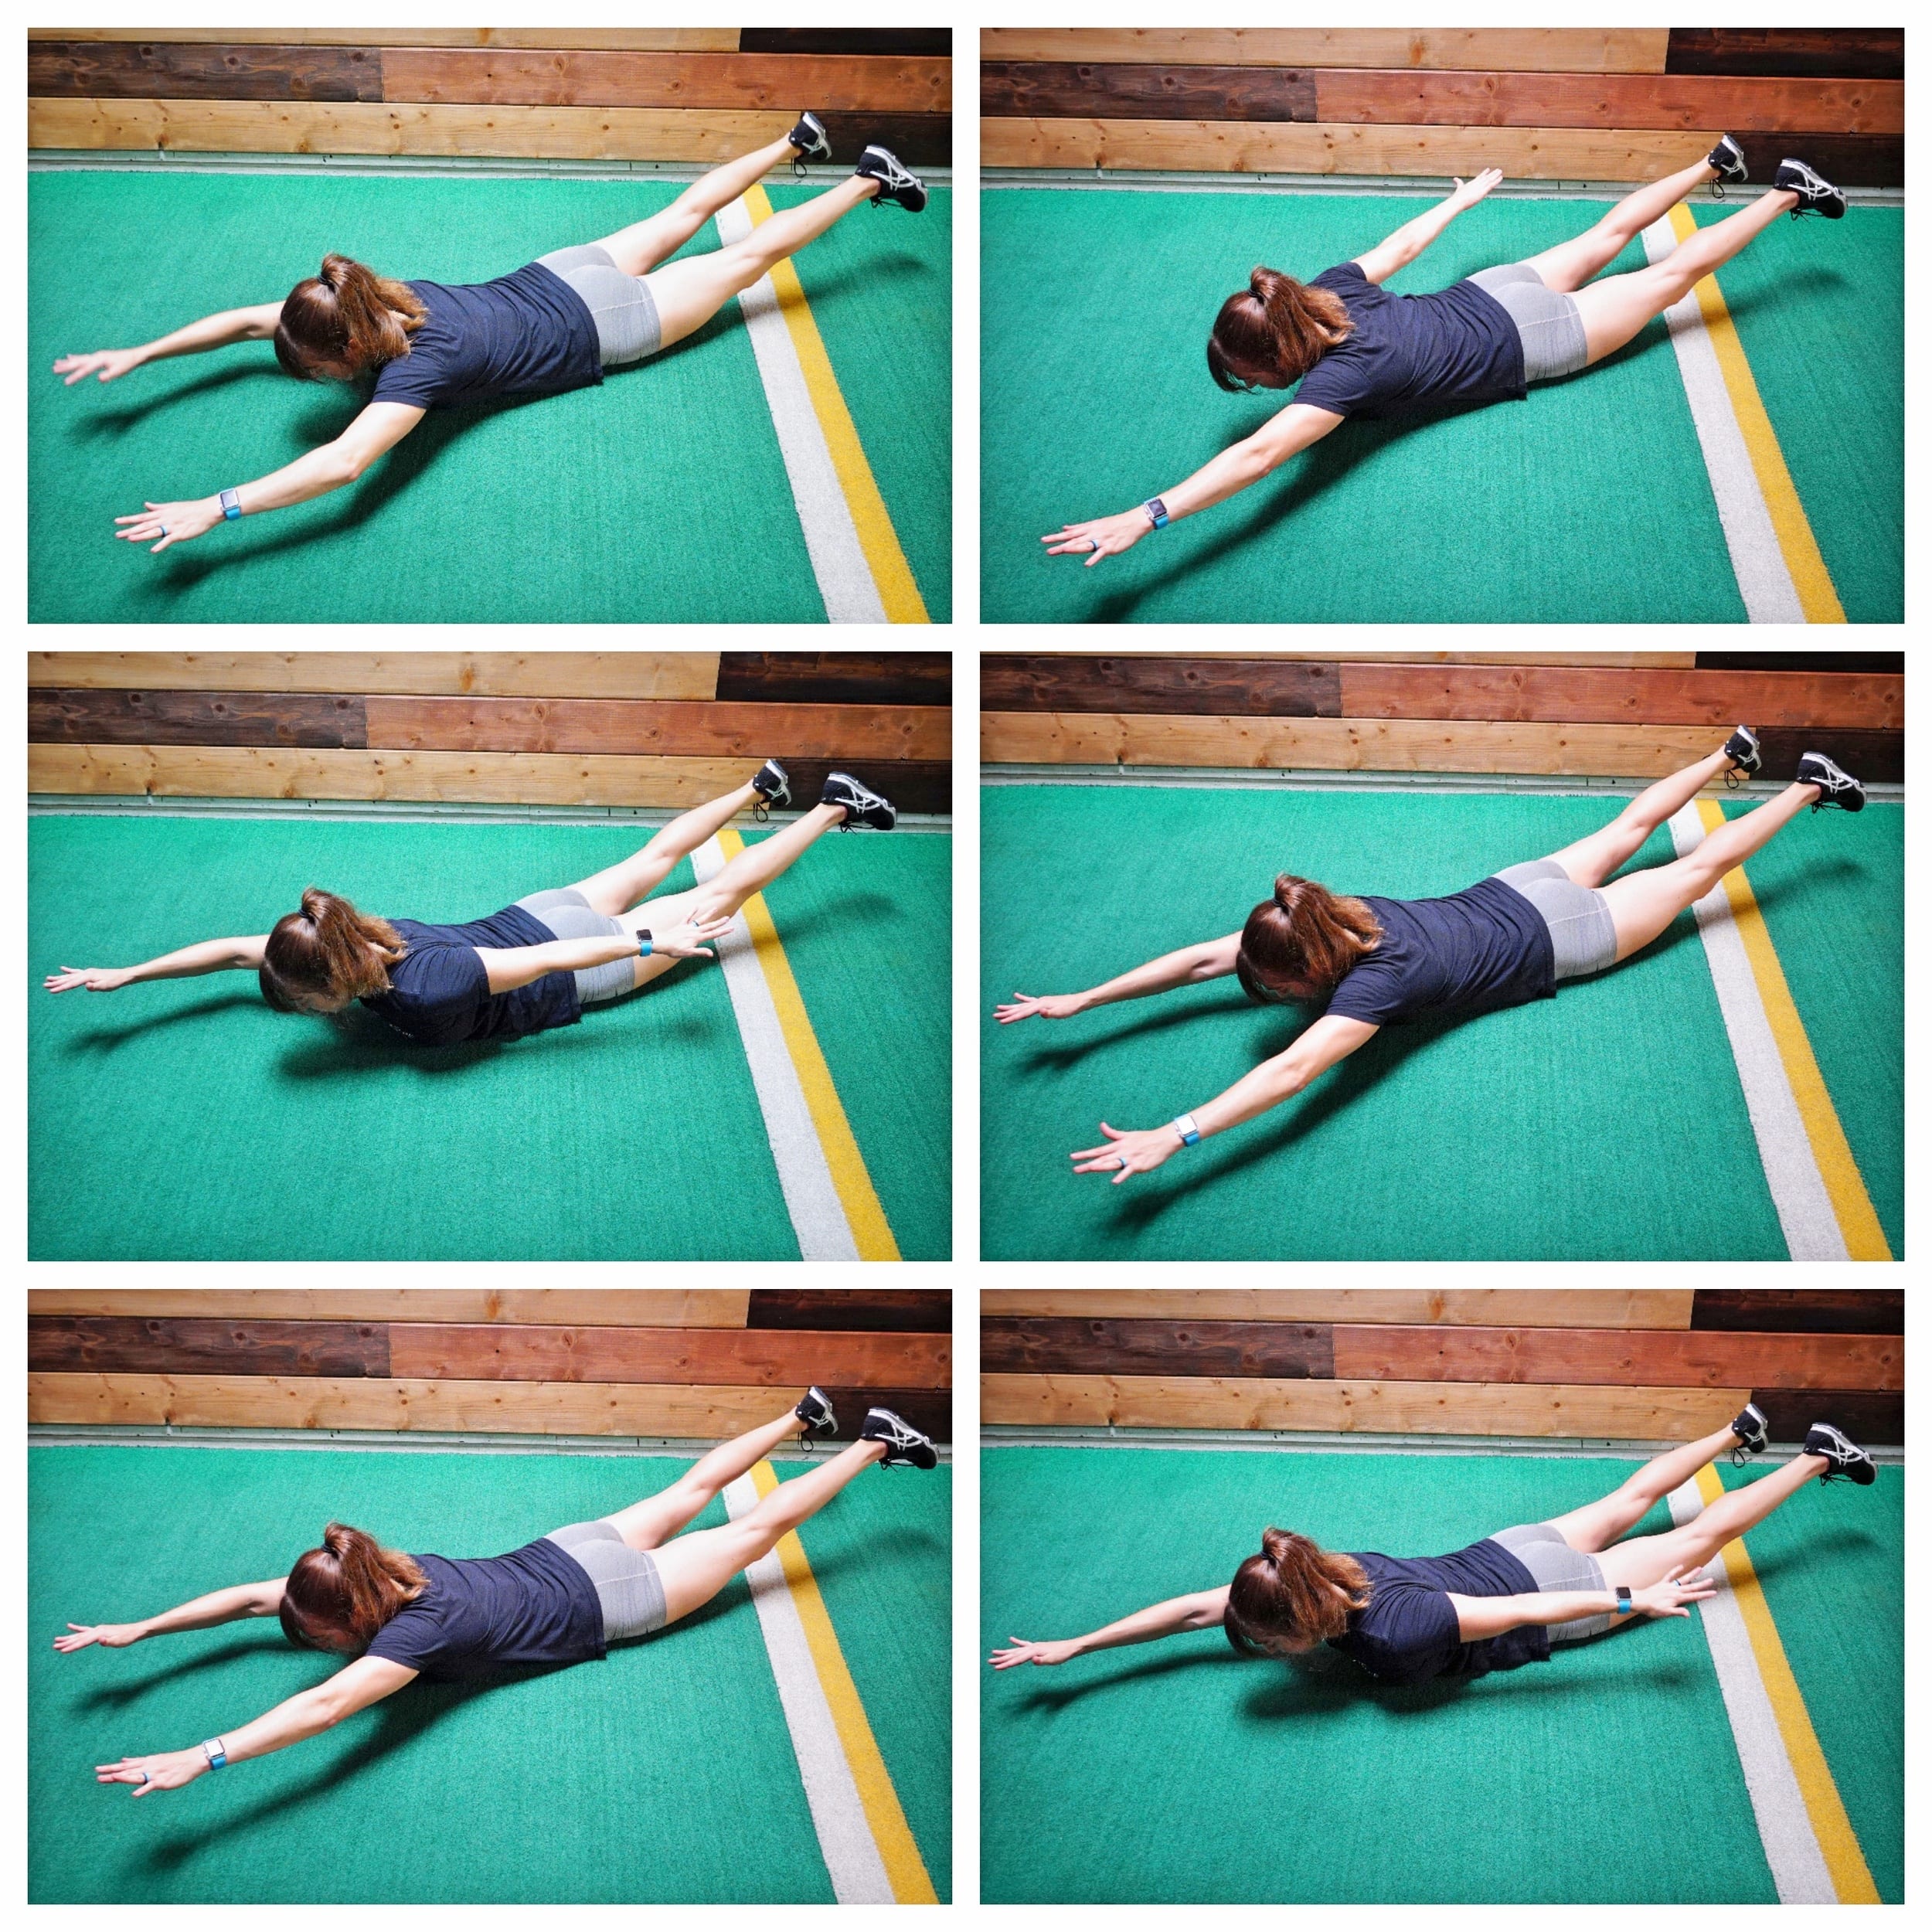
To do Superman Waves, lie face down on the ground with you arms reaching overhead and your legs out straight behind you.
Then lift your arms and legs off the ground, engaging your glutes and back to lift. Try to lift your chest up as high as you can and get your quads off the ground as much as possible.
Holding here, sweep one arm out and down toward your side, keeping your arms straight. Keep the other arm reaching straight out overhead as you wave the other arm down.
As you lower one arm down by your side, keep it as high off the ground as possible to work the back of your shoulder.
Wave the arm back overhead then sweep the other arm out and down to your side. Keep alternating sides as you engage your back and butt to stay up in the superman position. Move at a controlled pace.
Lat Pull Downs:
To do Lat Pull Downs, you can use a machine or even resistance bands. Using a resistance band, anchor the resistance band up high and grab the band in both hands with your palms facing away. You can use a variety of grips and even hold it with your palms facing each other or toward you.
Then step back so that there is tension on the band even with your hands extended toward the anchor point. Sink into a lunge with the back leg straight. You can also stand with your feet together if you don’t need to counterbalance against the band. Lean forward over the front leg with your back flat and reach your hands up overhead toward the anchor point as you hold the band. You want to create a nice straight line from your hands to your tailbone so that you can mimic the vertical pull of the Pull Up.
With your chest pressed out, pull the band down to your shoulders, driving your elbows down toward your hips. Feel your shoulder blades retracting and the sides of your back working to pull the band down. Keep your core tight as you pull the band down and do not let your back round as you pull.
Hold for a second at the bottom of the pull then extend your arms back overhead and repeat. Make sure to keep your back flat and draw your shoulder blades down and back as you pull the band down to you.
Step further away from the anchor point to increase the tension on the band and make the move harder. You can also use a heavier band.
Back Flyes:
To do Back Flyes using dumbbells, hold a light dumbbell in each hand. Start light so that you can focus on your upper back and the backs of your shoulder’s working without engaging your upper traps, neck or lower back.
Hinge over at the hips holding the weights with your arms hanging straight down toward the ground. Keep your back flat and slightly bend your knees. Make sure to drop your chest to about parallel to the ground. If you start to stand back up, you could start to overuse your upper traps instead of using your upper back. You do not want to turn this into an upright row.
Then, bracing your abs, fly your arms out to the side. Keep your elbows soft as you lift your arms out to the sides and back toward the ceiling at about, or just below, shoulder height. Pinch your shoulder blades together as you fly your arms open and really feel your upper back and the backs of your shoulders working. Keep your neck relaxed as you fly.
Lower back down and repeat the fly. Try not to swing, but really focus on using your back to lift. Also, make sure to keep your elbows soft as you fly your arms up and out.
If you feel your neck and upper traps engaging, you can place your head against the wall or on top of a bench. Also, make sure your low back doesn’t engaged as you keep your back flat. You may need to brace your abs more or bend your knees slightly, especially if your hamstrings are tight.
Side Plank Rows:
To do the Side Plank Row, set up in a high side plank from your hand with your feet staggered (your top foot will be in front). You will hold a dumbbell just off the ground down in front of you with your top hand.
Keeping that nice side plank position, row that weight up and across your body, driving your elbow back toward the wall behind you. You will slightly rotate open as you row. Feel your back pulling the weight up and across as your bottom side works to keep your bottom hip up for that nice plank position.
Lower the weight back down and across toward the ground and repeat the row.
Mini Pull Ups:
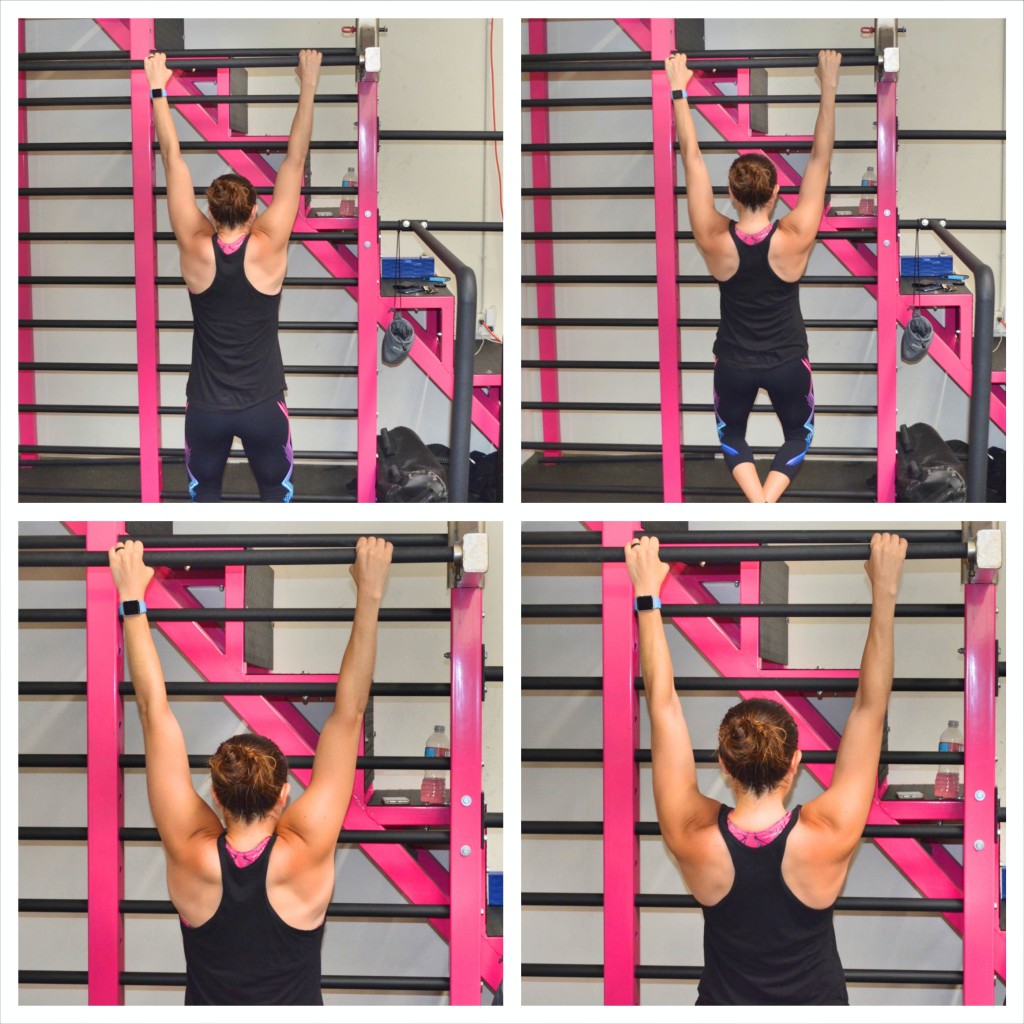
To do Mini Pull Ups, start hanging from the bar with your palms facing away from you and your hands about shoulder-width apart.
From this dead hang position, press your chest out and up toward the bar as you draw your shoulder blades down and together. Feel your back engage as you draw your shoulder blades together and press your chest up toward the bar. You will feel your shoulders “unshrugging.”
Don’t bend your elbows and turn this into a pull up. You are simply working on that initial retraction and engagement. Really press your chest out and retract your shoulder blades, bringing them down and together.
Again, do not bend your arms to pull up. Use your back and feel your back engage. You should also feel your shoulders go down as your chest lifts up.
Pause at the top then relax back down to a full dead hang and repeat. Remember, you are not bending your elbows to make this movement bigger.
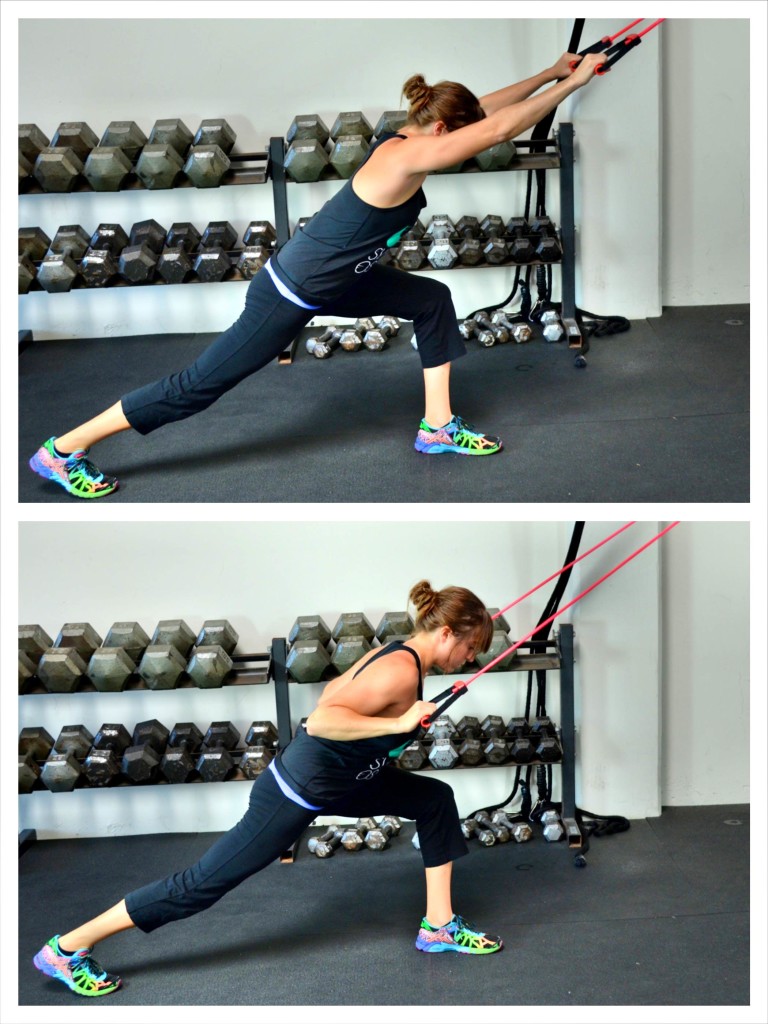
Suspension Trainer Single-Arm Rotational Rows:
To do a Single-Arm Rotational Row, grab one strap in one hand. Walk your feet forward and lean back to put your body at an incline. Start with your hand holding the strap in at your chest as you reach the other hand up the strap as high as you can. Do not let your shoulder holding the handle shrug. Pretend you’ve already rowed up and you’re driving your elbow down and back as your hand is in at your chest and your body is rotated toward the strap.
Then lower yourself down, extending the arm holding the strap as you rotate the hand reaching up down toward the ground almost as if you are doing a hanging side plank. Keep your body in a straight line and don’t let the hips sag toward the ground.
Keeping your core tight, row your chest back up to the handle, and as you do, rotate back to the start, turning your chest back toward the strap as you reach your other hand as high up the strap as you can.
Do not shrug your shoulder as you row. Really feel your lat and back on the side you are rowing with working. To advance (or regress this move), change the incline of your body. The closer you get to parallel to the ground, the harder the move gets.
Bench Plank Rows:
To do Bench Plank Rows, hold a dumbbell in one hand and place your other hand down on the bench as you move your feet back so you are in a high plank position. Set your feet about hip-width apart so your core doesn’t rotate as you row. Let the arm with the dumbbell hang down.
Then holding this plank position with your abs braced and back flat, row the weight up to your chest, driving your elbow back. Make sure to pull from your back as you row the weight up to about chest height. Don’t shrug your shoulder as you row or turn it into a bicep curl. Feel your back engage as you row it up.
Then lower it back down and repeat. Make sure to keep your core engaged so you don’t sag or rotate as you row. If you have wrist issues or even want to make it harder, go down to your forearm on the bench.
To make it easier, use a higher box. Do not go lower than a box at about knee height!
Full Bicep Curls, Bottom Curls, Top Curls:
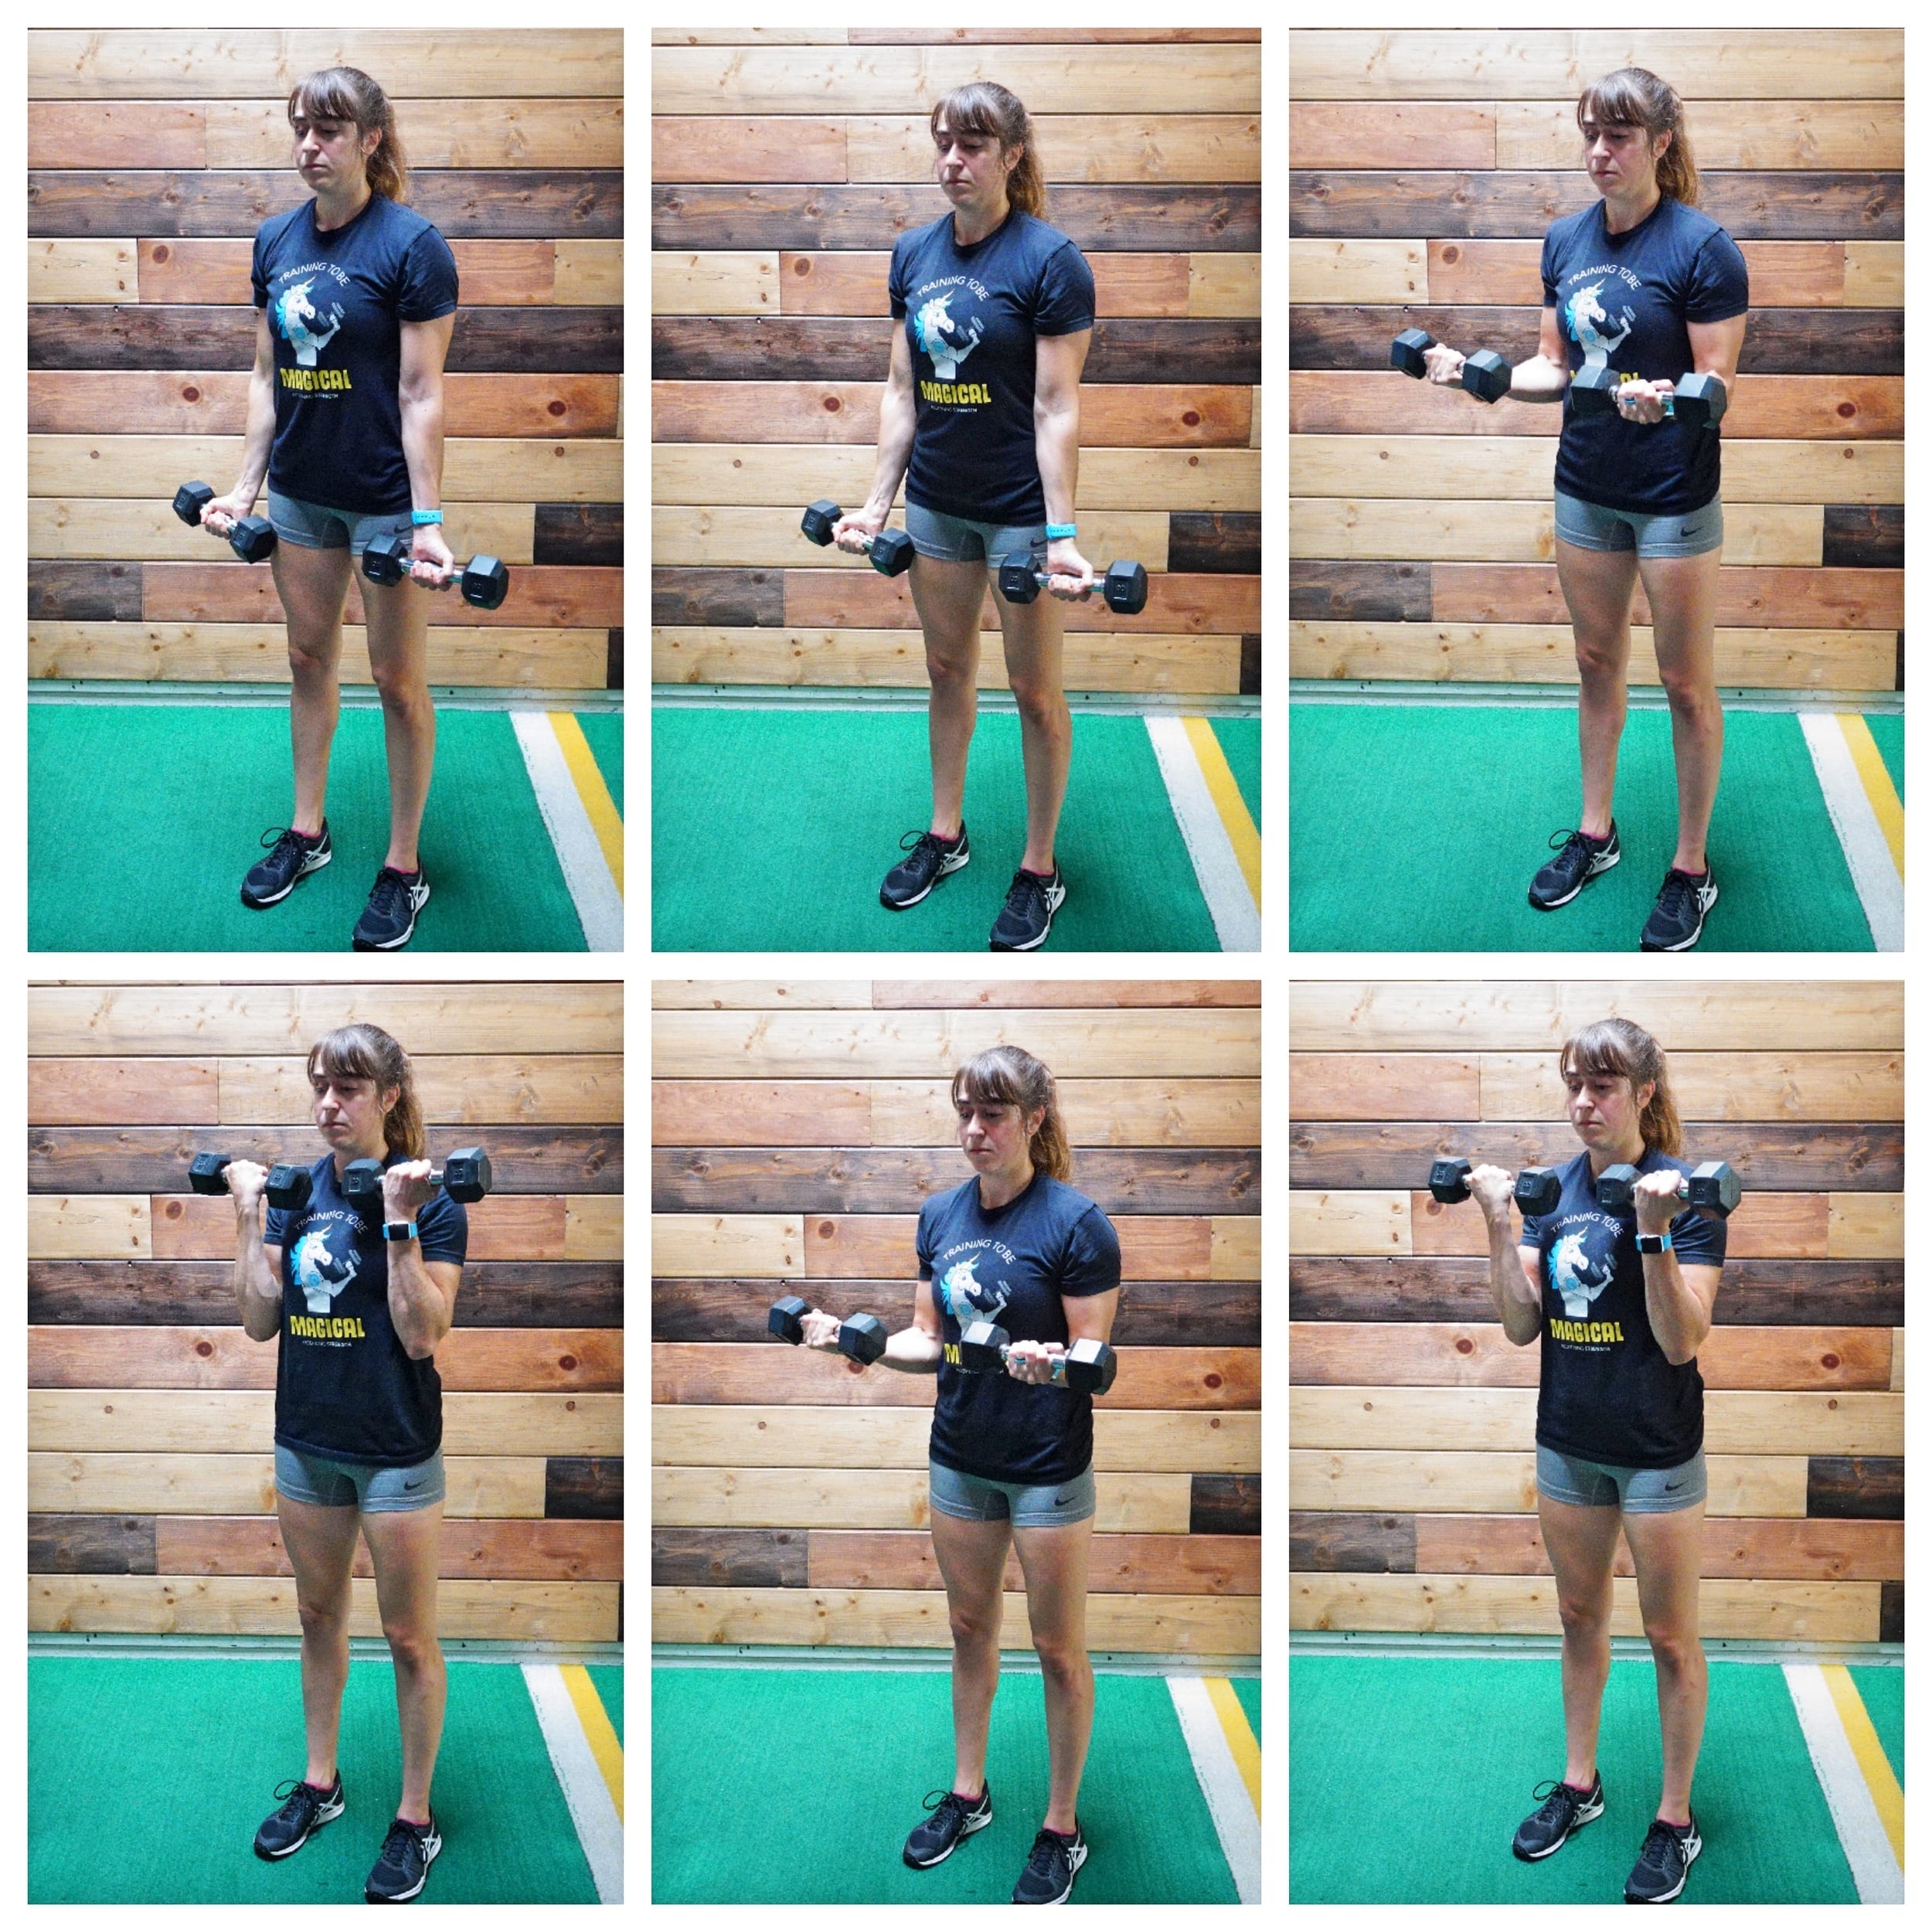
To do the three different bicep curls, hold a dumbbell in each hand, standing with your feet about hip-width apart and arms down by your side with your palms facing up.
Without swinging the weights, curl them all the way up to your shoulders, keeping your elbows pointing down toward the ground. Control the lower back down and repeat. That is the full bicep curl.
To do the Bottom Bicep Curl, you will only curl the weights up to the point your forearms are about parallel to the ground and then lower back down. You are curling for only the bottom half of the full curl. Even take a quick pause when you reach that halfway point.
To do the Top Bicep Curl, you will start at the top of that bottom curl, so about halfway up in the curl. From this point, you will curl the weights to your shoulders. When you lower back down, control the weights down to that halfway point. Don’t go lower and make sure to pause there so you can’t use much, if any, momentum. Remember you are curling to the top and lowering so that your forearms are parallel to the ground.