The Push Up – It is a bodyweight exercise that we should all be able to do. And while it seems so easy, it can be a very challenging move.
Because, while the Push Up seems like it is only an upper body exercise, a Perfect Push Up works more than just your chest, shoulders and triceps – it works your entire core.
The Push Up is basically a moving plank. And for many, just holding a plank is hard enough. Yet with a Push Up, you are being asked to hold that perfect plank as you move.
To do the Perfect Push Up, everything from your shoulders to your heels must be engaged and working together.
Below we will teach you how to do the Perfect Push Up and get all the correct muscles engaged and working. Plus, we will show you how to strengthen your weak points with Push Up Variations and supplemental exercise to help you do more Push Ups
How To Do A Push Up
Push Up Form:

To do a Push Up with correct form, set up in the high plank position (the top of a push up) with your hands under your shoulders and your arms locked out. Place your feet together and set up so your body is in a nice straight line from your head to your heels. Squeeze your glutes, brace your abs and drive back through your heels to engage your legs (quads especially). You even want to squeeze your legs together as you hold your body in a nice straight line, which means your adductors will engage.
By engaging your core before you even lower, your hips shouldn’t drop toward the ground and your butt shouldn’t go up in the air toward the ceiling as you perform the Push Up. Your head isn’t tucked toward the ground or jutting forward. Your back is not excessively arched or rounded.
Your body is in a nice straight line with your core engaged.
While in the high plank position, remember your hands should be below your shoulders and right outside your chest. Your finger tips should be pointing straight ahead and your hands should be pressing into the ground and away from each other as if trying to tear a piece of paper between them.
As you lower down to do the Push Up, you should lower your chest directly between your hands, keeping a nice straight line with your body. Your elbows shouldn’t flare out from your body. Your elbows should make an arrow shape with your body. Like this (–> ). You do not want your arms to create a “T” with your body or you will put more strain on your shoulders and risk injury.
Your shoulders, elbows and wrists should all be in a straight line. Your body should move as one unit toward the ground.
Your chest should touch the ground when you lower and everything should move together. Hips shouldn’t move back up first or touch the ground first. Your head also shouldn’t jut forward as you lower and lift.
Everything should move as one. Don’t let the hips sag or the elbows flare out as you lift. Keep your head in line with your spine.
Only if you engage your entire core will your body move as one unit.
Press back up to the starting position and lock out your arms and then repeat, lowering your chest back down to the ground as you keep your body in a nice straight line.
Building Your Push Ups:
To improve your Push Ups, you not only need to work on your Push Up form, but you also need to get the correct muscles working and strong.
To get your body working properly so you can do more Perfect Push Ups, you need to first foam roll and stretch the tight muscles so that you can then get the big muscles activated and strong.
Below are foam rolling, stretching, activation and strengthening moves (including Push Up variations and supplemental exercises) to improve your Push Ups!
Foam Rolling:
Sitting at a desk all day can create imbalances and tight muscles that can keep the big muscles of your back and chest from working properly. If your big muscles aren’t engaging and working, you can’t do as many Push Ups and you risk injury.
Below are some foam rolling moves you need to include in your warm up routine before your push up workouts. When foam rolling, spend time on areas that you find are tight and not just areas of pain. Also, do not roll quickly over muscles. Hold on any tight points to help the muscle release.
Forearm Foam Rolling –
If you sit at a desk all day, you may find that doing Push Ups aggravates your wrists and even your elbows. This is because your wrists and even your elbows are in flexion for most of the day typing at a computer and doing Push Ups requires you to apply pressure to your hands and wrists while in extension.
Therefore, before you do Push Ups, you should roll out your forearms to help loosen up your wrists and even your elbows.
To roll out your forearm, place a small ball or roller up on a desk, chair, box or bench. Place your forearm over the ball with it right below your elbow. Press down on your forearm to press it into the ball.
Make small circles on the ball, holding on any tight spots. If you find a tight spot, you can also tense and relax your forearm by either making a fist or by pointing your fingers down toward the ground.
By flexing and relaxing the muscles, you help the ball dig in and release the tight spot.
Once you’ve worked on one spot, move the ball down your forearm. You can use it to roll out both sides of your forearm.
Don’t waste time on any areas that aren’t tight or sore. Seek out and spend time on any areas of pain.
You can even do this move at your desk during work to help prevent wrist and elbow pain and injury.
Triceps Foam Rolling –
If your Triceps are tight this can cause elbow and shoulder pain. It can also mean that the muscles of your upper body aren’t being recruited properly during Push Ups, which can not only hinder you from doing better Push Ups but it can also lead to injury.
To roll out your triceps, place a roller or ball up on a desk, bench or chair so that you have leverage to press down into the roller.
Then place the backside of your upper arm on the roller with the roller right above your elbow. Rock your upper arm side to side on the roller. Hold on any tight spots.
Then roll the roller higher up your tricep toward your shoulder. Rock side to side on the roller each time you move it up higher. Work up the length of your tricep, hitting toward the inside and outside of your arm as you go.
You can also use a ball or roller against a wall as well. Still rock side to side and work your way from the top of your elbow up to your shoulder.
Chest Foam Rolling-
Rolling out your chest is super important after sitting at a desk all day. When your chest is tight, you can prevent the big muscles of your upper body from working, which means small muscles like your Rotator Cuff muscles take over and do work they can’t handle. Not only does this mean your Push Ups won’t be as strong as they could be, but it also means you risk shoulder, neck and even upper back pain and injury.
To roll out your chest, a blue foam posture ball is a great tool, especially if you want to roll out on the ground.
Place the ball on the ground and lie face down on top of it with the ball right in your chest beside your shoulder joint and below your collarbone. Then with the ball right to the inside of your shoulder, move your hand overhead and then back down toward your legs. Sweep your arm from overhead out to the side and down as you lie on the ball.
Move your arms slowly up and down to change exactly how the ball digs into your chest muscles. Hold and relax on any tight spots.
If you have a smaller ball, like a tennis ball or lacrosse ball, you can also use that to roll out your chest by using it against a wall. Stand with the ball in your chest against a wall, preferably in a doorway so you can extend your arm forward to help you dig into your chest.
Press into the ball and raise the arm on the side you are digging in to up toward the ceiling and back down. Hold on any tight spots. You can also roll the ball along the muscles below your collarbone and even down around your shoulder toward your armpit.
Then switch and do the other side.
Upper Back Foam Rolling –
A tight upper back could prevent you from having perfect Push Up form. It could also cause your head to jut forward as you perform Push Ups and lead to neck, shoulder and upper back pain and injury.
To roll out your upper back, a ball is best although you can use a roller.
Using a ball, stand with your back to a wall and place the ball to the side of the base of your neck between the top of your shoulder blade and your spine. Press the ball into the wall and roll it down along your shoulder blade.
Hold on any tight spots. You may even want to pull your arm across your chest as you dig out under the shoulder blade. You can also lift and lower your arm. By flexing and relaxing the muscle, you can help the muscle release the knot.
You can also use the ball against the wall to dig out right at the top of your armpit and into your rotator cuff muscles.
If you want to apply more pressure with the ball, you can use a harder ball or use the ball against the ground instead of the wall.
Lat Foam Rolling –
Just like if your chest is tight, if your lats are tight, you may start to strain and overuse your rotator cuff muscles. Plus you may have trouble with proper scapular retraction to support your upper body during Push Ups.
Tight lats can also lead to low back pain, which means that your core probably won’t engage properly during Push Ups to allow you to maintain a nice straight line with your body.
To roll out your lats, you can use a ball or roller. If you have known trigger points in your lats, especially at the top near your armpit, a ball may be best. Otherwise a roller works really well, especially if you are more sensitive to harder pressure during massages.
To use a roller to roll out your lats, lie on your side with a roller under one armpit and your arm stretched out overhead.
Rock forward and backward on the roller and then move it lower down the side of your back. Hold on any tight spots as you go and make sure to rock forward and backward as you make your way down your side.
Work all the way from your armpit to the end of your rib cage. You can even work down toward your lower back as long as you stay focused on your back as you get to the end of your ribcage. (Do not roll your low back straight over the roller. You can hyperextend your low back doing this.)
You can also use a foam ball or posture ball to roll out your lats and chest in one movement called the Shoulder U.
To do the Shoulder U, lie face down on the ground with the ball starting under your chest in the side of your shoulder. Roll it right along the shoulder joint and then down under your armpit to hit the side of your back.
Hold on any tight spots as you roll.
Then roll it around under your armpit back between your shoulder blades. Work up and down the shoulder blade then roll it back around front.
Make sure to really get the intersection of your back and shoulder (the back of your armpit) as you roll the ball around.
Once you’ve rolled out one side, switch the ball to the other side and complete the “U” around your shoulder and shoulder blade.
If you find any knots you want to dig into more, use a smaller harder ball on those areas.
Thoracic Extension Foam Rolling –
When we sit at a desk all day, our Thoracic Spine is in flexion. When we sit in flexion, not only do we create movement patterns that tend to overuse the small muscles of our upper back and shoulders, but we also can’t engage the big muscles of our upper body to maintain a proper body position during Push Ups.
To help ready our body to work on Scapular Retraction during our Activation Exercises, so that we can properly use our chest and lats during Push Ups (yes your lats do work!), we need to work on our Thoracic Extension.
To work on your Thoracic Extension, a roller works best. You can use either a Rumble Roller or a softer roller to apply less pressure.
Using the roller, lie back over the roller with the roller in your mid-back. Cross your hands over your chest and, keeping your butt on the ground, extend back over the roller. Try to touch your head to the ground behind you.
Then move the roller higher up on your back and, again with your butt on the ground, extend back over the roller.
Hold for a second or two as you extend and then move the roller higher up. Work all the way up your mid to upper back. Do not do this on your lower back.
Psoas Release –
Your Psoas is another hip flexor muscle that can cause low back pain and prevent your core from functioning properly. And if your core doesn’t engage properly, you are going to end up with sloppy Push Ups.
To roll out your Psoas, a big foam ball/posture ball works best. Place the ball in your abs above your hip to one side of your belly button.
Relax over the ball and lie face down on the ground. Breathe.
Then move the ball, working your way around the side of your lower abs between your belly button and hip. After you move the ball, relax completely back over it.
If you don’t have a larger ball, you can use a tennis ball; however, the tennis ball will dig in more. To use the tennis ball, you will also need some books or a yoga block. Place the ball up on the books or block and lie over it just like you would with the posture ball. Relax and breathe.
Hips/Glutes Foam Rolling –
If your hips and glutes are tight, you may start to strain your low back during Push Ups and you may find it hard to keep your core and glutes engaged so that your body stays in a nice straight line.
To roll out your hips and glutes so that you can use your core correctly during Push Ups, a smaller, harder ball is best.
Start by placing ball under one side of your glutes. Roll it around under your glute, searching for any tight spots. Work your way from along your tailbone out to the side of your hip. Also make sure to work from the top of your glute down to the top of your hamstring.
When you find a tight spot hold there and bend your knee in toward your chest and then straighten the leg back out. You can also lift and lower the leg when the ball is on the tender area. While holding on the tight spot, try 5-10 of each move and then move on to the next spot.
By bending your knee or lifting and lowering your leg, you are flexing and relaxing the muscle to help loosen the tight spot.
Search all around your glute.
Once you’ve worked on the tight spots in your glutes, bring the ball under your hip and around to the front of your leg. Use the ball under and around your hip bone, working in toward your inner thigh as well as down the quad a little bit. Hold on any tight spots.
Quad Foam Rolling –
Tightness in your quads can also prevent your glutes from firing properly and can also cause your low back to engage instead of your abs during Push Ups. The Rectus Femoris is another hip flexor muscle and is the muscle down the middle of your quads.
To roll out your quads, a foam roller is best.
Take the foam roller and lay over it as if you are about to do a plank supported on your forearms. Start with the roller right above your knees. Rock side to side, hitting toward your inner thighs and out toward your IT Bands. Then move the roller up a little higher on the front of your legs and again rock side to side.
As you rock and move the roller higher, make sure to pause and hold on any extra tight spots until the pain lessens a bit.
Work your way all the way up to your hips.
If you find any tight spots, while you hold on them, flex and relax your quad to help the muscle relax.
To apply more pressure, place only one leg down on the roller (you can cross the other leg behind) and rock side to side, holding on any extra tight spots.
To target your Rectus Femoris specifically, a ball works best.
Place the tennis ball on the ground and lie face down supported on your forearms with the ball at the top of your quad to the front and inside of your hip bone.
Hold there for a second or two, flexing and relaxing your quad to help the ball dig in more if there are any knots. Then roll the ball straight down your quad to a new spot. Hold there. Again you can flex and relax your quad to help the muscle release the knot.
Work your way straight down the middle of your quad to right above your kneecap.
Calves/Feet Foam Rolling –
Your feet and lower legs are your base. If you don’t have proper mobility and flexibility there, you are going to have problems further up your body. Plus if your lower legs and feet are tight, you aren’t going to drive through your heels properly and keep your legs and core tight during Push Ups.
To roll out your calves, you can use a roller or a ball.
Using a roller, place one calf over the foam roller with the roller at the bottom part of the meat of your calf. Cross the other foot on top of the leg on the foam roller to help apply more pressure.
Rock right to left or side-to-side a couple of times and then move the foam roller up higher on your calf toward you knee. Keep rocking side to side as you work your way up your calf.
Make sure to hold on any tight spots. If you find a super tight spot, make 10 circles with your foot and then tense and relax your calf (flexing and dropping your foot) 5 times before you move to the next spot. This will help you dig in further to any knots and help the muscle relax itself.
Don’t spend any time on areas that aren’t tight. Repeat all the way up both calves.
You can also use a ball and either a yoga block and some books to dig out your calves if you know that specific areas are tight or want to apply more pressure. Place the ball on the books/block and then place one calf on top of it. Cross the other leg over and press down into the ball. Hold on any tight spots and circle and/or flex the foot to dig in more. Then move to another tight spot.
To roll out your feet, a smaller, harder ball is best. You can use a tennis ball, lacrosse ball or even a golf ball.
Place whatever ball you are using on the ground and step on top of it. Roll it along the length of the bottom of your foot. Hold on any tight spots. Only place as much weight on your foot as you can handle.
The smaller and harder the ball you use and the more you apply pressure, the more you can dig into any tight spots.
Stretching:
Once you’ve foam rolled your tight muscles, you then need to restore all of the muscles to their proper lengths so that the correct muscles can engage so you can do more Push Ups!
The stretches below target the major muscles involved in Push Ups that may be tight or short or restricting our mobility because of our other daily activities (such as sitting at a desk hunched over a computer all day). Use these stretches in your warm up or even between rounds of Push Ups to keep everything working properly.
Kneeling Wrist Extension Stretch –
To do Push Ups requires wrist extension and places pressure on our wrists while in extension. However, most of us spend most of our time with our wrists in flexion.
Therefore, after all day sitting in flexion typing at our computers, we need to stretch out our wrists so we don’t suffer from wrist pain during Push Ups. Also, if we force out Push Ups with a lack of wrist mobility, we risk elbow and shoulder pain and problems.
To stretch out your wrists and work on extension, try the Kneeling Wrist Extension Stretch.
To do the Wrist Extension Stretch, kneel on the ground and place your hands down on the ground in front of you, palms down. Turn your fingertips out and back toward your knees.
Then rock back, sitting on your heels, keeping the heels of your palms down on the ground as you sit back. Come back out of the stretch then sit back again, stretching down the inside of your forearms.
Kneeling Wrist Flexion Stretch –
Although our wrists are in flexion most of the day typing and gripping different things, after a hard workout where our wrists are in extension from push ups and handstands, it is a good idea to do this Wrist Flexion Stretch.
This stretch will release your wrists and your extensors after forcing them to do a movement they aren’t as accustom to.
To do the Kneeling Wrist Flexion Stretch, start kneeling on the ground. Place your hands down on the ground in front of you with the backs of your hands on the ground and your fingertips pointing in toward each other.
Rock side to side slowly, holding slightly to each side so that you feel a stretch down the outside of your forearms.
Standing Chest Stretch –
If you sit hunched over a computer all day, your chest is probably tight. And if your chest is tight, the muscles of your upper back may not be engaging correctly.
Even though Push Ups are a chest exercise, the muscles of your back still need to engage correctly to help you maintain a nice straight line with your body and use the big muscles of your chest correctly.
If your chest is tight and your back is underactive, push ups could lead to shoulder pain and injury. That is why this Standing Chest Stretch is an important move to include in your workout routine.
To do the Standing Chest Stretch, you can use a doorway, wall or pole. Place one hand back on the wall or doorway and walk past it, turning away from the hand on the wall or door.
As you rotate open and away from your hand, do not shrug your shoulder. Relax and breathe. Feel a nice stretch in your chest and shoulder.
You can also change the direction your thumb is pointing to hit a slightly different angle of your chest and shoulder. If you rotate your thumb to face backward (palm up toward the ceiling), you will hit your chest from a different angle than if your palm is facing the wall (thumb up toward the ceiling).
Hold the stretch for at least 15-30 seconds each side.
This is a great stretch to do any time you walk through a doorway (even if you don’t do a long hold)!
Child’s Pose with Reaches –
Tight lats can also lead to your upper body not engaging correctly during Push Ups, which could lead to shoulder and neck pain and injury. And if your upper body doesn’t recruit the big muscles to work correctly during Push Ups, your form will suffer and you probably won’t be able to do as many.
And the Child’s Pose with Reaches is not only a great stretch for your lats, but also your low back and hips. Releasing your low back is important so that your abs can engage correctly during Push Ups, which are basically a moving plank.
To do the Child’s Pose with Reaches, point your toes and sit back on your heels as much as you can as you reach your arms out straight in front of you on the ground. Relax and reach out as far as you can with your hands as you try to keep your butt all the way back on your heels.
Then walk your hands to one side. Breathe and feel a stretch down your side and into your low back. Then walk your hands back center and to the other side.
Hold to each side for a breath or two. Repeat walking your hands back to the first side.
Quadruped Thoracic Extension (Cat/Cow) Stretch –
Loosen up your back after sitting all day and work on your Thoracic Extension with this Cat/Cow stretch. This move can even help you work on engaging your abs if you focus on drawing your belly button in as you round.
To do the Cat/Cow Stretch, set up on your hands and knees with your hands under your shoulders and your knees under your hips.
Keeping your arms straight, round your upper back and tuck your chin toward your chest. Draw your belly button in toward your spine as you round your back.
Then exhale and arch your back and look up toward the ceiling. Drop your belly button toward the ground as you try to extend your back.
Repeat, rounding your back again and tucking your chin.
Lying Chest Stretch with Scorpion –
Another great stretch to loosen up your chest and the front of your shoulder so that your upper body works properly during Push Ups is the Lying Chest Stretch with Scorpion. This move also stretches your low back as you stretch your chest because of the Scorpion portion of the stretch.
To do the Lying Chest Stretch with Scorpion, lie on your belly with your arms out straight at shoulder height. Bend the elbow of one arm to 90 degrees so that your upper arm is still in line with your shoulder.
Then lift the opposite leg up from the bent arm and bend your knee to kick your foot over and behind you as you press your chest open with your straight arm. Kick your leg back over your body, trying to touch your toe back behind you and feel a stretch through your chest and low back.
You should feel a nice stretch down the front of the shoulder of the bent arm. Make sure as you reach the leg back over that you relax your head down onto the ground.
Hold for a second or two then bend the other arm and kick the other leg back over. Alternate sides, holding for a second or two each way.
Kneeling Thoracic Extension and Lat Stretch –
Another great stretch to open up your chest, lats and work on your thoracic extension so that you can recruit the big muscles of your upper body correctly during Push Ups is the Kneeling Thoracic Extension and Lat Stretch.
To do the Kneeling Thoracic Extension and Lat Stretch, place your elbows up on a bench about shoulder-width apart and kneel on the ground in front of the bench. Make sure you are back far enough that you have room to lean forward and over and drop your head between your elbows.
Then with your elbows on the bench, relax your chest and head over, sitting your butt back just slightly. Press your chest toward the ground and feel a nice stretch down your triceps and lats as well as through your thoracic spine. Try to extend your back as much as possible as you press your chest toward the ground.
You can either hold here and breathe to stretch deeper or you can come out of the stretch and then relax back into it and try to get further with each rep.
Half-Kneeling Hip and Quad Stretch –
To make sure that your core, legs and glutes engage correctly to help keep your body in a nice straight line during Push Ups, you need to make sure to stretch out your hips and quads. One great stretch to use is the Half-Kneeling Hip and Quad Stretch because it will stretch your hips and quads so that your low back doesn’t engage during Push Ups.
To do the Half-Kneeling Hip and Quad Stretch, set up half-kneeling with your right leg back. It is best to do this with a wall or bench in front of you to help you balance.
Then reach back and grab your right foot/ankle with your right hand and pull it in toward your butt. In the half-kneeling position with your heel pulled in and the wall to balance you, rock forward and backward, pressing the hip forward to increase the stretch down your quad. Then relax back out of it and repeat. Complete all reps then switch sides.
Make sure to squeeze your glute as you press your hips forward to stretch your right hip and quad. Do not simply hyperextend your low back as you rock forward.
For other variations of the Half-Kneeling Hip and Quad Stretch, check out this post with 35 Stretches.
Camel –
The Camel is the exact opposite of what you do all day seated hunched over a computer. It is a stretch that opens you up and works on extension while also activating your glutes. The Camel will help your core work properly during Push Ups.
To do the Camel, start kneeling with your knees about hip-width apart and your feet flexed. Sit back on your heels and place your hands on your heels.
Then arch your hips up and away, lifting your glutes up off your heels and pressing your chest out. Keep your hands on your heels as you arch away and squeeze your glutes to fully extend your hips.
Relax your head back and arch as much as you can, getting a nice stretch down your chest, core, hips and quads. Do not let your shoulders shrug. Also make sure to squeeze your glutes so you don’t just feel this stretch straining your low back.
Hold for 1-2 seconds and relax back down. Repeat, arching back up. You can also make this a static stretch by simply holding the pose for 15-20 seconds.
If you want to make the stretch more challenging, point your toes and place your hands on your heels instead of flexing your feet (the two bottom photos).
If you are less flexible, do this stretch with a couch, chair or table behind you. Kneel down and place your hands back behind you on the couch or table. If you are at your desk, you can use your desk or chair. Keeping your arms straight behind you, press your chest out and arch away as much as possible away from the piece behind you while leaning your head back.
Activation:
After stretching, you need to get the big muscles you’ll use during Push Ups activated and working. If the big muscles of your upper body and core are activated and working, your body will recruit the correct muscles so you can perform more Push Ups with perfect form.
Below are some great moves to include in your warm up to get your body ready to do Perfect Push Ups. Pick the moves that address your specific problems. You do not need to include all of these moves before every workout.
Scapular Wall Hold Variations –
The Scapular Wall Hold is a great move to activate your lower traps and rhomboids while stretching your chest. By getting the big muscles of your back activated and working, you’ll give more support and stability to your shoulders and help your body maintain a nice straight line during Push Ups.
To do the Scapular Wall Hold, stand with your back to the wall.
Step a couple of inches away and bend your arms to 90 degrees. Keep your elbows in by your sides and drive them back toward the wall. Do not shrug your shoulders as you drive your elbows back and pinch your shoulder blades down and together.
With your elbows back, lean into the wall so that only your elbows are touching. Do not let your upper arms or back touch the wall.
Relax your head back instead of tucking your chin. Pinch your shoulder blades down and back while keeping your core tight as you lean into the wall. Squeeze your glutes and don’t arch your low back. Really press your chest out so that you feel this move low between your shoulder blades.
You can also do a Lying variation and an Inverted Row Hold variation. Click here for more about the Scapular Wall Hold.
Scapular Push Ups –
If you have Scapular Winging during Push Ups, you need to work on your Scapular Retraction and the muscles of your back as well as your Serratus Anterior. Scapular Push Ups will help you improve your Push Up form and help you prevent shoulder pain and injury.
To do Scapular Push Ups, set up in a high plank position with your hands under your shoulders and your feet together as if you are going to do a push up. Your body should be in a nice straight line from head to your heels.
Then, without bending your elbows, press your chest out and pinch your shoulder blades together. Do not tuck your chin or allow your hips to drop toward the ground. Your elbows should not bend.
You are not doing a push up. You are simply pinching your shoulder blades together. This move has a very small range of motion. All you are doing is pinching your shoulder blades together and then relaxing or even rounding your back up out of it (round your back at the top is another variation but can be very useful for correcting certain push up problems).
If done right the Scapular Push Up should be felt in your back as well as your core because your core is working hard to keep everything in line.
Pelvic Tilt –
A Push Up is basically a moving Plank, which means your core must work hard the entire time to keep your body in a nice straight line. If your deep intrinsic core stabilizers don’t engage correctly, your low back will start to take over and your hips may sag during Push Ups. Or to compensate for your core not working correctly, you will push your butt up in the air.
To help you maintain a nice straight line with your body, you need to get your abs working properly. The Pelvic Tilt Progression is a great way to get your deep intrinsic core stabilizers working and help you build a stronger core.
Click here for the complete Pelvic Tilt Progression.
Handstands –
Handstands are a great way to get your upper back and shoulders warm and working while also activating your core. To hold a handstand requires you to really focus on engaging your entire core, which will help you perform Push Ups with perfect form.
Even if you can’t hold a Freestanding Handstand, there is a handstand variation that can help you activate your upper body and core. Check out this Handstand Progression to find the handstand variation right for you (and even help you work up to that full handstand!).
Dip Hold –
The Dip Hold is a great way to get your triceps and shoulders working while also improving your posture so that you don’t shrug during your Push Ups. The Dip Hold will work on Scapular Retraction so that the big muscles of your upper back work to stabilize your shoulders and you don’t shrug or jut your head forward during Push Ups.
To do the Dip Hold, you can do it off of parallel or dip bars or off of a bench. Off of a bench is a bit easier, but also a great variation you can do at home off a table, chair or couch even.
To do the Dip Hold from parallel or dip bars, place one hand on each bar and then push up to the top of a dip with your arms locked out and your shoulders down and back. Your legs should hang down straight below you. Keep your core tight and make sure you aren’t shrugging.
You want to press your chest out and draw your shoulder blades down and back. Hold at the top.
To advance the move further and add in even more core involvement, you can bend your knees up until your quads are parallel to the ground or even raise your legs out straight, like an L-Sit, and hold. This can help activate your quads, hips and abs.
To do the Dip Hold from a bench or chair, sit on the bench and place your hands on the edge just outside your butt. Your fingertips should hang over the edge of the bench.
With your legs out straight in front of you (you can bend your knees to make the move easier), lift yourself up and in front of the bench. Straighten your arms and keep your butt right back by the bench.
Make sure to draw your shoulder blades down and back so that you aren’t shrugging. You want a nice tall posture. Hold at the top. Do not let your hips come up as you hold. You want to keep your butt down and back.
Bull Dog Hold –
The Bull Dog Hold is a great move to activate the entire frontside of your core and get your quads and shoulders really working. During Push Ups, you need to engage your quads to help keep your body in a nice straight line and this move will help get your quads working.
To do the Bull Dog Hold, set up on your hands and knees with your hands under your shoulders and your knees under your hips. Flex your feet.
Then lift up onto your hands and toes/balls of your feet and hold. Your knees should only be an inch off the ground as you hold. Do not tuck your chin or let your low back arch. Keep your abs engaged and your back in a nice straight line. Hold and do not let your butt go up in the air.
Do not let your legs straighten out as you hold or you will change the muscles being worked.
Wall Push Hold –
The Wall Push is a great way to get your entire core activated and working together. It also helps you improve your mind-body connection so that you can recruit the proper muscles and contract them.
The way you have to recruit your core for the Wall Push is similar to the Push Up – everything from your shoulders to your feet must be engaged.
To do the Wall Push Hold, stand a foot or two from a wall. Push into the wall with your arms bent (the closer you get to the wall, aka the more your arms are bent, the stronger your position will be).
Push as hard as you can against the wall as if you are trying to move it. Keep everything engaged as you drive into the wall. You may want to stagger your feet and switch the stance as you push.
Make sure to use your upper body, legs and core to drive into the wall. Keep your abs braced so that you don’t feel this in your low back.
The harder you push and engage, the more you’ll get out of this move. If you just stand with your hands on the wall, this move won’t be beneficial.
If you have a partner available, have them push you from every angle to force you to engage more. Do not let your partner move you as you push into the wall. They aren’t trying to push you over, but they are trying to force you to brace harder.
Even if you don’t have a partner, pretend someone is trying to push you off the wall and brace hard!
Glute Bridge –
The Glute Bridge is a must-do move if you sit at a desk all day and want your core to function properly during your workouts. This move works on hip extension, ab engagement and glute activation. The Glute Bridge will help strengthen your core so that you can do Push Ups without your hips sagging or your butt going up in the air to compensate for core weakness.
To do the Basic Glute Bridge, bend your knees and put your feet flat on the ground just close enough that you can graze your heels with your fingertips when you stretch your arms down by your side. Your feet should be about hip-width apart. If you put your feet further away from your glutes, you will engage more hamstring than if you keep your heels in closer to your glutes.
Bend your elbows to 90 degrees so that only your upper arms are on the ground.
Then drive up through your heels and upper back to lift your glutes off the ground. Drive your hips up as high as possible, squeezing the glutes hard. Keep your belly button drawn in so you don’t hyperextend your back. Focus and consciously squeeze your glutes at the top.
Do not push backward off your heels. Make sure you are driving straight up and that your knees aren’t caving in.
Squeeze your glutes for second or two at the top and lower all the way back down to the ground before repeating.
Do not rush through the move. To make the move harder, hold longer at the top or even slow down the lower back down to the ground. A slower tempo means more time under tension and more work for your glutes.
You can also do a Single Leg Variation to make the movement harder and isolate each leg to correct imbalances.
Table Top Bridge –
To recruit the muscles of your core properly, you’ve got to stretch your chest and hips and get your abs and glutes working. The Table Top Bridge is a great move to not only stretch but also activate the big muscles of your core, including your glutes.
To do the Table Top Bridge, start seated on the ground with your feet flat on the ground in front of you and your hands on the ground behind you.
Squeeze your glutes and lift your hips up as high as you can. Lean your head back and press your chest out as you bridge up. Really feel a nice stretch across your chest and shoulders.
Keep your core tight as you bridge up. Try to create a “table” with your body.
Drive your hips up as high as you can without hyperextending your low back. Really squeeze your glutes at the top.
Hold for a few seconds at the top then lower back down and repeat.
Keep the core engaged and even do a pelvic tilt at the top so that you engage your glutes without hyperextending your low back.
Posterior Plank –
The Posterior Plank is a move advanced variation of the Table Top Bridge that also gets your back and hamstrings activated and working while still working on hip extension. This move is also a bit tougher on the triceps and really makes them work.
To do the Posterior Plank, start seated on the ground with your legs out straight in front of you and your hands on the ground behind your butt. Your feet should be together and your fingertips should be pointing toward your butt or out to the side.
Drive through your hands and heels and raise your hips up off the ground toward the ceiling, keeping your legs out straight.
Press your chest up and out as you raise your hips.
Keep your legs straight as you bridge up and relax your head back. Your body should be in a nice straight line at the top.
Keep your core engaged and squeeze your glutes. Hold at the top then lower down and repeat.
Mini Band Moves –
Mini Bands can be used to activate the big muscles of your back, core and glutes so that you can perform Push Ups with perfect form.
For a complete guide to the Mini Band, check out this Full-Body Mini Band Training Program.
Strengthening:
Once you’ve gotten your body loose and the correct muscles activated, you are ready to start strengthening the muscles involved in the Push Up.
Below are some great supplemental exercises to help you strengthen your weak points so you can do more Push Ups.
And one of the best Supplemental Moves for the Push Up is actually the Push Ups itself. You get better at doing Push Ups by doing more Push Ups. Also, by using different Push Up Variations, you can target different muscles involved in the Push Up to make them stronger.
Include a few of these Push Up Variations in your workout routine as well as some of the other Supplemental Moves. Pick variations and Supplemental Exercises that target your weak points.
Push Up Variations:
Push Ups can be regressed and progressed so that they are challenging for exercisers of every level. There are also Push Up variations to target different muscles in your upper body and core. For instance Close Grip will work more tricep while Wide Stance will work more chest.
Using these variations, you can teach your body to move as one unit and strengthen your upper body and core so that you can do more perfect Push Ups!
Incline Push Up –
The Incline Push Up is the best way to regress the Basic Push Up because it makes your muscles work in the exact same way they would in a Push Up from the ground. The Incline Push Up will teach your body to work as one unit while you strengthen your upper body and core with less of your bodyweight.
As you become stronger, you lessen the incline and bring yourself closer to parallel to the ground until you can do a full Push Up.
To do an Incline Push Up, place your hands up on a wall, bench, shelf or bar at an appropriate height that allows you to drop your chest all the way down while maintaining perfect form.
Your feet should be together and your hands should be right outside your chest. It is best to set up at the bottom of the push up so that you know your chest will hit the incline right at nipple height. This ensures that your upper body will be in perfect alignment with your arms forming an arrow shape (->) with your body.
Do not push forward onto your toes. Drive your heels back toward the ground, but don’t think they need to stay on the ground. Driving back through your heels will help you keep everything engaged. If you press forward onto your toes, you are going to make your push ups weaker because your legs won’t be engaged to help keep your body in a nice straight line.
Draw your abs in and squeeze your glutes and quads.
Then press up from the bar, extending your arms out all the way and locking out at the top. Do not round your back at the top.
As you press up, make sure your body moves as one unit. Your head should be in line with your spine and your hips shouldn’t sag toward the ground and your butt shouldn’t go up in the air.
Make sure your shoulders don’t shrug as you push up and your back doesn’t round at the top of the push up. Do not tuck your chin toward your chest or let your head jut forward.
Then with your body moving as one unit, lower your chest back down to the bar. Do not shrug your shoulders or let your hips sag or rise up. Your core should be tightly engaged with your butt and quads squeezed and your belly button drawn in toward your spine. You may even feel your inner thighs working to help keep everything tight and in a nice straight line.
Even at the bottom of the push up, do not relax. Keep everything engaged so you can press right back up.
As the incline becomes easier, make it lower and lower. If your form starts to falter, do fewer reps from the lower incline or regress the incline and bring it back up.
Knee Push Up –
If you don’t have a proper incline to do a Push Up off of, you can always regress the Push Up by doing it from your knees.
While the Incline Push Up is best because it makes your legs engage like they would with a full Push Up, a Knee Push Up is still better than using bad form if you don’t have an appropriate incline.
The Knee Push Up will allow you to lighten the load so that you can properly work and engage your upper body and core.
To do the Knee Push Up, set up in a high plank position with your hands under your shoulders and your body in a nice straight line from your head to your knees.
Engage your core and lower your chest down to the ground. Your arms should create an arrow shape with your body. Do not let your elbows flare way up by your shoulders and create a “T” shape with your body.
Move your body as one unit to lower your chest to the ground. Do not let your hips sag or your butt go up in the air. Also, do not sit your butt back toward your heels.
Once you lower your chest to the ground, press back up and straighten your arms. Make sure your body moves as one unit. Do not tuck your chin or let your head jut forward.
Repeat, lowering your chest back down to the ground.
Staggered Stance Push Up –
If your shoulders and triceps are weaker, you can use the Staggered Stance Push Up to strengthen them. Even if you can’t do a full Push Up, you can still use this different hand position to work your shoulders and triceps.
To do the Staggered Stance Push Up, place one hand up at the top/slightly above your shoulder with your fingertips pointing in and the other hand as normal outside your chest. Set up with your arms locked out and your feet close together. Your body should be in a nice straight line from your head to your heels.
Engaging your legs and core, lower your body down toward the ground as one unit. Try to touch your chest to the ground without your hips sagging or your butt going up in the air. Do not tuck your chin as you lower down.
The arm of your hand by your chest should stay close to your body while the other arm may flare out a bit. Keep both hands firmly planted on the ground.
Lower down then press back up to the top, moving your body as one unit. Complete all reps on that side then stagger your hands the other way.
If turning the top hand in creates too much strain, you can keep both hands pointing straight ahead with one outside your chest and the other up above your shoulder.
To make this push up harder, you can make it a plyometric move and jump up off the ground after each push up to switch to a staggered stance on the other side.
Beginners can also do this from their knees or an incline if their is a base to stagger their hands on.
Wide Stance Push Up –
If you want to work your chest more, you need to spread your hands out wider. While this move works your chest more, it can also put more strain on your shoulders if you aren’t careful and your hands elbows flare way up by your ears.
To do the Wide Stance Push Up, you will set up with your hands out wider at chest height. To find a good width, make a fist and place your knuckles together. Lay your arms on the ground with your knuckles together. Place your hands where your elbows are.
Make sure your hands are at chest height and not way up by your shoulders or head and set up in the high plank position. Your feet should be close together and your body should be in a nice straight line from your head to your heels.
Then lower your chest down to the ground, keeping your body in a nice straight line. Do not let your hips sag or your butt go up in the air.
Once you’ve lowered all the way down, press back up with your body moving as one unit. Lock your arms out at the top and repeat, lowering back down.
Make sure that you are pressing your hands straight down into the ground and not rocking toward the outside of your palms.
Beginners can do the Wide Stance Push Up from their knees or off an incline.
Close Grip Push Up –
Work your core while also targeting your triceps with the Close Grip Push Up. While dips are a great exercise to focus on your triceps, dips off a bench or chair can be very hard on your shoulders. That is why this Push Up Variation is a great move to include in your workout routine.
To do the Close Grip Push Up, place your hands no wider than right outside your chest. The closer together your hands are (aka the closer to a Diamond Push Up you get), the harder the move will be.
Set up in a high plank position with your feet together and your body in a nice straight line.
Keeping your body in a nice straight line, lower your chest down to the ground. Keep your elbows and arms in by your side as you lower. Do not let them flare out at all. By keeping your arms in close, you will force your triceps to work harder.
Lower your chest as close to the ground as possible then press back up. Make sure your body moves as one unit and your arms don’t flare out.
Press up to the top and repeat.
Beginners can do this from their knees or off an incline. Advanced exercisers can make their hands into a diamond to make this move harder or they can do this Push Up as a Decline Push Up with their feet up on a box or table.
Eccentric Only/Focused Push Ups –
The Eccentric Focused Push Up is a Push Up in which you slowly lower yourself down to the ground, going as slowly as you can (or for a set count like a 3 or 5 count), before quickly pushing back up.
The Eccentric Only Push Up variation is useful if you can’t yet do a full Push Up, but want to work up to one. To do this variation, you will slowly lower down then sit back on your heels and simply reset at the top instead of worrying about pushing back up with good form.
If you really want to advance your Push Ups, the Eccentric Focused Push Up will help you get there. Whether you are working on your first Full Push Up or simply doing more Full Push Ups, you need to include the Eccentric Focused Push Up in your routine.
This Push Up makes you spend more time under tension and helps strengthen your upper body and core in a functional way.
Also, because you can do this as an Eccentric Only Variation, beginner exercisers may even be able to do a few of repetitions from a full Push Up position.
However, if you need to regress it further than only doing the Eccentric portion, you can do this from an incline or off your knees.
To do the Eccentric Focused Push Up, start by lying on the ground with your legs together. Place your hands outside your chest. Draw your belly button in toward your spine and squeeze your glutes and flex your quads as you flex your feet and drive back through your heels.
Then press up to the top of the push up with your arms locked out and your body in a nice straight line.
Everything should move together as you press up to the top of the push up. Do not let your butt go up in the air or your hips sag toward the ground. Do not tuck your chin. Keep your head in line with your spine. Make sure to keep your core tight so your low back doesn’t arch.
Then lower back down, going as slowly as you can or following an outlined slower tempo like a 3 or 5 count. Make sure your body moves as one unit. Touch your chest to the ground and then lift quickly right back up.
If your body doesn’t move together, if you do the “worm” as you press up or down, regress to your knees or an incline push up.
If you only do the worm when you press back while doing this Push Up from your toes, simply reset at the top instead of pushing back up so that you can then lower slowly back down (aka the Eccentric Only variation). Even if you can’t push up with good form, lowering slowly down with good form from the full Push Up position will help you improve your Push Ups.
Plyo Push Ups –
Plyo Push Ups are a great way to improve your upper body strength and power while also advancing any Push Up Variation. They are also a very challenging Push Up variation for your core because you have to keep your body in a nice straight line as you explode up off the ground.
To do the Plyo Push Up, set up in a nice push up position with your hands outside your chest and your body in a nice straight line down from your head to your heels. Set up at the top of the push up with your arms locked out.
Lower your chest down to the ground, keeping your body in a nice straight line from your head to your heels. Once you’ve lowered your chest to the ground, push back up quickly from the bottom of the push up, exploding up off the ground at the top.
You can choose to clap your hands or just jump up off the ground with your arms straight. Keep a nice straight line with your body as you explode up. Try not to push your butt up in the air just to try to get higher off the ground. Force your core to really work and keep your body in a nice straight line.
Bend your elbows as you land on the ground and lower right back down to the ground before exploding back up. Move quickly and explosively.
Beginners may start with Incline Plyo Push Ups, Knee Plyo Push Ups or quick Push Ups without leaving the ground. The point is to be explosive while keeping your core tight.
Push Ups From a Dead Stop –
The hardest part of the Push up is keeping your body in a nice straight line as you push up from the bottom; therefore, you need to focus on and isolate that piece of the Push Up if you want to improve your Push Ups.
To do the Push Ups from a Dead Stop, start lying on the ground with your feet together and hands on the ground outside your chest. Flex your feet and engage your abs, quads and glutes so your body is nice and tight and in a straight line.
From a complete dead stop on the ground, press up to the top of a Push Up. Your body should move as one unit as you press up. If it doesn’t move as one unit, regress the move to your knees or do it off an incline.
Your body should be in a nice straight line from your head to your heels. Do not tuck your chin or let your elbows flare way up by your shoulders. You arms should create an arrow shape with your body.
Once you’ve locked your arms out at the top, lower back down to the ground and reset. Make sure you release all tension at the bottom so you are pushing up from a dead stop each time.
Again engage your core and legs and press all the way back up to the top.
Push Up to Dip –
If you want to strengthen your core and triceps even more, you need to do the Push Up to Dip. Doing the Push Up to Dip really blasts your triceps.
To do the Push Up to Dip, set up two kettlebells next to each other. The kettlebells should be narrow enough that you can only really slide your feet through. They should be about hip-width apart.
Place your hands on the kettlebell handles with your palms facing in so in a neutral grip with the kettlebell handles parallel. The kettlebells and your hands should be at chest height just outside your chest.
You can set up from you knees (beginner) or toes (advanced). Make sure your body is in a nice straight line from your head to your knees or toes.
Perform two push ups with your hands on the kettlebell handles. Drop your chest down to the handles.
Then swing your legs through and perform two dips. Make sure your butt stays back by the kettlebells as you dip.
The more you “swing” through and the less you walk back and forth through the kettlebells, the more challenging the move will be. Also, the straighter your legs are, the harder the move will be. Bend your knees and walk your feet back toward your butt to make the dip easier.
After doing two dips, walk or swing your feet back through and set back up to do two more push ups and repeat the series.
This move can also be regressed by doing it on an incline. You can use a bench and do two push ups followed by two dips off the bench.
Chest Fly to Push Up –
The Chest Fly to Push Up is a great Push Up Variation to work your chest and core. There are a few different variations of the Fly to Push Up that you can do based on your level.
To do the Beginner Fly to Push Up, set up in a push up position with one hand on a Valslide and the other hand on the ground. You can do this from your knees to make it easier or from your toes to make it harder. Then slide the hand on the slider out to the side and perform a push up. As you push up, slide the hand on the slider back in toward your hand on the ground. Repeat, completing all reps on one side before switching.
If the single slider Fly to Push Up is too much, this move can be done by just stepping the hand out to the side on the ground or even on an incline.
To advance the Fly to Push Up, you will use two sliders. Again this variation can be done from your knees (easier) or toes (harder). Start at the top of a push up and then slide one hand out to the side and perform a push up. Push up and slide the hand back into the starting position. Even though this is a wider push up, don’t let your elbows flare way out by your ears. Slide the other hand out on the slider and perform a push up. Keep alternating sides until all reps are complete.
You can advance the movement further to the Full Fly to Push Up by sliding both hands out to the side as you lower into the push up and then pull them back in as you come back up out of the push up. You will perform the fly as you perform the push up instead of sliding out, doing a push up and sliding back in. With all the different variations, do not let your butt go up in the air or your hips sag toward the ground as you do the push up. Also make sure not to shrug or let your elbows flare up by your ears. You want to create more of an arrow position (->) with your arms and upper body than a “T” as you do the push up.
Decline Push Up –
The Decline Push Up is a great way to make the Basic Push Up more challenging to help you build more upper body and core strength so you can do more Push Ups once you’ve mastered the basics. Beginners will not want to try this move.
To do the Decline Push Up, find a box or bench to place your feet up on. Set up on your hands with your hands under your shoulders and outside your chest.
On your hands and feet up on the box, set your body in a nice straight line from your head to your heels. Then, keeping your body in that nice straight line, drop your chest down to the ground between your hands.
Do not let your hips sag or your butt go up in the air as you lower down.
Get your chest close to the ground then push back up and lock out your arms at the top. Again, make sure your body moves as one unit.
Repeat lowering back down while keeping your feet up on the box.
Spiderman Push Up –
The Spiderman Push Up is a great way to work your upper body while also strengthening your obliques. It can also be a super challenging Push Up Variation for anyone looking to advance the Basic Push Up.
There are two main Spiderman Push Up Variations you can do and both can be done from an incline or your toe. Doing them from your knees is more awkward but it can also be done.
The first Spiderman Push Up Variation is easier because you will include the knee drive at the top of the Push Up. To do this variation, set up in a nice plank position with your feet together and your hands outside your chest. Perform a Push Up, lowering your chest to the ground with your body moving as one unit. Do not let your elbows flare way up by your shoulders as you lower. Then push back up to the top and straighten your arms fully. Make sure your butt doesn’t go up in the air or your hips don’t sag. In this plank position, drive your right knee in toward the outside of your right elbow. Then put the foot back down so you’re in the nice plank position again. Perform another Push Up then drive the left knee in to the left elbow. Keep alternating knee drives after each Push Up. Beginners can do this from an incline or even do the Push Up from their knees then come up to their toes for the knee drive.
The second Spiderman Push Up Variation is more challenging because you will include the knee drive at the bottom of the Push Up, which requires you to hold at the bottom for a little longer. To do this variation, perform a Push Up and at the bottom of the Push Up, bring your right knee in to your right elbow. As you press back up, put the foot back. Then perform another Push Up, and holding at the bottom, bring the left knee in to the left elbow. Push back up and put the foot back. Make sure to keep your core tight as you bring the knee in. Your hips may rotate a bit but your butt shouldn’t go way up in the air and your body should move as one unit as you push back up to the top. Beginners can also try this variation from an incline.
Renegade Row Push Up –
While Push Ups are usually a Chest, Tricep and Shoulder exercise, they can also work your back. When you do the Renegade Row Push Up, you will not only build shoulder and core stability, but you will also strengthen both your chest and triceps and your back and biceps.
To do the Renegade Row to Push Up, you can use dumbbells or kettlebells. Place them on the ground about shoulder-width apart with them just outside your chest. Place your hand on each dumbbell or kettlebell with your palms facing in so the weights are parallel. Then set up at the top of a plank with your arms straight and legs out straight behind you. You can do this from your knees or your toes. The closer together your feet/knees are, the harder the move will be on your core because you won’t have as wide a base to fight rotation during the row.
From this plank position, perform a Push Up, dropping your chest to the weights. With your body moving as one unit, lower down and press back up. At the top of the Push Up, row one dumbbell up to your side, driving your elbow down and back toward the ceiling. Lower the weight down and then perform another Push Up. After the Push Up, row the other dumbbell up. Make sure not to shrug your shoulders as you row. You want to feel your back working.
Also, fight the urge to rotate open as you row. Keep your body in a nice straight line from your head to your heals. Really focus on squeezing your glutes.
Beginners may need to do a row on each side after each Push Up to eliminate some of the Push Ups. Advanced exercisers will want to do only one row after each Push Up and use heavy weights.
Push Up Shuffle –
The Push Up Shuffle is a great way to slightly isolate each side of your upper body to make it work more independently from the other. It can also be made into a very tough Plyometric Push Up!
To do the Push Up Shuffle, place a kettlebell on its side with the handle facing away from you. You can also use a med ball or any object that won’t move on you, but will give you a little platform up from the ground that you can “shuffle” over.
Set up at the top of a Push Up from your knees or toes with one hand on the kettlebell and the other hand on the ground. Make sure your hands are under your shoulders and outside your chest. Don’t let your hands get way up by your head.
Perform a push up, dropping your chest as close to the ground as you can. Make sure your body moves as one unit as you lower down and press back up to the top.
Then step your hand off the kettlebell and on to the ground on the opposite side of the kettlebell. Step the hand from the ground up onto the kettebell so that you have “shuffled” over the kettlebell.
Perform another push up and then shuffle back.
Beginners will need to move slowly and do this from their knees while more advanced exercisers can make the shuffle more explosive and “jump” to shuffle their hands over instead of stepping one hand on as they step the other hand off.
Suspension Trainer Push Ups –
While you don’t need any equipment to make Push Ups challenging, it can be fun to add in some variety. And by using the Suspension Trainer, you make Push Ups and even more challenging core exercise.
There are two great Basic Suspension Trainer Push Up Variations – one is the Incline Push Up (with your hands in the trainer) and the other is the Decline Push Up (with your feet in the trainer).
The Incline Suspension Trainer Push Up is not necessarily an easier push up variation. While often raising your hands up off the ground to perform an incline push up can make the movement easier, when you add in the instability of the trainer, the incline push up requires a lot of shoulder and core strength and stability. Beginners may find they want to start either at more of an incline or on a more stable surface.
To do the Incline Suspension Trainer Push Up, hold a suspension trainer strap in each hand. You can hold the straps so your palms are facing each other or so that your thumbs are facing each other.
Walk your feet back so your body is at an incline. The closer to parallel to the ground you get, the harder the move will be.
Set up with your arms out straight in front of you in line with your shoulders and your feet together. Make sure you aren’t shrugging your shoulders.
Keeping your body in a nice straight line, lower your chest down between your hands. Keep your elbows from flaring up by your shoulders. You want your arms to create an arrow shape with your body not a “T.” Make sure that as you perform the push up, you are driving back through your heels and not rising up onto your toes. You also want to engage your quads and glutes to help keep your body in a nice straight line.
Then press back up. Keep your core tight as you lower down and press back up. Do not let your low back arch or your butt go up in the air. You want your body to move together in one straight line. Make sure your hands stay right outside your chest and don’t spread out wider than your shoulders.
Do not let your shoulders shrug as you perform the push up.
If your form breaks down, walk your feet toward the anchor point so you are at more of an incline. To make it harder, walk your feet back.
The Decline Suspension Trainer Push Up is a more challenging push up variation. To make it more challenging, you will raise your feet up higher and put your body at a bigger incline. To make the move easier, you will lower the foot straps down closer toward the ground so that your feet are in line with your body. This move is very core intensive so beginners may want to start with a push up from the ground first.
To do the Decline Suspension Trainer Push Up, place your feet in the straps and walk your hands out so that you are in a plank position with your hands under your shoulders and your body in a nice straight line.
Squeeze your glutes and quads and draw your belly button in toward your spine. Keep your feet together and your body in a nice straight line as you lower your chest down toward the ground.
Do not let your elbows flare out toward your shoulders. You want to create an arrow shape with your arms and body as you lower down.
Then press back up, making sure your body moves together as one unit. Do not let your hips sag or your butt rise up toward the ceiling.
To make the move harder, make the suspension straps shorter so that the push up is even more of a decline push up. You can also walk your hands forward and pull the suspension trainers straps forward so that when you do the push up, the straps are trying to pull you backward.
This Decline Suspension Trainer Push Up is an advanced move to begin with. Do not attempt this if you can’t easily complete a perfect push up from your toes on the ground.
Supplemental Exercises:
If you want to get better at Push Ups, you need to include Push Up variations in your workout routine. However, you can also strengthen the muscles involved in Push Ups with these Supplemental Exercises.
If you know you have a weak point in your Push Up or places where your form always breaks down, you can target those areas and muscles with these moves.
Below are some great Supplemental Exercises that target common areas of weakness in Push Ups to help you build strength and perfect your Push Up Form.
Push Up Holds –
Push Up Holds are a great way to strengthen different points of your Push Up while still working your body in the same way Push Ups would.
A Push Up is basically a moving Plank. And with Push Up Holds you are holding a Plank at three different points in the Push Up to not only strengthen your upper body, but also strengthen your core.
By doing Push Up Holds, you help your body learn to engage properly to keep everything in a nice straight line as you perform the movement.
Below are three different holds you can use:
High Push Up Hold – This is a great way to begin improving your lock out and core strength for push ups. Set up at the top of a push up with your feet together and your hands under your shoulders. Your body should be in a nice straight line from your head to your heels (with your legs straight). Tilt your pelvic under and hold in that position. Make sure your legs are engaged and you are driving back through your heels not coming forward onto your toes. Do not tuck your chin as you hold or shrug your shoulders. Keep your head in line with your spine. You can also hold from your hands and knees to make the plank hold easier.
Mid-Push Up Hold – This is a great move to really work your core, chest and triceps. To do this move, set up in a push up position with your feet together and your hands under your shoulders. Press up to the top of the push up with your body in a nice straight line from your head to your heels. Keeping your body in a nice straight line, bend your elbows to about 90 degrees. Do not let your hips sink or your butt go up toward the ceiling as you hold at that mid-point. Do not tuck your chin as you hold or let your elbows flare way out. You want your arms and body to create an arrow shape (->) not a “T.” Hold as close to 90 degrees as you can. You can also do this from your knees to make it easier or even off an incline.
Bottom Push Up Hold – This is the hardest of all three holds because often the hardest part of the push up is keeping everything engaged and pushing up from the bottom. This hold works on that. To do the Bottom Push Up Hold, set up at the top of a push up. With your body in a nice straight line and everything engaged, lower down until your chest is an inch off the ground. Make sure to engage your glutes and quads to keep your body in a nice straight line. Do not tuck your chin or let your hips sag toward the ground. Also do not let your butt go up in the air. Maintain a nice straight line from your head to your heels and hold an inch off the ground. Do not let your elbows flare way out as you hold. You can also do this from your knees or off an incline.
Band Chest Presses –
To strengthen your chest and shoulders, Band Chest Presses are a great option. And because the band can easily move, using the resistance band can help build shoulder stability. Also, even if you don’t do the Single Arm Chest Press, because each arm must press its own side of the band, this move will help correct imbalances and strengthen each arm independently.
Make sure with this move that you stand tall and even engage your back to help keep your chest pressed out. Practicing this posture will improve your Push Up form.
To do Band Chest Presses (top), anchor the band behind you and bring the handles up to your chest. Hold a handle in each hand. You can do two different grips – palms facing in or palms facing the ground. You can stand with your feet parallel or in a staggered stance.
The wider your feet are apart, the easier the move will be on your core.
Then press the band straight out from your chest with both hands. Do not let your shoulders shrug as you press.
Keep your core nice and tight.
Extend your arms fully and then bring the handles back in to your chest. Move slowly and don’t let the band pull you back in.
The Single-Arm Chest Press (bottom) is a great anti-rotational move that also works each side individually to correct imbalances.
To do the Single Arm Chest Press, anchor a resistance band behind you at about chest height. Grab a handle in one hand and step away so that there is tension in the band when your hand is in at your chest. You can stand in a staggered stance or with both feet even. Standing with your feet together will make the move more challenging.
Then without letting your body rotate, press your arm straight out from your chest. Move slowly and do not let your shoulder shrug. You want to press straight out from your chest.
Then bring your hand back in to your chest without letting your body rotate. You want your body to move as if you were pressing both hands instead of rotating with the hand that is pressing. Move slowly and control the band. Do not let the band pull your hand back in.
Complete all reps on one side before switching. You can place the hand that isn’t working across your chest, by your side or on your hip.
To advance the move, walk further away from the anchor point and slow down the tempo. You can also use a heavier resistance or make a heavier resistance out of a lighter band by holding both handles in one hand with the band doubled over.
Chest Flyes –
Chest Flyes are a great way to work your chest and the front of your shoulders in a different plane of motion from the traditional press or Push Up. And, while you can do Chest Flyes with dumbbells, Standing Chest Flyes with a resistance band force your core to work harder and create resistance throughout the movement.
To do Chest Flyes with a resistance band, hook the band around a piece of furniture or in a doorway. Grab a handle in each hand and face away from the anchor point. Walk away from the anchor point so there is tension in the band and set up in a staggered stance.
Then spread your arms out wide. Keep your elbows soft. Then, bring your arms forward and your hands together as if hugging a tree.
You do not want to really bend at the elbows so much as pull your arms together. Once you’ve brought your palms close together, open your arms back, staying in control of the movement so that the band doesn’t jerk you back.
Repeat, pulling your arms back together. Try not to lean forward or bend a ton at the elbows as you do the flyes.
Beginners may want to start with a lighter band or stay closer to the anchor point.
Overhead Hold or Carry –
Your shoulders can take a beating during Push Ups and are often unstable because of our poor posture seated hunched over a computer all day. And while foam rolling, stretching and activation are important parts of building shoulders stability, strength training moves like the Overhead Hold or Carry can help us build stability and learn to engage the big muscles of our back to support and assist our shoulders.
Moves like the Overhead Hold or Carry can also help us not only build shoulder stability but also core stability. Include this move as supplemental work to your Push Ups to not only work your body in a different direction but build upper body and core stability!
To do the Overhead Hold, you can use a dumbbell or kettlebell. If using a kettlebell, take one kettlebell and place your hand through the handle. Rest the kettlebell on the back of your forearm.
Standing with your feet about hip-width apart, press your hand up toward the ceiling, straightening your arm up by your ear. Do not arch your low back. Keep your core tight and your arm up straight toward the ceiling. Do not lean to either side. Try to get your bicep back by your ear as much as your mobility allows. Work on your mobility to get closer to this position.
As you hold with your arm overhead, make sure to breathe and feel your lats (back) working to help stabilize your shoulder.
If you want to make this an Overhead Carry, begin to walk as you hold the weight overhead. Keep the arm straight up and core engaged as you walk.
Windmill –
The Windmill is another great move to build shoulder and core strength and stability. It also works the obliques and glutes and can help improve your mobility.
Beginners will start with no weight or even something balanced on their hand. Advanced lifters will use a kettlebell or dumbbell.
To do the Windmill weight a kettlebell, place your hand through the handle and let the weight rest on the back of your forearm. Your feet should be about shoulder-width. Turn out the toe of the side that doesn’t have the weight to about 45 degrees. Straighten the arm with the weight up toward the ceiling.
Then hinge over, driving your butt back as you reach your hand toward the ground while keeping the arm with the weight straight up toward the ceiling. Slow hinge over as far as you can.
The stand back up, keeping the arm with the weight straight up toward the ceiling the entire time.
As you hinge over, use your leg as a guide. Slide your hand down toward the ground. Keep the arm with the weight straight up toward the ceiling.
Then come back up and stand nice and tall. You will feel this in your obliques and shoulders. You will also feel a nice stretch down your hamstring while you feel your glutes working.
Halos –
Halos are another great shoulder and core move; however, not only do Halos build strength and stability, but they also improve your shoulder mobility and open up your upper back.
To do Halos, stand with your feet not wider than hip-width apart. Grab the kettlebell by the handle with one hand on each side close to where the handle attaches to the bell part. Turn the kettlebell upside down and hold it upside down in front of your face.
Squeeze your glutes and keep your core tight as you begin to circle the kettlebell around your head. Point the bottom of the kettlebell backward as you circle it around the side of your head.
As you drop it down behind your head, reach the bottom of the kettlebell down between your shoulder blades. Your elbows should point up toward the ceiling. Reach it down your back as far as you can to make as big a circle as possible. But don’t let your back arch.
Continue the circle and bring it around the other side and back in front of your face. Then go back the way you just came. Keep alternating directions until all reps are complete.
Do not move your head or core as you circle. Everything should be tight and still. Only the kettlebell is moving. Beginners will do fewer reps and go lighter.
Really try to do as big a circle as possible and not just go fast through the movement.
Climbers –
Push Ups are basically moving Planks so why not include another move to strengthen your upper body that is also basically a moving plank!?
Work your core, triceps and shoulders at the same time with Plank Climbers. When you do the Climbers, try to keep your hips as still as you can to help build core strength and stability and improve your Push Up form.
To do Plank Climbers, set up in a Forearm Plank with your elbows under your shoulders and your body in a nice straight line from your head to your toes. Beginners may do this from their knees. Set your feet out wider to give yourself more stability. Bring your feet closer together to make the move harder.
Then, engaging your quads, glutes and abs to keep your body in a nice straight line, place one hand on the ground to start to push yourself up. Place your hand right below your shoulder. Do not let your hands get way out in front of your shoulders as you climb up.
Then place the other hand down to climb into a High Plank position from your hands and toes. Try to keep your hips from rotating a lot as you climb up.
Once in a Plank position from your hands, climb back down one forearm at a time, placing your elbow back below your shoulder.
Keep your core engaged and wiggle your hips as little as possible as you climb up and down. Make sure that both hands lead the climb up and down. You can alternate which hand leads each rep or you can switch after a certain number of reps.
You can also make Climbers more challenging for your shoulders, triceps and core by placing your feet up in a Suspension Trainer.
Dips –
Dips are a great bodyweight compound exercise like the Push Up; however, they are a vertical push instead of a horizontal push. Because they work your upper body from a different angle and really target your triceps, they are a great supplemental exercise for your Push Up workouts.
However, be careful with dips as they can be harder on your shoulders especially if you regress them and do them off a bench. If you need to regress them, it is best to do a foot-assisted variation instead of a bench variation unless you only have access to a bench or box.
Click here for Dip Variations you can use.
Suspension Trainer Back Flyes –
While the Push Up is a chest, shoulder and tricep exercise, your back does need to be strong and engaged to help you maintain a nice straight line and use the big muscles of your upper body correctly. Back Flyes will help strengthen the muscles between your shoulder blades to help stabilize your shoulders so that you can engage your chest, shoulders and triceps properly during Push Ups.
And by doing Back Flyes in the Suspension Trainer, you will also strengthen your entire core, including your legs.
To do Suspension Trainer Back Flyes, hold a strap in each hand, facing the anchor point of the trainer. Walk your feet forward toward the anchor point. You will not want to walk them in as far as you do with the Inverted Row.
Keeping your body in a nice straight line from your head to your heels, open your arms out to the side. You may open them slightly out and down to make sure you don’t shrug your shoulders.
Keep your elbows soft, but do not bend your arms as you open to the side. Do not turn this into a row.
Pull yourself up so your arms are even with your body and then lower back down, bringing your hands back together. Keep your body in a nice straight line as you row. Do not arch your back to help yourself get all the way up. If you can’t fly your arms all the way open, walk your feet back so you are more vertical instead of horizontal.
Do not let your hips sag or arch as you perform the fly. Squeeze your glutes and keep your abs engaged.
Make sure you don’t shrug your shoulders as you open. Keep your chest pressed out as you perform the fly. Move slowly and don’t bounce off the bottom.
Focus on squeezing your shoulder blades down and together as you perform the Back Fly.
Inverted Rows –
Inverted Rows are another great exercise to work your back, including your lats, and help your upper body work correctly during Push Ups. A strong back also means that you will more easily be able to maintain a straight Plank line with your body throughout the entire movement.
Check out these Inverted Row Variations for a few different ways to strengthen not only your back, but also your core.
Crawling –
Crawling is not only a great cardio exercise, but it also builds core strength and a great mind-body connection. Part of recruiting the correct muscles during Push Ups is having a good mind-body connection to know how to get your core and legs engaged. Crawling can help you build that mind-body communication and coordination while also strengthening your shoulders, quads and abs.
One of the best crawling variations to start with is the Table Top Crawl.
To do the Table Top Crawl, set up on your hands and knees with your knees under your hips and your hands under your shoulders. Flex your feet and lift up onto your toes/the balls of your feet.
Then take a step forward with your left foot and right hand, keeping your knees close to the ground and your back flat. Make sure to brace your core so that your hips don’t wiggle a lot side to side as you crawl forward.
Then step forward with your right foot and left hand. Keep crawling forward, moving the opposite arm and opposite leg together. Take small steps forward so that you don’t get too spread out. You don’t want your hips to start to wiggle and your butt to go up in the air. Also, keep your knees as close to the ground as possible.
You can also do the Table Top Crawl backward. Backward may be a bit more challenging and harder on the shoulders. Make sure to keep your steps small, especially when starting out, so that you don’t overload your shoulders and can keep up the contralateral movement.
To do the Table Top Crawl backward, step back with the opposite arm and leg. Make sure you don’t get too spread out as you crawl backward. If you reach too far back with your feet and get too stretched out, your going to put a lot of pressure on your shoulders and then you wont’ be able to move fluidly. Keep you steps nice and short and compact to start with and your knees close to the ground. Make sure to brace your core and keep your butt down.
Check out these other 21 Crawling Exercise as well.
Planks –
Push Ups are basically moving Planks so if you want to perfect your Push Up form, you need to practice your Planks and learn to keep your core engaged so that your body stays in a nice straight line.
Click here to learn how to perfect your Plank Form. And then once you’ve mastered the Basic Plank, try some of these fun Plank Variations.
Downward Dog Abs –
The Downward Dog Abs is not only a great stretch for your lats and chest but also a great way to build core and shoulder strength and stability.
Plus, the knee drives even works your quads, hips and abs, including your obliques. Building stability in the muscles of your core will help you maintain a nice straight line during Push Ups.
To do Downward Dog Abs, set up in Downward Dog. Start in the high plank position. Then push your butt back and up toward the ceiling as you press your chest back toward your legs between your straight arms.
Focus on getting your back flat and a nice straight line from the heels of your hands up to your tailbone. You want your arms to be in line with your torso (aka your biceps by the ears).
Push your butt back and up as you hold the downward dog position and try to drive your heels down toward the ground. Do not walk your hands in too close to your feet as you hold just to try to get your heels down.
Then raise your right leg up in the air, kicking your heel up toward the ceiling. Drive your right knee in toward your chest. As you drive your knee forward, shift your weight forward into a front plank. Try to get your body in a nice straight line and your shoulders over your arms.
Then kick your right heel back up toward the ceiling and move back into Downward Dog.
You can then switch sides or you can perform another knee drive with the right, bringing your knee in toward your opposite elbow or the outside of the same elbow.
Once you’ve done a few knee drives on one side, switch sides.
Changing the angle of the knee drive, hits your core from different angles!
Mountain Climbers –
Mountain Climbers are another great cardio exercise that also work your shoulders, triceps, abs, hips and quads. Because you are holding a High Plank position while performing movement, this is a great functional way to strengthen your entire body for Push Ups.
You can do Mountain Climbers with 3 different knee drives to hit different aspects of your core. Just make sure that your butt doesn’t go up in the air as you do the knee drives.
To do the Basic Mountain Climber, set up in a high plank position with your feet together and legs out straight behind you. Your hands should be under your shoulders and your body should be in a nice straight line from your head to your heels. Make sure to brace your core so that you don’t feel this in your low back.
Then, maintaining the nice plank position, bring your right knee in toward your chest. Your left leg should still be out straight. Make sure your butt doesn’t go up in the air as you run the knee in.
Then slide the foot back out as you bring your left knee in toward your chest. “Run” your knees in as quickly as possible until all reps are complete. The faster you go, the harder the move will be.
Do not let your butt go up in the air or your hips sag as you run your knees in.
You can also do a Spiderman Mountain Climber, running your knees in toward the outside of the same elbow, or a Cross-Body Mountain Climber, running your knee in toward the opposite elbow. Even when you do these variations, keep your core tight and your butt down.
Reverse Hypers –
During Push Ups, you may not realize how much your quads and glutes are working to keep your body in a nice straight line until they are either sore or you can’t hold that Plank position any longer. So while you need to include Supplemental Exercises to work your upper body, you also need to include moves to strengthen your quads (like the Crawling and Mountain Climbers) as well as your glutes.
And the Reverse Hypers are a great move to work your glutes, which are an important part of your core!
While you can do Bent-Knee Reverse Hypers, if you are trying to strengthen your glutes for Push Ups, Straight-Leg Reverse Hypers may be a better option.
To do Straight-Leg Reverse Hypers, lie face down on a bench or box. Place your hips right on the edge of the bench and hold on to the bench or something in front of you.
Place your heels together. You can choose to turn your toes out to hit a slightly different aspect of your glutes as well.
Then, keeping your legs straight, raise your heels up toward the ceiling. Squeeze your glutes as you lift as you press your pubic bone down into the bench.
Lift so that your quads are about parallel to the ground then lower back down. Only lift higher if you don’t feel your lower back taking over. You want to focus on and make sure your glutes are working to lift NOT your low back.
Consciously squeeze your glutes at the top and hold for a second or two before lowering back down.
Thrusters –
The Basic Glute Bridge is a great way to get your glutes activated and working before your Push Up Workout. It can help improve your hip extension so that the muscles of your core engage correctly to prevent your low back from straining during Push Ups.
Hip Thrusters are another great bridge variation to improve your hip extension, strengthen your glutes and improve your core stability. They are generally a tougher bridge variation than the Basic Glute Bridge so make sure to master that first.
If you are comfortable with the Basic Glute Bridge, you may want to check out these other Glute Bridge Variations, including the Thrusters, to work your glutes and improve your hip extension while also building core stability.
Using These Moves
Using the foam rolling, stretching, activation and strengthening moves in this post, you can improve your upper body and core strength in a way that will help you improve your Push Ups whether you are working toward your first full one or doing 50 in a row and harder variations.
Do not simply skip to the Push Up Variations and the Supplemental Moves. If you do not first foam roll, stretch and activate, you may not engage the correct muscles, which can not only hinder your Push Up progress, but also lead to injury.
For some great workouts showing you how to use the moves in this post, check out our Workout Library with over 50 FREE workouts!


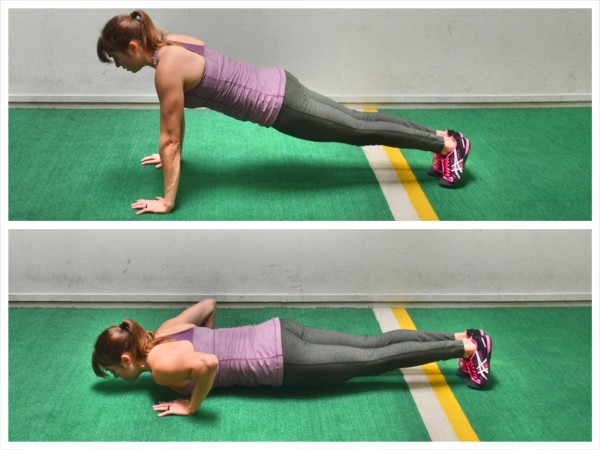

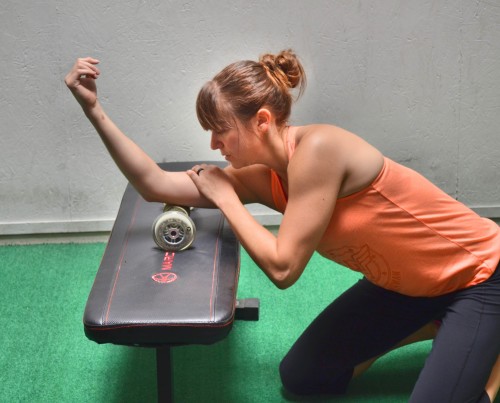
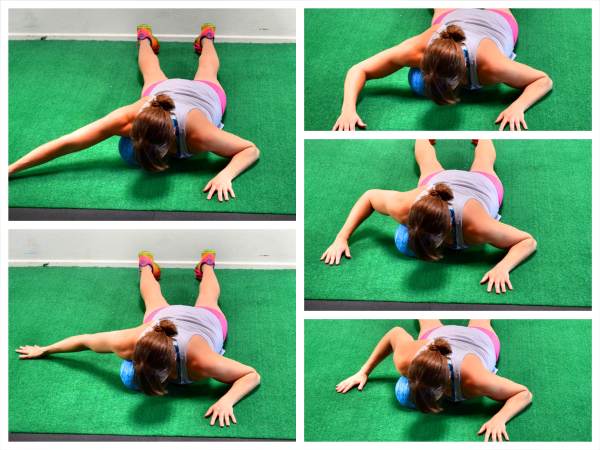
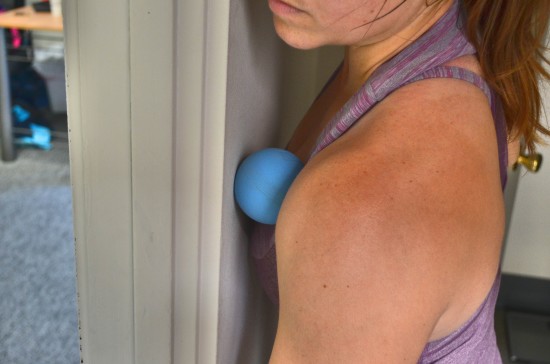
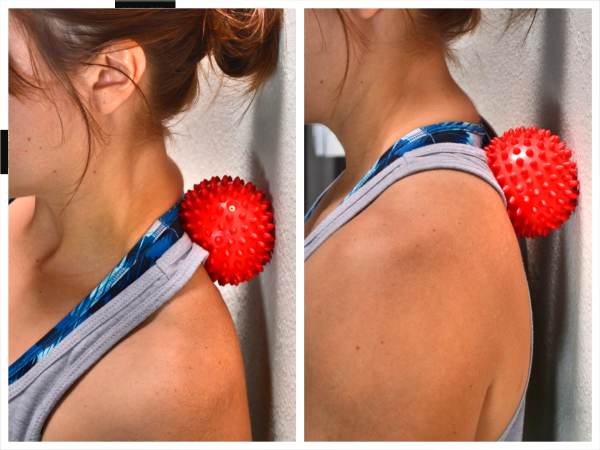
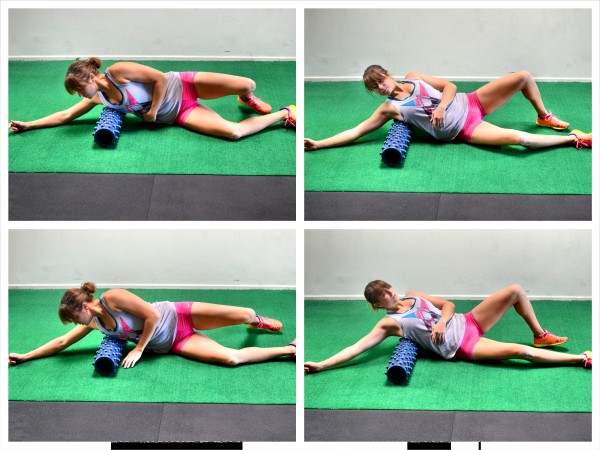
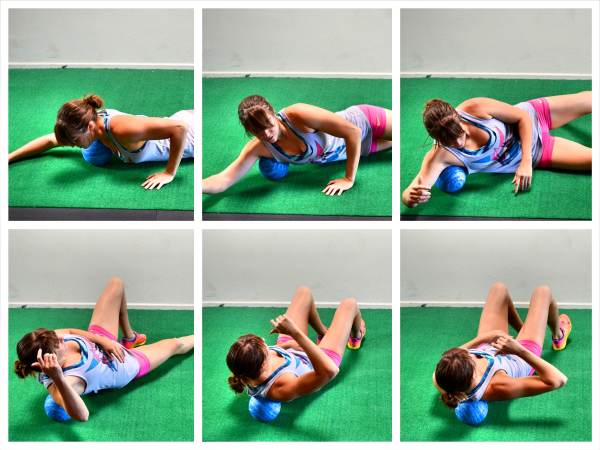
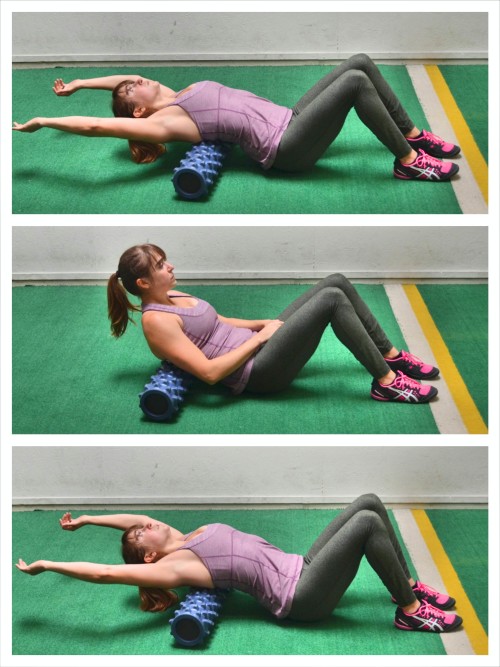
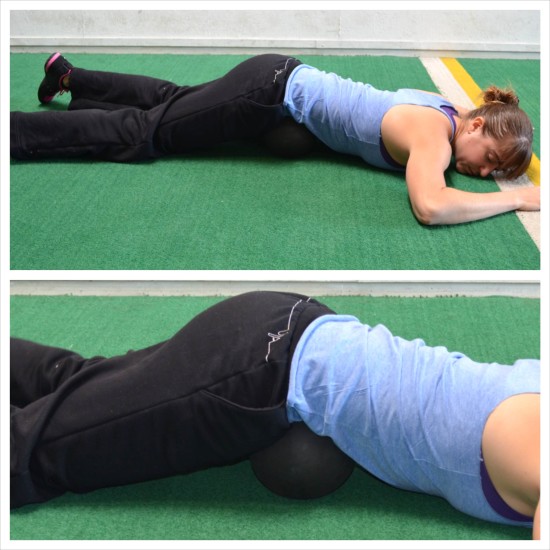

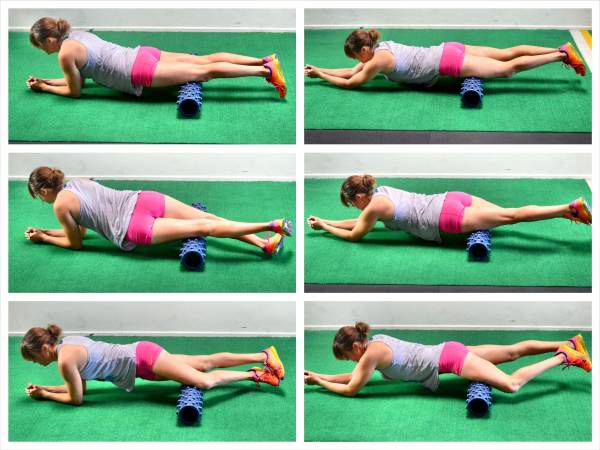
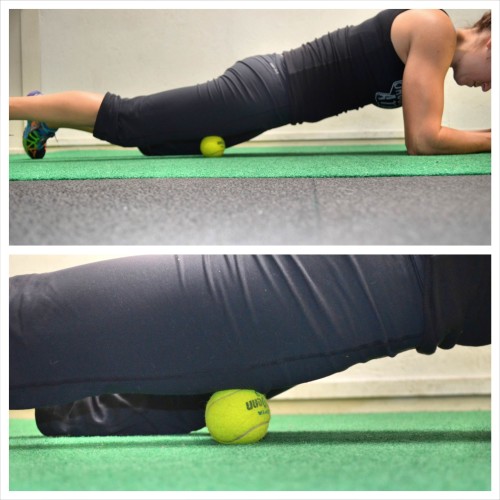
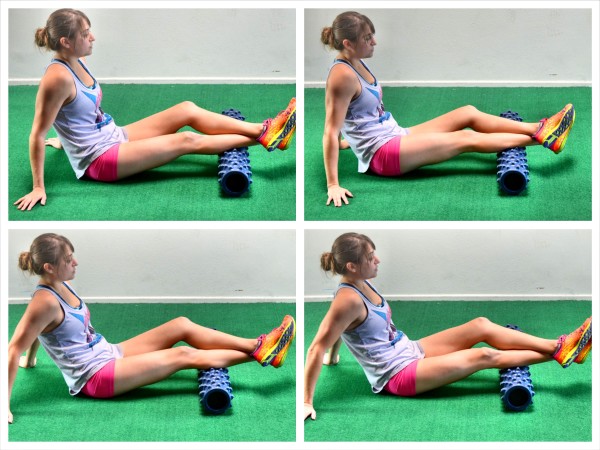
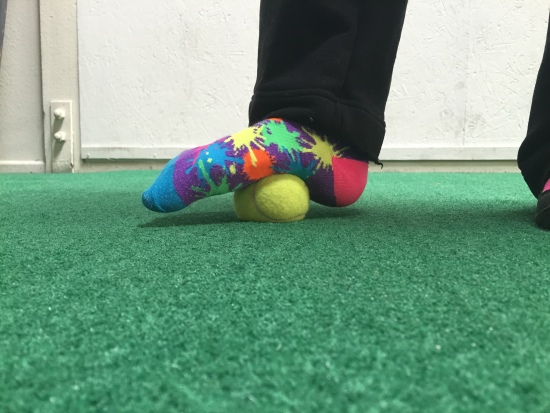
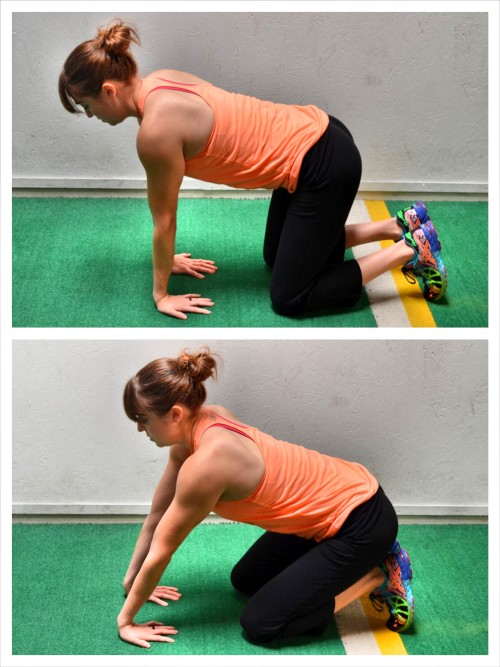
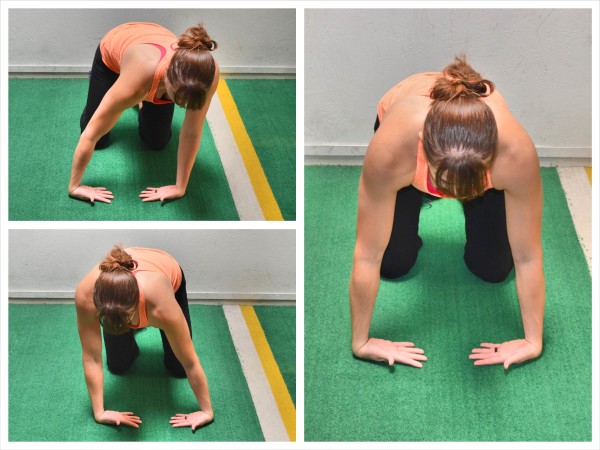
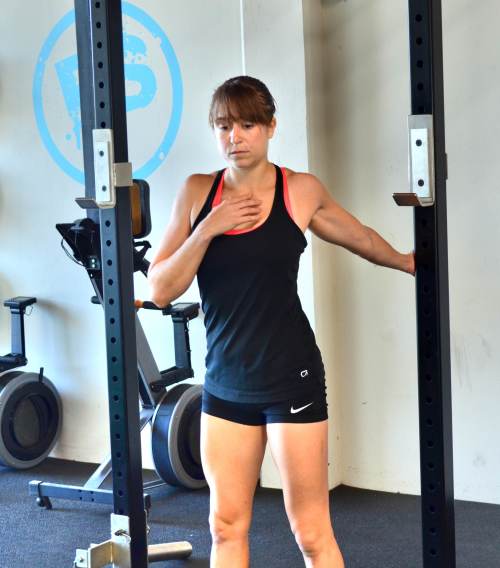
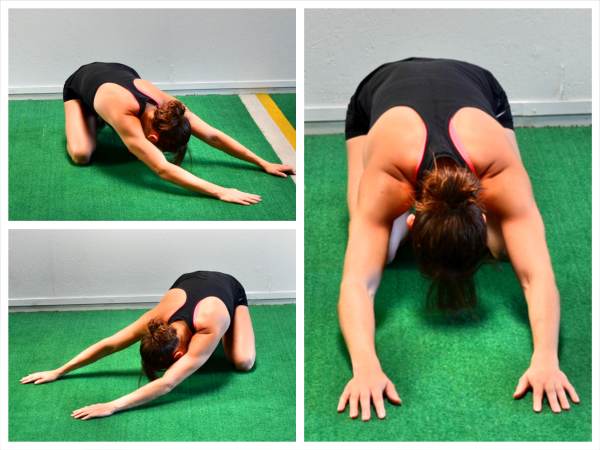

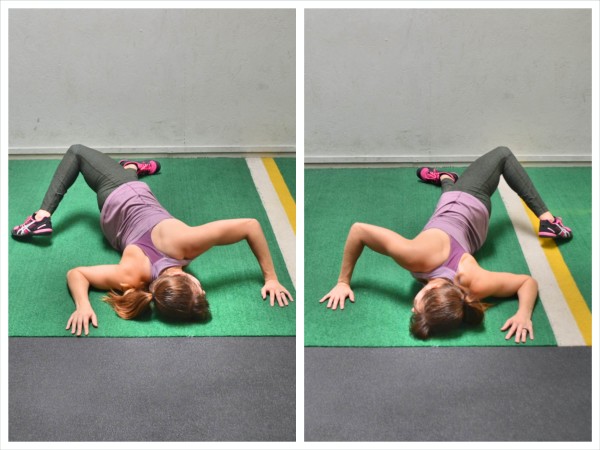
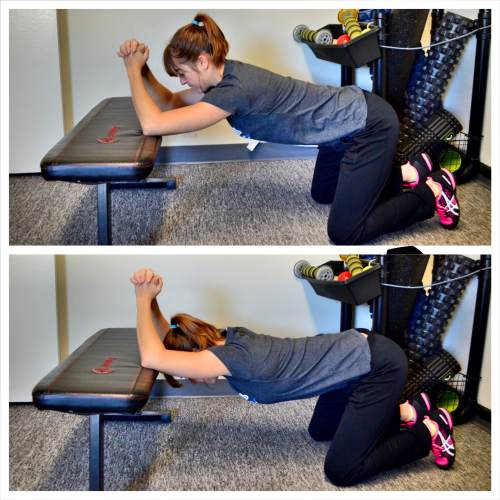

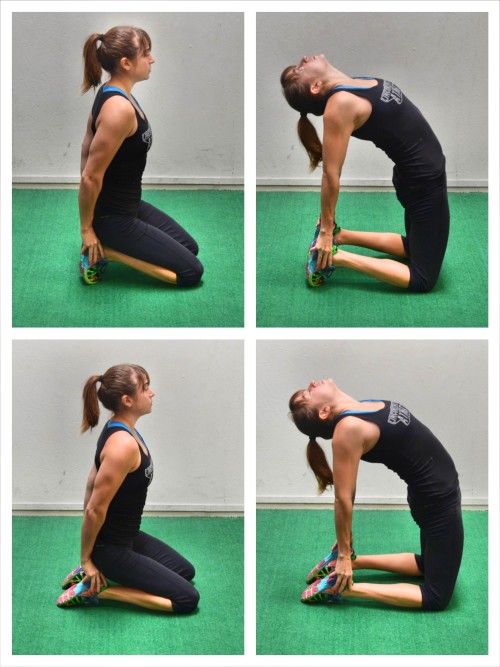
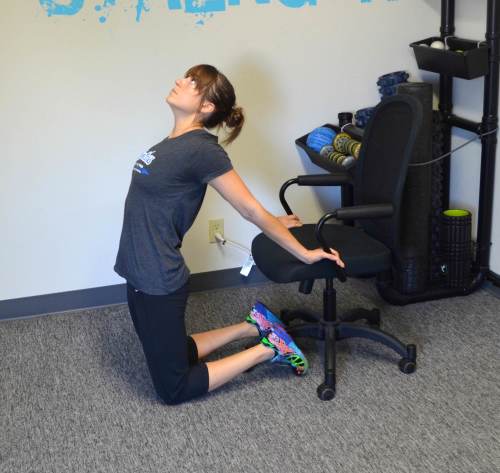
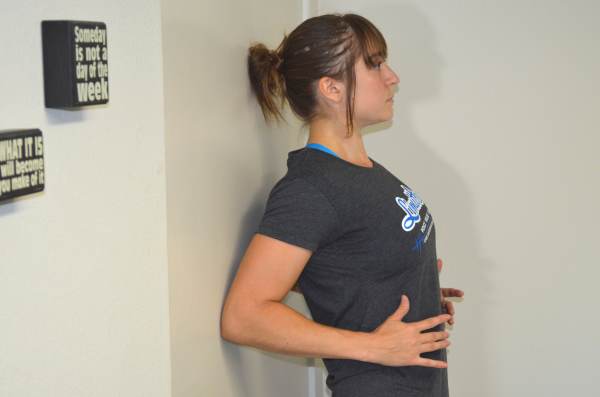
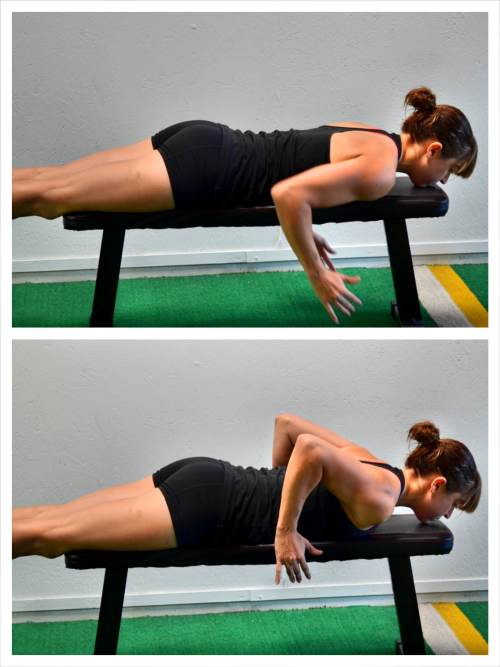
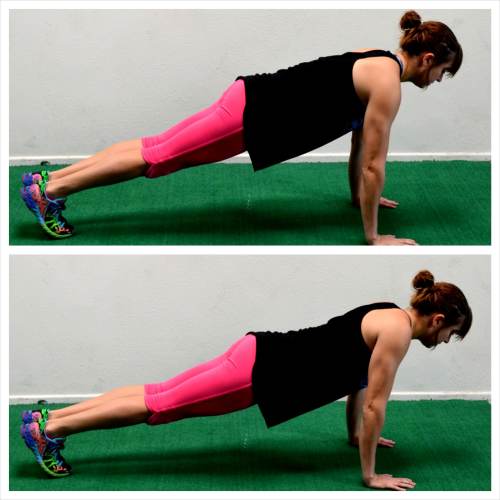
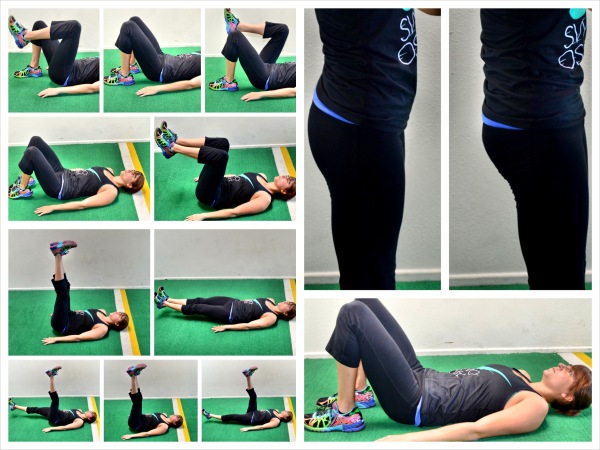
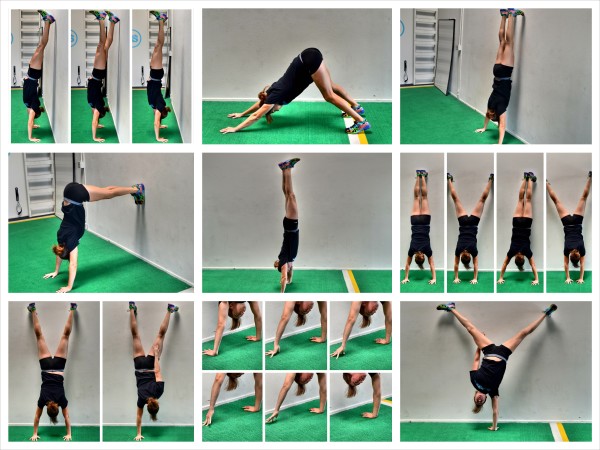

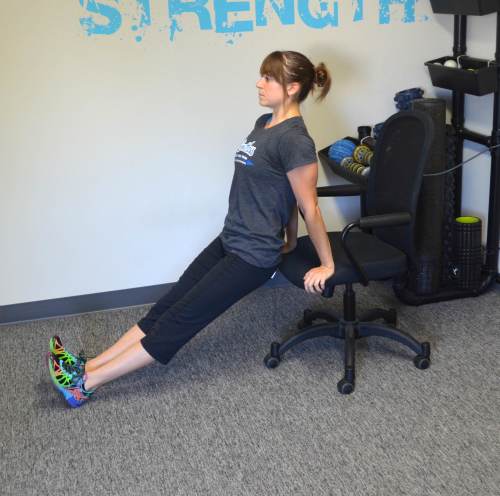
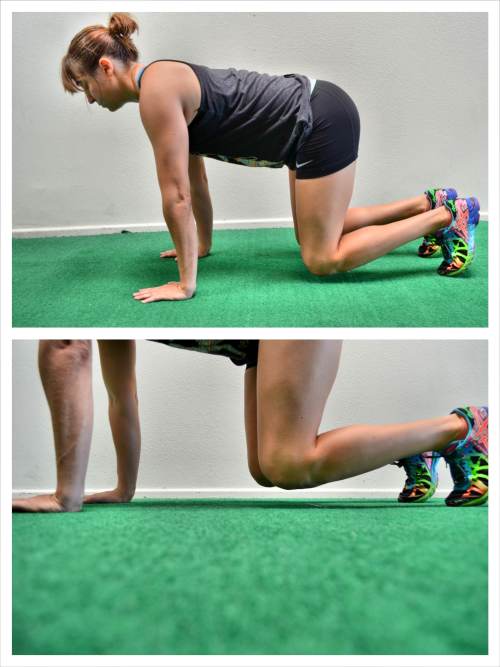
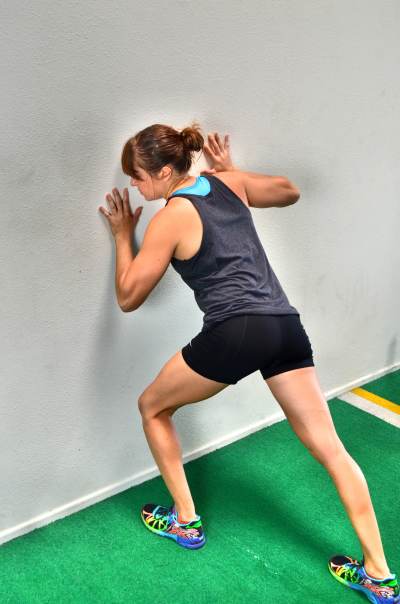
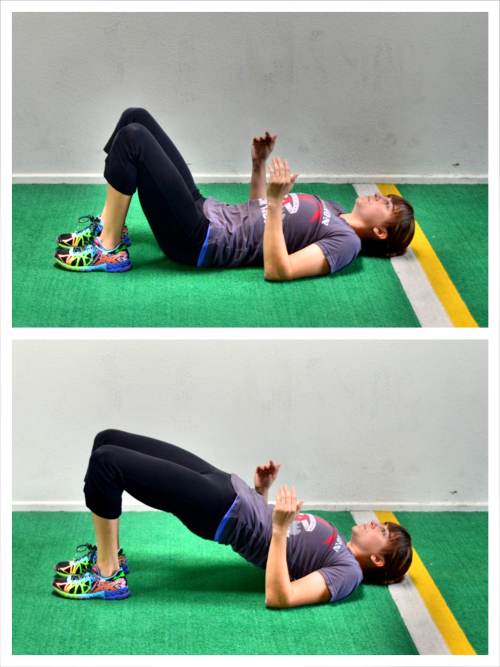
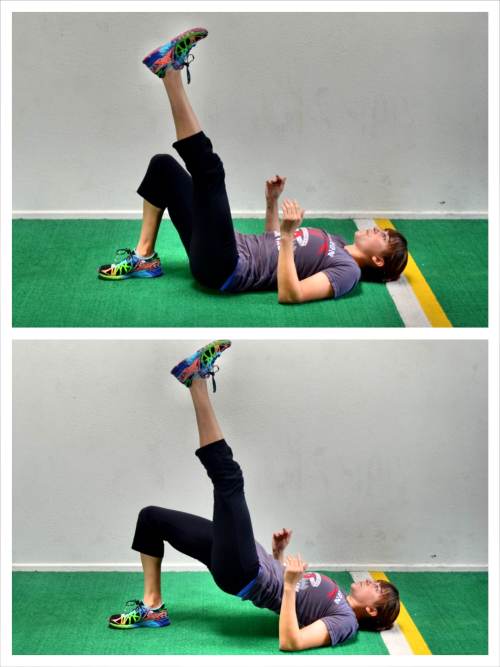
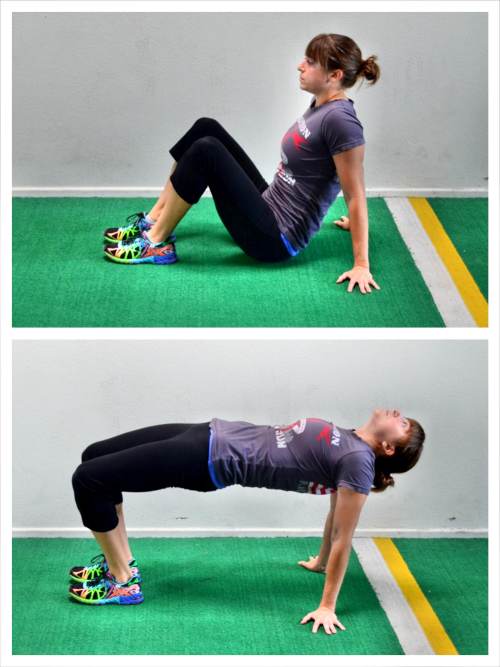
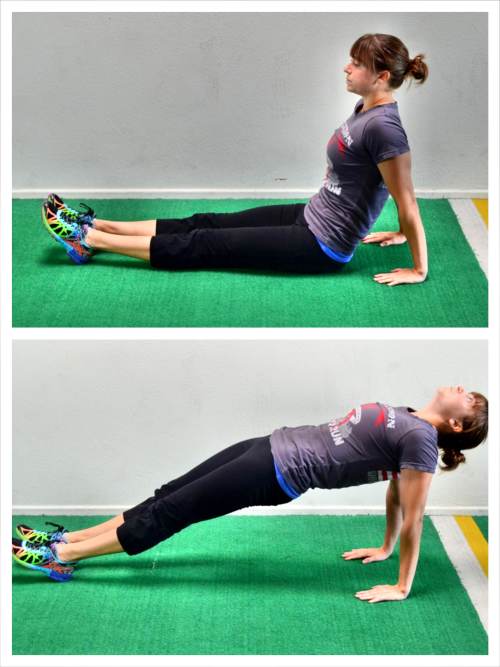
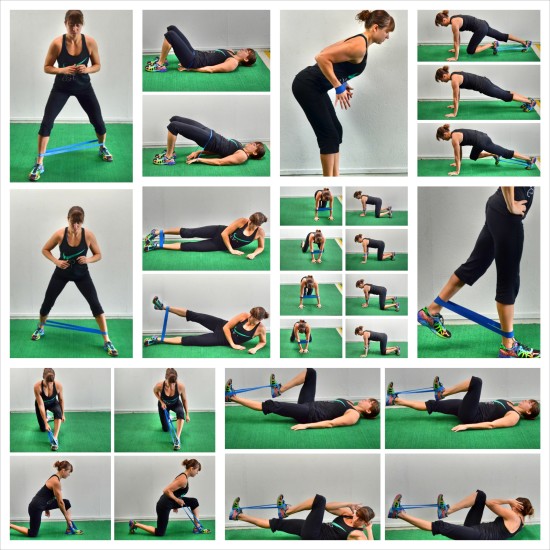

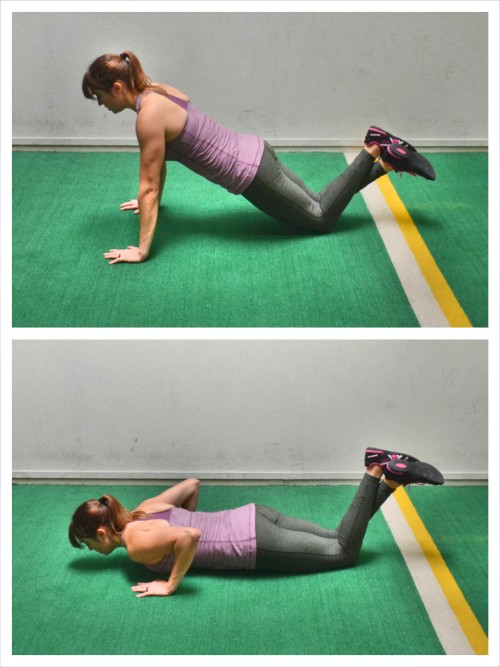
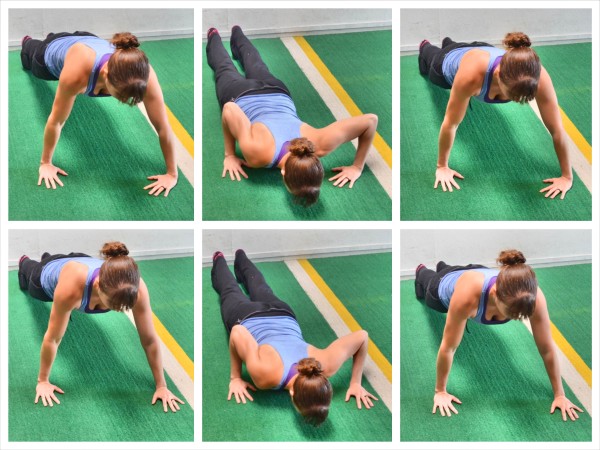

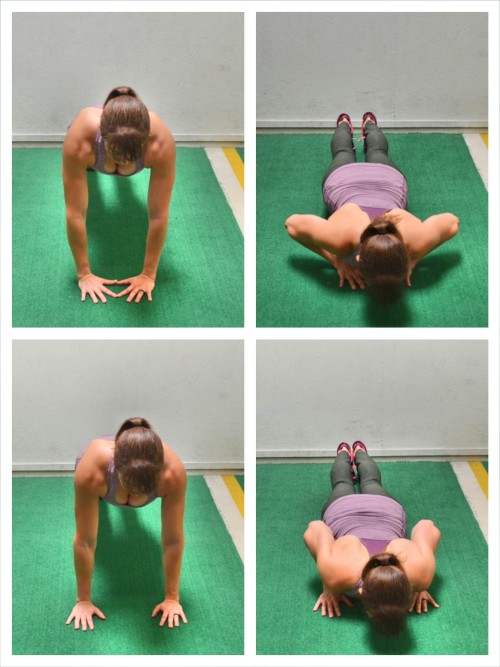
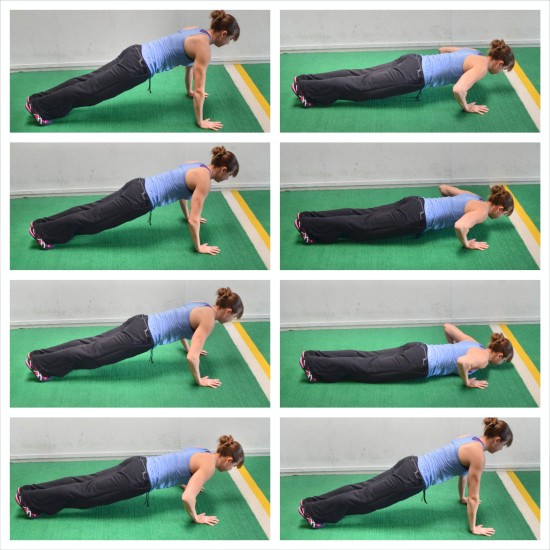

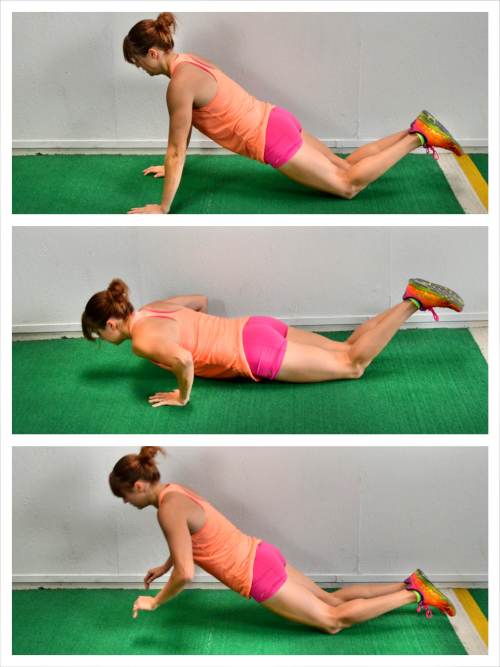
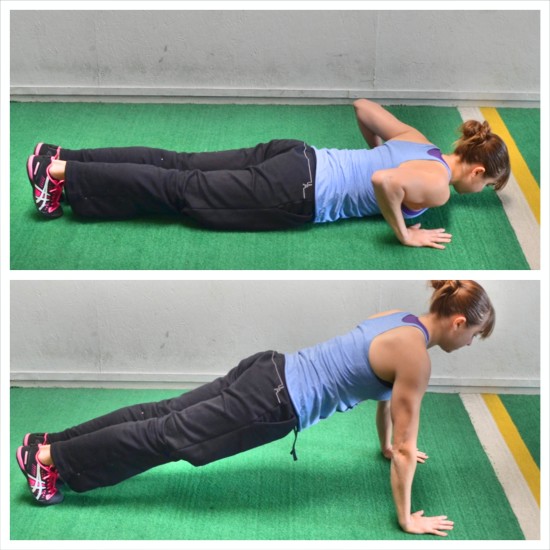
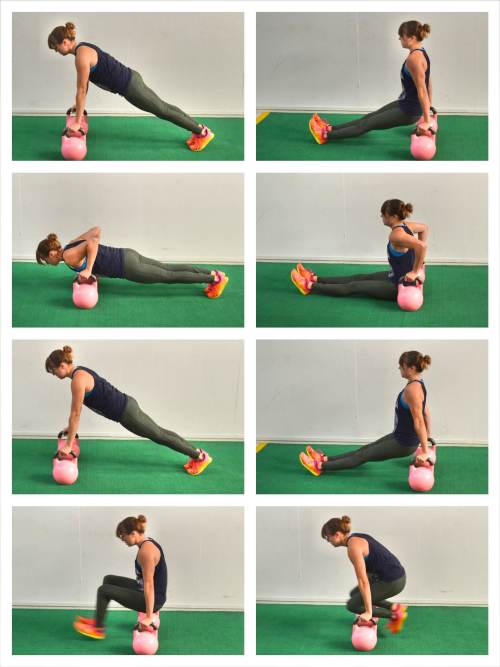

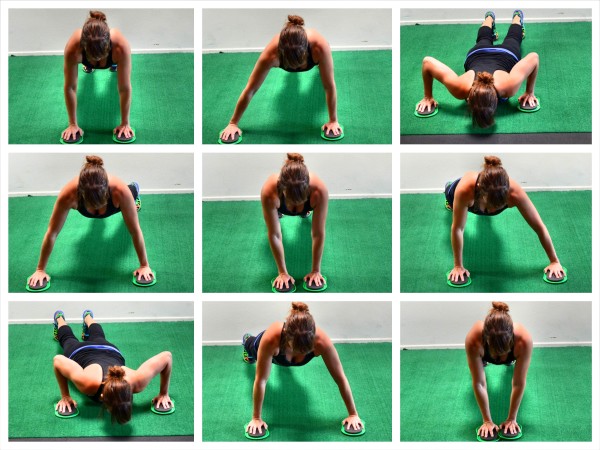
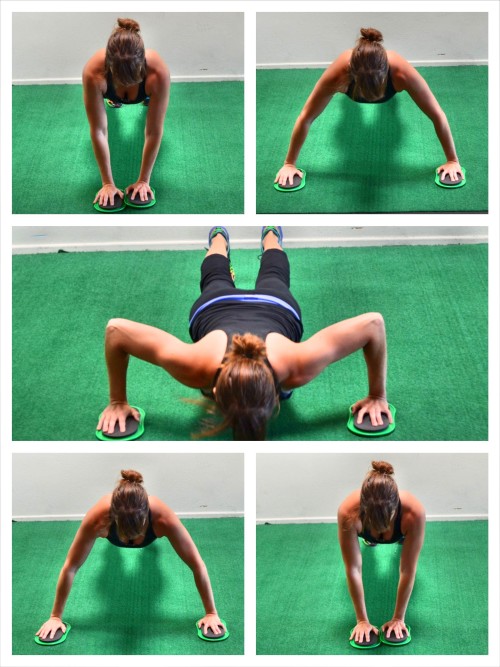
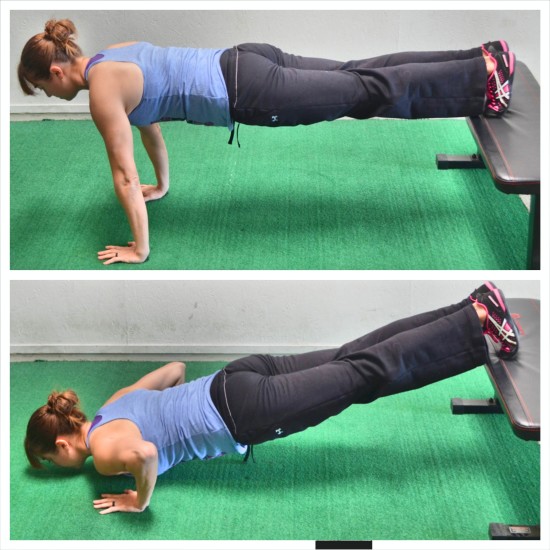
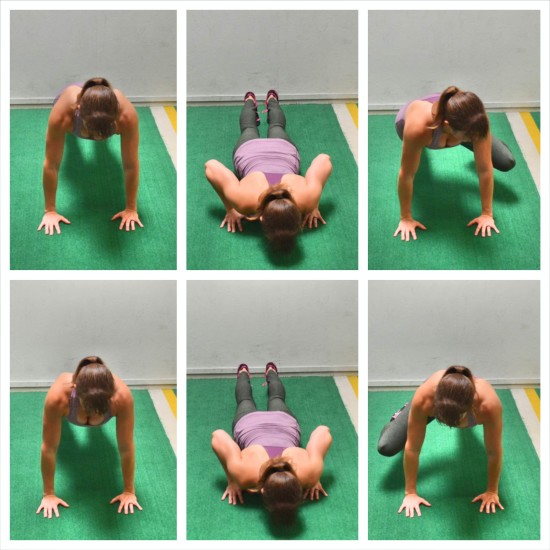
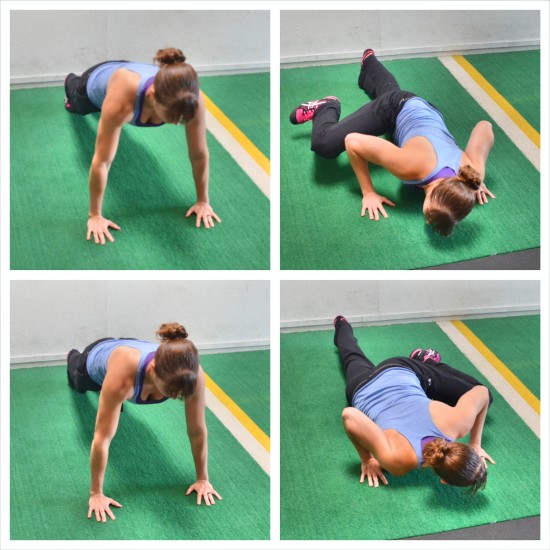
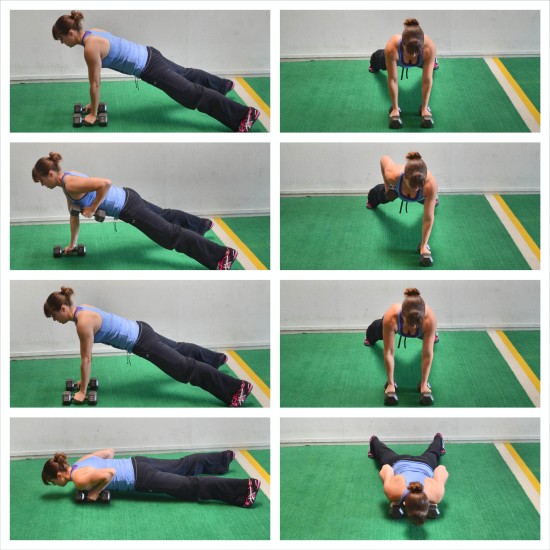
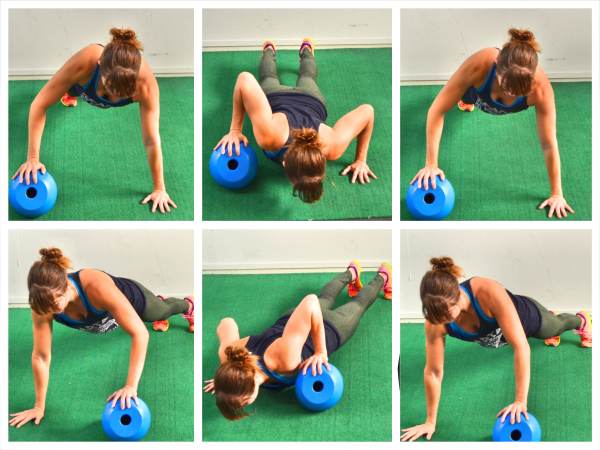
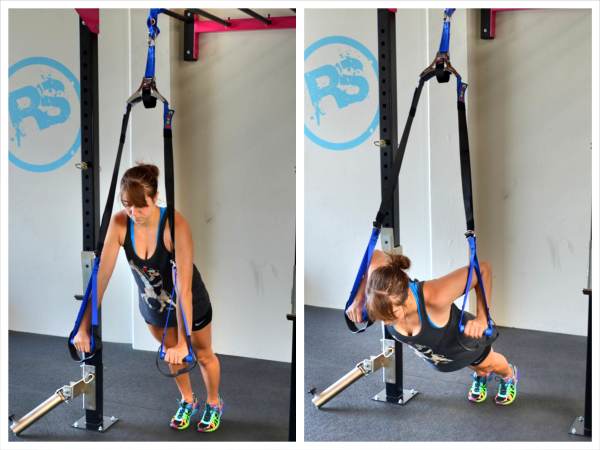

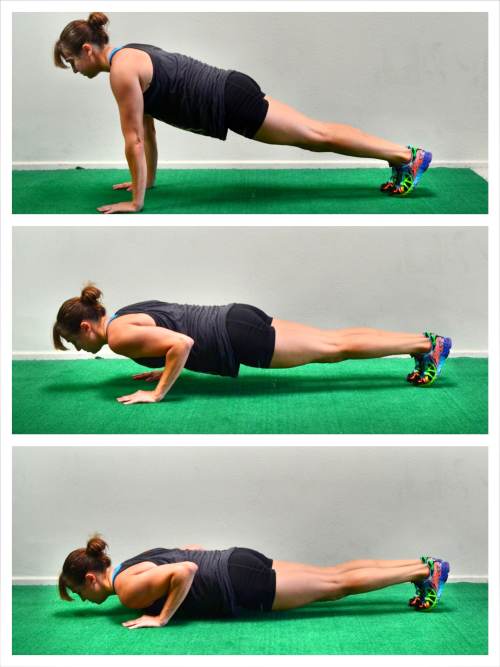
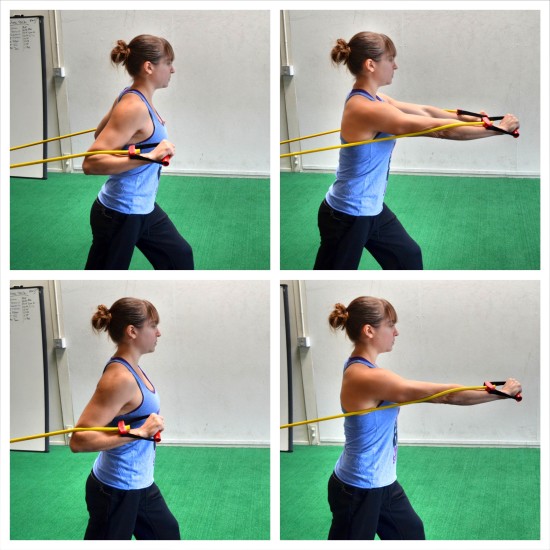
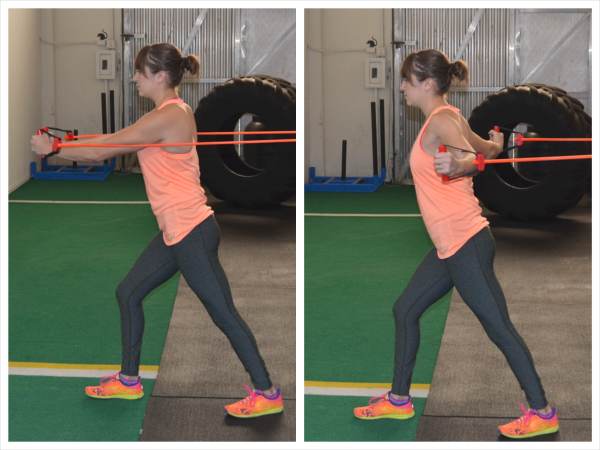
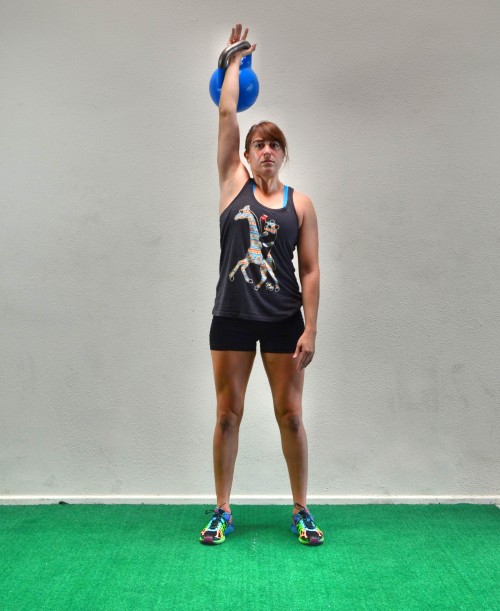
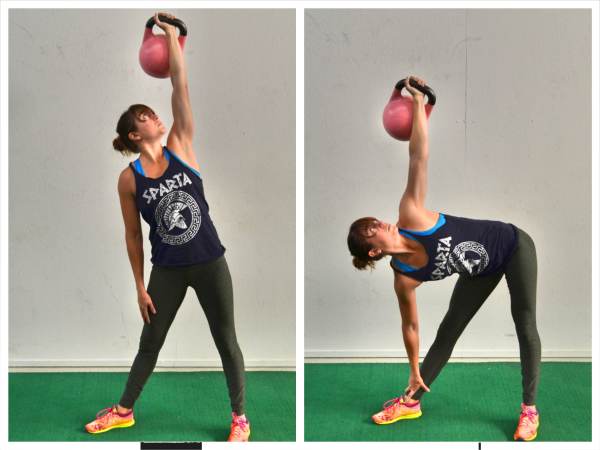
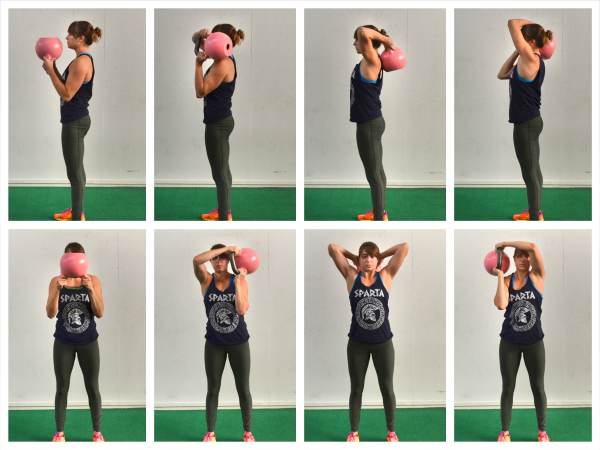
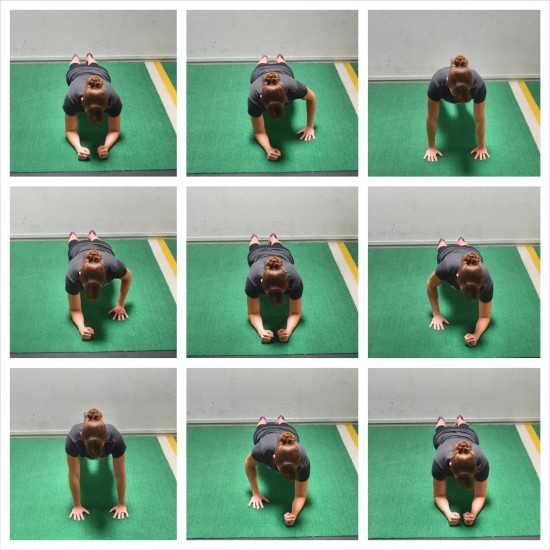
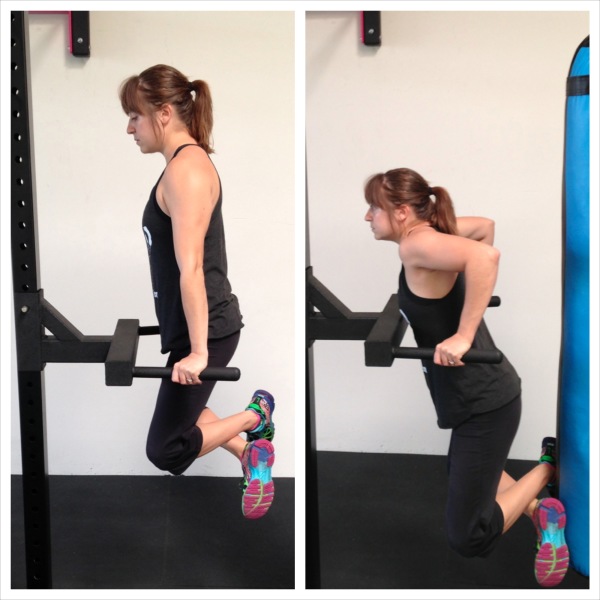
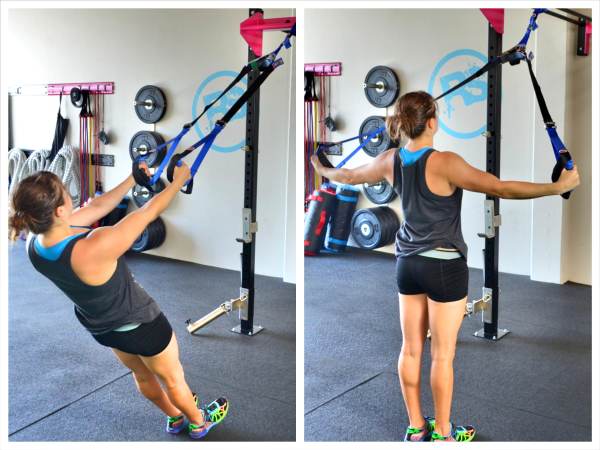
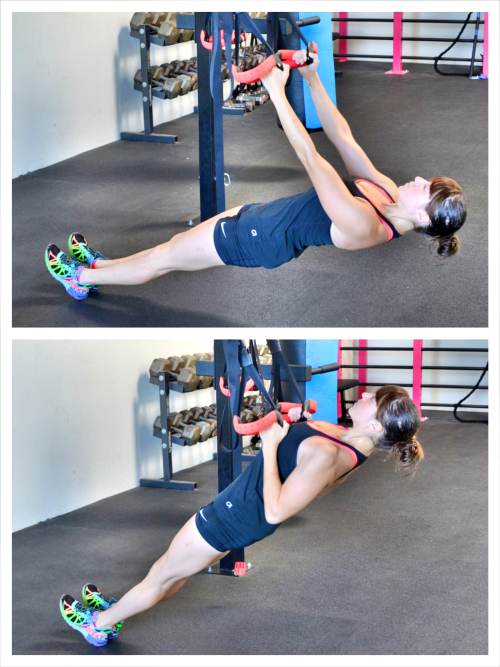
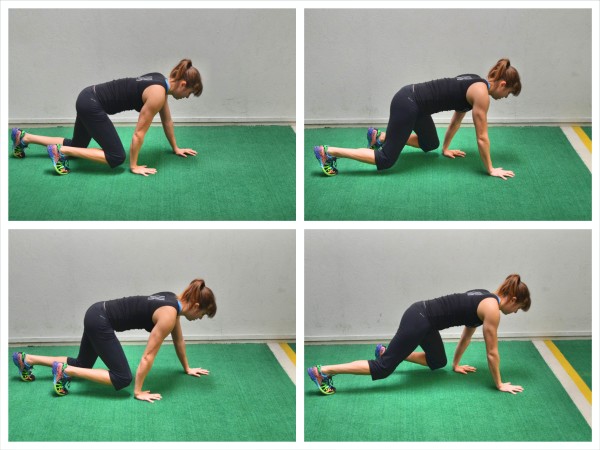
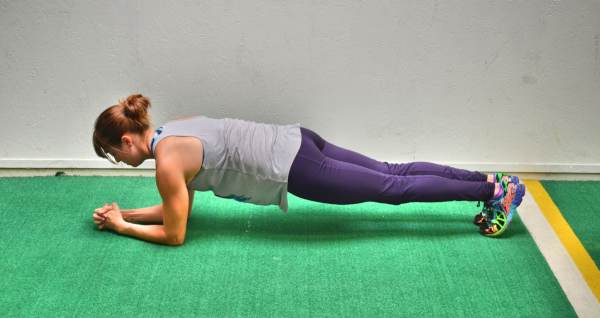
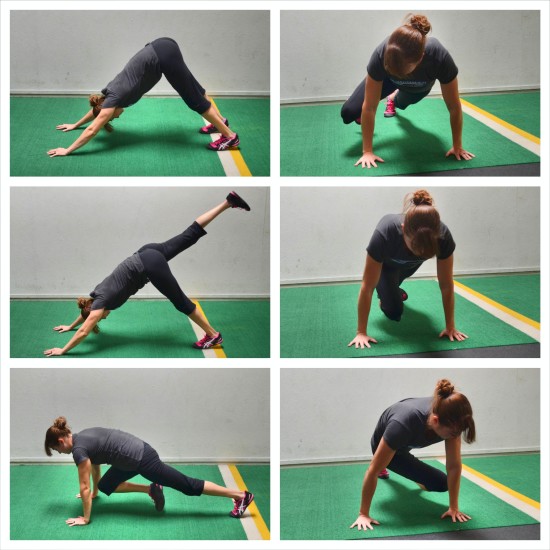
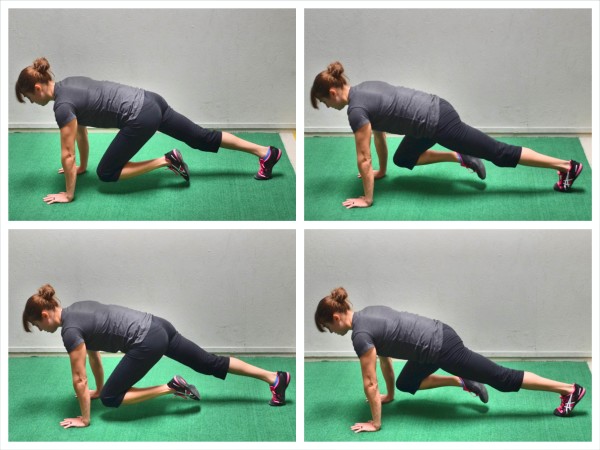
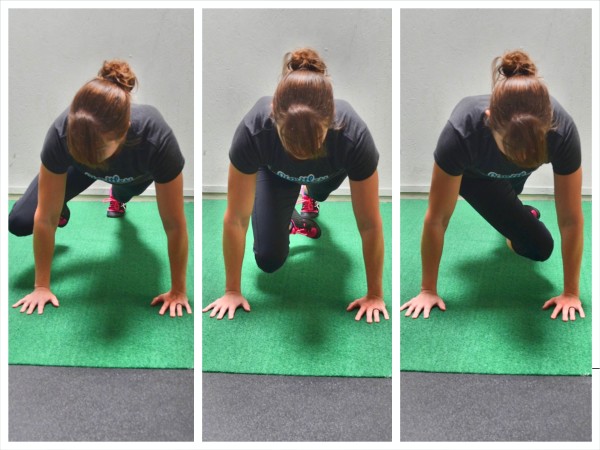
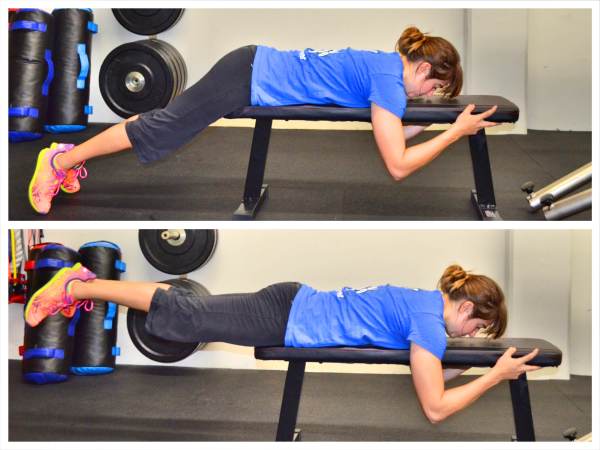
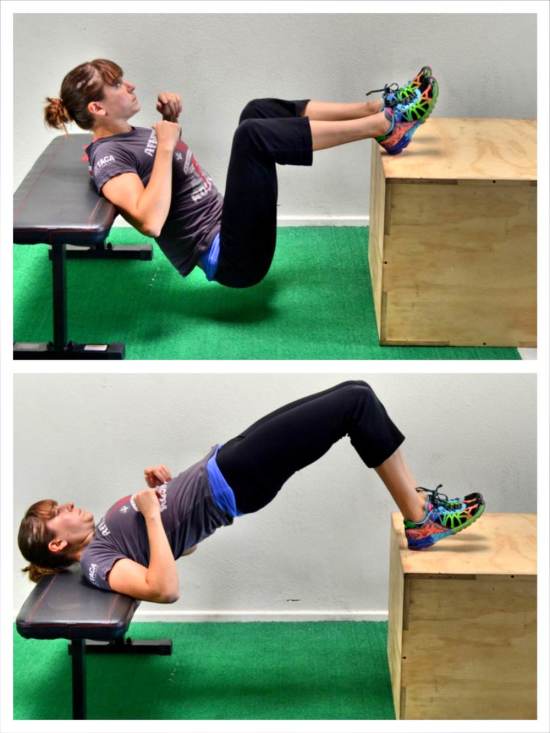


I LOVE this page! Very thorough and progressive.
Thanks! So glad it helps!