The Build A Stronger Back Workout

The Build A Stronger Back Workout

WARM UP
Stretch and Roll Out:
Wrists/Forearms
Chest
Shoulders
Traps
Upper Back

ACTIVATION

Complete 2 rounds of the circuit below.

CIRCUIT:
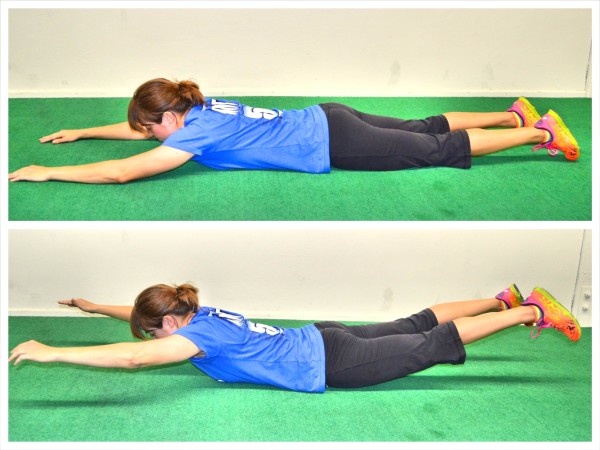
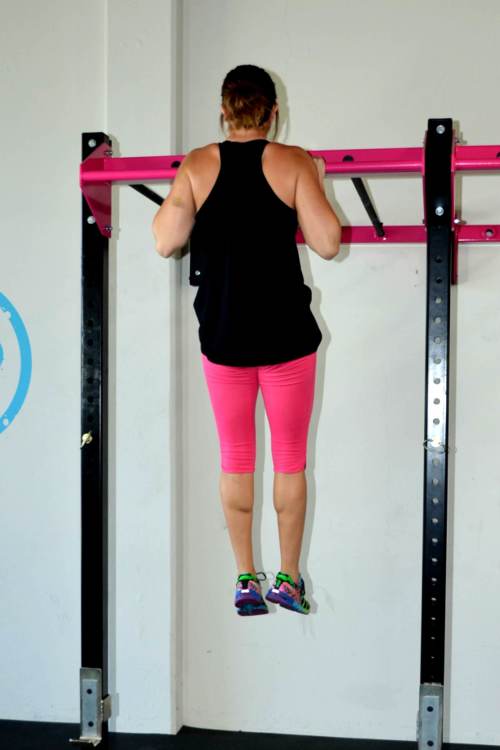
10 reps Scapular Retraction Mini Pull Ups
10 reps Inverted Rows

WORKOUT

Complete the first exercise then rest 1-2 minutes and do the supplemental circuit. Rest 30-90 seconds between rounds of the circuit. Complete 3-5 rounds.

EXERCISE:
50 reps Pull Ups

Do the 50 Pull Ups in as few a rounds as possible. That means resting long enough between rounds that you can do a lot in a row without resting too long (rest 30-90 seconds…90 seconds max). If you can do all 50 without releasing the bar, do it! You may do assisted variations as well, but make them challenging enough that you can’t do all 50 in a row.

CIRCUIT:
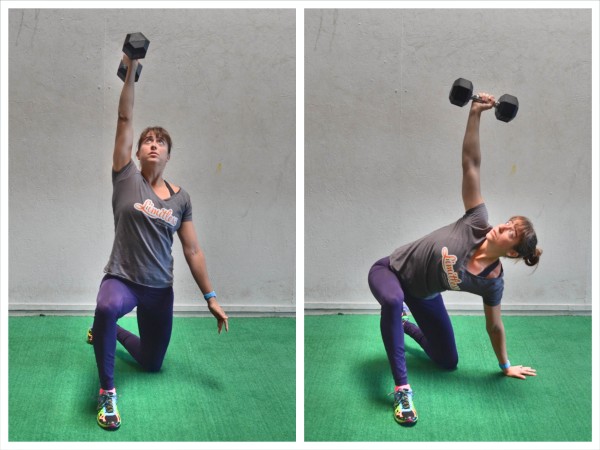
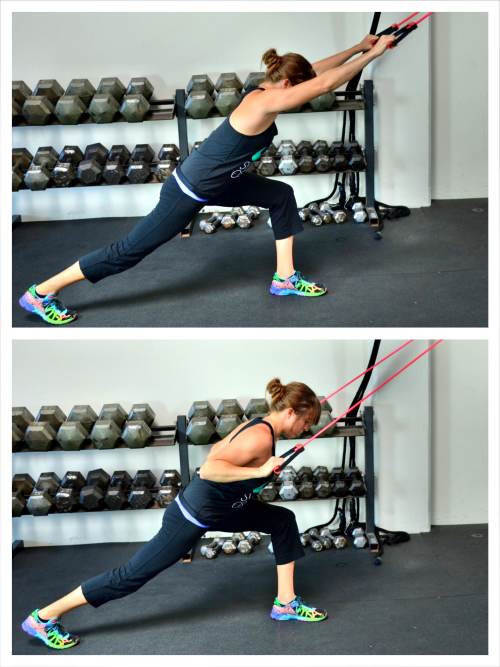
8-12 reps per side Single Arm Anti-Rotational Row
10-15 reps Suspension Trainer Back Flyes
10-15 reps Hanging Knee Tuck to Twist

NOTES:

Record how many rounds and the reps you get each round for the 50 Pull Ups. Try to beat it next time by either doing fewer rounds, more reps in a few rounds or even resting shorter between rounds.

EXERCISE DESCRIPTIONS:

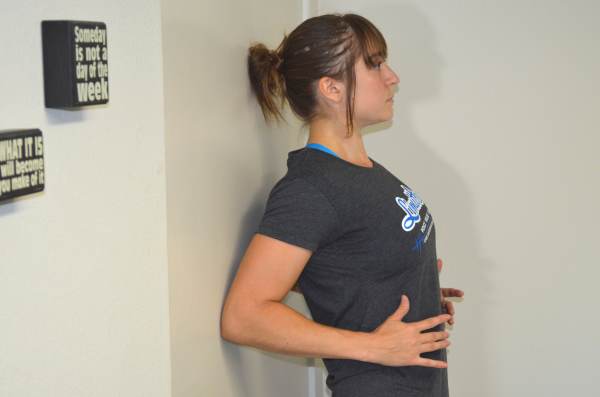
Scapular Retraction Mini Pull Ups – To do this move, hang from a bar with your palms facing away from you. Your hands should be about shoulder-width apart although you can do it with them wider apart or closer together. From this hanging position, press your chest out and pull your shoulder blades down and together. Don’t bend your elbows and start to pull up. Just press your chest out and retract your shoulder blades bringing them down and together. You should feel your shoulders go down as your chest lifts up.Then relax out and repeat. Remember, you are not bending your elbows to make this movement bigger.
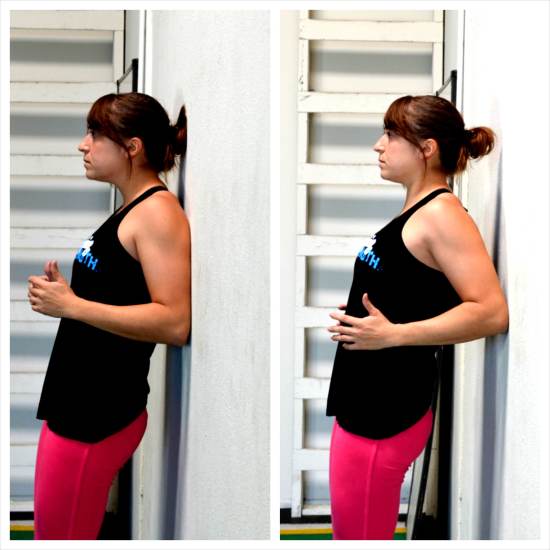
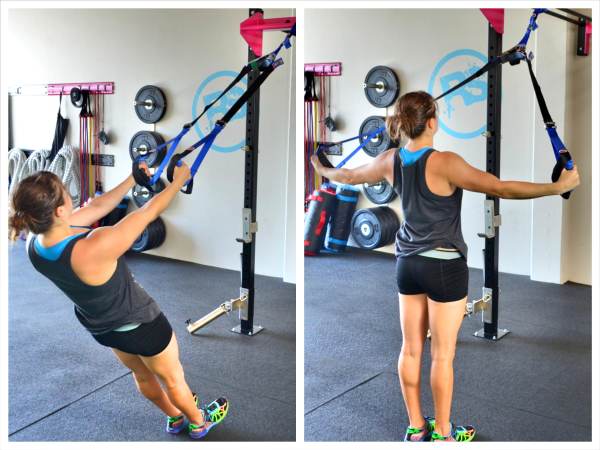
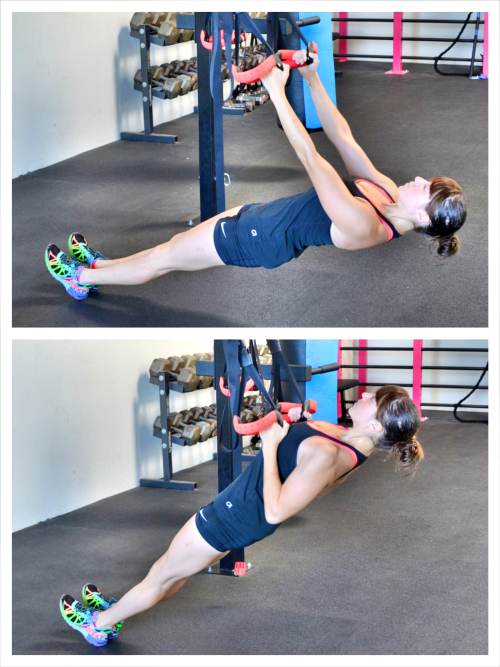
Inverted Rows – To do the Inverted Row, hold a suspension trainer strap in each hand or use a bar. Walk your feet out so that you are leaning back. The closer to parallel to the ground you get, the harder the move will be. Squeeze your core and glutes and press your chest out so there is tension between your shoulder blades. Make sure you don’t shrug your shoulders and that your body is in a nice straight line. Then row up, keeping your body in that nice straight line. Row until your chest comes up to the handles and then lower yourself back down. Don’t let your hips sink as you lower back down or your low back arch. Also, keep your chest pressed out the entire time (make sure you don’t round your thoracic spine at the bottom). Move in a controlled fashion as you keep tension between your shoulder blades the entire time. Make sure you row low and don’t shrug your shoulders at any point. Do not bounce off the bottom of your row or use momentum to get back up.

inverted-row
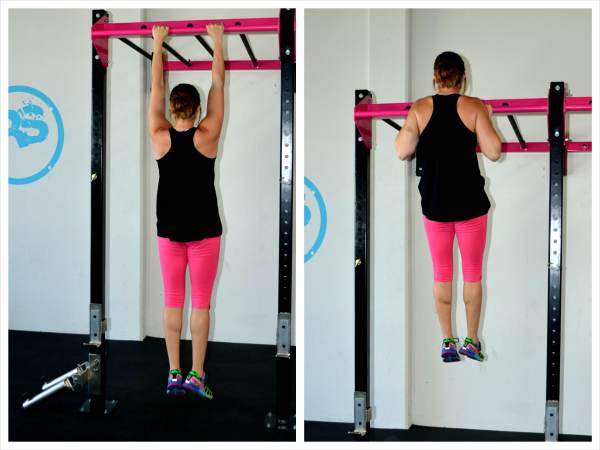
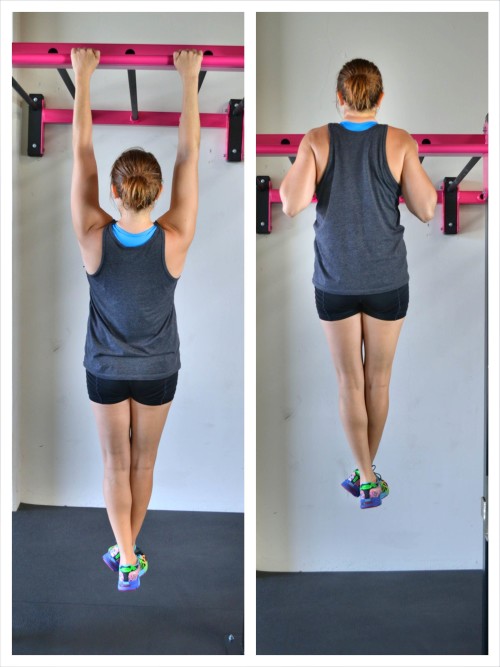
Pull Ups – To do a Pull Up, start hanging from the bar with your palms facing away from you. Hanging with your arms straight off the bar, press your chest out and up and feel your shoulder blades draw down and together. Leading with your chest, pull yourself up to the bar. Ideally you want to bring your chest all the way up to the bar as you draw your shoulder blades down and back. Then slowly lower yourself down until your arms are fully extended.Your arms should fully extend at the bottom but you do not want to relax the tension in your back. Make sure to lead with your chest and do not let your shoulders shrug. Do not bounce or swing at the bottom. You do not want to use momentum to pull back up. Only on the last couple of reps should you ever swing at all or kick your legs. You want clean reps, but to eek out an extra rep or so and go past failure, you can use a little momentum.

pull-up
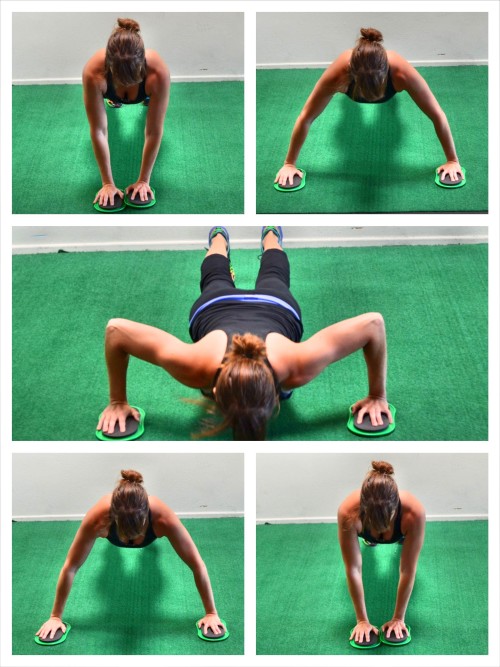
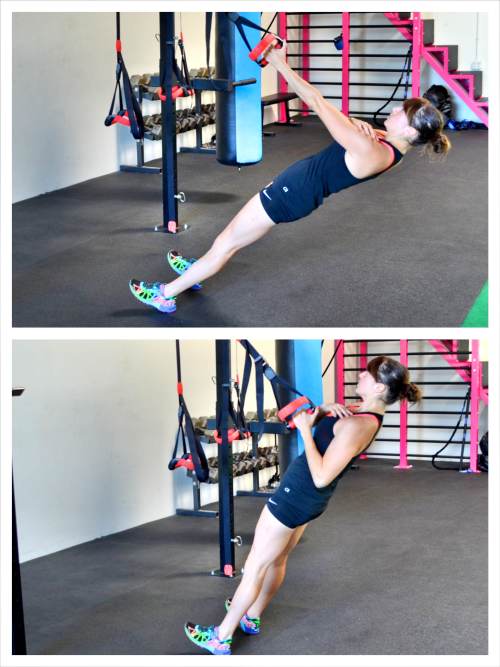
Single Arm Anti-Rotational Row – To do the Single Arm Anti-Rotational Row, place one hand across your chest and grab the strap in the other hand. Set up in a nice straight line, squeezing your quads, glutes and core. Do not let your body rotate. You want to move in a straight line as you row up and down. Pull you arm in toward your chest. Do not shrug your shoulder as you row. Drive the elbow back and pull your hand in toward the bottom of your pec. You should move as if both arms are pulling instead of letting the side not rowing rotate open toward the ground. To advance (or regress this move), change the incline of your body. The closer you get to parallel to the ground, the harder the move gets.

anti-rotational-inverted-row
Suspension Trainer Back Flyes – Hold a strap in each hand, facing the anchor point of the trainer. Walk your feet forward toward the anchor point. You will not want to walk them in as far as you do with the Inverted Row. Keeping your body in a nice straight line from your head to your heels, open your arms out to the side. You may open them slightly out and down to make sure you don’t shrug your shoulders. Keep your elbows soft, but do not bend your arms as you open to the side. Do not turn this into a row. Pull yourself up so your arms are even with your body and then lower back down, bringing your hands back together. Keep your body in a nice straight line as you row. Do not arch your back to help yourself get all the way up. If you can’t fly your arms all the way open, walk your feet back so you are more vertical instead of horizontal. Do not let your hips sag or arch as you perform the fly. Squeeze your glutes and keep your abs engaged. Make sure you don’t shrug your shoulders as you open. Keep your chest pressed out as you perform the fly. Move slowly and don’t bounce off the bottom. Focus on squeezing your shoulder blades down and together as you perform the Back Fly.

back flyes
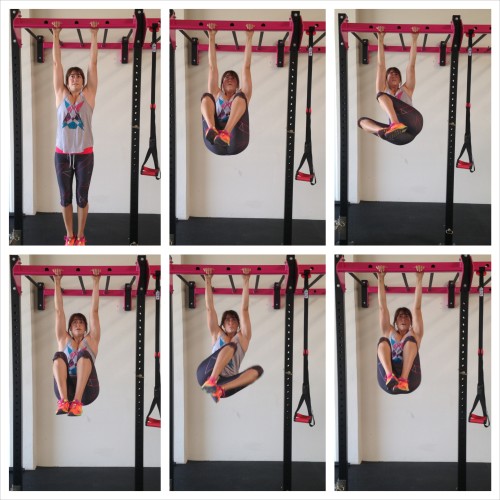
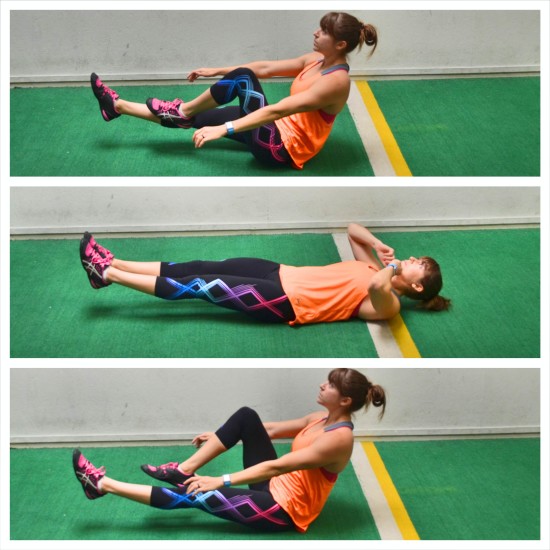
Hanging Knee Tuck to Twist – To do the Hanging Knee Tuck to Twist, start hanging then tuck your knees up toward your chest. With your knees up by your chest, twist them to the right. Then lower back down. Raise them back up center, then drop/twist your knees to the left. Lower back down and repeat on the right side. You can also vary this move up by bringing your knees up center then twisting right, center, left, center then lowering back down. However, it will be more challenging to keep your knees tucked the entire time.

Hanging Knee Tuck and Twist

The Upper Body Bodyweight Workout

The Upper Body Bodyweight Workout

WARM UP
Stretch and Roll Out:
Wrists/Forearms
Chest/Back
Shoulders/Traps
Hips/Glutes

WORKOUT

Complete 3-5 rounds of each circuit. Try not to rest between exercises, but rest up to 1 minute between rounds. Rest 1-2 minutes between circuits.

CIRCUIT #1:
30 seconds Handstand Hold
10 reps Fly to Push Up
10-15 reps per side Sprinter Sit Ups

CIRCUIT #2:
30 seconds Scapular Wall Hold
15 reps Inverted Rows or Scapular Wall Rows
10-15 reps Superman

COOL DOWN
Stretch and Roll Out:
Wrists/Forearms
Chest/Back
Shoulders/Traps
Hips/Glutes

NOTES:
Complete the hold then move right into the next two exercises. Rest only between rounds.

EXERCISE DESCRIPTIONS:

Handstand Hold – The most basic Handstand Hold is very similar to the downward dog. Start on your hands and knees. Then push back and up, raising your hips up toward the ceiling as you straighten your arms and press your chest back toward your legs. Focus on getting your back flat and a nice straight line from the heels of your hands up to your tailbone. You want your arms to be in line with your torso (aka biceps by the ears). Push your butt back and up. Do not worry about keeping your legs straight like in downward dog. Also, do not walk your feet in toward your hands. Push your butt up and create a nice straight line with your back. To advance that basic hold, place your feet up on a table. Walk your hands in toward the table and press your butt up in the air. You want to straighten your arms so your head is hanging down between your hands straight down toward the ground. Create a nice straight line from your palms up to your tailbone. Do not worry about straightening your legs. The higher the box, the harder the move. To do a Full Assisted Handstand, you can walk your feet up a wall. The closer to the wall you get, the harder the move will be. From there, you can move into a full handstand. No matter which variation you are currently able to do, you are going to create stability and strength throughout your core by doing Handstand Holds!
handstand holds
Fly to Push Up – To do the Beginner Fly to Push Up, set up in a push up position with one hand on a Valslide and the other hand on the ground. You can do this from your knees to make it easier or from your toes to make it harder. Then slide the hand on the slider out to the side and perform a push up. As you push up, slide the hand on the slider back in toward your hand on the ground. Repeat, completing all reps on one side before switching.
slider-fly-to-push-up
If the single slider Fly to Push Up is too much, this move can be done by just stepping the hand out to the side on the ground or even on an incline. To advance the Fly to Push Up, you will use two sliders. Again this variation can be done from your knees (easier) or toes (harder). Start at the top of a push up and then slide one hand out to the side and perform a push up. Push up and slide the hand back into the starting position. Even though this is a wider push up, don’t let your elbows flare way out by your ears. Slide the other hand out on the slider and perform a push up. Keep alternating sides until all reps are complete.
slider-fly-to-push-up
You can advance the movement further by sliding both hands out to the side as you lower into the push up and then pull them back in as you come back up out of the push up. You will perform the fly as you perform the push up instead of sliding out, doing a push up and sliding back in. With all the different variations, do not let your butt go up in the air or your hips sag toward the ground as you do the push up. Also make sure not to shrug or let your elbows flare up by your ears. You want to create more of an arrow position (->) with your arms and upper body than a “T” as you do the push up.
fly-push-up
Sprinter Sit Ups – Lie on your back and raise both legs straight out off the ground. Beginners may keep one leg on the ground. Crunch your upper body up so that you are sitting on your sit bones and then bring one knee into your chest. Lie back down and straighten both legs back out. Then bring the other knee into the chest as you crunch back up. Keep alternating, trying to keep both legs off the ground when you straighten back out. Do not let your chest cave when you crunch up. Keep your back flat as you crunch up and bring one knee in.
sprinter-sit-up
Scapular Wall Hold –To do the Scapular Wall Hold, stand about six inches from the wall. With your back to the wall and your elbows bent in by your side, drive your chest out and your elbows back. Then lean back against the wall on your elbows. Only your elbows should touch as you lean back. Draw your shoulder blades down and back and make sure to drive your chest out and open toward the ceiling. Do not shrug your shoulders and keep your body in a nice straight line as if holding a plank. Keep your head in line with your spine and do not tuck your chin. Walk your feet back toward the wall to make the move easier or walk them away to make the move harder. Make sure to drive the chest out and draw your shoulder blades down and together as you hold.
bat-wing
Inverted Row/Scapular Wall Row/Corner Row – Stand in a corner with your back relaxing against the walls and your feet about six inches from the corner. (You can also do this just off the wall like demonstrated above if you don’t have a useable corner.) Place an elbow against each wall with your elbows bent. With your body in a nice straight line, drive off the wall with your elbows, pressing your chest out and pinching your shoulder blades down and back. Relax back into the corner, keeping your body in a nice straight line from your head to your heels. Do not arch your low back as you press out. Also, make sure not to shrug your shoulders. The further from the corner that you walk your feet out, the harder the Corner Row will be. If you have a suspension trainer, you can do Inverted Rows instead.
corner-row back exercise
Superman – Lie face down on the ground with your arms out straight overhead on the ground and your legs out straight behind you. Everything should be relaxed and your neck should be in a neutral position. Then squeeze your glutes, back and shoulders to raise your chest and legs up off the ground. Try to get your chest up as high as possible as well as your quads. Keep your neck in a neutral position. Hold up off the ground for a second then lower back down and repeat the lift. Keep your arms and legs straight as you lift but do not lock them out. Do not bend your knees to try to get your quads higher up off the ground. Make sure to really squeeze your glutes as you lift so your low back doesn’t do all the work. And also make sure not to shrug as you lift your upper body up.
superman-exercise

The Push Up Destroyer Workout

The Push Up Destroyer Workout

WARM UP
Stretch and Roll Out:
Wrists/Forearms
Chest
Shoulders
Traps

WORKOUT
Complete 3-5 rounds of the Eccentric Push Ups, resting 60-90 seconds between rounds so you do quality reps each and every time. Then rest 2-3 minutes before moving on to the supplemental circuits. Rest 20-40 seconds between rounds of the circuits. Complete 6-8 rounds of each circuit. Rest 2-3 minutes between circuits.

ECCENTRIC PUSH UPS:
3-8 reps Eccentric Focused Push Ups (as slow as possible)

CIRCUIT #1:
20 seconds Push Up Variations
20 seconds Inverted Row Hold or Scapular Wall Hold
20-40 seconds Rest

CIRCUIT #2:
20 seconds Push Up Holds
20 seconds Inverted Rows or Corner Rows
20-40 seconds Rest

COOL DOWN
Stretch and Roll Out:
Wrists/Forearms
Chest
Shoulders
Traps

NOTES:
For this workout to really help you improve your Push Ups, you need to make sure that on the Eccentric Push Ups all your reps are quality reps. You want to make sure you have perfect form and lower yourself down as slowly as possible. You are better off doing 3 perfectly than moving quickly or allowing your form to slightly break down and doing 8 reps. The Eccentric isn’t about volume. Those reps are about quality and doing the hardest variation possible.

Also, it is better to regress the Eccentric by doing them off an incline instead of from your knees so your core has to work like it would with the full Push Up. Also, you can do an Eccentric Only if you are close to a full Push Up, but not quite there yet.

See the Push Up post link below for Eccentric Push Up Form.

For the second two circuits, it is very important that you pick variations you can do for the entire 20 seconds. If you rest during that time, you aren’t going to get as much out of the workouts as you would otherwise.

For the Push Up Variations, mix it up and use this time to work on your weak points. If your chest is weak, do Wide Grip. If your triceps are weak, try Close Grip. If your core is weak, try a Spiderman Variation. If you struggle pushing up from the bottom of the Push Up, try a Dead Stop. Pick variations that help you strengthen your weak points while allowing you to maintain proper form!

For the Push Up Holds, you can use the High Plank or Top Push Up Hold, Mid-Push Up Hold or Bottom Push Up Hold. Mix it up to strengthen different points in your Push Ups and challenge your upper body and core in different ways.

EXERCISE DESCRIPTIONS:
For Stretches, Foam Rolling Moves and all of the exercises in this workout, including Push Up Variations, check out our How To Do A Push Up post.
advanced-spiderman-push-up

The Upper Body Ladder Workout

The Upper Body Ladder Workout

WARM UP
Stretch and Roll Out:
Wrists/Forearms
Chest
Shoulders
Traps
Upper Back
Lats
Hips

ACTIVATION

Complete 2 rounds of the circuit below.

CIRCUIT:
30 seconds Scapular Wall Hold
30 seconds Handstand
30 seconds Dead Hang
30 seconds each side Side Planks

WORKOUT

Complete 3 rounds of the ladder for each superset. Rest 1 minute between rounds. Then rest up to 2 minutes between supersets. For instructions on how to do the Ladder see the Notes.

SUPERSET #1:
1-5 reps Pull Up
1-5 reps Push Up

SUPERSET #2:
1-5 reps Inverted Row
1-5 reps Dips

SUPERSET #3:
1-5 reps per side Sandbag Plank Pulls
1-5 reps per side Turkish Hinge

NOTES:

To do this workout, you will do one rep of each exercise in the superset. Then two reps of each, then three…up to 5 reps of each. Then rest before completing another round. Try to go quickly back and forth between the two exercises, using a weight that challenges you but allows you to keep building.

Adjust weight as necessary.

EXERCISE DESCRIPTIONS:

Pull Up – For variations and modifications, check out our post on How to do a Pull Up. Basic Pull Up shown below.

pull up back exercise

Push Up – Check out this post on push up form if you need assistance. You can also change up the type of push up you do. Try close grip, wide grip, staggered stance, decline…even handstand. Mix it up! Basic Push Up shown below.

push up isometrics

Inverted Row – For variations and modifications, check out our post on Inverted Rows. Basic Inverted Row shown below.

inverted-row

Dip – For variations and modifications, check out our post on Dips. The full dip is show below.

full dip

Sandbag Plank Pulls – Set up in a plank position from your hands and toes or hands and knees and place the sandbag on the ground to one side of your body just outside and below your shoulder. Make sure your hands are under your shoulders and then place your feet or knees wider apart to give you more stability. The closer together your feet are, the harder the move will be because you won’t have as wide or stable a base. If you feel your hips rocking side to side, widen your feet out. If the move is too easy, bring your feet closer together. Then reach your hand under your body and across to grab the sandbag. Squeeze your glutes and, without rotating your hips, pull the sandbag through and across to the other side of your body. Make sure your body stays in a nice straight line with your abs engaged as you reach through and pull. Do not let your hips go up in the air or sag toward the ground. You want to pull the sandbag all the way across and outside the other shoulder. If you can’t pull the sandbag all the way across or need to rotate your hips a lot to do so, it may be too heavy. Then reach through with the other hand to pull it back. To fight your body’s desire to rotate, you will need to engage your core and really squeeze your glutes. You do not want to feel this move in your low back. Keep alternating reaches until all reps are complete. Your goal is to keep a nice straight line from your head to your heels the entire time.

sandbag-plank-pulls

Turkish Hinge – Start by kneeling on your left leg with your left hand out to the side and a little in back of your left knee. Your right knee is bent with your right foot flat on the ground. Your right arm should be pointing straight up toward the ceiling. Advanced exercisers will hold a weight in their right hand. Then from this supported kneeling position, you are going to hinge up to kneeling. You will lift your left hand up and move from the leaning position to kneeling straight up. As you hinge to the side, make sure your chest doesn’t collapse forward or round. You want to stay up nice and tall and really feel your right oblique engage to pull you up. Then lower back down and place your left hand back on the ground and repeat.

turkish-get-up-side-bend

The Eccentric Pull Up Workout

The Eccentric Pull Up Workout

WARM UP

Stretch and Roll Out:
Forearms and Arms
Upper Back
Shoulders
Chest

ACTIVATION

Complete 2 rounds of the circuit below.

CIRCUIT:
30 second Scapular Wall Hold
30 second Towel Pulldown
30 second Pull Up and Hold

WORKOUT

Complete 4-5 rounds of the first exercise. Rest up to 2 minute between rounds of the first exercise. Then rest 1-2 minutes before moving on to the supplemental circuit. Complete 4-5 rounds of the circuit resting up to 1 minute between rounds.

EXERCISE:
5-8 reps Eccentric-Focused Pull Ups

CIRCUIT:
8-15 reps Band Lat Pulldown (tempo 1/2/1)
8-15 reps Suspension Trainer Back Flyes
8-15 reps Hanging Abs

NOTES:

For the Eccentric, your goal is to go as slowly as possible even if it means doing fewer reps. Do not rush them. And rest enough between rounds that you can complete as many quality reps each round as you did the first round.

EXERCISE DESCRIPTIONS:

Scapular Wall Hold – For the Scapular Wall Hold, you can do the traditional move shown below or pick a variation from this post if you want to mix it up.

bat-wing
Towel Pulldown – Grab a towel with both hands about shoulder-width apart and  pull your hands away from each other so there is tension on the towel. Then press the towel overhead, keeping the towel taunt between your hands. Press your chest out and pull the towel down toward your chest, pinching your shoulder blades down and back as if you were doing a pull up to the bar. Drive your elbows down to the ground as you pull the towel down keeping it tight between your hands. You can either hold at the bottom of the pull or complete repetitions. If you do repetitions, move slowly and make sure to maintain tension on the towel the entire time. If you don’t have a towel, you can do this with just your bodyweight. Without a towel, you will have to focus on pressing your chest out and driving your elbows down toward the ground to create tension between your shoulder blades.

towel pulldown back exercise
Pull Up and Hold –
Start hanging from the bar in a dead hang (aka with the muscles engaged). Then pull your chest up to the bar, or at least your chin over the bar, and hold. Keep your core tight and do not tuck your knees into your chest. Make your back and core really work with this move. Do not let your shoulders start to shrug as you hold. If you start to lose the hold, lower yourself down as slowly as you can and then perform a dead hang for a few extra seconds. If you can’t pull up to the top to hold, jump up or use a box to step up at the top of the movement.

pull up and hold
Eccentric-Focused Pull Ups – 
If you can do full Pull Ups, focusing on the Eccentric portion can help you be able to do more. For this move, you will pull yourself up to the top and then just focus on really slowing down the lower down to a 5 or even 6 count. The point is to focus on the lowering down and slow it down as much as possible no matter how you get to the top of the Pull Up. To get to the top of the Pull Up, you can also do a Jumping Pull Up or even a Foot-Assisted variation if you can’t pull yourself up. This will still help you work a little on the Concentric portion instead of just setting up at the top of the Pull Up, which is also an option, but makes the movement an Eccentric ONLY move. Once at the top of the Pull Up, you will lower yourself down as slowly as possible. If you are doing the Foot-Assisted variation, you can keep your feet on the ground; however, this is also a great way to start taking on your full body weight. If you can, use your feet to lift to the top of the Pull Up and then lift your feet off the ground as you lower down as slowly as possible. If you can no longer control the tempo down, you may want to again use your feet. You want more time under tension when focusing on the Eccentric. If you do a Jumping Pull Up, you will have assistance up to the top of the move, but will take on your full weight as you lower down. The slower you can lower down, the more you will get out of this move!

pull up back exercise
Band Lat Pulldown (tempo 1/2/1) – Anchor the band up high. Then grab the band in both hands with your palms facing away. (Just like with the Pull Up, you can use a variety of grips.) Step back and sink into a deep lunge with the back leg straight. Lean forward over the front leg, keeping your back flat and reach your hands up overhead holding the band. You want to create a nice straight line from your hands to your tailbone so that you can mimic the vertical pull. Then pull the band down to your shoulders, driving your elbows down toward your hips. Feel your shoulder blades retracting and the sides of your back working to pull the band down. Keep your chest pressed out and your core tight as you pull the band down. Do not let your back round just to pull the band lower. Hold for a two count. Then extend your arms back overhead and repeat. Make sure to keep your back flat and draw your shoulder blades down and back as you pull the band down to you. Step further away from the anchor point to increase the tension and make the move harder. Make sure to pull the band down to your chest in a controlled fashion, hold for a two count then extend your arms back out in a controlled fashion.

lat-pull-downs
Suspension Trainer Back Flyes – Hold a strap in each hand, facing the anchor point of the trainer. Walk your feet forward toward the anchor point. You will not want to walk them in as far as you do with the Inverted Row. Keeping your body in a nice straight line from your head to your heels, open your arms out to the side. You may open them slightly out and down to make sure you don’t shrug your shoulders. Keep your elbows soft, but do not bend your arms as you open to the side. Do not turn this into a row. Pull yourself up so your arms are even with your body and then lower back down, bringing your hands back together. Keep your body in a nice straight line as you row. Do not arch your back to help yourself get all the way up. If you can’t fly your arms all the way open, walk your feet back so you are more vertical instead of horizontal. Do not let your hips sag or arch as you perform the fly. Squeeze your glutes and keep your abs engaged. Make sure you don’t shrug your shoulders as you open. Keep your chest pressed out as you perform the fly. Move slowly and don’t bounce off the bottom. Focus on squeezing your shoulder blades down and together as you perform the Back Fly. If you feel this too much in your neck and upper traps, you may want to try the Scapular Band Fly first to learn how to engage your lower traps.

back flyes
Hanging Abs – For a variety of Hanging Ab Moves to choose from based on your ability level, check out this post – 10 Hanging Core Exercises.

Hanging Knee Tuck to Kick Out