Why 93% Of Women NEVER Lose Belly Fat

Why 93% Of Women NEVER Lose Belly Fat

Alright so do you think those old fitness infomercials are as ridiculous as I do?

What’s the real reason why 93% of women never lose belly fat?

BECAUSE IT’S REALLY…

REALLY…

REALLY HARD!

And because when we feel like results aren’t snowballing,

when we don’t see changes happening on the scale, we feel like the effort doesn’t equal the outcome…

And we QUIT.

But to lose from those oh so stubborn areas…To lose that last little bit…

We often NEED to keep going past the point we want to quit.

We need to stay consistent, be precise with our nutrition and workouts and not give up just because it feels like nothing is happening.

Because the simple fact of the matter is…

It’s not easy to reach a new level of leanness…especially for the first time.

And stubborn areas are stubborn for a reason.

Literally we may see fat being lost from EVERYWHERE else FIRST before we shed that final bit.

We may not see the scale change at all as we are actually getting leaner.

But we will only lose that last little bit of stubborn belly fat if we don’t quit or let little inconsistencies and 1% deviations from our plan start to add up.

We’ve got to embrace the suck of doing something hard and outside our comfort zone.

Which is easier to do when we remember that what you do to reach a goal is not what you’ll do to maintain it.

While we don’t want to sabotage our long-term success with fad diets or crazy 2 a day workout routines, we do need to recognize that not everything we do will feel sustainable.

There is a hard we have to push through before we then transition into maintenance and more of a lifestyle balance.

So now that I’ve sold you on still pursuing your goal of achieving abs so you can be in that 7%, I want to share why some areas are so stubborn to lose from…

Then go over the 2 main struggles you will have to push through…

And finally highlight 4 key tips that can make that 1% difference when you already have the fundamentals dialed in.

So first, why are areas like our stomachs, especially often the lower abs and obliques, so hard to lose from?

First off…our genetics do have an impact on where we tend to store fat. 

And as women we do have higher levels of body fat, and need those levels to be higher than men, to maintain hormonal balance.

But that doesn’t mean we can’t still lose that stubborn fat to see that definition.

This all just has an impact on what areas are most stubborn for us.

It just means these areas we often want to change the most will be the last to go…And consistency for longer will be key. 

Sucky but key.

Fat loss from these areas, like specifically our love handles, lower abs or even our hips, thighs and butt, can be harder because there is generally less blood flow to these specific regions.

Less blood flow makes it harder to mobilize and utilize fatty acids from these areas. 

And not only that, but these areas generally contain fat cells that don’t respond as well to the fat loss process.

Yup.

There are different types of fat cells in our body – alpha and beta – and both respond differently to the fat loss process. 

Alpha cells respond better and accelerate the process while beta cells don’t respond as well and make it harder to lose the fat.

Of course guess which ones we tend to have more of around our middle?

Those annoying beta fat cells!

But notice I didn’t say they made it impossible to lose belly fat.

It just is why you have to truly go in prepared to be consistent and let TIME work its magic as you’re precise in making sure those systems work together.

You can’t out exercise your diet if you want abs.

You can’t try to rush the process to see the scale change quicker.

Both of those things will ultimately only sabotage your success.

That’s why I think it is key we go in with eyes wide open as to the struggles we may encounter when trying to get leaner. 

Because the more we almost oversell the negative to ourselves, the less challenging we may find the process because we are prepared for the struggles. 

We may even find ourselves thinking “That wasn’t so bad!” just because we knew it was going to pop up over being caught off guard!

So in terms of the challenges….

First, the areas you want to change the most will be the last to go and even though you’re progressing, you may feel like you look worse. 

Yea you heard that right…

You may actually feel like you look WORSE as you lean down.

Where does your eye go when you look at progress photos? 

The areas you want to change the most.

And as I already mentioned, those are the stubborn areas that often are the last to change.

This means we will lose off of other areas first.

As these areas get smaller, guess what looks bigger in comparison?

That fat around our middle!

Yet that area didn’t gain.

We just haven’t lost from there YET.

This is why we need to track measurements too from these other places. 

Seeing losses from those other areas can help us know we are on the right track and just need to stay consistent. 

So if you’re feeling like you look worse, and have seen loss from other areas, you need to buckle down and keep going.

Second, you’re going to get “burned out.” 

Breaking a set point, getting leaner than you’ve gotten before will not be easy.

It’s new and oddly “scary” for your body.

Our body, and even our mind, doesn’t like or want change.

So your body will fight the process and you are going to need to be more precise in your systems. 

You can’t guestimate your macros or calories.

You can’t randomly pick a workout.

You need a strategically designed plan.

And this plan will be uncomfortable and push your boundaries.

Because it will take a lot of focus to be consistent and prevent old habits and patterns from creeping in…

It will require WILLPOWER and not just discipline to sometimes do that workout on a day you’re tired and just want to watch chick flicks on the couch…

Or skip that cupcake or cookie when everyone else is having something on Friday night. 

You’ll question is it worth it?

And you’ve got to say YES and keep pushing through.

Now you may be thinking…IS it truly worth it?

Honestly…

It is.

But it’s not the actual ab definition goal that is worth it…whatever losing the belly fat and achieving ab definition means to you and your aesthetic goals. 

What’s worth it is you achieving something you thought you couldn’t.

Doing habits that are honestly good for you and your body and health. 

It feels good to almost “overcorrect” and break patterns you thought were impossible to break to then be able to create new and sustainable habits and a lifestyle balance.

Because in achieving this aesthetic goal, yes we may love how we look…

But the confidence and strength is really built through what we overcome.

Life is the pursuit of goals…and about conquering the journey and showing ourselves all that is possible. 

We train hard and make sacrifices in so many areas for goals that matter to us.

No shame in this being one of them!

Honestly, I can tell you that so many clients that realize their strength in changing lifestyle patterns not only achieve amazing body recomp but feel their most fabulous and confident inside and out of the gym.

They see so many wins in not only their health and functional fitness but also because they’ve gained pride in what they can push themselves to achieve, in the love and dedication they’ve shown this one body they have for life!

So if you’re like YES this is a challenge I want…

Yes this is a pride I take in my body and I’m going to own my goals, here are 4 keys I want you to focus on to help you push through and see results snowball.

#1: Macros matter most.

Not tracking when you want to get abs is like throwing spaghetti at a wall hoping something sticks.

Precision pays off and what gets measured gets managed.

Track your food. Sucks but it is the best way to make 1% changes that build. 

It helps us avoid dramatic wrong turns in our program and makes sure our diet even matches our activity level, body and goals.

And then don’t be afraid to adjust as you progress. 

Too often when we are trying to lose fat, we even first turn to cutting our calories lower.

But when a client has only that last little bit to lose, I avoid cutting calories as much as possible.

A bigger deficit often backfires and leads to more muscle being lost. 

Instead we will do more cycling of macros, especially going higher on protein. 

This is where those really high protein ratios of over 40% of your calories coming from protein pay off amazingly well, especially as you get older and even go through menopause! 

#2: Progress your core work.

You better learn to love core work. 

No you can’t spot reduce an area by just doing a bazillion reps of an exercise for that muscle group. 

But your abs are muscle and you see better definition when you do build them to some extent.

No, you’re not trying to grow them like you may other areas…

But you do still need to progress your core training to see better results.

Focus on changing the range of motion, tempos, loads, resistance types all while keeping the reps in that even 10-20 rep range.

And even consider including this core work to END your workout before maybe some steady state cardio, such as walking. 

I mentioned to start there is less blood flow to stubborn areas making them more stubborn.

But by working the muscles in an area, we can stimulate more blood flow to help mobilize more fatty acids.

The key is then making sure we USE those mobilized fatty acids which is where the walking comes in. 

Now note…this is that 1% tweak…if your macros aren’t already dialed in…

If you aren’t already following a clear workout plan…

If you aren’t implementing proper recovery…

This isn’t going to be a magic fix to broken fundamentals.

#3: Focus on QUALITY. 

Honestly this is quality in every component of the systems you are implementing.

Because losing belly fat isn’t about one magic food, one magic supplement or one magic move.

It’s about quality in all those systems working together. 

And it’s about intentionality in your training and your fueling.

You want to make sure you’re focusing on nutrient dense foods.

Yup…as much as I preach including foods you love, you’ll see better results faster by focusing less on those fun foods and more on those nutrient dense foods that help maintain hormonal balance, make you feel fuller, help you recover and even have a higher thermic effect.

This will make the fat loss process easier.

Same goes for your workouts…

You need to focus on quality in those sessions. You need to push hard and truly drive progression. 

You need to focus on what you feel working.

You need to work hard in the gym and then focus on that recovery between. 

We want to focus on quality NOT quantity.

Doing more will only backfire.

Now last but not least…

#4: The process is never linear. 

Note I didn’t say progress is never linear…

I said the process.

You’ve got to embrace ebbs and flows.

To lose that belly fat, you may not always be driving toward fat loss.

Diet breaks, maintenance periods…

Times you back off to keep doing the minimum…

May be needed to ultimately achieve your goal.

Self control is like a gas tank.

We can’t let it hit E while driving on the highway or we’re going to be in trouble. 

At points, you need to pull into that gas station and refill…ideally when the light even first comes on, to keep being able to move forward.

Same thing goes for your fat loss goals.

Sometimes you need to strategically back off to keep pushing forward. So know when burn out may become I don’t care at all forget everything…

And proactively and strategically even plan in breaks! 

So if you’ve felt like you’ll never lose belly fat…

Stop writing off your body recomp goals.

Yes it is hard but when we know the struggles we can plan for them and prove to ourselves so much more than we thought possible is possible!

If you’re looking for that support and programming to dial in your nutrition and workouts to see amazing body recomp, check out my 1:1 Coaching…

–> Learn More

The Best Core Exercise (Everyone Hates)

The Best Core Exercise (Everyone Hates)

Teapots have gotten a lot of hate in recent years.

But unpopular opinion. I think the hate is unwarranted.

They can actually be an amazing move to include in your workout routine when implemented correctly.

I say this often but there are no bad exercises…

Just misused moves that aren’t right for our needs or goals that need to be modified for us at this phase in our journey!

And too often these days a missing component of our core training routines IS lateral flexion movements.

Our spine and the muscles of our core are meant to side bend.

Learning to control this movement in our workouts is key to helping us avoid unwanted strain on our spine when we lift and move in everyday life.

Not to mention, by simply writing it off because someone said it was bad for them, means we could be missing out on a move that perfectly addresses OUR unique needs.

Can’t get down on the ground?

Well the teapot is an amazing STANDING core move.

Need to address an imbalance between each side?

Well the teapot is an amazing UNILATERAL core move.

There is so much opportunity with different exercises if we simply seek to learn more about them and when and why they may work, or not work, for us and our goals.

That’s why I first want to go over some key pointers for using this exercise correctly, such as ways to include it in your workout routine, and even variations so you can build up and work your core in a way that matches your needs and goals!

USING TEAPOTS:

Now if you’re thinking about grabbing as heavy a weight as possible for your teapots and doing only a couple or reps, this is not the exercise for that type of loading.

While creating progression even in our ab and core routines is key, moves like the teapot should never be about constantly just going heavier and heavier, especially for lower rep work.

Moves like this should most often be progressed through changes in equipment, tempos and even to some extent volume (adding a few more reps).

While you can add loads, you want to be conscious that you aren’t trying to max out. You want to be in full control of that range of motion.

And often you will want to work in that 10-20 rep range based on your experience with lateral flexion and any injuries.

Keeping the reps higher and loads challenging but overall lighter is key especially starting out.

You also want to note that this lateral flexion exercise often puts more emphasis on the eccentric, and because it applies more load when the muscle is stretched, can make you VERY sore even with lighter weights starting out.

That’s why even opting for just a round or two to start of those higher reps at the end of your workout can be good.

It’s key you move slowly and work through only the range of motion you can control.

But because strengthening and controlling that movement is so key, again starting lighter is best.

Really focus on that slow lower down of the weight at your side and don’t twist or rotate to get the range of motion bigger.

When you lower you aren’t focusing on the side that is actually flexing…

You’re focusing on the STRETCH on the opposing side.

And then to move back up to standing, you will feel that stretched side PULL your torso back up straight.

While you can crunch slightly to the other side, the focus should be on that eccentric lower down to the move back upright.

Too often we rush through movements over focusing on what we feel working.

Now as amazing as this move can be, one exercise in one form is not right for everyone.

And while this traditional teapot may be done with a dumbbell or kettlebell down by your side, there are other variations you can use based on the tools you have and even your specific needs.

VARIATIONS:

There are so many ways to address and implement lateral flexion into your routine – from more isolated oblique crunches to variations of the teapot.

You can simply change the type of tool you use while doing the same basic teapot, trading a dumbbell for a kettlebell or plate weight.

(The plate weight especially can be a great too for one, working on your grip strength in a different way!)

You can even keep the same loading placement and use a cable or band anchored down low to apply resistance in a new way. The band anchored down low will really challenge your core as you pull to come back up!

This simple change in types of resistance can be a great way to progress this move as you advance with it to challenge your body in new ways.

You can also change loading placement, anchoring the resistance overhead by using a cable or even doing a variation of this in the suspension trainer.

This will also change the focus from being on your OPPOSING side, to the same side you’re bending toward.

But so often little changes like this can create progression through the same but different and really help improve our mind-body connection because we are working the same muscles but in a new way.

And if you have no tools available, you don’t have to miss out on the benefits of this amazing move.

Side plank hip dips are a great way to work on that lateral flexion without any equipment.

If the full version off the ground isn’t right for you, modifying the side plank off an incline, such as a bench, allows you to really use this move to your advantage and control that lateral flexion.

Just make sure you’ve engaged your back to support your shoulder and have flexed your feet, especially if your feet are stacked, to protect your knees.

And as important as it is to work through that range of motion to strengthen the muscles that power the lateral flexion movement, it can also be key to include some ANTI-FLEXION exercises as well.

Learning to PREVENT unwanted flexion or movement is equally as important.

And you can strengthen those muscles to stabilize using different anti-flexion moves as well.

It’s why things like side plank holds or the stability or pallof press can also be key to include.

But too often we aren’t using both and we’re even valuing one over the other instead of seeing the opportunity in combining both in our routines.

Remember moves are only as good as their implementation.

And lateral flexion, and the ability to avoid it, are key movement patterns we want to learn to control.

Train them in the gym to become stronger and functionally fit!

Looking for amazing workouts to help you rock those results?

Join my Dynamic Strength program!

–> LEARN MORE


18 Underrated Core Exercises

18 Underrated Core Exercises

Often we fall back into using the same old moves, forgetting all of the options and variations out there. But having different variations of exercises to target the same area can help us create progression through the same but different.

It can help us even activate different muscles to different extents!

That’s why I want to throw back to the origins of my YouTube channel and share a Core Exercise Variations video with all of you.

These exercises work your entire core, frontside and backside.

Because sometimes we just need that library of move options to help remind us of all of the tools out there we have to meet our needs and goals and design the workouts that help us rock those results!

18 Underrated Core Moves

Balance Toe Touches 00:37
Cross Body Knees 00:54
Twist And Pivot 01:13
Wall Push 01:26
Side Balance Oblique Twists 01:35
Side Plank Clams 01:56
Plank with Reach Back and Out 02:12
Bulldog Reaches 02:34
Plank Snow Angels 02:55
Sit Thrus 03:39
3-Way Sit Up And Reach 03:59
Seated Hinges 04:24
C-Sit With Knees 04:42
Bridge to Boat 04:57
Banana Rolls 05:17
Butterfly Crunches 05:41
Frog Kickouts 05:57
Leg Wipers 06:12

BONUS!

15-Minute Core Burner

Complete 2-3 rounds through each circuit without resting. Rest no more than 30 seconds between circuits if possible. 

CIRCUIT #1:
30 seconds Twist And Pivot
30 seconds per side Plank With Reach Back And Out
30 seconds C-Sit With Knees
30 seconds Frog Kickouts

CIRCUIT #2:
30 seconds per side Cross Body Knees
30 seconds Plank Snow Angels
30 seconds 3-Way Sit Up And Reach
30 seconds Bridge To Boat

For more amazing workouts to match your needs, goals and schedule, check out Dynamic Strength!

–> LEARN MORE

The Most Underrated Plank Exercise

The Most Underrated Plank Exercise

The plank is an amazing core move and a fundamental we need to include. 

But holding longer only helps us build strength to a point.

And just because a move is a must-do basic, doesn’t mean we can’t have fun using other variations especially to target specific muscles of our core more. 

Because the basic plank doesn’t help us work on that rotational core strength nor does it include any lateral flexion.

And learning to power and control both of these movements is key if we want not only a toned, strong core but also to improve our shoulder, hip, knee and even ankle stability.

So if you want to work those obliques and glutes even more with both a rotational and lateral flexion movement, while improve your shoulder stability try this amazing plank variation – the Plank with Oblique Knee Tuck! 

In this video, I’ll show you how to perform this move and modify it to fit your current fitness level so you can build a strong core!

And I’ll share my “secret” to finding a way to modify ANY exercise to fit someone’s needs and goals. 

How To Do The Plank With Oblique Knee Tuck:

This plank variation actually combines the basic front plank with the side plank as you transition from side to side with this rotational exercise.

And then it advances the basic side plank by adding in that oblique knee tuck.

Because you are stabilizing on just one arm and one leg, this move needs to be built up to slowly so that you aren’t overloading your shoulder or knee.

It is a challenging plank variation to work on your shoulder, hip and knee stability and will really work those obliques and glutes!

To do the Plank with Oblique Knee Tucks, set up in a forearm front plank from your elbows and toes.

Stack your elbows under your shoulders but outside your chest and focus on engaging your back to really lock your shoulders in place. Your hands will be in toward each other as your elbows are wider. This will feel more comfortable as you rotate.

You can even start with your arms fully perpendicular to your body under your shoulders.

Flex your quads as you drive back slightly through your heels and perform a small posterior pelvic tilt to feel your abs light up.

Maintain a nice straight line from your head to toes.

Then rotate to one side. Make sure your elbow stays stacked under your shoulder and your hips don’t drop as you twist.

As you move into that side plank, also make sure your foot that stays on the ground is flexed. This protects your knee and ankle to create better tension up your leg to engage your glute.

Squeeze your butt forward as you lift your top leg up and reach your top hand overhead.

Then tuck your elbow and knee together. You will crunch them together slightly in front of you, but do not allow your bottom hip to sag.

You want that bottom oblique and glute working!

After performing the tuck and reaching back out move back to face the ground and rotate into a side plank on the other side to perform the oblique knee tuck.

Do not rush this move. Take it slow to really stabilize and feel those obliques and glutes working!

So How Can You Modify This Move?

Adding movement to a plank exercise creates a new stability challenge. And side planks themselves are already very challenging.

You do not want ego to get in the way. So just because you can do a full plank from the ground, doesn’t mean you’ve necessarily earned this variation. 

The rotation into the side plank and then supporting yourself with only your bottom leg as you tuck the top leg, requires more strength and stability than we realize. 

If you find yourself losing balance or rushing, try first modifying with your elbow up on a bench, stair or incline. 

By lifting up your elbow, you reduce the resistance on your upper body and put less strength demands on your entire core. 

I prefer the incline to modify because it allows you to learn to engage everything down to your feet. 

When you do a knee plank variation, you don’t learn how to create tension into your lower leg.

As you build up and get comfortable with the movement pattern, you can move back to the ground. 

We have to remember it isn’t just strength sometimes but that mind-body connection we first need to work on with movements. We need to build that smooth coordination and get muscles engaged efficiently and correctly to progress.

So slow things down and use that incline.

However, if you find that you can do the full plank off the ground but that you lose balance as you alternate sides, you can even modify by doing one side at a time. 

Just rotate from that front plank to the same time to help you maintain that balance. Then after all reps are complete, switch to the side plank on the other side.

Now what if due to injury, an incline variation still isn’t right for you?

Because I know that not every move is right for every person, I wanted to share some tips to help you learn how to adjust any moves you ever need… 

So my secret to modifying moves?

Not being married to an exercise and instead always prioritizing the muscles I need to train and movement patterns I want to work on.

With this plank with oblique knee tuck, I always want to first see how I can simply regress the exact movement. 

But when this isn’t possible, I go back to why the move was being used in the first place.

Was it that I wanted rotational core work? That extra oblique and glute medius work? That lateral flexion?

When you have a goal for every move you include, you can easily swap in another move or moves that achieve those same goals whenever you need. 

If you did still want a balance and stability component while working on that lateral crunch, but that didn’t require strain on the shoulders, maybe you include a standing oblique knee tuck where you stay balanced on one side. 

Or maybe you wanted more of the rotational element to target your obliques and glutes unilaterally but can’t get down on the ground so you include a cable hip rotation. 

The point is, when modifying, you aren’t as much concerned with the exact exercise as the GOAL for the movement.

And whenever possible, you keep the exercise as close as possible to train that exact movement, build the mind-body connection and build up. 

But when that isn’t possible, you simply stay focused on the goal for including the move so you can see the same benefits!

There is always a way to find a movement variation to match our needs and goals. 

That’s why I love this amazing plank with oblique knee tuck when you want to work your glutes and obliques even more. 

And the rotational movement and lateral flexion are a great way to target your core in multiple planes of motion.

But if you can’t get down on the ground to enjoy this amazing plank move, give these non-floor core moves a try.

–> Non Floor Core Moves

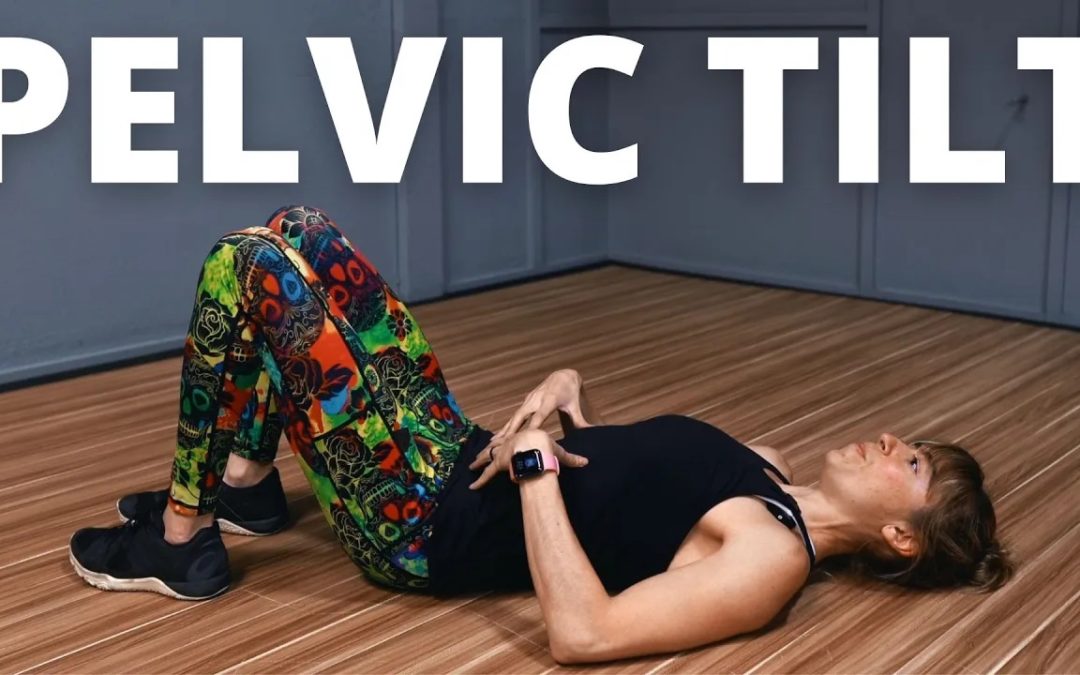
How To Do The Pelvic Tilt Exercise (And SHOULD You?)

How To Do The Pelvic Tilt Exercise (And SHOULD You?)

The pelvic tilt…

How can you use this amazing move and progress this exercise to build a stronger core?

And why has this move received some hate in recent years?

Let’s break down the pelvic tilt progression and when and how to use it!

This exercise is a great way to learn to brace your abs and protect your lower back during core work

If you’ve ever felt your lower back or hips during crunches or leg lowers, Leg Raises you want to master this movement.

It will even help you better engage your glutes during moves like the glute bridge or other activation exercises. And it is a great way to target that lower portion of the rectus abdominis even more aka work those lower abs!

To learn the basic pelvic tilt engagement…

Lie on your back on the ground and take a deep inhale.

As you exhale, tuck your hips up toward your ribs, focusing on pulling each side of your pelvis in toward each other and up toward your ribs.

You want to focus on engaging those abs through that exhale as you tuck. You will feel the space between your lower back and the ground go away.

You should also feel your glute max engage with the tuck.

Hold here for a 3-5 count then relax.

Learning this engagement is key.

It helps you learn to control that spinal flexion as you progress to leg lower exercises and even progress your planks.

And if you’ve ever had lower back pain and feeling your back during glute bridges, hip thrusters or other glute activation movements, using the pelvic tilt can help you better engage your glutes during these moves without your lower back taking over!

Now, before I go over the full progression and how to master that double leg lower exercise we see in so many workout routines…

I want to touch on why people are against using the pelvic tilt exercise.

And it relates back to bracing during lifting and even the ability to maintain a neutral spine.

During lifting exercises, such as the squat and deadlift, you do not want that posterior pelvic tilt. This can lead to overload of your lower back.

And daily excessive posterior pelvic tilt posture can have a negative impact just like excessive anterior pelvic tilt can.

But this doesn’t mean the move is bad.

It just means you have to understand WHY and WHEN to use it.

Improper implementation of any exercise, using a move we haven’t earned even, can lead to issues.

While you may focus on that forceful exhale like you’re being punched in the gut to brace during heavy lifts, you do want to know how to engage through that posterior pelvic tilt to better use those intrinsic core stabilizers and even activate your glutes during prehab work and those floor core moves.

Our spines are MEANT to flex and posterior pelvic tilt is an action we want to know how to control using our abs while disengaging our hip flexors and back.

This is why you want to focus on building up through the posterior pelvic tilt progression instead of just jumping into those double leg lowers you can’t control.

So how can you progress the pelvic tilt and what are three of my favorite moves using it that aren’t part of this progression?

To progress the posterior pelvic tilt, you will want to start with a march Single Leg March from this basic position. From here you can progress to a double knee tuck. 

Then you can go to a single straight leg lower Single Leg Lower before a full double leg lower.

You only want to progress though as you can truly control the move.

If you start to feel your lower back lifting or your hip flexors are doing all of the work, stop and reset or regress the move.

While the leg raises and lowers are going to involve your hip flexors since they are movement at the hip, you want to feel your abs bracing the movement.

To help yourself check your engagement through this progression, place a towel under your back and hold the other end in your hand. 

You can then give it a slight tug to see if it stays pinned as you progress. This helps you double check you’re maintaining that tilt.

And make sure you don’t hold your breath. You want to exhale to help you brace as you lower a leg down or both down.

Once you’ve gone through this progression, you are never above those foundational variations but you may find you start to include other leg lower variations like flutters or criss crosses or even that full hollow body hold I love to call the banana!

Three other uses of the pelvic tilt I love are…

The dolphin plank, the hanging pelvic tilt and the glute bridge.

Dolphin Plank: 

The dolphin plank is a great variation to add movement to your basic forearm front plank and will help you learn to engage your abs to power spinal flexion but also avoid unwanted spinal extension.

You will use the posterior pelvic tilt as you round up in the plank and then you will fight the urge to extend your lower back as you allow your hips to sink toward the ground.

This is a killer anti-extension plank option. And you can modify it by holding a plange plank or by doing what I like to call the vomiting cat from your hands and knees. 

This is NOT that cat cow stretch.

The reason I call it the vomiting cat is you want to round up and draw your abs in as if coughing up a hairball. That hollowing out of your stomach is what really engages your abs.

Hanging Pelvic Tilt:

The hanging pelvic tilt is a great way to advance the pelvic tilt and really learn to control hanging ab exercises like knees to elbows.

Too often with knees to elbows and even leg raises, we let our hip flexors take over or really start to swing and lose control.

By first learning to do the hanging pelvic tilt, we can learn to start that engagement with our abs!

Really focus on pulling down on that bar as you tuck your pelvis toward your ribs!

Glute Bridge: 

I want to mention the glute bridge as well because of the impact that the posterior pelvic tilt can have on our glutes.

That pelvic tilt can help us better activate our glute max which is key if we are struggling with feeling our lower back or even our hamstrings take over during our glute work.

So if you even feel your lower back when trying to do weight glute bridges or hip thrusters, make sure you aren’t arching but instead starting the move with this tilt.

This helps you also focus more on true hip extension.

Too often with bridging we lift up higher and don’t realize we are actually getting the extra range of motion from our backs, not by actually fully extending our hips.

When you start with the pelvic tilt, you help yourself focus just on true hip extension using your glutes!

And learning to use the pelvic tilt during moves like this is especially a win win if you’re rebuilding post-partum. 

Bonus Tips:

I did also want to include just a few extra tips, especially if you are using this move to rebuild after lower back injury or pregnancy…

If you are rebuilding your core strength after having a baby, make sure you roll onto your side before lying on your back over just lying back.

And make sure you only progress the pelvic tilt as you are able to control your abs and avoid them doming out.

You may also find it easier to engage your ab and even your pelvic floor by also engaging your adductors.

If you’re struggling with that brace, consider squeezing a ball or block between your knees.

This squeeze can really help you stay focused on that tension. 

And do not hold your breath!

Use the pelvic tilt exercise to better brace your abs and build a strong core!