10 Minutes To Improve Your Posture
Whether you have a desk job, a long commute, work on your laptop on the couch, text on your phone as you walk, watch TV…you’re spending probably way too much time in flexion.
You’re hunched over, your head is forward, your hips, knees, elbows and even wrists are bent….
And then you start to suffer from aches and pains…Your neck, shoulder, back, hips, knees….
You get massages and maybe even see a chiropractor. Yet the aches and pains just continue to come back and maybe even start getting worse.
Your workouts suffer and you either feel limited in what you can do or you start to notice things aren’t working correctly and you’re getting injured.
Guess what?
This all has to do with your posture!
You know what makes all of this even worse? People then think they simply can no longer do the things they love. They think they’ll just end up injured again if the run or lift or cycle.
And while that is partly true, it isn’t because you can’t get back to doing the things you love. You don’t need to give those things up!
Instead of giving up the activities you love, you need to first do things to improve your posture. If you solve the real problem, you can get back to being active.
But if you never solve the actual problem, you’re just going to have to keep avoiding activities and exercises. And avoidance solves nothing. It may seemingly prevent injury, but not for long.
At some point there will be a “straw that breaks the camel’s back” and your poor posture and imbalances and compensations will lead to injury. And you’ll still suffer from aches and pains.
So stop avoiding the problem and solve it. Allow those massages and adjustments to stick by working to loosen, activate and strengthen the correct muscles and improve your posture so you move and feel better!
Try this quick 10-Minute Core Workout using my RStoration method from my 21-Day RStoration Workout Program!
The Core Focused Posture Workout
This posture workout is focused on strengthening your core and on mobilizing and activating everything between your shoulders and your knees. It should take 10 minutes and can be done as a warm up or as something separate from your workout (which is ideal).
Tools Needed: Ball or Roller, Towel
Set a timer for 30 seconds for each move (or per side) for the first two circuits. Then complete the reps/time as listed for the third circuit.
CIRCUIT #1 – 1 round
Chest Foam Rolling
Bicep Foam Rolling
Quad Foam Rolling
CIRCUIT #2 – 1 round
Lying Chest Stretch with Scorpion
Rotational Half Kneeling Hip and Quad Stretch
CIRCUIT #3 – 2 rounds
5 reps per side Sit Thru to Thoracic Bridge
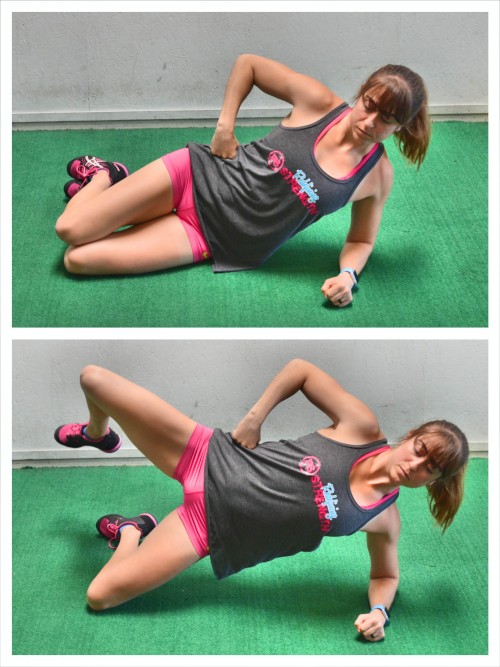
10 reps per side Side Plank Clams
30 seconds Forearm Front Plank Hold
–> If you’re sick of aches and pains and ready to commit 10 minutes a day for 21 days to improve your posture and prevent injury, click HERE! <–
EXERCISE DESCRIPTIONS:
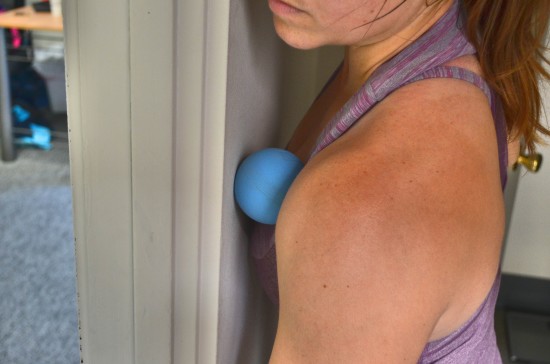
Chest Foam Rolling – To roll out your chest in a doorway, it is best to use a smaller, harder ball. Stand facing the wall besides the doorway and place the ball between your chest and the wall. You want to be right on the edge of the wall so that you can extend your arm forward through the doorway. Start with the ball in your chest besides your shoulder and below your collarbone. Press into the ball and raise the arm on the side you are digging into up toward the ceiling and back down. Because you are in a doorway, you can raise the arm straight out in front of you as you swing the arm very slowly up toward the ceiling and down toward the ground. Hold on any tight spots as you move your arm. You can also roll the ball along the muscles below your collarbone and even down around your shoulder toward your armpit. Hold on any tight spots you find and even lift and lower your arm. Then switch and do the other side.
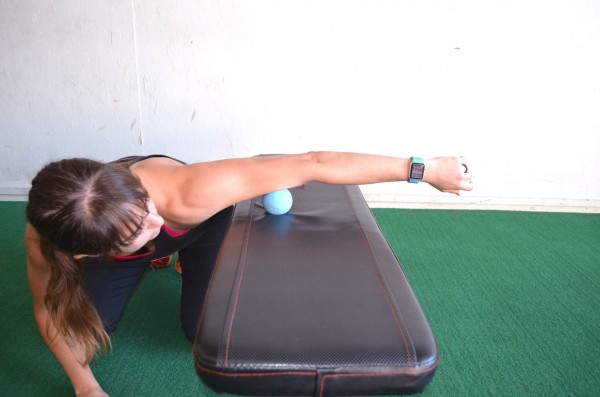
Bicep Foam Rolling – To roll out your biceps, you will place a ball or roller up on a table or desk like you did to roll out your triceps. You will then rotate your chest toward the ground and place your bicep down on the roller or ball right above the inside of your elbow. Rock slightly side to side to dig out your bicep. Hold if you find an especially tight spot and even flex and relax your bicep by flexing and extending your elbow if your desk or table allows. Then move the roller higher up your bicep toward your shoulder. Again rock side to side and hold on any tight spots. If you don’t have a table or desk you can use, you can also do this against a wall although you may not be able to flex and extend your arm then.
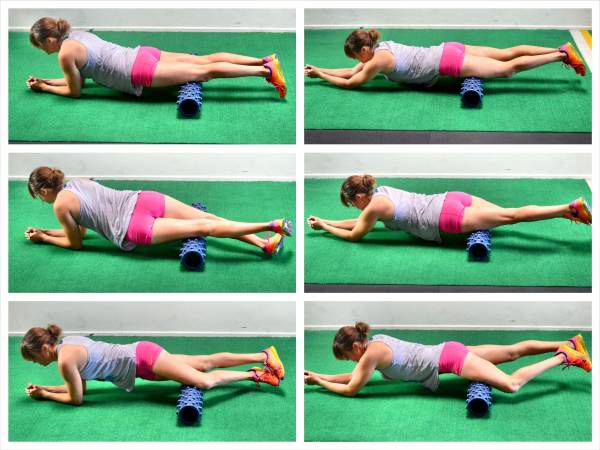
Quad Foam Rolling – To roll out your Quads, take the foam roller and lay over it as if you are about to do a plank. Start with the roller right above your knees. Rock side to side and then move it up a little higher on the front of your legs. As you rock and move the roller higher, make sure to pause and hold on any extra tight spots until the pain lessens a bit. Work your way all the way up to your hips. If you find any tight spots, while you hold on them, flex and relax your quad to help the tight spots loosen. To apply more pressure, place only one leg down on the roller and rock side to side, holding on any extra tight spots.
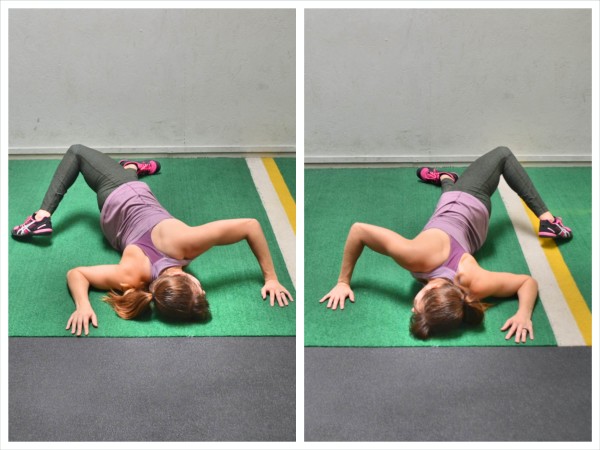
Lying Chest Stretch with Scorpion – To do the Lying Chest Stretch with Scorpion, lie on your belly with your arms out straight at shoulder height. Bend the elbow of one arm to 90 degrees so that your upper arm is in line with your shoulder. Then lift the opposite leg from the bent arm up and bend your knee to kick your foot over and behind you to try to touch the toe down to the ground behind you. As you rotate your leg over, press your chest open with your straight arm. Feel a stretch through the chest and shoulder on the side you are kicking toward. You will also feel a stretch through your low back. Make sure that as you rotate open and kick the leg back over your body that you relax your head down onto the ground. Hold for a second or two then bend the other arm and kick the other leg back and over. Alternate sides, holding for a second or two each way.
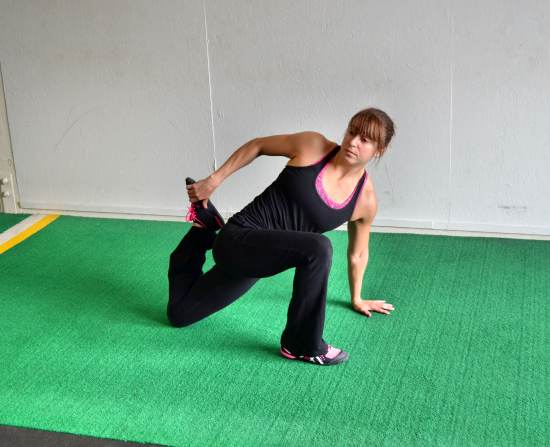
Rotational Half Kneeling Hip and Quad Stretch – To do the Rotational Half-Kneeling Hip and Quad Stretch, set up in a half kneeling position with your right leg forward. Then place your left hand on the ground and lean forward. Reach back with your right hand and grab your left foot. Pull your foot in toward your butt as you drive your hip forward. Feel a stretch down your hip and quad. As you press your hip forward, rotate your chest open toward your front leg. You may also feel a stretch through your spine and down the outside of that front leg. Hold here and breathe as you relax deeper into the stretch. You can also open your knee outward to stretch into your adductor or rotate your knee inward to hit your TFL. Beginners may need a towel or stretch strap to help them do this stretch as it requires more flexibility to reach around and grab the leg with the rotation.
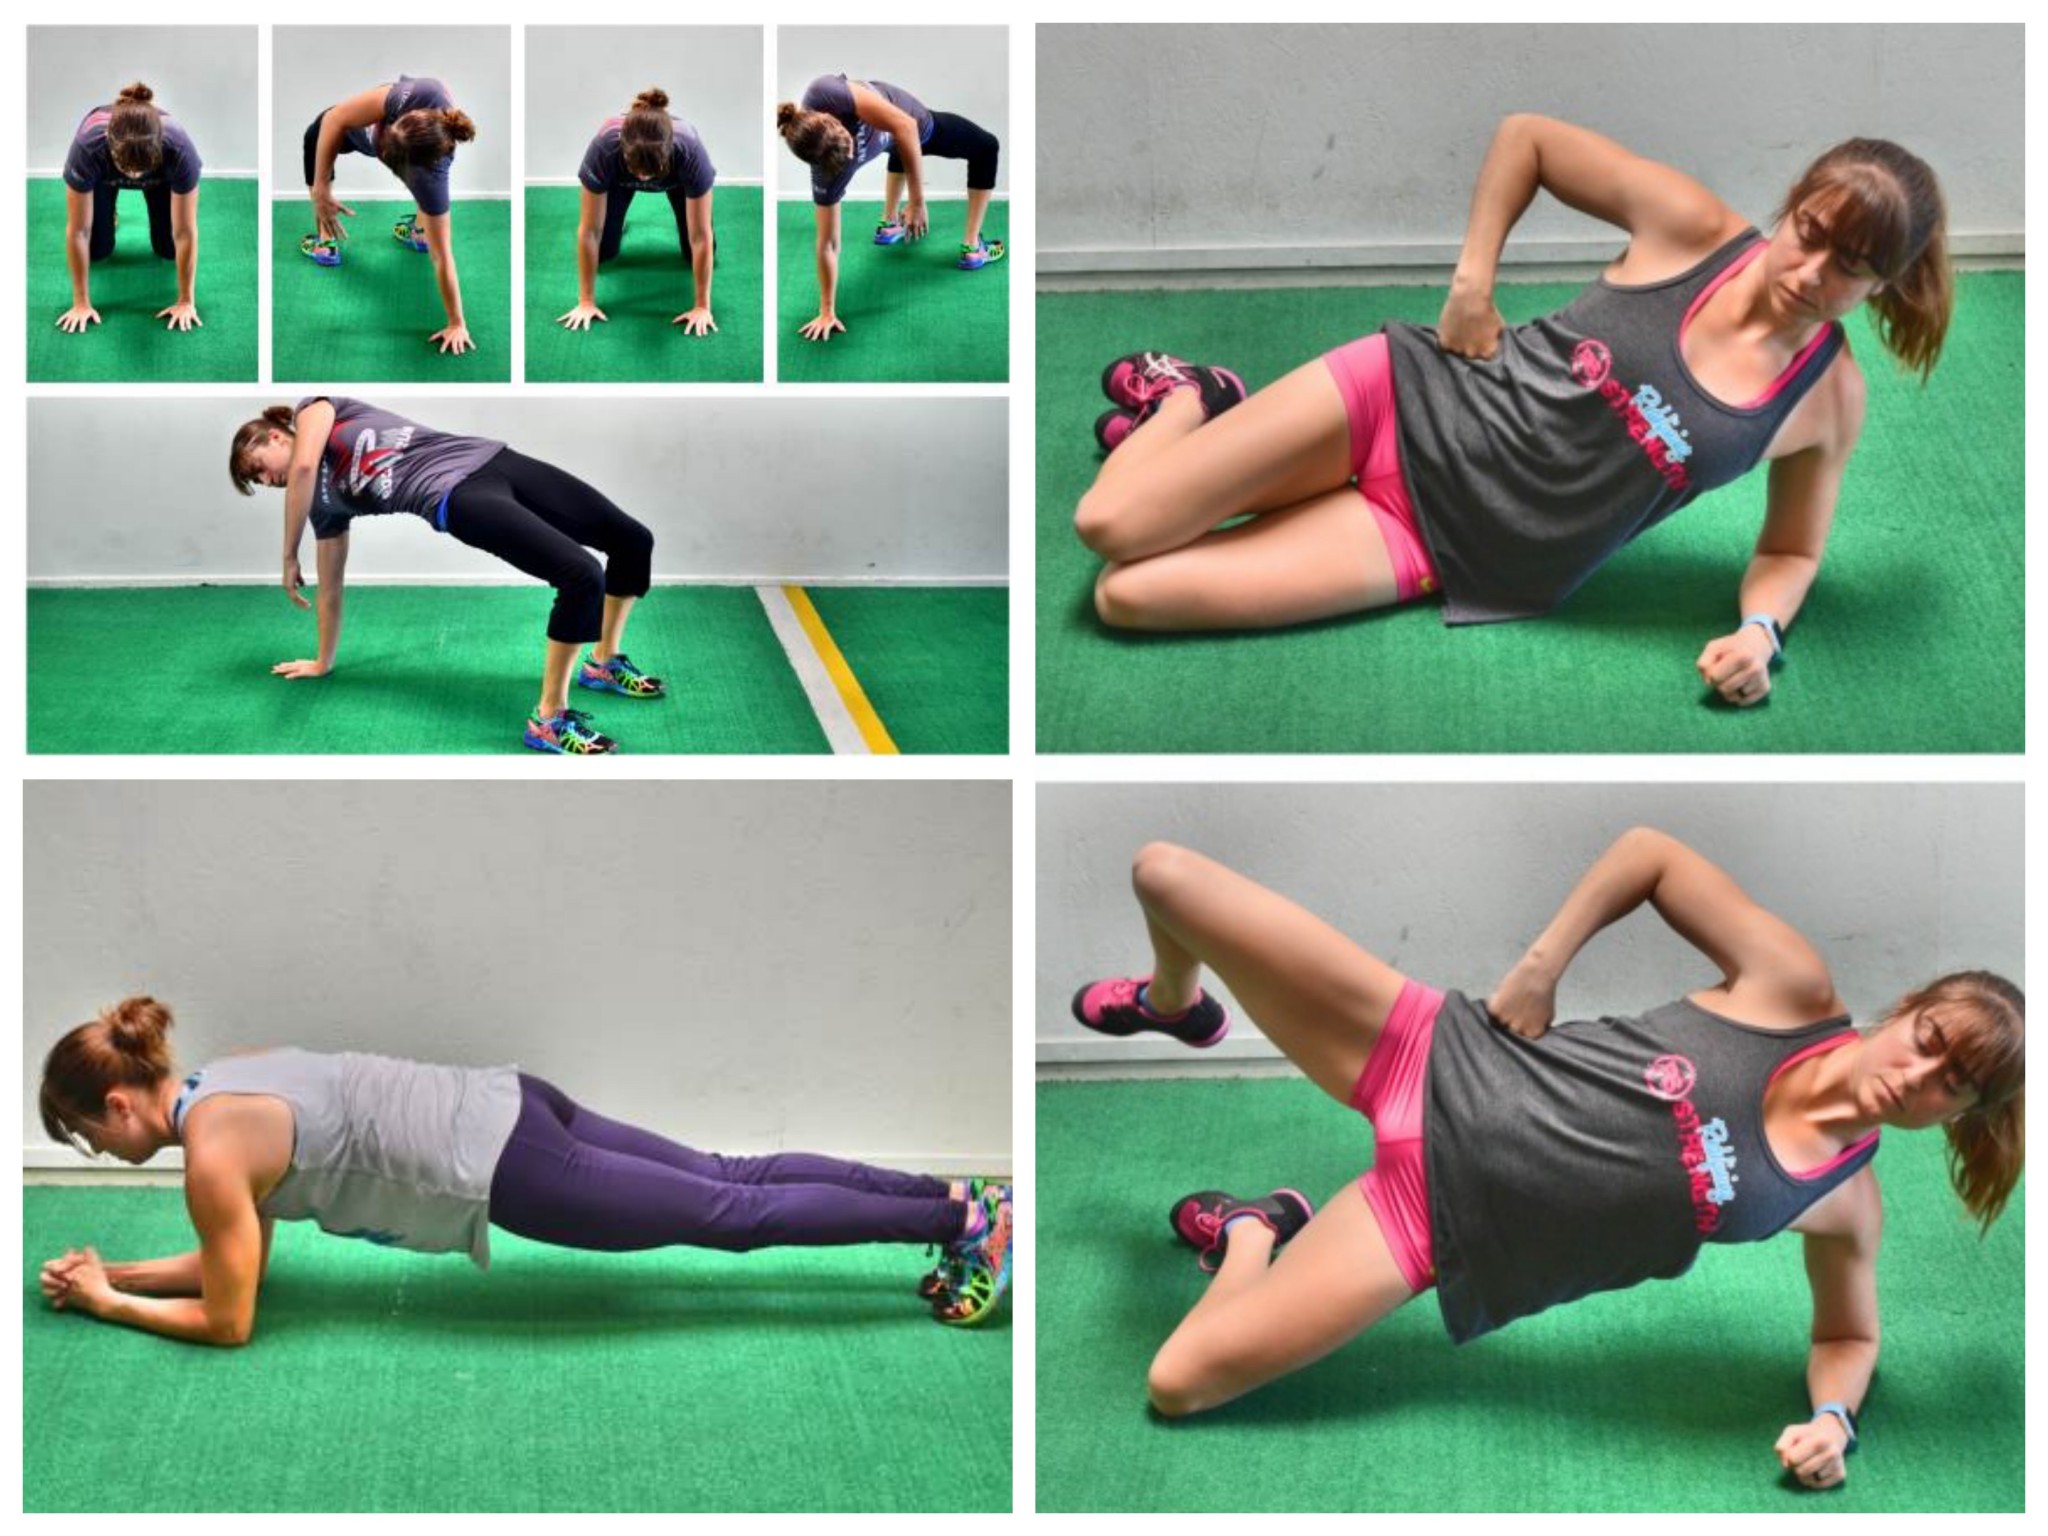
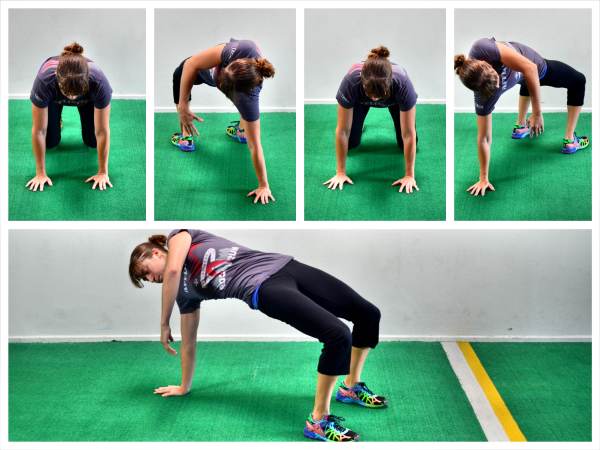
Sit Thru to Thoracic Bridge – To do the Sit Thru to Thoracic Bridge, start on your hands and knees with your hands under your shoulders and your knees under your hips. Flex your feet and lift up onto your hands and the balls of your feet. Then lift your right hand up and bring your left leg under your body and through and place your left foot flat on the ground. Rotate your hips up toward the ceiling, squeezing your glutes to lift them up as high as you can. Really try to open your hips up toward the ceiling and squeeze your glutes to fully extend your hips. With your hips lifted, reach your right hand down toward the ground, rotating your chest toward the floor. Really reach your hand toward the ground as the rest of your body opens toward the ceiling to feel a nice stretch as you rotate. Feel your glutes working to keep BOTH hips up, while you reach your hand down. Don’t let your hips drop as you rotate. You should feel a nice rotation and stretch through your spine. You are twisting almost like someone wringing out a towel. Make sure though that you aren’t hyperextending your low back to bridge up but are instead squeezing your glutes. Then drop your hips and step your foot back through while placing your hand back down on the ground. Rotate to the other side, bridging your hips up as high as you can. (Click here for a video – shown at 1:39)
Side Plank Clams – To do the Side Plank Clam, lie on your side propped up on your forearm with your elbow underneath your shoulder. Bend your knees so that your feet and lower legs are behind you. You can place your top hand on your hip or reach it up toward the ceiling, but don’t touch it down to the ground. With your legs stacked, lift your hip up off the ground, driving through your knee and forearm. As you lift your hips up, lift your top leg up and toward the ceiling, keeping the knee bent. Open up as high as you can then lower the leg back down. As you lower the leg back down, lower your hip back down to the ground. Repeat, lifting up and, as you do, raise your top leg up toward the ceiling. Complete all reps on one side before switching. Make sure you are lifting straight up and not rotating toward the ground or open toward the ceiling. Also keep your elbow under your shoulder and do not get too spread out. When you lift the top leg, don’t rotate open as you do. Really focus on lifting with your glute.
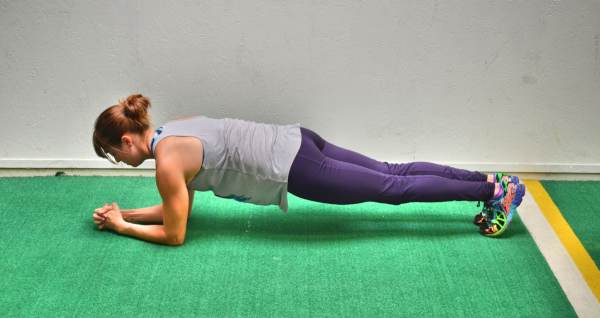
Forearm Front Plank Hold – To do the Basic Forearm Front Plank, lie on your stomach and bend your elbows so that you’re propped up on your forearms. Your legs should be straight out behind you with your feet together. Flex your feet and lift up onto your forearms and toes. Your elbows should be stacked under your shoulders and your feet should be together. On your forearms and toes, create a nice straight line with your body from your head to your heels. Make sure that in this position you are concentrating on tucking your pelvic to engage your abs as you squeeze your glutes and quads to keep your legs straight. Make sure that you are also squeezing your legs together as you hold and driving back through your heels. Do not push forward onto your toes. Also, do not let your chest sag toward the ground or your upper back round. You want a nice flat upper back. Feel your lats engage to pull your elbows down under your shoulders and toward your hips to protect your shoulders. While holding, don’t just go through the motions. Assess whether the right muscles are engaged and even consciously activate them. If you begin to shake, you know you are engaging the muscles. Hold in this position for a set amount of time or until your form starts to break down. If you feel this in your low back, assess whether or not you are performing a proper Pelvic Tilt. Beginners will want to start with a Plank from their knees.