Often people think they can’t workout their legs when they have knee pain.
And while you don’t just want to jump into a lower body strength routine if you aren’t sure what is going on with your knees, there are knee-friendly lower body exercises you can do once you’ve identified the problem and are doing the proper rehab to take care of them.
The exercises below put little to no strain on the knees and also strengthen common areas of weakness that contribute to knee pain….Aka WEAK GLUTES and EXTERNAL ROTATORS!
Using these exercises (along with a proper prehab/rehab routine that includes foam rolling and stretching) you can prevent knee pain from ever returning!
10 Knee Friendly Lower Body Exercises:
1. Glute Bridge (Table Top Bridge, Off Box Bridges, Hip Thrusters):
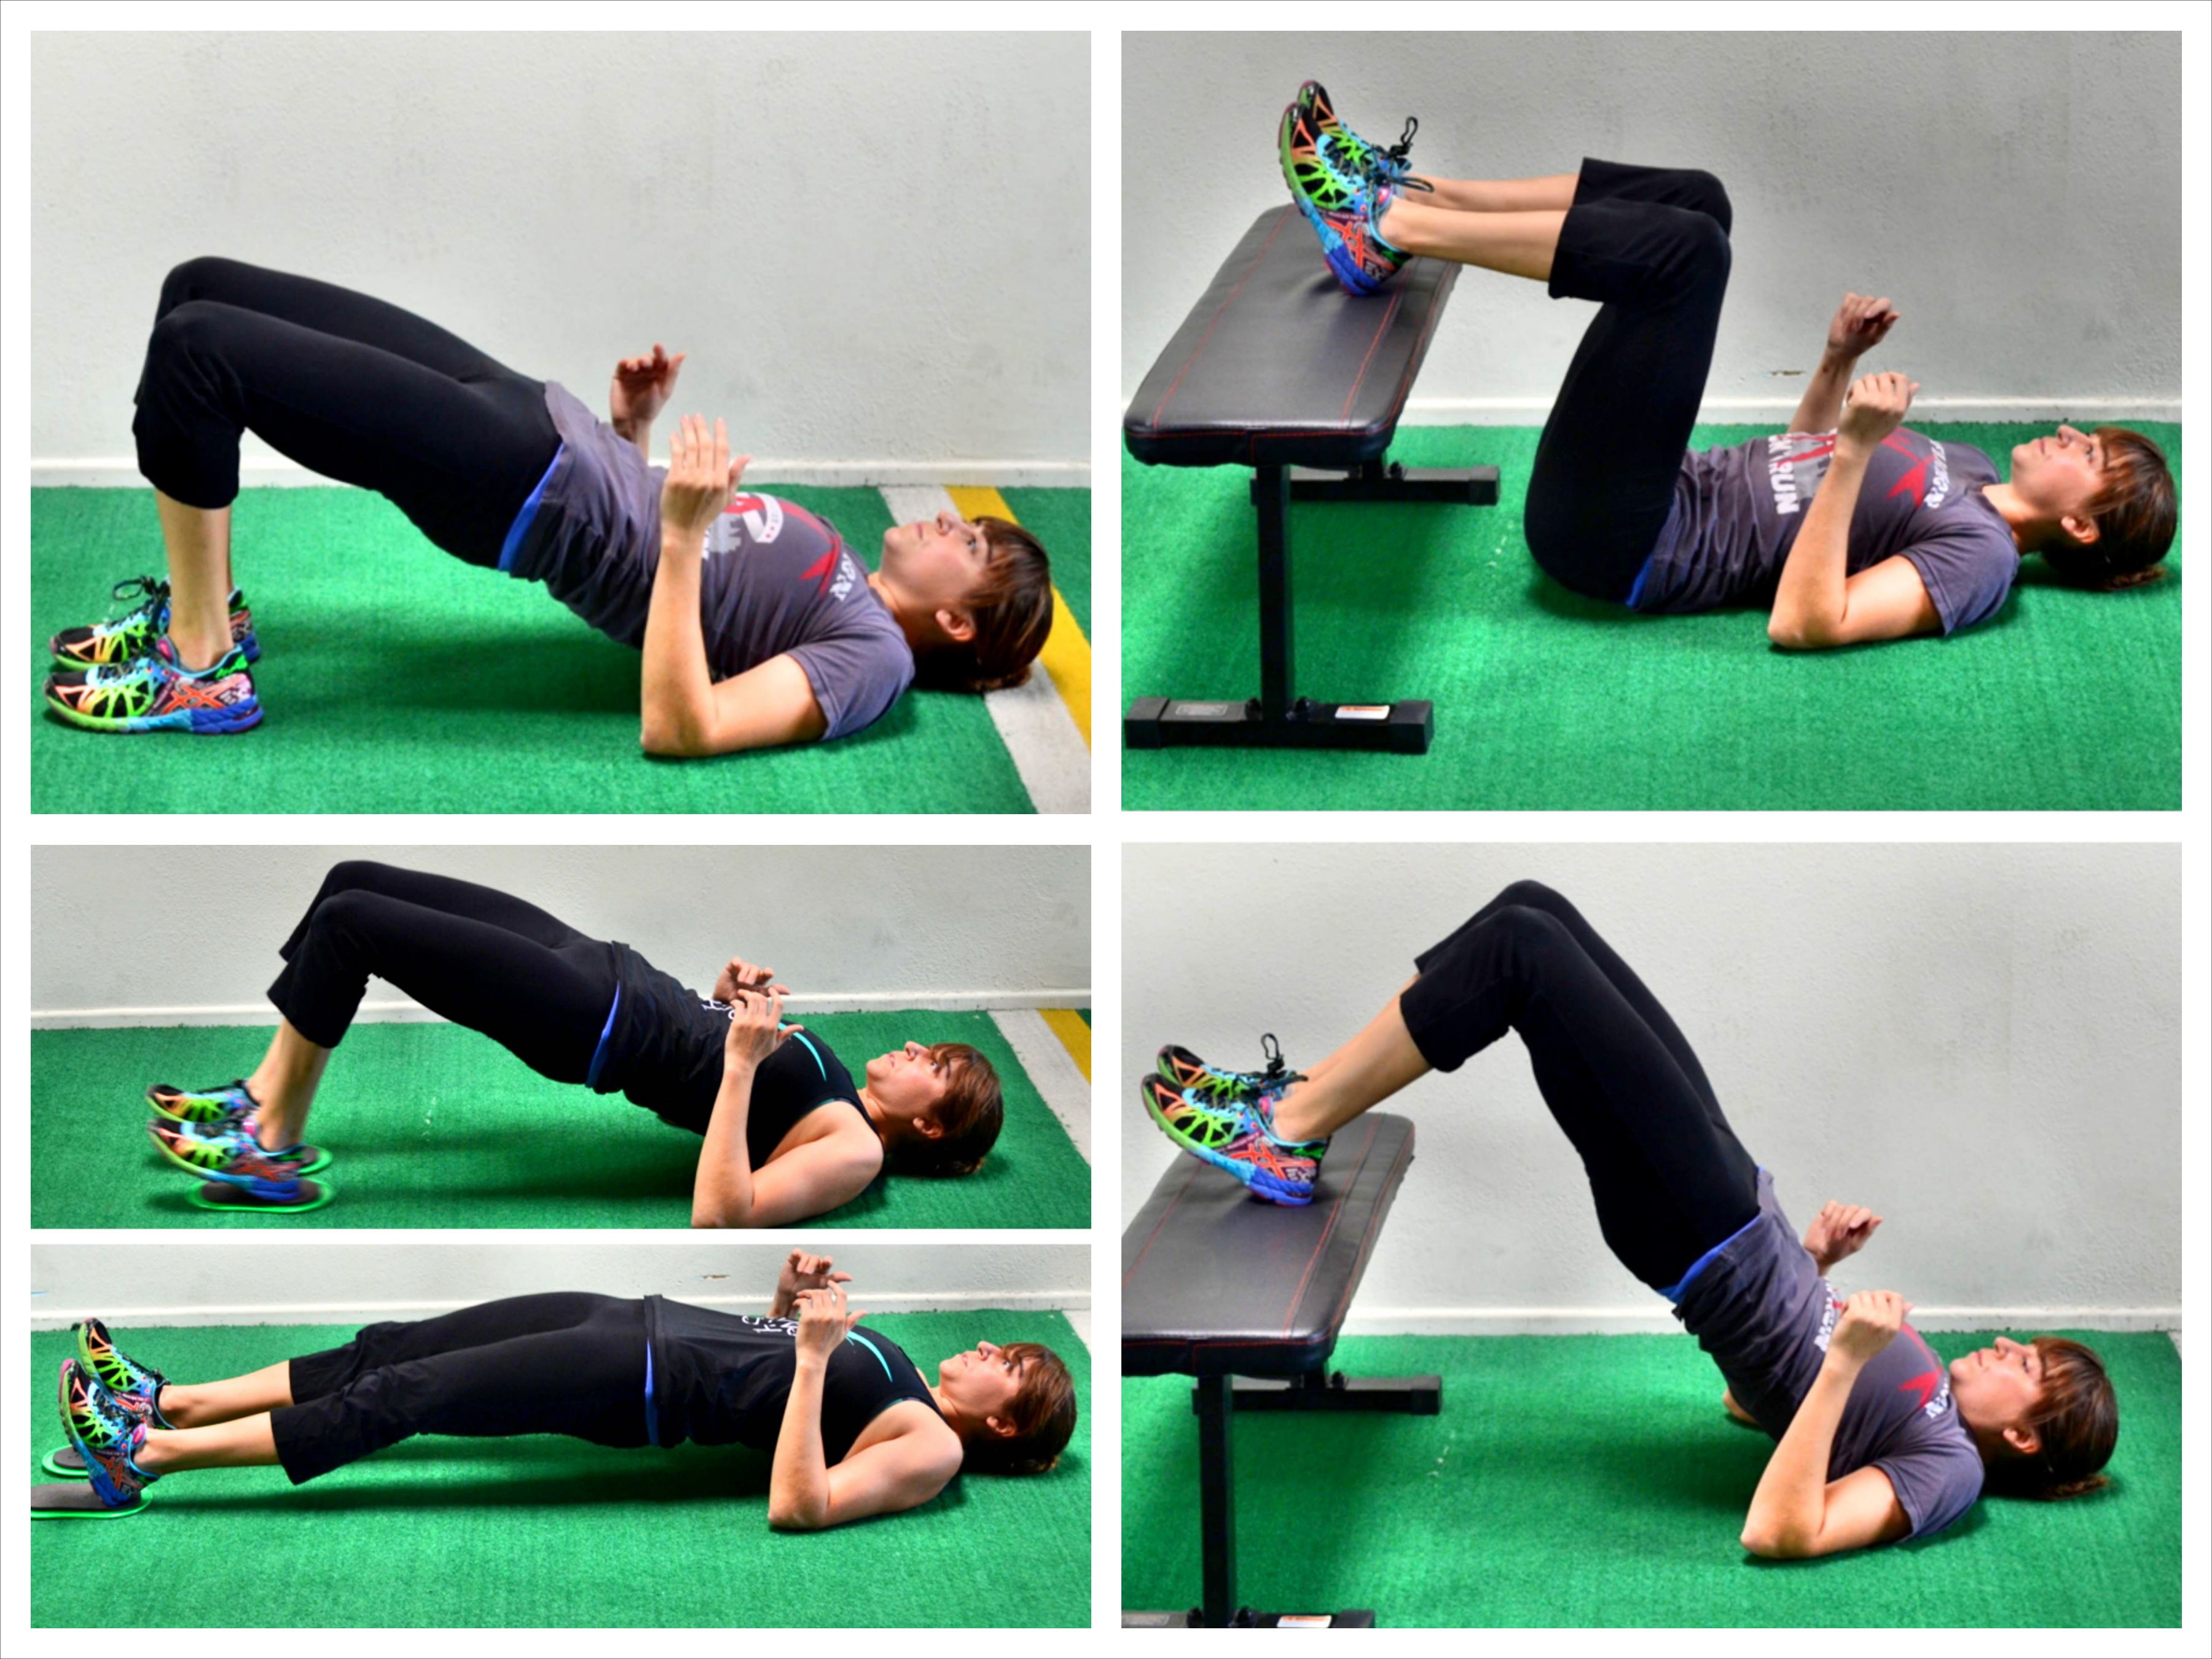
I love glute bridges or any variation of the glute bridge because I think it is probably the best exercise for EVERYONE to do. It strengthens your glutes and hamstrings and opens up your hips while also helping to strengthen your core.
And it is completely KNEE FRIENDLY. It is actually a great rehab/prehab exercise and, depending on the variation you are doing, a great ACTIVATION EXERCISE to include in your warm up!
For instructions on how to do the glute bridge and other variations, check out this Glute Bridge Variations post.
Also, the glute bridge and curl can be a knee-friendly variation; however it is more difficult. For variations of the glute bridge and curl, check out this article!
2. Reverse Hyper:
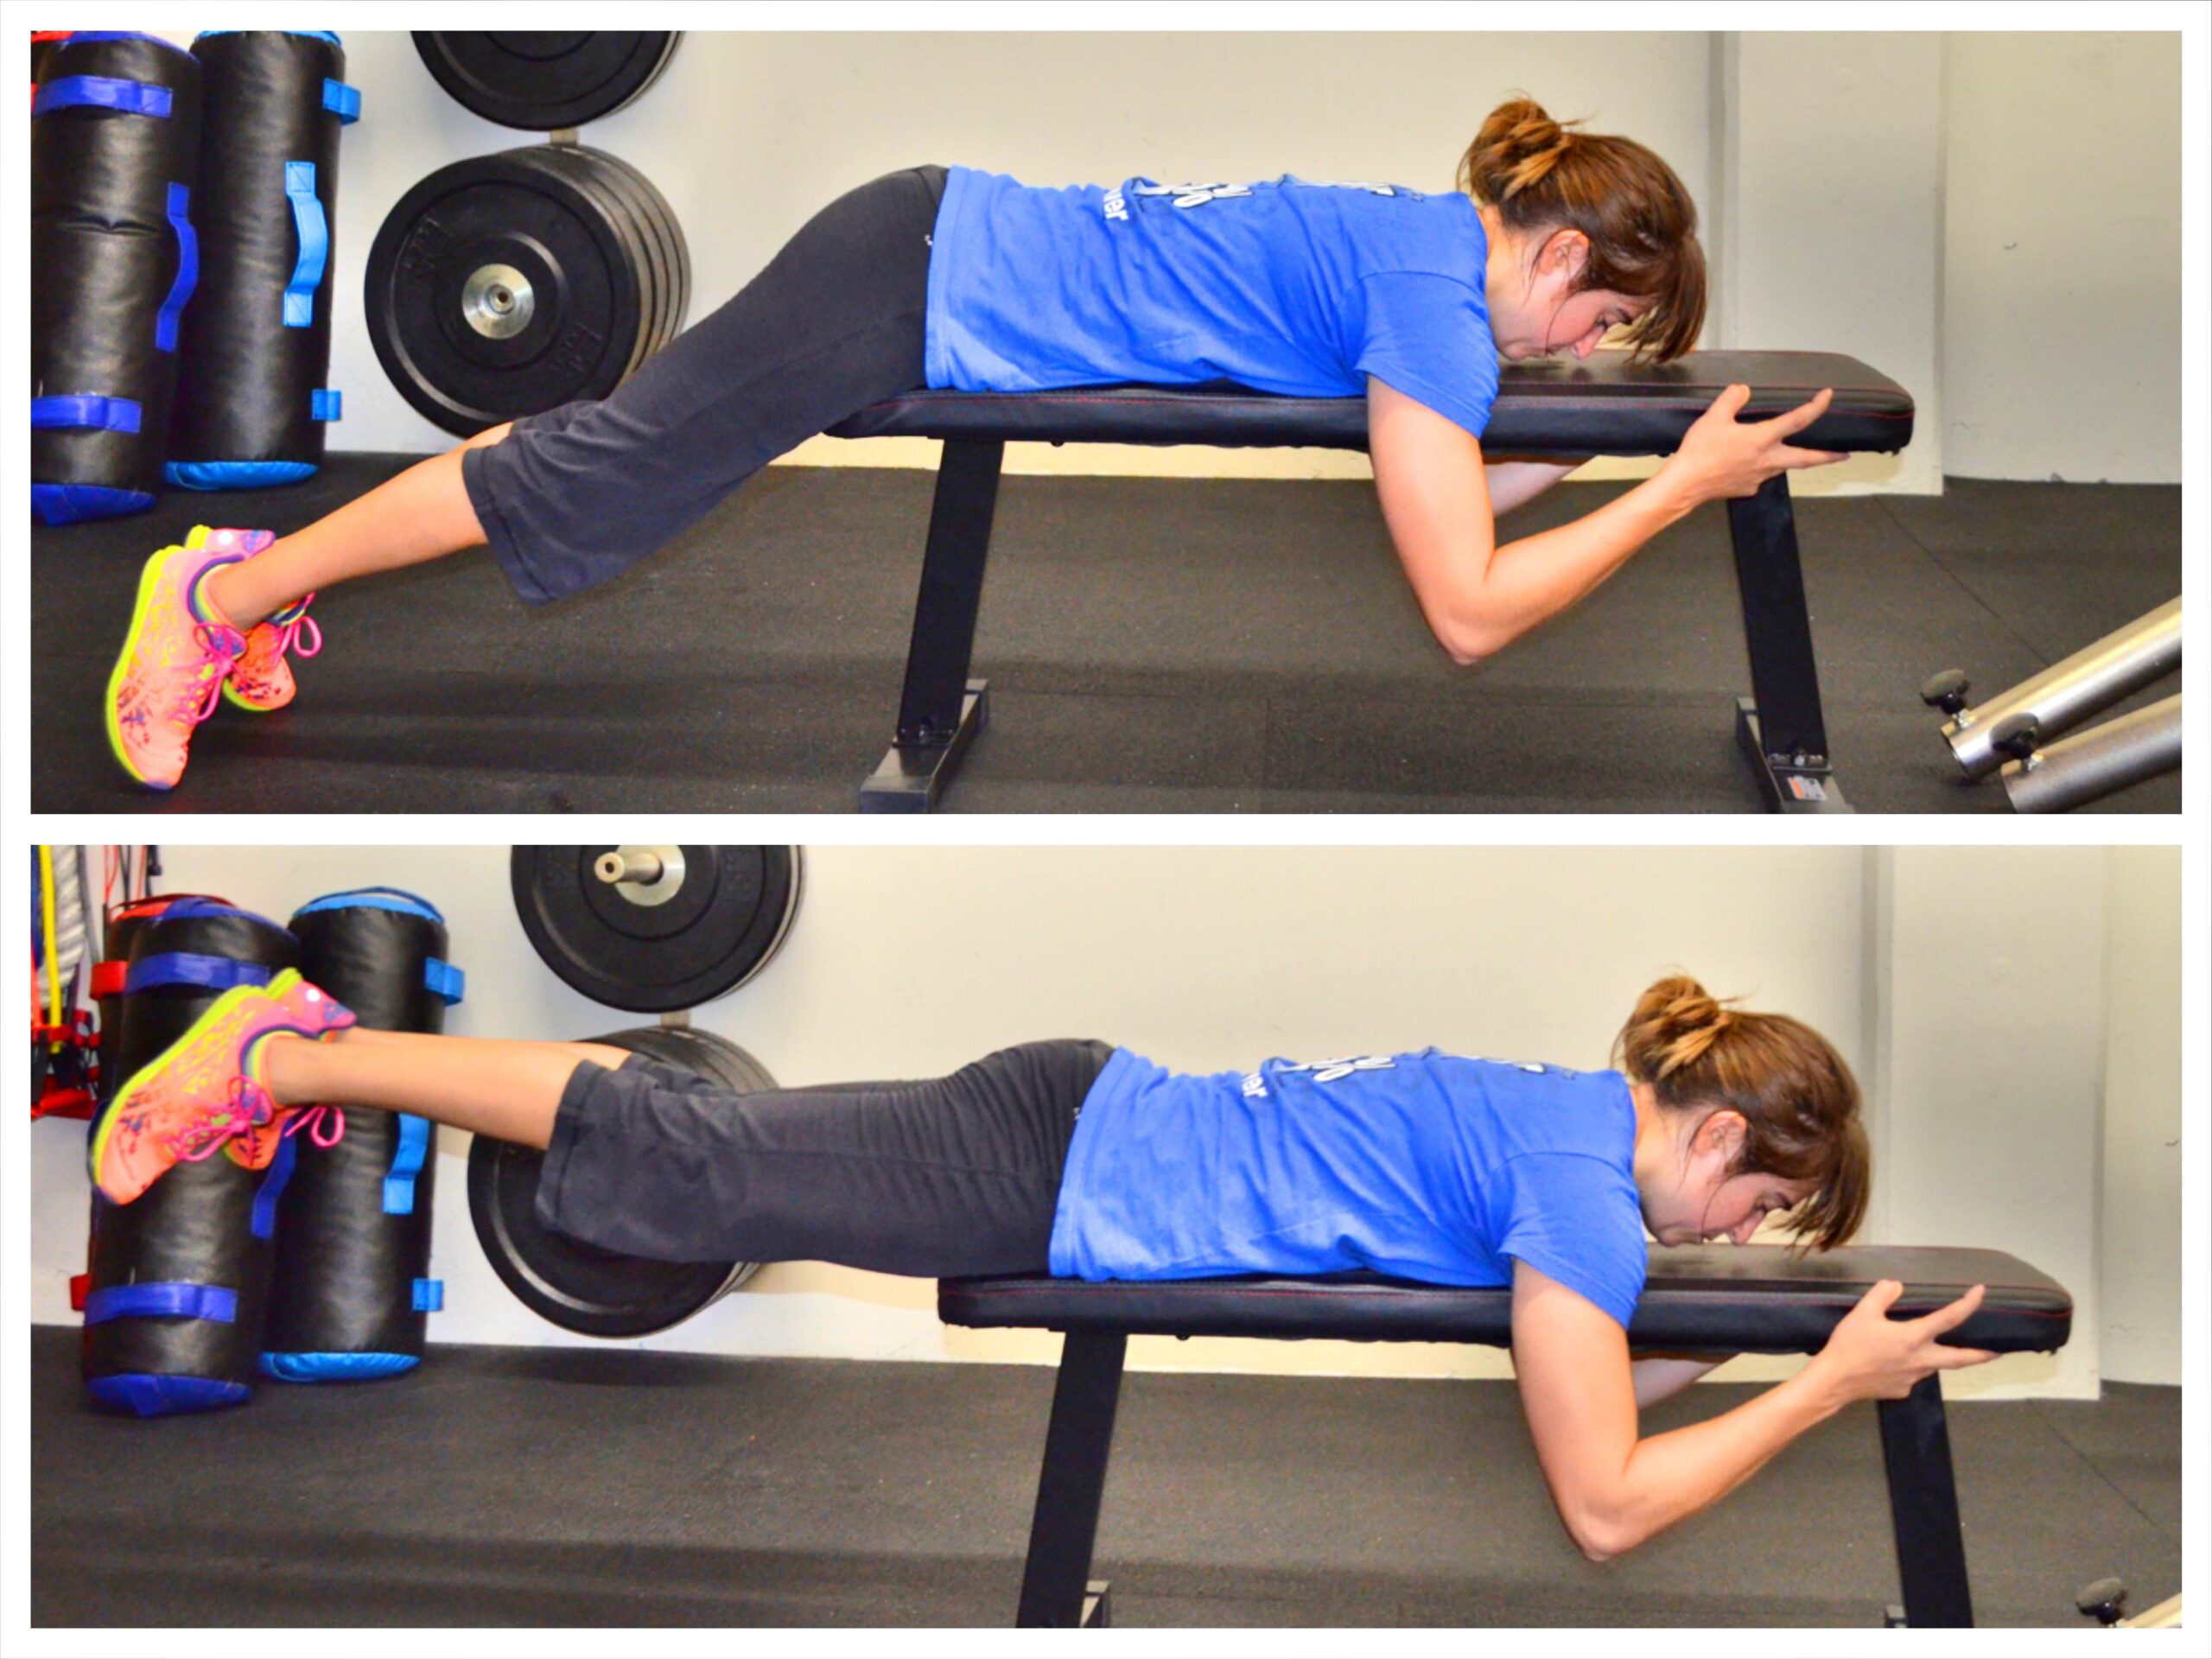
Another great glute exercise, the Reverse Hyper is completely knee-friendly and great for everyone from the beginner to the advanced lifter.
The key with Reverse Hypers is to make sure you hold at the top. Do not rush through this move.
To do the Reverse Hyper, lie face down on a table, bench or box. You want your hips close to the edge. The more your hips are on the box or bench, the easier it will be to keep your core tight and not let the move go into your back. The further off the bench your hips are, the more the move will require your abs to stay engaged to protect your low back.
Hold on to something in front of you if you want. Keep your upper body relaxed. Squeeze your legs together and point your toes out a bit if you are having trouble activating your glutes. Lift your legs to basically parallel to the ground, keeping your legs straight. Do not hyperextend your back and lift way higher than parallel. You do not want to feel this in your low back. Hold for 2-5 seconds and then lower down. Keep your core tight and really squeeze your glutes as you lift.
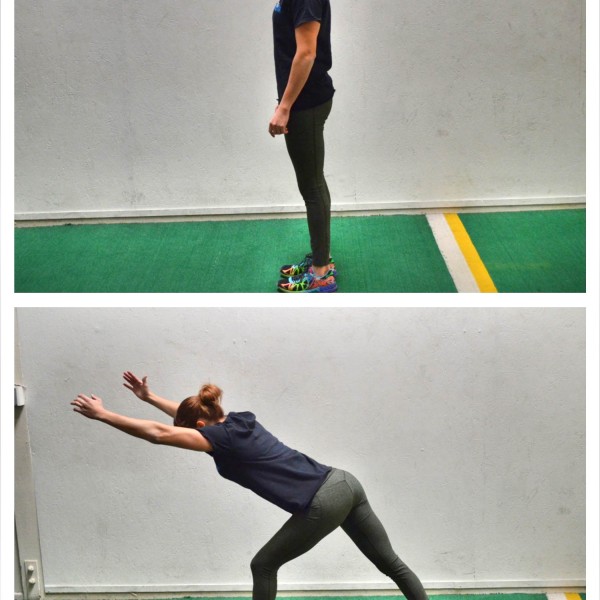
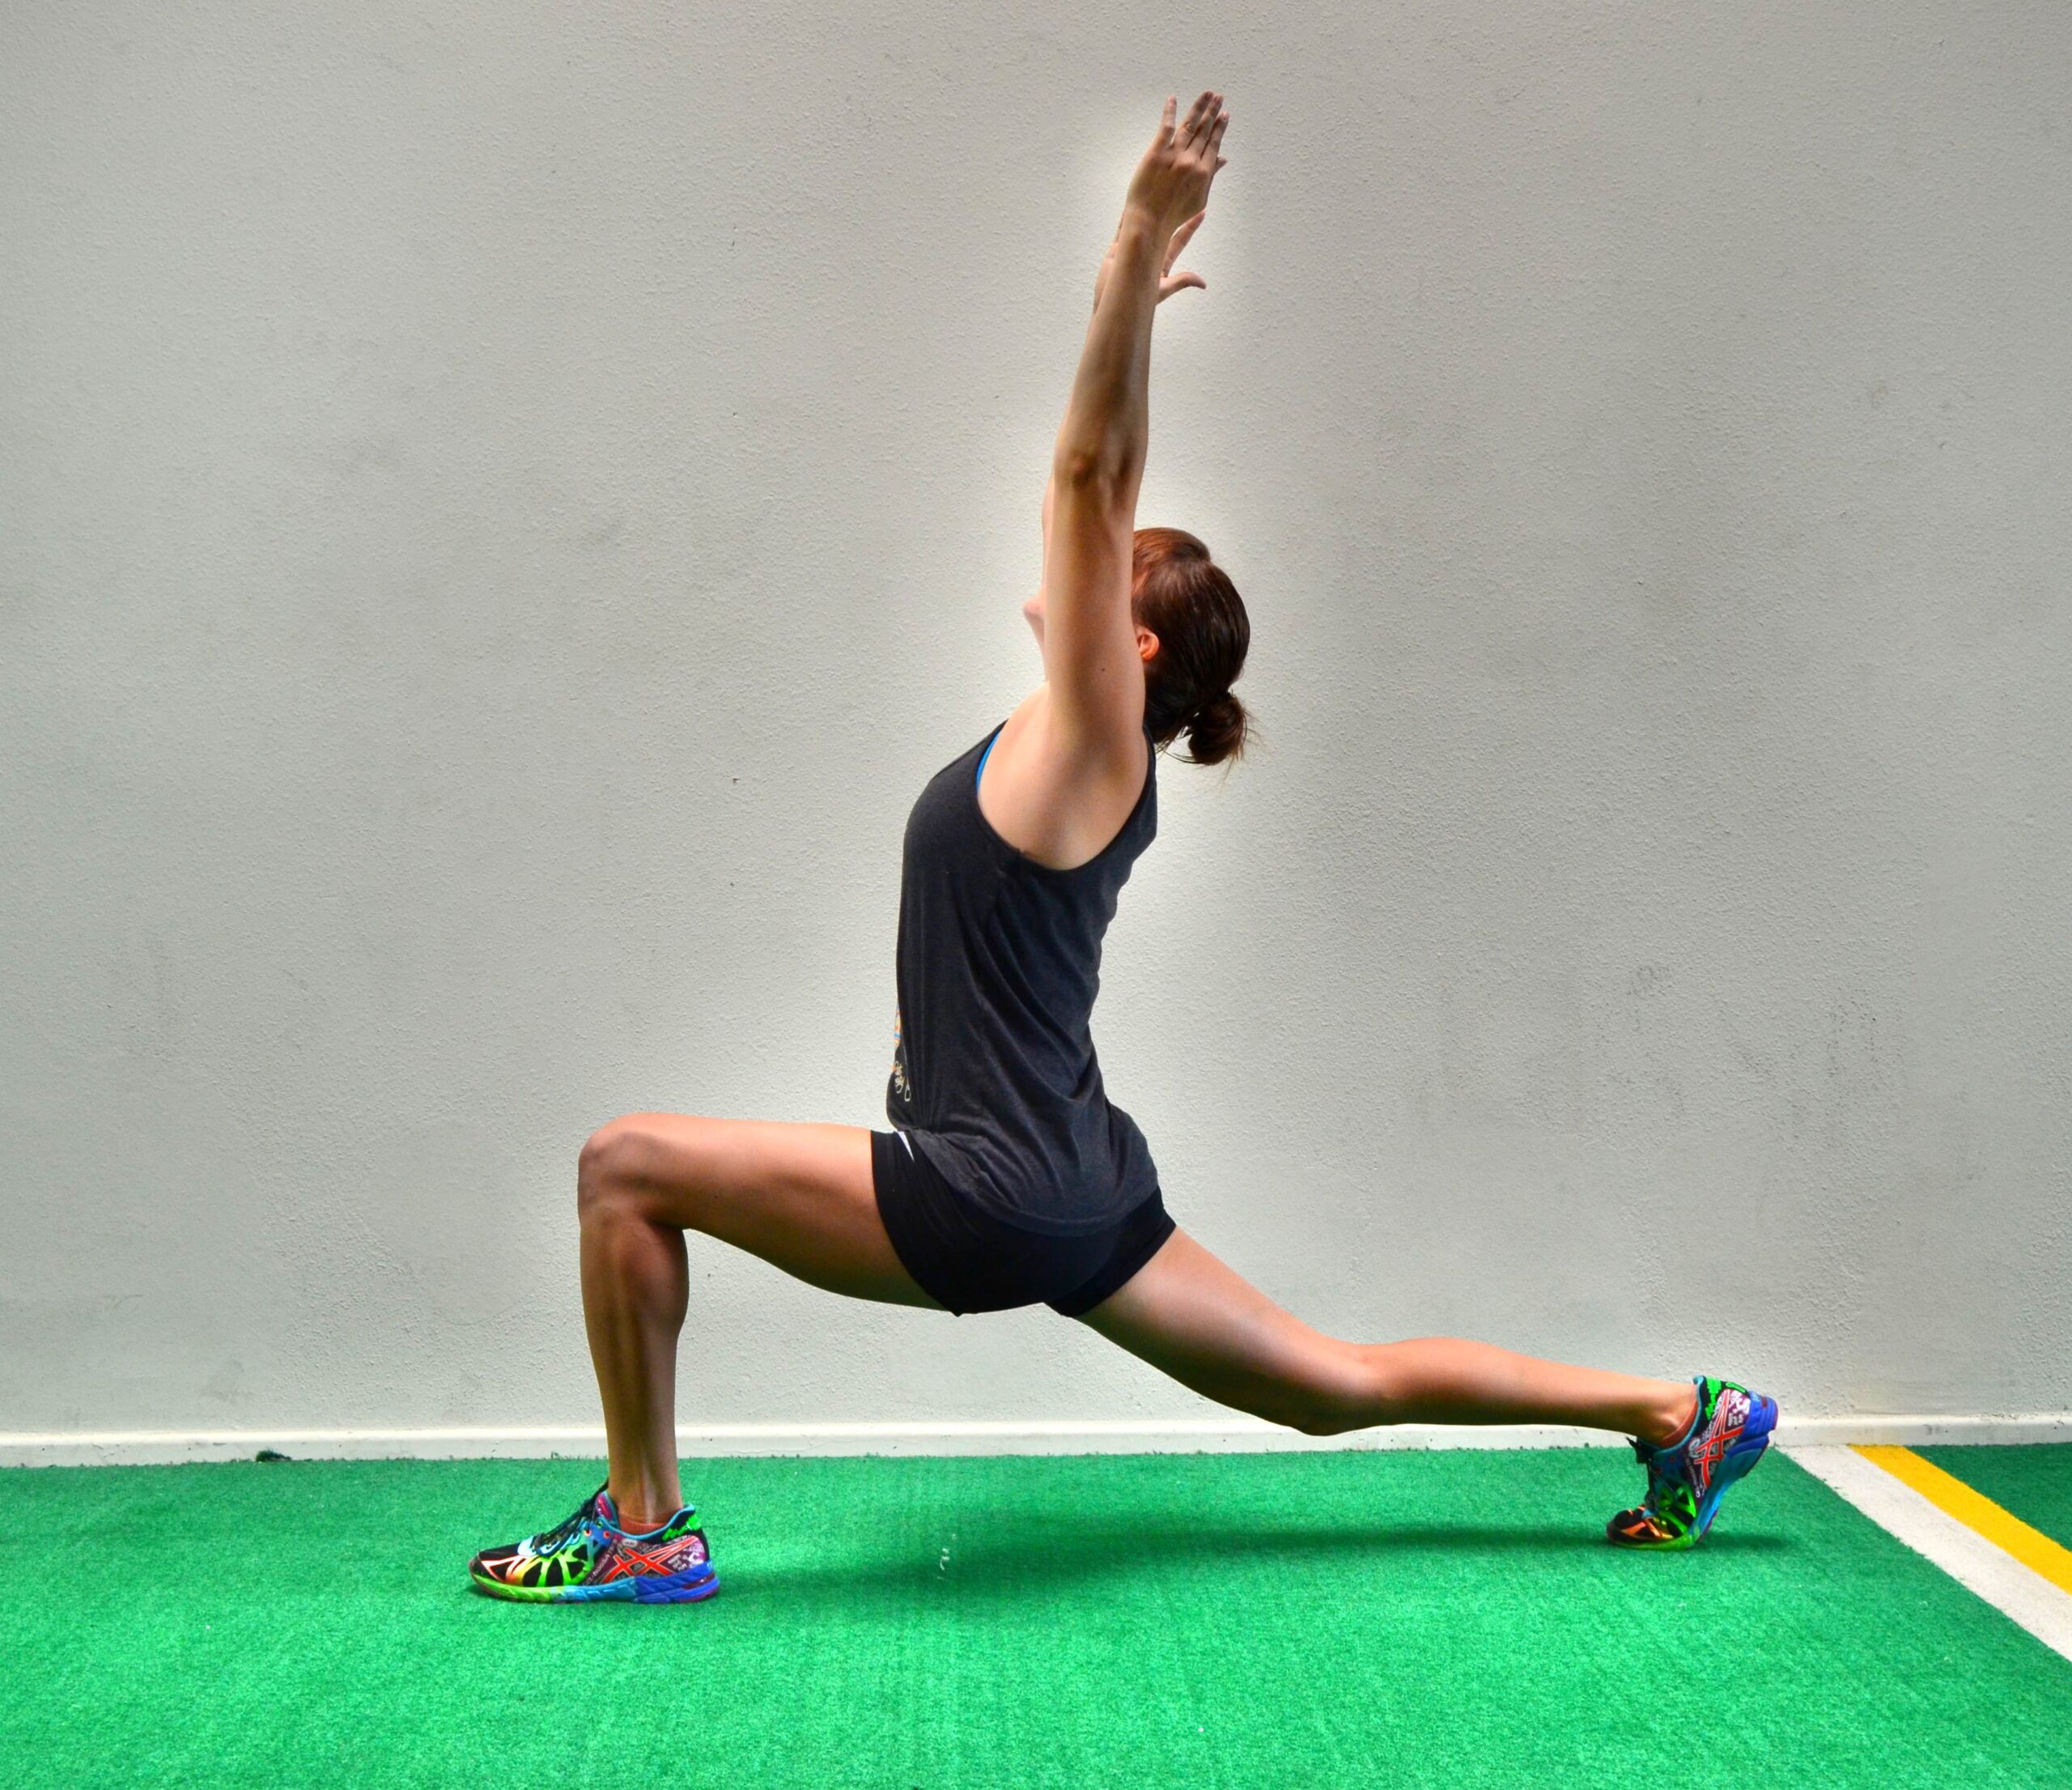
3. Anterior Reach Lunge:
I think one of the hardest things to do when you have knee pain is work your entire leg. It is easy to stay focused on your posterior chain since many of those moves require little to no knee flexion.
BUT with the Anterior Reach Lunge you can work your entire leg and add a bit more variety to your routine. Beginners will want to start with no weight while more advanced exercises will want to weight this down.
Add weight slowly and make sure your form is correct so that you keep this move KNEE FRIENDLY!
To do the Anterior Reach Lunge, Stand with your feet together and take one big step forward. Bend your front knee as you step forward, keeping your front heel down as you lunge forward. You will not bend your front knee to 90 degrees. Do not come up onto your front toe as you lean your torso over keeping your back flat. Keep your weight in your front heel and your back leg straight. Then come back up and step your front foot back. Complete all reps on one side before switching. Beginners will reach their hands overhead when they lunge. Advanced exercisers will hold weights down by their front leg as they lunge forward and hinge over.
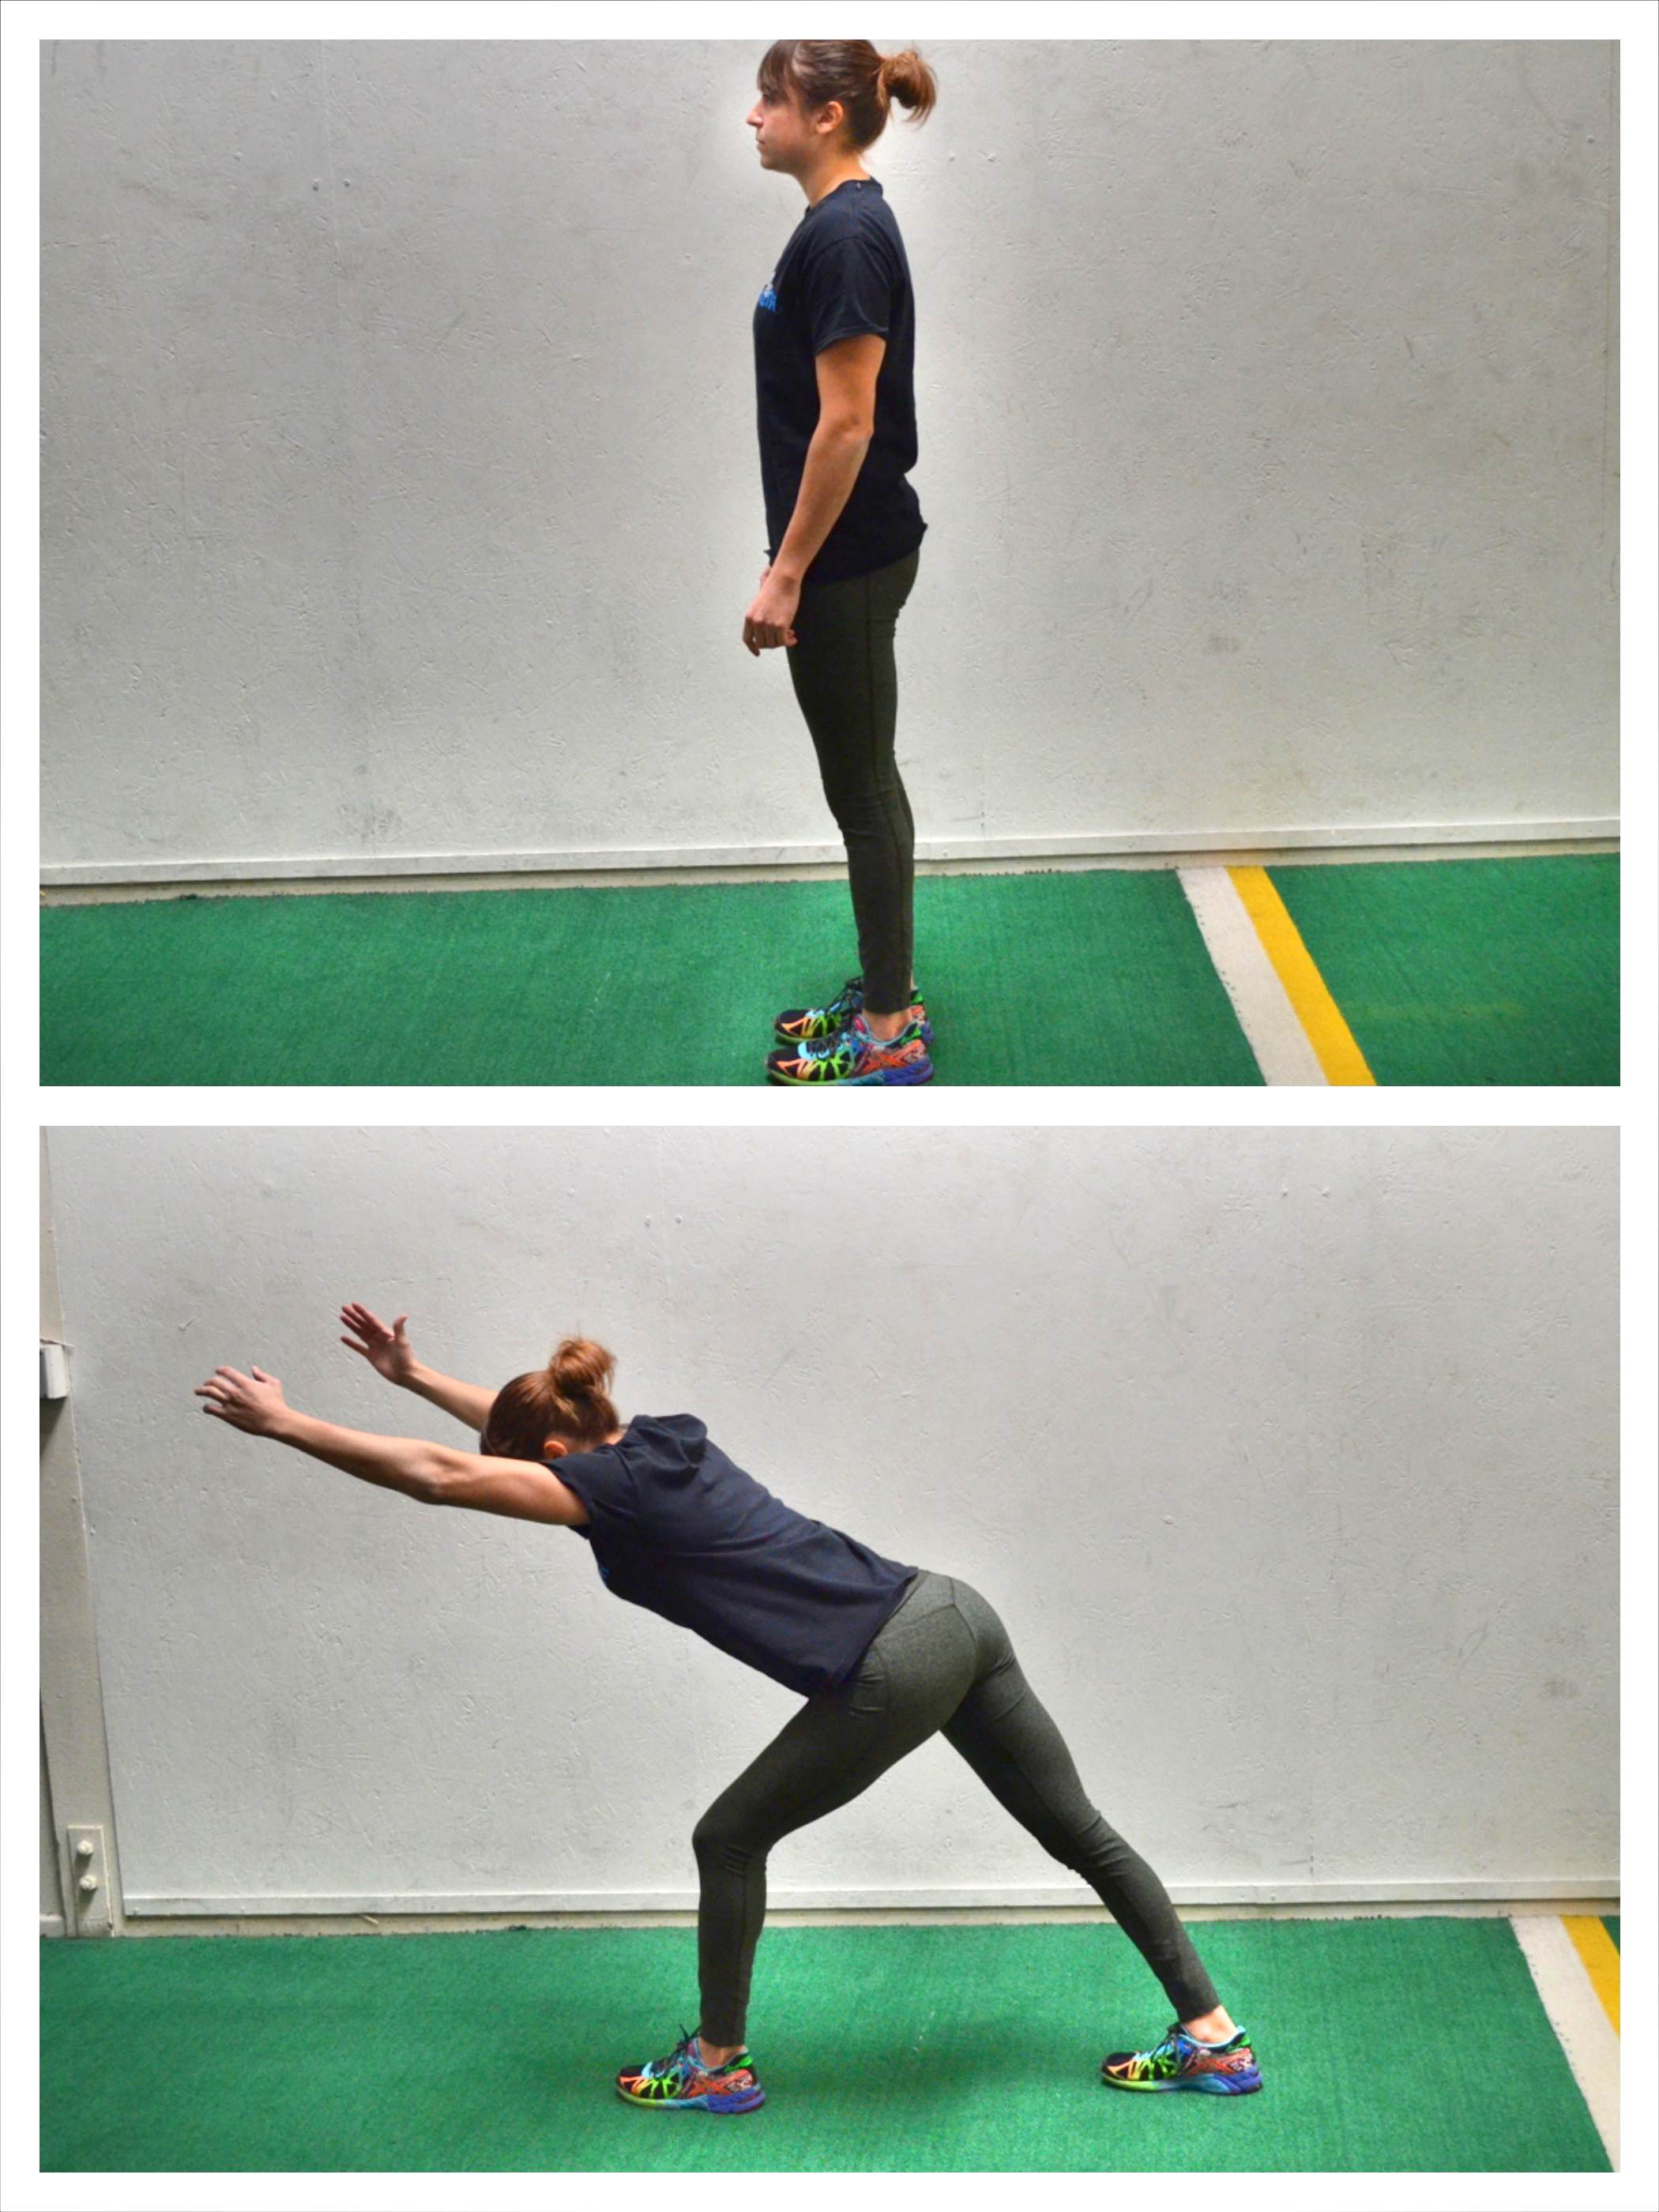
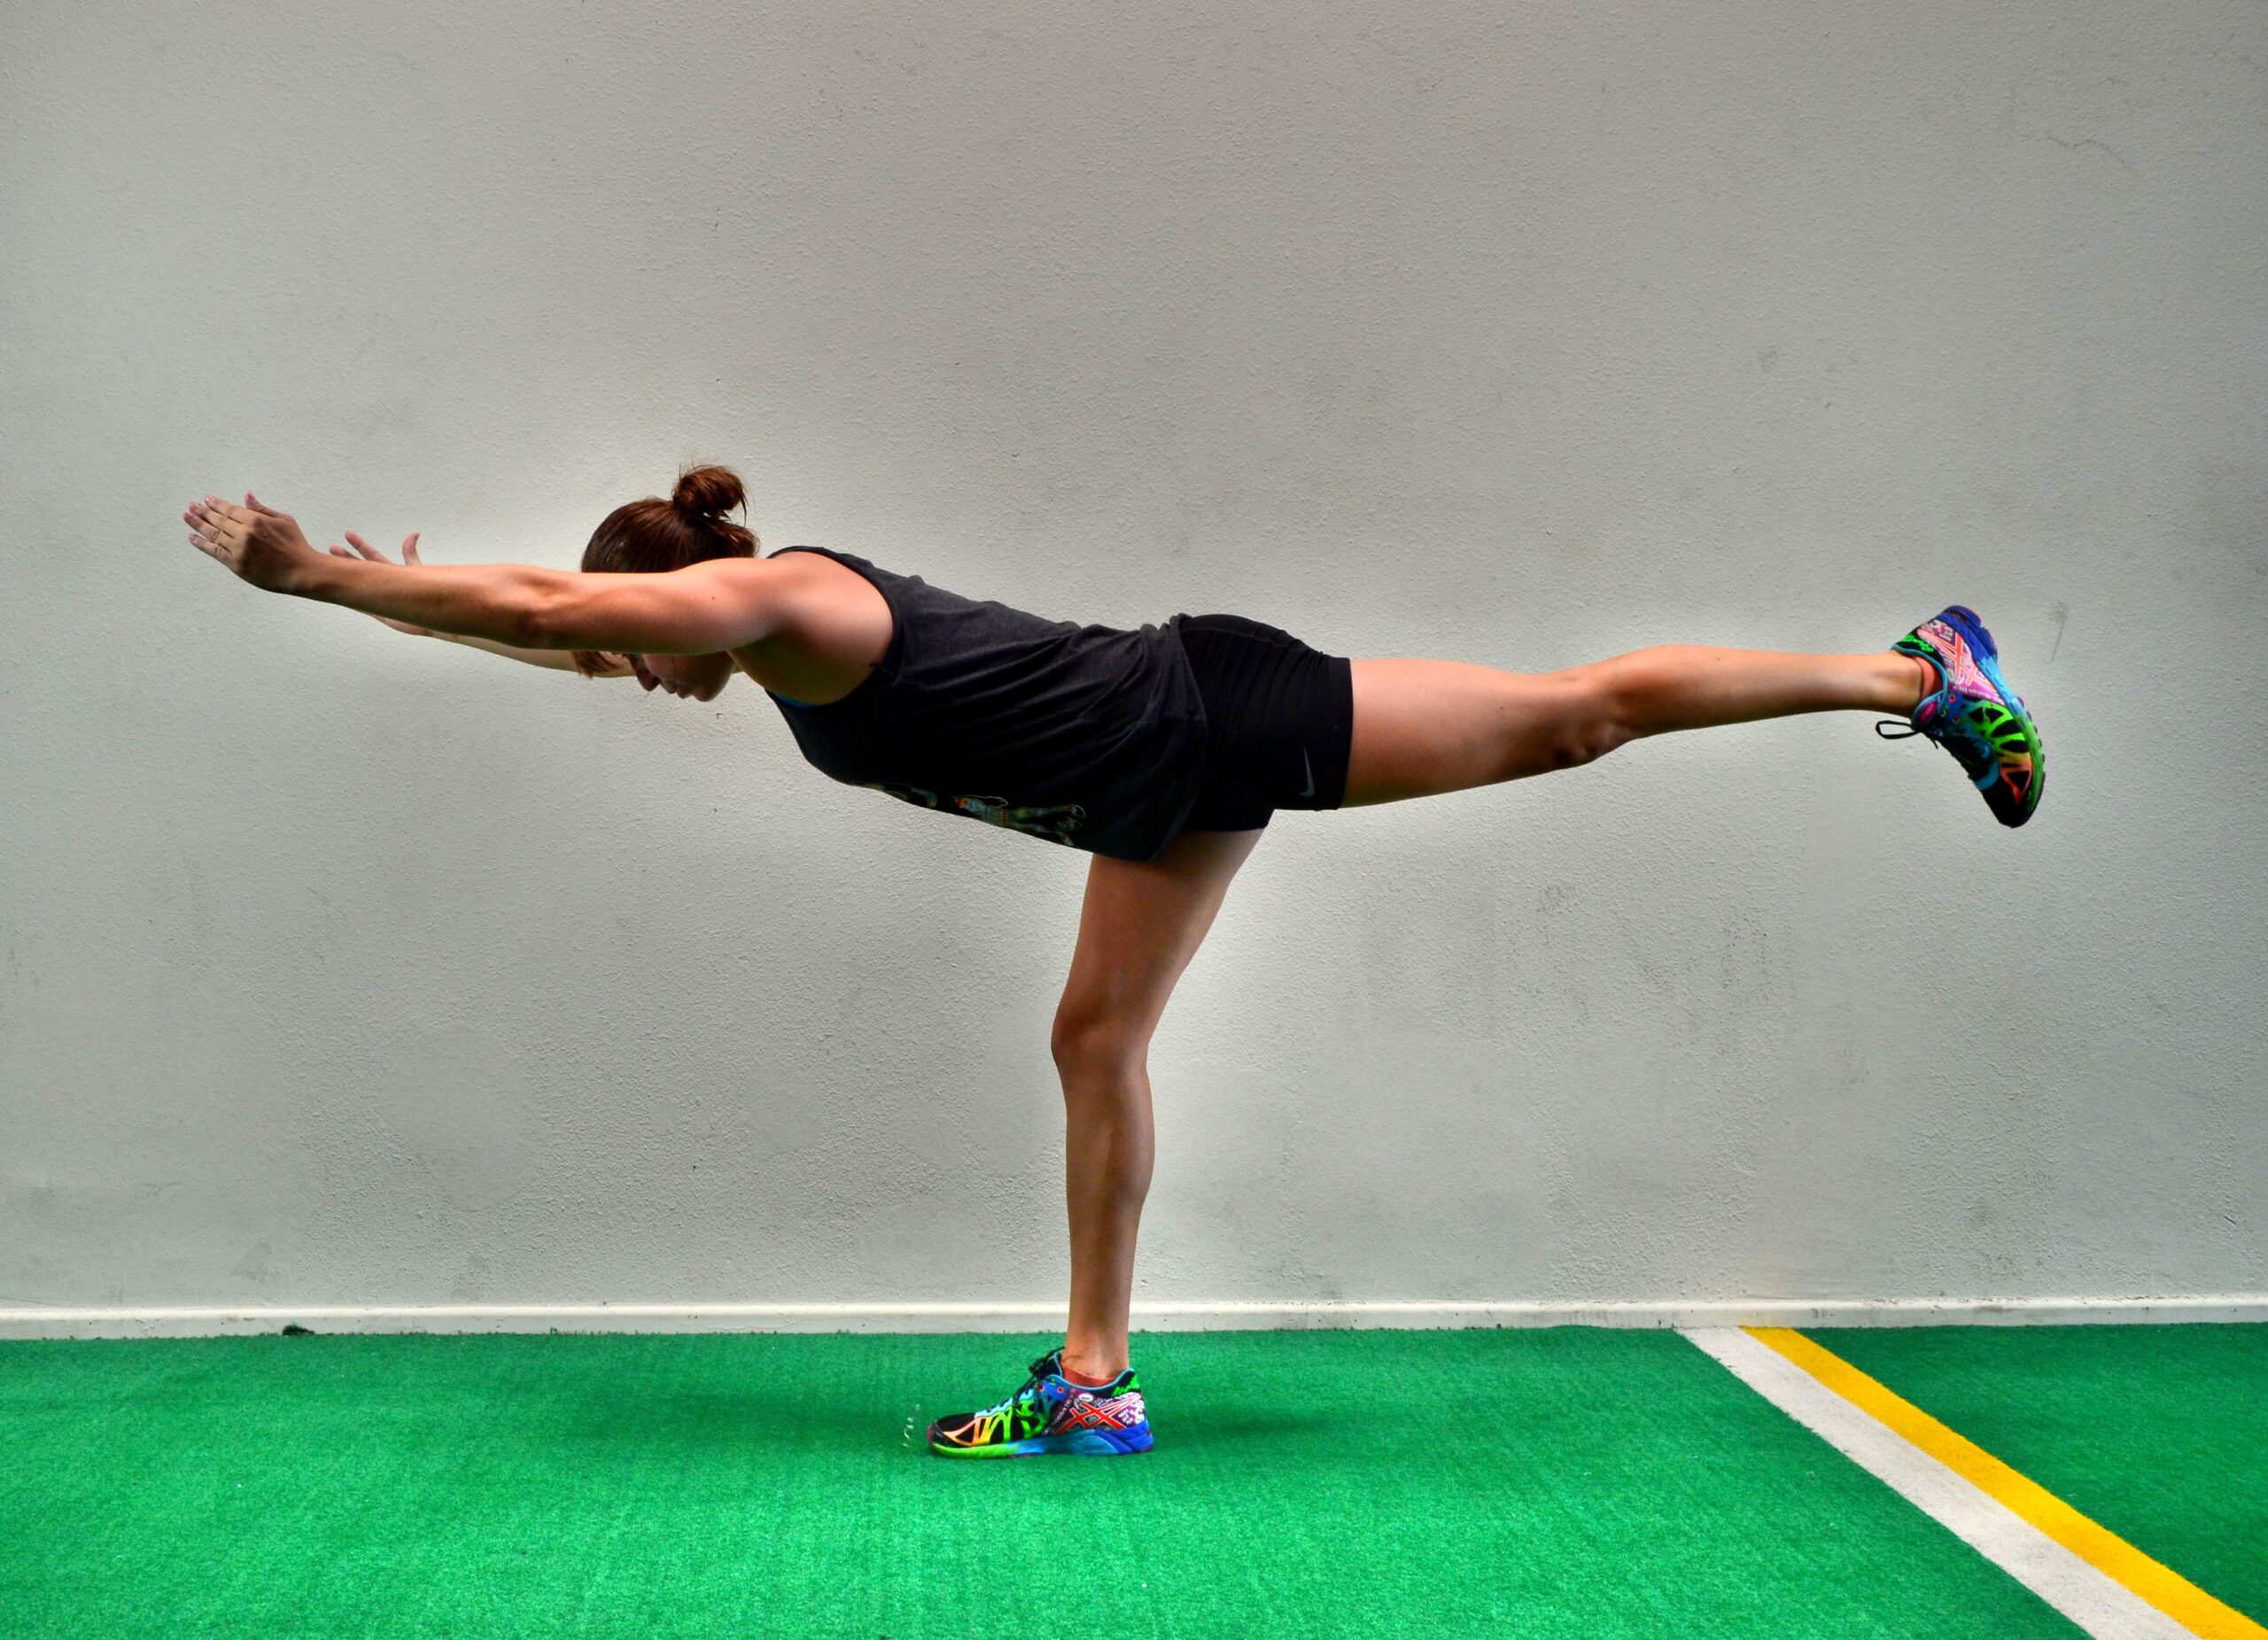
4. Single Leg Deadlift:
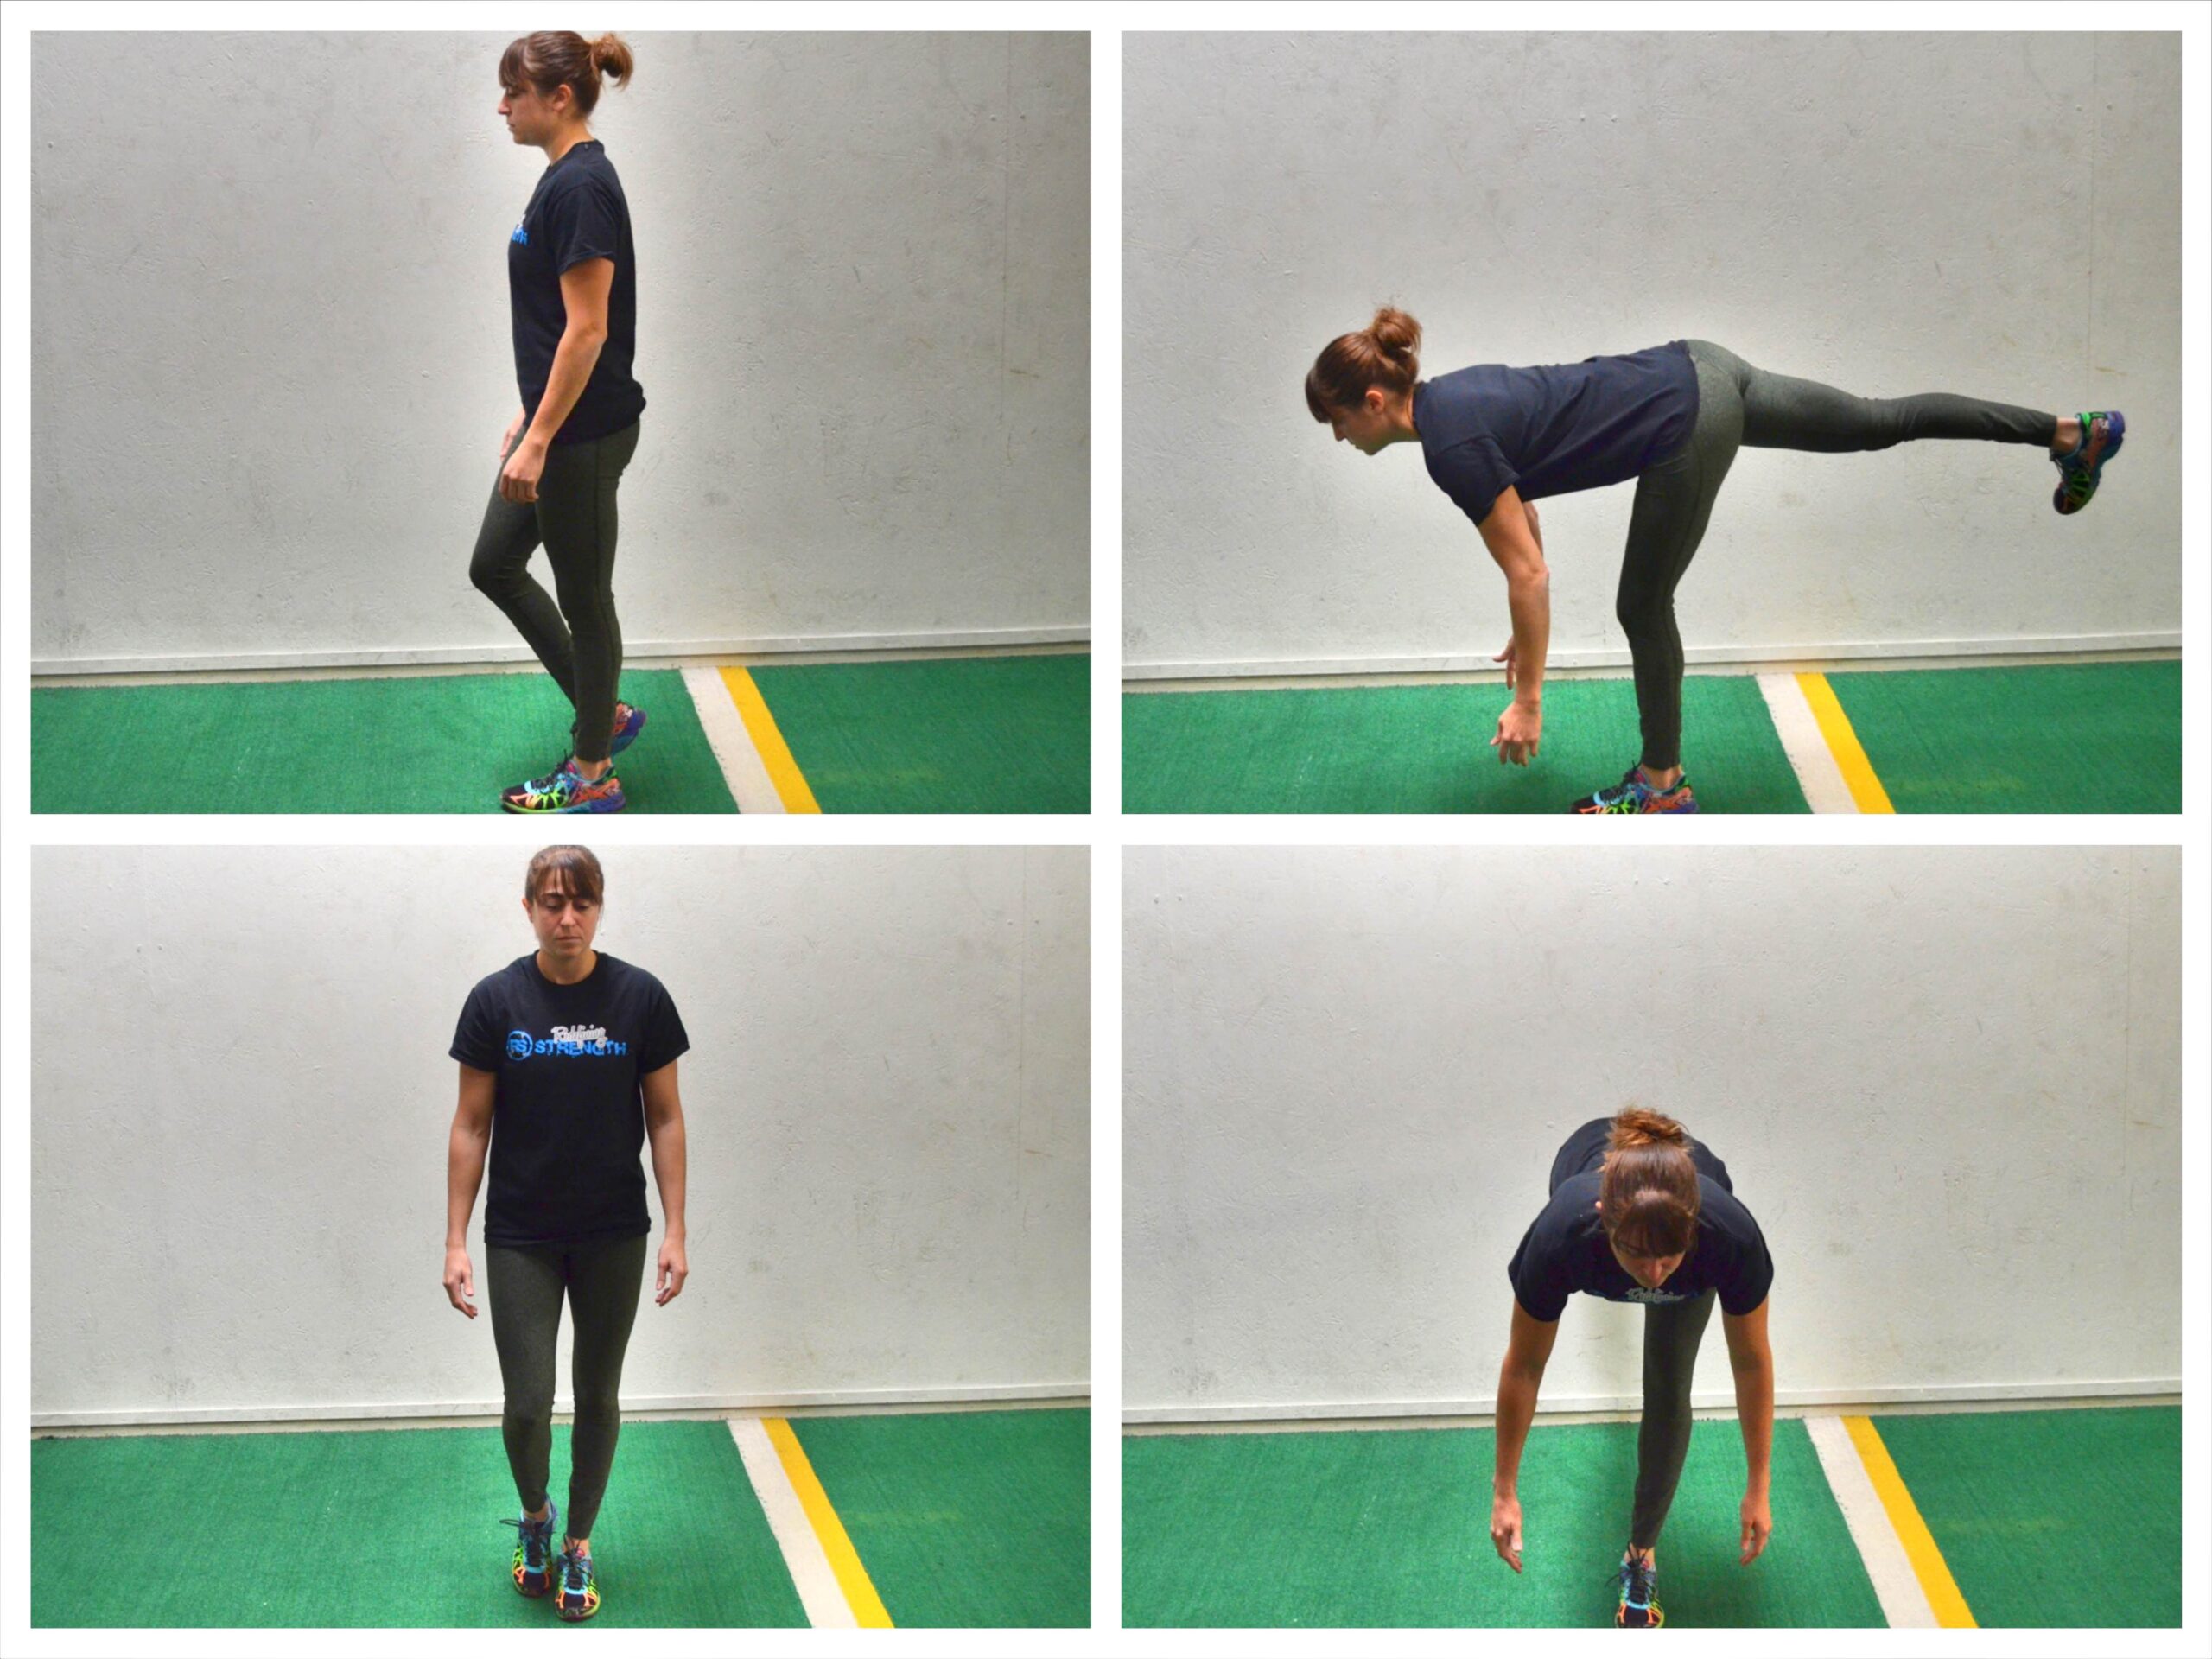
I often encounter clients with knee pain that also have (or had) foot and ankle pain/injury. Often those injuries weren’t properly rehabbed, which ends up leading to knee pain because of improper movement patterns.
For those people, I love using single leg deadlifts because they work on the mind-body connection to improve movement patterns while also working on balance and strengthening the lower leg, hamstrings and glutes.
To do a Single Leg Deadlift, stand on one foot with the knee of that standing leg slightly bent. Hinge over at your hips, sweeping the other leg back toward the wall behind you. Pretend you are driving the heel of that foot straight into the wall behind you. Lean forward with your upper body as you hinge forward, keeping the back nice and flat. Make sure that as you hinge, you are sitting into the heel of your standing leg. Do not lean forward and come up onto your toes.
To stand back up, drive through the heel of your standing leg and squeeze your glute at the top. Try not to tap the other foot down at all or at least not till you are fulling standing. Complete all reps on one side before switching to the other leg. To make the move harder, do a 3-5 count lower down toward the ground. Take 3-5 seconds to hinge over and then push straight back up. You can also add weight to the move to make it more challenging.
5. Straight Leg Deadlift/Good Morning:
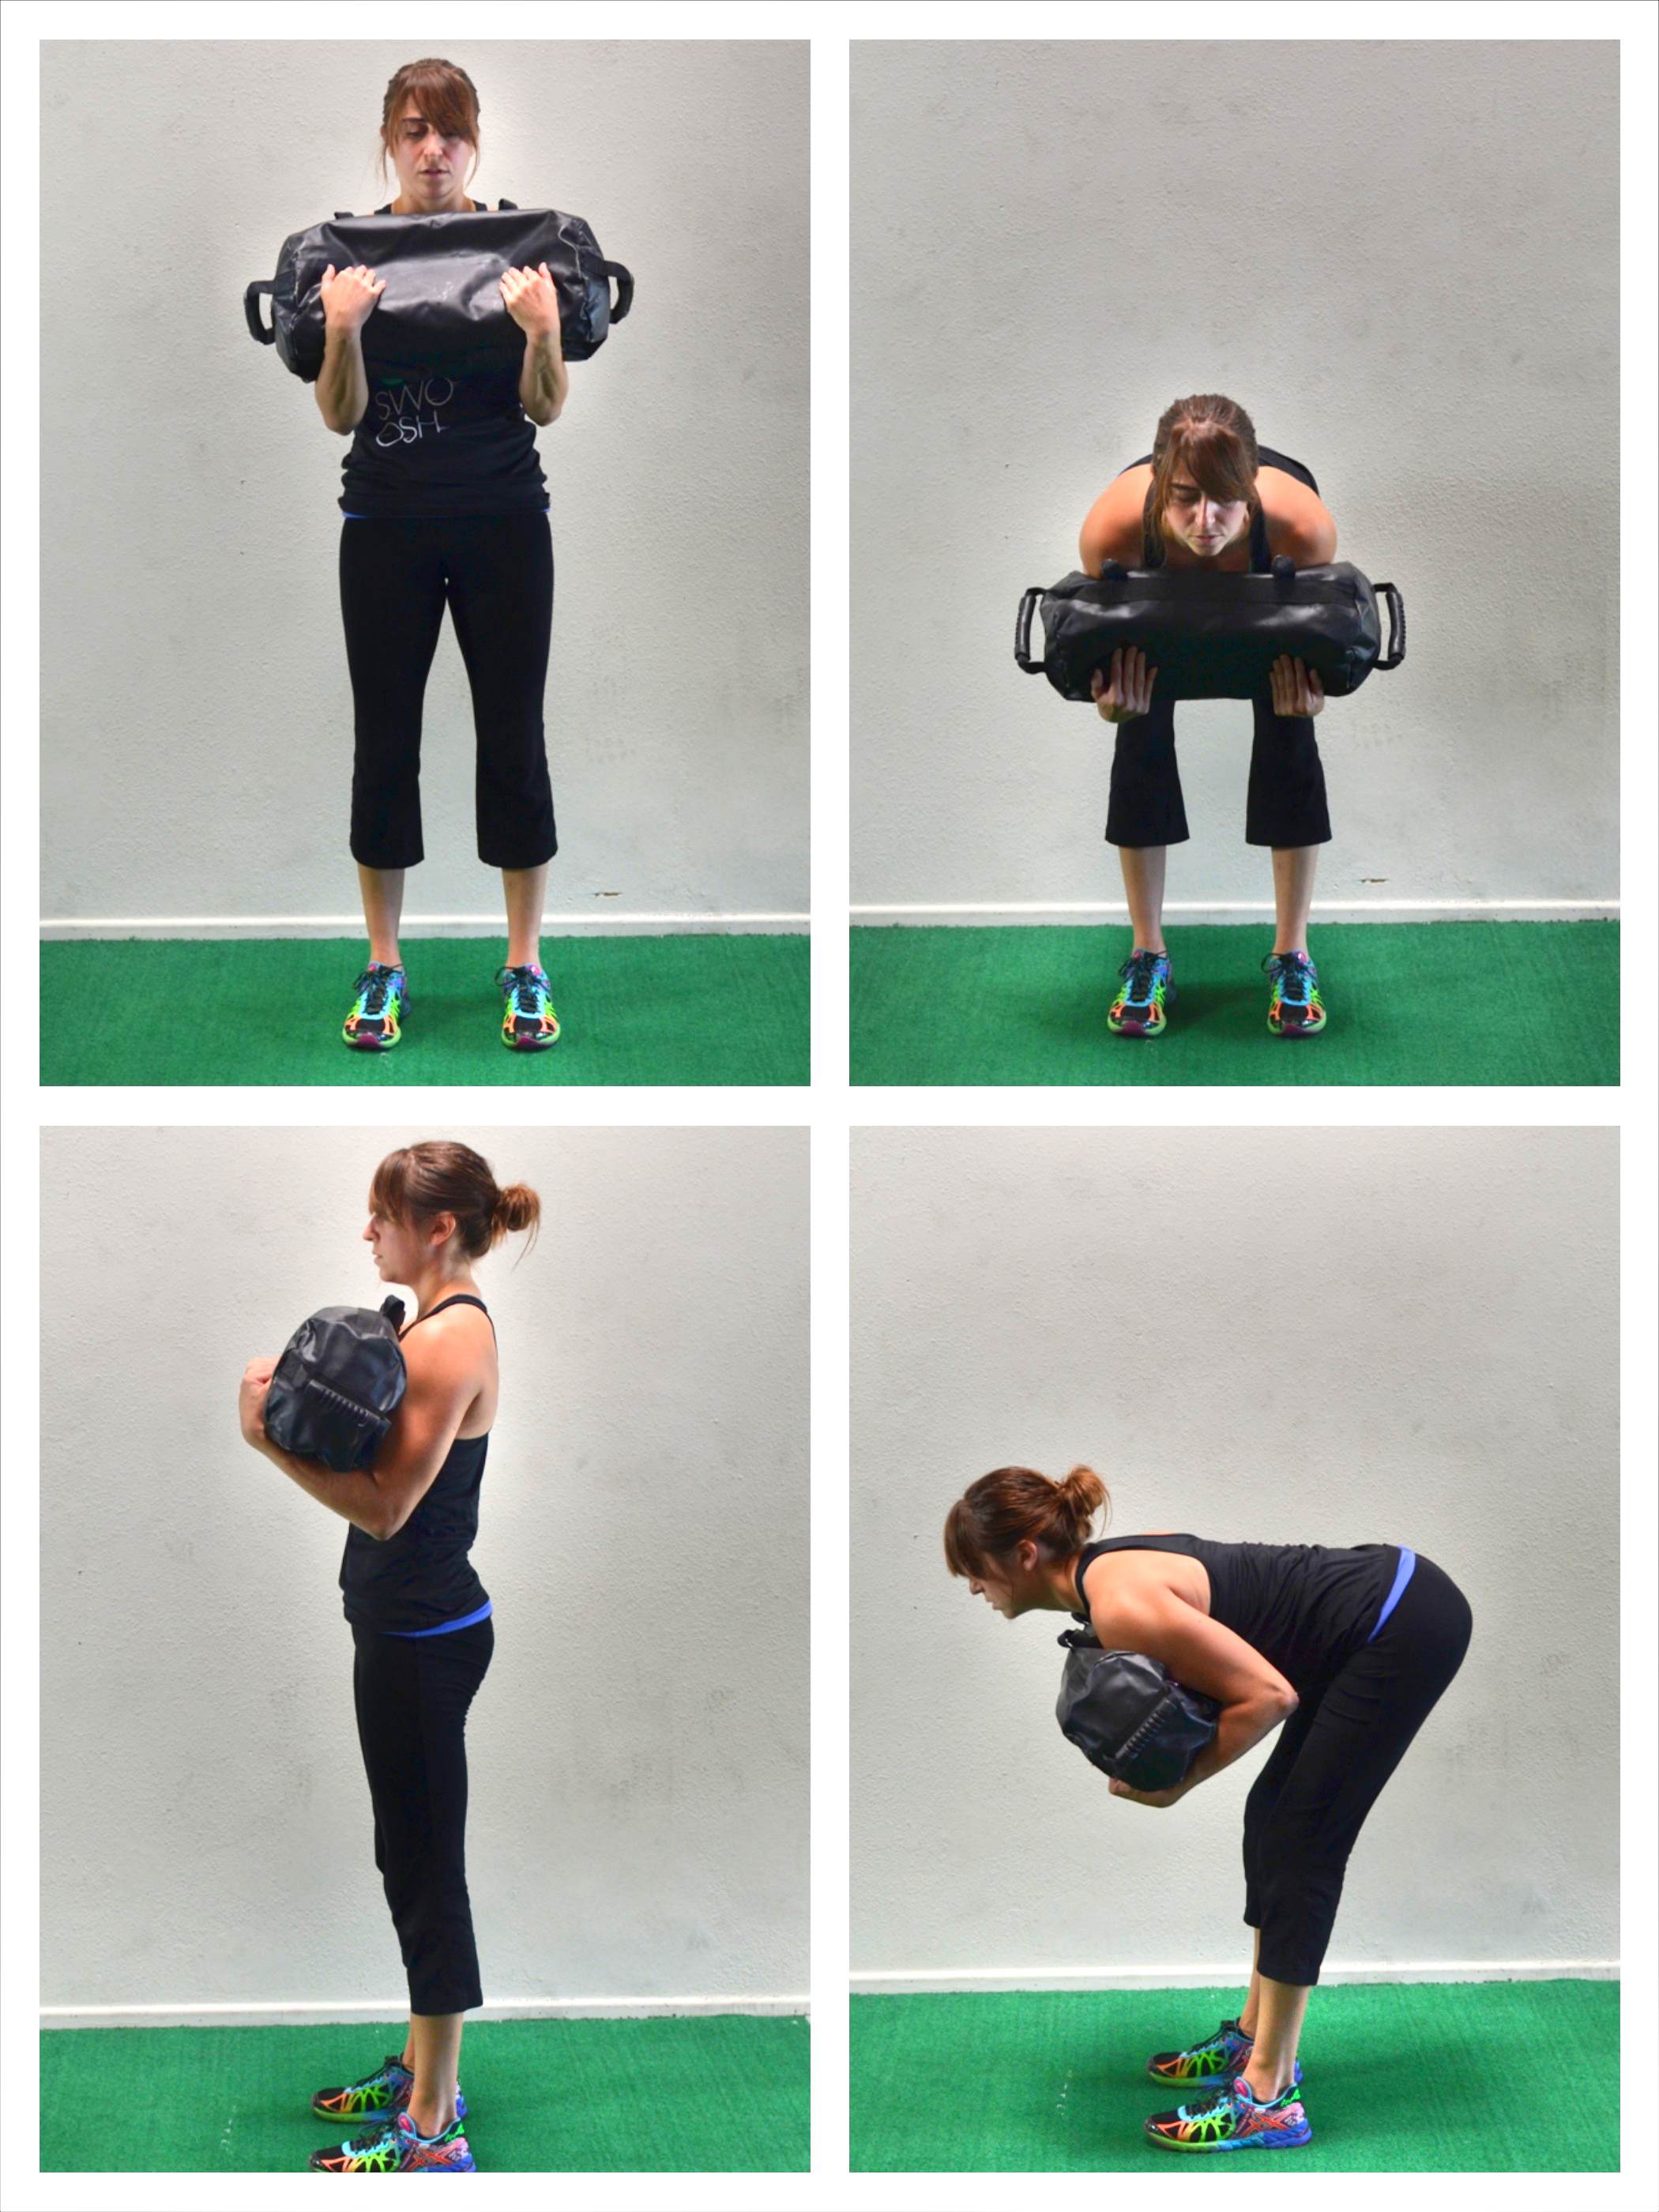
The straight leg deadlift is another great standing posterior chain move that really works the glutes and hamstrings (and if you front load the move with weight at your chest, it can also really challenge your core!)
The key with this move, and the Single Leg Deadlift, is to not lock out your knees and to make sure you keep your back flat and don’t round it while reaching toward the ground.
To do the Straight Leg Deadlift, hold a sandbag, barbell, kettlebells or dumbbells in you hands in front of you or by your sides. With your feet no wider than hip-width apart, hinge over, keeping your back flat. Your knees should be soft as you hinge over and push your butt back toward the wall behind you. You should feel a nice stretch down your hamstring as you hinge over. Do not let your back round toward the ground. Keep your weight in your heels. Come back up to standing, driving through your heels and squeezing your glutes at the top.
You can also hold a sandbag or weight at your chest as you perform the hinge.
6. Band Exercises: Clams, Monster Steps, Side Shuffle, Kickbacks, Side Raises:
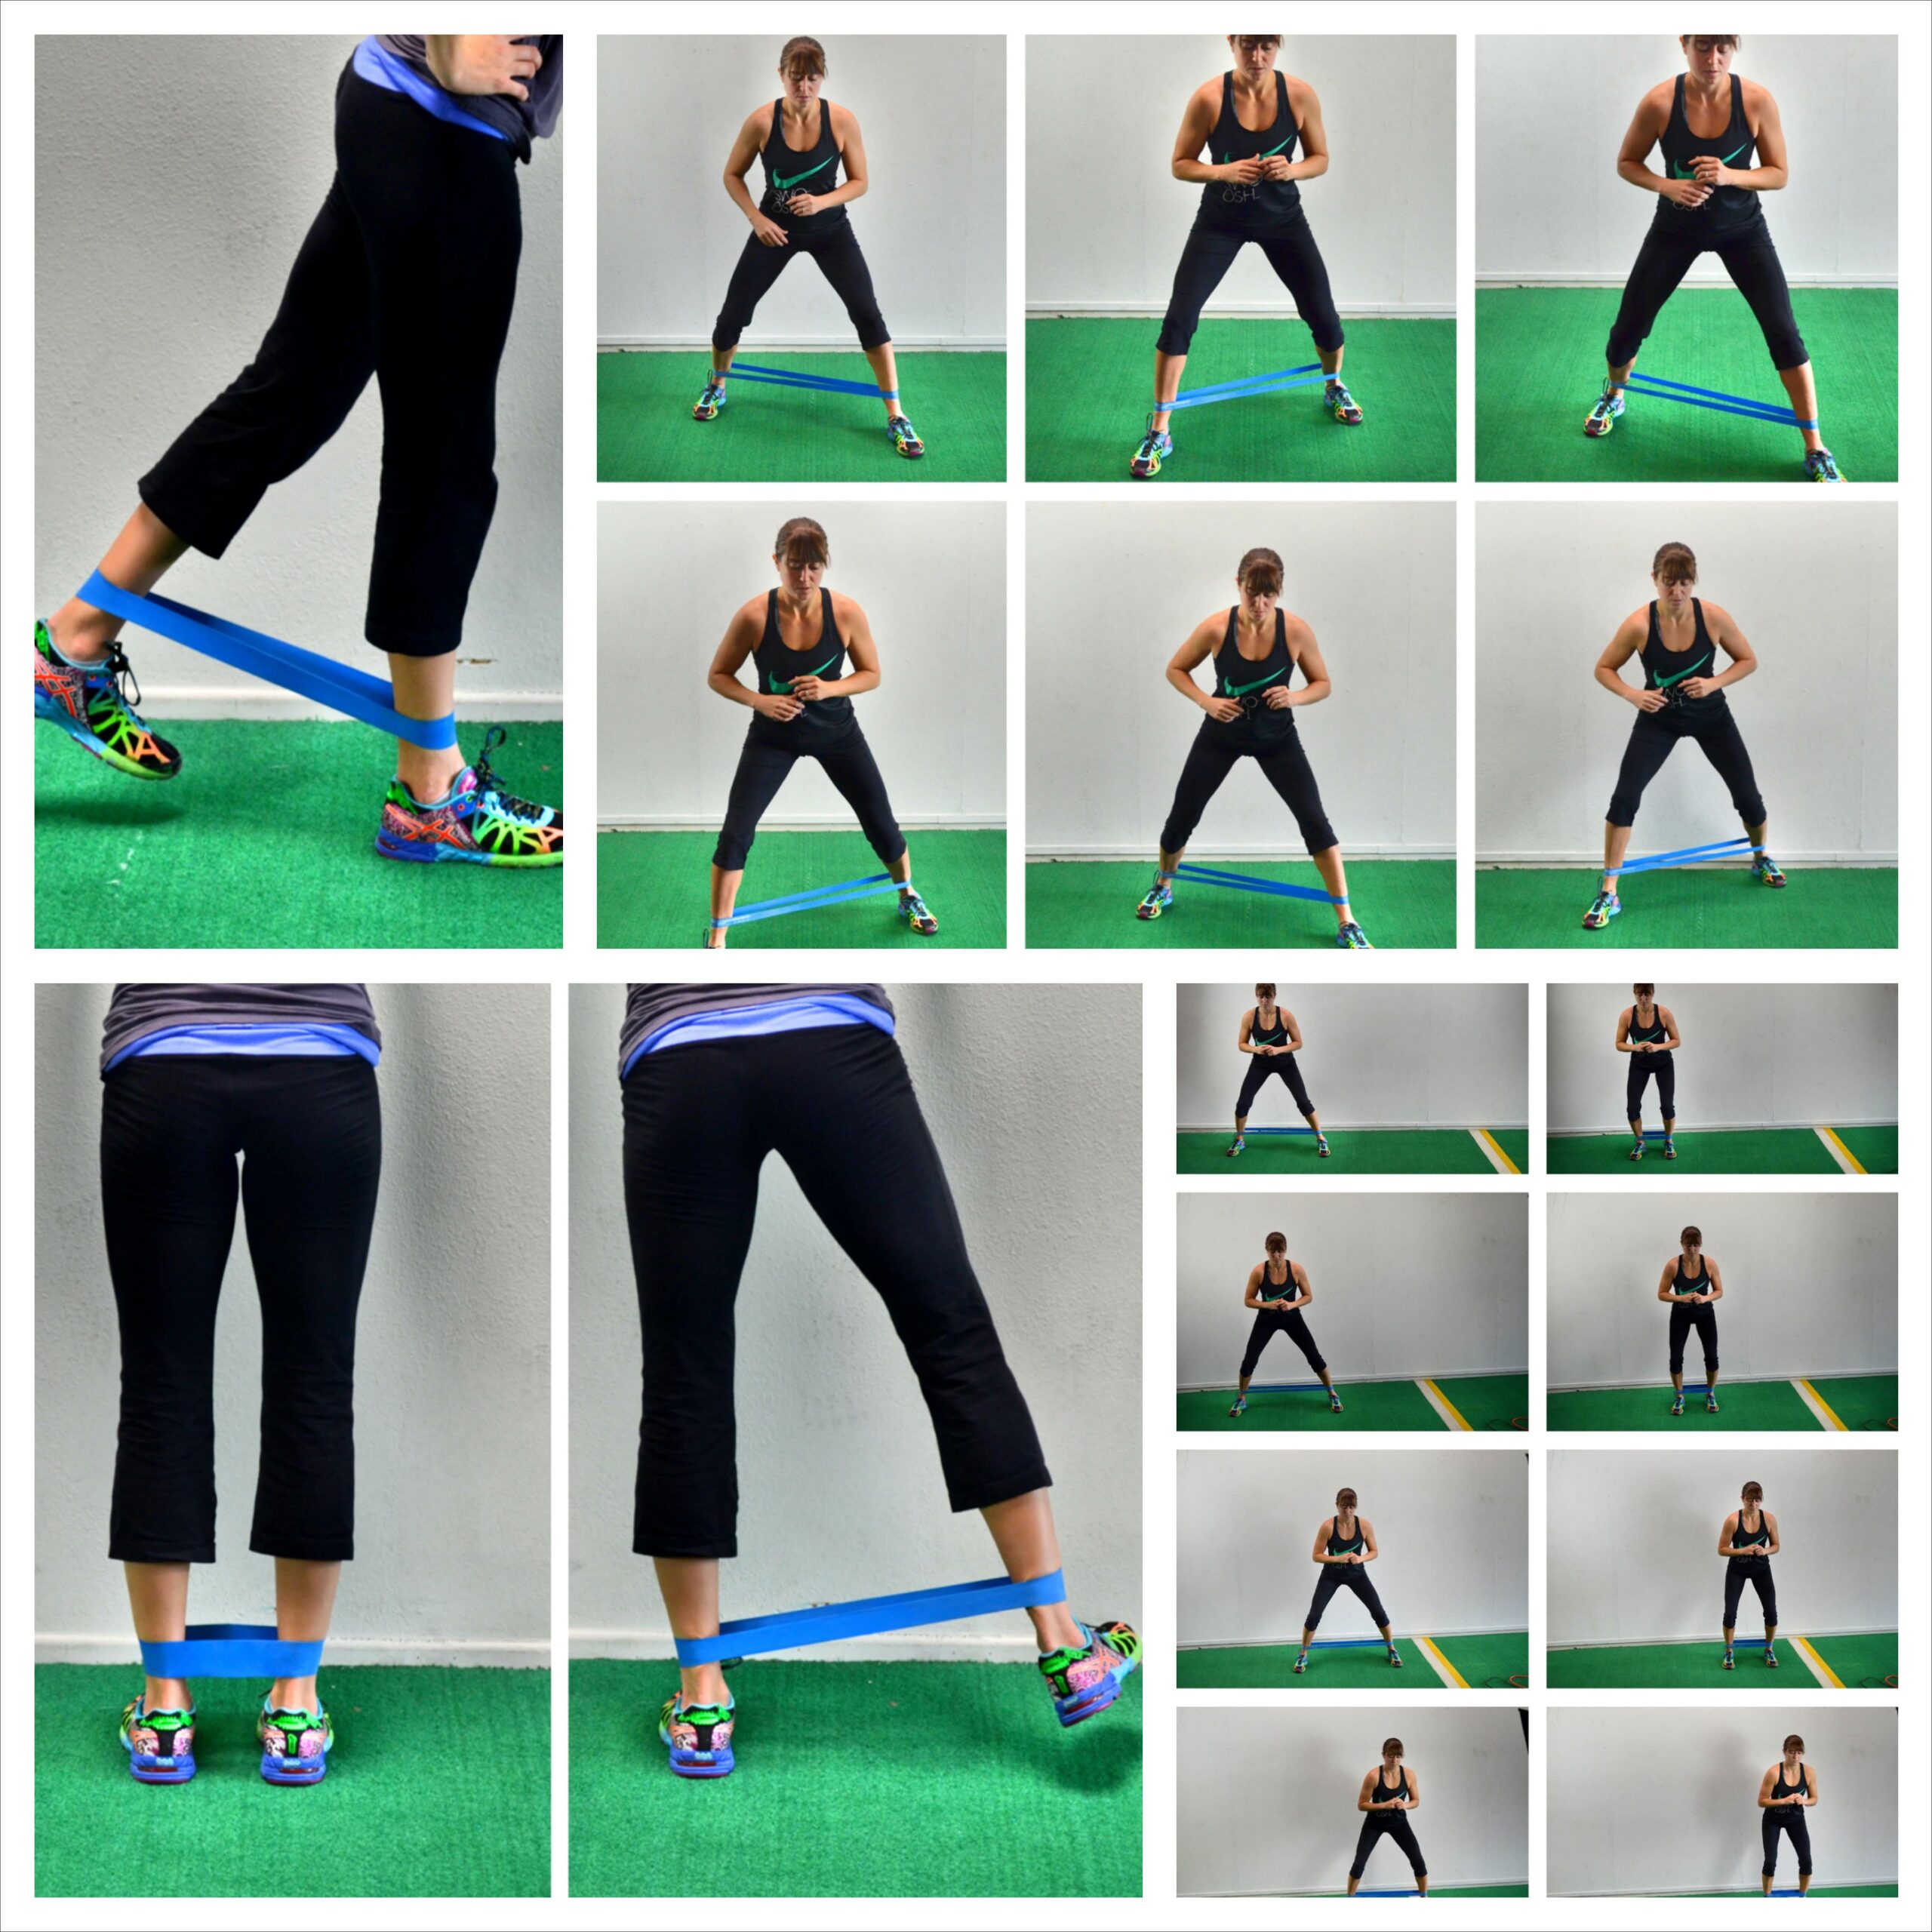
The mini band is a great tool to own because it is small, lightweight and tortures the muscles of your butt like none other and complete knee friendly!
There are so many great mini band moves to get your glutes activated and help you prevent knee pain that I couldn’t pick just one to list here…So I went with a general…MINI BAND MOVES!
Here is a great list of all the different moves you can do with a $3 mini band. All of them will strengthen your glutes and you can use a few different ones to work them from every angle.
They can be included as part of your workout or as part of your warm up, but they need to be included because they will help you strengthen your glutes and lessen your knee pain.
7. Isometric Leg Poses:
Often we suffer from pain and injury because we lack mobility, which means smaller, weaker muscles end up doing work they shouldn’t be doing.
Therefore, in order to get rid of your knee pain, you need to improve your mobility while you activate the weak muscles.
Isometric exercises do just that. The following isometric leg poses open up your hips and improve your mobility while helping you develop muscular stability. Not only are these moves knee-friendly but they develop the mobility and stability you need to get rid of the pain and prevent it from ever coming back!
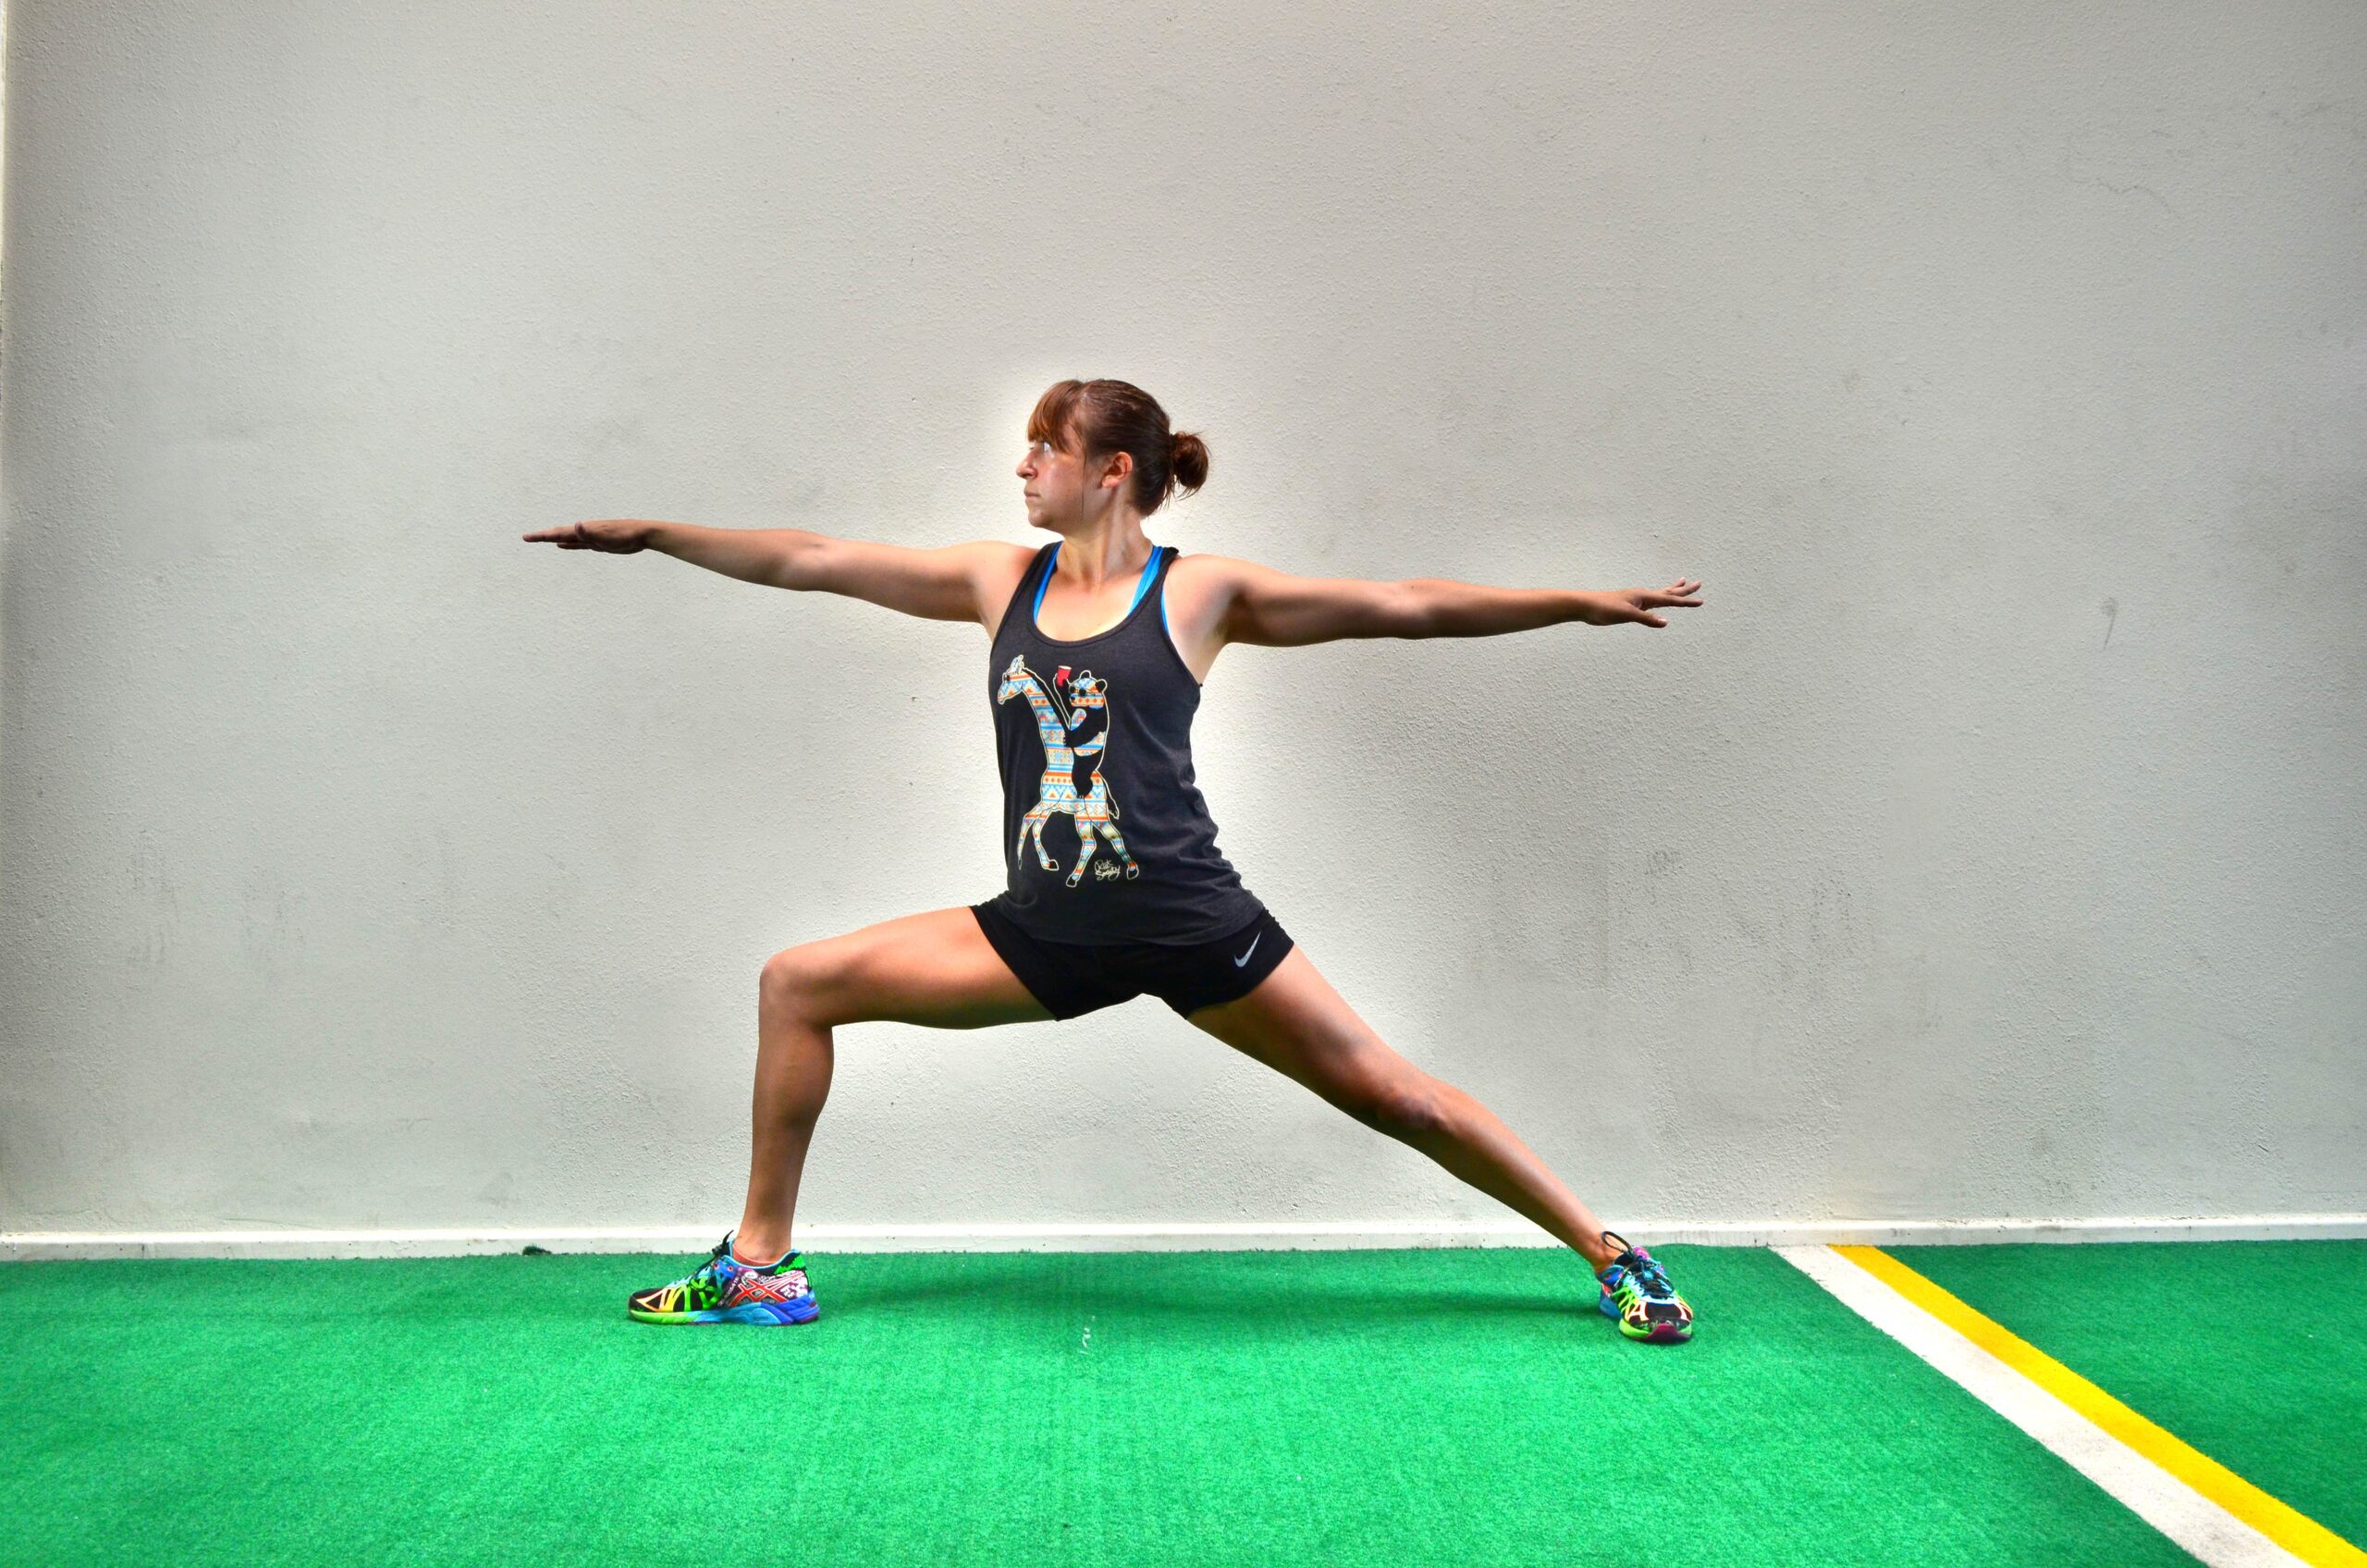
Warrior II – Set up in a nice wide lunge stance with one foot forward and one foot back. Turn the back toe out so your feet are perpendicular. Your front foot should be at the instep of your back foot when you turn it out. Sink down into a lunge, keeping the back leg straight and the front heel firmly planted. Try to get your front knee bent to 90 degrees and your quad parallel to the ground. You may find you need to step your front foot forward a bit more to sit comfortably in the lunge and keep the front heel down. The lower you sink in the lunge, the harder the move will be. Do not let your front knee cave inward. Squeeze the glute and keep the knee in line with your hip and your ankle. While in the low lunge, open your arms out at shoulder height. Reach one forward over the front leg and the other back over the back leg. Keep the chest open and do not lean forward. Keep your weight centered in the lunge.
Warrior III – Balance on one leg with the knee slightly bent. Hinge over lifting your back leg toward the wall behind you. Lean your torso over, keeping your back flat and your core tight. Reach your hands overhead in front of you. Hold in this position. Do not let your back round or your other foot touch down. Keep your arms in line with your body. You want a nice straight line from the bottom of your lifted heel to the end of your finger tips. Make sure you do not lock the standing leg out as you hold. Beginners may need to reach back toward their foot instead of out in front of them. Using a wall can also help beginners. Stand with a wall behind you and when you hinge over have the lifted foot lightly touch the wall behind you to help you balance.
Crescent Pose – Start in a high plank position. Step one foot up between your hands with the front knee bent and the back leg out straight. Your front heel will be down while your back heel will be up. Lift your hands up off the ground and reach them back and overhead as you stay low in the lunge. Keep your front heel down as you sit back into the lunge. If your front heel is coming up, you may want to step your front foot forward a bit more. As you hold the lunge, your back heel will stay up and the back leg will stay straight. Feel a nice stretch down the front of the hip and quad of the back leg. Hold then switch to the other side.
(Warrior I, Triangle Pose, Glute Bridge Hold, Squat Hold, Half Moon, Tree Pose…All of these are great as well…AKA Yoga can be a super beneficial thing for anyone with knee pain!)
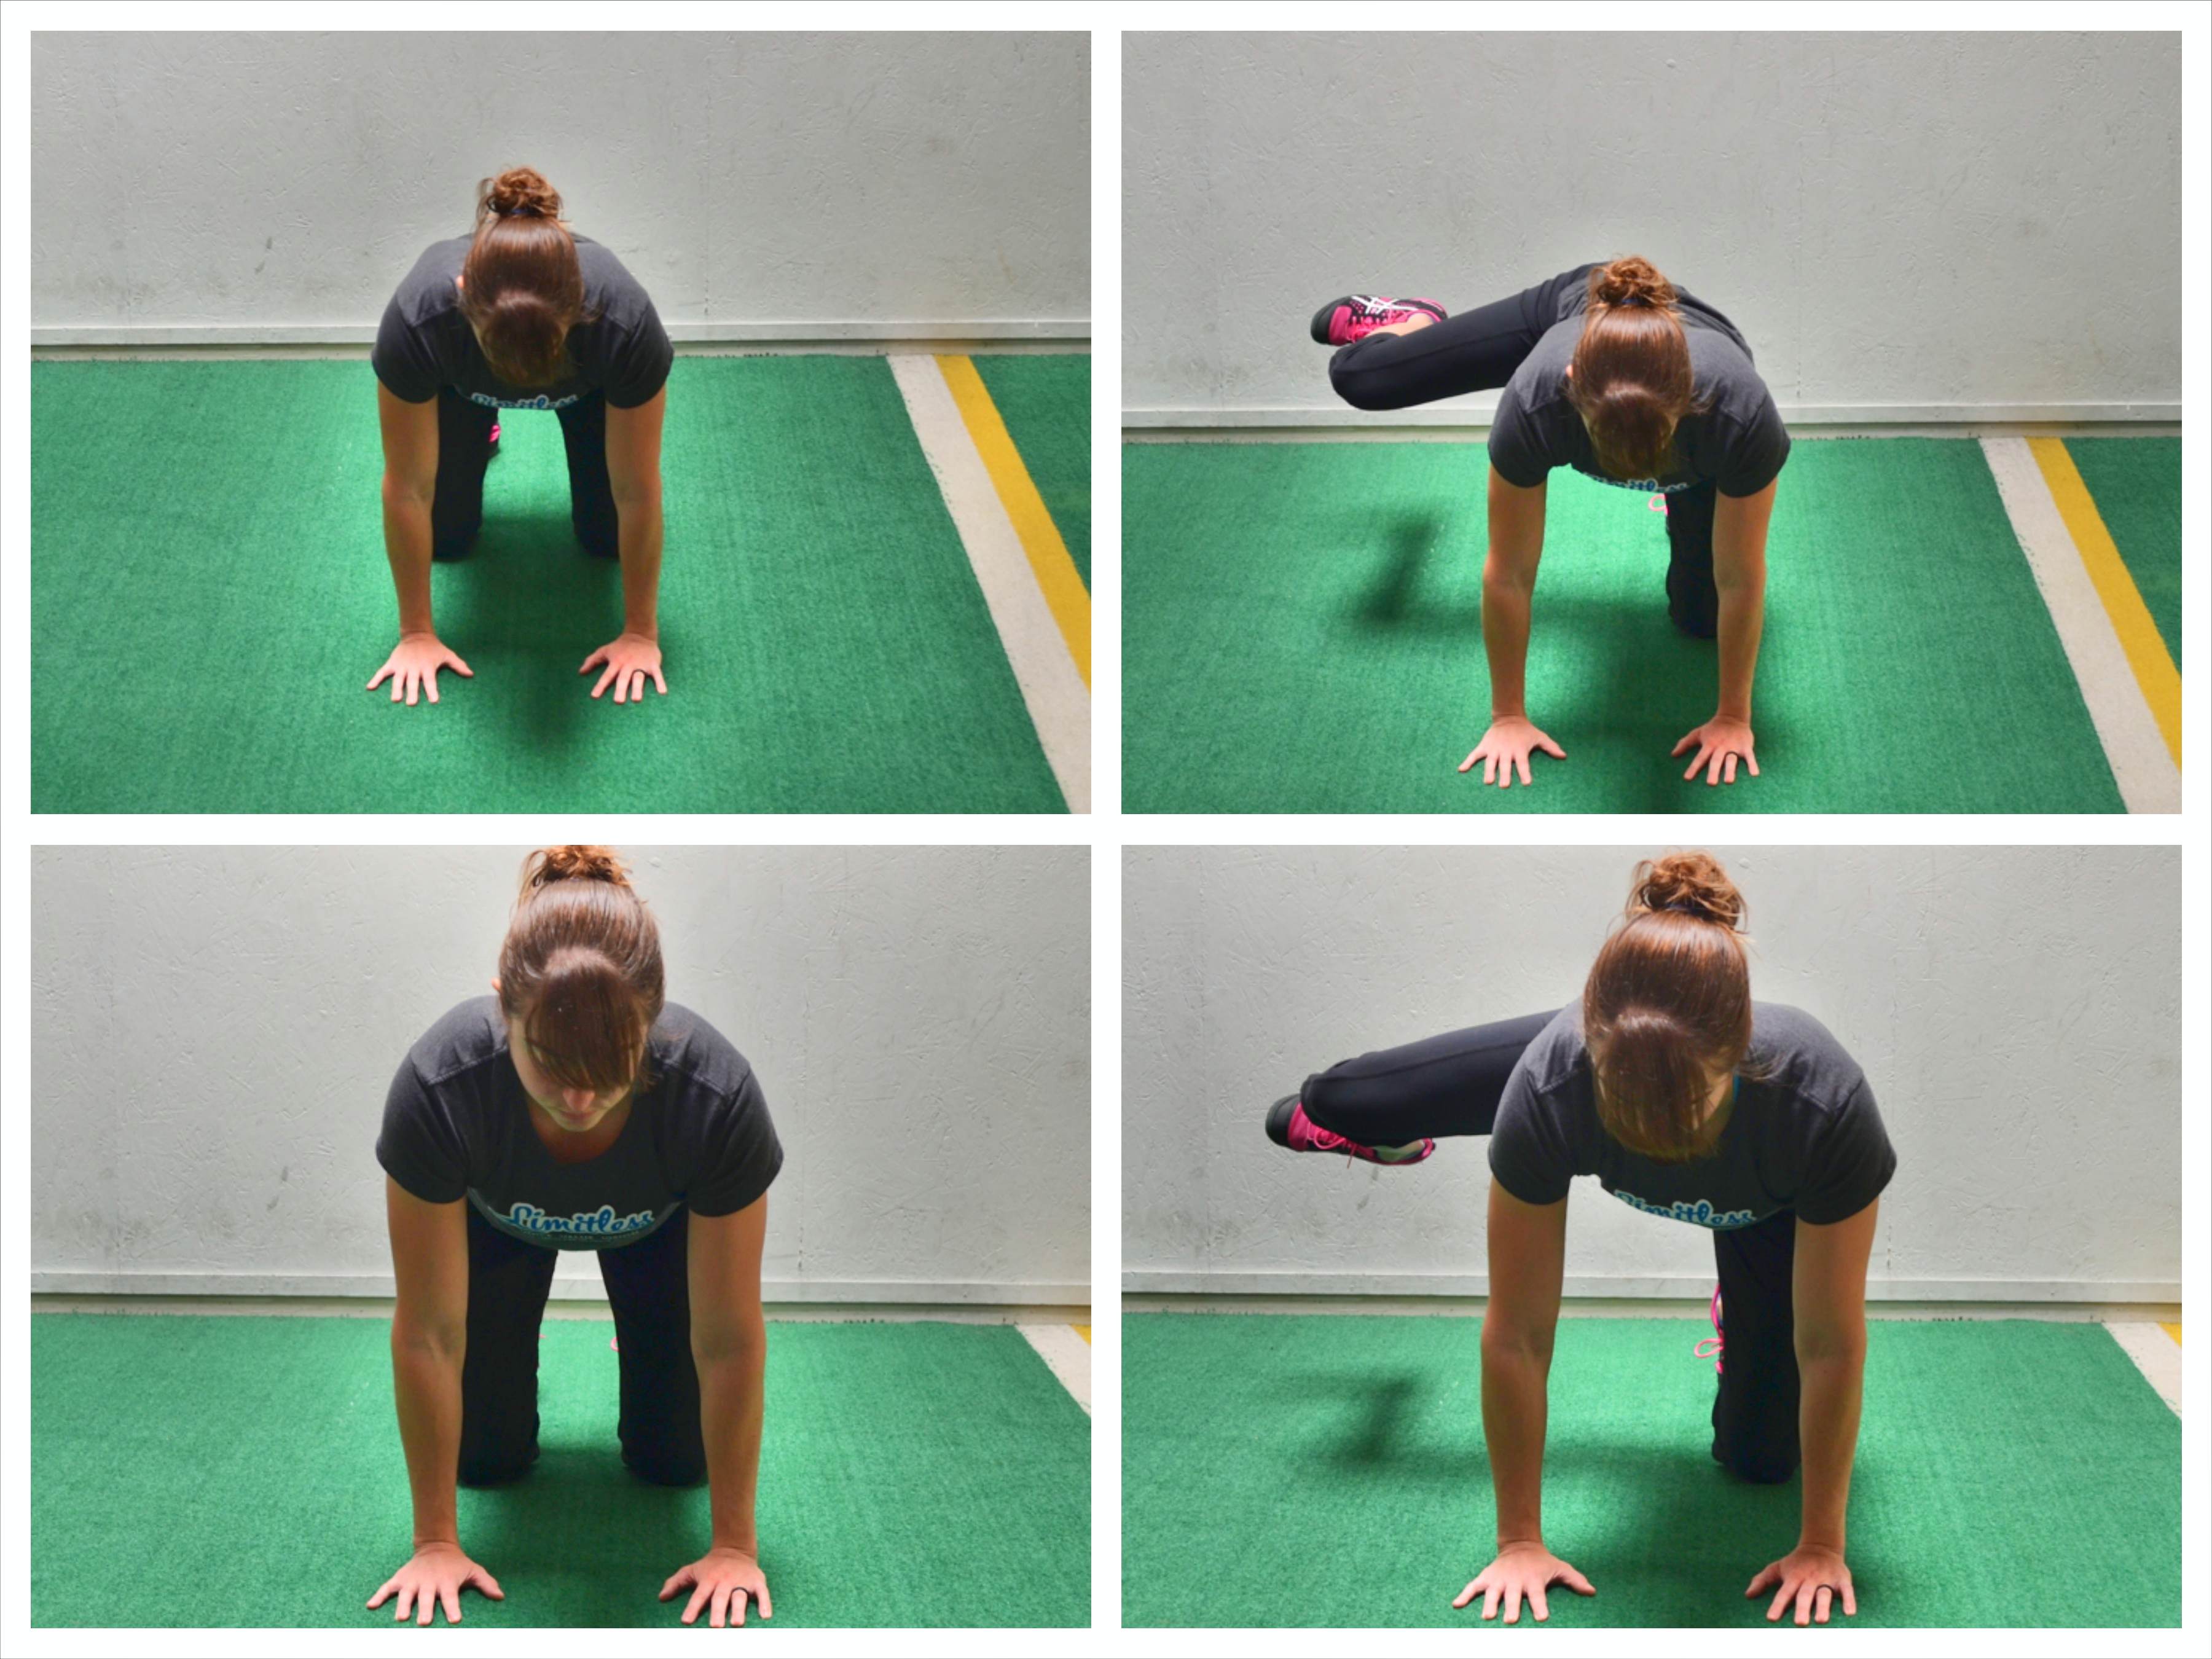
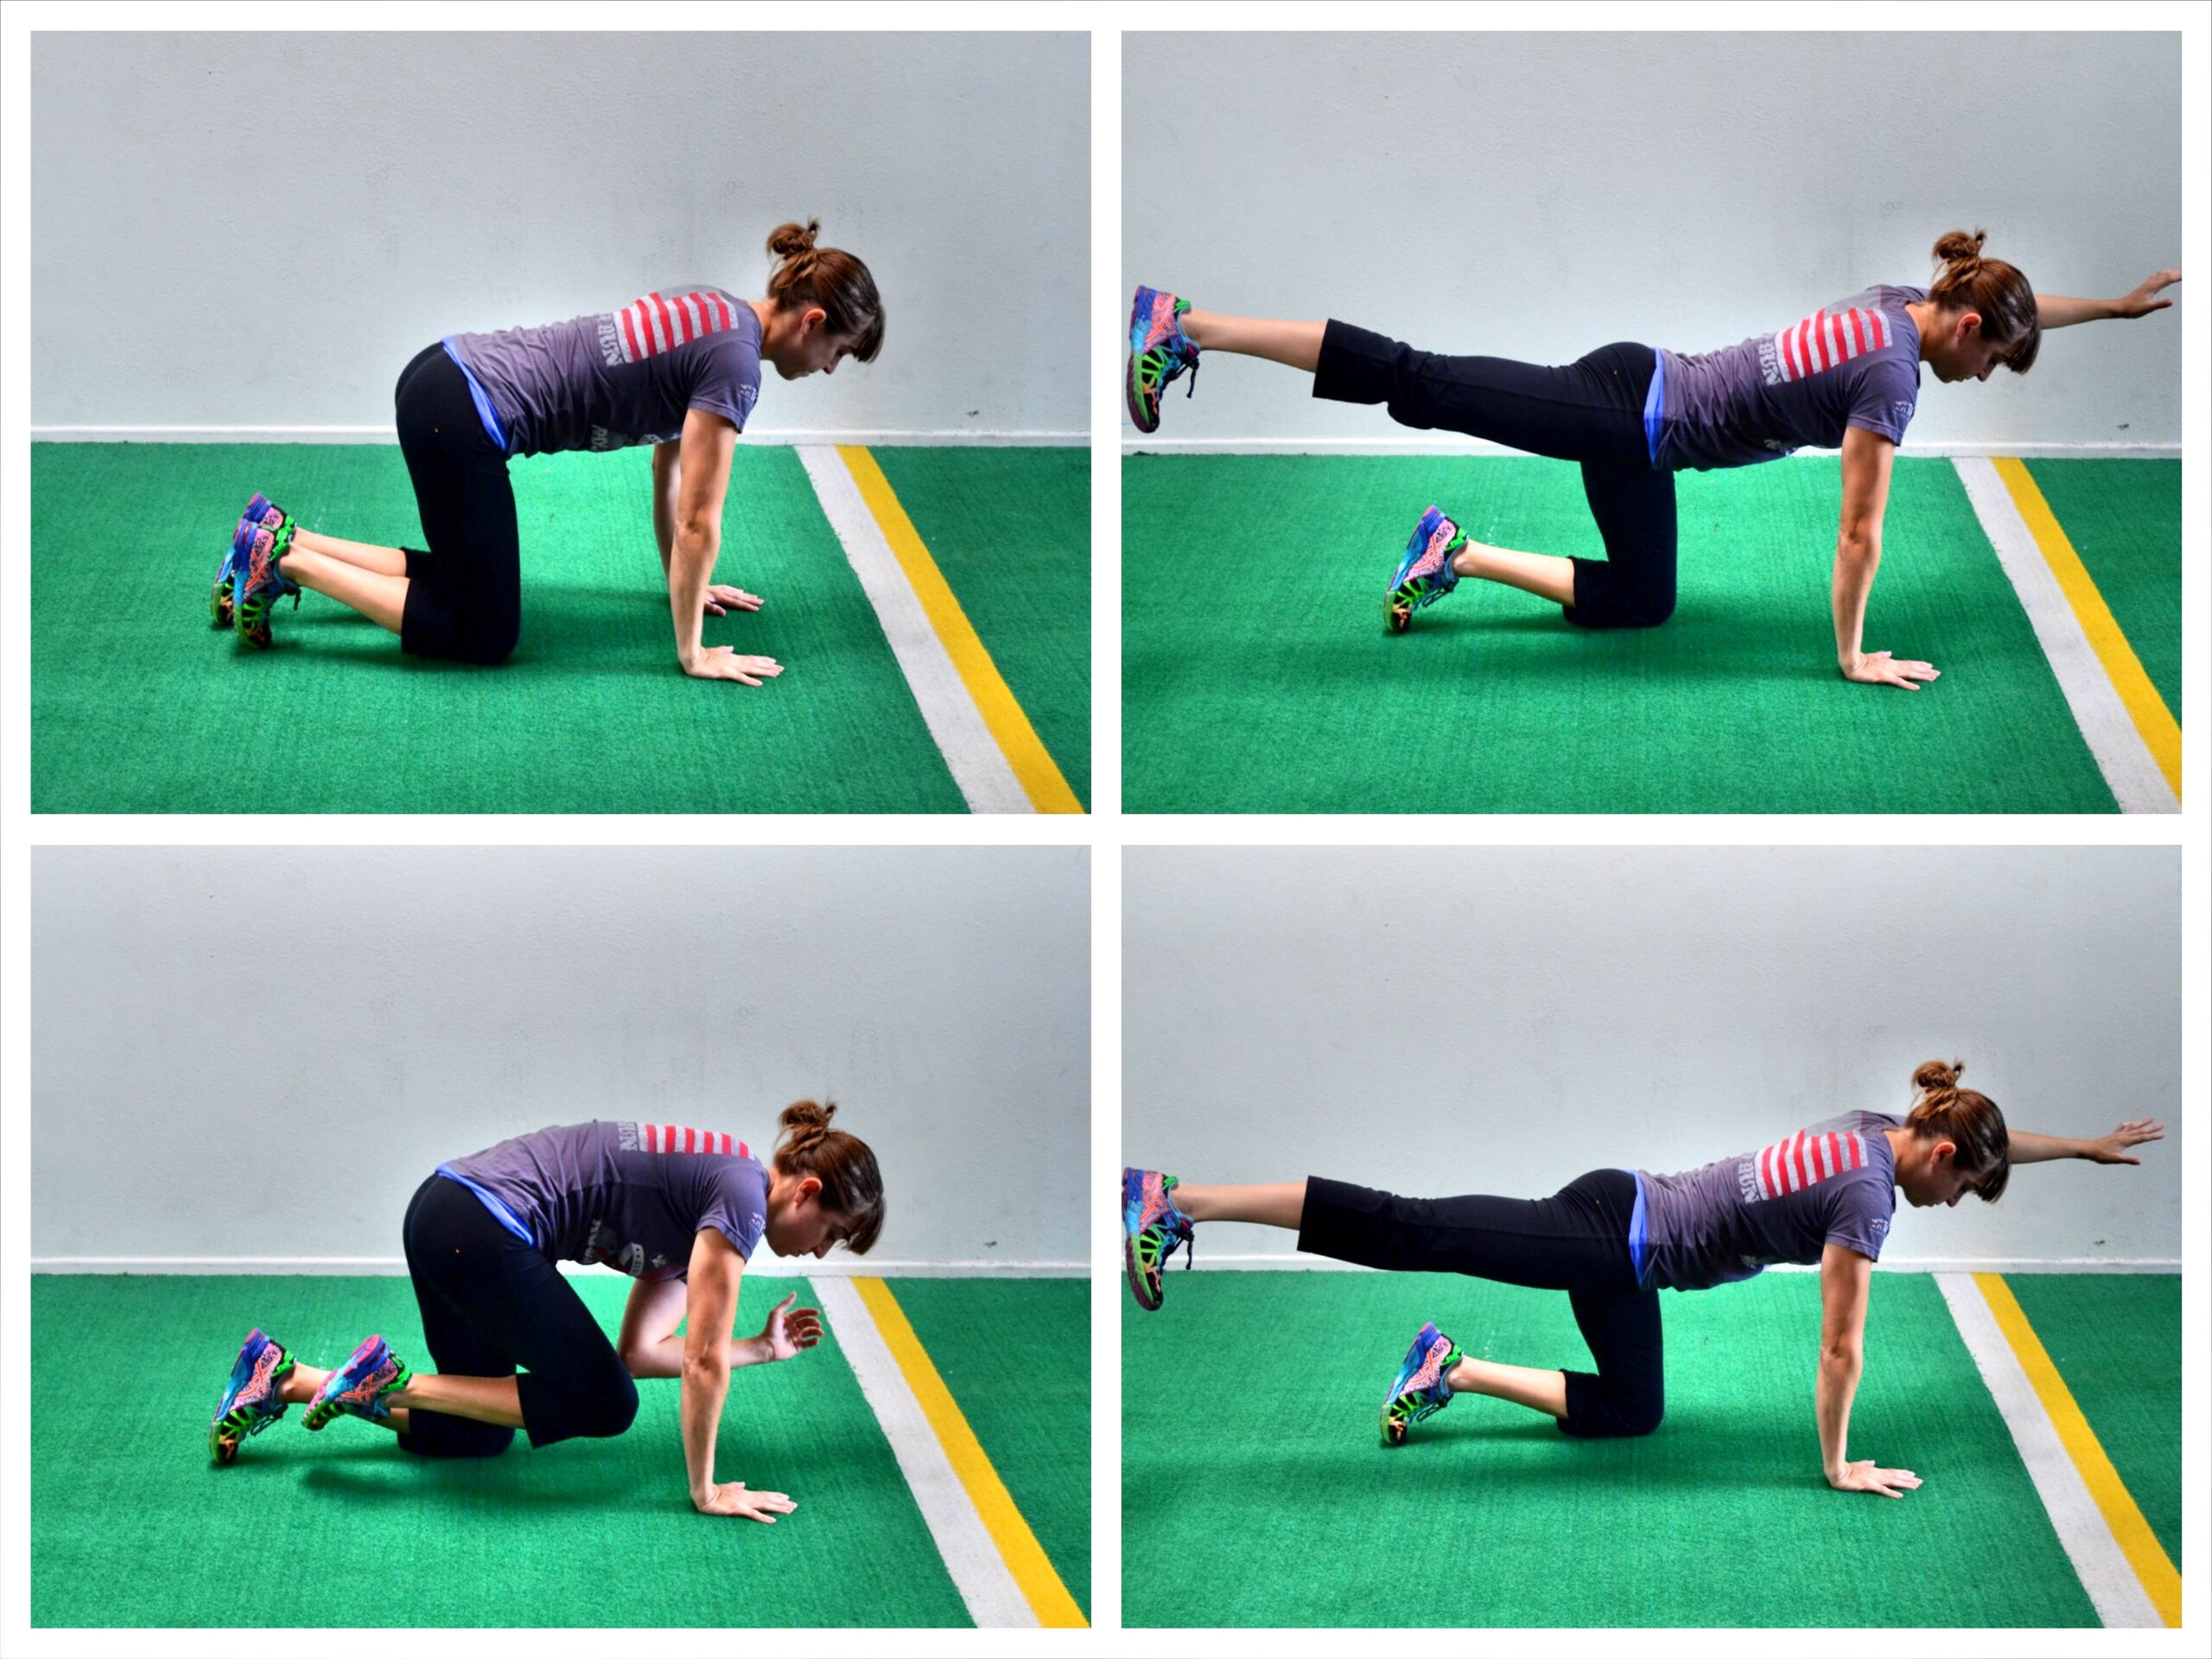
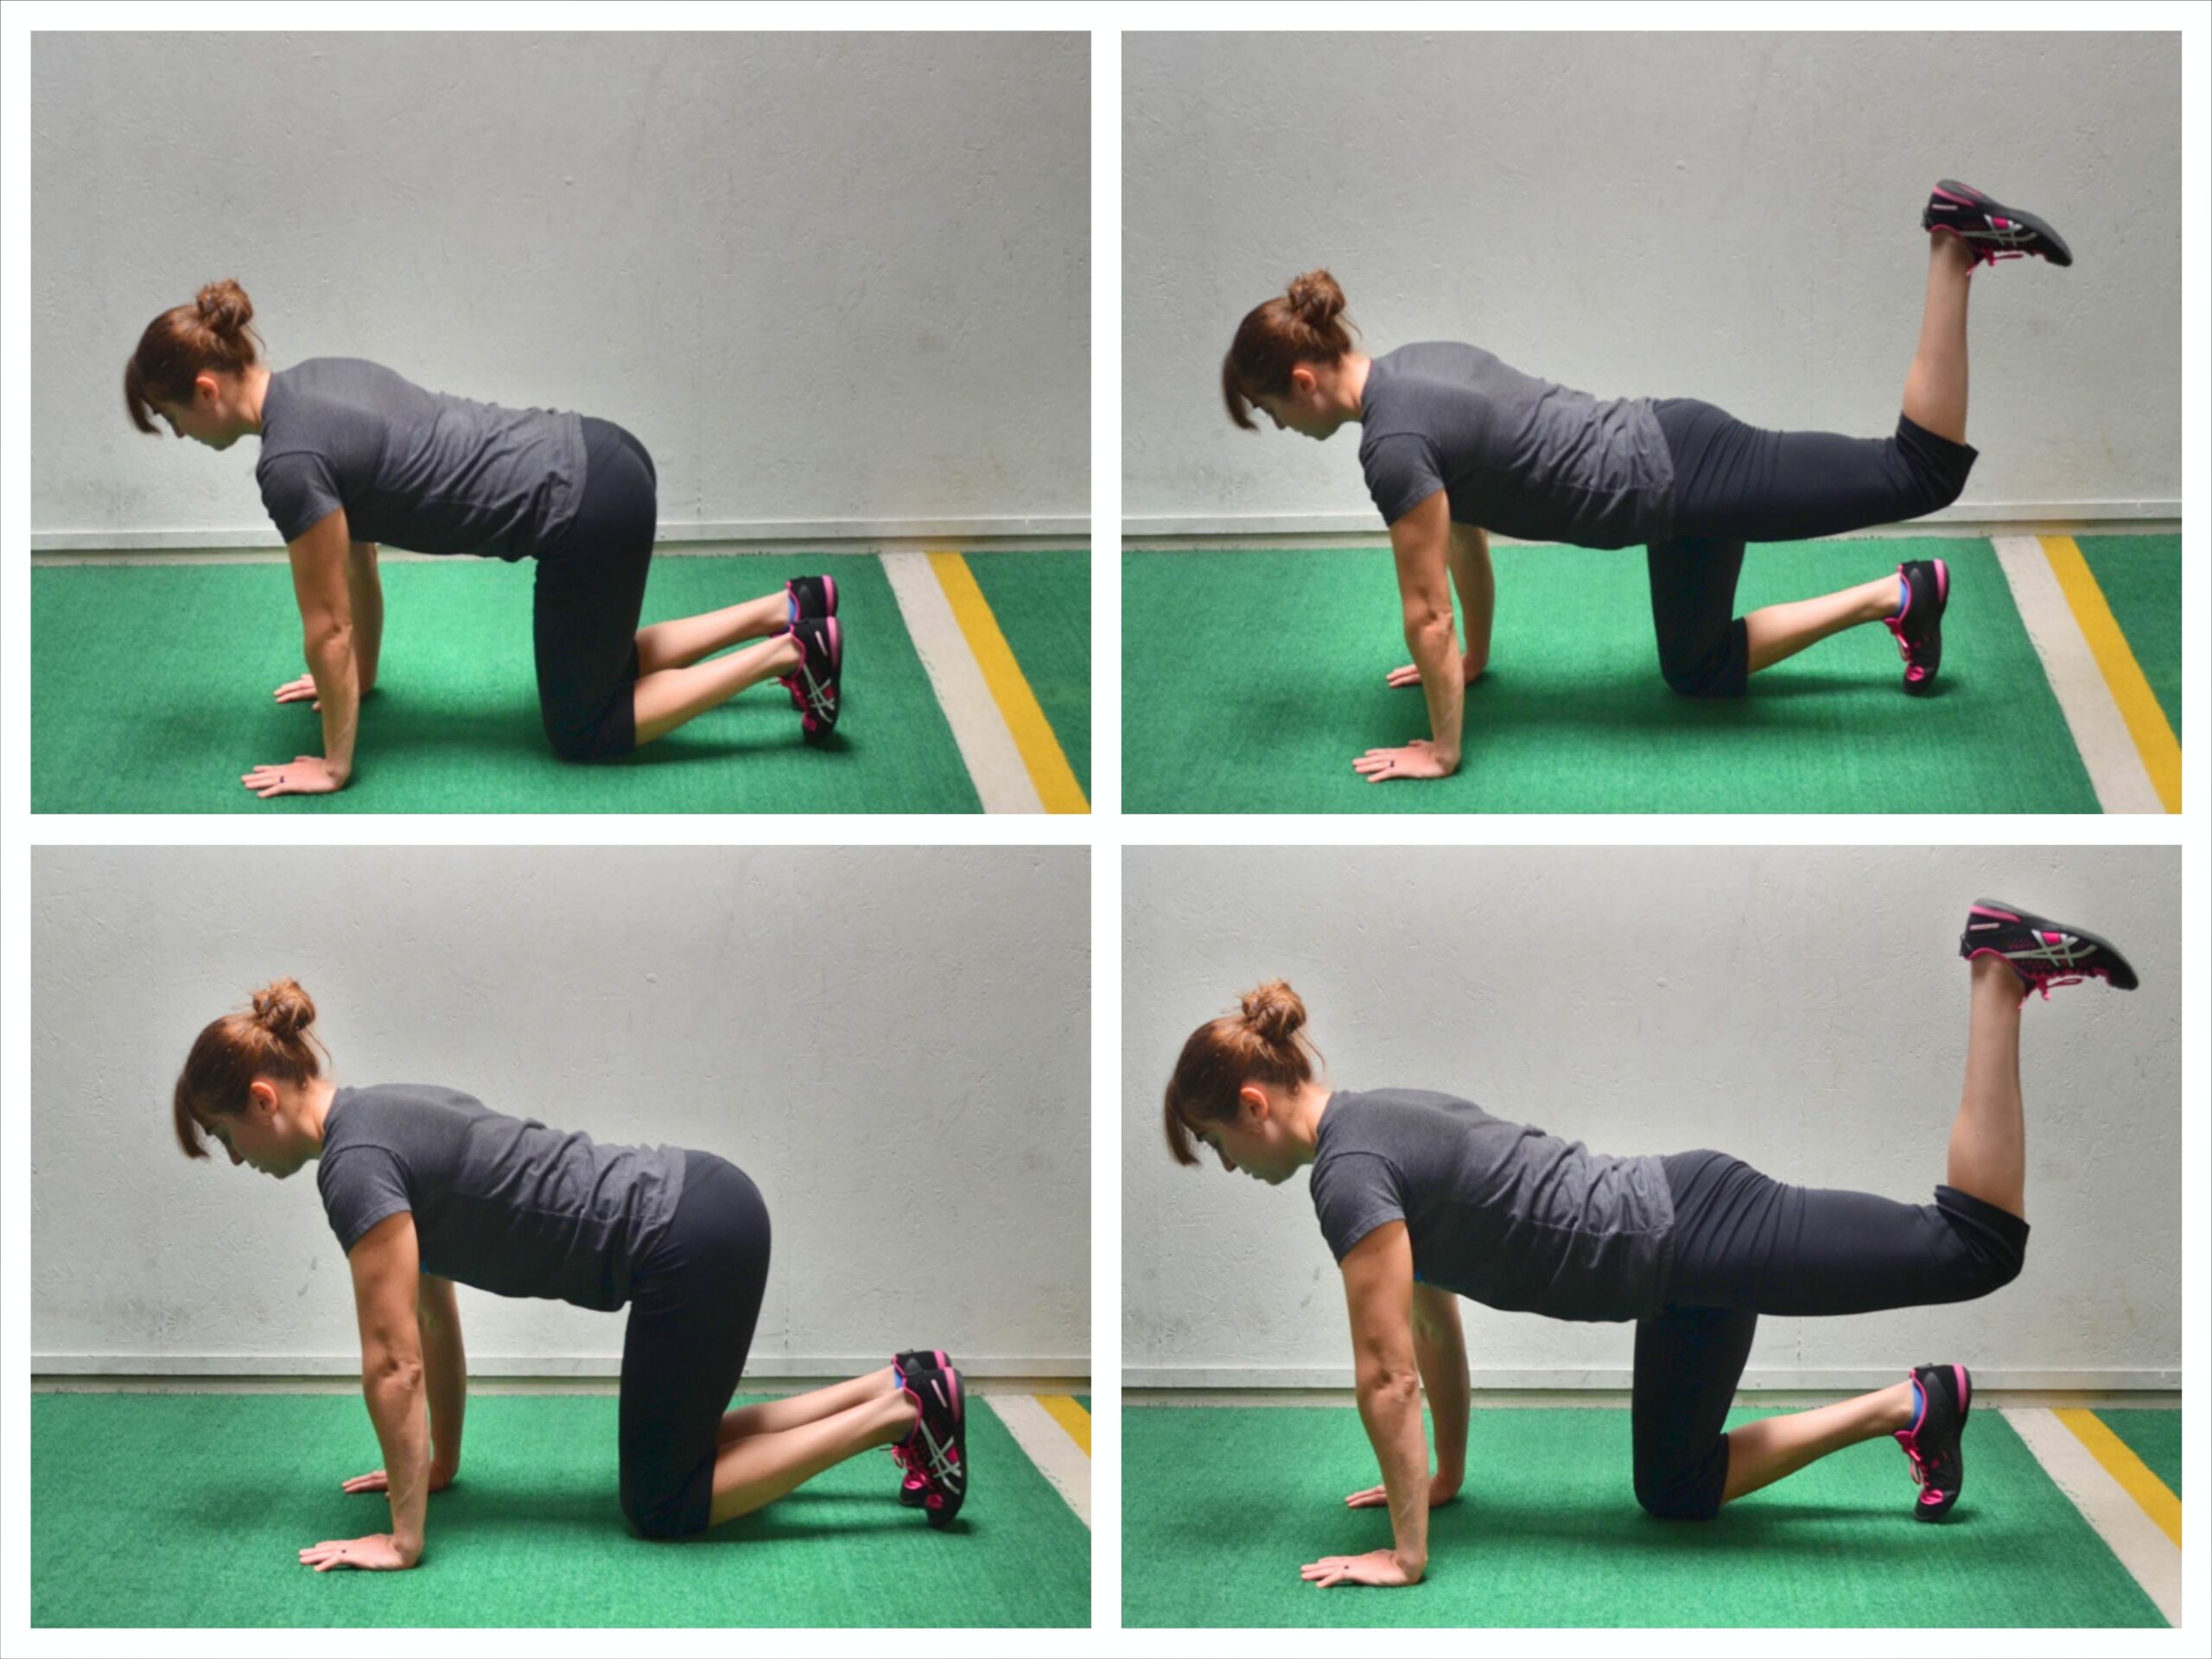
8. Quadruped Exercises: Fire Hydrants, Bird Dogs and Donkey Kickbacks:
Just like there are a ton of mini band moves that are safe to do if you have bad knees, there are also a ton of quadruped glute and core exercises that you should include in your routine if you have knee pain.
These moves also focus on activating the core and can even open up your hips.
The three below are a few of my favorites because they hit the glutes from numerous different angles while also building core strength. They also all can help improve your hip mobility.
Fire Hydrants – Place your hands underneath your shoulders and your knees underneath your hips. Flex your feet. Then raise one leg out to the side, keeping the knee bent to 90 degrees. Lift it as high as you can while keeping your arms straight. Try to not let the foot get higher than the knee or the knee get higher than the foot. Really squeeze the butt cheek as you lift. Hold for a second or two at the top. Lower down and then repeat. Complete all reps on one side before switching.
Bird Dogs – Place your hands under your shoulders and your knees under your hips. Flex your feet. Kick one leg out straight as if kicking it into the wall behind you while you reach the other arm out straight toward the wall in front of your head. Don’t worry about lifting your leg or arm up high. Really try to drive your arm and leg toward opposite walls. Squeeze your glutes and keep your belly button pulled in toward your spine. As you lower your arm and leg, bend them and bring them together under your body. Try to touch your knee to your elbow before extending back out. Repeat all reps on one side before switching to the other side. All reps should be done in a slow and controlled manner. You should even hold for a second or two at the top of the move. You can advance this move by adding a resistance band around your leg and opposite arm so that you lengthen the resistance band as you reach out and have to fight against it pulling you back in.
Donkey Kickbacks – Keep the knee bent close to 90 and keep the foot flexed as you kick one leg back and drive the heel up toward the ceiling. Don’t let the low back arch. Make sure that as you lift you are squeezing the glute of the leg you are raising. Also make sure the foot is driving straight up to the ceiling. And do not let your elbows bend to get the leg higher. Hold at the top and squeeze the glute then lower and repeat. Make sure you are driving straight back and that the knee of the raised leg isn’t flaring in or out.
9. Step Downs:
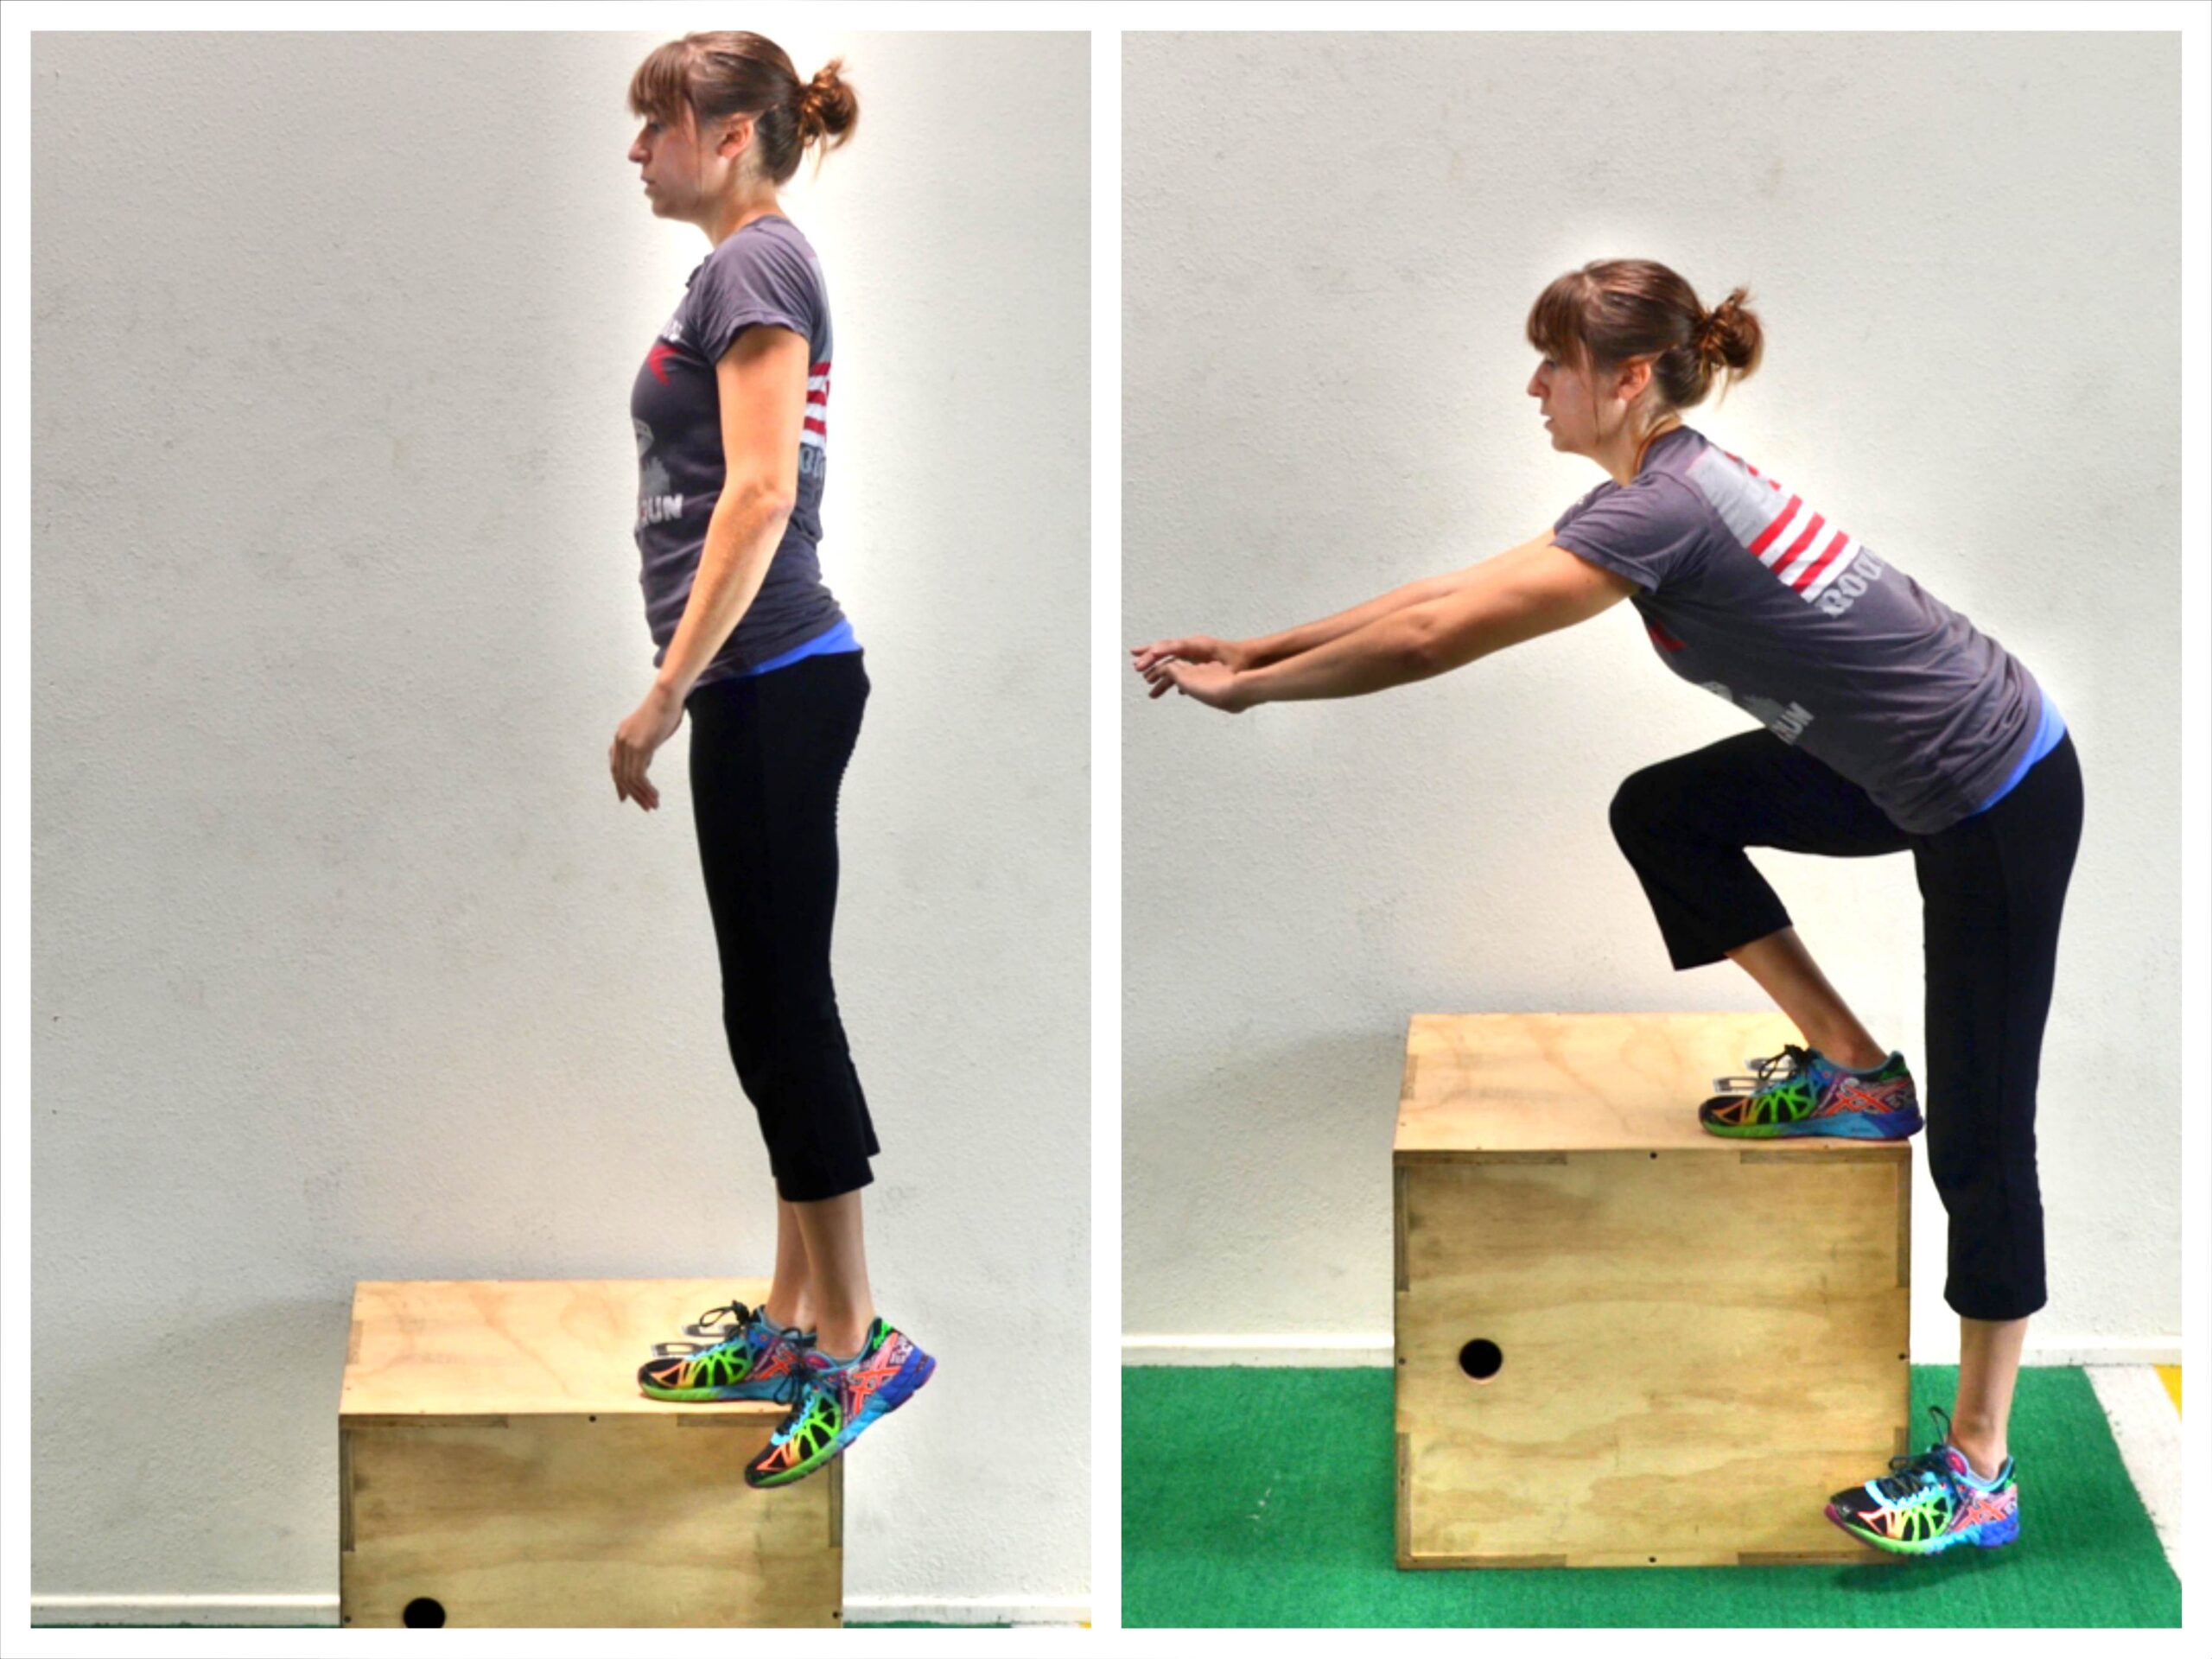
Step Downs can be another safe way to really active your glutes and work your entire leg. They also really work to improve your balance.
However, unlike many of the other moves, you do have to be careful with these and not push the range of motion to quickly.
Start with a shorter box or don’t go down as low. Sink deeper as your mobility and strength improves.
To do Step Downs, start standing on the bench or box so that you can step off of it to the side with your left foot. Your right foot will be near the edge of the bench as if you are going to step down onto your left foot. Slowly hinge forward, keeping your back flat. Push your butt back as you bend your right knee, dropping your left foot toward the ground. Do not touch your left foot down. Once you go as low as you can, drive right back up to standing. Do not do more than touch your left toe down. You don’t want to be able to push off your left foot at all. Make sure you are only driving through your right heel and not using your left foot on the ground.
10. Single Leg 1/2 Squat, 1/2 Deadlift or Skater Lunge:
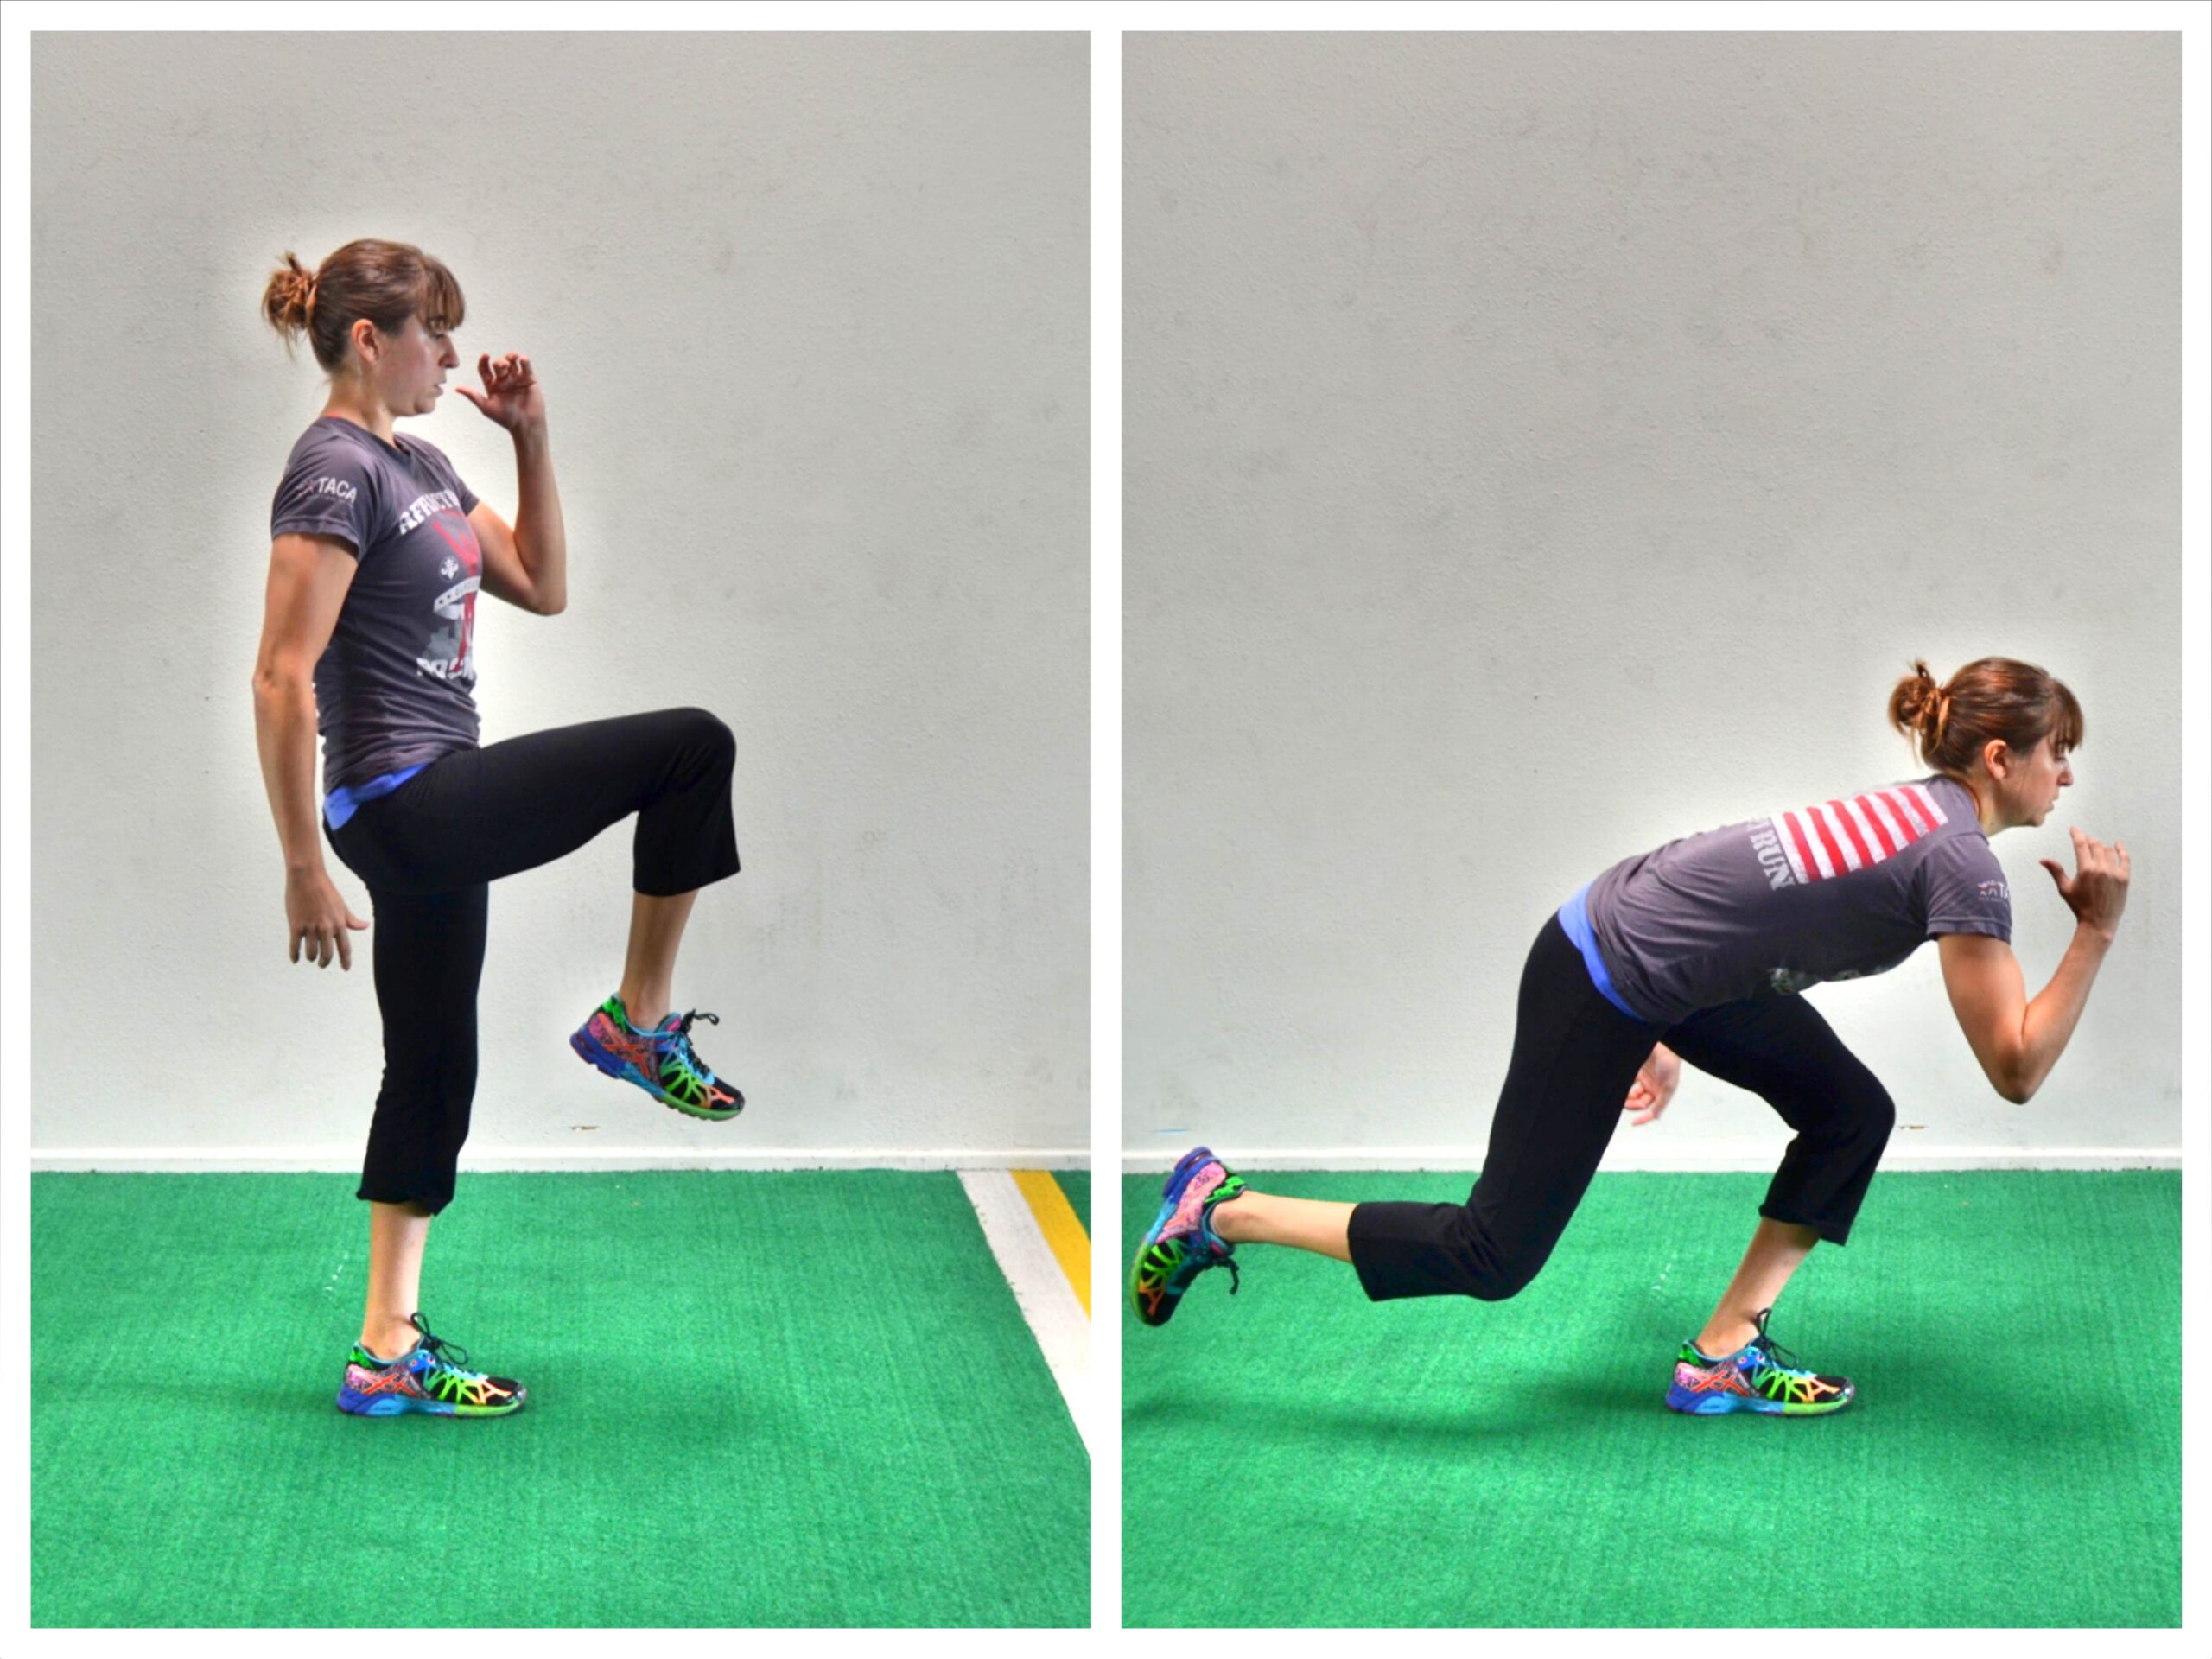
Similar to the single leg deadlift, this move will work on balance; however, it isn’t strictly posterior chain like the the deadlift. This move will also really work your quad.
As you get stronger, your range of motion will become greater. Start out shallow and reach closer to the ground as the you become more comfortable and your balance improves.
To do the Skater Lunge, start by standing on your right leg. Start to bend your right knee as you drive your left leg back. You are going to hinge forward as you also squat down on your right leg. Once you’ve gone as low as you can, keeping your chest up, you will come back to standing. Try not to touch your left toe down between reps. Move your arms as if running in slow motion. As your left leg goes back, your right arm will go back. As your left leg comes forward, your right arm will come forward. Slow down the tempo of this move to make it harder. Take 3-5 seconds to squat down and then quickly pop back up to standing.


Thanks for this! I have a pre-existing knee injury, and is that I’ve started really working out after baby, I’ve found that my butt on the injured knee side is absolutely hurting with a deep interior pain and my ankle (which has never given me problems) feels like there is bump on it. So weird! I’ve been looking up possible issues and this website popped up. Thanks for the suggested exercises. I will absolutely be trying these in the morning!
I would definitely try rolling out your glute some too Sharon. What did you do to your knee?
Thanks so much for these great exercises! I didn’t have any good ideas how I could build lower body strength while being impended in my left knee with a cyst (now can hardly run or bike – my favorite things). Five years ago the doctor diagnosed my cyst from an MRI. He said it should just go away. It hasn’t, and has recently become worse than ever (seems to be getting worse as a result of normal exercise and knee movement – maybe it’s inflamed?) I’m working in rural Africa for six more months, after which I’ll be going back to visit to my home country, Canada, and then will have a chance to get medical attention. Thanks again so much for posting these exercises!
Hi Neil
Reducing flexion and even high impact stuff will help. I would also stretch your calves and hamstrings A TON! These things can help you stop causing inflammation and irritation. Glute Activation will also really be key!
Hope this helps!
Cori
Wow! Thanks for the tips! I’m going to try that all out.
Much appreciated.
Neil
No problem! 🙂
Thanks so much for this, been suffering with knee injury and unable to train, after a month off was unsure what was safe, definitely gonna give the above a try!
Glute activation will definitely be key and seeing a doctor to determine the exact problem is a good idea as well! 🙂 If you need anything though, let me know! – Cori
This is great…I’ve worked with personal trainers who just didn’t give me much variety for lower body workouts so I will try all of these. THanks
Thank you! Make sure to progress slowly so that you build strength while avoiding re-injurying your knee! If you need anything, let me know!
I have knee surgery in 10 days to get my knee cap reattached. As it’s been a struggle, I’ve noticed I’ve been gaining weight and can’t put any weight on my knee, as in, cannot kneel or squat. Do you have any exercises that will help with that where I don’t need equipment and can do at home? I did the glute bridge, absolutely loved it, thanks!
I should add that I’ve been swimming a lot and also have done a lot of ab workouts, but my weight is in my lower abs, butt and thighs, as these workouts I’m doing are normal for me, but I used to also run.
Hi Jess. So get cleared by a doctor, but these glute activation ones will be good as you are approved. Also, diet is really key for losing weight. We can’t out exercise a bad diet and since you are limited, eating well is even more key.
Here are the glute workouts – https://redefiningstrength.com/5-quick-booty-burners-to-build-a-better-butt/
Here are some diet tips – https://redefiningstrength.com/carb-cycling-vs-macro-cycling/
Hope this helps!
Cori
Thanks so much Cori!!!
Just had 60% partial medial menisectomy. I am looking for stuff to do to prevent a future knee replacement as my ortho has said running is definitely out for me now…wife will be running half marathon without me in 2 weeks…bummer. these look to be promising exercises! thank you!
Hi Josh. Make sure to roll your lower body and focus on mobility work. Also, glute activation will be really key! https://redefiningstrength.com/glute-activation-15-glute-bridge-variations-and-2-activation-series/ – Cori
Got tendonitis in both knees, I love running and do weights for my legs but my muscles are very tight, started therapy yesterday and cannot run, bike for more than 15 min, no squats, lounges…. so I will use this exercises to not let myself go during the recovery time. I hope I can run and be back to train.
I would also recommend glute activation and foam rolling for your quads, hamstrings and calves. Working on mobilizing your hips and ankles will also be good! Here is a glute activation one to check out – https://redefiningstrength.com/glute-activation-15-glute-bridge-variations-and-2-activation-series/
I am 10 months post Tibial Tiberosity Transfer (on an already dodgy knee after previous dislocation and mcl repair) I am going really well with my Physio finally but was looking for some low impact glute exercises to add in to my rehab, looks like I found what I was looking for, thanks! ?
YAY! Enjoy! Also check out my booty burner workouts and glute activation articles 🙂
I have no right knee so absolutely no bend at all. Fused knee joint. My left knee has a new joint. What exercises can I do
Have you seen a PT? I would hope with that you would have and they would give you moves to do. You will want to look at some of my glute activation stuff. Standing mini band work may be a great place to start!
HiCori
My left knee has always had a tendency to be a little sore but nothing too serious and I have been able when running just to run it away. Over the last week I have been doing squats and lunges to strengthen my glutes (the right one seems a bit weak and I sometimes get a bit of soreness in my right hip). Anyway, this has caused my right knee to flare up – directly below the knee – so much so that even walking is now painful unless I hold my left leg quite straight and stiff. I guess I’ve probably not been doing the exercises right.
It does sound like you haven’t been loading the right things. Denis it is always good to see a PT. It does sound like too if your right glute is weak, you need to be doing more focused glute work….Like those silly things like this – https://redefiningstrength.com/the-mini-band-booty-burner/
https://redefiningstrength.com/unilateral-booty-burner-workout/
I’d also recommend you foam roll your quads and hips. Make sure when you lunge and squat, you aren’t going forward onto the ball of your foot. You may also want to roll your lower leg, including your calf, outside of shin and foot.
If you are in pain though and it’s been a chronic problem, getting checked out is never a bad thing to make sure you know what is going on!
I have had knee pain and hip pain for a couple of years. It has been diagnosed as Chondromalacia Patella. I would love to try these. How often do you think one should do these (specially when I have a focus on getting better and strengthening my lower body)
Make sure you do lots of glute activation with both of those two injuries as your glutes may not be firing properly. Glute activation you should do 4-5 times a week and these moves you could use in a leg day maybe once a week.
What excercise can replace The Bird Dog. I can’t kneel because I’ve had 2 knee replacements and have difficulties with pain on kneeling.
You could do a plank bird dog from your forearms and feet. You could also do warrior iii abs.
Hey, Cori! Thanks so much for this post, these are great exercises. I really enjoy doing glute bridges, but lately, they’ve been bothering my knees, specifically right below the kneecap. Is this likely because I’m not engaging my glutes properly? Or are the common form issues that might cause this to happen? Thanks 🙂
Hi Cortney! Are you driving through your heels? Have you rolled out your quads before doing them? What is your positioning with your feet? You want your heels just beyond your fingertips at closest. You need a position that allows your glutes to work without your hamstrings taking over; HOWEVER, if your feet are in too close that could be causing the issues you describe too.
I have had a severe kick back from a resident at work , after a m r I scan show lateral meniscus tear and caused onset of osteoporosis. Seeing a knee surgeon. Since this happened 9 wks ago I have been signed off work . My left leg and bottom has lost muscle tone and have slot of muscle wastage on my left injured leg . I would like some exercises that could tone up and strengthen both please . Thankyou Shirl
Hi Shirley. Have you had PT? I would recommend that you definitely be careful until consulting a surgeon and you should receive PT. Glute activation will be a great way for you to keep strong and even prep your body to recover more quickly post surgery should you need it.
These look like good exercises to try. I’ve got a left knee injury and a combination of left hamstring pain + sciatica on my left side again. It makes for working out my glutes difficult because my right side is fine but left side can’t hack too much. When I try doing kick backs on my left leg it feels like something is rolling or tweaking behind my knee (not to mention hamstring pain). I’ll try these ones out!
I would definitely recommend you roll out the muscles of your back and your hips. Potentially even lightly your glutes and hamstrings too.
Hi Cori, are single leg squats to bench effective for knee rehabilitation in patellar tendonitis? Are there any exercises you wouldn’t recommend?
I would be careful with those until your inflammation has gone down a bit. You will want to limit knee flexion or at least active knee flexion to start.
Is it ok to try these with a medial collateral ligament injury? I overdid it on a run recently, which set me off and it doesn’t seem to be getting any better. I have been making a lot of progress with lower body strength over the last few months and don’t want to loose it all.
Thanks!
Hi Anna. Have you seen someone about a rehab program?
Can you come up with a workout for pans anserine. It mimics knee pain I think because of the extension through that area?
I’m assuming you mean pes anserine bursitis? You should check out my ankle and hip mobility stuff. You’ll be surprised by how much that stuff is key.
Hi Cori
I have been told that I have knee alignment issues together with IT band syndrome. Are the above exercises ok for me to do in the recovery period? Thanks
Are you going to physio Gabby? That is key and then focusing on rebuilding slowly! This article may also interest you – https://redefiningstrength.com/the-surprising-cause-of-it-band-issues-back-hip-and-knee-pain/
Been fast walking for years 3 or more miles a day! Wanted to up my game and started jogging! It was going great for weeks then out of the blue both inside knees started hurting and burning! I can’t even walk now without pain! I’m no spring chicken but workout religiously! Heavy weights and all! The only thing I did different was to try new shoes Didnt know if that was the cause or not. Now I’m taking ibuprofen just so I can workout! I’m 68 years old! Getting very depressed because of this!
Have you gotten your running form assessed? Did you do a proper warm up? Are you doing the prehab work? Sharing these tips to help – https://redefiningstrength.com/how-to-fix-knee-pain-do-these-4-moves?sl=blogcomment