Glute Activation is a hot topic right now and with good reason – strong, active glutes not only look great, but they also help prevent pain and injury while also helping you to lift more and run faster.
And the Glute Bridge is one of the best basic glute activation exercises out there.
But as much as everyone needs to include the Basic Glute Bridge in their workout routine, it is important to also add some variety to that basic movement to challenge your glutes and work them in different ways.
By using variations of the same basic move, we can progress the movement to challenge our body with the “same, but different.”
Here are 15 Glute Bridge Variations and some new Glute Bridge Activation Series you can include in your workouts to get your glutes activated and working (aka pumped and feeling the burn!).
Glute Activation – 15 Glute Bridge Variations And 2 Activation Series
Below are 15 Glute Bridge Variations to get those glutes activated and working. These variations will target your glutes in different ways to help even the most stubborn glutes get working.
Plus all of these moves will open up your hips (aka relax tight hip flexors) and even help activate your abs if you really focus on squeezing your glutes and use the posterior pelvic tilt, instead of simply trying to bridge up higher by hyperextending your lower back.
(Glute activation, through a process called reciprocal inhibition, relaxes overactive hip flexors. Basically, by engaging the OPPOSING muscle group, you inhibit the other muscle.)
With all of these bridge variations, make sure to focus on feeling the correct muscles working. We can’t just go through the motions. Moves like this are all about the mind-body connection. Using our mind to activate and engage the muscles HARDER!
By concentrating on the muscles working, you will get even more out of these Glute Bridge Variations so do not rush through them!
Below is a review of Basic Glute Bridge Form followed by some fun variations!
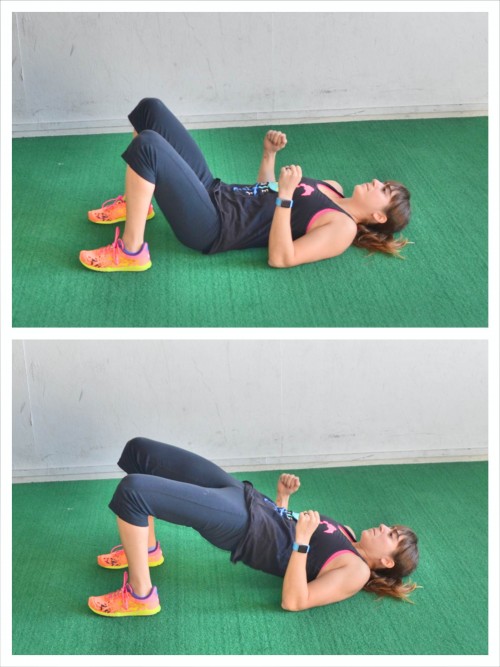
How To Do The Basic Bodyweight Glute Bridge:
Basic Glute Bridge – No matter how much weight you can lift or how advanced an exerciser you are, it is always good to return to the basics. And the Basic Glute Bridge is simply one of those must-do moves, you’ve always got to include. It is also a great place for beginners to start.
And if you have a desk job, this should be a staple move in your routine.

To do the Basic Glute Bridge, lie on your back and bend your knees and put your feet flat on the ground just close enough that you can graze your heels with your fingertips when you stretch your arms down by your side. Your feet should be about hip-width apart. You may need to adjust your exact foot positioning based on how tight or mobile your hips are. You can move your feet slightly away from your fingertips, but just make sure you don’t move them so far away that you feel your hamstrings taking over.
Bend your elbows to 90 degrees so that only your upper arms are on the ground. This will help you really be able to drive down with your elbows, upper arms and back to help you bridge straight up instead of pushing yourself backward.
Then bridge up, driving through your heels and upper back and arms to lift your glutes up off the ground. Drive your hips up as high as possible, squeezing your glutes hard as you brace your abs. Keep your belly button drawn in so you don’t hyperextend your back.
Focus and consciously squeeze your glutes at the top. You may even want to perform the pelvic tilt before you lift to help keep your abs engaged throughout the bridge so that your low back doesn’t take over.
When you bridge, do not push backward off your heels. Make sure you are driving straight up and that your knees aren’t caving in. Even think about driving your knees forward over your toes to help extend your hips and prevent you from pushing yourself backward.
Squeeze your glutes for second or two at the top and lower all the way back down to the ground before repeating. Do not rush through the move.
Concentrate on feeling your glutes engage and on keeping your abs braced. You do not want your low back to take over. If you do feel your low back or don’t feel your glutes, stop and reset and focus on engaging them a little extra at the top!
Using the Mini Band, one of the variations below, can also help if you have super stubborn glutes that don’t want to engage.
15 Glute Bridge Variations To Activate Your Glutes:
Glute Bridge With Rock – Because of how we sit and move throughout the day, most of us have imbalances, even if just small ones. We generally have a stronger and a weaker side and it can be different between our lower halves and our upper halves. It can even depend on the muscle group!
Because of these imbalances, it is good to include moves that isolate or force each side to work independently.
A great Glute Bridge Variation to make both glutes work while also allowing you to shift the focus from one side to the other is the Glute Bridge With Rock.
The Glute Bridge With Rock forces each glute to contract a little extra independently so that each side gets the focus while both also have to work together.
To do the Glute Bridge With Rock, set up like you are going to do the Basic Glute Bridge. Lie on your back with your knees bent and feet flat on the ground. Your feet should be about hip-width apart and your knees should be in line with your feet and hips.
Bend your arms to 90 degrees and then drive through your arms, upper back and heels to bridge up. Squeeze your glutes and brace your abs to bridge up.
Then slightly release the contraction in one glute and rock to bridge one hip up slightly higher. Really focus on contracting that glute.
Release that side and rock your other hip slightly up to contract that glute harder. Keep your abs braced as you rock slightly and alternate contracting each glute a little bit extra at the top of the bridge.
Do not let your low back take over as you hold at the top and work to contract each glute a little bit extra. Also, do not let your hips sag down toward the ground.
Alternate rocks until all reps are complete then lower down.
Glute Bridge With March – The Glute Bridge With March is another great way to isolate each side a bit while still holding a bridge. It is also a slightly easier way to isolate each glute than doing a full Single Leg Glute Bridge.
However, if you can’t properly bridge up doing the Basic Glute Bridge, you should not progress to this variation. If you can do the Basic Glute Bridge, but struggle to keep your hips up with this variation, the Glute Bridge With Rock could be a good variation to do.
To do the Glute Bridge With March, lie on your back with your knees bent and feet flat on the ground. Your feet should be about hip-width apart and your knees should be in line with your feet and hips. Your feet should be just beyond your fingers when you stretch your arms down by your sides.
Bend your arms to 90 degrees and then drive through your arms, upper back and heels to bridge up. Squeeze your glutes and brace your abs to bridge up.
Holding this bridge, lift one foot up off the ground, bringing your knee in toward your chest as if marching. Do not let your hips sag as you lift the leg.
Move slowly to lift the leg then lower back down and switch, bringing the other knee in toward your chest.
Do not let your hips sag as you march. Also, do not let your low back take over. Keep your abs engaged and really focus on making the glute of the leg that is down work to keep your hips up.
You may not want to lift your leg as high if you struggle to maintain the bridge. Doing a smaller march means that each side has to work independently for shorter, which can make the move a bit easier.
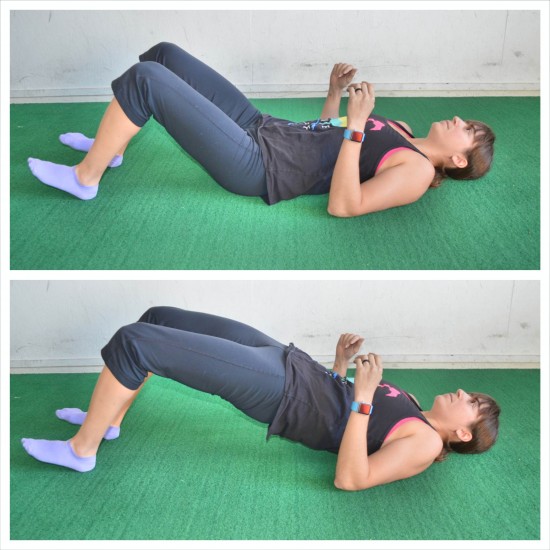
Frog Bridge – If you struggle to get your glutes working, the Frog Bridge is a great Glute Bridge Variation to include in your warm up. It is often one of the easiest Glute Bridge Variations to make people feel their glutes.
It is also a great way to really focus on learning how to engage your abs as you bridge. Using the pelvic tilt during this exercise will help you feel, not only your abs, but also your glutes more!
To do the Frog Bridge, lie back on the ground and place the bottom of your feet together, letting your knees fall open as if you’re doing the butterfly stretch. The closer you bring your feet in toward your crotch, the more mobility you need to do the move. Find a comfortable placement and allow your knees to relax open. If you feel your hips or even your inner thighs during the bridge instead of your glutes, try moving your feet out a bit from your body.
Lying on your back with your knees wide and the bottoms of your feet together, bend your elbows to 90 degrees so that only your upper arms are against the ground. You want to really drive your elbows down into the ground as you bridge up.
Then, perform the pelvic tilt, engaging your abs as you drive through your upper arms and the outsides of your feet to bridge up. Keep your knees open as you bridge and squeeze your glutes as you lift. Really contract them at the top and hold for a second to feel them working. Do not let your knees come back together. Relax them open as you squeeze your glutes and keep your abs engaged.
Then lower back down and repeat.
Make sure to keep your core engaged and really drive down through your upper arms so that you don’t push yourself backward as you bridge back up. Do not let your knees come back together. Keep them relaxed and open. Again, concentrate on your glutes working to lift. Make sure to pause and engage your glutes at the top.
Glute Bridge With Alternating Overhead Reach – Glute Bridges are a great exercise partly because they activate your glutes and partly because they are the opposite of what you do all day seated at a desk – aka they are a hip extension exercise as opposed to the hip flexion you sit in all day.
And when you do the Glute Bridge with Alternating Overhead Reach, you can also stretch your back and improve your thoracic mobility.
To do the Glute Bridge With Alternating Overhead Reach, set up as if you are doing the Basic Glute Bridge. Lie on your back with your knees bent and feet flat on the ground. Your feet should be about hip-width apart and your knees should be in line with your feet and hips. Your feet should be just beyond your fingertips when you stretch your arms down by your sides.
For this variation, you can leave your arms down by your sides; however, bending your elbows can help you get a little more leverage for the bridge and reach.
Then driving through your heels and upper back bridge up, bracing your abs and squeezing your glutes to extend your hips. As you bridge up, reach one arm up and across your body to try and touch the ground on the opposite side just above your shoulder.
Stretch your back and feel your spine twisting and extending to reach, but do not hyperextend your low back to reach overhead. You want to get the mobility out of your mid and upper back not your low back.
Hold for a second or two then bring your arm back across and down to the ground as you lower down out of the bridge.
Then bridge back up and reach the opposite hand across and overhead.
You should feel your glutes working to help you bridge up and may even feel one side slightly take over as you reach overhead. This move will force each side to work slightly independently.
Mini Band Glute Bridge – If you struggle to feel your glutes activate even during the Basic Glute Bridge, a great way to force them to engage is by using a Mini Band.
Then Mini Band can help you activate your glutes because it will try to press your knees in as you have to force them out. This will make your glutes engage to stabilize your hips as you bridge.
It is also a great bridge variation if you’ve had low back, hip or knee pain! (And it can be advanced to a Single Leg Variation shown bottom.)
To do the Mini Band Glute Bridge, place the band around your knees or right below or above your knees. Putting it right above makes the move easier to isolate your glutes if you don’t feel them working. Placing the Mini Band below your knees requires your glutes to be more active.
Then lie flat on your back with your knees bent and feet flat on the ground. Bring your heels in toward your butt with your feet about hip-width apart. The closer to your butt your heels are, the more you will isolate the glutes. The farther your heels are from your butt, the more you will work your hamstrings.
Make sure that you press your knees out against the band to keep your knees in line with your ankles and hips.
Bend your elbows to 90 degrees and then, pressing out on the band, drive through your heels and upper back and arms to bridge up. Fully extend your hips and squeeze your glutes.
Really press out on the band to keep your knees in line and feel your glutes activate. Hold for a second or two at the top with your glutes and abs engaged and then lower back down and repeat.
Do not let your knees cave in as you lower down. Do not release tension at the bottom. Drive your knees out against the band the entire time and squeeze your glutes extra at the top.
Wide Stance Glute Bridge – If you struggle with engaging your glutes and your knees caving in, the Wide Stance Glute Bridge is a great option. Plus, you can add a Mini Band around your knees to make it even more challenging and really get those glutes burning.
To do the Wide Stance Glute Bridge, lie on your back with your feet flat on the ground about shoulder-width apart and close enough in toward your butt that you can almost graze your heels with your fingertips.
Bend your arms to about 90 degrees and then drive down through your arms, upper back and heels to bridge up. Do not let your knees cave in as you bridge. Keep your knees in line with your ankles and hips and squeeze your glutes hard at the top.
Keep your abs braced as you bridge and hold for a second or two at the top, focusing on engaging your glutes.
Make sure your knees don’t cave in as you lift, hold or lower.
Lower back down and repeat.
You can also do this with a Mini Band to really work those glutes and help remind you to keep your knees open.
Close Stance Glute Bridge – Glute Bridges don’t only have to work your glutes. They can also work your inner thighs to help build hip and knee stability. That is why the Close Stance Glute Bridge is great. It works on your hip extension and glute activation while also engaging your inner thighs.
To do the Close Stance Glute Bridge, lie on your back with your feet together on the ground and just beyond your fingertips when your arms are down by your sides.
Bend your elbows to 90 degrees and squeeze your legs together. Then bridge up, keeping your legs together. Do not let your knees come apart. You want to squeeze your legs together as you extend your hips and squeeze your glutes.
Brace your abs as you bridge and hold. Do not worry about how high up you bridge. Just squeeze the glutes and press your legs together.
Lower back down after pausing at the top and repeat.
More Hamstring Glute Bridge – So while they are called Glute Bridges, they don’t only work your glutes. Often, actually, people feel their hamstrings more than their glutes, which isn’t necessarily a good thing.
You do want your glutes to fire especially during the Basic Glute Bridge. However, there are variations of the Glute Bridge that can be used to target your hamstrings more if you’ve got your glutes activated and working as well – bridges like the More Hamstring Glute Bridge.
By placing your feet further away from your butt like you do with the More Hamstring Glute Bridge, you can engage more hamstrings and really get them activated and working.
To do the More Hamstring Glute Bridge, lie on your back with your feet flat on the ground about hip-width apart. Your heels should be well out of reach of your hands, about a foot from your glutes. Bend your arms so that you can drive through your upper arms and back when you bridge up.
Then driving through your heels and upper back, bridge up, squeezing your glutes to lift.
Feel your hamstrings and glutes engage to help you bridge up. Hold at the top with your abs braced so that you don’t hyperextend your low back. Then lower back down and repeat.
You can move your feet in slightly closer or slightly further away. If you move them in closer, you will lessen the strain on your hamstrings and if you move them further away, you will place more strain on your hamstrings.
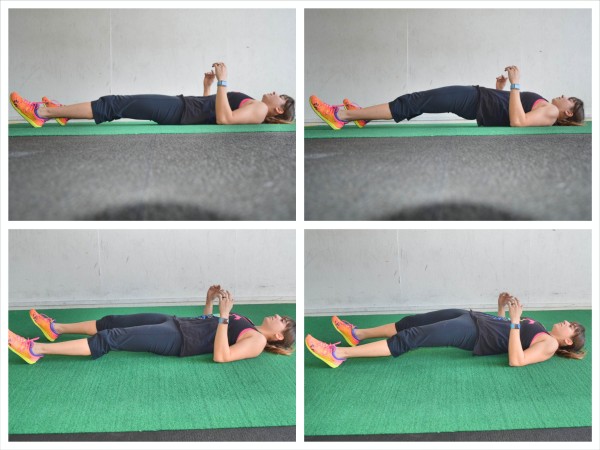
Straight Leg Glute Bridge – If you really want to get those hamstrings working, you can place your legs out basically straight and perform a Glute Bridge. This won’t be a bridge with a big range of motion, but it will really challenge those hamstrings.
Plus you can do this bridge off a bench or even with our feet in a Suspension Trainer for a little extra challenge.
To do the Straight Leg Glute Bridge off the ground, lie on the ground with your legs almost straight. Bring your heels in just an inch or two toward your butt. You can leave your arms down by your sides or bend your elbows to help you press straight up.
Then bridge up, driving through your heels and upper back and arms. Squeeze your glutes. You will not lift up super high but you do want to engage your glutes and abs and extend your hips. Feel your hamstrings working as well as your legs stay basically straight.
Hold and squeeze then relax back down and repeat. You must be very careful with this one that you don’t hyperextend your low back in an attempt to make the bridge bigger.
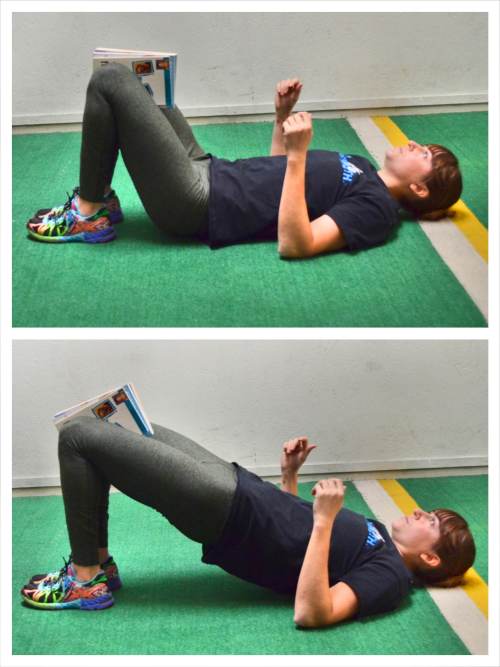
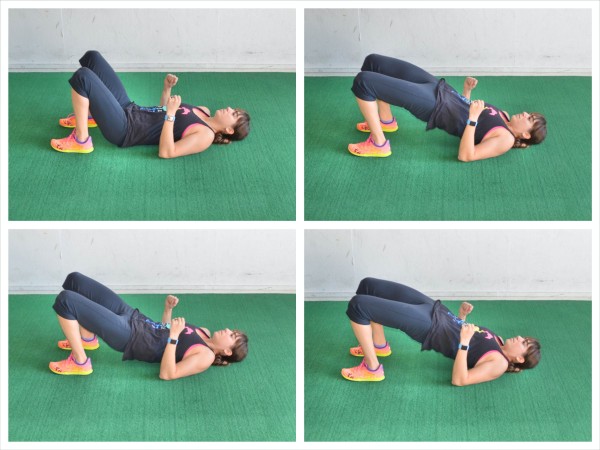
Glute Bridge With Squeeze – Glute Bridges are an important exercise to include because they activate your glutes to help you prevent and alleviate hip and low back pain. But they can also help prevent knee pain, especially when you do the Glute Bridge With Squeeze.
This variation will help strengthen your knee stabilizers while also activating your glutes. And all you need is a book, block or even a pillow to hold between your knees.
To do the Glute Bridge with Squeeze, bend your knees and place your feet flat on the ground. Start with your feet just beyond your fingertips when you stretch your arms down by your sides and place the block or pillow between your knees. Depending on what object you use, you may have to adjust your foot placement so that, when you squeeze the object tight between your knees, your ankles, knees and hips are all in alignment.
Then bend your elbows to 90 degrees so that only your upper arms are on the ground and brace your abs. Driving through your heels and upper back and arms, bridge up, lifting your glutes up off the ground.
Squeeze the block and drive your hips up as high as possible without hyperextending your low back. Squeeze your glutes to lift and brace your abs as you extend your hips and squeeze the block. Feel your glutes and even your inner thighs working to help you bridge and hold the block.
Do not worry about exactly how high you bridge up. Just focus on consciously squeezing your glutes at the top and extending your hips. And do not push yourself backward off your heels. You want to also drive up using your upper back too.
Using the block should keep your knees from really caving in or falling open as long as you set up with your ankle, knees and hips in line.
Squeeze your glutes for a second or two at the top and then lower all the way back down to the ground before repeating. Do not lose the block as you bridge and lower. Squeeze and engage the entire time even when you lower to the ground.
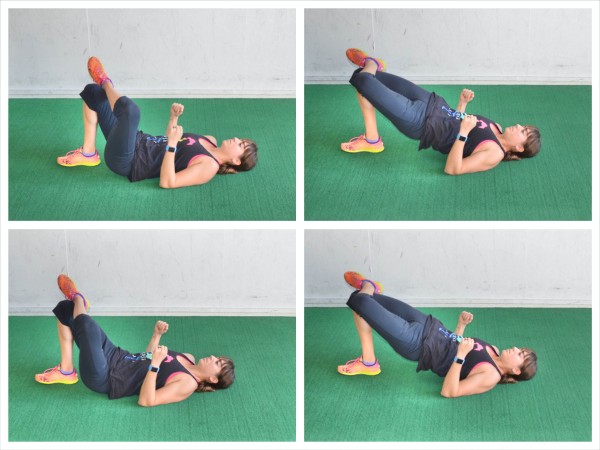
Glute Bridge Hold with Leg Lifts – By holding the Glute Bridge, you can force your glutes and core to engage and stabilize while you open up your hips. And when you add in movement as you hold the bridge, you get the added benefit of learning how to engage and stabilize against rotation or other movements.
Plus the Glute Bridge Hold with Leg Lift forces each side to work independently to stabilize as you lift and lower. It is a great move to really challenge the frontside and backside of your core.
To do the Glute Bridge Hold with Leg Lift, lie on your back on the ground with your knees bent and feet flat on the ground a little closer than hip width apart. Bend your arms so that you can drive through your upper arms and elbows to bridge up. Then bridge up, squeezing your glutes to lift and extend your hips.
Holding the bridge, lift one leg straight up toward the ceiling. Keeping your hips up, slowly lower the straight raised leg down toward the ground. Do not let your hips sag as you lower the leg down.
Keep your hips still and raised as if you were bridging up with both legs. Then raise your straight leg back up toward the ceiling. Move slowly and lift and lower the leg.
Then switch and raise the other leg straight up toward the ceiling and perform Leg Lifts on that side.
Crossed-Leg Single-Leg Glute Bridge – This is a great Glute Bridge Variation to really open up your hips while activating and isolating each glute.
If you have tight glutes or even low back or hip pain, this is a must-do glute bridge variation. Plus the bonus is you get to stretch as you activate!
To do the Crossed-Leg Single-Leg Glute Bridge, lie on your back with your knees bent and feet flat on the ground. Then cross one ankle over the other knee and let your knee fall open. Bend your elbows and drive them into the ground.
Then bridge up, driving through your heel on the ground and your upper back. Squeeze your glutes and let your knee fall open. Even active engage the glute to pull the knee open as you lift.
Brace your core so that you don’t hyperextend your low back as you bridge. Hold for a second at the top and then lower down and repeat. Try to keep your knee as open as possible to really engage that glute and open up your hip.
Complete all reps on one side before switching. Do not do this bridge variation if you can’t perform the two leg Glute Bridge Variations easily. If you can’t get your hips off the ground without engaging your low back, regress the movement.
Glute Bridge Pulses – Our glutes respond well to more time under tension. That is why Glute Bridge Pulses are a great move to include.
These Glute Bridges keep your glutes under tension, but aren’t an isometric. They keep your glutes under a certain amount of tension as you move.
They are even a great finisher after doing a series of Basic Glute Bridges. For instance, you could do 10 reps of the Basic Glute Bridge and on the 10th one hold at the top and perform Pulses to burn out the glutes.
To do Glute Bridge Pulses, set up like you would for the Basic Glute Bridge (knees bent and feet flat on the ground about hip-width apart). Bend your elbows and then drive down through your upper back and heels to bridge up.
Bridge all the way up, squeezing your glutes. Then slightly lower down and again contract fully and squeeze your glutes. You can do Pulses of different sizes, lowering almost all the way down or even barely lowering at all. The different ranges of motion can keep your glutes under more or less tension.
Make sure to brace your abs as you Pulse so that you don’t hyperextend your low back. Really squeeze your glutes hard at the top.
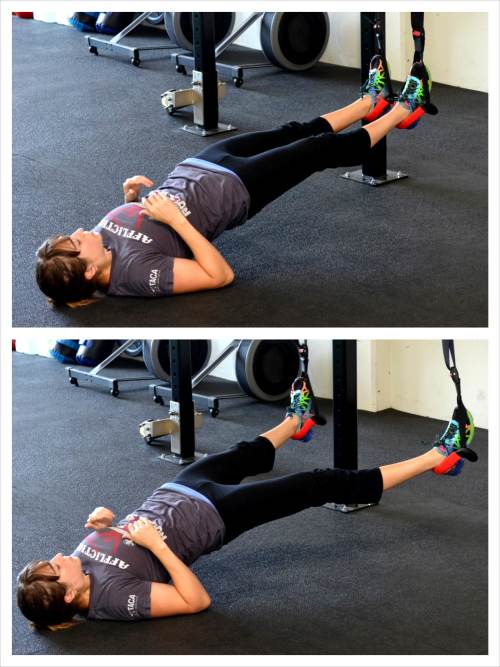
Glute Bridge with Abduction (Glute Cherry Bomb) – Your glutes are made of three different muscles, the glute maximus, medius and minimus. Like the Mini Band Glute Bridge, the Glute Cherry Bomb works all three to really get those glutes burning.
The Glute Bridge with Abduction also works all your abductors as well as your glutes and really challenges your core to stay tight as you have to hold the top of the bridge to abduct.
To do the Glute Cherry Bomb, you need a Suspension Trainer or sliders. Using the Suspension Trainer, place your heels in the suspension trainer straps and lie on your back on the ground.
With your legs out straight and your feet close together, bridge up, squeezing your glutes and driving through your heels. Keep your core engaged so you don’t hyperextend your low back.
Keeping your core engaged and your body in a nice straight bridge, move both feet out laterally, opening your legs up. Do not let your hips sag as you open your legs out. Feel the outside of your butt work to open your legs up as you brace your core so your low back doesn’t engage as you maintain the bridge.
Then bring your feet back together and lower back down.
To advance this move, you can add in a Glute Bridge and Curl plus the Abduction.
For more Suspension Trainer Glute Exercises, click here.
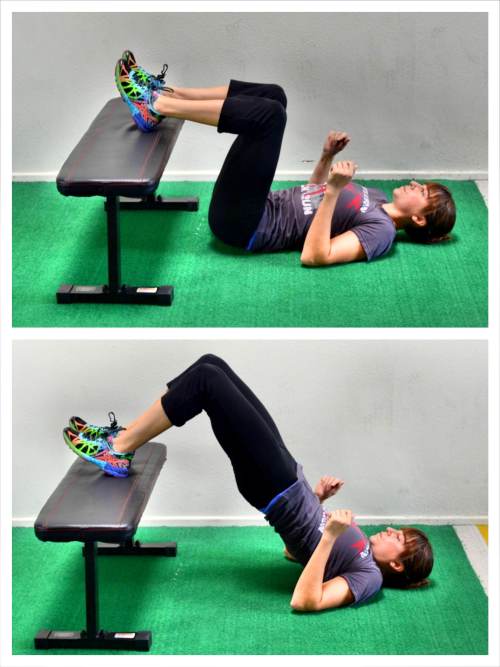
Feet-Raised Glute Bridges and Thrusters – A great way to advance the Basic Glute Bridge, besides making it a unilateral exercise (aka one leg), is to place your feet up on a box or bench. This makes the Glute Bridge way more challenging.
And if you want to take it a step further, you can even place your feet and back up on benches or boxes. Using the box, either just under your feet or under your back and feet, allows you to perform a bigger range of motion, making the move harder.
If you feel your low back engage, bring the movement down to the ground or use a lower box.
To do the Feet-Raised Glute Bridge, place your heels up on a box. A higher box will be harder. Set up with your feet near the edge or even slightly off, but not so far off you can’t drive through your heels. Also, make sure your butt isn’t too far from the box or you will use your hamstrings and not your glutes. Bend your arms to 90 degrees with just your upper arms on the ground.
Then driving through your heels, bridge your hips up as high as you can, squeezing your glutes as you lift. Keep your core tight as you bridge up so that you don’t hyperextend your low back. You may even want to perform the pelvic tilt before lifting. This can help you extend your hips and engage your glutes without hyperextending your low back.
Also, do not let your knees cave in or fall open as you lift up. Keep your knees in line with your hips and ankles.
Hold for a second or two and then lower back down.
For Thruster Variations, aka progressions of the Feet-Raised Glute Bridge, check out this post on the Hip Thruster.
2 Glute Activation Bridge Series:
While you can use any of these Glute Bridge Variations alone, it can be good to combine them into a series to use before your workout or as a burnout after your glute workout.
You can combine variations that work your glutes in the same way to burn them out or you can use variations that put an emphasis on different muscles and work the glutes from different angles.
Below are two Activation Series you can do to open up your hips and activate your glutes. You can use these before your workouts or you can use them after as a burnout.
Glute Activation Booty Burner #1:
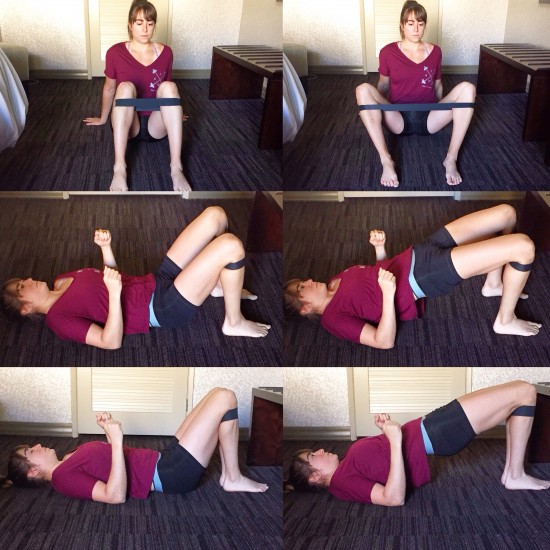
Glute Activation Mini Band Bridge Burner – This Activation Series combines the Seated Abduction with the Wide-Stance and Close-Stance Glute Bridges. It will burn out your glutes and really target all three gluteal muscles as well as your inner thighs.
To do this Glute Activation Mini Band Bridge Burner Series, you will complete 20 reps of each move. Place a Mini Band around your knees, either right below or right above. Right above is “easier” and allows you to feel your glutes if you don’t feel them working with the band below your knees.
To start you will do the Seated Abductions. To do the Seated Abductions, sit on the ground with your hands behind you and band around your knees. Place your feet about hip-width apart and close into your butt.
Then open your knees out against the band as wide as you can while sitting up nice and tall. Do not slouch. You need to sit up tall and press your hips forward as you actively open your knees up using your glutes.
Complete 20 abductions, feeling the outside of your glutes open the band up.
Once you complete the 20 reps, move on to the Glute Bridges.
Start with the Wide-Stance Glute Bridges with the Mini Band around your knees still. Lie on your back with your feet still about hip-width apart and your knees in line. You can open your knees up slightly wider if you want, but do not let the band force your knees to cave in. You want to push out on the band even when your butt is on the ground.
Pushing out on the band, bridge up. Pause at the top and lower back down. Press out on the band and complete 20 glute bridges.
Then bring your feet and knees together to perform the Close-Stance Glute Bridges. You do not need the band for this one but don’t waste time taking it off. Complete 20 glute bridges keeping your legs right together.
Do not let your knees fall apart at all. You should squeeze your inner thighs to keep your legs together and keep your ankles, knees and hips in line. Pause at the top and lower back down. Do not let your knees come open even at the bottom.
Once you’ve completed 20 reps of all three moves, rest.
Glute Activation Booty Burner #2:
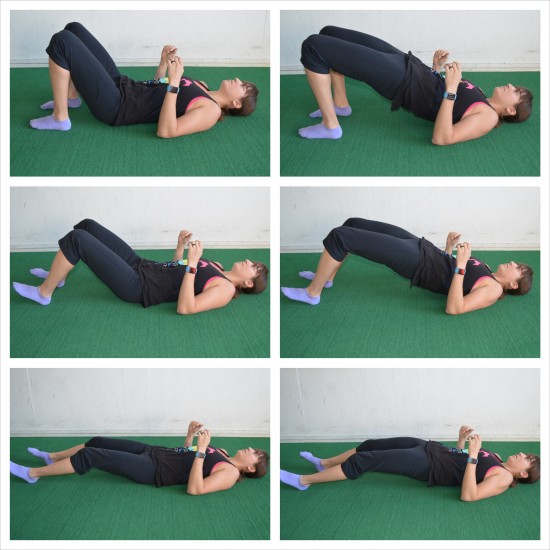
Glute to Hamstring Bridge Burner – This Activation Series will get your backside working and is a great burnout or warm up before any hinge focused workout. This series will get your glutes and hamstrings burning!
To do the Glute to Hamstring Bridge Burner, lie on your back with your knees bent and feet flat on the ground.
Start by setting up for the Basic Glute Bridge with your feet about hip-width apart and in close enough to your butt that you can basically graze your heels with your arms stretched down by your sides. Then bend your elbows to 90 degrees and, driving through your upper arms, upper back and heels, bridge up. Complete all 20 reps then move quickly right into the next bridge variation.
Then at the bottom pause and reset, placing your feet out about a foot from your butt to do the More Hamstring Glute Bridge. Your knees will still be bent, but your heels will be out further from your glutes. Keep your arms bent to 90 degrees and again drive through your upper back, arms and heels to bridge up.
With this bridge you will feel your hamstrings working more than with the first. Still make sure to keep your abs engaged and feel your glutes working to extend your hips. Do not let your low back take over.
Complete all reps then quickly reset for the third move, moving your heels even further from your glutes so your legs are almost straight to perform an almost Straight Leg Glute Bridge. Bridge up with your legs almost straight. The range of motion on this bridge will be smaller. Just focus on engaging and using your glutes and hamstrings. Make sure you brace your core so your low back doesn’t take over. Don’t arch your back just to try to get up higher. Complete all 20 reps with this third bridge then rest.
Using these Glute Bridge Variations and Activation Series, you can get your glutes pumped and working. This can help you lift more, run faster, look better and prevent pain and injury!
Loves these quick booty burner series? Check out my entire 28-Day Booty Burner program with video workouts so you can follow along with me and get some amazing coaching cues to get even more out of the moves!


Thank you so much! You’re my favorite guide to strength training!
Thank you Ashley!
Please help me. I can not get to the ground. Take classes from a chair. How can I do something that simulates a glute bridge.
I have found nothing, thank you
Check out my glute activation moves you don’t have to get down on the ground for 🙂 Standing band hip hinges and hip thrusters are a great option 🙂