The Glute Bridge is one of the best movements to stretch your hips, activate your glutes and give you a stronger, sexier butt all while also helping to prevent and alleviate low back pain.
Basically whatever your goals are, you need to include a bridge variation in your leg workouts because these moves do the opposite of what your body does all day seated at a desk hunched over a computer.
If your glutes aren’t activated, which they often aren’t if you have a desk job, you risk injury and you also won’t end up working one of the biggest muscle groups in your body when you perform the big lifts in your leg workouts.
Want to get stronger? Leaner? Then you need to work the big muscles of your body, especially the muscles of your legs and glutes!
The 20 Glute Bridge Variations below can be used as part of your warm up or as exercises to include in your workout. Some moves, like the Barbell Hip Thruster or Weighted Glute Bridge, can even be the big lifts you focus on for your workout.
If you want to get your glutes activated and strong, you need to include a few of these bridging exercises in your workout routine!
20 Glute Bridge Variations
With all of these bridge variations, it is very important that you focus on working your glutes. You don’t want to feel your low back working. Your glutes should drive the movement.
If you do feel your low back taking over, make sure that you aren’t hyperextending your low back just to get your hips up higher. You want to fully extend your hips, but it doesn’t matter how high up you bridge if it means arching your back.
To help protect your low back, you may even want to perform a Pelvic Tilt before bridging up. For Pelvic Tilt instructions, check out this post on the Pelvic Tilt Progression.
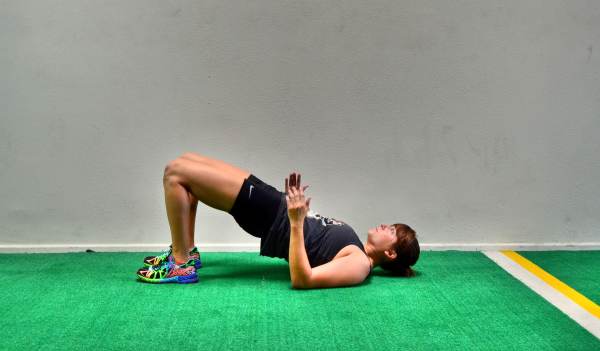
1. Basic Glute Bridge Hold – If you’ve never done a glute bridge before, you need to start with the basic glute bridge hold. This is also a good recovery and activation move for even the most advanced lifter.
Basically EVERYONE at some point needs to do the Basic Glute Bridge Hold.

To do the Basic Glute Bridge Hold, bend your knees and put your feet flat on the ground just close enough that you can graze your heels with your fingertips when you stretch your arms down by your side. Your feet should be about hip-width apart. You can change up how far your heels are from your butt. If they are further out, you may engage more hamstring. While keeping your heels in closer to your butt will isolate more glute.
Then bend your elbows to 90 degrees so that only your upper arms are on the ground. Drive up through your heels and upper back and arm to lift your glutes up off the ground. Drive your hips up as high as possible, squeezing the glutes hard. Keep your belly button drawn in so you don’t hyperextend your back.
Do not push backward off your heels. Make sure you are driving straight up almost as if driving your knees forward over your toes. Also, make sure that your knees aren’t caving in or falling open.
Squeeze your glutes and hold at the top. Concentrate on feeling your glutes work. Don’t just go through the motions. Actually think about the muscles that should be working!
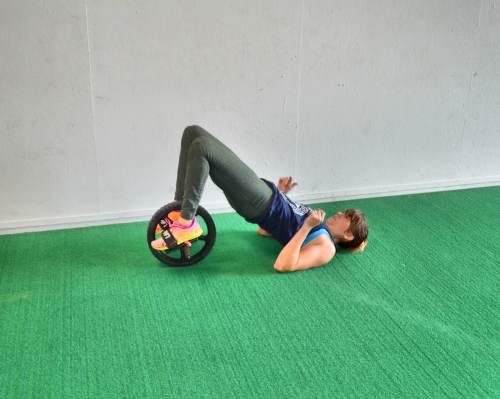
If you want to make the Basic Glute Bridge Hold more challenging, you could hold the bridge with your feet in a Power Wheel.
The instability of the wheel will make the move harder. Only add in the wheel if you can fully extend your hips and feel your glutes working with the Basic Hold and even the Single Leg Hold.
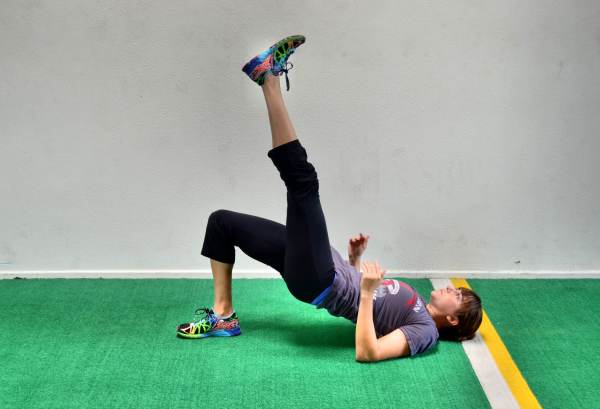
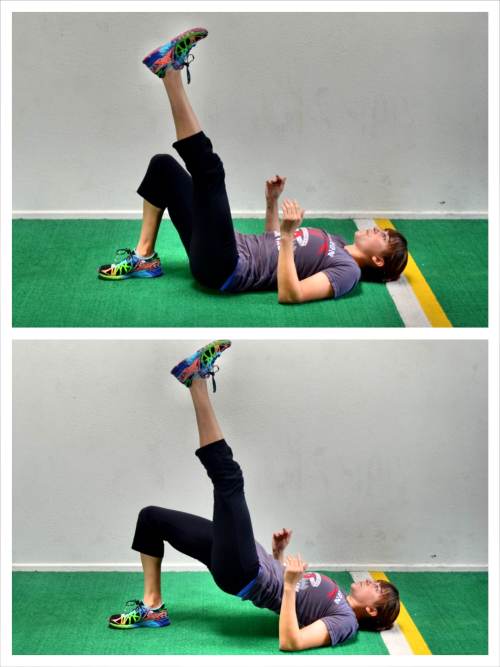
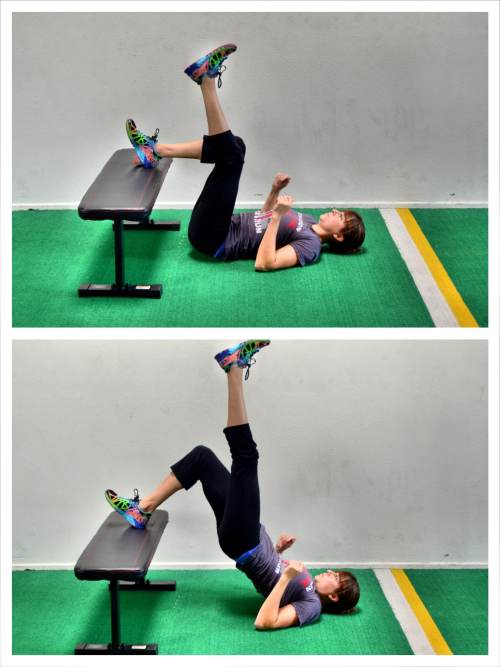
2. Single-Leg Glute Bridge Hold – By making the Glute Bridge a unilateral movement (aka holding on one leg), you will make the move more challenging since the single leg will have to do the work of both legs. Make sure you only progress to this move if you can still fully extend your hips. If you struggle to feel your glutes working on the two-leg hold, do not yet attempt this single leg variation.
To do the Single-Leg Glute Bridge Hold, set up like you would for the glute bridge and then raise one leg up off the ground. You can bend the raised leg to 90 degrees or you can straighten the leg up straight toward the ceiling. Either is fine. Just make sure you don’t swing the raised leg to help you bridge up.
Drive your hips up, pressing through your heel and upper back. Hold at the top. Keep your abs engaged so you don’t feel it in your low back. Like with all the bridge exercises, focus on feeling your glutes work and not just going through the motions of bridging up.
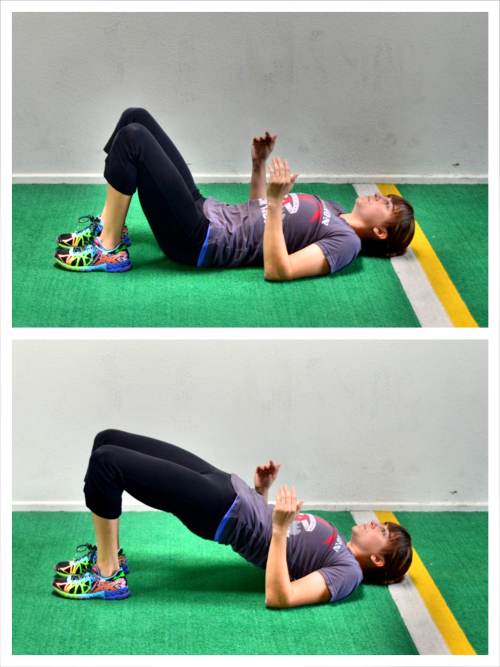
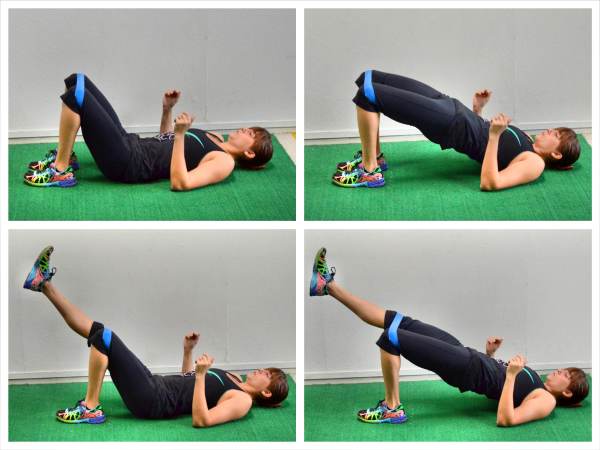
3. Basic Glute Bridge Reps – The Basic Glute Bridge done for reps is another great beginner bridge variation. It is also a great warm up move to get your glutes ready and activated for your leg workout.
To do the Basic Glute Bridge for reps, bend your knees and put your feet flat on the ground just close enough that you can graze your heels with your fingertips when you stretch your arms down by your side. Your feet should be about hip-width apart. If you put your feet further away from your glutes, you will engage more hamstring than if you keep your heels in closer to your glutes.
Bend your elbows to 90 degrees so that only your upper arms are on the ground.
Then drive up through your heels and upper back to lift your glutes off the ground. Drive your hips up as high as possible, squeezing the glutes hard. Keep your belly button drawn in so you don’t hyperextend your back. Focus and consciously squeeze your glutes at the top.
Do not push backward off your heels. Make sure you are driving straight up and that your knees aren’t caving in.
Squeeze your glutes for second or two at the top and lower all the way back down to the ground before repeating.
Do not rush through the move. To make the move harder, hold longer at the top or even slow down the lower back down to the ground. A slower tempo means more time under tension and more work for your glutes.
4. Single Leg Glute Bridge – Just like with the hold, using a single leg makes the repetitions harder. Do not rush through the move just because you are using a single leg. You want to still focus on really squeezing the glutes at the top and fully extending the hips.
By doing the unilateral bridge, you force each leg to work independently, which can also help correct any imbalances you may have. Often one leg is weaker and when we do bilateral moves, the stronger leg can take over and perpetuate the imbalance. With unilateral moves, each leg is forced to work separately, which can help correct the imbalance.
To do the Single Leg Glute Bridge with reps, you will set up like you did for the Basic Glute Bridge with reps except you will raise one foot up toward the ceiling.
Bridge up, driving through your heel and upper back and arms. Hold for a second or two at the top with your hips fully extended. Then lower back down. Make sure to squeeze your glutes at the top and not hyperextend your low back just to get higher up off the ground.
Complete all reps on one side before switching. Do not alternate sides. You want to fatigue the leg before switching to the other side.
5. Mini Band Glute Bridge – If you have knee valgus when you run or squat (aka if your knees cave in), you should try the Mini Band Glute Bridge. This is a great move to include in your warm up or recovery routine especially if you are a runner.
The Mini Band Glute Bridge can be done as either a two-leg glute bridge or a single leg glute bridge. Do not do the single leg variation if you haven’t mastered the two-leg.
To do the Two-Leg Mini Band Glute Bridge, place the band around your knees or right above your knees.
Lie flat on your back with your knees bent and feet flat on the ground. Bring your heels in toward your butt. The closer to your butt your heels are, the more you will isolate the glutes. The farther your heels are from your butt, the more you will work your hamstrings.
Then bend your elbows to 90 degrees and, driving through your heels and upper back and arms, bridge up. Fully extend your hips and squeeze your glutes.
Hold for a second or two at the top with your glutes and abs engaged and then lower back down and repeat.
To do the Single-Leg Mini Band Glute Bridge, set up like you would for the two-leg variation. Then lift one foot up off the ground and extend the leg in front of you so that your quads are next to each other.
Keep tension on the band as you bridge, driving through your heel on the ground and your upper back. Do not let your knee cave in as you bridge up.
Hold for a second or two at the top and fully extend your hips, squeezing your glutes. Lower back down and repeat.
Just like with the two leg variation, if you move your heel further from your butt, you will work your hamstring more.
Make sure you do not feel either bridge variation in your low back. Only progress to the single leg variation if you can get your hips up just as high without engaging your low back.
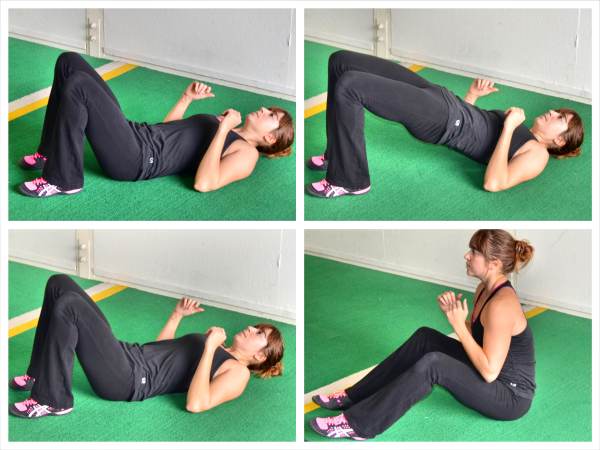
6. Glute Bridge to Sit Up – Want to work your entire core? Then the Glute Bridge to Sit Up is a great move to include in your workout.
Make sure you don’t rush this move. You want to hold the glute bridge for a second or two before performing the sit up. Beginners may need to straighten their legs all the way out to make the sit up easier.
To do the Glute Bridge to Sit Up, lie on your back with your knees bent and feet flat on the ground about hip-width apart. Bridge up, lifting your hips as high as possible while driving through your heels. Lower your hips back down and let your feet move a little away from your butt.
Then sit up, keeping your torso up nice and tall and your feet on the ground. Once you sit all the way up, lie back down, bring your feet back in and then bridge back up.
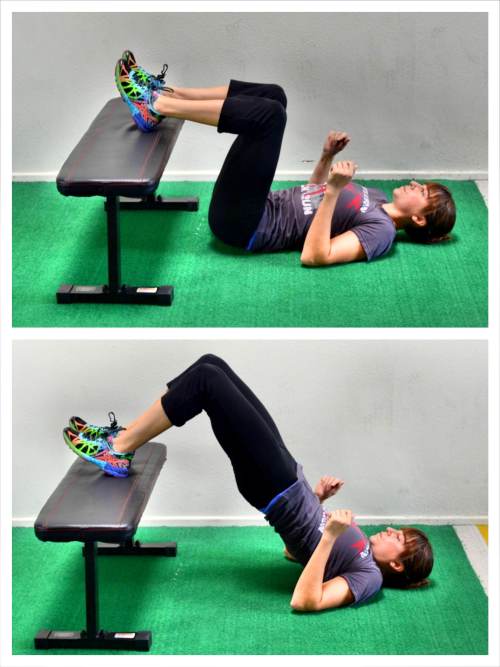
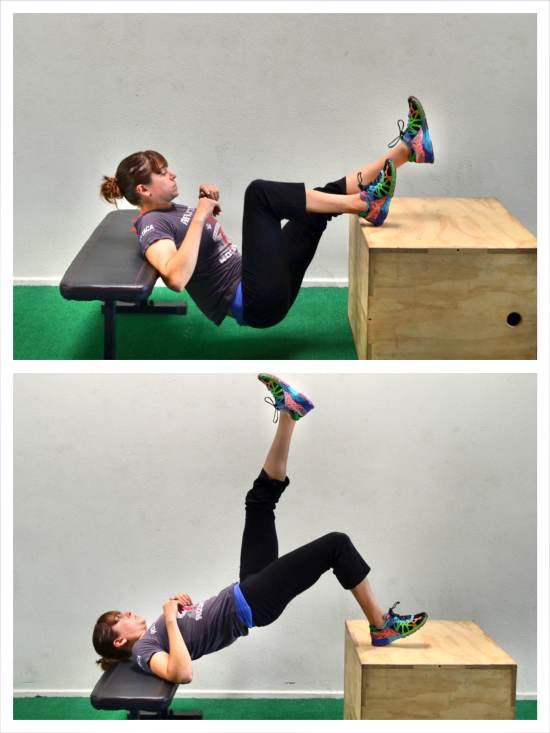
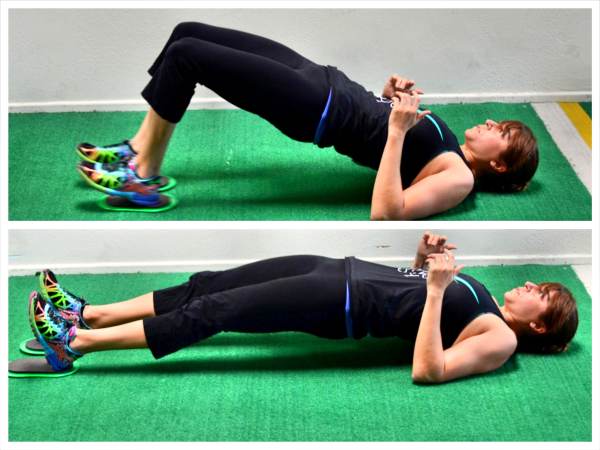
7. Glute Bridge Off Box – If you don’t have weights, a great way to make the basic bridge more challenging is by putting your feet up on a box. This move is a great supplemental exercise to include after you’ve done your big lift, whether that big lift is a deadlift, squat or Barbell Hip Thruster.
Make sure to keep the tempo slow when doing the off box variation. Also make sure you do not feel your low back.
To do the Glute Bridge Off Box, place your heels up on the box. You want your knees bent to 90 degrees or your butt to be even closer to the box. Do not let your butt get too far away from the box.
Bend your arms to 90 degrees with just your upper arms on the ground.
Then driving through your heels on top of the box, press your hips up as high as you can. Squeeze your glutes and keep your core tight as you bridge up so that you don’t hyperextend your low back.
Also, do not let your knees fall in or out as you lift up. Keep your knees in line with your hips and ankles.
Hold for a second or two and then lower down.
This move can also be made harder by slowing down the tempo. And just like the glute bridge from the floor, it can also be progressed to a Single Leg Variation.
8. Single Leg Glute Bridge Off Box – Once the Glute Bridge Off Box is no longer challenging, you will want to try the single leg variation. Make sure that you can get your hips up just as high with the single leg variation. If you can’t fully extend your hips, regress the movement.
To do the Single Leg Glute Bridge Off the Box, place your heels on top of the box. Your butt should be right against the box or no further away then when your knees are bent to 90 degrees with your heels on the box.
Bend your arms to 90 degrees with just your upper arms on the ground.
Lift one leg up and either lift the foot straight up toward the ceiling or bend the knee to 90 degrees. Do not let the lifted leg swing to help you bridge up.
Then, drive through the heel on top of the box and press your hips up as high as you can. Squeeze your glutes and keep your core tight as you bridge up. Keep the ankle, knee and hip of the working leg in line.
If you feel this in your low back or can’t get your hips up as high as with the Two-Leg Glute Bridge Off Box, you may need to regress the movement.
Hold for a second or two and then lower down. Complete all reps on one side before switching.
Again, make sure you drive through your heels and upper back to get your hips up just as high as you do with the two-leg bridge off box. And do not use your lifted leg to help you bridge up by swinging it.
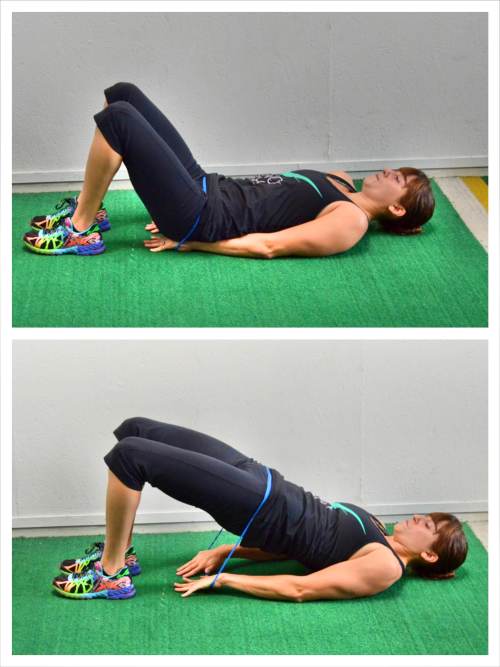
9. Mini Band Hip Thrusters – Another way to advance the basic bridge is with a Mini Band. The Mini Band adds resistance to the move and is a great tool for anyone that travels often or works out at home because it is easily transportable.
To do the Mini Band Hip Thruster, place the mini band around your hips and lie on your back on the ground. Place your feet flat on the ground. The closer your heels are to your glutes, the more the move will isolate your butt. The farther from your glutes your heels are, the more your hamstrings will be involved.
Make sure that no matter how close or far your heels are from your butt, your heels stay down. Extend your arms down by your sides and grab the back of the band behind your butt in both hands.
Press the band down into the ground and then bridge your hips up toward the ceiling, pressing against the band.
Bridge your hips up as high as you can, hold for a second and then lower down.
Do not hyperextend your low back just to bridge up higher. Make sure to drive straight up as you bridge and not push yourself backward.
Slow down the tempo of the move to make it harder or use a heavier resistance. Make sure to keep the mini band against the ground as you bridge up.
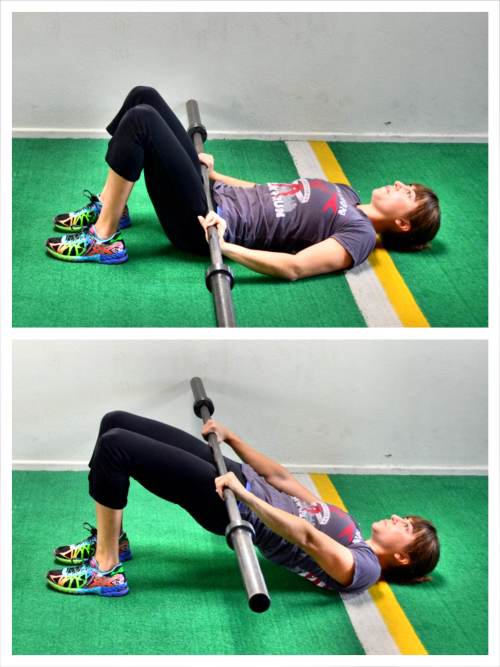
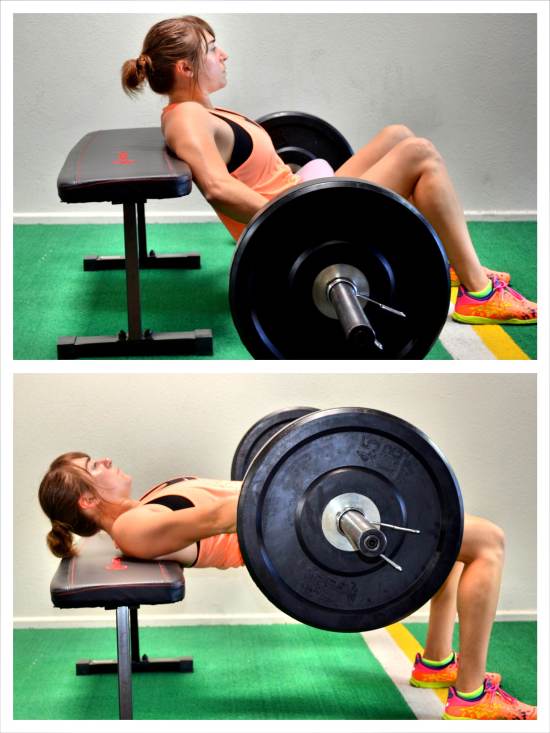
10. Weighted Glute Bridge – One of the best weighted exercises to really strengthen your glutes is the Weighted Glute Bridge or Barbell Glute Bridge. This move isolates your backside like none other to create great glute strength.
To do the Weighted Glute Bridge, sit on the ground and roll or place the barbell over your hips. Then lie back and bend your knees with your heels close to your butt.
Holding on to the barbell, drive your hips up and squeeze your glutes. Make sure you drive through your heels and upper back to lift straight up.
Do not let your knees fall open and do not hyperextend your low back as you squeeze your glutes at the top.
Hold for a second or two and lower back down.
As you lift, you may find you want to press the barbell down and away onto your thighs to help you squeeze your glutes at the top and keep your core engaged.
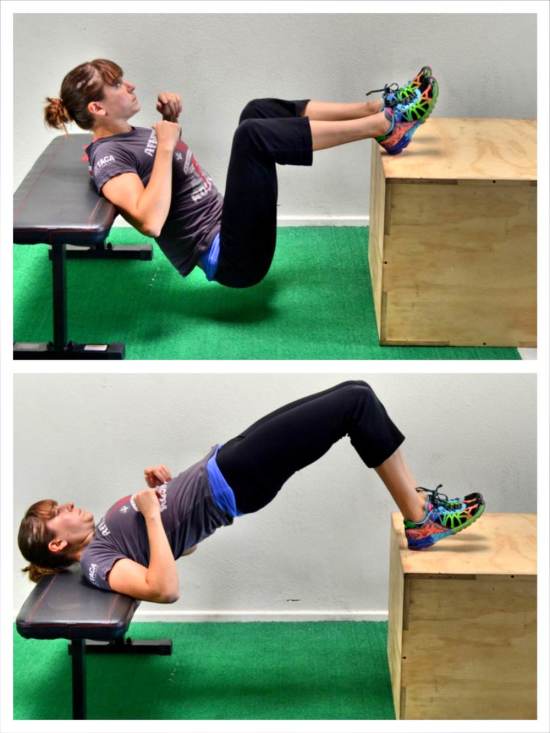
11. Thrusters Off Box – If you want to progress the Glute Bridge Off Box, try the Thrusters Off Box. With this move, your back and feet are raised allowing you to perform a bigger range of motion.
Thrusters are one of the best glute exercises out there and should be included in your glute training program.
Do not attempt this move if you feel the other bridge variations in your low back.
To do Thrusters Off Box, place a box and a bench close enough together that your back can be on the bench and your feet up on the box with your knees bent to about 90 degrees.
Place your upper back on the bench and your heels up on the box. Then, driving up through your heels and your upper back, press your hips up and squeeze your glutes.
Lift your hips to full extension, hold for a second and lower back down.
Like with all the glute bridges and hip thrusters, make sure you don’t hyperextend your low back at the top. Consciously squeeze your glutes and drive up through your heels.
Make sure your knees don’t fall apart at the top but stay in line with your hips and ankles.
Drop back down so your butt goes below the height of the box and repeat. You do not have to touch the ground each time, but you do want to do a bigger range of motion than you could do from the ground. If you can’t lower down past the box, you may want to regress the move to a glute bridge variation.
12. Single Leg Thrusters Off Box – When you don’t have weight, also turn to the single leg variation to make the movement harder. Like all single leg variations, the Single Leg Thrusters Off Box, allow you to correct imbalances while also challenging each leg to work harder.
Just like with the Thruster Off Box, for the Single Leg Thrusters Off Box, your feet and upper back will both be on benches or boxes.
Once you are set with your heels on a box and your upper back on a bench, raise one heel up off the box.
Then, driving through the heel on the box and your upper back, press the toe of the raised leg up toward the ceiling while raising your hips as high as you can.
Squeeze your glutes and keep your core tight as you extend your hips.
Hold at the top and then lower back down past the box and repeat. Complete all reps on one side before switching.
This move can be made even harder by slowing down the tempo and even holding longer at the top. This is a great option if you don’t have weights and really want to work your glutes at home or while traveling!
13. Barbell Hip Thrusters – The Barbell Hip Thrusters, like the Weighted Glute Bridges, are essential lifts to include in your glute workouts if you want to develop great glute power and strength.
Only progress to the Barbell Hip Thrusters after increasing your weight on the Weighted Glute Bridges. The Barbell Hip Thruster is a bigger range of motion than the Weighted Glute Bridge, which makes it easier to load your low back. Make sure to brace your abs and use your glutes to lift during the Thrusters.
If you feel it in your low back, regress to another Thruster variation or back to the Weighted Glute Bridge.
To do the Barbell Hip Thruster, set up a bench and make sure it won’t move as you bridge up onto it. Take a barbell and put some padding around it so that it won’t dig into your hips as you perform the move.
Place your upper back on the bench and sit your butt on the ground with your legs out straight. Place the barbell over your hips and plant your feet firmly on the ground and close to your butt.
Then drive up through your heels and your upper back on the bench, to lift your glutes and the barbell up toward the ceiling.
Squeeze your glutes and press your hips up as high as possible, driving the barbell up and off the ground. Hold a second or two at the top and then lower back down and repeat.
Do not hyperextend your back at the top. Keep your belly button pulled in toward your spine and really squeeze your glutes at the top. Make sure you are driving straight up through your heels. Do not push yourself backward over the bench.
You may find that as you bridge up you want to “push” the barbell down toward your thighs to help you drive up and squeeze your glutes.
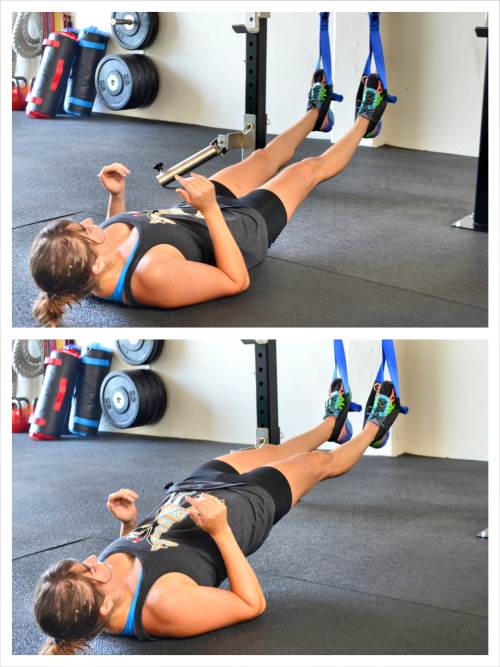
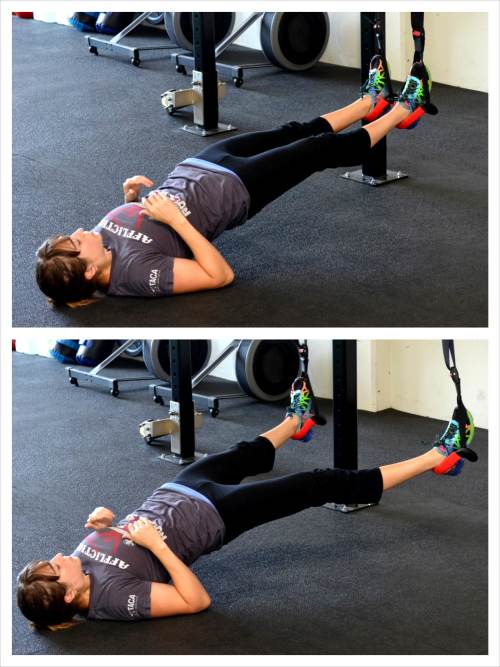
14. Straight Leg Glute Bridge – Many people because they sit all day, especially women, are quad dominant. That is why it is important to not only work your glutes but also your hamstrings. The Straight Leg Glute Bridge is a great exercise to not only work your glutes, but also work your hamstrings.
To do the Straight Leg Bridge, place your heels in the Suspension Trainer foot straps. Lie back on the ground with your legs out straight in front of you. You can either bend your elbows to 90 degrees or leave your arms on the ground down by your sides.
Squeezing your glutes and driving down through your heels, lift your hips up as high as you can while keeping your legs straight.
Keep your abs engaged so that you don’t hyperextend your low back as you lift. Hold at the top for a second or two and lower back down.
Lift as high as you can without feeling your low back work. Really press your heels down in the straps as you lift.
You can lift the straps up higher or slow down the tempo of the move to make the move harder.
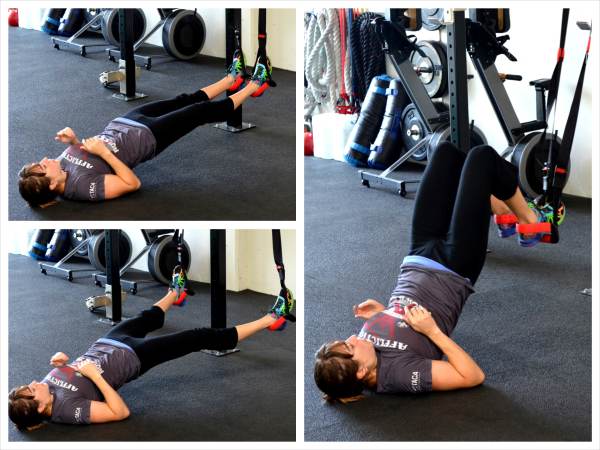
15. Glute Cherry Bomb – The Glute Cherry Bomb is another glute bridge exercise that also works the hamstrings. However, this move also works your glute medius and abductor muscles.
To do the Glute Cherry Bomb, place your heels in the suspension trainer straps and lie on your back on the ground.
With your legs out straight and your feet close together, bridge up, squeezing your glutes and driving through your heels. Keep your core engaged so you don’t hyperextend your low back.
Do not worry about how high you bridge up. This straight leg bridge won’t have a very big range of motion.
Then curl your heels in toward your butt, bridging up higher as you curl. Keep your glute engaged. You want your bridge at the end of the curl to look like a basic glute bridge.
Straighten your legs back out then and, keeping the nice straight bridge, move both feet out laterally, opening your legs up.
Keep your hips up high as you spread your legs. Feel the outside of your butt work to open your legs up.
Then bring your feet back together and repeat, curling your heels in toward your butt.
This is an advanced movement. Beginners may not want to include the curl and instead do a Straight Leg Glute Bridge to the “Cherry Bomb” portion (aka moving their legs open and closed).
16. Glute Bridge and Curl – The Glute Bridge and Curl is a very tough hamstrings exercise. It can be done using Valslides or a Power Wheel or Suspension Trainer.
For all the variations, check out this post – The Glute Bridge and Curl!
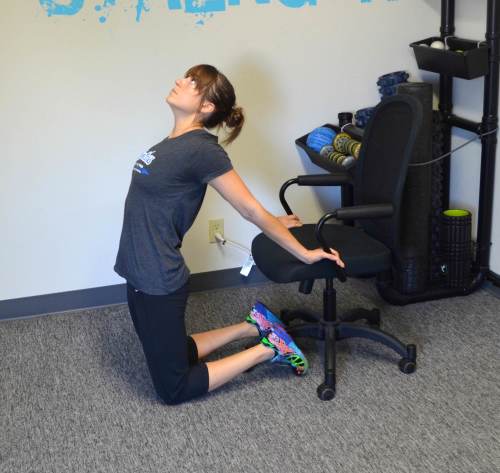
17. Camel – Glute bridge variations not only work the glutes but also focus on stretching the hips. And with the Camel, you not only stretch your hips and activate your glutes, but also open up your chest and shoulders after sitting hunched over a computer all day.
This is even a great stretch you can do right at your desk!
To do the Camel, start by kneeling on both legs with your feet flexed. Sit back and place your hands on your heels.
Then arch up off your heels and press your chest out, keeping your hands on your heels. Relax your head back and arch as much as you can, getting a nice stretch down your chest, core, hips and quads.
Hold for 1-2 seconds and relax back down. Repeat.
If you are less flexible, do this stretch with a couch, chair or table behind you. Kneel down and place your hands back behind you on the couch or table.
Press your chest out and arch as much as possible away from the piece behind you while leaning your head back.
Then relax back down and repeat.
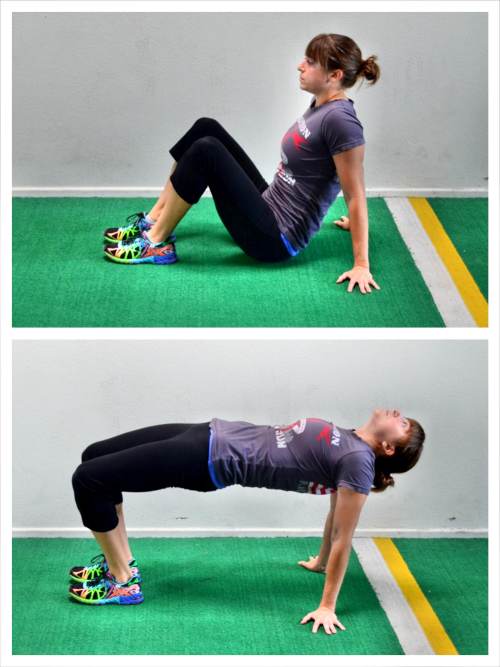
18. Table Top Bridge – Like the Camel bridge, the Table Top Bridge is a great way to stretch your chest and hips while activating your glutes. This is a great move to include in your warm up routine.
To do the Table Top Bridge, start seated on the ground with your feet flat on the ground in front of you and your hands on the ground behind you.
Squeeze your glutes and lift your hips up as high as you can. Lean your head back and press your chest out as you bridge up. Really feel a nice stretch across your chest and shoulders.
Keep your core tight as you bridge up. Try to create a “table” with your body.
Drive your hips up as high as you can without hyperextending your low back. Really squeeze your glutes at the top.
Hold for a few seconds at the top then lower back down and repeat.
Keep the core engaged and even do a pelvic tilt at the top so that you engage your glutes without hyperextending your low back.
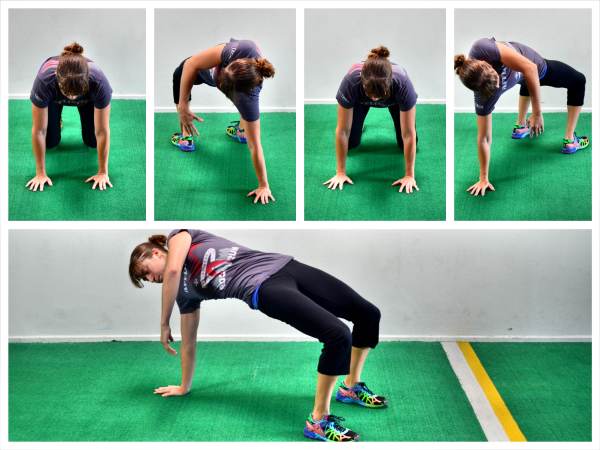
19. Sit Thru to Thoracic Bridge – The Sit Thru to Thoracic Bridge is another must-do activation move. It not only stretches your hips and activates your glutes but also stretches your thoracic spine, which most of us need after sitting hunched over all day.
To do Sit Thru to Thoracic Bridge, set up on your hands and knees with your hands under your shoulders and your knees under your hips. Flex your feet and lift up onto your hands and toes.
Then lift your right hand and bring your left leg through and place your left foot flat on the ground. Rotate your hips up toward the ceiling, squeezing your glutes to lift them up as high as you can.
While your lift your hips, reach your right hand down toward the ground, rotating your chest toward the floor.
Feel your glutes working to keep BOTH hips up, while you reach your hand down. We have a tendency when we rotate to drop the hip on the side we are rotating toward. Make sure both hips stay up as high as possible.
You should feel a nice rotation and stretch through your spine. You are twisting almost like someone wringing out a towel.
Then drop your hips and step your foot back through while placing your hand back down on the ground.
Step through and rotate to the other side, bridging your hips up as high as you can as you reach toward the ground.
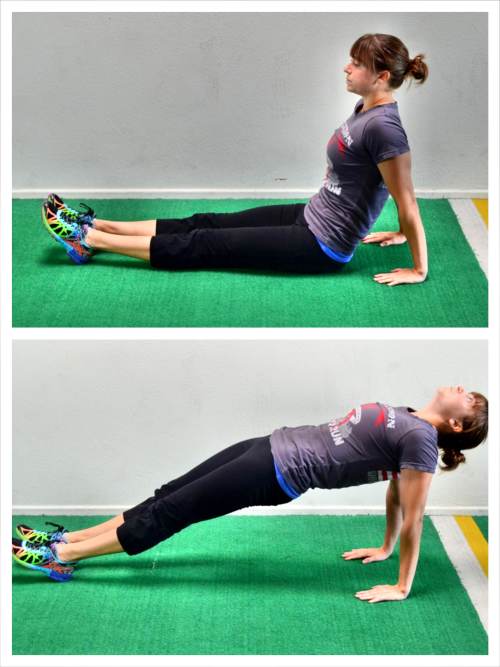
20. Posterior Plank – The Posterior Plank is a great way to advance the Table Top Bridge and get your hamstrings working as well as your glutes and your back. This move also stretches your chest and your hips, but it is more advanced because your legs are out straight.
Beginners may need to stick with the Table Top Bridge.
To do the Posterior Plank, start seated on the ground with your legs out straight in front of you and your hands on the ground behind your butt. Your feet should be together and your fingertips should be pointing toward your butt or out to the side.
Drive through your hands and heels and raise your hips up off the ground toward the ceiling, keeping your legs out straight.
Press your chest up and out as you raise your hips.
Keep your legs straight as you bridge up and relax your head back. Your body should be in a nice straight line at the top.
Keep your core engaged and squeeze your glutes. Hold at the top then lower down and repeat.
Slow down the movement and add in a longer hold at the top of the movement to make the move more challenging. You can also lift one leg and do a Single Leg Posterior Plank to make the move harder.
These 20 Glute Bridge Variations will activate your glutes to make them stronger so you can lift more and run faster. These moves, because they are the opposite of what you do all day seated at a desk hunched over a computer, will also help you alleviate and prevent low back, hip and knee pain.
No matter which variation you choose, you need to include Glute Bridges in your leg workouts!
Want more Glute Exercises and 28 days of Booty Burner Workouts!? Check out my 28-Day Booty Burner Program!


So are you maintaining the pelvic tilt ab activation during all these variations? Great info!
In Camel and the Thoracic Bridge, you will not maintain pelvic tilt. And you don’t have to perform the pelvic tilt if you don’t feel your low back taking over. Some people can do bridges with hip hyperextension without feeling their low back and that is fine. But if you feel your low back wanting to take over, I do recommend Pelvic Tilt especially at the beginning so you learn how to keep your abs engaged while extending through your hips as you squeeze and engage your glutes. Hope that helps!
Whenever I’ve seen exercises for the Swiss ball, rolling up into a bridge is usually one of the first exercises given. It is not included here. Is that because there is a problem with it, or just because you were showing that there are many other ways to do it?
It is simply another tool. I’ve used it for the bridge and curl and for more instability than simply off the box. HOWEVER, I find many people let their low back take over with it or don’t activate their glutes so just wanted to share some others I’ve had success with.
There are even variations here I didn’t touch on that I do in other articles. Too many to include. If you found one that works, definitely include it. 🙂
I love this Thankyou. I’ve recently started with Glute Bridges and I do get lower back pain. This is great it gives detail and how to protect your lower back, while trying to strengthen glutes and hamstrings. thank you I’m going to be inplemnting these into my workout
Awesome Debbie! Thank you! Also, practicing the pelvic tilt alone will also be key 🙂
Very effective, for body shaping and relieving my lower back pain. THANK YOU! ??
🙂 My pleasure!
Glad to see functional exercises rather than the usual ” get a bigger butt”. Suffering from chronic hip flexors. Thanks!!
haha hey they can be multipurpose! 😉
Great instructions. Thank you. For how long should one hold the Basic Bridge Hold?
Depends on the workout. Check out some of my Booty Burners. 🙂
Hi. Are there any of these that you WOULDN’T recommend for someone with pelvic floor issues? I do basic bridges in Pilates but would love to step it up a notch at home to increase my core strength.
Depends on the pelvic floor issues. But no as long as they are the right level for you. If you’re starting with the basic bridge, the next move may be to add a band or start to add in a little movement or a slight increase in range of motion but I wouldn’t jump right to weights or the single leg. Everything needs to be a slow progression.
The best sport website on the internet
Hi i wonder what difference it makes to do the bridge with a ball squezze compared to a glute bridge with a band around your knees?
If you squeeze the ball you’re working your adductors more. If you put the band around, you’re working your abductors such as your glute medius more.
How do you increase the motion on a Glute bridge (I can’t higher than a short range)
Are you working on hip mobility? That’s often key while building strength in your glutes to be able to work through a fuller range of motion.
Hello, hopefully you can help me. I can perform a regular bridge but not even close to being able to do the table top variation. Which muscles are most likely the reason that I’m unable to do this variation?
Thank you.
Depends on why you can’t do it…but it could be your chest is tight or hip tightness even…just depends on what even may not be strong enough based on why you can’t lift.