Squats and Deadlifts are often touted as the head honchos of lower body exercises because they are compound, functional exercises. Heck, the deadlift is even held in high esteem as a back exercise. And while both moves are a great way to strengthen your lower body, you can’t forget about lunges.
Lunges very often take a back seat in our programming. They aren’t the main lift and, often when they are used, they are aren’t used in every direction like they could be.
But the Lunge is an extremely functional exercise that we need to include in our workouts.
Lunges work your entire leg and can target your legs from a variety of angles as you move in different directions. While most Squat and Deadlift variations are sagittal plane movements.
Lunges are also a very “reactive” movement as well. Think about when you move or react to change directions or go after a ball or even chase a child around a playground…You’ll be surprised by how often it is a lunge like movement to react and change directions and chase.
So if you’re moving like that and constantly moving and lunging in every direction, why wouldn’t you want to strengthen those same movements in your workouts? Why would you ONLY focus on sagittal plane lifts like the deadlift and squat?
YOU WOULDN’T!
Start strengthening your legs and glutes with these wonderfully functional Lunge Variations.
Functional Lunge Variations
Most of us are very familiar with the Front Lunge, Reverse or Backward Lunge and even the Side Lunge.
But not only can those basic Lunges be changed up by using different types of loads and equipment, but those aren’t the only directions you can lunge in.
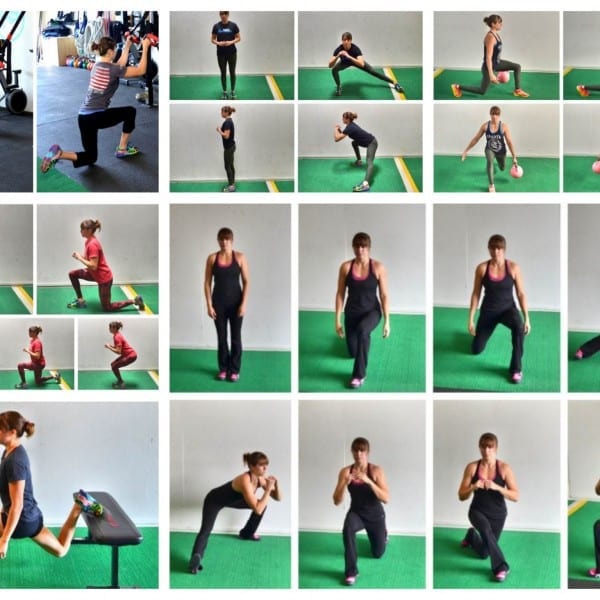
A great way to learn how to lunge in a variety of directions is using the Lunge Matrix. The Lunge Matrix is 7 different Lunges you can do that make you move in different directions.
7-Lunge Lunge Matrix – This is a great way to work your legs in multiple planes of motion and really target different muscle groups. It is also a great way to mobilize your hips and strengthen them through a bigger range of motion than just simple sagittal plane movement.
To do the Lunge Matrix:
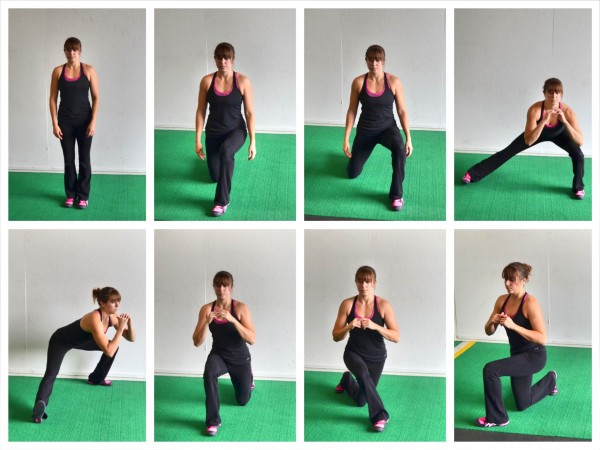
One of the best ways to think about the 7 Lunges in the matrix is to think about lunging around a clock. Start facing “12″ on the clock. Then lunging with the left foot, you will complete all 7 Lunges below.
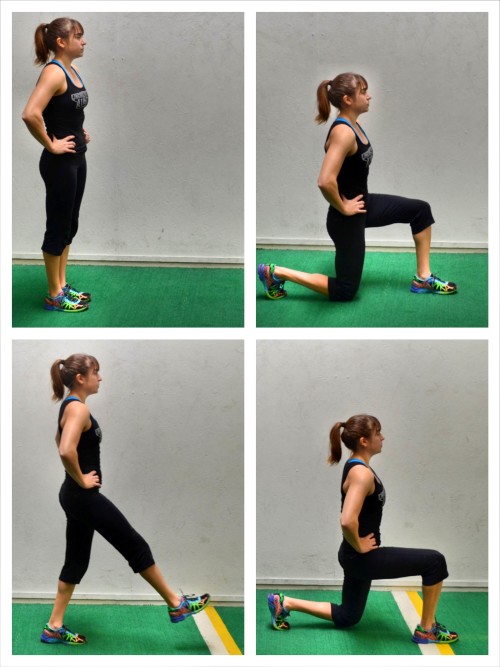
- Front Lunge: With both feet pointing straight ahead toward “12,” step the left foot forward and sink down into a front lunge, dropping the back knee down toward the ground as if moving to a half-kneeling position as you bend your front knee to about 90 degrees. Keep your chest up nice and tall as you lower into the lunge and try to keep your front heel down. Think about sinking down as you lunge and not going forward. You want to keep your front foot flat on the ground so that you can drive through your heel and use your glute instead of simply loading your knees. Make sure you do not lean or round forward as you lunge forward or go forward onto your front toe. Then drive off your front heel to push back to standing. Move back to standing in one move. If you have to stutter step, you lunged out too far or went too low. Beginners will not step out as far or lunge as low.
- Angled Front Lunge: Standing tall with both feet close together after lunging forward, you will perform another front lunge, but with this one you will step out slightly to the side and forward. Still working with your left side, step your left foot out and forward toward “11″ on the clock. Keep both feet pointing straight ahead and your hips square toward 12. Do not rotate as you step out toward 11 or you will simply perform another Front Lunge. After stepping forward, bend both knees as if moving to half kneel on the ground. Your legs will be wider apart as you sink than with the Front Lunge. Make sure to keep your chest up as you sink down. Also, make sure your front heel stays down. After sinking as low as you can, drive off your left heel to come back to standing. Push straight back to standing and don’t perform any stutter steps or swing your body back to come back up.
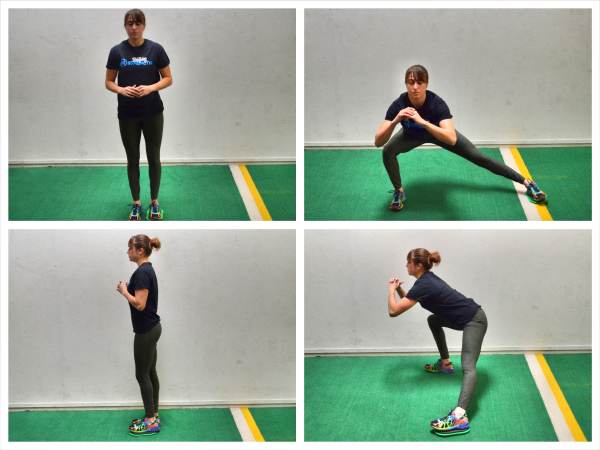
- Side Lunge: Again lunging with the left foot, you are going to step out to the left. Step your left foot out toward “9″ on the clock with both feet pointing straight ahead. As you lunge out to the side, you are going to bend your left knee and sit your butt back as you keep your right leg straight. Really push your butt back and slightly hinge forward at the hips, keeping your back flat. Keep your left heel down as you sink into the lunge. Then drive off your left foot to come back up to standing.
- Backward Rotational Lunge: Next you will lunge back with your left foot, stepping it back toward “7″ on the clock while rotating your toe out so that your left foot is perpendicular to your right foot, which is pointing toward “12.” After stepping back and rotating your left toe open, you will bend your left knee and push your butt back to sink into a deep lunge. Keep your right leg straight as you sit your butt back and slightly hinge forward at the hips. Keep your back flat and really sit your butt back. Do not let the left heel come up. Then driving off your left heel/foot, push back to standing. Make sure that your right toe doesn’t rotate toward the left but continues to point toward “12.” Also make sure your right leg does not bend as you push back up to standing.
- Backward Lunge: Again lunging with the left foot, you will perform a basic Backward or Reverse Lunge. Step your left foot straight back and bend both your front and back knees as if sinking to half kneel on the ground. Keep your chest up nice and tall as you drop your back knee down toward the grouhnd. Keep your front knee aligned basically over your ankle as you keep your front heel down (it isn’t so much that your knee can’t go forward, it is just that you want to keep your heel down and really sit back to load your glute). Thinking about this knee and ankle alignment can help you focus on loading your glute and not your knees. Really sit back and keep your front heel down. Then drive back up to standing, driving through your front heel. Bring your back leg (left leg) back forward as you squeeze your butt as you stand up.
- Curtsy Lunge: For the Curtsy Lunge, you really want to cross your foot back behind your front leg so that you load the front glute. To do this, step your left foot back behind and across your right leg. You will reach your left foot back toward about “5″ on the clock. You really want to make sure that left leg crosses behind your right leg toward the right so that you aren’t simply doing a Reverse Lunge. Also, make sure you step far enough back (do not keep your left foot in too close to your right) that you can bend both knees and sink down into a deep lunge. Keeping your chest up, bend your knees and sink into a lunge, making sure that your right heel stays down on the ground. Really feel yourself loading that front glute while keeping your hips square forward toward “12.” You will want to rotate your hips open toward the left, but if you do this, you won’t work your right glute correctly. Then, driving through your right heel, come back to standing. Make sure that you feel this lunge in the outside of your right butt cheek when you lunge back with the left leg. You almost sort of want to feel like you are pushing your right butt cheek out to the side slightly.
- Forward Cross Lunge: The Forward Cross Lunge is a more awkward feeling lunge. To do this Lunge, you will step your left foot forward and across your right toward about “2″ on the clock. As you step, you can pivot your left foot so that your feet are perpendicular, turning your left toe toward the right instead of keeping it pointing straight ahead. However, if you have had problems with your knees, you may not want to pivot your toe. After crossing your left foot in front, sink down into a lunge, bending both knees while making sure to keep your chest up and your left heel down. Then drive off your left heel to come back to standing. Your hips will pivot slightly as you cross in front to lunge, but you don’t want to rotate them way toward the right and feel like you are twisting your right leg. (This lunge, especially if you turn the front foot, is actually a great way to practice a pivot to react and change directions, pushing off the front foot.)
These 7 Lunges don’t always have to be done as part of the full Lunge Matrix either. You can then break down the Lunge Matrix into different series and do 2 lunges or even 3 lunges in a sequence. You don’t have to use all of them all of the time.
And to make the Matrix even more challenging, you can add in Arm Drivers or even hold weights.
But these are the only Lunges you can do to get you moving in every plane of motion. Some other great lunges to mobilize your hips and get you moving in every direction like you would in every day life, are the Duck Under Lunge and the Get Up Lunge.
Duck Under Lunge – If you want strong, mobile hips and glutes that help power rotational movements, then you need to include Duck Under Lunges in your workout routine. Because this move is front-loaded, it is also great for building core strength as you work on your pivoting power!
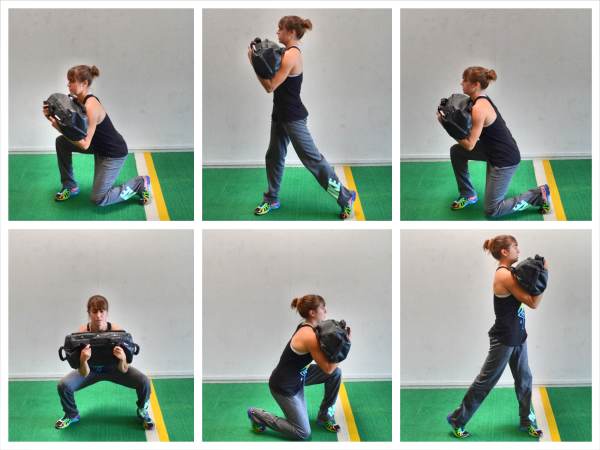
To do the Duck Under Lunge, you can use dumbbells, kettlebells or a sandbag. To use a sandbag, wrap your arms under and around it so that it is resting back on your upper arms up at your chest. Start standing up nice and tall with your chest pressed out and your feet about shoulder-width apart. You may turn your toes out slightly or simply allow them to turn out as you go through the movement.
Then squat down, sitting your butt back while keeping your chest up. Make sure your heels stay down as you squat down as low as you can with good form.
As you move to come back up out of the squat, you will rotate toward the right, pivoting your left foot as your right foot slightly opens up. As you pivot, pop up out of the squat and squeeze your glute as you come up. Stand up nice and tall, facing to the right with your back leg in triple extension. Do not let your foot stay put and your knee cave in. You want to pivot and use your glute to power the pivot and pop up.
Then begin to lower back into a squat and, as you sink, rotate back center. Your feet will pivot back and both heels should be down as you come into the squat. As you come back center, you will then want to begin to pivot and rotate up toward the left side, pivoting your right foot. Keep your chest up the entire time and do not let your back round toward the ground. Keep your core engaged so that you don’t feel this in your low back. Also do not lean forward to try to get lower to the ground. While you can hinge a bit at the hips, you don’t simply want to lean forward to “duck under.” You actually want to squat down as low as you can.
Pivot to the left and pop up to stand up tall out of the squat, feeling your glute engage to power the pivot and move to standing. Then sink back into the squat and quickly pivot up to the first side.
As you get comfortable with the move, try to make it as fluid as possible, squatting as low as possible while quickly moving between the pivots and standing up. The move should almost look like you are drawing a “U” shape. Beginners may need to make it look more like a “V” until their hips open up more. Beginners may also need to use only their own bodyweight or not go as low.
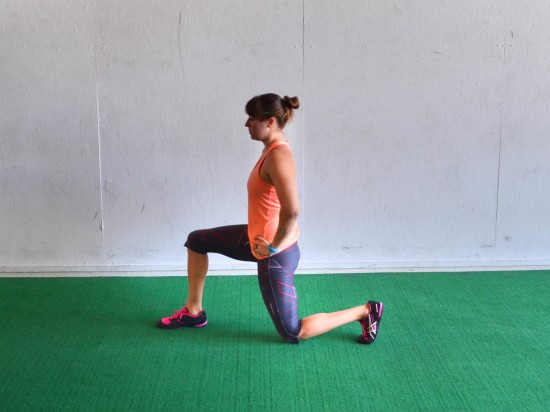
Get Up Lunge – Working out should not only help us look and feel better, but it should also help us MOVE BETTER. And part of moving better means that we can function better in every day life. And part of functioning better in every day life means being able to get up and down off the floor easily!
Get Up Lunges help you build leg and core strength so that you can kneel on the ground and easily be able to stand back up.
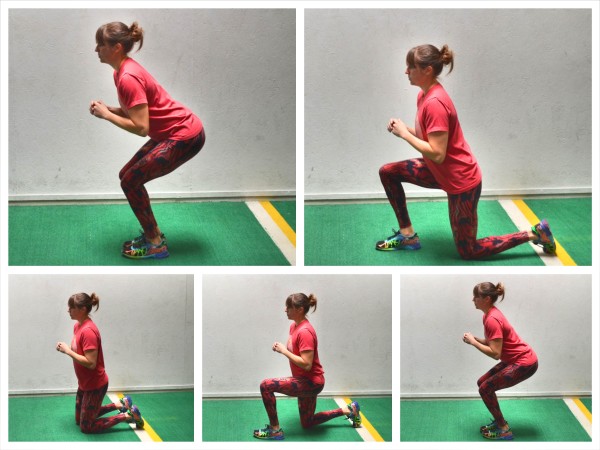
To do the Get Up Lunge, start standing with your feet close together. Then sit your butt back and sink into a little squat. You will not stand up out of this squat while performing the Get Up Lunges.
From this little squat, lunge back to half kneeling on the ground. Keep your chest up as you step one leg back and lower that knee down to the ground so that you are half kneeling down.
Then lunge back with the other leg until you are fully kneeling on the ground. Keep your chest up and back flat as you come to kneeling. Do not sit back on your heels as you lower down to the ground.
From here, you will stand back up one leg at a time. Step one foot forward and place that foot flat on the ground so that you are back in a half kneeling position. Then step the other foot forward up to your front foot, but do not fully straighten your legs as you bring both feet back together. You want to return to that starting little squat.
Repeat the Lunge, either lunging back with the same leg or by alternating sides.
To make this move harder, add a weight. It is best to front-load the movement and hold a weight at your chest. Beginners may need to add a pad under their knees if they can’t get all the way down to the ground.
Make sure that even when you stand up, you don’t completely extend your legs. You want to stay in that little squat even at the top so your legs are working the entire time.
Lunges are not only great functional because they get you moving in every direction, but also because they can be used to improve your balance and isolate each leg to correct imbalances between each side. Muscle imbalances between your right and left sides can lead to compensations and injuries. And better balance is always important, especially as we get older.
Some great Lunges to improve your balance and work each side independently are the Airborne Lunge, Suspension Trainer Single Leg Lunge, Walking Lunge, Split Squat and Balance Lunge.
Airborne Lunge – If you’re looking for an advanced exercise to improve your balance, strengthen your core and correct imbalances, then the Airborne Lunge is right for you. It is also a great variation of the Single Leg Squat that is a bit more glute focused.
Beginners may want to skip the full Airborne Lunge and instead focus on developing balance, mobility and strength using the Suspension Trainer Single Leg Lunge.
To do the full Airborne Lunge, start standing on one foot and bend your other knee, bringing your foot back up toward your butt. You can then reach your arms out in front of you at about shoulder height to help you balance.
Begin to sink into a lunge, pushing your butt back as you hinge slightly forward to drop your back knee down toward the ground. Load your glute and sit your butt back as you drop the back knee down. Do not touch the lifted foot to the ground as you touch that back knee down. Keep that foot lifted up toward the ceiling.
As you sit back and sink down, make sure you don’t try to reach the back knee too far back. Keep it just a little behind your standing foot. If you try to reach too far back, you won’t be able to touch all the way down and come back up to standing. Make sure though that you do hinge at the hips and keep your standing heel down. Sink as low as you can, trying to touch the knee down, without your standing heel coming up.
Then, once you’ve touched your back knee down, drive back up to standing, pushing through your standing heel to engage and use your glute to help power the drive back up to standing. Make sure you don’t rock forward onto the ball of your foot as you drive back up.
Stand up nice and tall and squeeze your glute at the top and then repeat the lunge.
Complete all reps on one side before switching. Make sure you engage your core and keep your standing heel on the ground at all times. Also, make sure you feel this move in the glute of your standing leg. While you may lean forward and hinge at the hips, do not round over as you lunge.
Beginners may not touch all the way down or may hold a weight out in front of them to counterbalance. They can also do the Suspension Trainer Single Leg Lunge.
Advanced exercisers may load down with a front-loaded or back-loaded weight.
Suspension Trainer Single Leg Lunge – This lunge is a great way for beginners to work on their balance and perform a single leg exercise without having to take on their full weight. It can also be a great way to improve their range of motion in their lunges!
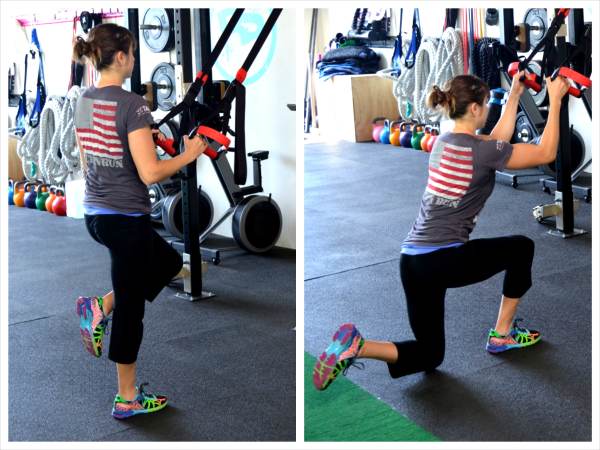
To do the Suspension Trainer Single Leg Lunge, hold a strap in each hand and step back so that there is a little tension in the straps with your arms slightly bent. Stand on one foot and bend the other knee, bringing your foot back up toward your butt.
Then using the straps only as much as you need to help you balance, sit your butt back and drop your back knee down toward the ground. As you sit your butt back, don’t be afraid to hinge forward slightly at the hips. Just make sure you don’t round forward. Keep your standing heel down as you touch your back knee down toward the ground. Beginners may not be able to lower all the way down. Do not let your back foot touch down whether you go all the way down or not.
As you lunge, make sure you don’t “swing” back on the straps. You want want your front leg working to lower you down and control the movement. The straps are there just to make sure you don’t fall over and to give you a little extra control.
After touching your knee down, drive through your standing heel to come back up to standing. Do not rock forward as you stand back up. Once standing, squeeze your glute at the top.
Use the suspension trainer to help you balance and get back up, but do not turn this into an upper body exercise. Use your arms only as needed! If you find you are using your arms as much or more than your legs, do not go as low in the lunge. Only go as far down as you can without really using your arms at all.
Complete all reps on one side before switching to the other leg.
Beginners may not be able to go all the way down and touch their knee to the ground. Start with the range of motion you can control while feeling your glutes work. Remember the straps or to help with balance not to turn this into an upper body exercise!
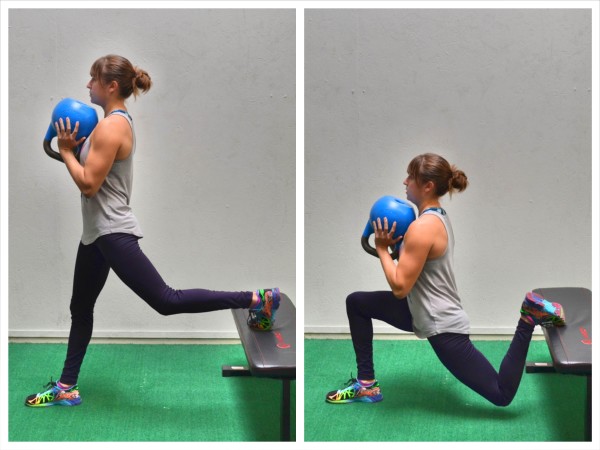
Balance Lunge – While one foot isn’t kept off the ground like it is with the other two Lunges to improve your balance, the Balance Lunge is definitely just as challenging when it comes to balancing and single leg work. Heck…It is called a BALANCE Lunge after all!
It is also a great core move, especially when you front-load it. And if you are looking for moves to help improve your Squats, this would definitely be a great one to include as it can not only strengthens your entire leg, but can correct imbalances and open up your hips!
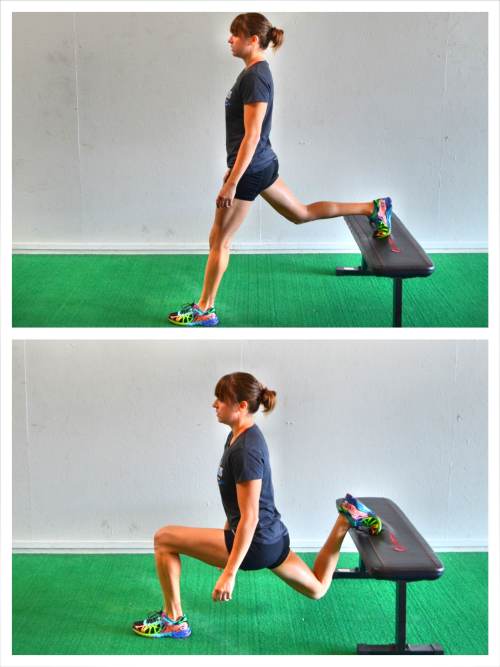
To do the Balance Lunge, place one foot back up on a box or bench. You can place the top of your foot on the box or you can flex your foot and rest the ball of your foot on top. Then, if you aren’t in a wide enough stance, hop your front foot out so that you are in a nice wide stance with your back foot up on the box.
Then sit your butt back and sink down into the lunge, dropping your back knee toward the ground as you bend your front knee to 90 degrees. Really sit back into the lunge as you keep your chest up. Do not go forward onto your front toe and load your knee. You want to sit back to make your glute work. You should also feel a nice stretch down the quad of the leg that is back when doing this move. If you are struggling to sit back, you can hinge very slightly forward at the hips, but do not let your back round forward.
Driving through your front heel and your back foot on the box, come back up to standing. Don’t go forward onto the ball of your front foot as you drive up. Then repeat, sinking back down.
Beginners may want to use a super low box or do the move from the ground as a Split Squat (described below). Advanced exercisers may use a higher box, suspension trainer or even add weights.
Split Squat – The Split Squat is a great way to improve your Lunges, mobility and balance. If you struggle with proper lunging form, this move can be a great way to work on improving it and help you learn how to use your glutes and drive off your entire foot instead of going forward onto the ball of your foot and loading your knees. It is also a great way to regress the Balance Lunge so that you can build your strength and balance.
To do the Split Squat, step one foot forward into a wide lunge stance. Keeping your chest up nice and tall, stand with your front foot flat on the ground and the heel of your back foot up so that you are on the ball of your back foot.
Then drop your back knee down toward the ground. Do not go forward as you drop your back knee down. Really sit back in your front heel, while keeping your foot flat on the ground, as you bend your front knee and drop your back knee down. You can touch your knee to the ground if you have the strength and mobility.
Your weight should be centered as you lower down to the bottom of the Split Squat. To make the move more challenging, touch your knee down and pause so that you have to drive up from a dead stop.
Then drive back up to standing, keeping your weight centered. Drive through your front foot and the ball of your back foot. Feel you quads and your front glute really working to bring you back up to standing. Do not lean or round forward as you lift back up.
Come back up and then repeat the move on the same side. Really focus on keeping your weight centered as you lift and lower.
Beginners may not go as low while more advanced exercisers will lower all the way down and even add weight.
Walking Lunge – If you want a Lunge variation that will get your blood pumping and legs working, you may want to include the Walking Lunge in your workout routine. It is a more challenging variation, and because of the forward movement with each lunge, it can really get you out of breath.
Plus by “walking” forward from lunge to lunge, you force each leg to really work to keep you balanced as you go right from lunge to lunge. Beginners may find they need to touch their foot down between lunges to help them stay balanced.
To do the Walking Lunge, start standing up nice and tall with your feet together. Then step one foot forward and then bend both knees, dropping the back knee down toward the ground. Even though you’ve lunged forward, your weight shouldn’t be going forward. Drop your knee straight down and keep your chest up. Make sure your front foot stays flat on the ground as you lower down.
Drive back up to standing, pushing off the front heel. As you drive back up to standing and bring your back foot forward, try not to touch it down but swing it forward and out to go right into another lunge. Beginners may need to tap their foot down center to balance, but if you can step right into the next lunge.
Again sink down, keeping your weight centered and chest up. Drive back up to standing and bring that leg forward right into the next lunge.
Add weights to make the move more challenging.
Many of these Lunges can be made more challenging, or work different muscles even, by the weights and equipment you add to them.
For instance, you can add sliders or Valslides to the basic Reverse or Side Lunge to make it more challenging without even adding weight. And when you add a slider to the Reverse Lunge, it can become even more glute intensive while the slider can make the Side Lunge work your adductors even more.
Slider Reverse Lunge – If you don’t have any weights, this can be a great way to make the basic Reverse Lunge even more challenging. And if you add weights on top of using the slider, it can make it a super killer lunge!
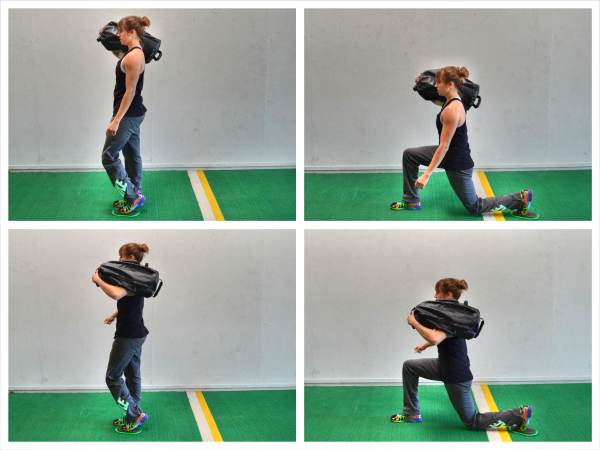
To do the Slider Reverse Lunge, place a slider under the ball of one foot and stand up nice and tall.
Then slide the foot on the slider back and sink into a deep lunge, dropping your back knee down as close to the ground as possible while you sit back and bend your front knee close to 90 degrees. Really sit back in that front heel and do not round or cave forward. Also make sure that front heel stays down so that you load the glute of the front leg. Also, do not let your back leg slide back so far that you can’t get back up without rocking forward or so that you can’t drop your back knee down.
Driving through the standing heel, pull the foot on the slider back forward and drive back up to standing. Make sure you keep your chest up nice and tall and do not lean or round forward as you come back up to standing. Squeeze your glute at the top and then repeat, lunging back. Complete all reps on one side before switching.
This is a great move to do with a unilateral load aka a sandbag, dumbbell or kettlebell loaded on one side. Beginners may need to stick with just the slider or even regress to a basic Reverse Lunge.
Slider Side Lunge – The Slider Side Lunge is a great way to work your glutes and adductors; however, it is a more challenging variation so beginners will need to make sure to start out with a smaller range of motion.
If you slide out too far with this move, you won’t be able to bring your leg back in so be careful that you don’t end up doing the splits!
If you have had knee problems in the past, this can be a great laterally lunge to include as it is a bit more knee friendly!
To do the Slider Side Lunge, place a towel or slider under one foot. Start standing tall with your feet together.
Then bend your standing leg and sit your butt back as you slide the foot on the towel/slider out to the side. You may hinge a bit at the hips as you sit your butt back and bend your standing leg to sink down, but don’t round forward. Make sure to keep your standing heel firmly planted on the ground. Also, make sure to slide your leg out straight to the side. Do not bend that leg on the slider.
Drive through your standing heel and pull your foot on the towel/slider back in to come back up to standing. Do not allow yourself to go forward as you come back up to standing. You do not want to load your knee. Make sure to really sit back and then drive back up through your standing heel. Keep your back flat as you lunge even if you lean forward a bit because you hinge slightly at the hips. Also make sure to pull your foot on the slider back in using your inner thigh.
Make sure you feel this in your standing glute and the adductor (inner thigh) of the leg on the slider. Complete all reps on one side before switching.
Go lower in the lunge, slow down the tempo, or add weight to make the move harder.
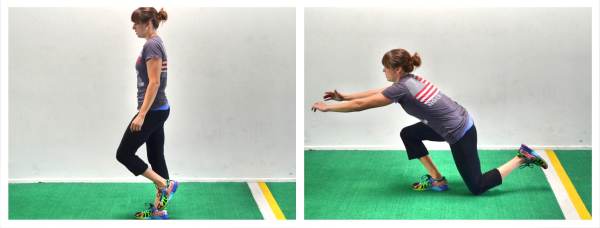
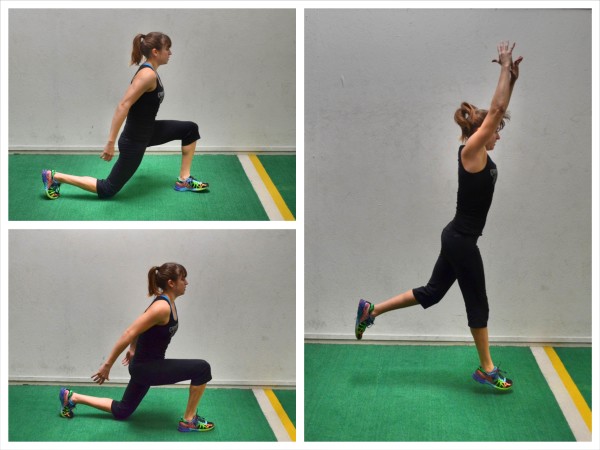
If knee pain is the issue and you feel like you won’t ever be able to lunge again, you should try the Anterior Reach Lunge. This is a very knee-friendly exercise just like the Slider Side Lunge can be a more knee-friendly lunge variation.
Anterior Reach Lunge – Knee pain doesn’t mean you can’t work your legs. Actually you should definitely be strengthening your glutes if you have knee pain. And you can also include the Anterior Reach Lunge. This is a great move to build leg strength while also protecting your knees.
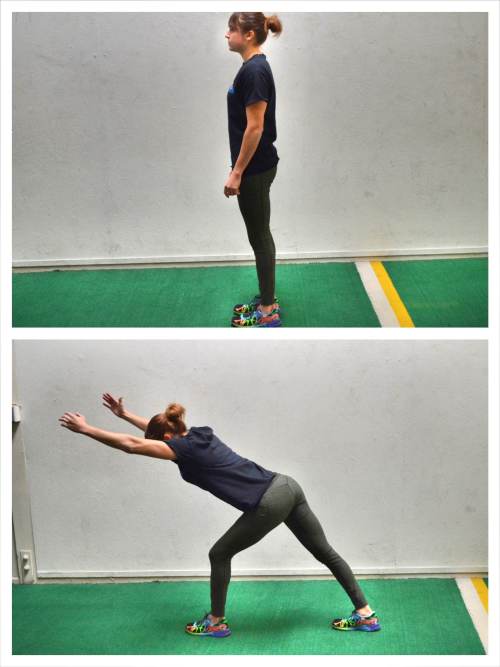
To do the Anterior Reach Lunge, start standing tall with your feet together. Then take a big step forward with one foot and, as you place your foot on the ground, bend that front knee a little bit and push your butt back. Keep your back leg straight as you lunge forward and make sure that, when you step forward, your front heel down stays down and you feel your glute load.
As you’ve stepped forward, you want to hinge over and reach your hands overhead. So you should lunge and hinge at the same time to make sure that, even though you are stepping forward, you are loading your glute.
Do not let your weight go forward and your front knee go over your front toe. If your weight all goes forward and your foot isn’t firmly planted, you may load your knee which could perpetuate your knee pain.
Then, pushing back off the front leg, come back up to standing. Stand nice and tall and then repeat, stepping forward and hinging over to load that front glute.
Make sure that you don’t step out so far that you can’t push back up to standing in one smooth move. Also, you aren’t not trying to bend your knee as much as possible when you lunge forward. You are combining the slight knee bend and lunge with a hinge to load your glute.
You can also either alternate sides or stay on one side until all reps are complete. Add weight to make the move more challenging, but makes sure you have good form and can maintain your balance and feel your glutes working before you do.
If, however, you don’t have knee pain, and you are looking to make the basic Lunge more challenging and cardio without weights or equipment, you can also make the Lunge an explosive, jumping movement.
The Split Squat Jump is a great jumping Lunge Variation to include. Jumping exercises are not only a great way to get your blood pumping but are they are also a very functional exercise to include. Then help us learn to recruit muscles quickly to produce force and react quickly to things.
Split Squat Jump – Split Squat Jumps are a great cardio, leg exercise. They can also help you work on your balance and core strength.
To do Split Squat Jumps, step one foot back and sink into a deep lunge, bending both knees as you drop your back knee down toward the ground as if you’re going to half kneel on the ground. Make sure your front heel is down as you lunge back and lower down. Your chest should be up although you can lean slightly forward just don’t round over.
Then explode up and jump up out of the lunge to switch and land in a lunge on the other side. Swing your arms to propel yourself up as high as you can as you switch the back leg forward and lunge back with the other leg. As you land, sink down into a deep lunge on the other side.
As you land, make sure to sit back and drop the heel of your front foot down. You don’t want all your weight going forward. You want to make sure to load your glute to help you jump.
Once you land in the deep lunge, explode back up and jump back into a lunge on the first side. Use your arms to help propel you up. Make sure not to round forward or lean too far forward as you jump and switch.
Quickly keep jumping and switching, lunging as low as you can while jumping as high as you can.
Beginners may need to do quick step back lunges instead of jumping to switch. They can also perform more of a “skip” and switch instead of a full jump. The lower you go in the lunge and the quicker you jump to switch, the harder the move will be.
While all these different lunge variations are great and very functional, you can’t ignore the importance of adding loads once your body is ready. Often when we move in every day life, we are carrying things. And often these things are awkward and on one side of our body or up at our chests. That is why it is important that we also perform lunges with not only different types of loads, but also loads held in different positions. These different weights held in different places can help us target different muscle groups and make the moves even more core-intensive and full body.
You can use dumbbells, kettlebells, sandbags, or barbells depending on what you are trying to accomplish. Awkward weights especially will be great for your core strength and to build strength to move better in every day life!
Unilaterally-Loaded Lunge – Unilateral loading is a great way to make any move more core intensive. And it can help us build anti-rotational strength to prevent injury. It is also very functional because often when we carry items we hold them on one side of our body. We throw a bag over our shoulder or carry a box underneath our arm on one side.
That is why lunging with a unilateral load can be a great exercise to include in your workout routine.
One of our favorite Unilaterally-Loaded Lunges is the Sandbag Slider Reverse Lunge. For this variations, you’ll do the Slider Reverse Lunge but with a sandbag over one shoulder (shown above as the Slider Reverse Lunge). If you place it over the shoulder of the standing leg, it will be a bit easier than if you place it over the shoulder of the leg on the slider.
When you unilaterally load down a move, you have to make sure that you don’t end up leaning to one side or that your core doesn’t break down. It is very important that you maintain proper posture and stay up nice and tall instead of letting the weight bend and twist you.
You can also unilaterally load down lunges with a kettlebell racked on one side or the other.

Kettlebell Pass Under Lunge – Another variation of a unilaterally-loaded lunge is the Kettlebell Pass Under Lunge. This unilateral load though keeps changing sides making this move very balance and core intensive. It is also a very functional exercise since often we are moving loads and switching sides as we carry it and move around.
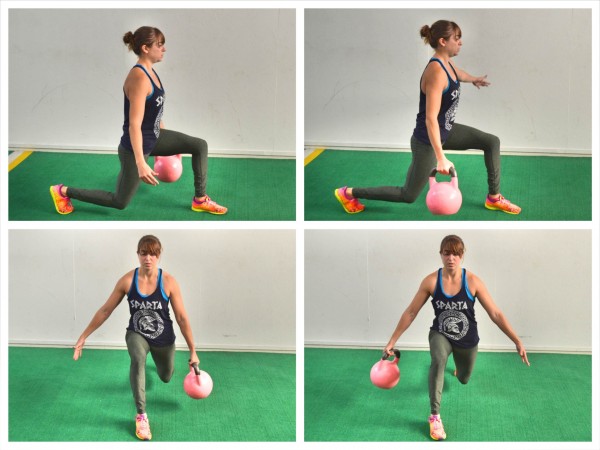
To do the Kettlebell Pass Under Lunge, step one foot back so that you are in a nice wide lunge stance with a kettlebell in one hand down by your side. Then drop your back knee down toward the ground as you keep your chest up and bend your front knee to about 90 degrees. The lower you get in the lunge, the harder the move will be. Make sure your weight is centered and that your front heel is down and that you are balanced on the ball of your back foot. Do not let all your weight go forward.
As you lower down, you will slightly hinge forward at your hips and bring the kettlebell forward and under your front leg as you reach your empty hand under your leg to grab it. Pass the kettlebell between your hands as you pause in the lunge.
Drive back up to standing holding the kettlebell in the other hand. Again sink back down and hinge forward to pass the kettlebell back under.
Complete all reps on one side before switching. You can also simply hold the lunge and pass back and forth as you hold instead of standing up between each pass.
Beginners should use a lighter weight and not lunge as low.
Front-Loaded Lunge – A great way to make any lift more core intensive is to front load the movement. To front-load Lunges, you can use a barbell, dumbbells, a sandbag or kettlebells.
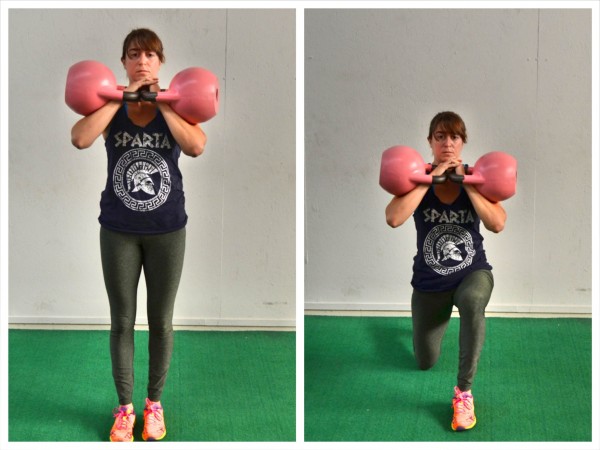
One of our favorite ways to front-load lunges is with the kettlebell. You can hold it in the racked position or in both hands in a “goblet” hold. You can then perform basically any lunge…Cursty, Front, Reverse, Side, Balance…
To do a Lunge with a Goblet hold, you will turn the kettlebell upside down so that the bottom of the kettlebell is pointing up toward the ceiling as you hold it in both hands. Both of your hands will be on the round part of the kettlebell instead of the handle. Hold it this way in right at your chest with your elbows pointing down toward the ground. Do not let them flare way out to the sides.
To do a Lunge with kettlebells in the Racked position, you will rack on kettlebell on each side (you can make this a unilaterally-loaded lunge by only racking one kettlebell on one side!). To rack the kettlebell, you will put your hand through the handle, settling the handle low across your hand with it resting at the base of your thumb and hitting down outside the heel of your palm on the outside of your hand. The bell of the kettlebell will be resting on the back of your forearm. Then wrap your fingers around the handle and pull your arm in toward your chest. Your hand will be in at about your sternum and your arm will be angled slightly down and out. Do not let your elbow flare up too much toward your shoulder, but just enough to prevent the kettlebell from rolling forward off your arm. Then perform your lunge of choice!
Overhead Lunge – While many of us probably don’t walk around carrying things overhead, being able to stabilize a weight overhead is a great way to build shoulder, back and core strength. And when you carry a weight overhead while lunging, you make the Lunge a great full-body move.
You can do either a unilateral or bilateral overhead carry. A great Overhead Lunge Variations uses a plate weight.
To do the Overhead Lunge with a plate weight, hold the plate in both hands and press it overhead. Press it back and up lock it in overhead so that your arms aren’t bending and the weight isn’t moving all around. Then lunge. You can do Walking Lunges, Alternating Front Lunges (shown in the video) or even Reverse Lunges.
Make sure that as you hold the weight overhead, you feel your upper back working to support your shoulders and not simply your upper traps taking over. Also make sure that you aren’t hyperextending your low back, but instead bracing your abs.
Back-Loaded Lunge – As children we constantly carry a load on our back as we walk around…It’s called a backpack! So whether you load down movements with a back pack or barbell, back-loaded lunges can be a great way to really work your legs. Often we can handle more weight with a barbell over the back of our shoulders than we can with a weight front-loaded or even unilaterally loaded.
Because we are able to use a heavier weight when the weight is back-loaded, we can really focus on using a weight that challenges our legs. If you use a barbell over the back of your shoulders to load down the move, just make sure that you engage your back and don’t round forward otherwise you risk injuring your shoulders. Make sure to really engage your lats and drive your elbows down as you hold the barbell on your back. Exact placement of the barbell may vary from right at the top/back of your shoulders to a little bit lower down your back/more behind your shoulders.
By adding a little variety to your current workout routine using a few of these different Lunges, you can not only become functionally stronger so that you move better in every day life, but you can also strengthen and improve your Deadlifts and Squats!
While your programming definitely needs to include Deadlifts and Squats, you can’t ignore Lunges!


Thank you!
Glad it helps!