Many of the clients that I work with come into the gym unable to do a Pull Up. And most have it as a main goal they would like to accomplish.
Some clients may have never even really tried to achieve that first Pull Up, believing that there was no way they would be able to do one while others may have been working toward it for awhile with no real progress forward.
Because the Pull Up is a unique exercise that not only requires strength, but also a mind-body connection that many people with a desk job simply don’t have. So it isn’t as simple as doing some back exercise and BAM! first Pull Up!
It isn’t even as simple as slowly progressing variations from easiest to hardest and BAM! first Pull Up.
Helping clients, or even yourself, achieve that first Pull Up is about building the mind-body connection, reversing the effects of sitting, strengthening your back and forcing your body to take on more and more challenging Pull Up variations. It is about a complete program of foam rolling, stretching, activation and strengthening exercises.
It is about a program that boils down to 3 key things – Activation, not using Assistance and lower reps. End of story.
You can do all the Inverted Rows and Machine-Assisted Pull Ups assisted Pull Ups you want and never achieve that first Pull Up if you don’t think about these 3 things.
Three Keys To Achieving That First Pull Up
While a good Pull Up program needs to include foam rolling, stretching, activation and strengthening moves, a successful program really boils down to 3 key things – activation, not using assistance and lower reps.
If these three things aren’t a main part of your program, you’ll find it very difficult to achieve success.
Below are the Three Keys To Achieving That First Pull Up and how to implement them properly in your workout routine so that you actually move forward toward your goal!

Activation – Get Your Back ACTUALLY Activated and Working
Pull Ups require your back muscles to work – back muscles that are usually not properly activated and working because we sit hunched over a computer for 9 hours a day.
If your back isn’t truly activated and working, you probably aren’t actually strengthening it when you do all those back strengthening exercises.
It also means that, when you attempt Pull Ups, you aren’t actually using the large muscle group required to pull you up!
That may be exactly why you aren’t able to do Pull Ups – your back isn’t actually working to pull you up!
So what do you do if your back isn’t engaging during the Pull Up?
You get it activated and working by first rolling out your chest, upper traps, shoulders and lats. Then you stretch your chest and lats before you finally perform activation exercises to get the muscles of your back to start working.
You can’t simply jump right into doing Pull Ups, especially if you have a desk job. First you’ve got to foam roll and stretch to loosen tight muscles and then you’ve got to do more isolated movements to get your back activated and working.
Three key foam rolling moves to improve your Pull Ups are the Chest Foam Rolling, Thoracic Extension and Upper Back Foam Rolling Exercises.
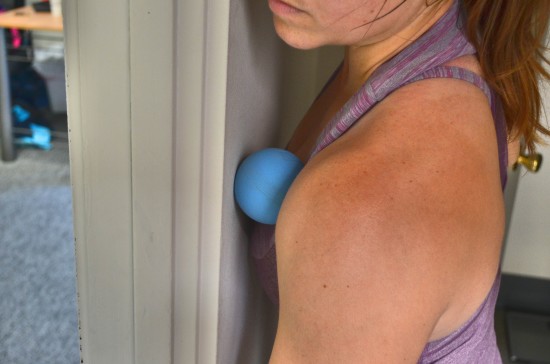
Chest Foam Rolling – One of the best ways to roll out your chest and open everything up after sitting hunched over a computer all day, so that your back muscles can actually engage and work during Pull Ups, is to roll out your chest against a wall or doorway.
To roll out your chest, it is best to use a small ball against a wall, especially in a doorway. Face the wall besides the doorway and place the ball between your chest and the wall with the ball right besides your shoulder and under your collarbone. Make sure you are standing with the ball near the edge of the wall so that you can extend your arm forward through the doorway.
Lean into the ball and raise that arm up toward the ceiling and back down. Feel the ball digging into the muscle as you raise and lower the arm. You can raise the arm straight out in front of you as you swing the arm very slowly up toward the ceiling and down toward the ground. Hold on any tight spots as you move your arm. Try to relax against the ball as you hold.
You can also roll the ball along the muscles below your collarbone and even down around your shoulder toward your armpit. Hold on any tight spots you find and breathe and relax into the ball.
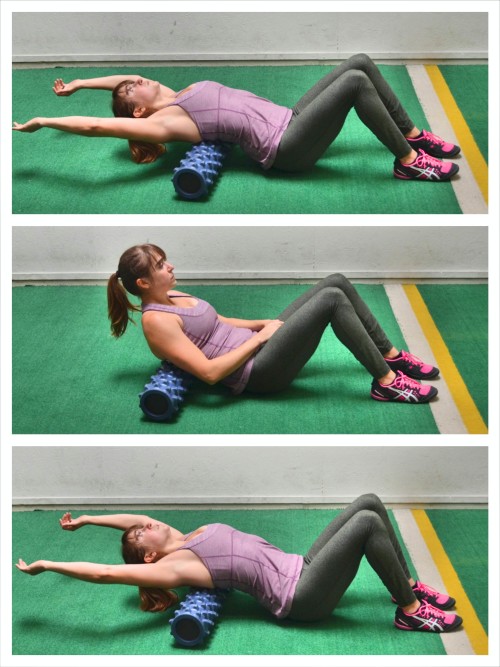
Thoracic Extension- Our spines are in flexion for most of the day. This means we may have limited Thoracic Extension. And when our Thoracic Extension is limited, we tend to overuse smaller muscle groups instead of using the big muscles of our back properly. Improve your Thoracic Extension with this movement so that you can properly engage your mid and lower traps, rhomboids and lats during Pull Ups.
To work on your Thoracic Extension, place a roller on the ground and lie back over the roller with the roller at about your mid-back.
Keeping your butt on the ground, extend your back over the roller, relaxing your head back down toward the ground. As you extend back over the roller, reach your hands overhead and relax your head and neck. Try to touch the backs of your hands to the ground behind you without lifting your butt up. If you feel yourself hyperextending your low back, engage your abs and even use them to pull you back up from completely relaxed over the roller. Then take a deep breath and relax back over fully. Focus on extending your mid and upper back over the roller.
Then sit back up and repeat the extension a few times, especially if the area feels tight, before moving the roller higher up on your back.
Work all the way up your mid to upper back. Do not do this on your lower back.
You can also use a peanut instead.
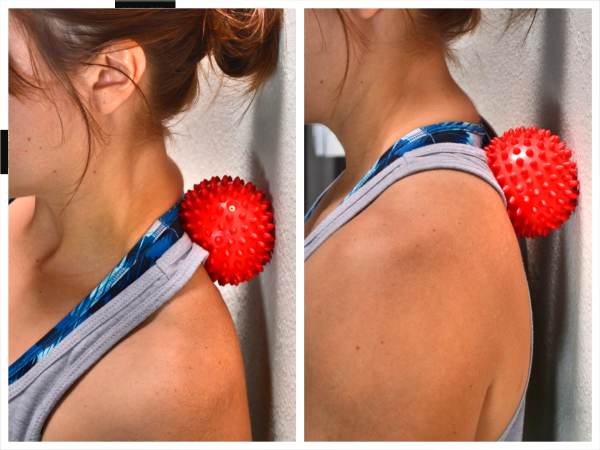
Upper Back Foam Rolling – Because of sitting all day, your upper traps may become tight and overactive, which could prevent your lower and mid traps from engaging properly. This could inhibit your scapular mobility and prevent the big muscles of your back from engaging properly during the Pull Up.
To roll out your upper back and traps, place a ball behind your back right to the side of the base of your neck as you stand with your back to the wall. Press back into the ball. Hold for a second or two.
Then rotate and drop your shoulder back toward the wall as you roll the ball up toward the top of your trap at the base of your neck and even out toward your shoulder. Hold on any tight spots. To really dig into your trap and along the base of your neck toward your shoulder, you may sort of have angle yourself with the side of your head toward the wall.
Then rotate your back toward the wall and roll the ball back toward your shoulder blades and even down the side of your back under your shoulder blade. You can work all down your shoulder blade and then even along your spine and back up. Hold on any tight spots.
If you find a tight spot, you can even pull the arm on the side with the ball across your chest or lift and lower it to help you dig in more to any knots or trigger points.
Make sure to breathe and relax on any tight spots you find.
For more upper body foam rolling moves you may want to include to make sure you can properly engage your back, check out these 11 Upper Body Foam Rolling Exercises.
Once you’ve foam rolled, you’ve got to stretch. Three key stretches to improve your Pull Ups before implementing activation exercises are the Standing Chest Stretch, Kneeling Thoracic Extension and Lat Stretch, and Thread the Needle Stretch.
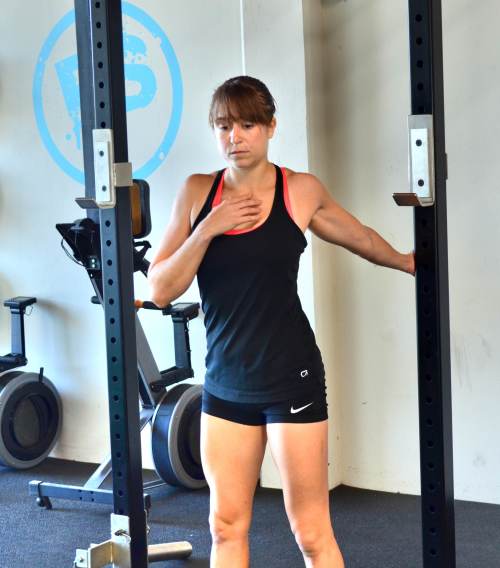
Standing Chest Stretch – While often before a workout we want to include Dynamic Stretches that take our joints through a full range of motion, the Standing Chest Stretch is an important move to still include in your workout routine. It will stretch out your chest and open you up so that your shoulder doesn’t try to do work it can’t handle.
To do the Standing Chest Stretch, place one hand back on a wall or on the edge of a doorway or even on a pole. Walk past your hand and turn away from your hand on the wall or door while keeping your arm straight.
Rotate open and away from your hand, feeling your chest and the front of your shoulder stretch. Do not shrug your shoulder. Relax and breathe.
Change the direction your thumb is pointing to hit a slightly different angle. By rotating your thumb to face backward (palm up toward the ceiling), you will hit your chest from a different angle than if your palm is facing the wall (thumb up toward the ceiling).
Hold the stretch and relax and breathe.
If you want a dynamic variation to do right before you lift, try the Chest Stretch with Wave.
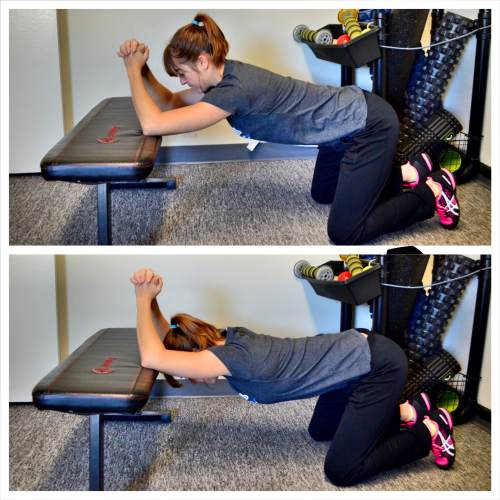
Kneeling Thoracic Extension and Lat Stretch – Improve your Thoracic Extension and loosen up your lats to restore proper mobility to your spine and shoulders so that you can properly perform a Pull Up. This move can help get your back ready to work and engage so that your shoulders and arms don’t try to take over.
To do the Kneeling Thoracic Extension and Lat Stretch, place a box, bench or table on the ground in front of you. Kneel on the ground facing the bench and place your elbows up on it about shoulder-width apart. Make sure that you are kneeling far enough away from the bench that you can lean forward and drop your head between your elbows as you press your chest toward the ground.
From this kneeling position, relax your chest and head over, sitting your butt back. Press your chest toward the ground and feel your spine extend. You should feel a nice stretch down your triceps and lats as well as through your thoracic spine. Try to extend your back as much as possible as you press your chest toward the ground, but don’t simply arch your lower back. Keep your abs braced so that you force your mid and upper back to extend.
Breathe to stretch deeper and then relax back out and repeat, trying to get further with each rep.
If you really feel your elbows constantly sliding out on the bench, you can hold a dowel or even a towel between your hands to help keep everything in line.
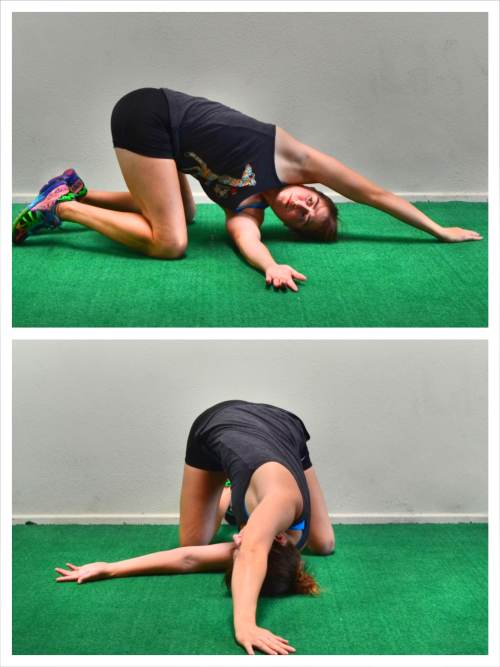
Thread the Needle Stretch – The Thread the Needle Stretch is a great way to relax your upper traps and open up your spine before doing activation moves to get your back working. It will allow your mid and lower traps to engage and help prevent your upper traps from wanting to take over.
To do the Thread the Needle Stretch, kneel on the ground and then reach one arm out on the ground as you relax the side of your head and shoulder down and reach the other one under your arm as if threading that arm through a needle. As you relax the side of your head and your bottom shoulder down, use the hand overhead to help rotate your chest open toward the ceiling.
Breathe and relax into the stretch so that you feel a stretch down your neck and across your shoulder blades and even down your spine. Walk your top arm back behind your head to increase the stretch and open your chest up toward the ceiling more.
Hold for a two count and then thread the other arm under and through.
Hold each stretch for at least a second or two before switching. You can sit back on your heels more if you can keep your head and shoulder on the ground.
Once you’ve loosened tight muscles, you’ve got to include activation exercises in your routine.
Both foam rolling and stretching are essential to actually get your back activated and working during Pull Ups. When choosing activation exercises to include, you want to make sure that you include moves that also improve your scapular mobility, especially your scapular retraction.
Three of our favorite activation exercises to improve your Pull Ups are Scapular Band Flyes, Band Pull Downs and Mini Pull Ups.
These moves should be done in warm up BEFORE your pull up workouts or even potentially before any workouts you do to strengthen your back!
Scapular Band Flyes – This is one of our favorite moves because it opens up your chest, activates your back and posterior deltoid while also improving your scapular mobility. It helps you build the mind-body connection necessary to retract your shoulder blades and engage your back during Pull Ups.
Plus, with a band, you can do this move anywhere – even when you need a break from work at your desk!
To do the Scapular Band Fly, hold a band in both hands with your hands about shoulder-width apart. If you hold in closer, it will make the move harder. Do not hold out wider though. You want there to be tension on the band through a full range of motion. Instead pick a lighter band.
Holding the band, raise your arms straight up in front of you at about shoulder height. Press your chest out so that you are standing nice and tall, but make sure to keep your neck and shoulders relaxed. Do not shrug.
Keeping your arms straight and at about shoulder height, pull out on the band to open your arms out to the sides as you bring the band in toward your chest. Pinch your shoulder blades down and together as you open and stretch the band. Do not shrug your shoulders as you fly your arms open. Hold with your arms open for a second or two and feel your back working.
Then, in a controlled fashion, bring your arms back together so that your arms are again about shoulder-width apart. Make sure there isn’t slack in the band even when you bring your arms back in front of you.
Repeat the fly. Do not bend your arms or shrug your shoulders. Feel your back working to pull the band open and your arms apart.
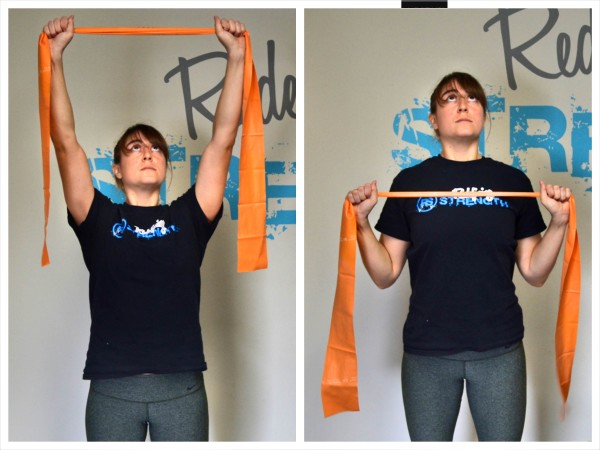
Band Pull Downs – This is a great activation exercise that mimics the Pull Up and gets your back working and shoulder blades mobile. It is a great way to make sure that you feel your shoulder blades retracting and your lats engaging.
The Band Pull Down allows you to engage all of the muscles used during the Pull Up but with less weight and resistance on them, making it easier to actually get them activated and working.
To do Band Pull Downs, hold a band between both hands about hip-width apart. You don’t need a very heavy resistance to make this move work and can even use a towel if you don’t have a resistance or mini band available.
Slightly pull out on the band so that there is tension on the band as you press your chest out and reach the band overhead. Keep tension on the band as you press it overhead. Do not let your hands come together; however, you may need to adjust your hands in closer if the band is light. Pull out on the band so that your hands are not much wider than shoulder-width apart.
Then, keeping your chest pressed out, pull the band down toward your chest, as if pulling your chest up to a bar during a Pull Up. Draw your shoulder blades down and back and feel your back working to pull the band down as you drive your elbows down toward the ground. Keep tension on the band the entire time and do not let your hands come together at the bottom.
Pause at the bottom and feel your back engage and hold then slowly reach the band back overhead before repeating the Pull Down. Move slowly and make sure to maintain tension on the band the entire time. Focus on feeling your back work to pull the band down so that you are “leading” with your chest.
Do not arch your low back as you perform the pulls. Keep your abs engaged.
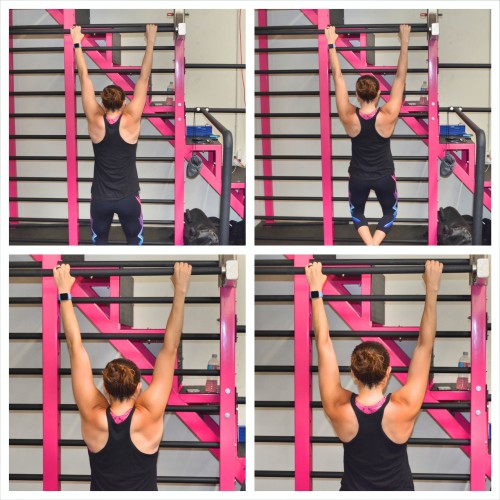
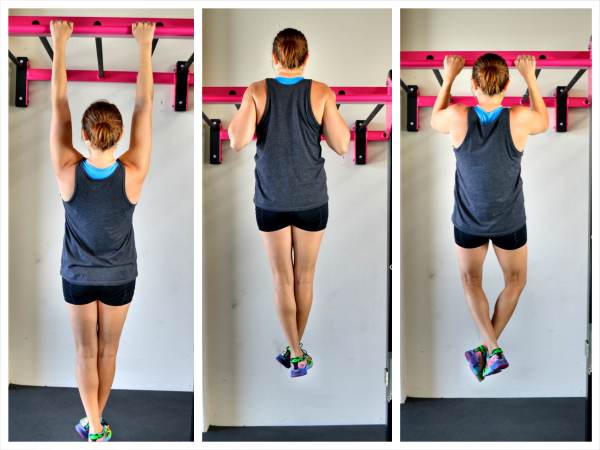
Mini Pull Ups – To be able to do a full Pull Up, you’ve got to start actually doing Pull Ups. And a great way to learn how to engage the muscles of your back and improve your scapular retraction, while taking on your bodyweight in the same way you would with a Pull Up, is by doing Mini Pull Ups.
Mini Pull Ups work on that initial engagement of the lats and retraction of the shoulder blades. It also works your core, grip and arms as well.
It is the perfect way to engage your back and start working on your Pull Ups.
To do Mini Pull Ups, start hanging from the bar with your palms facing away from you and your hands about shoulder-width apart.
From this dead hang position, press your chest out and up toward the bar as you draw your shoulder blades down and together. Feel your back engage as you draw your shoulder blades together and press your chest up toward the bar. You will feel your shoulders “unshrugging.”
Don’t bend your elbows and turn this into a pull up. You are simply working on that initial retraction and engagement. Really press your chest out and retract your shoulder blades, bringing them down and together.
Again, do not bend your arms to pull up. Use your back and feel your back engage. You should also feel your shoulders go down as your chest lifts up.
Pause at the top then relax back down to a full dead hang and repeat. Remember, you are not bending your elbows to make this movement bigger.
Once you’ve got your back activated and working, you’ve then got to focus on actually taking on your full weight to perform Pull Ups.
Stop Using Assisted Machines and Bands – Try These Moves
If you want to achieve that first full Pull Ups, you’ve got to include Pull Ups in your workout routine. No amount of rows or lat pull downs will ever be even if you don’t actually practice doing a Pull Up.
However, you can’t simply hop on the Assisted Pull Up machine or string up a whole bunch of bands and bust out Pull Ups and expect to get stronger and achieve that first one.
Because, in order to do a full Pull Up, you need to actually DO a real Pull Up…or at least as close to a full one as you can.
That means taking on as much of your own weight as you can while still working your body in the same way that an actual Pull Up would. It means not simply using assistance and doing as many reps as you can.
Because truly assistance only makes you better at doing Pull Ups with assistance.
Yes…If you are careful about progressing, you can slowly wean yourself off of assistance, but especially bands, tend to help you at the wrong spots and can prevent you from full engaging your muscles in the same way you would when handling your own bodyweight.
If you want to build your Pull Ups, you need to take on your own bodyweight and use Eccentric Pull Ups and Pull Up Holds.
Eccentric Pull Ups – Eccentric Pull Ups are a great way to take on your own bodyweight and strengthen your grip, back and core even if you can’t do a full Pull Up. They allow you to take on your own weight just like you would during a full Pull Up.
To do the Eccentric Pull Up, you can jump, use your feet or simply set up at the top of a Pull Up. You want your chin over the bar and your chest pressed out at the top.
Once at the top of the Pull Up, pause and then slowly lower yourself down until your arms are fully extended and you are hanging from the bar. Then reset at the top and repeat.
The slower you go and the longer the time under tension, the more your core and back will work.
If you can’t lower down slowly, try keeping a foot down on the ground to help take some of the weight off your arms.
Constantly work though to go slowly and take on your full bodyweight.
If you can, even perform a Jumping Pull Up to the top, using as little assistance as you can from your legs to force your back to work hard both on the concentric and eccentric phases of the move.
Pull Up Holds – Pull Up Holds are another way to take on your full bodyweight like you would during the Pull Up without having to be able to do the full Pull Up. Plus, you can choose holds that focus on the areas that you usually get “stuck.”
Three basic Pull Up Holds to include are the Dead Hang, Mid-Pull Up Hold and Pull Up and Hold.
- Dead Hang – This move is a great way to work on that initial engagement at the bottom of the Pull Up. It helps you work on scapular retraction and activating your lats right from the bottom of the pull up. To do the Dead Hang, grab the bar with your hands about shoulder-width apart. Your palms can be facing toward you or away. Then hang from the bar with your arms straight. Your shoulders will be a bit raised as you hang from the bar. Press your chest up and out as you draw your shoulder blades together. Feel your shoulders sink down and your neck elongates as you retract your shoulder blades and hold. You should feel your back work as you hang. If you struggle with this, you may need to start with just a basic hang.
- Mid-Pull Up Hold – The Mid-Pull Up Hold is where you hold with your arms bent to about 90 degrees. Grab the bar and either pull up or set up with your arms bent to 90 degrees. Then hang, keeping your arms bent and chest pressed out. Don’t shrug or tuck your head as you hold. Really try to lead with your chest and feel the muscles of your back working. You can do a “mid” hold from really anywhere between the Dead Hang and full Pull Up and Hold.
- Pull Up and Hold – The Pull Up and Hold is a great way to work on your lock out at the top of the Pull Up aka getting your chin up over the bar. To do the Pull Up and Hold, set up at the top of the Pull Up with your chin above the bar and your chest pressed out. Hold here with your chin over the bar or even the bar at your chest. Keep your core tight and let your legs hang down as you hold your chin above the bar. Make your back and core really work with this move. Do not let your shoulders start to shrug as you hold. If you start to lose the hold, lower yourself down as slowly as you can and then perform a dead hang for a few extra seconds. If you can’t yet handle your full weight for the hold, lightly touch a foot down to the ground.
Besides using these moves, a big part of not using assistance is also not focusing on doing more reps, but on doing harder variations.
Use Lower Reps And Harder Variations
With Pull Ups, if you want to achieve that first full one, you need to work with very low reps and attempt the hardest variations you can.
Simply doing more reps, while it can build strength, will also only make you “better” at doing that assisted variation.
Don’t worry about how many reps you can do. Just do one at the hardest variation you can. Then rest. Then attempt one again at that hardest variation.
And keep pushing toward harder variations while resting between singles. Because if you don’t do these harder variations, you won’t build toward the full Pull Up.
Don’t be afraid to keep the reps low and rest often. While sometimes increasing volume is key to fatigue your muscles, it can also be important to do harder variations even if it means doing only one rep.
Because if you can do a harder variation for one rep each time that will lead to one rep of a full Pull Up!
So stop wasting time and start focusing on these 3 Keys To Achieving That First Pull Up. Get your back activated, take on your full bodyweight as often as you can and don’t be afraid to do sets on one rep!
If you’re ready to crush your pull up work, join my 30-Day Pull Up Challenge TODAY!


This is a very informative article – thank you for the tips. I can already do a few pull ups but am trying to get to 10. I’ll try your suggestions. Cheers : )
Definitely use some eccentric! It will help you get volume!
Thank you! I’ve been using an assistance band, and, as you pointed out, I went from doing 3 assisted pull ups to 16. However, I still can’t do 1 unassisted pull up.
I lowered the amount of assistance, but I will abandon it all together and work on these techniques. Thank you.
Hi Lisa. Don’t abandon it all together. Each thing can have its place. Just start implementing some of these techniques. You could even use the assistance up if needed and then perform a slow eccentric lower back down without the assistance to keep progressing. If you need any further help, don’t hesitate to message me at [email protected].
Hi. I’m female and 50 years old . Last week I did my very first 3 reps of unassisted pull ups. It was the narrow grip variation but I’m chuffed I did it.I had been working on an assisted pull up machine for a while..and I do have many old gym and sports injuries but I slowley made it harder and harder over time.. then finally able to achieve the assistance of just 30 pounds. I weigh 125pound’s. I did 2 sets of 3..Then my last set I used no assistance for 3 reps. I tell you it was hard but I can only get better. I need to.get my chin over the bar on my last rep and start leading more with my chest.(thanks to your article). It’s given me more motivation to get to the gym everyday because I want to work up to 10 pull ups at the hardest variation (wide grip) and I love facing new challenges.thanks for your blog. I Will also incorporate those stretches you suggested and perhaps just get better and better. Regards, Issy Potae
Hi Issy. That’s so awesome! Sounds like you are really pushing yourself and progressing. I would definitely recommend you try some Eccentric Pull Ups as well. And mix up your grip and even do some other lat exercises to help with the wide grip variations. And if you are looking for a program I do offer a 30-Day Pull Up Challenge 🙂 If you have any questions, don’t hesitate to email me at [email protected]. Have a great day! -Cori
This article hit on some walls I’ve been hitting and gave me a ton of insight to maybe what some of my problems are. I’m desperate to achieve pull-ups in this article gave me hope that I can achieve it. I’ve already sent you an email hoping you can help me a little bit more in depth but regardless I’m very thankful for the article !!!
Just emailed you back. We will chat and I’ll help in any way I can! 🙂
Awesome article! Thank you. My goal has been a pull up for 2 years. I gave conquered all other goals except this. I use a green and blue band and still can’t do 1. ? I want this sooooo bad.
Hi Lori. Using the bands can be helpful, but I would definitely suggest, if you aren’t doing it already, activation pre-workout and then some eccentric pull ups taking on your own bodyweight even if for very low reps and pull up holds.
If you are interested, I do have a 30-Day Pull Up Challenge that I’ve only done a soft launch with to current members that has yielded great results. If you have any other questions, don’t hesitate to message me at [email protected].
I’ve been working for months to do one pull up. I have come a long way but got stuck. Can’t wait to try some of these tips. It will be my most prized fitness accomplishment!
These will help! Also, I posted one of my 30-Day Pull Up Challenge workouts at the link below and it uses these tips to help improve your core strength and pull ups. You may want to check the workout out! https://redefiningstrength.com/improve-your-pull-ups-and-core-strength-with-this-killer-workout/
I love this article and the “Improve Your Pull Ups”. I don’t think I can get through many of the circuits, but how many times per week do you recommend working on them? 3x/week? I think I would end up needing more rest, but am anxious to get there and it makes me hesitant to sign up for the 30-day. Thoughts?
You can do workouts for them twice a week and you should do activation for you back up to 4 times a week. Honestly, if you want results, you can’t go about things haphazard. Of course I love my program, but following something consistently is important. If you are just starting out, there are modifications. And some of my beginners go through the program a couple of times to reach that first one. Plus, I can help you modify anything as needed. You never lose access to the program so you can start slow! 🙂 If you need anything else Tracy, you can always email me at [email protected]
I’m very impressed with this article as a personal trainer myself. I’m glad you shared this – it’s inspired me to share top tips as well. Can wait to try the rolling, actIvation excercies etc. I’ve done lots of the later exercise and totally aggree on ISO holds and negative reps versis band assistance. Thank you very much: I’ll keep an eye on you as you’ve gained my respect.
Thanks Simon! Let me know how the other moves go after you try them 🙂
Can you share where you got the upper back foam roller and the back roller? They look like they’d be very helpful for me and I’d like to look into purchasing them. Thanks!
Here they are:
Rumble Roller – https://www.amazon.com/gp/product/B00E4YWG3M/ref=as_li_tl?ie=UTF8&camp=1789&creative=9325&creativeASIN=B00E4YWG3M&linkCode=as2&tag=r0cbd-20&linkId=6aad92e428e54a8d7ca8ac7d02a59854
Red Ball – https://www.amazon.com/gp/product/B00M776F12/ref=as_li_tl?ie=UTF8&camp=1789&creative=9325&creativeASIN=B00M776F12&linkCode=as2&tag=r0cbd-20&linkId=3700787c46221b7651a9410471b63631
I assume that much of this depends on your strength to weight ratio… I’ve been training to do pull up for years but recognise I need to drop 20lbs to make it easier… Once I’m done I’ll be back to try the programme!
Hi Ronnie
So losing weight can help, but I have a number of clients who are still “overweight” by 40lbs and have managed to do not only one but multiple push ups (I say overweight as in they want to lose that much). So don’t count yourself out just because you are still on your weight loss journey! Back activation was key for them and you may find it more helpful than you even realize!
Plus doing pull up work on your journey can help you lose the weight!
Cori
I do 4 good pull ups, 5 with a band and extra weight, then 5 with a band and my body weight x 2. Finished with 6 to 12 eccentric ones with an extra 5kg of weight but can’t ever get to 6 pull ups, what am I doing wrong?
What do you mean a band? Like a band to assist? Do you include activation? Is this at the beginning of a workout? The end? The entire workout? How many times a week are you working on pull ups? Sorry can’t really help without knowing a bit more info!
I wish I had read this before two weeks ago! I am seeing a trainer and I told him how i want to build my upper body strength and how I am unable to do pull ups and he helped me be able to do proper push-ups. However, after attempting assisted and holding pull-ups I was so sore after and kept stretching my shoulder muscles out and applying pressure for the next few days. By the week after I was having excruciating pain and couldn’t look over my right shoulder nor could I get up from laying down without being in pain. 2 weeks later, it’s back to square 1 in building my upper body muscles, still sore, but I am slowly working my way back into arm workouts.
This is by far the best article I’ve ever read on pull ups! Thank you and great job! I will definitely use this on myself and clients.
Yes definitely take it slowly. And roll out your chest and your upper back. Also, activation exercises before trying pull ups will definitely help! If you need anything else, don’t hesitate to message me at [email protected] – Cori
Thank you so much Bri! 🙂 If you ever want to chat more, don’t hesitate to email me at [email protected]! – Cori
This is a very informative article. I have been doing similar routines at my crossfit box for over a year without success of a pull up yet. And I never really understood the science behind it, especially activating the back muscles as I do have a job involving a lot of sitting. I will definitely adopt this routine also. Here’s hoping.
How do I hold the holds for?
I would recommend starting with 10-20 seconds. 🙂 You could do up to 30 but I usually only pick one to include in a circuit for that long.
Yes! You can do it James! Stretch and roll your chest and really work on activating those lats and mobilizing those shoulder blades!
Sounds like great advice. I can’t get to a gym. What product do you suggest for home use. I’ve seen the doorway bars but nervous they won’t work properly. I’m 53 and would love to do a pull up and work towards many more.upper body strength I’d my weakness Thank you
Some of my clients have power towers. I had a screw in doorway one from Amazon that worked well too!
What pull up bar system is this? I have all pink equipment at my gym too and this system look great!
Battlehouse fitness made it 🙂
So glad I saw this post. Last night I did the 3 foam rolling and stretches followed by doing the Mini Pull up. Wow I finally felt my back and last activating. It’s what I knew was supposed to happen but I Finally Felt it. I’m so excited. Thank you so much for sharing. Also is this something that should/could be done daily?
So glad you’re feeling the muscles engage! I would definitely roll and stretch daily, but vary how you activate and not do the same things every day.