“Isometric” describes the type of muscle contraction that is taking place.
So an isometric exercise, therefore, is an exercise that is held. The muscle is being held at a point under tension.
That makes isometrics great exercises to use when you are looking to activate under-active muscles and get your body ready to work. It also makes isometrics great recovery exercises.
Here are some of the best Isometrics to prevent injury, activate under-active muscles and help your body recover! These moves will improve your muscular stability and your body’s mobility.
Legs

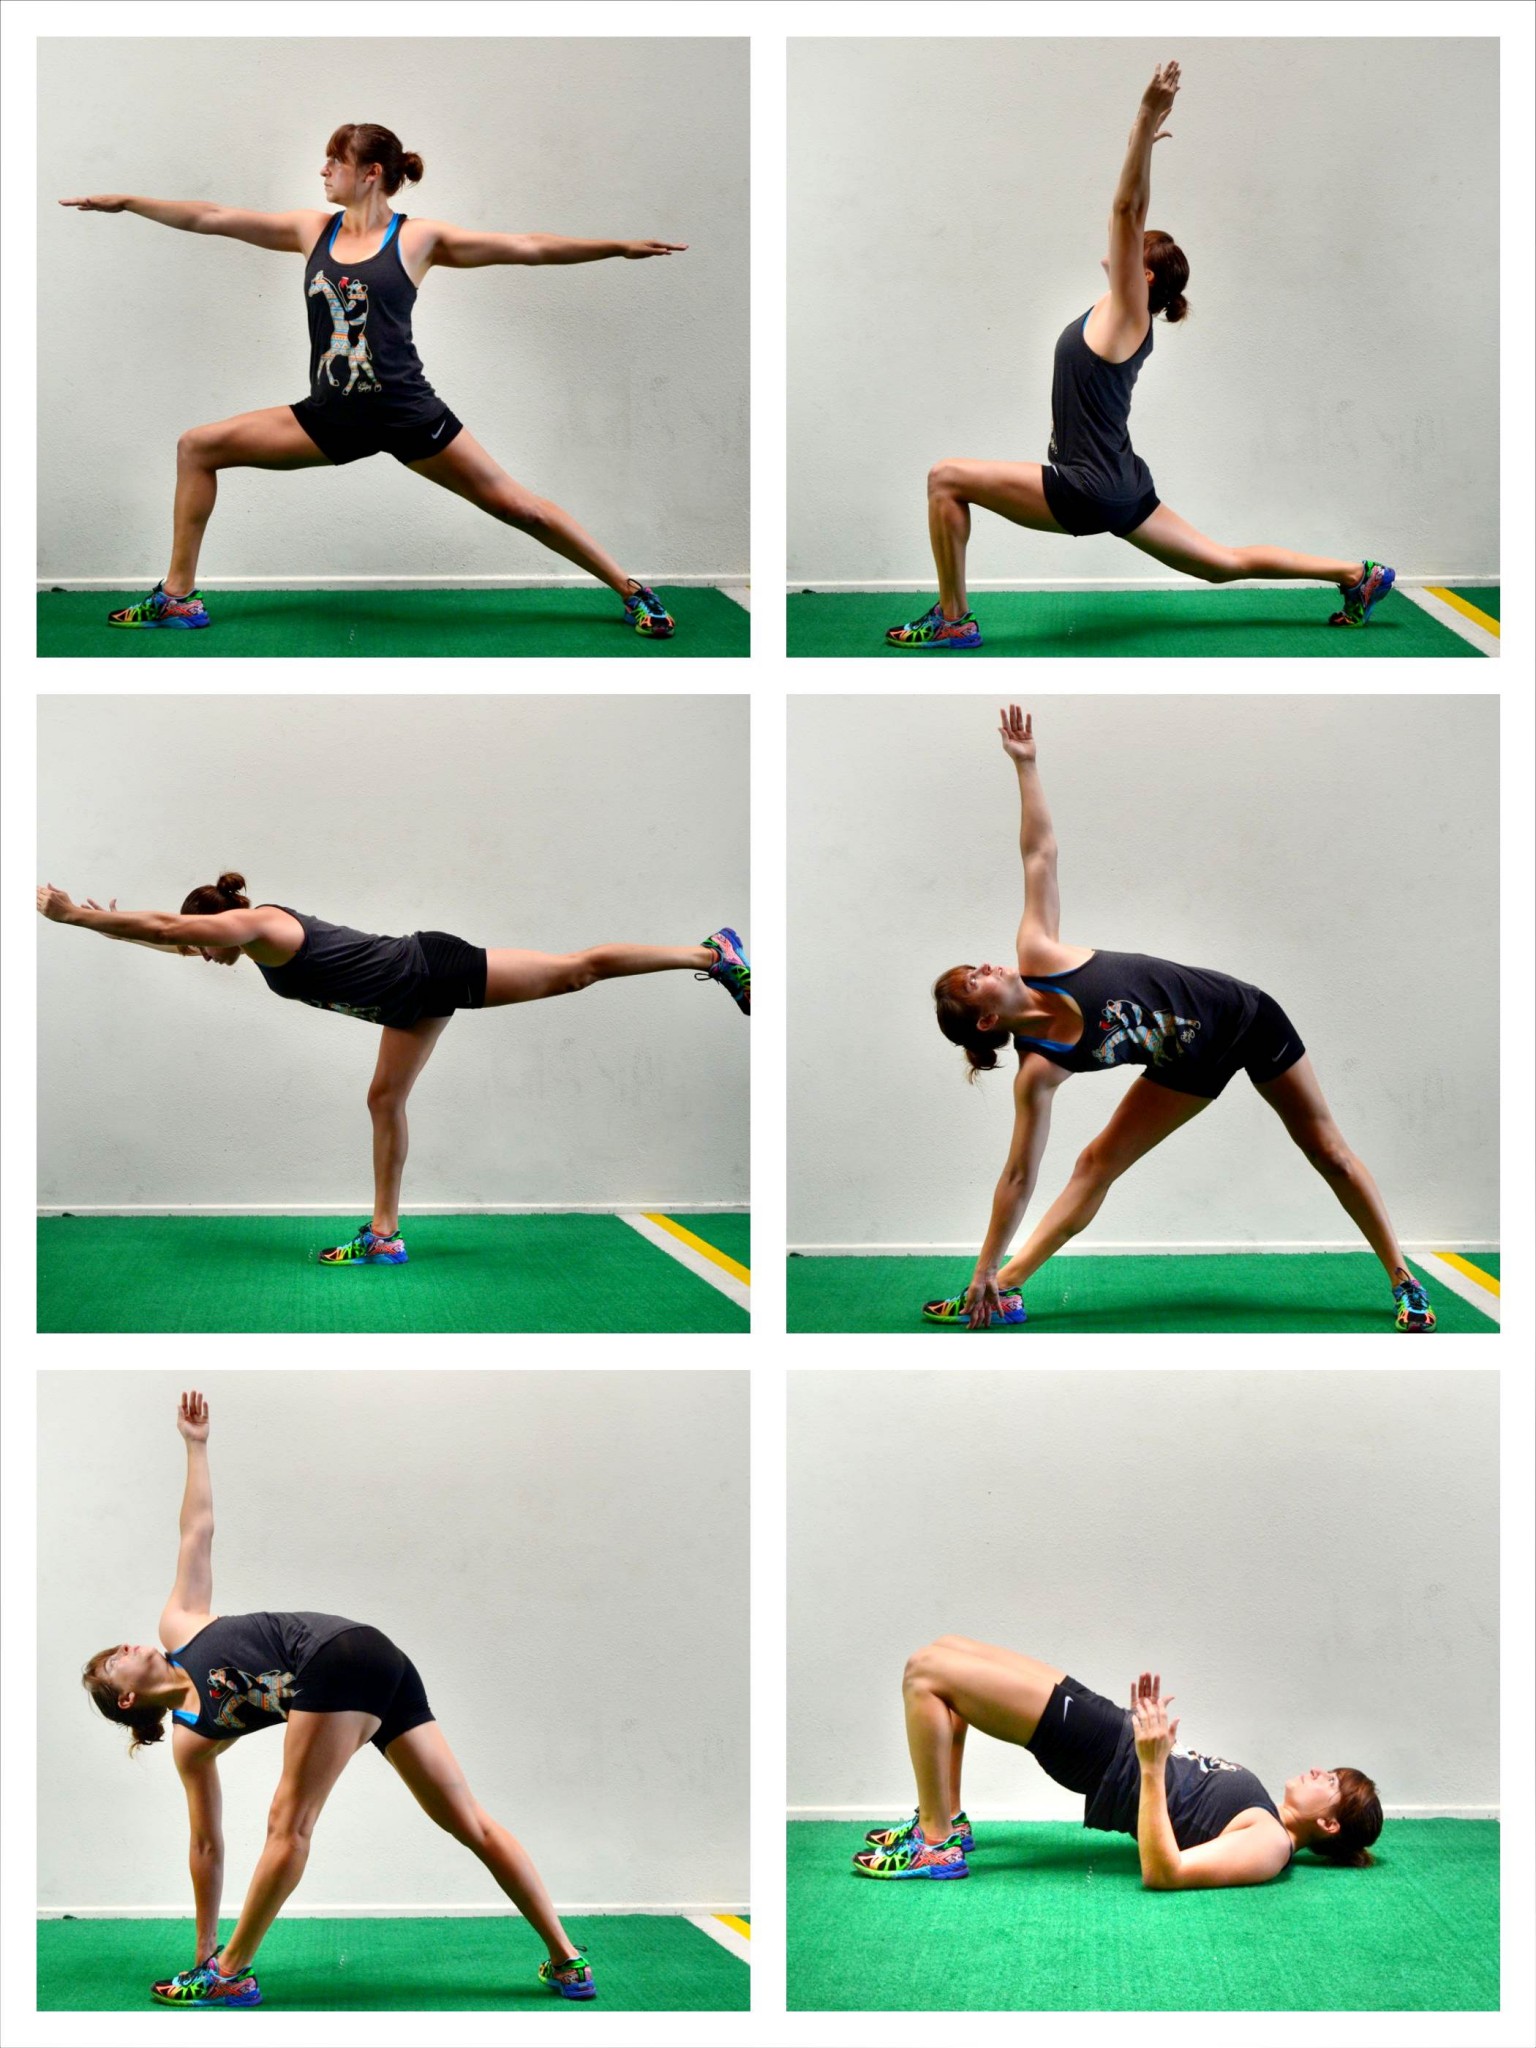
1. Crescent Pose – The Crescent Pose is a great way to develop leg strength while improving your hip mobility. To do the Crescent Pose isometric, step one foot forward into a wide stance and bend the front knee while keeping the back leg out straight. Your front heel should stay down while your back heel will be up. Make sure you are really sitting back into your front heel. Lift your hands up and reach them back and overhead as you stay low in the lunge. Keep your front heel down as you sit back into the lunge. If your front heel is coming up, you may want to step your front foot forward a bit more. As you hold the lunge, your back heel will stay up and the back leg will stay straight. Make sure though to drive back through your back heel instead of coming up onto your toe. Feel a nice stretch down the front of the hip and quad of the back leg. Hold then switch to the other side.
2. Warrior II – This Warrior Pose is a great way to work your entire leg and really open up your hips and even your inner thigh. To do the Warrior II Pose, set up in a nice wide lunge stance with one foot forward and one foot back. Turn the back toe out so your feet are perpendicular. Your front foot should be at the instep of your back foot when you turn it out. Sink down into a lunge, keeping the back leg straight and the front heel firmly planted. Try to get your front knee bent to 90 degrees and your quad parallel to the ground. You may find you need to step your front foot forward a bit more to sit comfortably in the lunge and keep the front heel down. The lower you sink in the lunge, the harder the move will be. Do not let your front knee cave inward. Squeeze the glute and keep the knee in line with your hip and your ankle. While in the low lunge, open your arms out at shoulder height. Reach one forward over the front leg and the other back over the back leg. Keep the chest open and do not lean forward. Do not let your arms sink from holding at shoulder height. Keep your weight centered in the lunge. Hold then switch to the other side.
3. Warrior III – This is one of my favorite yoga poses because it really activates the glute while working on mobility AND balance. To do the Warrior III Hold, balance on one foot with the knee slightly bent. Hinge over lifting your back leg toward the wall behind you. Pretend you are driving the foot straight back into the wall behind you. Lean your torso over, keeping your back flat and your core tight. Reach your hands overhead in front of you. Hold in this position. Do not let your back round or your other foot touch down. Keep your arms in line with your body. You want a nice straight line from the bottom of your lifted heel to the end of your finger tips. Make sure you do not lock the standing leg out as you hold. Also make sure your hips don’t open up as you hold. Squeeze your glutes to keep your hips level. Beginners may need to reach back toward their foot instead of out in front of them. Using a wall can also help beginners. Stand with a wall behind you and when you hinge over have the lifted foot lightly touch the wall behind you to help you balance.
4. Extended Triangle Pose (Twisting Extended Triangle Pose) – A great pose to stretch your hamstrings, low back, glutes, calves and hips. It also works on your thoracic mobility. To do the Extended Triangle Pose, step up as if you were going to do the Warrior II pose. Step one foot forward and have the back foot turned out. If your right leg is forward, reach forward and down with the right hand. Place your hand on the ground inside your foot or on a block or your shin if you can’t reach the ground while keeping your front leg straight. Reach the left hand up toward the ceiling, opening your chest up toward your left hand. Hold that pose and relax and breathe.
To do the Twisting Extended Triangle Pose, you will reach the opposite hand toward the ground and twist toward your front leg. So if your right leg is forward, you will reach your left hand down to the ground and your right hand up toward the ceiling. Still make sure to keep your right leg straight and open your chest up toward the ceiling.
5. Glute Bridge Hold – An essential glute activation move that can also open up your hips. Lie on your back on the ground with your feet flat on the ground and knees bent. Bring your feet in so that you can just barely touch them with your fingertips when your arms are down by your side. Then bend your elbows to 90 degrees and drive your hips up. Drive through your heels, upper back and arms. Fully extend your hips and squeeze your glutes as you raise. Brace your abs so that you don’t hyperextend your low back as you lift. You want to feel this move in your glutes and a little in your hamstrings. Hold at the top.
Back/Biceps
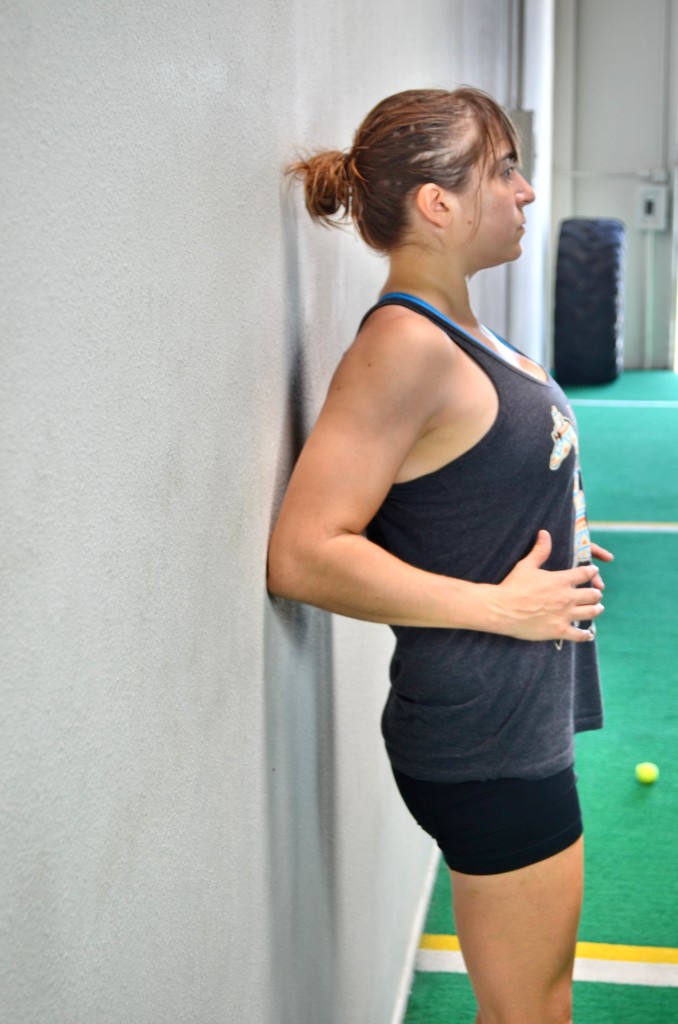
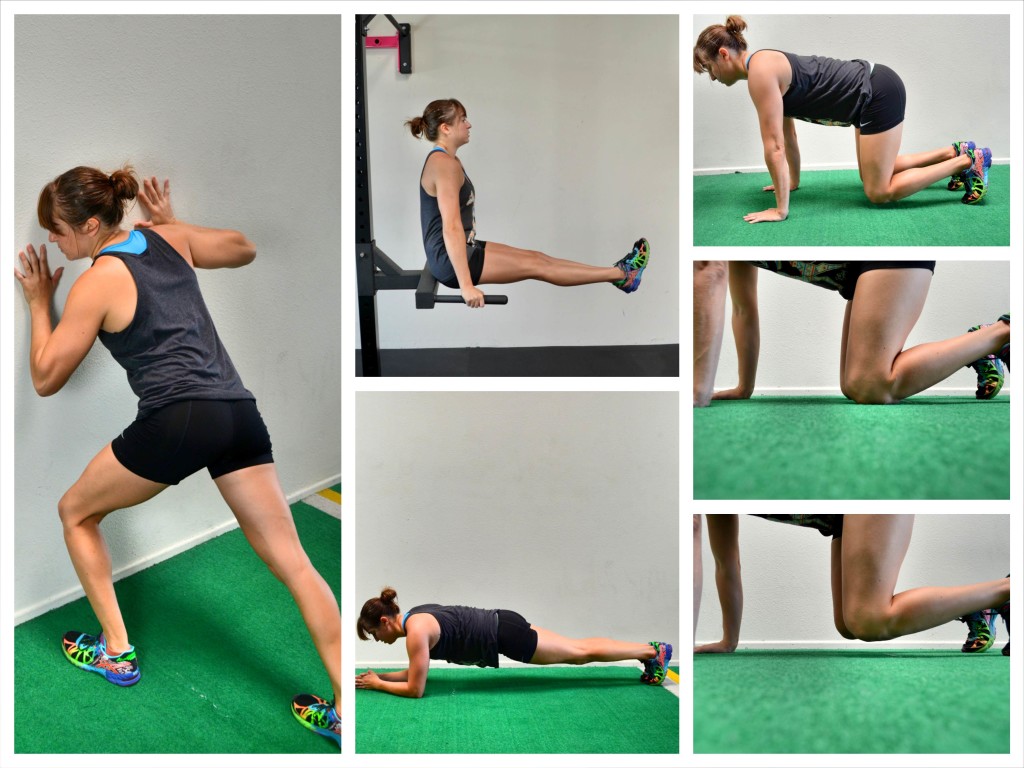
1. Scapular Wall Hold – A must-do move for anyone with a desk job. This move will help alleviate your neck, shoulder and upper back pain by activating the large muscles of your back.
To do the Scapular Wall Hold, stand about six inches from a wall. With your back to the wall and your elbows bent in by your side, drive your chest out and lean back against the wall. Only your elbows should touch as you lean back. Do not shrug your shoulders and keep your body in a nice straight line as if holding a plank. Keep your head in line with your spine and do not tuck your chin. Walk your feet back toward the wall to make the move easier or walk them away to make the move harder. Make sure to drive the chest out and draw your shoulder blades down and together as you hold.
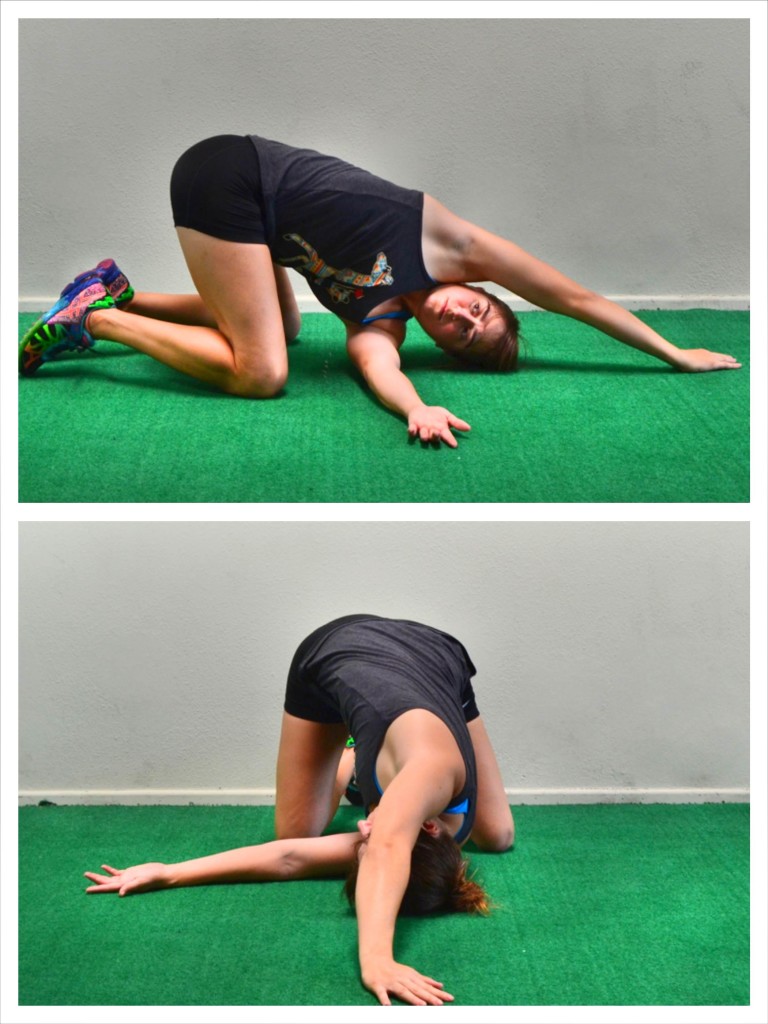
2. Thread the Needle – This is a great upper back and neck stretch. If you sit hunched over a computer, you need to do this stretch to help you prevent upper back, neck and shoulder injuries. This is a great stretch to do to loosen up tight muscles so you can then activate the big muscles with the Scapular Wall Hold.
To do the Thread the Needle Stretch, kneel on the ground. Then lean forward, relaxing the side of your head down onto the ground. Reach one arm under your body and toward the direction you are facing as if “threading a needle.” Relax that shoulder down toward the ground and then rotate your chest up and open. You can reach your top arm up overhead and even try to walk the hand up and backward behind you. Hold and then thread the other arm under and through.
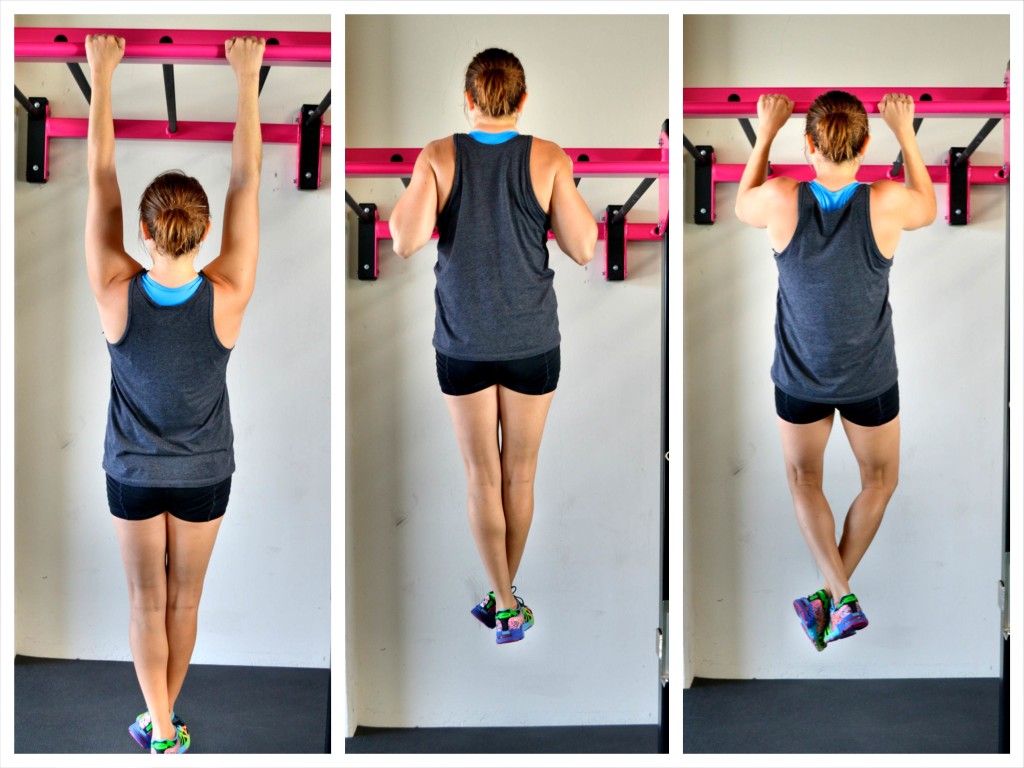
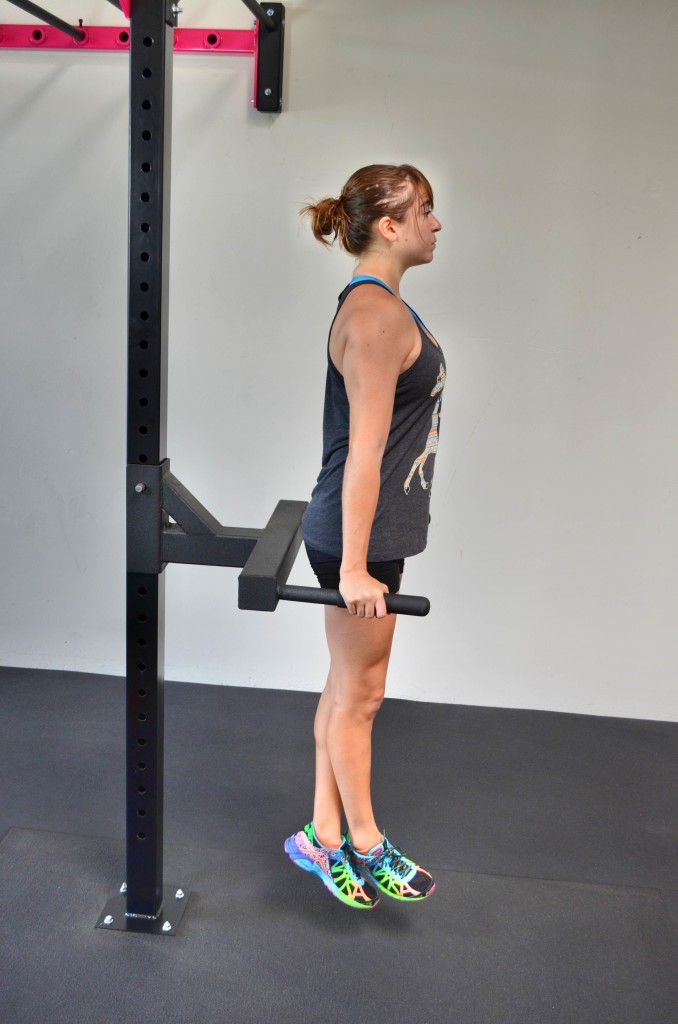
3. Pull Up Holds – If you want to improve your pull ups, you need to do pull up isometrics. You can use isometric holds to improve and strengthen the weak point of your pull ups.
There are three pull up isometric moves we like to do:
The Pull Up and Hold – With this move you will hold at the top of the pull up with your chin above the bar. You can use a pull up or chin up grip. Make sure to press your chest out and draw your shoulder blades back and down as you hold. Make sure to keep your chin above the bar as you hold.
The Dead Hang – While this move is called the Dead Hang, you aren’t simply going to hang from the bar completely disengaged. With either a pull up or chin up grip, hang from the bar with your arms straight. As you hang, drive your chest out and pinch your shoulder blades down and back to engage your lats. Do not let your shoulders shrug as you hold.
The Mid-Point Hold – For this isometric move, you will hold with your elbows bent to about 90 degrees. Make sure to press your chest out as you hold and don’t shrug your shoulders.
4. Cobra – This is a great isometric move to activate the big muscles of your back and alleviate upper back, neck and shoulder pain. It will also help improve your pull ups and rows.
To do the cobra, lie face down on the ground with your arms down by your sides. Then lift your chest up as high off the ground as you can, pinching your shoulder blades down and back. Squeeze your butt to protect your low back. Hold with your chest up as high off the ground as possible. Do not strain your neck as you hold. Keep your head in line with the rest of your spine.
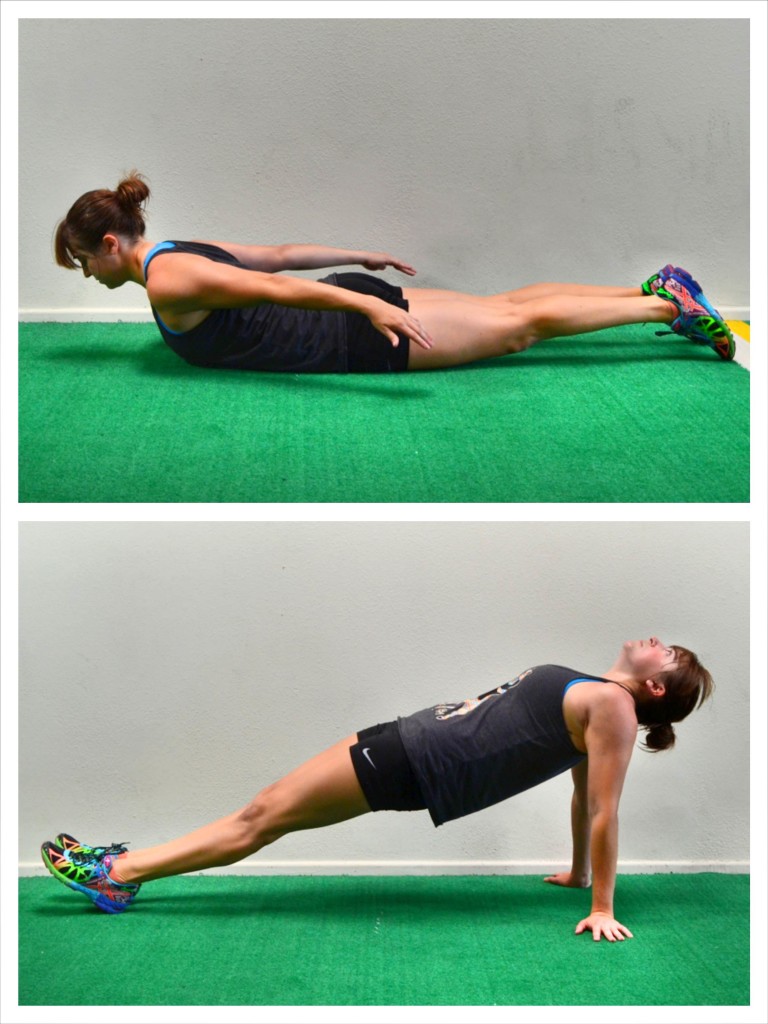
5. Posterior Plank – This is a great move to stretch your chest and work your entire backside.
To do the Posterior Plank, sit on your butt with your legs straight out on the ground in front of you. Place your hands down behind your butt on the ground. Then, driving up through your heels and your hands, lift your butt up off the ground and press your chest out. Lean your head back as you bridge up. Squeeze your butt and lift your hips up as high as you can while keeping your legs straight. Hold at the top of the move with your body in a nice straight line. Make sure to keep your abs tight so you don’t hyperextend your low back.
Chest/Shoulders/Triceps
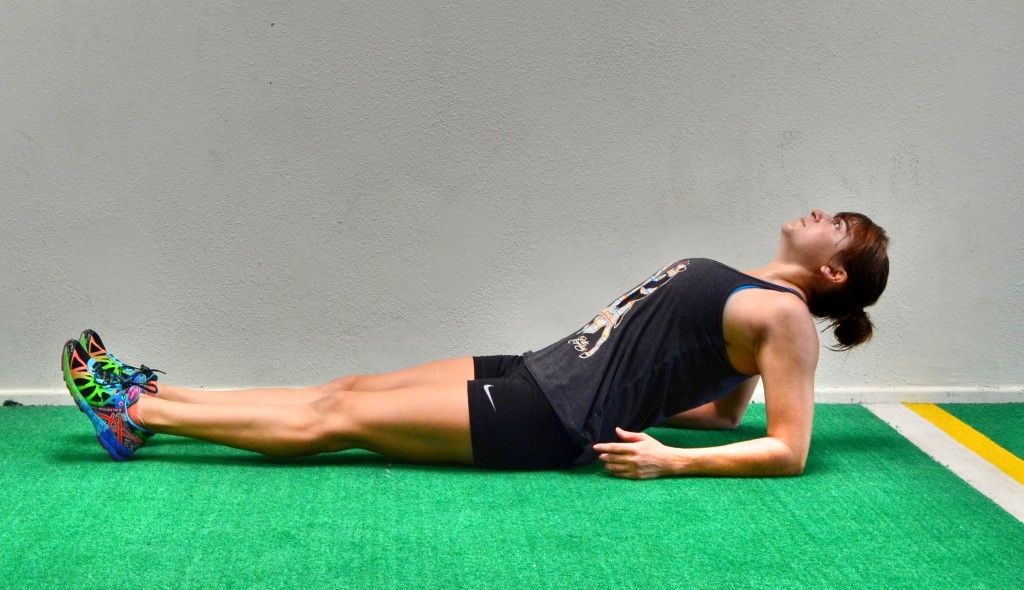
1. Fish – Because we sit all day hunched over a computer, our chest can become tight. This move will stretch you out and improve your posture.
To do the Fish pose, lie on your back on the ground with your legs together and straight out in front of you. Your arms should be down by your sides. Then prop yourself up on your forearms and drive your chest up and out. Relax your head back and feel the stretch across your chest and shoulders.
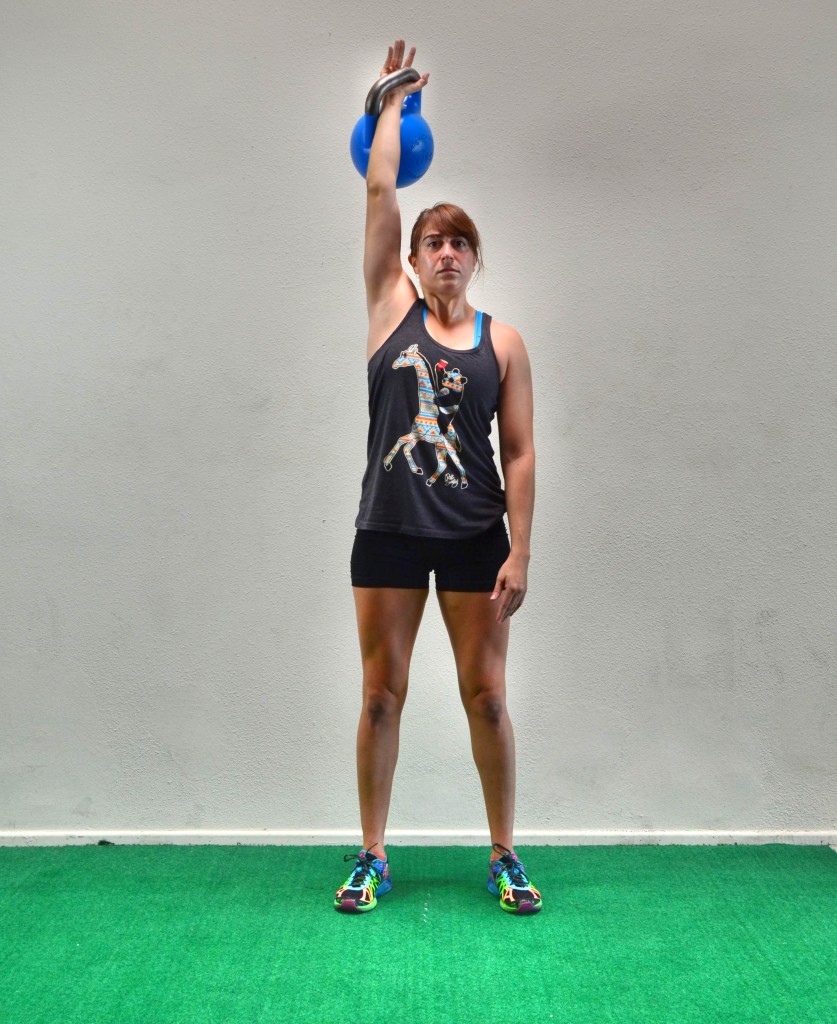
2. Overhead Hold – This is a great shoulder stability and core exercise. You can do a bilateral overhead hold (both hands) or a unilateral overhead hold (single arm). The unilateral hold is a great way to work on creating stability through your core while being imbalanced.
To do the Unilateral Overhead Hold, grab a kettlebell or dumbbell and hold it in one hand. Then extend the arm up toward the ceiling with the arm straight. Your bicep should be by your ear. Make sure your elbow isn’t bent and your arm is straight up toward the ceiling and not forward. Do not lean away from the raised arm. Act as if you are holding a weight in both hands. Stand up nice and tall and keep your abs engaged. Do not arch the low back as you hold overhead. You can either stand and hold or walk around as you hold overhead.
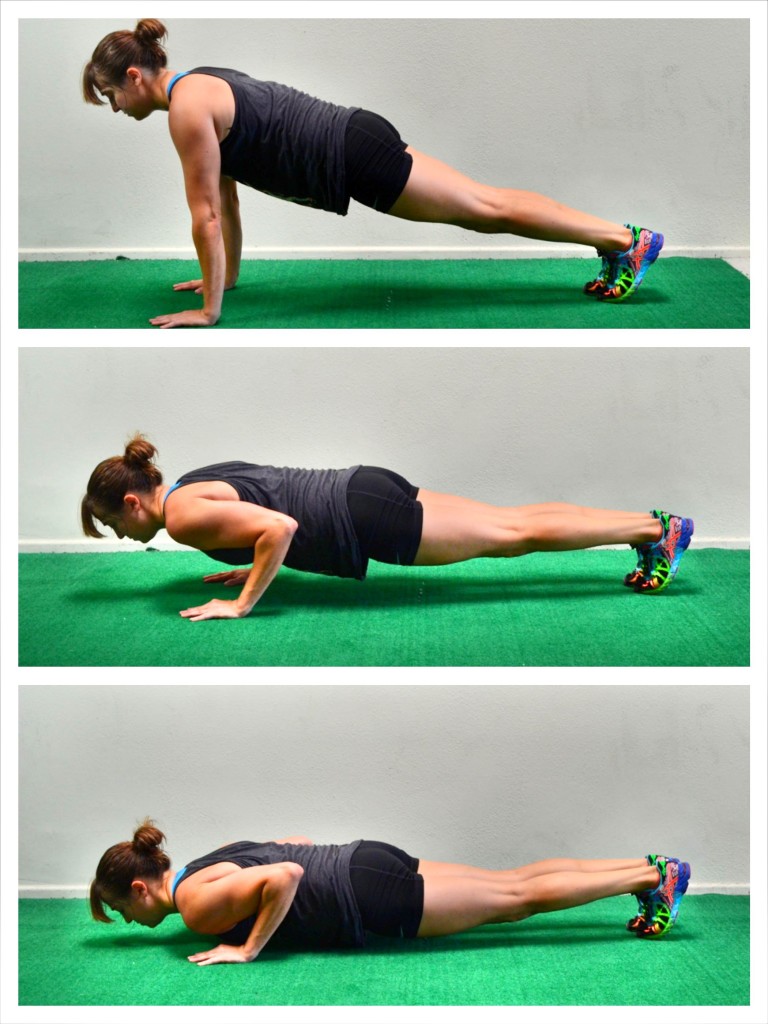
3. Push Up Holds – Just like with your pull ups, holding at the weak points of your push ups can improve your strength and help you do more.
There are three great push up holds we do to strengthen different parts of the movement:
High Push Up Hold – This is a great way to begin improving your lock out and core strength for push ups. Set up in a push up position with your feet together and your hands under your shoulders. Your body should be in a nice straight line from your head to your heels (with your legs straight). Tilt your pelvic under and hold in that position. Make sure your legs are engaged and you are driving back through your heels not coming forward onto your toes. Do not tuck your chin as you hold. Keep your head in line with your spine. You can also hold from your hands and knees.
Mid-Push Up Hold – This is a great move to really work your core, chest and triceps. To do this move, set up in a push up position with your feet together and your hands under your shoulders. Press up to the top of the push up with your body in a nice straight line from your head to your heels. Keeping your entire frontside engaged, bend your elbows to about 90 degrees. Do not let your hips sink or your butt go up toward the ceiling as you hold at that mid-point. Do not tuck your chin as you hold. Hold as close to 90 degrees as you can. You can also do this from your knees to make it easier.
Bottom Push Up Hold – This is the hardest of all three holds because often the hardest part of the push up is keeping everything engaged and pushing up from the bottom. This hold works on that. To do the Bottom Push Up Hold, set up in a push up position. With your body in a nice straight line and everything engaged down the frontside of your body, lower down until your chest is an inch off the ground. Make sure to engage your glutes to keep your body in a nice straight line. Do not tuck your chin or let your hips sag toward the ground. Also do not let your butt go up in the air. Maintain a nice straight line from your head to your heels and hold an inch off the ground. You can also do this from your knees or off an incline.
4. Dip Hold – This is a great way to work your arms as well as improve your scapular retraction and posture. This hold also really works your core.
This move can be done from parallel or dip bars (advanced) or off a bench (beginner).
To do the move from parallel or dip bars, place one hand on each bar and then push up to the top of a dip with your arms locked out and your shoulders down and back. Your legs should hang down straight below you. Keep your core tight and make sure you aren’t shrugging. You want to press your chest out and draw your shoulder blades down and back. Hold at the top. To advance the move further and add in even more core involvement, you can bend your knees up until your quads are parallel to the ground or even raise your legs out straight, like an L-Sit, and hold.
To do this move from a bench, sit on the bench and place your hands on the edge just outside your butt. Your fingertips should hang over the edge of the bench. With your legs out straight in front of you (you can bend your knees to make the move easier), lift yourself up and in front of the bench. Straighten your arms and keep your butt right back by the bench. Make sure to draw your shoulder blades down and back so that you aren’t shrugging. You want a nice tall posture. Hold at the top. Do not let your hips come up as you hold. You want to keep your butt down and back.
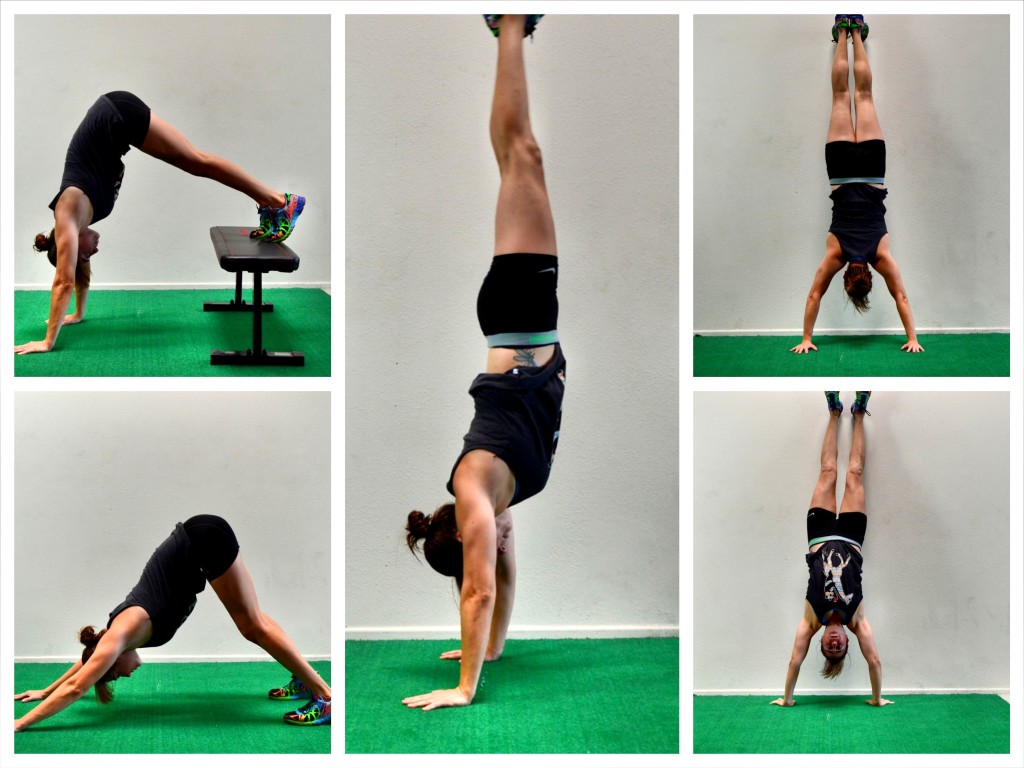
5. Handstand Hold – When many people hear “handstand hold” they think, “I could never do that!” But there are some great modified handstand holds that can not only help you work up toward the full hold, but can also really work your shoulders and core.
The most basic Handstand Hold is very similar to the downward dog. Start on your hands and knees. Then push back and up, raising your hips up toward the ceiling as you straighten your arms and press your chest back toward your legs. Focus on getting your back flat and a nice straight line from the heels of your hands up to your tailbone. You want your arms to be in line with your torso (aka biceps by the ears). Push your butt back and up. Do not worry about keeping your legs straight like in downward dog. Also, do not walk your feet in toward your hands. Push your butt up and create a nice straight line with your back.
To advance that basic hold, place your feet up on a table. Walk your hands in toward the table and press your butt up in the air. You want to straighten your arms so your head is hanging down between your hands straight down toward the ground. Create a nice straight line from your palms up to your tailbone. Do not worry about straightening your legs. The higher the box, the harder the move.
To do a Full Assisted Handstand, you can walk your feet up a wall. The closer to the wall you get, the harder the move will be.
From there, you can move into a full handstand.
No matter which variation you are currently able to do, you are going to create stability and strength throughout your core by doing Handstand Holds!
Core
1. Bridge Variations (Table top, kneeling bridge/camel) – Bridging – it is the opposite of what most of us do for 9 hours a day and it is essential to preventing injury, moving well and creating a strong and stable core.
There are a variety of bridging exercises you can do. Some focus more on stretching your anterior chain while others focus more on activating your posterior chain. Both will open up your hips, chest and even your lats after sitting at a computer all day.
Here are five great bridge variations. Also, make sure to check out the queen of all bridges for developing great glute strength – the Hip Thruster!
2. Bull Dog – A great exercise to work your shoulders, quads and core. The Bull Dog Hold is a plank variation that is more quad intensive. It is also a great way to improve your strength for crawling.
To do the Bull Dog Hold, set up on your hands and knees with your hands under your shoulders and your knees under your hips. Flex your feet. Then lift up onto your hands and toes and hold. Your knees should only be an inch off the ground as you hold. Do not tuck your chin or let your low back arch. Keep your abs engaged and your back in a nice straight line. Hold and do not let your butt go up in the air.
3. Plank Holds – Often when we think about planks with think “abs.” But planks work everything from your shoulders to your knees. And the best part is, there are a ton of variations to target different muscles in different ways.
Check out these 10 Plank Variations for a variety of planks to work your core.
However, no matter which variation you choose, you need to make sure that your abs are engaged and that your low back doesn’t take over. You shouldn’t feel any of these moves in your low back. Also make sure to maintain proper alignment for each plank so that you are engaging the correct muscles!
4. Wall Push – Probably one of the most fun isometrics on the list especially if you do it with a partner, the wall push is a great way to learn how to brace your abs and engage your core.
To do the Wall Push, stand a foot or two from a wall. Push into the wall with your arms bent (the closer you get to the wall, aka the more your arms are bent, the stronger your position will be). Push as hard as you can against the wall as if you are trying to move it. Keep everything engaged as you drive into the wall. You may want to stagger your feet and switch the stance as you push.
If you have a partner available, have them push you from every angle to force you to engage more. Do not let your partner move you as you push. They aren’t trying to push you over, but they are trying to force you to brace harder!
5. L-Sit – Basically the L-Sit is sitting like an “L” be it from the ground or off of parallel bars or rings. It is a great core exercise that can also help you improve your posture.
Often we do the L-Sit from our dip bars. To do the dip bar L-Sit, press up from the dip bars into a dip hold. Your arms should be straight and your chest should be pressed out. Make sure you don’t shrug your shoulders as you hold. Then, keeping your legs together and straight, raise them up in front of you until they are parallel to the ground. Hold there. To regress the movement, you may want to only raise and hold one leg at a time or even bend your knees and raise your legs together. Hold at the top and make sure to maintain a nice tall posture!
Use these 20 great isometrics to improve your mobility, stability and strength so that you can lift more and move and feel better!
NOTE: You may recognize many of these isometrics from yoga. Yoga poses are actually great moves to simply hold to improve your stability and mobility!


0 Comments
Trackbacks/Pingbacks